Tianlong GeneRotex 96 User manual
1
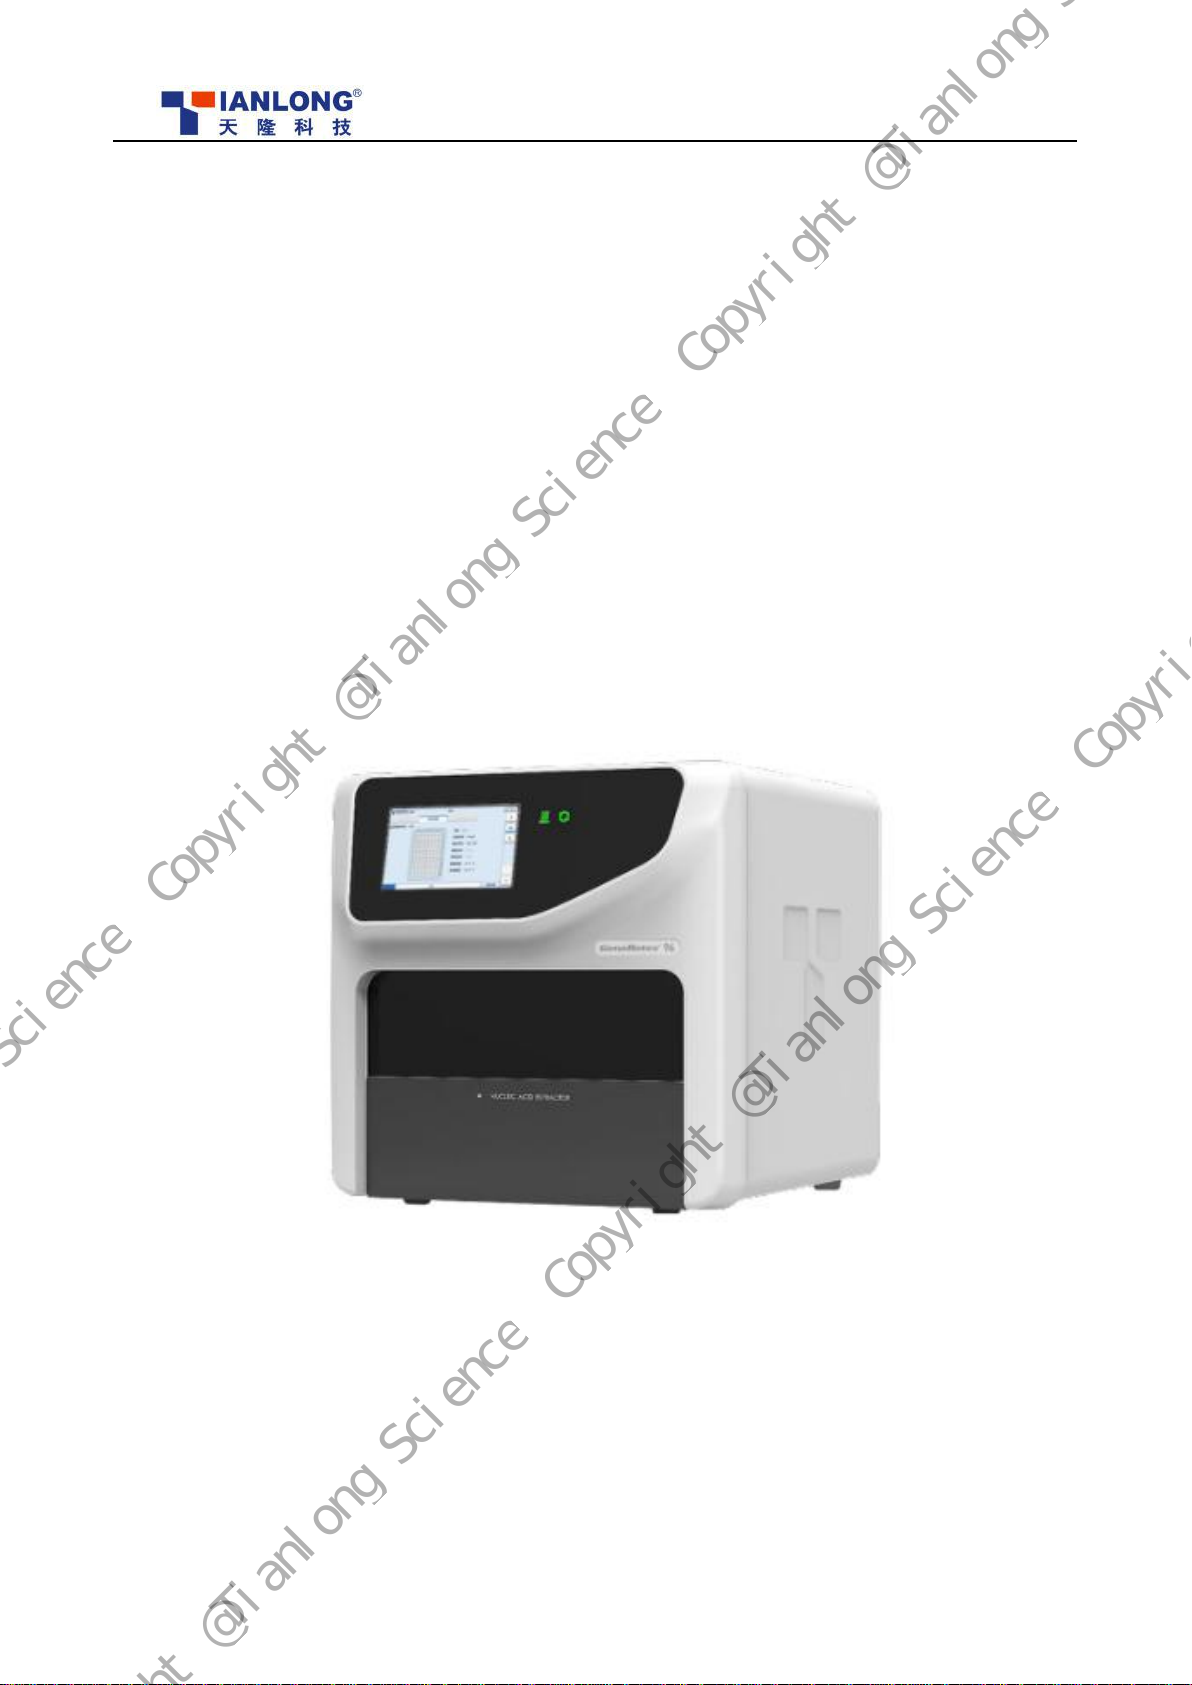
Full-Automatic Nucleic Acid Extraction
System GeneRotex 96
Service Manual
Copyright @Tianlong Science
Copyright @Tianlong Science
Copyright @Tianlong Science
Copyright @Tianlong Science
Copyright @Tianlong Science
Copyright @Tianlong Science

2
Intellectual Property
Xi'an Tianlong Technology Co., Ltd. (“Tianlong”) owns the copyright of this non-publicly
published manual and is entitled to treat it as confidential information. This manual is only used
as a reference for maintenance of Tianlong’s products.
This manual and all its intellectual property rights (including copyright) are owned by Tianlong.
Without the prior written permission of Tianlong, no one shall use, disclose or allow others by
any means to obtain all or part of the information in this manual . Without the prior written
permission of Tianlong, no one shall (but not limited to) photograph, copy, reproduce or
translate into other languages all or part of contents of this manual.
Tianlong has the final right to interpret the manual
Tianlong reserves the right to modify any content of this manual without prior notice
Tianlong reserves the right to change the technology without prior notice
Tianlong reserves the right to change the product specifications without prior notice
Statement
Tianlong does not make any form of guarantee for this manual, including (but not limited to)
the implied guarantee of marketability and suitability for a specific purpose.
Tianlong is only responsible for the safety, reliability and performance of the instrument under
the following conditions:
Assembly operation, expansion, re-adjustment, improvement and repair are all carried
out by personnel approved by Tianlong;
The relevant electrical equipment complies with national standards;
The instrument is used in accordance with the operating instructions.
In the event of the following situations, Tianlong will not be responsible for the safety,
reliability and operating conditions of the products
Components are replaced, stretched and re-commissioned
The product is not used correctly in accordance with the User Manual.
Copyright @Tianlong Science
Copyright @Tianlong Science
Copyright @Tianlong Science
Copyright @Tianlong Science
Copyright @Tianlong Science
Copyright @Tianlong Science

3
Warranty
Maintenance Service
Free service scope:
All equipment in accordance with Tianlong’s specified scope of warranty service can be subject
to the free service.
Charged service scope:
For all equipment beyond Tianlong’s specified scope of warranty service, Tianlong will
implement the charged service;
The product needs to be repaired due to the following causes even in the warranty period:
Man-made damage; grid voltage beyond the specific scope of the equipment; acts of god.
Tianlong will not be responsible for the direct, indirect or final damage and delay arising from
the following causes (including but not limited to):
Improper use; replacement of accessories unauthorized by Tianlong or repair of equipment by
the personnel unauthorized by Tianlong.
After-sales Service Unit
Xi’an Tianlong Technology Co., Ltd.
Address: No. 389, Zhuhong Road, Xi’an National Economic and Technological Development
Zone
Postal code: 710018
Service hotline: 400-606-1686 +86-29-82683675
Copyright Information
The version number of this manual may be upgraded due to the change of the software or
technical specification at any moment, and no further notice will be issued.
Version No.: 1.0
Date of issue: Nov., 2020
Copyright @Tianlong Science
Copyright @Tianlong Science
Copyright @Tianlong Science
Copyright @Tianlong Science
Copyright @Tianlong Science
Copyright @Tianlong Science

4
Contents
Chapter 1 Safety and Precautions.................................................................................................................................5
1.1 General Safety and Precautions......................................................................................................................5
1.2 Personal Safety and Precautions.....................................................................................................................6
1.3 Electrical Safety and Precautions................................................................................................................... 6
1.4 Environmental Safety and Precautions...........................................................................................................7
1.5 Bio-safety and Precautions............................................................................................................................. 8
Chapter 2 System Overview......................................................................................................................................... 9
2.1 Applicable Scope............................................................................................................................................9
2.2 Product Composition and Structure............................................................................................................... 9
2.2.1 Product Composition...........................................................................................................................9
2.2.2 Product Structure................................................................................................................................. 9
2.3 Conventional Parameters.............................................................................................................................. 11
Chapter 3 Installation Requirements and Procedure.................................................................................................. 12
3.1 Installation Requirements.............................................................................................................................12
3.1.1 Environmental Requirements............................................................................................................12
3.1.2 Power Requirements..........................................................................................................................12
3.2 Inspection before Installation....................................................................................................................... 12
3.2.1 Environment and Power Inspection.................................................................................................. 12
3.2.2 Appearance and Configuration Inspection........................................................................................ 13
3.3 Installation Procedure...................................................................................................................................13
3.3.1Unpacking...........................................................................................................................................13
3.3.2 Instrument Installation.......................................................................................................................16
3.4 Performance Test..........................................................................................................................................17
3.4.1 Reagents and Tools Preparation........................................................................................................ 17
3.4.2 Test Items and Procedure...................................................................................................................18
Chapter 4 Troubleshooting......................................................................................................................................... 19
4.1 LCD Abnormality (Screen Scratch, Screen Reversal and Contact Failure, etc.)........................................ 20
4.2 Reset Failure and Position Overranging of Horizontal Pushing Motor.......................................................21
4.3 Reset Failure and Position Overranging of Lifting Motor...........................................................................24
4.4 Reset Failure and Position Overranging of Magnetic Motor.......................................................................27
4.5 Module Door Motor Reset Failure............................................................................................................... 29
Chapter 5 Maintenance...............................................................................................................................................31
Copyright @Tianlong Science
Copyright @Tianlong Science
Copyright @Tianlong Science
Copyright @Tianlong Science
Copyright @Tianlong Science
Copyright @Tianlong Science
5
Chapter 1 Safety and Precautions
The user uses this product voluntarily, and must strictly abide by the following safety precautions for the
operation, maintenance, repair and transportation of this product. This product is designed with full consideration
of biological pollution protection, electrical safety protection and mechanical movement protection. Any operation
that does not comply with safety precautions or other reminder information in this manual may result in protection
failure, or may prejudice he safety standard of design and manufacture and the intended use scope of the
instrument.
Xi'an Tianlong Technology Co., Ltd. shall not bear any responsibility for any loss caused by the user not
reading this manual or failing to operate the instrument in accordance with the contents of this manual!
Caution: Please read this manual carefully before using the instrument. Incorrect understanding or operation may cause damage
to the instrument, harm to the laboratory, injury to the operator, and lower instrument use efficiency.
Reminder: Please note that all descriptions indicated with “Caution”, “Reminder” and “Ban” as well as the safety symbols and
marks used in the manual and on the instrument.
1.1 General Safety and Precautions
Caution: The operator shall not disassemble the instrument, replace the components or debug the instrument without our
authorization. If the above operations are required, they must be approved by us and then completed by professionals.
Caution: Please avoid bumping against and damaging the instrument. Handle with care.
Caution: In the event of following situations, the user shall immediately pull out the power plug of the instrument from the
power socket, and contact the supplier or ask our professional maintenance personnel to deal with it:
The instrument undergoes raining or water logging;
Abnormal sound or odor appears during the operation of the instrument;
The instrument is bumped or the enclosure is damaged;
The instrument function has evident changes.
Ban: Do not move the instrument during its operation.
Caution: The openings on the instrument are provided for ventilation. To avoid excessive temperature, do not block or cover
these openings during the operation of the instrument, or cover the surface of the instrument with use a dust guard or any
other materials.
Copyright @Tianlong Science
Copyright @Tianlong Science
Copyright @Tianlong Science
Copyright @Tianlong Science
Copyright @Tianlong Science
Copyright @Tianlong Science

6
Caution: If this instrument needs to be installed or transported, please contact us to request professionals or professional guide.
Otherwise, we shall not bear any responsibility for the damage caused to the instrument.
Caution: After the instrument is installed, the transportation lock shall be properly kept in accordance with the
technician’s requirements.
Caution: During the operation of the instrument, do not forcibly open the sample compartment. Otherwise, the biological safety,
electromagnetic radiation and other protective actions of the instrument will be prejudiced.
Caution: Do not forcibly place consumables (96-hole plate/8-tube strip/test tube, etc.) that are not compatible with this
instrument into the sample module.
Caution: Failure to use the instrument in accordance with the method as specified by the manufacturer may prejudice the
protection provided for the instrument.
1.2 Personal Safety and Precautions
Caution: The actual weight of the instrument is relatively large, so the instrument shall be moved or lifted with appropriate tools,
methods or by cooperating with others. Avoid moving the instrument alone without cooperating with others. Lifting the
instrument improperly may result in the physical injury, pain or damage to the instrument.
Ban: Do not touch the power plug, power cord or switch with wet hand.
Hot surface: During the operation of the instrument, the sample module in the sample compartment may be hot. During the test
and immediately after the test, do not directly touch the sample module with your hand or any body part to avoid
burns. Please open the sample compartment and take out the sample after the temperature of the sample module
drops to the standby temperature.
1.3 Electrical Safety and Precautions
Ban: This instrument has voltage that is harmful to the human body. Please power off the instrument before opening the casing
of the instrument at any time. Do not replace components when the power cord is connected.
Caution: The enclosure of this instrument shall be properly grounded through the power ground wire. Any damage to the
internal or external grounding path of the instrument may result in danger.
Caution: If the electric leakage is found, please immediately power off and stop using the instrument.
Caution: Power off the instrument before moving it.
Copyright @Tianlong Science
Copyright @Tianlong Science
Copyright @Tianlong Science
Copyright @Tianlong Science
Copyright @Tianlong Science
Copyright @Tianlong Science
7
Reminder: Generally, please use the power cord that comes with the instrument. If the original power cord is broken, worn or
disconnected, replace it with an equivalent power cord as soon as possible.
Caution: To avoid the risk of electric shock, the power cord of this instrument must be reliably grounded. The power cord of
this instrument is a standard three-plug power cord. Please insert the power plug into an appropriate three-wire grounded
socket (the external power supply connected to the socket must be grounded reliably) to ensure the safety of the
instrument.
Caution: The power grid environment where the instrument is located must be grounded.
Caution: Please carefully check whether the power connection is secure. Always hold the plug when plugging or unplugging
the power cord. Do not pull the power cord forcibly. When inserting the plug into the power supply, make sure that the
plug is fully inserted into the socket.
Caution: Keep the power plug and power cord away from hot objects such as heater. When using this instrument, do not place
anything on the power cord, and do not place the power cord in a place where people often move.
Caution: The fuse model of this instrument is 250V/10A, and the fuse is placed in a spare box at the power socket at the rear of
the instrument. Using an inappropriate fuse may damage the wiring system of the instrument and cause a fire. Before
turning on the power switch of the instrument, please check to make sure that the fuse has been installed correctly.
Caution: To avoid the risk of fire for a long time, please use the correct type of fuse with the rating as indicated by this
instrument when replacing the fuse. Please cut off the power first, unplug the power cord, and pry open the fuse box with
a flat-blade screwdriver, and replace the old fuse with an equivalent new one.
1.4 Environmental Safety and Precautions
Caution: This instrument is only applicable to an indoor environment which is well-ventilated and free of corrosive gas.
Ban: Electric sparks may result in explosion hazard. Do not use this instrument in an environment where flammable and
explosive gases exist or may exist.
Reminder: The working ambient temperature of this instrument shall be between 10℃ and 30℃, and the relative humidity
should be ≤~80%.
Reminder: The working environment of this instrument shall be normal atmospheric pressure (the altitude is lower than 2000
m).
Copyright @Tianlong Science
Copyright @Tianlong Science
Copyright @Tianlong Science
Copyright @Tianlong Science
Copyright @Tianlong Science
Copyright @Tianlong Science
8
1.5 Bio-safety and Precautions
Biohazard: The sample object of this instrument is nucleic acid. In actual operation, please treat it as a biological sample with
potential biological hazards. During the sample handling and operation, generally applicable safety protection
actions shall be taken, and appropriate protective goggles, clothing and gloves shall be worn.
Biohazard: The user shall dispose of the discarded sample and contaminated materials in accordance with the relevant local or
national applicable regulations.
Biohazard: This instrument shall be treated as a waste with biological contamination risk during disposal. Before reuse,
recycling, or disposal, the instrument shall be cleaned (including cleaning, disinfection, and/or sterilization). This
instrument shall be disposed of in accordance with relevant local or national regulations.
Biohazard: If the liquid samples overflow during any operation, appropriate disinfectants shall be quickly used for disinfection
to avoid the spread of contaminants to laboratory personnel or contamination of instrument.
Copyright @Tianlong Science
Copyright @Tianlong Science
Copyright @Tianlong Science
Copyright @Tianlong Science
Copyright @Tianlong Science
Copyright @Tianlong Science
9
Chapter 2 System Overview
2.1 Applicable Scope
The full-automatic nucleic acid extraction system can be widely used in scientific research, clinical, disease control, food safety,
forensic and other fields. Users only need to add samples and paramagnetic particle method nucleic acid extraction reagents, load
reaction consumables, and the full-automatic nucleic acid extraction system will complete all nucleic acid extraction operations in
accordance with the experimental procedures.
With different magnetic bead method nucleic acid extraction reagents, the full-automatic nucleic acid extraction system can
quickly extract the DNA and RNA in animal and plant tissues, blood, body fluids, and criminal materials.
2.2 Product Composition and Structure
2.2.1 Product Composition
This product is mainly composed of temperature control module, rotating module, magnetic attraction module, circuit control
module, power supply module, enclosure, man-machine interaction module and software.
2.2.2 Product Structure
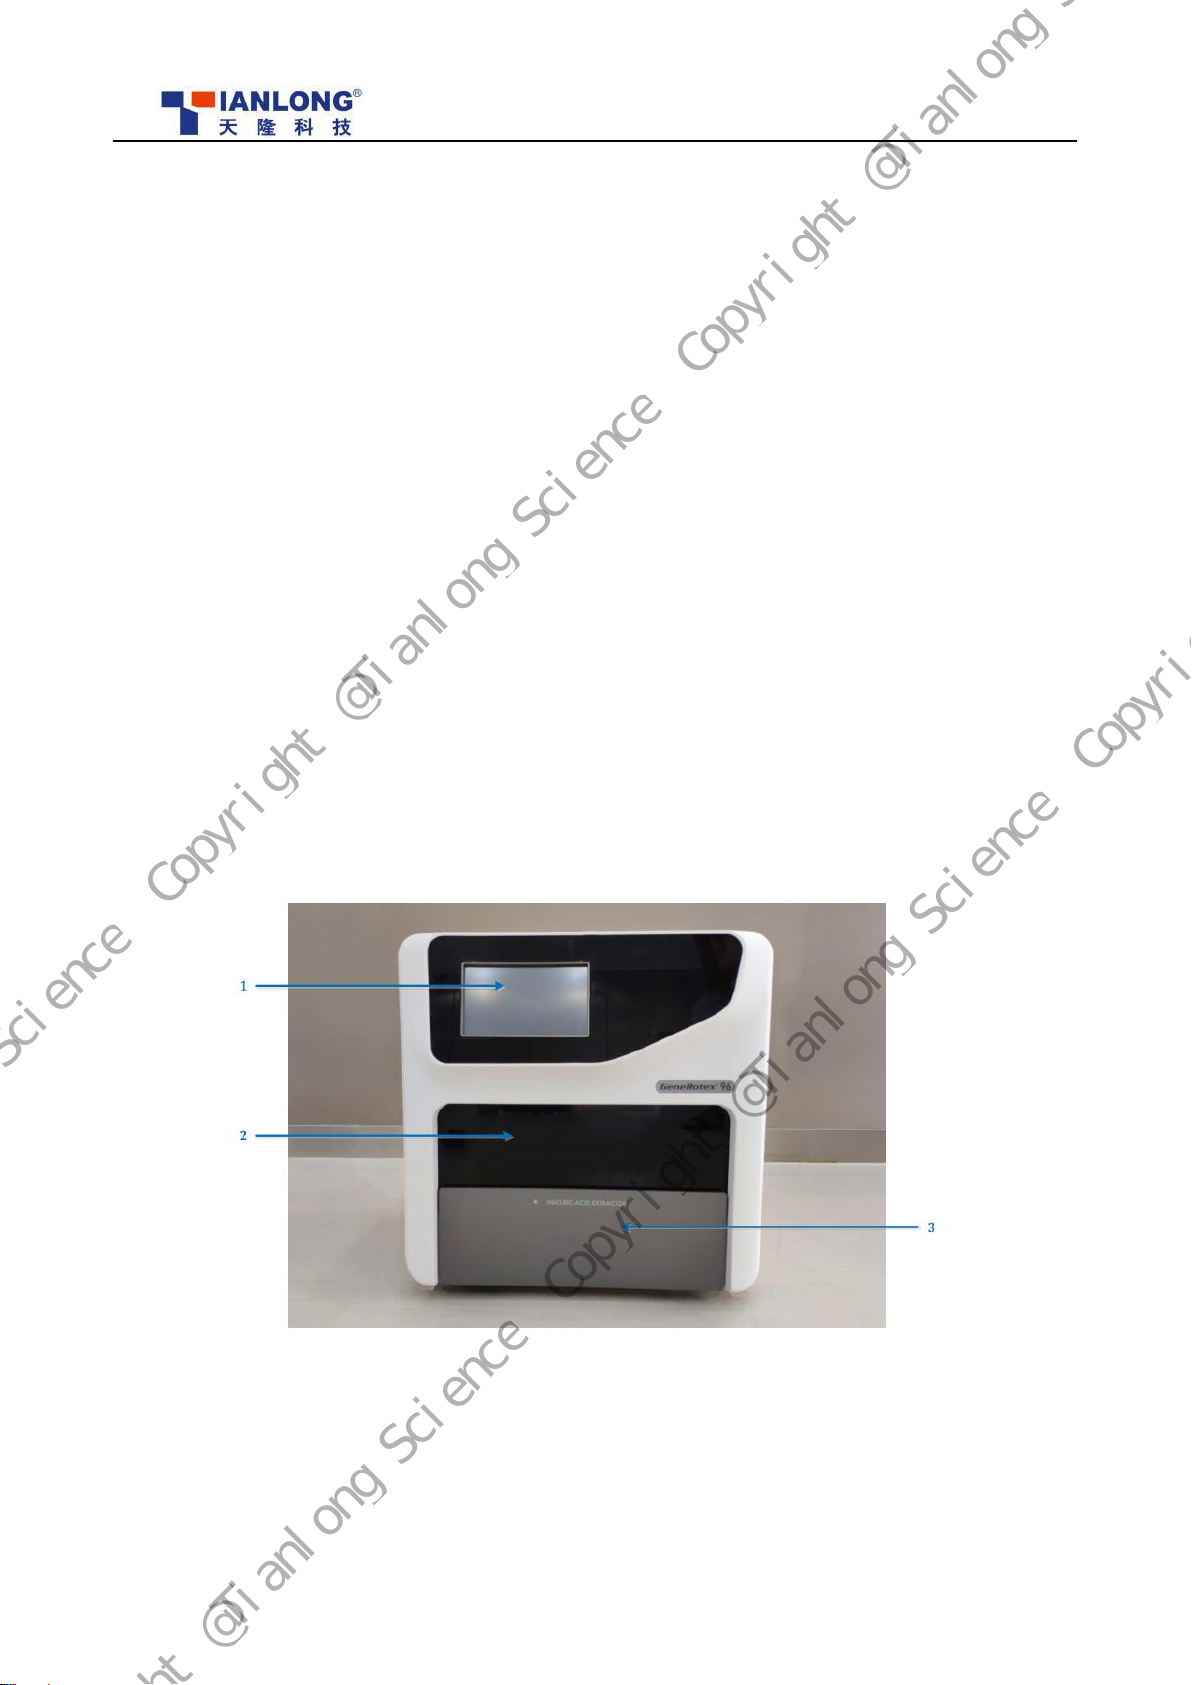
Front
Figure 2-1 Front of Full-automatic Nucleic Acid Extraction System
Introduction to
functions: 1.Display 2.Experiment module lifting door
3. Experiment module drop-down door
Copyright @Tianlong Science
Copyright @Tianlong Science
Copyright @Tianlong Science
Copyright @Tianlong Science
Copyright @Tianlong Science
Copyright @Tianlong Science
10
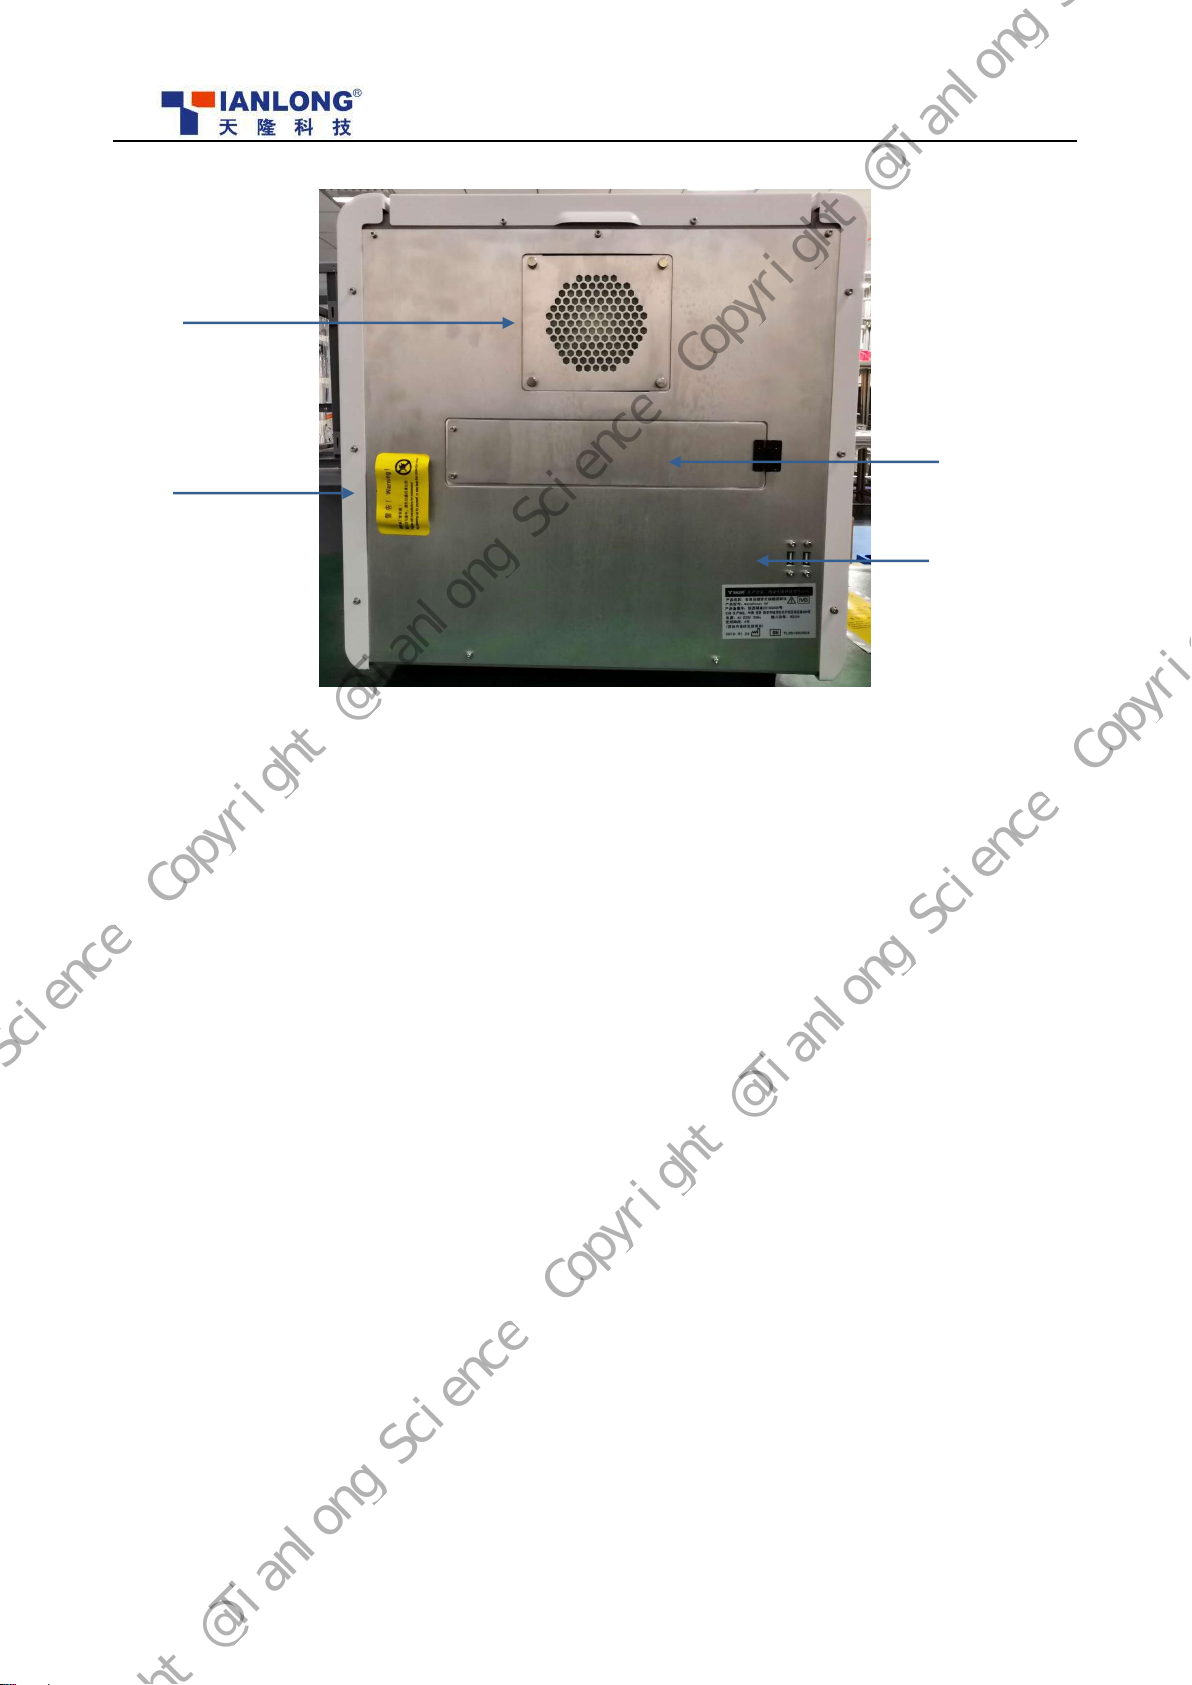
Back
Figure 2-2 Back of Full-automatic Nucleic Acid Extraction System
Introduction to
functions:
1.Heat emission hole on the back 2.Three-in-one switch
3.UV lamp door 4.USB interface
1
2
4
3
Copyright @Tianlong Science
Copyright @Tianlong Science
Copyright @Tianlong Science
Copyright @Tianlong Science
Copyright @Tianlong Science
Copyright @Tianlong Science
11
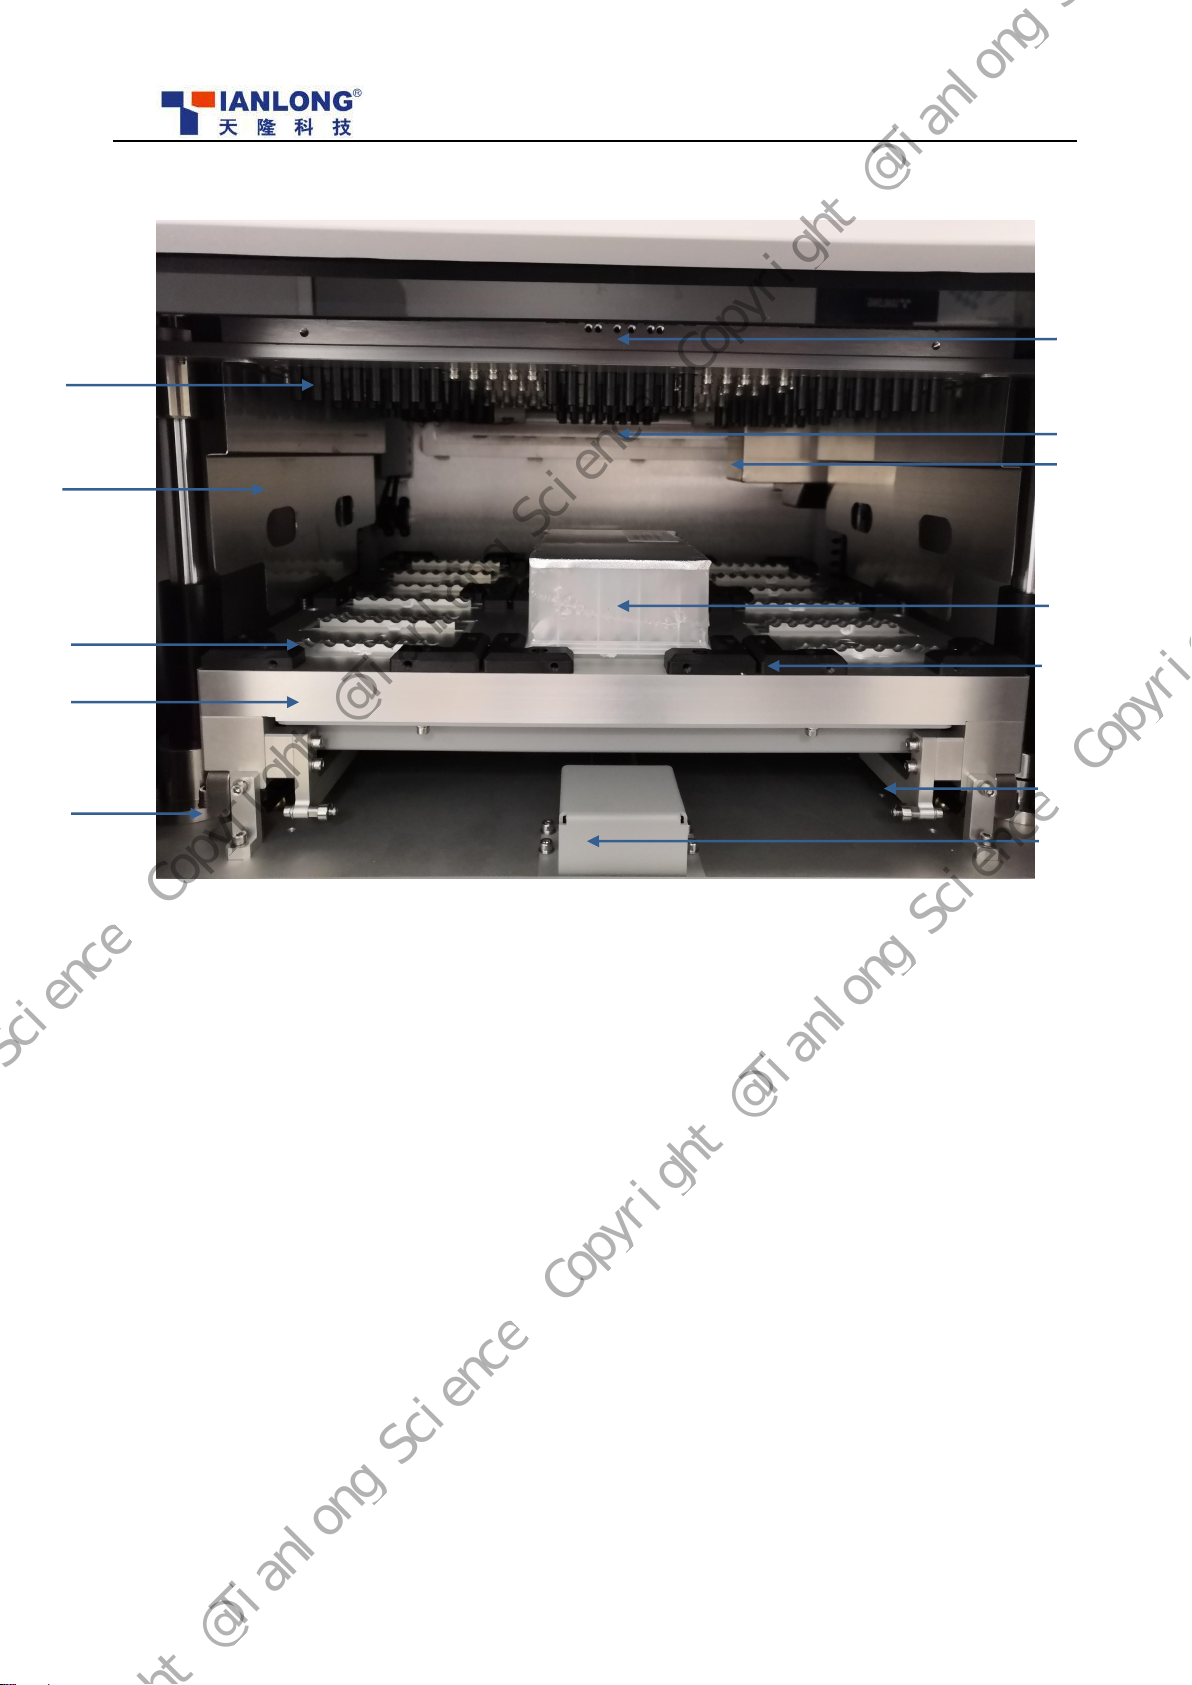
Experiment Module
Figure 2-3 Experiment Module
Introduction to
functions:
1. Rotary sleeve 2.Lead screw protective shield
3.Heater strip 4.Heating upper plate
5.Transportation lock 6.Rotary sleeve frame
7.UV lamp 8. Power wind shield
9.Tianlong 96 deep hole plate 2.0 (anti-static) 10.Deep hole plate positioning block
11.Push rod slide way 12. Horizontal pushing belt wheel cover plate
2.3 Conventional Parameters
1) Product specification: 490mm(L)×510mm(W)×480mm(H) Weight: 45 Kg
2) Packing specification: 700mm(L)×660mm(W)×580mm(H) Weight: 55 Kg
3) Communication interface: USB interface
2
1
3
4
10
9
7
6
5
11
8
12
Copyright @Tianlong Science
Copyright @Tianlong Science
Copyright @Tianlong Science
Copyright @Tianlong Science
Copyright @Tianlong Science
Copyright @Tianlong Science

12
Chapter 3 Installation Requirements and Procedure
3.1 Installation Requirements
3.1.1 Environmental Requirements
a) Only applicable to an indoor environment with good ventilation, no corrosive gas and no strong magnetic field interference
b) Avoid using it in direct sunlight, keep it away from heaters, stoves and all other heat sources, and away from water sources,
such as pools and water pipes.
c) There shall be no electromagnetic field interference and no electrical equipment that generates vibration or high-frequency
waves around the instrument
d) When a single instrument is used, the distance between the ventilation hole around the instrument and the nearest object
shall not be less than 30cm. When multiple instruments are used at the same time, the distance between instruments shall be no
less than 80cm
e) Do not place the instrument on a soft cushion. Otherwise, the base will fall into the soft cushion and block the cooling fan
below the instrument
f) Do not place the instrument close to the wall or stack other objects behind the instrument to avoid affecting the heat
dissipation of the instrument
g) The instrument shall be placed at a location where the power cord is easily plugged and unplugged and away from people
passing by to prevent someone from tripping over the power cord
h) Operating ambient temperature:10℃~30℃;
i) The relative humidity shall be ≤80%;
3.1.2 Power Requirements
a) Working power supply requirements: Three-wire grounding power supply, voltage AC 220±10%, 50Hz/60Hz, 600VA; UPS
is recommended
b) The voltage between the neutral wire and the ground wire shall be less than 3V
3.2 Inspection before Installation
3.2.1 Environment and Power Inspection
a) Use a conforming hygrothermograph to measure the temperature and humidity in the operating room of the nucleic acid
Copyright @Tianlong Science
Copyright @Tianlong Science
Copyright @Tianlong Science
Copyright @Tianlong Science
Copyright @Tianlong Science
Copyright @Tianlong Science

13
instrument
b) Use a conforming multimeter to measure the supply voltage and the voltage between the neutral wire and the ground wire
After the measurement is completed, record the corresponding data in the Nucleic Acid Extraction System Installation and
Acceptance Report
3.2.2 Appearance and Configuration Inspection
a) Check whether the inner and outer packaging of the instrument is intact, whether it is damaged, bumped, soaked, affected
by damp and deformed, etc.
b) Check whether the instrument and accessories are damaged, rusted and bumped, etc. in appearance
c) Check whether the model, specification, configuration and quantity of the instrument and accessories are consistent with
the packing list
d) Check if the accompanying documents (user manual and certificate, etc.) of the instrument are complete
After the inspection, record the corresponding conditions in the Acceptance Report of Installation and Acceptance of Nucleic
Acid Extraction System
3.3 Installation Procedure
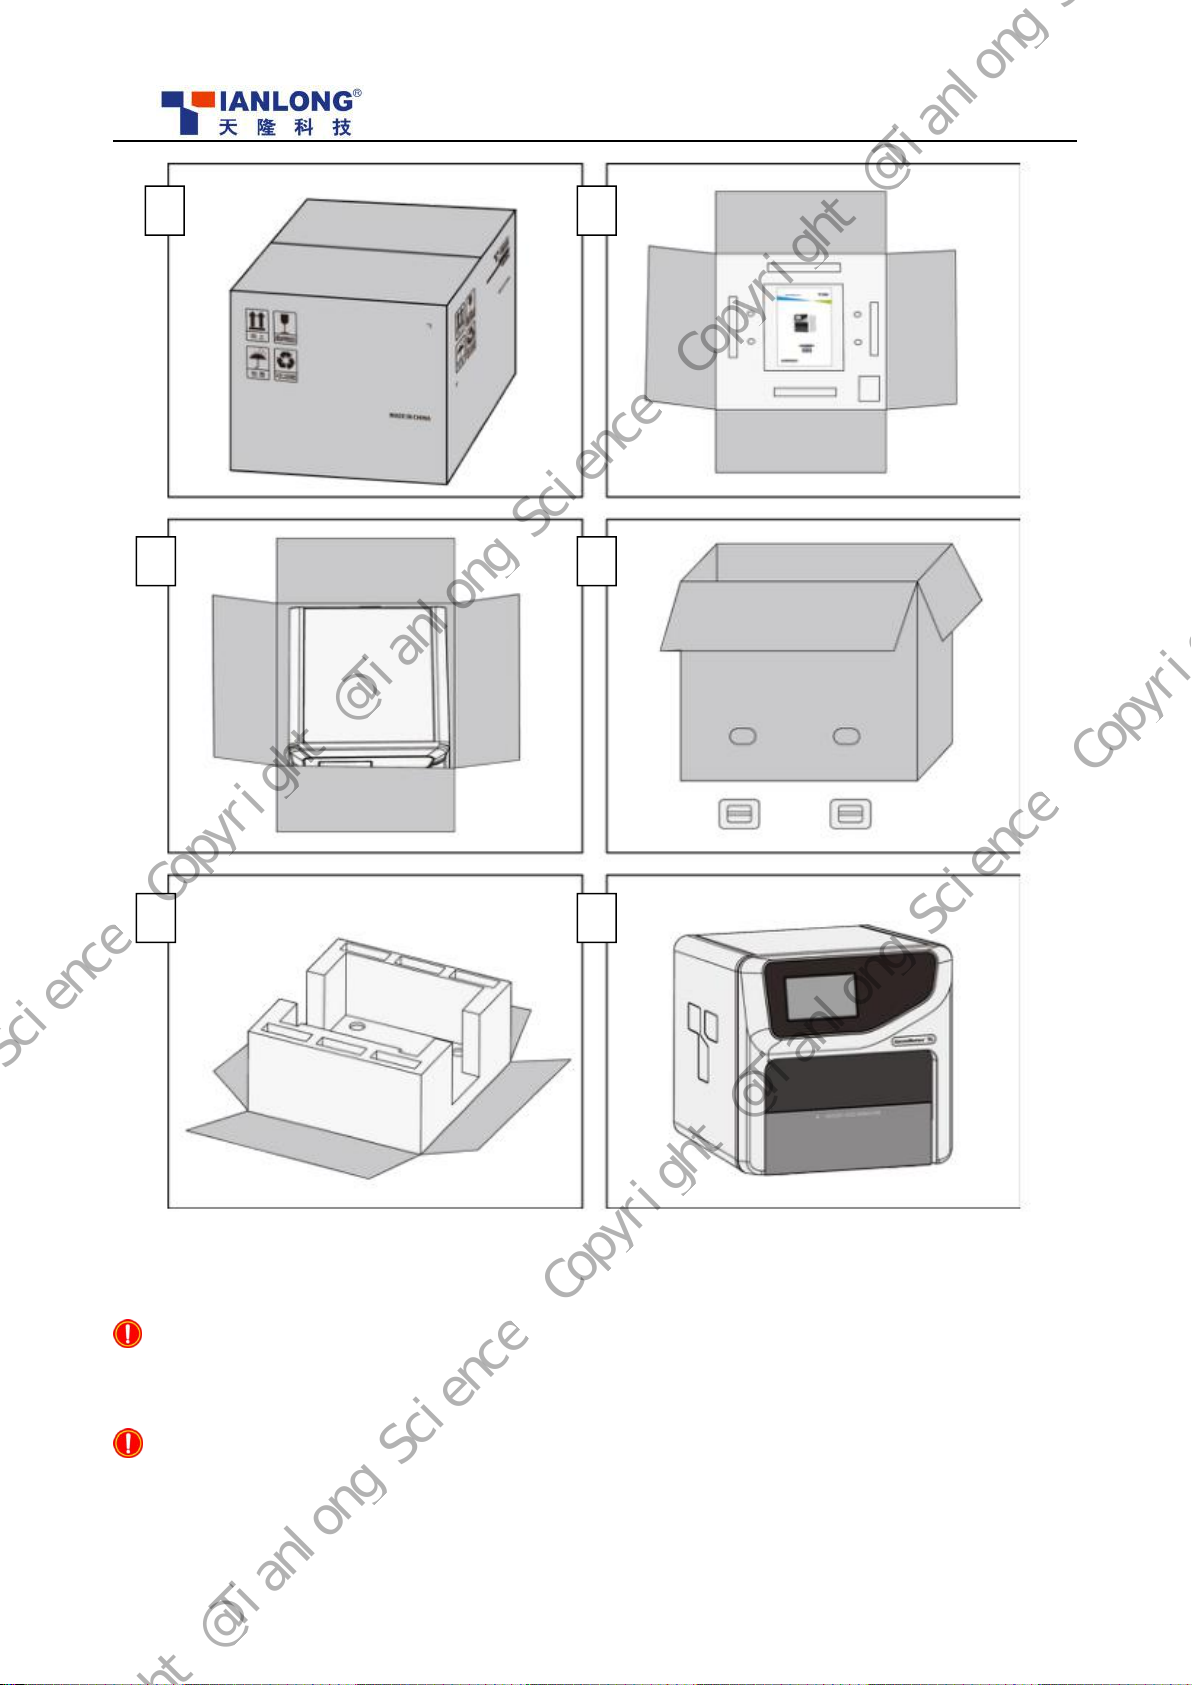
3.3.1Unpacking
The transportation package of this product is a whole equipment carton package, lined with protective foam. The instrument
body inside the packing container is sealed by a dust guard, and foam is used for support and protection at the corners of the
instrument to prevent collision and vibration during transportation, as shown in Figure 3-1.
Copyright @Tianlong Science
Copyright @Tianlong Science
Copyright @Tianlong Science
Copyright @Tianlong Science
Copyright @Tianlong Science
Copyright @Tianlong Science
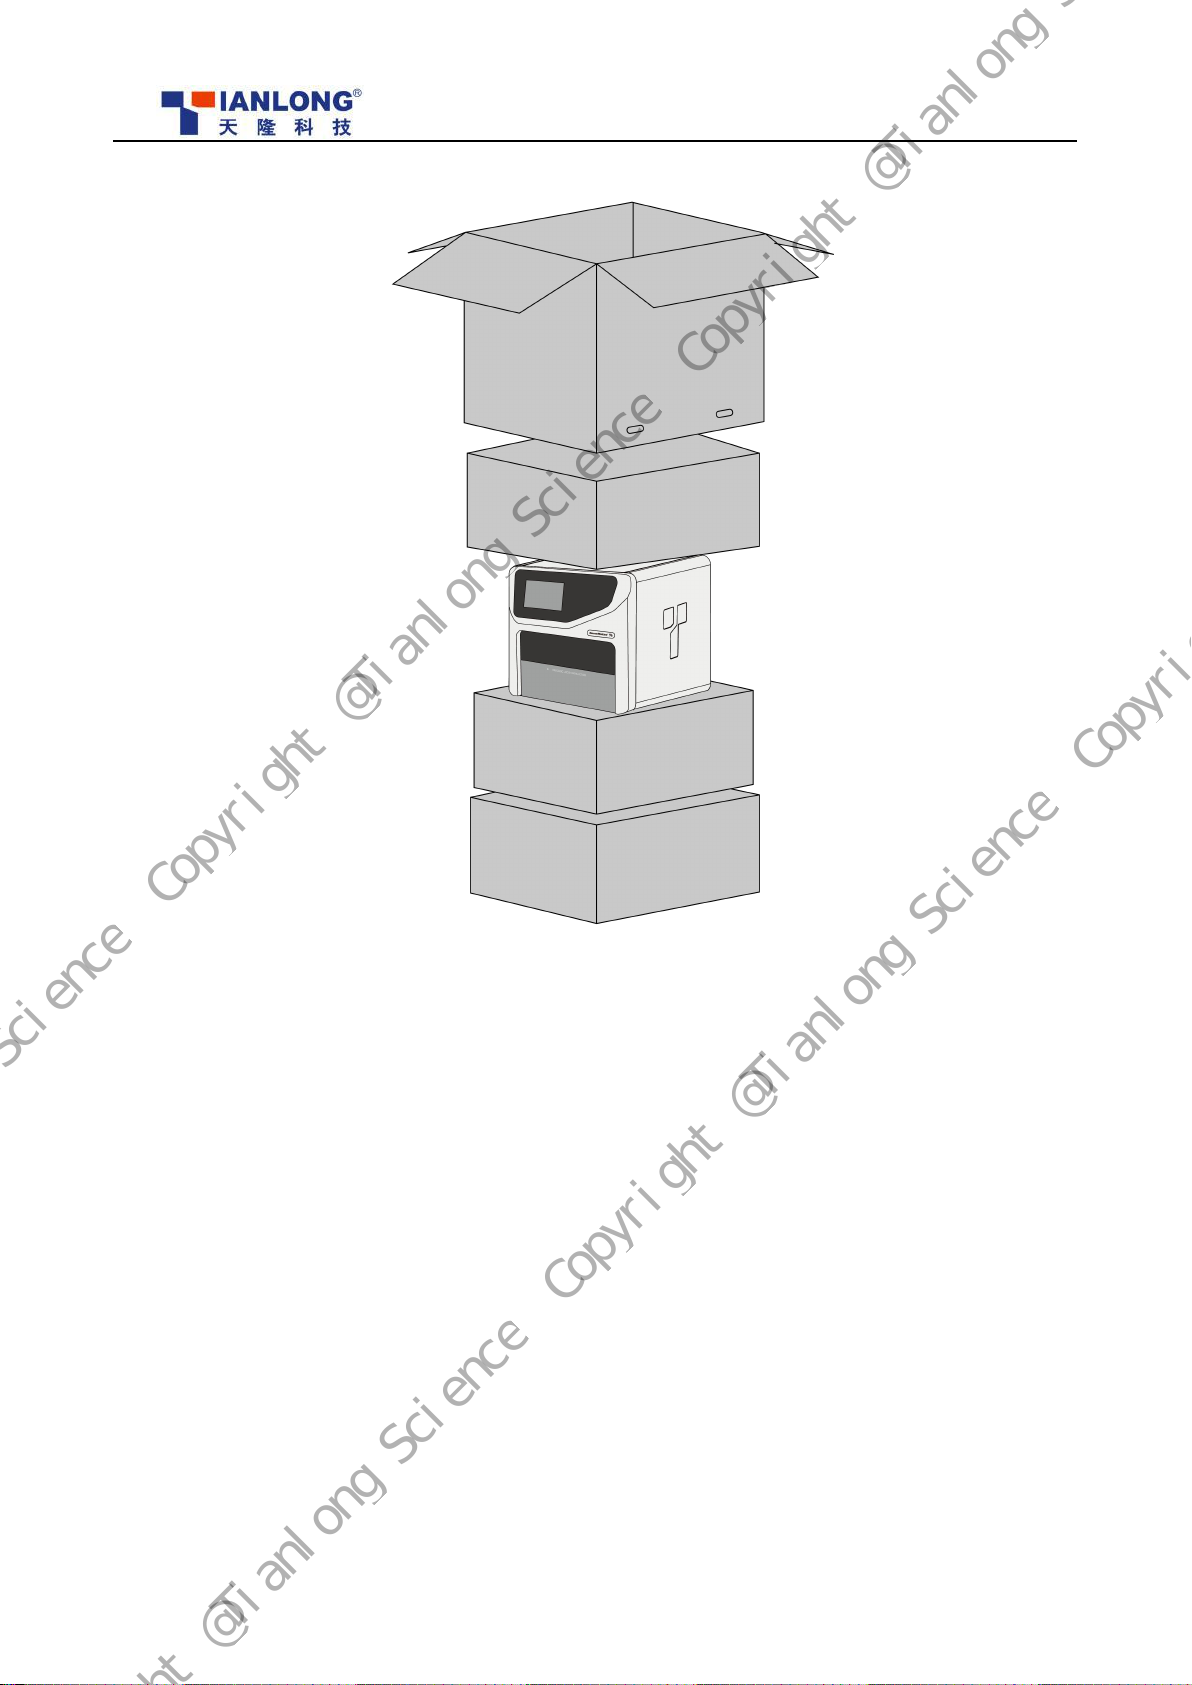
14
Figure 3-1. Exploded View of Packing Container
Instrument unpacking procedure
Step1: Please transfer the product packing container to the working place and open the sealing strip of the packing
container, as shown in Figures a and b.
Step 2: Open the top cover of the packing container and remove the rubber buckles on both sides of the packing container
(4 pieces in total); hold the handles on both sides of the instrument packing container, and remove the upper part of
the packing container, as shown in Figures c and d.
Step 3: Remove the protective foam at the top of the instrument and take out the instrument of the packing container as
shown in Figure e.
Step 4: Remove the dust guard of the instrument body, hold the left and right sides of the instrument and place the
instrument on a plane stably.
Copyright @Tianlong Science
Copyright @Tianlong Science
Copyright @Tianlong Science
Copyright @Tianlong Science
Copyright @Tianlong Science
Copyright @Tianlong Science
15
Figure 3-2 Unpacking Procedure
Reminder: To prevent the generation of condensed water, do not unpack the instrument before the container reaches the room
temperature.
Reminder: Before unpacking the instrument, please carefully check the integrity of the product packaging. If there are defects,
collisions or water logging marks, please contact the Transportation Department or us to solve the specific matters.
a b
dc
e f
Copyright @Tianlong Science
Copyright @Tianlong Science
Copyright @Tianlong Science
Copyright @Tianlong Science
Copyright @Tianlong Science
Copyright @Tianlong Science

16
Reminder: After unpacking, please check the product and its accessories according to the packing list. In case of any
discrepancy, please contact us or our distributor in time for replenishment. After the acceptance inspection passes, please
fill in the relevant contents on the installation information feedback form and feed it back to us for filing and warranty.
Caution: Please keep the original packaging materials of this instrument properly for future transportation again. The packaging
design of this product can reduce damage during transportation and ensure transportation safety. Selection of other
packaging materials will invalidate the warranty. Xi'an Tianlong Technology Co., Ltd. will not be liable for any damage
to the instrument due to improper packaging during transportation. Please also keep the instrument related documents
provided by us for future use.
Caution: With the net weight of about 45 kg, the instrument must be handled carefully. It is recommended that two persons
shall cooperate to move the instrument and some protective actions shall be taken to avoid damage. When lifting the
instrument, place your hands on the bottom of both sides to carry it.
3.3.2 Instrument Installation
Removal of Instrument Transportation Lock
After the instrument is properly placed on the laboratory bench, do not directly power on the instrument. Please follow the
instructions to remove the transportation lock before running the instrument. The specific operations are as follows:
1) Please open the drop-down door of the experiment module, and remove 4 bolts of transportation lock on the left and right
sides of the instrument with M3 hexagonal socket tool, as shown in Figure 3-3.
2) Please release the drop-down door to restore it naturally, and appropriately keep 2 transportation locks and 4 bolts.
Figure 3-3. Transportation Lock
Caution: Unless specifically indicated in the manual, do not loosen or disassemble the internal, exposed bolts or other parts of
the instrument at will. Otherwise, the instrument will be inaccurate and the instrument warranty will be invalidated.
Caution: This instrument must be disassembled by professionals.
Copyright @Tianlong Science
Copyright @Tianlong Science
Copyright @Tianlong Science
Copyright @Tianlong Science
Copyright @Tianlong Science
Copyright @Tianlong Science
17
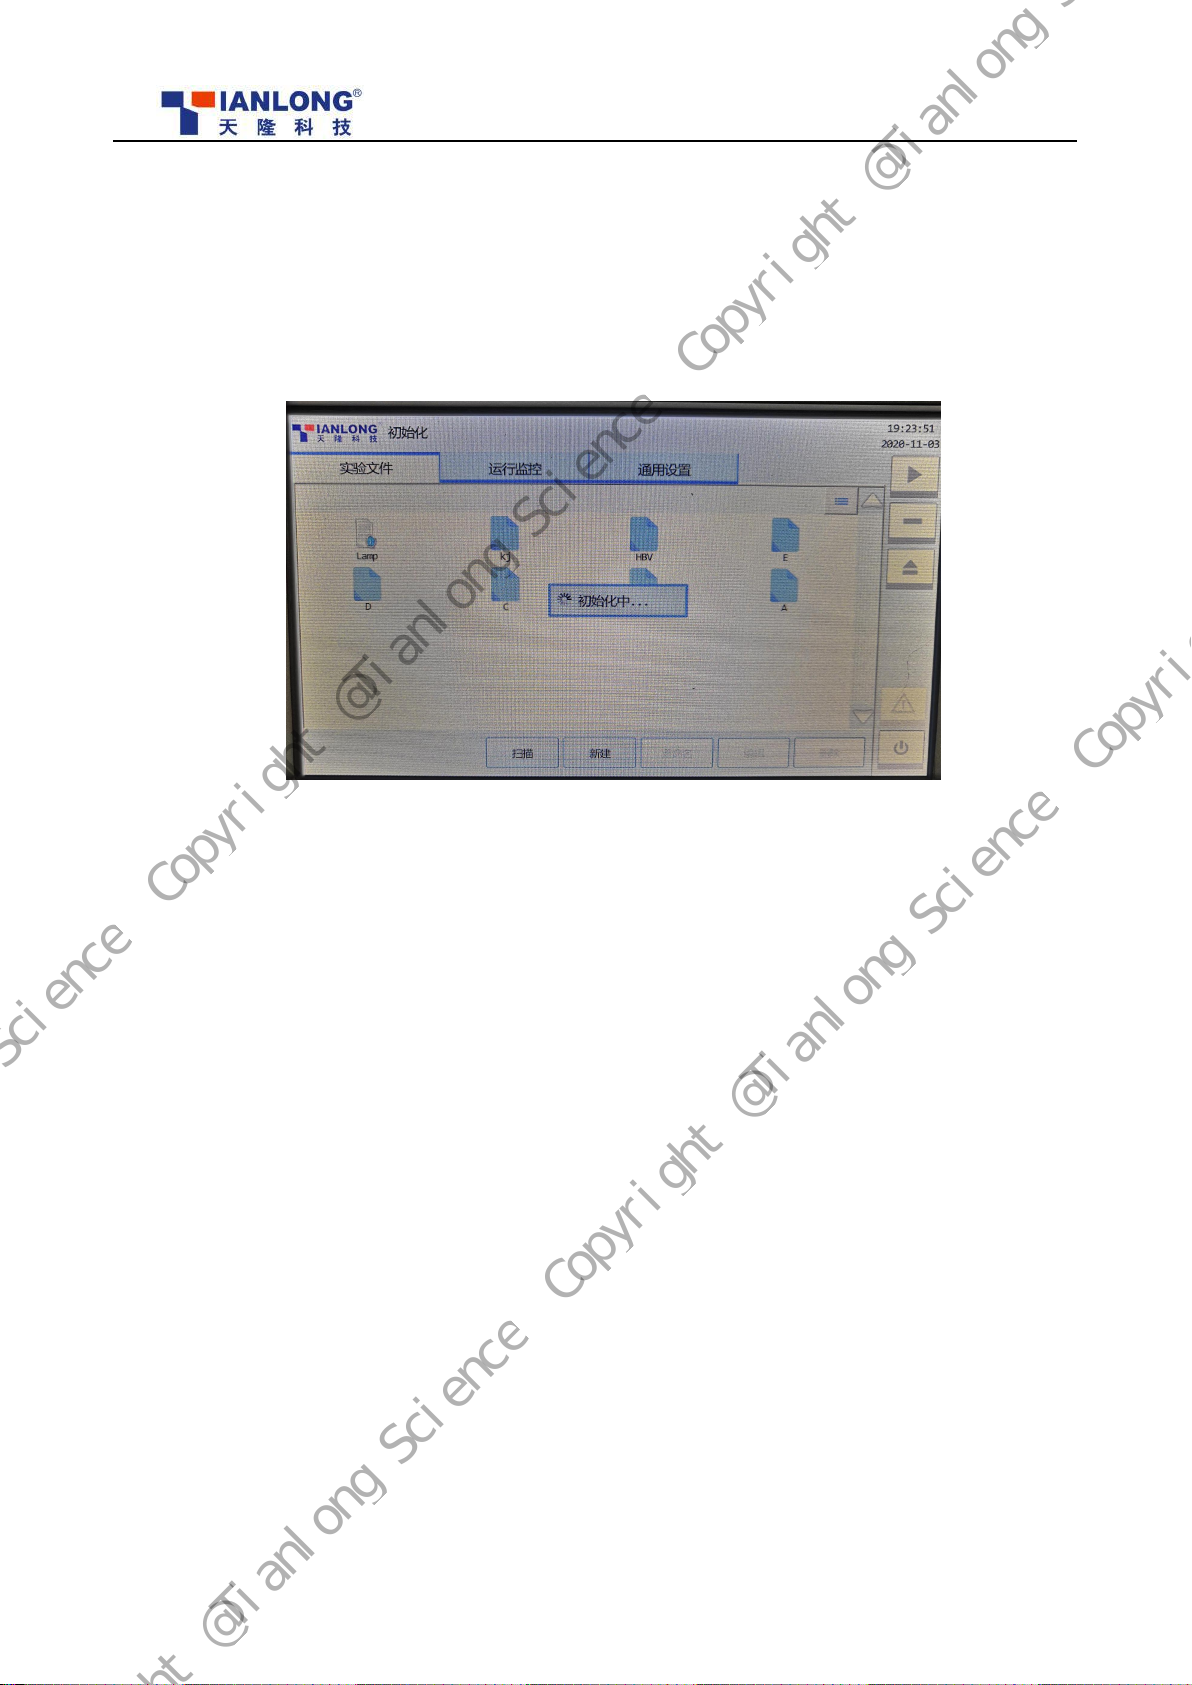
Power-on Self-inspection
1) Plug in the power cord of the instrument, and turn on the power switch on the back of the instrument to switch on the
instrument. The instrument will be then started and initialized. The system initialization interface is as shown in Figure
3-4.
Figure 3-4 Initialization Interface of Instrument
2) After self-inspection passes, the instrument will enter the standby state.
3) At this time, you can create a new experiment program normally or read the experiment program by scanning the QR code
on the reagent.
3.4 Performance Test
The following 3 points need to be checked in the performance test:
1) Whether the instrument will provide the reminder “incorrect placement of stirring sleeve” before running if the stirring
sleeve is not placed at the column 2/8
2) Whether the loading and unloading of stirring sleeve are normal and whether the stirring sleeve is damaged
3) Whether the heating strip can reach the set temperature in the set time
3.4.1 Reagents and Tools Preparation
Reagents Preparation
Before using the product, the user shall select the corresponding paramagnetic particle method nucleic acid extraction reagent.
In this manual, the "Full-Automatic Nucleic Acid Extraction System GeneRotex 96 Installed Kit" of Tianlong Technology Co.,
Copyright @Tianlong Science
Copyright @Tianlong Science
Copyright @Tianlong Science
Copyright @Tianlong Science
Copyright @Tianlong Science
Copyright @Tianlong Science

18
Ltd. is used as an example for description.
3.4.2 Test Items and Procedure
Please refer to the “Instructions for Use of Full-Automatic Nucleic Acid Extraction System GeneRotex 96 Installed Kit”
Loading of consumables
1) Place the stirring sleeve correctly at columns 2 and 8 of 96-deep-hole plate.
2) Place the 96-deep-hole plate in the experiment module of the full-automatic nucleic acid extraction system.
Reminder: Please confirm that the notch of the 96-deep-hole plate faces the upper left of the experiment moduleand is
placed appropriately (horizontal without floating or inclination), as shown in Figure 3-6.
Figure 3-6 Deep-Hole Plate
Reminder: Ensure that columns 2 and 8 of each deep-hole plate are provided with the stirring sleeves and the deep-hole plate is
not inclined and does not float. Otherwise, the risks of the instrument such as operation abnormality, stirring sleeve, rotating sleeve
damage and magnetic bar rupture may be caused, and the experimental results will be affected.
Running Test
1) Click the “Out” key and place the deep-hole plate provided with the stirring sleeve on the experiment module.
2) Click the “Out” key to return the experiment module into the instrument, and press the “Run” key to start running the test
program.
Copyright @Tianlong Science
Copyright @Tianlong Science
Copyright @Tianlong Science
Copyright @Tianlong Science
Copyright @Tianlong Science
Copyright @Tianlong Science
19
Chapter 4 Troubleshooting
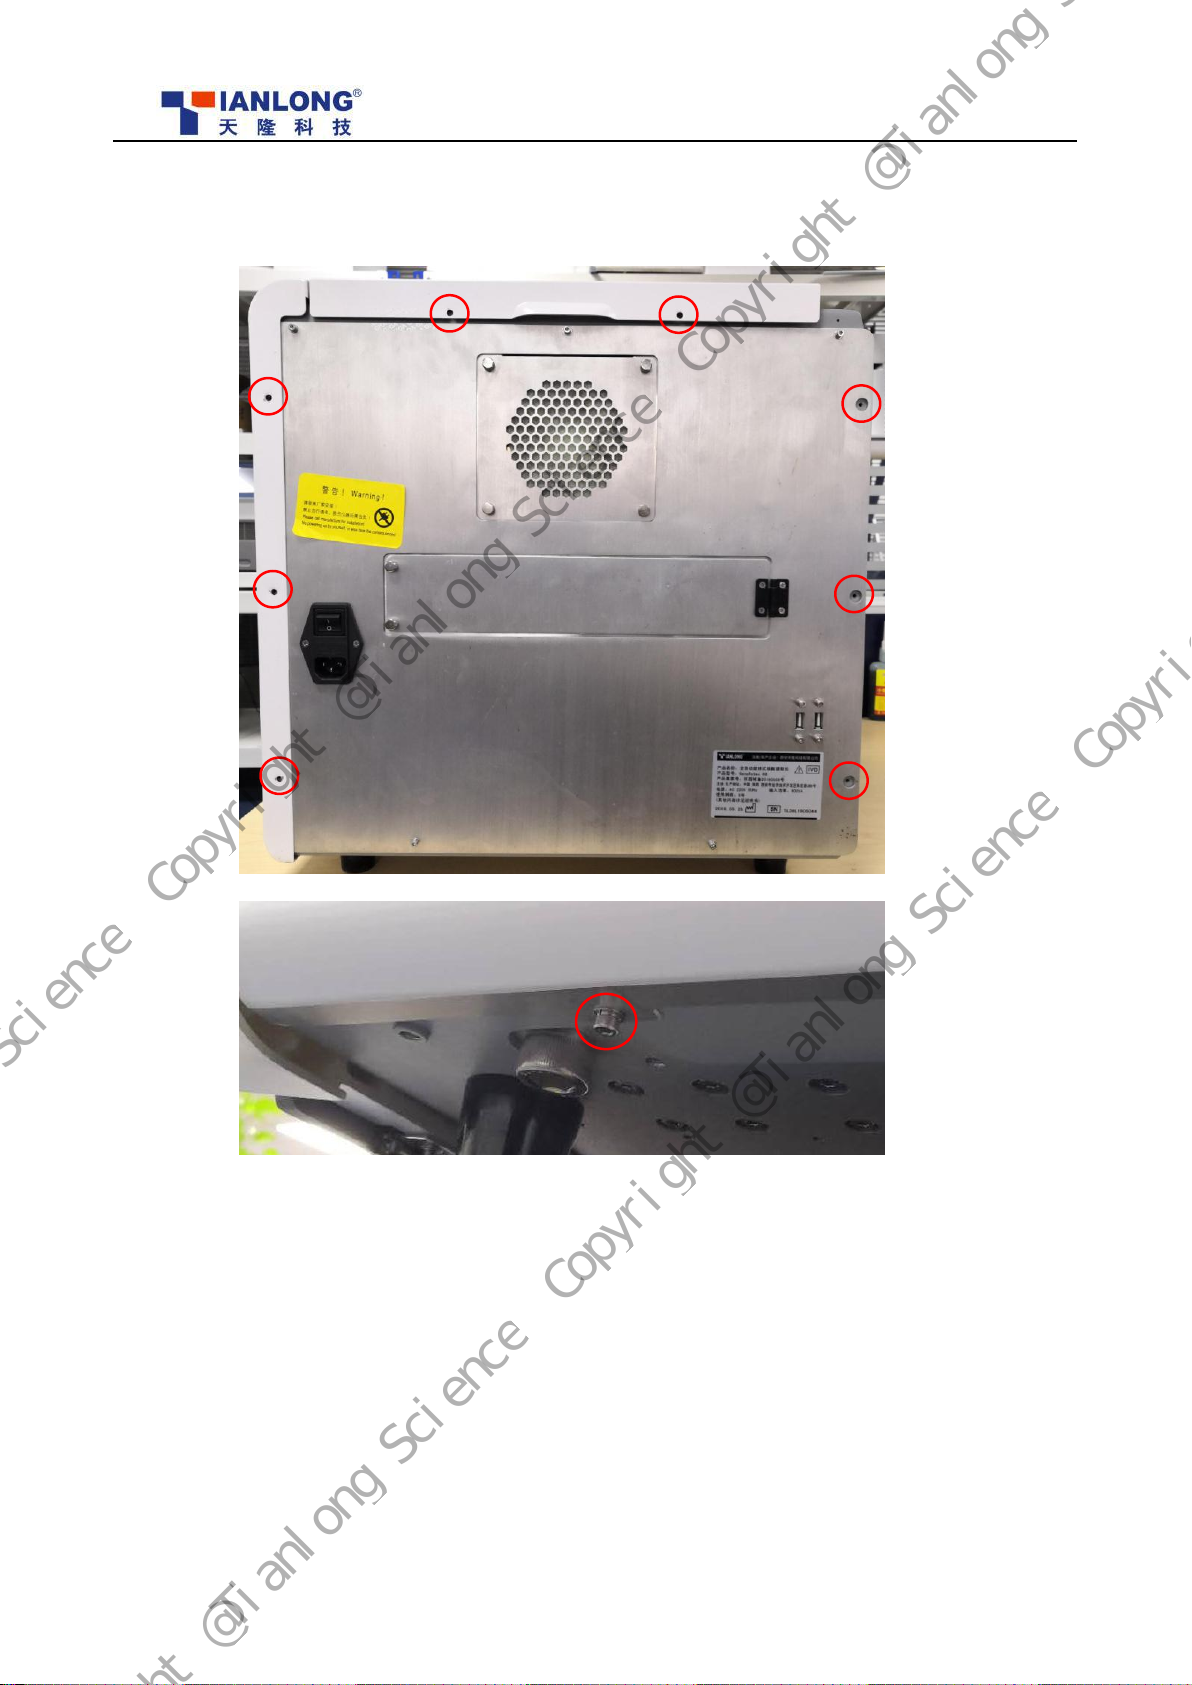
Disassembly:
Remove 2 bolts on the back panel with the M3 hexagonal tool to remove the top shell, remove the 6 bolts on
both sides of the back panel and 1 bolt below the left and right side panels to remove the left and right shells.
Copyright @Tianlong Science
Copyright @Tianlong Science
Copyright @Tianlong Science
Copyright @Tianlong Science
Copyright @Tianlong Science
Copyright @Tianlong Science
20
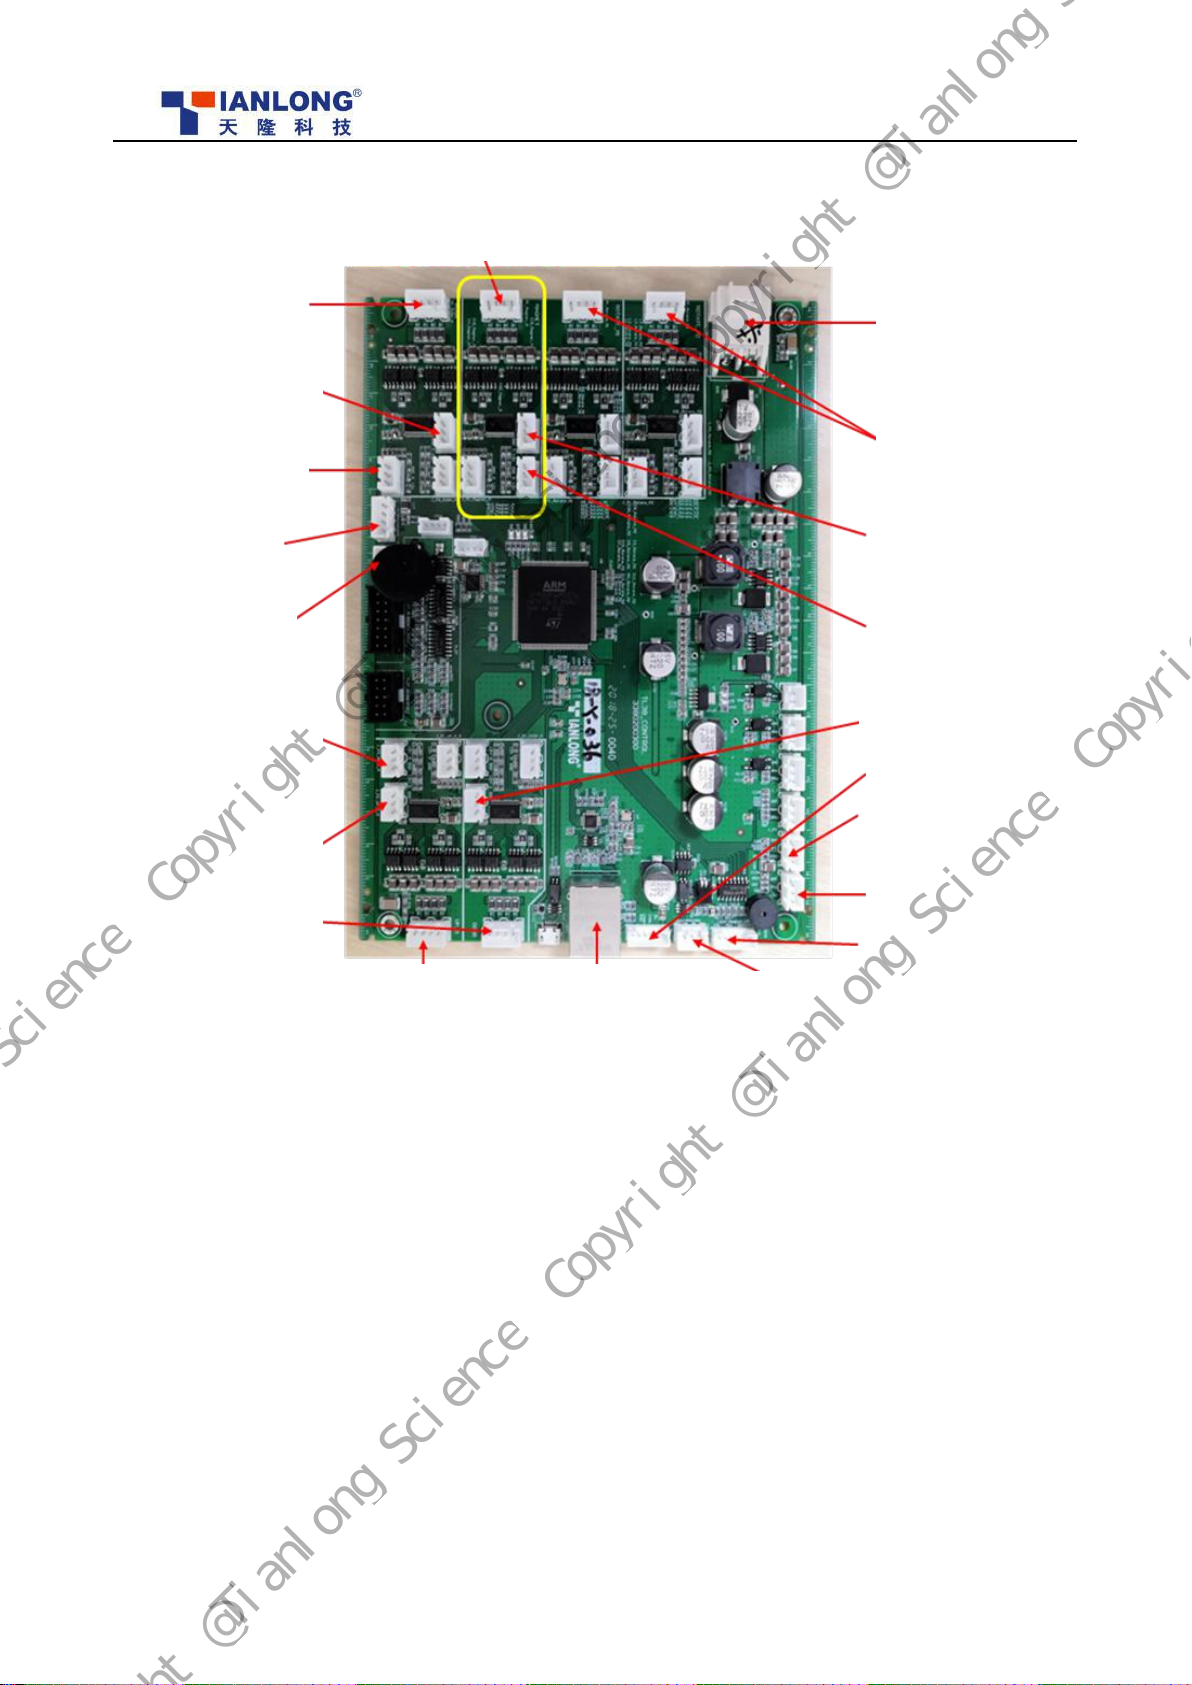
Connection Description of Main Control Panel Terminals
4.1 LCD Abnormality (Screen Scratch, Screen Reversal and Contact Failure, etc.)
Fault Description:
The LCD cannot be displayed normally and the experimental operation cannot be normally carried out.
Troubleshooting:
1. Restart the instrument and observe whether the fault exists.
2. Check whether the two FPCs between the LCD screen on the back of the screen and the circuit board
are connected properly, touch the FPCs with your hand to see if the LCD screen has changed (poor
communication will cause the above abnormalities).
3. Loosen 4 fixed bolts on the back of the screen. Restart the instrument to check whether the fault exists
(the welding spot short circuit between the LCD and the electronic components on the back of the
Magnetic motor interface
Horizontal pushing
motor interface
Photoelectric switch
interface close to the
horizontal pushing motor
on the base plate
Another photoelectric
switch interface on
the base plate
UV power cord
interface
Lifting, left
photoelectric switch
(zero) interface
Lifting, right
photoelectric switch
(negative pole limit)
interface
Lead screw motor
interface of lifting door
Lifting motor
interface
Network cable
interface CAN wire interface of
main control panel
DC input interface
Rotary motor interface
Magnetic absorption, left
photoelectric switch
(zero) interface
Magnetic absorption, right
photoelectric switch
(negative limit) interface
Lifting door photoelectric
switch interface
Connection wire interface
of display module
Optical fiber amplifier
interface No. 1
(Close to the front of
instrument)
Optical fiber amplifier
interface No. 2
Connection wire interface
of breathin
g
lam
p p
late
Power cord interfa
ce of fan
Copyright @Tianlong Science
Copyright @Tianlong Science
Copyright @Tianlong Science
Copyright @Tianlong Science
Copyright @Tianlong Science
Copyright @Tianlong Science
Table of contents
Other Tianlong Laboratory Equipment manuals


