manuals.online logo
Brands
  1. Home
  2. •
  3. Brands
  4. •
  5. Timex
  6. •
  7. Watch
  8. •
  9. Timex 33 User manual

Timex 33 User manual

TIM EX m o de I
33
self wind
day
and
date
13
lig.
28.96mm
1.140
in.
(/)
m
;;c
~:::::
on
om
~~
(..))>
wz
c
)>
r-
the
TIMEX
Model
33
Movement
The
Model
33
movement
is
a 13 ligne serf-winding movement with
day
and
date
features. The
Model
33 utilizes the same basic construction
as
the
Model
31
except
that
a
day
and
date
mechanism has been added. A plane-
tary
gear
winding
system located on the Front Frame provides a compact
method
of
obtaining
the necessary
gear
reduction between the self-winding
weight
and
the mainspring.
The reserve
power
of
the mainspring when the watch
is
worn
by
a
normally
active person
is
sufficient
to
run the watch
for
a full
day.
The
day
and
date
mechanism
is
similar
to
that
used
in
the
Model
27.
Dismantling procedures
are
outlined starting on
page
33.3.
Cleaning
procedures
are
outlined starting on
page
33.5.
Reassembly procedures
are
outlined starting on
page
33.7.
33.1
the
TIMEX
Model
33
Movement(exploded
view)
751
2561/1
2557/1
2576
145
33.2
~
2/1
851
~
850
A
I
/
~
498/1
~
255
,.
)
145
DATE FRAME
242
CANNON PINI
ON
ASS'Y
.
255
HO
UR WHEEL
498/1
HOUR
WHEEL WASHER
751
DIAL
850
HOUR HAND
851 MINUTE HAND
852/1
SWEEP
SECOND
HAND
2557/1
DATE RI
NG
DAY
FRAME ASS'Y.
DAY
DETENT SPRING
2575
DATE LEVER
2576
DATE
CLICK
SPR
I
NG
5145
PILLAR
SCREW
( LONG)
5145/1
PILLAR
SCREW
(SHORT)
5145/1
r
__
J
Disassembly
of
Movement
(
model
33)
FI
(;
URE
I
ROCKER
ARM
~
FI
GURE
2
ROTOR
SCREWS
ROTOR
The
Model
33 movement
is
dis-
assembled as follows: Remove the
case
back
. Loosen
and
remove
two
Rotor Frame Screws
(see
figure
1
).
Lift the
rotor
assembly slightly
to
free the dowels. Since the Rocker
Arm fits between the Rotor Frame
and
the Rotor
Weight,
position the
rotor
weight
as shown in
figure
2
and
slide the assembly
along
the
movement
plate
(toward
the
bal-
ance wheel) until it
is
free
of
the
rocker
arm
and
then
lift
the assem-
bly
out
of
the case.
CAUTION:
Any
attempt
to
lift
the
weight
before
it
is
free
of
the
Rocker Arm
will
result in
damage
to
the movement.
Pull crown
out
into
the set position.
Loosen the Set Lever Screw
and
raise lever sufficiently
to
release
the stem
and
pull the crown
and
stem assembly free
of
the move-
ment
and
the case (see
figure
2).
With
tweezers,
carefully
remove
ROCKING
BAR
the retaining sprinq
from
the Bezel
SPRING
(fiqure
21.
Be
careful
not
to
damage
Balance
Wheel
Assembfy.
ROCKING
BAR
Carefully
turn the
watch
over
and
SET
LEVER
th:
Dial
and
movement assembly
will
fall
out. Replace the crown
and
stem assembly
and
retighten the
set lever screw.
DIAL REMOVAL
Remove
all
hands. Turn the assem-
bly
over
and
bend
the
four
dial
tabs sufficiently
to
free
the
dial
from the
Date
Frame.
Hold
the
dial
in place
and
turn the assembly
so
CROWN
AND
STEM
h d· I . d f
II
I. h
ASSEMBLY
t e
Ia
IS
UP
an care U V
1ft
t e
RATCHET
WHEEL
dial
off
of
the movement.
Note
the
positions
of
the parts
under
the
dial
(see
illustrations on Page 33.4).
33.3
DATE
CLICK
SPRING
33.4 .
Disassembly
of
Movement
(model
33)
DATE
RING
CUT
OUT
AT
CENTER
POST
PRINCIPLE
OF OPERATION
The
illustrations
at
the
left
show the
functional parts
of
the
Day
and
Date mechanism.
DATE
RING INDEXING
A
tab
on the underside
of
the Date
Wheel engages the Date Lever and
moves the Date Lever
tab
backward
one tooth on the Date
Ring
.
At
a
predetermined time (about mid-
night) the date lever
is
released
and
moves
the date ring forward
one space.
The
Date Click Spring
engages the Date
Ring
to prevent
backward motion when the Date
Lever
is
being moved.
DAY DIAL INDEXING
A
tab
on the upper side
of
the
Date Wheel engages the Day Dial
Pinion. Rotating the
Day
Dial Pinion
moves the Day Dial
forward
one
position
at
about
l o'clock in the
morning.
The
Day
Detent Spring
positions,the
Day
Dial.
Disassembly
of
Movement
{model
33)
PLANETARY
GEAR
ASS'Y.
OIL
OIL
PILLAR
SCREW
(LONG)
ROCKING
BAR
Turn movement
over
and
with
tweezers,
lift
end
of
the Rocking
Bar spring free from the end
of
the Rocking Bar
(see
figure 2).
Turn movement over
so
date
frame
is
up
and
remove
two
pillar
screws
(see
exploded
view
page
33 2). Lift
Date Frame Assembly
off
movement
being careful not
to
disturb loose
parts underneath. Replace long
pil-
lar
screw
in
the Rocking Bar on the
movement
(see
figure
3).
Lift
off
the Hour
Wheel
Washer
Hour
Wheel
Cannon Pinion Assembly
TO
LET
DOWN
MAINSPRING
The stored
power
must be released
( DISENGAGED POSITION) from the mainspring
in
order
to
service the movement. For reference
purposes, the click in this movement
is
part
i
ally
hidden
by
the
plate
which holds the
planet
gear
assem-
K SPRING
bly
in
position
(see
Figure 3
).
There
is
no need
to
remove the
Fl
GURE
3
planetary
gear
assembly from the
frame
of
the movement assembly.
The
Model
24
procedure
for
remov-
ing
the balance, cleaning,
lubricat-
ing
and
reassembling the
balance
described on pages
24
.5, 24.6,
and
24.7
should be
followed
for
the
Model
33 movement.
CAUTION
Remember
that
the
day
and
date
ring
are
printed dials
and
some
watch cleaning fluids
will
strip the
printing. 33.5
33.6
Lubrication
of
(Model
33)
OIL(BOTH
SIDES)
FIG. A
FIG. B
DAT
E CLICK SPRING
FIG. C
LOCATING HOLE
DAY
FRAME
ASS'Y.
~~
-BOSS
DAY PINION
GREASE
L
UBRICAT
I
ON
The
basic movement
of
the Model
33 must be lubricated
as
described
for
the Model 24 movement on
Page 24.6 (Elgin
M56b
oil
is
used
in
the factory).
In
addition
to
the above,
additk
lubrication
is
required
as
follows:
A.
Lubr
icate the mechanism
on
the Rotor
(see
illustration below)
with Moebius Special Lubricant
#206
on the outside surface
of
the rotor
cam
and force
l
ubr
i~
cant beneath
th
e rotor staff
head and between the rotor
frame and the rotor cam.
ROTOR
FRAME
B.
Lubricate w
ith
fine watch
oi
l
~·
ratchet wheel teeth
and
three pivot points
shown
figure
2.
C.
Lubricate with fine watch oil the
seven
bearing points of the
planetdry gear
system
noted
on
figure 3 (page 33.5).
D.
Lubricate
as
noted at the left
in
figure A the junction
of
the
date
lever with the date wheel
stud, both sides
of
the junction
of
the date lever with the guide
stud
and
the bearing between
the date wheel
and
the
date
wheel stud.
E.
Apply
coating
of
grease (Ham-
ilton
PML
is
used
in
the factory)
to junction
of
the Day Detent
Spring
and
the Day Pinion
as
shown
at
the left
in
figu
re
B.
F.
Apply
coaling
of
grease (Ham-
ilton
PML
used
in
the factory)
to
the junction
of
the Date Click
Spring with the teeth
of
the
Date
Ring
and
to
th
e
jur-
tion
of
the
tab
on the [
Lever with the teeth
of
the
L.
Ring
as
shown
in
figure C
at
the left.
WA
RNING, Never lubricate the
junction
of
the
Day
Pinion wi
th
the
Day
Frome because th
is
may
cause
failure.
Reassembly
of
Movement
(Model
33)
DATE
LEVER
FIGURE 4
To reassemble the
Model
33 movement into a watch
after
the basic
movement has been cleaned
and
oiled, the
following
procedure should
be
followed.
Refer to the
exploded
view
on Page 33.2 as a guide.
Assemble the Cannon Pinion Assembly
onto
the Center Post
of
the move-
ment.
Apply
a small amount
of
fine
watch
oil
to
the center hole in the
Cannon
Pinion. Assemble the
Hour
Wheel
and
Hour
Wheel
Washer
onto
the
Cannon
Pinion Assembly.
Remove the short Pillar Screw (if assembled)
and
the
long
Pillar Screw
from
the movement.
Be
sure the bushing is in place in the rocking
bar
and
then
po
sition the lubricated Date Frame Assembly on the movement
as shown
on
Page 33.2
and
in Figure
3.
Hold
Date
Frame assembly in
plac
e
and
check
proper
Date
Wheel
engagement
by
testing
with
tweezers.
Secure the
Date
Frame assembly
to
the movement
with
the
long
and
short
pillar
screws. Reengage the Rocking
Bar
spring
as shown in Figure 2.
Check
for
proper
engagement
and
function
of
the crown
and
stem
assembly. Rotate crown enough
to
move
finger
on
the
Date
Wheel
away
from
the
cut
out
at
the center post (
see
Page 33.4).
Position the
Date
Ring on the Date Frame
so
it
is
engaged
with
the
finger
on
the
Date
Lever
and
the Detent Spring.
Test the
lubricated
Day
Frame Assembly (see Page 33.6)
for
free
rotat
i
on
of
the
Day
Pinion against the
Day
Detent
Spring
.
Note
the
two
smafl
locating
holes, the boss
and
the cut
out
on the underside
of
the
Day
Frame Assembly
(see
center
view
on Page
33
.6). Position the
lubricated
Day
Frame Assembly over the center
of
the movement
and
orient
the
assembly
on
the Date Ring
so
the
left
end
of
the cut
out
just clears the
tab
on the
Date
Lever.
Apply
l
i
~ht
pressure
and
move the
Day
Frame
Assembly
slightly
until the
two
holes
and
boss seat on the corresponding
bosses
and
hole in the
Date
Frame Assembly.
Centralize
the
Date
Ring
unde
r the
Day
Frame Assembly.
33.7
Reassembly
of
Movement
(Model
33)
Carefully
orient the
dial
over
the assembly
and
then,
hold
ing the
dial
in place, turn the assembly
over
and
bend
the
four
tabs
to
secure
the
dial
to
the
Date
Frame.
TO
POSITION
HANDS
FOR
PROPER
DAY
AND
DATE
CHANGE
First
-Hold
watch assembly
with
mov
ement
side
up
and
crown
and
stem
at
three o'clock position. Pull
out
crown
and
stem.
Next
-Rotate
crown
and
stem
slowly
and
observe
date
lever
at
nine
o'clock position.
Date
lever
will
then begin
to
move
and
a click
will
be heard.
After
the click,
rotate
crown slowly until
date
lever snaps
back
.
At
this time stop
rotating
.
Fi
nally-Turn
assembly
over
and
replace
all
hands
at
12 o'clock position.
Check the
proper
function
of
the
bay
and
the Date change mechanism.
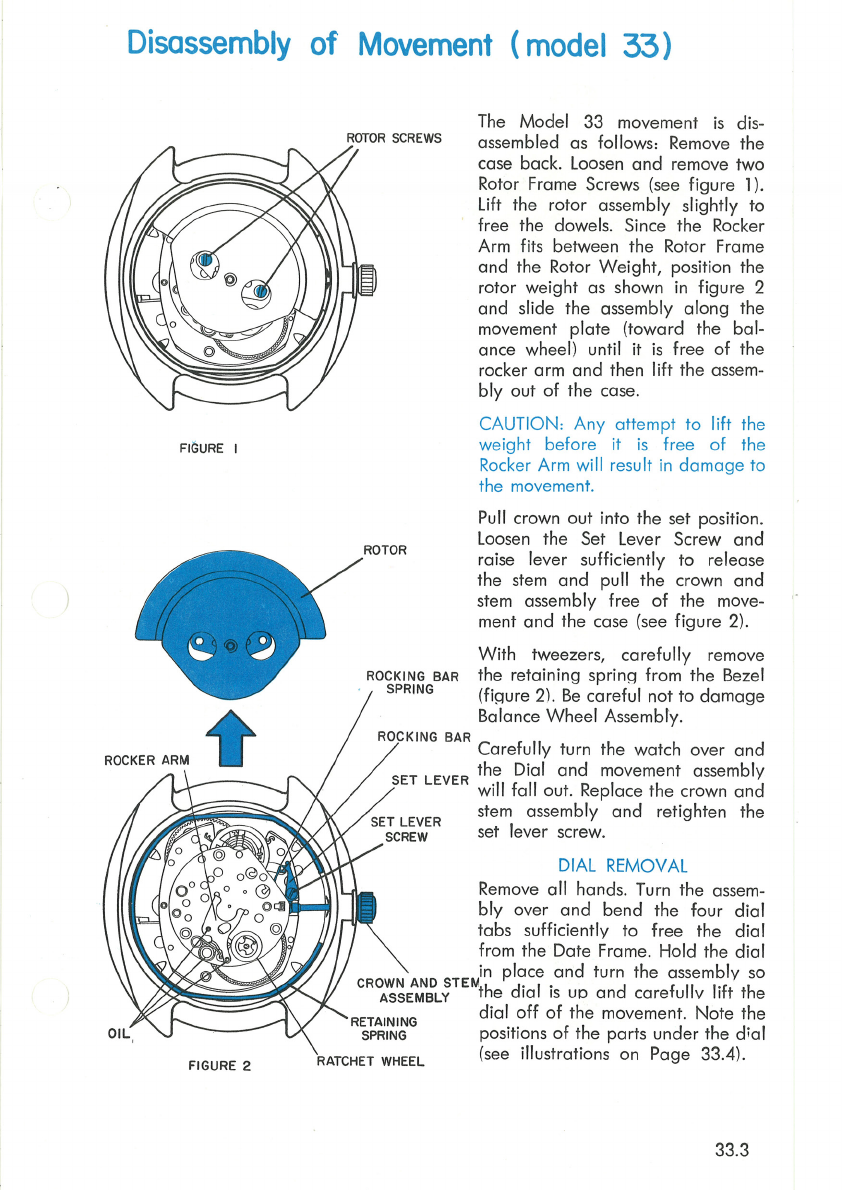
Loosen the set lever screw
and
remove the crown
and
stem
as
previously
noted on page 33.3. Position the Dial
and
Movement assembly in the
bezel, insert the crown
and
stem
through
the bezel
and
retighten the
set lever screw.
Reassemble the Retaining Spring as shown in Figure
2.
The
end
of
the
spring
should be inserted into the
groove
near
the stem
at
the
balance
wheel
end
of
the movement. Insert the rest
of
the spring into the
groove
being
careful
not
to
damage
the
balance
ass
embly
.
Reassemble the
rotor
assembly
by
sliding it into the movement
under
the rocker arm as shown
in
Figure 2. Secure the rotor
to
the movement
with
two
screws as shown in Figure 1.
Position the case
back
with the
'T'
on
"Timex"
toward
the crown
and
snap it into the bezel.
33.8

Other Timex Watch manuals

Timex M-286 Marathon Installation and operation manual

Timex

Timex M-286 Marathon Installation and operation manual

Timex W-194 User manual

Timex

Timex W-194 User manual

Timex W-207 User manual

Timex

Timex W-207 User manual

Timex W-141 User manual

Timex

Timex W-141 User manual

Timex 95 User manual

Timex

Timex 95 User manual

Timex Expedition User manual

Timex

Timex Expedition User manual

Timex W-292 User manual

Timex

Timex W-292 User manual

Timex 40 User manual

Timex

Timex 40 User manual

Timex IRONMAN ONE GPS+ User manual

Timex

Timex IRONMAN ONE GPS+ User manual

Timex 513-095000 User manual

Timex

Timex 513-095000 User manual

Timex W196 User manual

Timex

Timex W196 User manual

Timex IRONMAN R300 User manual

Timex

Timex IRONMAN R300 User manual

Timex 953-095017 User manual

Timex

Timex 953-095017 User manual

Timex M916 User manual

Timex

Timex M916 User manual

Timex 22 User manual

Timex

Timex 22 User manual

Timex 131-095000 User manual

Timex

Timex 131-095000 User manual

Timex W223 NA User manual

Timex

Timex W223 NA User manual

Timex M921 User manual

Timex

Timex M921 User manual

Timex IRONMAN Classic 50 Move+ User manual

Timex

Timex IRONMAN Classic 50 Move+ User manual

Timex W217 NA User manual

Timex

Timex W217 NA User manual

Timex Mini Digital User manual

Timex

Timex Mini Digital User manual

Timex 106 User manual

Timex

Timex 106 User manual

Timex Expedition User manual

Timex

Timex Expedition User manual

Timex W-207 User manual

Timex

Timex W-207 User manual

Popular Watch manuals by other brands

Seiko V657 Parts catalogue /technical guide

Seiko

Seiko V657 Parts catalogue /technical guide

Polaroid B502 user manual

Polaroid

Polaroid B502 user manual

KOSPET TANK M1 manual

KOSPET

KOSPET TANK M1 manual

A-rival SpoQ HR user manual

A-rival

A-rival SpoQ HR user manual

Reebok MIYOTA 2035 instruction manual

Reebok

Reebok MIYOTA 2035 instruction manual

Citizen CTZ-B8155 instruction manual

Citizen

Citizen CTZ-B8155 instruction manual

UMIDIGI Uwatch 2S operating instructions

UMIDIGI

UMIDIGI Uwatch 2S operating instructions

KSIX OSLO BXSW14N user manual

KSIX

KSIX OSLO BXSW14N user manual

Swatch Touch Zero One user manual

Swatch

Swatch Touch Zero One user manual

Xiaomi Mi Smart Band 7 NFC user manual

Xiaomi

Xiaomi Mi Smart Band 7 NFC user manual

iwc AQUATIMER CHRONO-AUTOMATIC Operating instructions for operators and installers

iwc

iwc AQUATIMER CHRONO-AUTOMATIC Operating instructions for operators and installers

HomeFree personal watcher operating instructions

HomeFree

HomeFree personal watcher operating instructions

Casio Edifice ECB-500D-1A Operation guide

Casio

Casio Edifice ECB-500D-1A Operation guide

Chase-durer Warhawk Operation manual

Chase-durer

Chase-durer Warhawk Operation manual

Tissot Quickster Chrono Foot G10-212 user manual

Tissot

Tissot Quickster Chrono Foot G10-212 user manual

WeatherMaster A instruction manual

WeatherMaster

WeatherMaster A instruction manual

EnjoyTone Robust W56 user manual

EnjoyTone

EnjoyTone Robust W56 user manual

Casio G-Shock MTG-900D-2V Operation guide

Casio

Casio G-Shock MTG-900D-2V Operation guide

manuals.online logo
manuals.online logoBrands
  • About & Mission
  • Contact us
  • Privacy Policy
  • Terms and Conditions

Copyright 2025 Manuals.Online. All Rights Reserved.