CARVER ONE
Paintball Marker
Owner’s Manual
WARNING
THIS IS NOT A TOY. MISUSE MAY CAUSE SERIOUS INJURY OR
DEATH. EYE, FACE, AND EAR PROTECTION DESIGNED FOR
PAINTBALL MUST BE WORN BY THE USER AND ANY PERSON
WITHIN RANGE. WE RECOMMEND YOU BE AT LEAST 18
YEARS OLD TO PURCHASE. PERSONS UNDER 18 MUST HAVE
ADULT SUPERVISION WHEN USING THIS PRODUCT. READ THE
OWNER’S MANUAL BEFORE USING THIS PRODUCT.
WARNING
SAFETY IS YOUR RESPONSIBILITY
READ AND FAMILIARIZE YOURSELF AND ANY OTHER USER
OF THIS MARKER WITH THE
SAFETY INSTRUCTIONS
IN THIS
MANUAL. FOLLOW THESE INSTRUCTIONS WHEN USING,
WORKING ON, TRANSPORTING, OR
STORING THIS MARKER.
ALWAYS KEEP THE TRIGGER SAFETY IN SAFE
MODE UNLESS IN A SHOOTING SITUATION, AS
DETAILED IN TRIGGER SAFETY INSTRUCTIONS.
ALWAYS KEEP THE BARREL SLEEVE
INSTALLED WHEN NOT IN A SHOOTING SITUATION,
SEE BARREL SLEEVE INSTRUCTIONS BELOW.
Barrel Sleeve Installation Instructions
1. InserttheBarrelSleeveontotheBarrelandloopthecordoverthetopofthereceiverandposition
atthebackofthegripasshown.
2. Adjustthecordlengthretaineruptothebackofthegripby
pullingthecordthroughituntiltheretainerissnugagainst
thebackofthegrip.Keepingthecordastightaspossible,
leavejustenoughcordelasticitytopullthecord/retainerup
overthetopofthemarkertoremovetheBarrelSleevefor
ring.
3. Afterthecordlengthisproperlyadjusted,lockthecordlengthby
tyingaknotinthecordagainstthebackoftheretainerasshown.
4. Beforeandafterplaying,inspecttheBarrelSleeve.Replacethe
BarrelSleeveifthesleeveorcordisdamaged,orathereisaloss
ofcordelasticity.
5. CleantheBarrelSleevewithplain,warmwaterandstoreoutofsunlightinadryareawhennotin
use.
Introduction
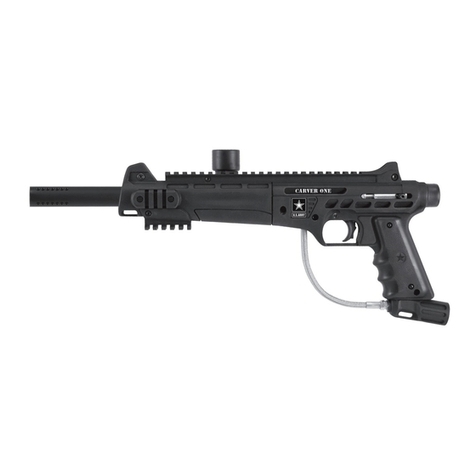
CONGRATULATIONSonyourpurchaseofyourTippmann®paintballmarker.WebelieveourCarver
One™markertobethemostaccurateanddurablepaintballmarkeravailable,anditisproudly
manufacturedbyTippmann.TheTippmann®CarverOnemarkerwillprovideyoumanyyearsof
dependableserviceifcaredforproperly.
PleasetaketimetoreadthismanualthoroughlyandbecomefamiliarwithyourTippmann®CarverOne™
marker’sparts,operation,andsafetyprecautionsbeforeyouattempttoloadorrethismarker.Ifyou
haveamissingorbrokenpart,orneedassistance,pleasecontactTippmannConsumerRelationsat
1-800-533-4831forfast,friendlyservice.
Warning / Liability Statement
ThismarkerisclassiedasadangerousweaponandissurrenderedbyTippmannSports,LLCwiththe
understandingthatthepurchaserassumesallliabilityresultingfromunsafehandlingoranyactionthat
constitutesaviolationofanyapplicablelawsorregulations.TippmannSports,LLCshallnotbeliablefor
personalinjury,lossofpropertyorliferesultingfromtheuseofthisweaponunderanycircumstances,
includingintentional,reckless,negligentoraccidentaldischarges.
Allinformationcontainedinthismanualissubjecttochangewithoutnotice.TippmannSports,LLC
reservestherighttomakechangesandimprovementstoproductswithoutincurringanyobligationto
incorporatesuchimprovementsintoproductspreviouslysold.
Ifyouasauserdonotacceptliability,TippmannSports,LLCrequestsyoudonotuseaTippmannSports,
LLCmarker.ByusingthispaintballmarkeryoureleaseTippmannSports,LLCofanyandallliability
associatedwithitsuse.
Safety Is Your Responsibility!
Trigger Safety
Familiarize Yourself with Safety...
Theownershipofthismarkerplacesuponyouthetotalresponsibilityofitssafeandlawfuluse.Youmust
observethesamesafetyprecautionsasyouwouldanyrearmtoassurethesafetyofnotonlyyourself
buteveryonearoundyou.Outlinedherearesomegeneralprecautionstobeawareof.Theusershouldat
alltimesusecautionandcommonsensewhenusingthismarkerandalwaysrememberthatthegameof
PaintballcanonlysurviveandgrowifitremainsSAFE!
• Donotloadorrethismarkeruntilyouhavecompletelyreadthismanualandarefamiliarwith
itssafetyfeatures,mechanicaloperation,andhandlingcharacteristics.
• Handlethisandanymarkerasifitwereloadedatalltimes.
• KeepyourngerofftheTriggeruntilreadytoshoot.
• Donotlookdownthebarrelofapaintballmarker.Accidentaldischargeintotheeyesmaycause
permanentinjuryordeath.
• KeeptheTriggerSafetyintheSafepositionuntilreadytoshoot(seeWarningmessageabove).
• Keepabarrelsleeveinstalledonmarkerwhennotshooting(seeWarningmessageabove).
• Neverpointthemarkeratanythingyoudonotintendtoshoot.
• Neverreyourmarkeratanythingyoudonotintendtoshootbecausetheremaybepaintballs
orforeigndebrislodgedinthechamber,barrel,orthemarker’svalve.
• Donotshootatfragileobjectssuchaswindows.
• Neverreyourmarkeratpersonalpropertyofothers.Thepaintballimpactcancausedamage
andthepaintcanstainthenishofautomobiles,houses,etc.
• Alwayskeepthebarrelpointeddownorinasafedirection,evenifyoustumbleorfall.
• Eye,face,andearprotectiondesignedspecicallytostoppaintballsintheformofgogglesand
fullfacemaskmeetingASTMSpecicationF1776mustbewornbytheuserandanyperson
withinrange.
• Nevershootatapersonwhoisnotprotectedbyeye,face,andearprotectiondesignedfor
paintball.
• Pressurizeandloadamarkeronlywhenthemarkerwillbeimmediatelyused.
• Storethemarkerunloadedanddegassedinasecureplace.
NOTE:Beforestoringordisassembling,besuretoremovepaintballsandair/CO2cylinder(see
Unloading Your MarkerandAir/CO2 Cylinder Warnings),puttheTriggerSafetyintheSafe
positionandinstallthebarrelsleeve.
• Donoteldstriporotherwisedisassemblethismarkerwhileitispressurized.
• Dressappropriatelywhenplayingthegameofpaintball.Avoidexposinganyskinwhenplaying
thegameofpaintball.Evenalightlayerofclothingwillhelpabsorbsomeoftheimpactand
protectyoufromthepaintballs.
• Keepexposedskinawayfromescapinggaswheninstallingorremovingtheair/CO2cylinder,or
ifthemarkerorair/CO2cylinderisleaking.Compressedair,CO2,andnitrogengassesarevery
coldandcancausefrostbiteundercertainconditions.
• Useonly.68caliberpaintballs.Neverloadorreanyforeignobjects.
• Avoidalcoholicbeveragesbeforeandduringtheuseofthismarker.Handlingmarkerswhile
undertheinuenceofdrugsoralcoholisacriminaldisregardforpublicsafety.
• Avoidshootinganopponentatpointblank,6feetorless.
• Familiarizeyourselfwithinstructionslistedontheair/CO2cylinder.Contacttheair/CO2cylinder
manufacturerwithanyquestions.
• Alwaysmeasureyourmarker’svelocitybeforeplayingpaintballandnevershootatvelocitiesin
excessof300feetpersecond(seeVelocity Adjustment instructions).
• AlwayskeepinmindthatthesportofPaintballisviewedandjudgedbyyoursafeand
sportsmanlikeconduct.
Getting Started
• Eyeprotectiondesignedforpaintballusemustbewornbytheuserandanypersonwithin
range.
• Donotdisassemblethismarkerwhileitispressurizedwithair.
• Donotpressurizeapartiallyassembledmarker.
• Readeachstepcompletelybeforeperformingthestep.
NOTE:Carefullyhandstartallthreadedpartswhenassembling,anddonotovertighten,asthis
maypotentiallystripthethreadedparts.
1. Prepare Marker for Air/CO2 Cylinder Installation.
a. ApplyTippmannoiltotheBarrelO-ring.
b. InserttheBarrelintotheReceiver.
c. CarefullyturntheBarrelclockwisebyhanduntiltight.
2. Air/CO2 Cylinder Installation.
ReviewAir/CO2 Cylinder Safety Tips.
a. PuttheTriggerSafetyintheSafepositionandinstalltheBarrelSleeve.
b. Cockthemarkerbyslidingthebolthandlealltheway
backuntilitlocksintoplace.Alwayskeepmarkerinthe
cockedpositionwhenattachingair/CO2cylindertothe
marker.Thishelpspreventanaccidentaldischarge.
c. Lubricatetheair/CO2cylindervalveO-ringwithalittle
Tippmann®oil.
d. Inserttheair/CO2cylindervalveintotheAirSupply
Adapter(ASA)(29)atthebackendofthemarkergrip.
e. Twisttheair/CO2cylinderclockwiseintotheASAuntilit
stops.Usecautionasthemarkerisnowcapableofring
afteryouputtheTriggerSafetyintheFireposition.
(Ifyoudonothearthefullair/CO2cylinderengage,the
pinvalvecouldbetooshortorthepinvalvesealisdamaged,followtheAir/CO2 Cylinder
Removalinstructionsandtakeyourair/CO2cylindertoa“C5”CertiedAirsmithforinspection
orcontactthecylindermanufacturer).
3. Loading the Hopper
TheBarrelSleevemustbeinstalledandtheTriggerSafetyintheSafeposition.
a. MakesurethattheFeedElbow(9)andHopperarecleanandfreeofsharpedgesordebris.
Thiskeepspaintballsfrombreakingprematurely,andallowspaintballstofeedtothemarker’s
chambersmoothly.
b. InstalltheHopperneckintotheFeedElbow.
c. TightentheFeedElbowBolt(11)usingtheincluded3/16”allenwrench.
d. WiththeBarrelSleeveinstalled,andtheTriggerSafetyintheSafeposition,youarenowready
toloadthehopperwith.68caliberpaintballs.Donotforceexcessivenumbersofpaintballsinto
thehopper.
4. Fire the Marker
a. RemovetheBarrelSleevefromthemarker.
b. Pointthemarkerinasafedirection.
c. PuttheTriggerSafetyintheFireposition.
d. Pullthetriggertorethemarker.
Velocity Adjustment
Eachtimeyouplaypaintball,checkthevelocityofyourpaintballmarkerwithachronograph(an
instrumentformeasuringvelocity)priortoplayingpaintball.Verifythatthemarker’svelocityissetbelow
300feetpersecond(orlessifrequiredbytheplayingeld).
Toadjustthevelocity,usethe3/16”allenwrenchincludedwithyourmarker.TheVelocityAdjustment
Screw(#51inPartsDiagramandshowninFigure3)islocatedonleftsidereceiver.Toreducethe
velocity,turnthescrewinwardorclockwise.Toincreasethevelocity,turnthescrewcounterclockwise.Do
notremovethevelocityscrew.
Unloading Your Marker
1. Eyeprotectiondesignedforpaintballusemustbewornbytheuserandanypersonwithinrange.
2. InstallthebarrelsleeveandputtheTriggerSafetyintheSafeposition.
3. EmptyandremovetheHopper.
4. Gotoadesignatedringarea,removetheBarrelSleeve,andputtheTriggerSafetyintheFire
position.
5. Pointyourmarkerinasafedirectionandreseveraltimestobesuretherearenoremaining
paintballslodgedinthechamberorbarrel.IMPORTANT:Donotuncockyourmarkerasuncocking
yourmarkermaypushaballintothechamberordownintothebarrel,makingithiddenfromview.
6. ReturntheTriggerSafetytotheSafepositionandreinstalltheBarrelSleeve.
7. Visuallyinspectthechamberforpaintballs.
8. ReadthefollowingAir/CO2 Cylinder WarningsandSafety Tipsbeforeremovingtheair/CO2
cylinderfromyourmarker.
Air/CO2 Cylinder Warnings
RefertoFigure4.Therehavebeenreportedincidentscausedby
playersunknowinglyunscrewingthecylinder(2)fromthecylinder
valve(1).Thisoccurswhentheplayerthinkstheentirevalve-cylinder
assemblyisbeingunscrewedfromtheairsupplyadaptor(ASA)ofthe
paintballmarker,wheninfacttheyareunscrewingthecylinderfromthe
cylindervalve.
Toavoidthisdanger,itisrecommended(ifyourcylinderisnotalready
marked)thatyouusepaintornailpolishtoplaceamark(3)onthe
cylindervalve,andplaceanothermark(4)onthecylinder,inlinewith
the#3markasshown.
Wheneveryouturnthecylinderduringremoval,watchthemarkson
thecylinderandthecylindervalvetobesurethattheyrotatetogether.
IfatanytimethesemarksstarttoseparateasshowninFigure5,the
cylinderisstartingtounscrewfromthecylindervalveandyoumust
STOPandtaketheentireunittoa“C5”certiedairsmithforsafe
removaland/orrepair.
NOTE:Thecylindervalveshouldunscrewfromthepaintballmarkerin
about3or4fullturns.Ifyounishthe4thfullturnandthecylindervalve
isnotunscrewedfromthepaintballmarker,STOP!Taketheentireunit
toa“C5”certiedairsmithforsaferemovaland/orrepair.
Locatea“C5”CertiedAirsmithatwww.paintball-pti.com/search.asp.
Whetheryouhaveaneworusedrellableair/CO2cylinder,youareatriskifanyofthefollowinghas
occurred:
• Thevalveunitwasreplacedoralteredafterpurchase.
• Ananti-siphondevicewasinstalled.
• Thevalveunitwasremovedfromthecylinderforanyreason.
• Anymodicationwasdonetotherellableair/CO2cylinder.
Ifanyoftheseconditionshasoccurred,takeyourair/CO2cylindertoa“C5”CertiedAirsmithfor
inspectionorcontactthecylindermanufacturer.
Air/CO2 Cylinder Safety Tips
SAFETYTIPStoensurethatyourairorCO2cylinderissafeforplay:
• Improperuse,lling,storage,ordisposalofair/CO2cylindermayresultinpropertydamage,
seriouspersonalinjuryordeath.
• Makesurethatanymaintenanceormodicationtoanyair/CO2cylinderisdonebyaqualied
professional,suchasa“C5”certiedairsmith.
• Theuseofanti-siphondevicesisnotrecommended.However,ifoneisalreadyinstalledon
yourair/CO2cylinder,orsuchdeviceisdesired,itiscriticalthatyourcylinderbecheckedbya
qualiedprofessional,andyouhavethedeviceinstalledbyaqualiedprofessional.
• Allair/CO2cylindersmustbelledonlybyproperlytrainedpersonnel.
• Cylindervalvesmustbeinstalledonlybyproperlytrainedpersonnel.
• Donotoverllacylinder!Neverexceedtheair/CO2cylinder’scapacity.
• Donotexposepressurizedair/CO2cylindertotemperaturesexceeding130degreesFahrenheit
(55degreesCelsius).
• Donotusecausticcleanersorstrippersontheair/CO2cylinderorcylindervalve,anddonot
exposethemtocorrosivematerials.
• Donotmodifytheair/CO2cylinderinanyway.Nevertrytodisassemblethecylindervalvefrom
theair/CO2cylinder.
• Anyair/CO2cylinderthathasbeenexposedtore,orheatedtoatemperatureof250degrees
Fahrenheit(121degreesCelsius)ormoremustbedestroyedbyproperlytrainedpersonnel.
• Useappropriategasforyourcylinder.OnlyuseCO2inaCO2cylinder,andonlyuse
compressedairinacompressedaircylinder.
• Keepallcylindersoutofthereachofchildren.
• Theair/CO2cylindershouldbeinspectedandhydrostaticallyretestedatleastevery5yearsby
aDOTlicensedagency.
• Keepexposedskinawayfromescapinggaswheninstallingorremovingtheair/CO2cylinder,
orifthemarkerorcylinderisleaking.CompressedairandCO2gassesareverycold,andcan
causefrostbiteundercertainconditions.
NOTE:Locatea“C5”certiedairsmithatwww.paintball-pti.com/search.asp.
Air/CO2 Cylinder Removal
1. ReadAir/CO2 Cylinder WarningsandAir/CO2 Cylinder Safety Tipsbeforebeginningthe
cylinderremovalprocess.
2. Eyeprotectiondesignedforpaintballusemustbewornbytheuserandanypersonwithinrange.
3. FollowtheUnloading Your Markerinstructions.
4. Watchthemarksonthecylinderandcylindervalve(asshowninFigure4)asyouturnthecylinder
approximately¾turncounterclockwise.Thisallowstheair/CO2cylinder’spinvalvetoclosesothat
nogasentersthemarker.
5. RemovetheBarrelSleeve.SettheTriggerSafetytotheFireposition.Pointthemarkerinasafe
direction,anddischargetheremaininggasinthemarkerbyrepeatedlypullingthetriggeruntil
themarkerstopsring(thismaytake4-5shots).Ifyourmarkercontinuestore,thecylinder’s
pinvalvehasnotclosedyet(thecylinderpinvalvecouldbelongerthanusual.Becauseofthe
variancesincylinderpinvalveparts,eachcylindervariesslightlyonexactlyhowfarithastobe
turned).Turnthecylindercounterclockwisealittlefurtherandrepeatthisstepuntilthemarkerdoes
notre.Onlythenremovetheair/CO2cylinder.
NOTE:Ifduringthisstep,youturnedtheair/CO2cylinderanditbegantoleakbeforeyoupulled
thetrigger,thecylinder’sO-ringshouldbecheckedfordamagebeforeanyre-assembly(see
Repairing Air/CO2 Cylinder Leaksbelow).
6. Aftertheair/CO2cylinderisremoved,againpointandrethemarkerinasafedirectiontoverifythe
markeriscompletelydischargedofgas.
7. MovetheTriggerSafetytotheSafepositionandinstalltheBarrelSleeve.
Repairing Air/CO2 Cylinder Leaks
Themostcommonleakoccursfromabadair/CO2cylindervalveO-ring.ToreplaceavalveO-ringyou
mustrstremovethebadO-ringandtheninstallanewone.ThisO-ringislocatedonthetipofyourair/
CO2cylindervalve.ThebestvalveO-ringsaremadeofurethane.UrethaneO-ringsarenotaffectedby
highair/CO2pressures.ThesemaybepurchasedfromTippmann®oryourlocalpaintballdealer.
NOTE:Ifanewair/CO2cylindervalveO-ringdoesnotresolvealeak,donotattempttorepairtheair/
CO2cylinder.ContactTippmannSports,LLC,yourlocalpaintballdealer,ora“C5”CertiedAirsmith.
Cleaning and Maintenance
• Eyeprotectionmustbewornbytheuser.
• Toreducethechanceofanaccidentaldischarge,followtheUnloading Your Markerand
Air/CO2 Cylinder Removalinstructions.
• Donotdisassembleamarkerwhileitispressurizedwithair.
• Donotpressurizeapartiallyassembledmarker.
• Followwarningslistedontheair/CO2cylinderforhandlingandstorage.
• Familiarizeyourselfwithinstructionslistedonair/CO2cylinder.
• Contacttheair/CO2cylindermanufacturerwithanyquestions.
• Donotuseanypetroleumbasedcleaningsolvents.
• Donotuseanycleaningsolventsthatcomeinaerosolcans.
NOTE:Petroleumbasedproductsandaerosolproductscandamageyourmarker’sO-rings.
Tocleanyourpaintballmarkerexterior,useadamptoweltowipeoffpaint,oil,anddebris.
Tocleaninsidethebarrel:
1. RemovetheHopper.
2. CompletelyloosentheFeedElbowThumbNut(10)fromtheReceiverandremovetheFeed
Elbow(9)fromthemarker.
3. InsertthetabofthecleaningsqueegeeintotheFeedElbowopeningtothebarrelandpushthe
squeegeeintothebarreluntilthetabisaccessibleatthemuzzleendofthebarrel.
4. Pullthesqueegeethroughthebarreltoremovedebris.
5. Repeatifnecessary.
6. ReplacetheFeedElbowbackontothemarker.
7. TightentheFeedElbowThumbNuttosecuretheFeedElbowtothemarkerandreinstallthe
Hopper.
Tomaintainyourmarkeringoodworkingcondition,inspect,clean,andreplaceanydamagedparts.
LubricateasinstructedintheMarker Disassembly/Re-assemblysectionbelow.Thebestvalve
O-ringsaremadeofurethane.UrethaneO-ringsarenotaffectedbyhighgaspressures.Thesemay
bepurchasedfromTippmann®oryourlocalpaintballdealer.UseTippmann®oiltolightlylubricatethe
O-rings,springs,andotherareasindicatedinMarker Disassembly/Re-assemblyinstructions.This
maintainsyourmarkeringoodworkingcondition.
Storage
PuttheTriggerSafetyintheSafeposition.Unloadthemarkerandremovetheair/CO2cylinder.Putthe
boltintheforward(uncocked)position.Cleanandoilthemarkersothatitdoesnotrust.InstalltheBarrel
Sleeve,andstoreyourmarkerinadryarea.
Whenremovingyourmarkeroutofstorage,makesuretheTriggerSafetyisintheSafepositionandthe
BarrelSleeveisinstalled.Youshouldre-oiltherearboltO-ringandthefrontboltO-ringbeforeuse.
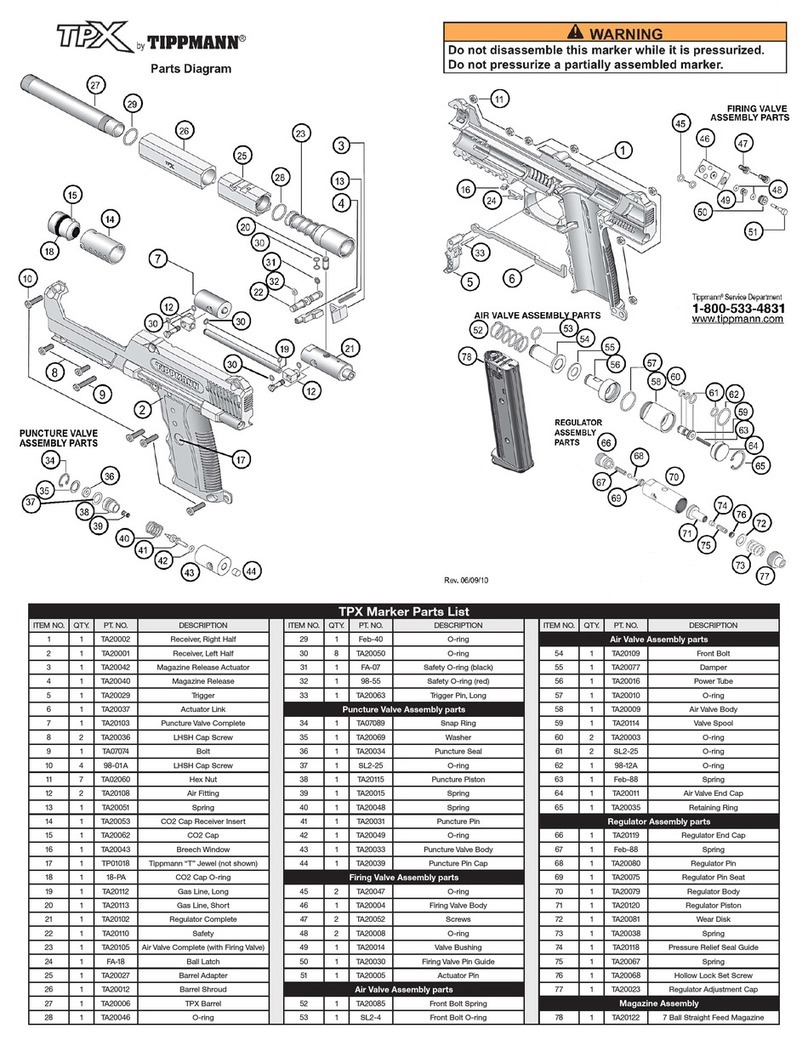
Marker Disassembly/Re-assembly
Alwaysweareyeprotectionwhenperforminganymarkerdisassemblyorre-assembly.RefertotheParts
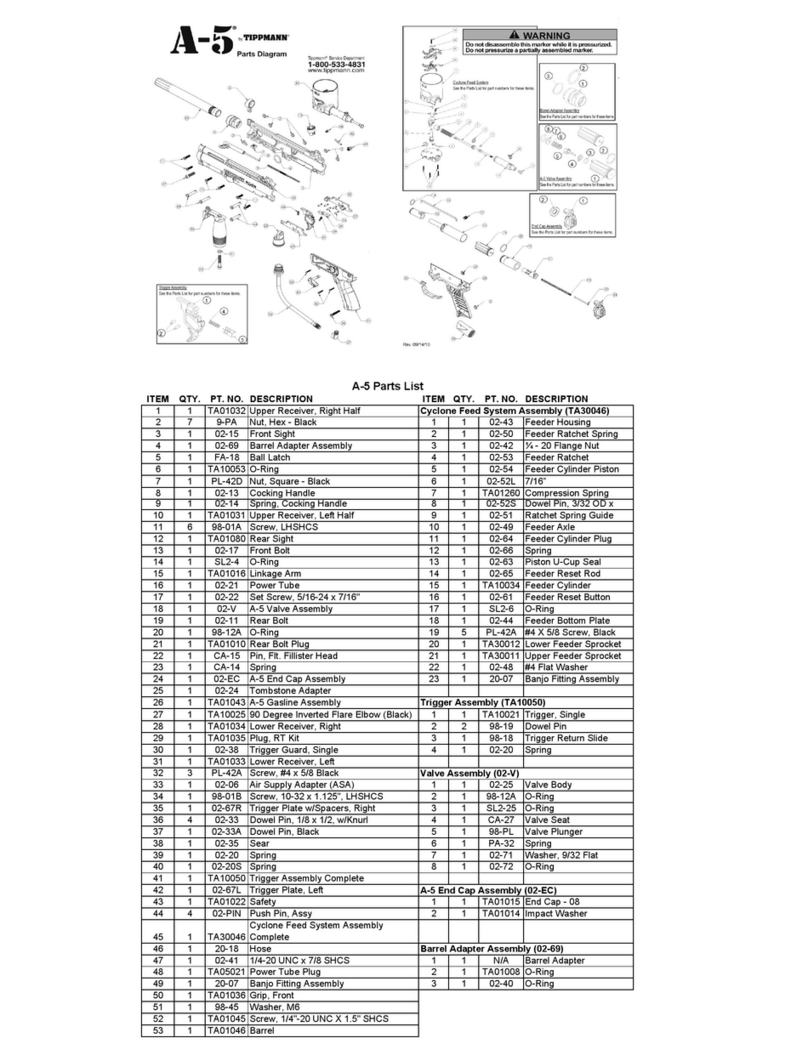
Diagramfortheseinstructions(itemnumbersareinparentheses).Disassemblyinstructionsarelisted
here.Tore-assemble,justdothestepsinthereverseorder.
1. Pullthebolthandleback(seeFigure2)andkeepholdingontoit.Thenpullthetriggerandallowthe
bolthandletomoveslowlyforward.Thisuncocksthemarker.
2. ToremovetheBarrel(item54,seeFigure1),simplyunscrewtheBarrelfromtheReceiver,andto
reinstallit,justturnitclockwisetothreaditintotheReceiver.
3. ToremovetheLeft Grip(22)ortheRight Grip(18),removetwoScrews(14)fromeachgrip.
ReassemblebyusingtheScrewstofastentheGripstotheReceiver.
4. ToremovetheFeed Elbow(9)fromthereceiver,unscrewtheThumbnut(10)fromtherightside
ofthereceiver.TheC-Clip(16)keepstheThumbnutfromcomingloose
fromtheFeedElbow.TheFeedElbowhingesdownwardandthebottom
tabscomeoutoftheslotsintheRightReceiverHalf(1).TheScrew(11),
Flat Washer(17)andNut(12)areusedtoholdtheHopperintheFeed
Elbow.Replaceonlyifnecessary.Doallreassemblyinthereverseorder.
Cord Length
Retainer
WARNING
The brass or nickel plated cylinder valve (Figure 4, #1) is intended to be
permanently attached to the air/CO2 cylinder (2).
An air/CO2 cylinder can y off with enough force to cause serious injury or
death if the cylinder (2) unscrews from the cylinder valve (1).
Figure 4: Properly marked
Valve and Cylinder
12
34
Figure 5: Misaligned Valve and
Cylinder
3
4
Figure 6: The Feed Elbow.
16
10
9
11
17
12
WARNING
EXCEPT WHEN YOUR MARKER IS IN USE, ALWAYS MAKE SURE THAT THE
TRIGGER SAFETY IS IN THE SAFE POSITION,
(WHICH DISABLES THE TRIGGER) AND THAT THE
BARREL SLEEVE IS PROPERLY INSTALLED
(SEE BARREL SLEEVE INSTALLATION ABOVE).
TO LOCK THE TRIGGER (SAFE POSITION):
PUSH THE TRIGGER SAFETY IN FROM THE MARKER SIDE SHOWN ABOVE
TO THE SAFE POSITION.
TO UNLOCK THE TRIGGER (FIRE POSITION): PUSH THE TRIGGER SAFETY
FROM THE OPPOSITE SIDE OF THE MARKER TO ENABLE FIRING.
TIPPMANN®
2955AdamsCenterRoad,FortWayne,IN46803USA
P)260-749-6022•F)260-749-6619
www.tippmann.com
Figure 2: Pull the Bolt Handle back
until it locks into place.
Figure 3: Velocity Adjustment Screw
Location
Figure 1: Barrel and O-ring
Barrel Sleeve
