TM Technologie Glass Deluxe User manual

sp. z o. o., Morawica 355, 32-084 Morawica, gm. Liszki, Poland, tel.: +48 12 444 60 60, fax: +48 12 350 57 34, www.tmtechnologie.pl
– praca awaryjna / non maintained
– praca sieciowo-awaryjna / maintained
– test ręczny / manual test
* – dotyczy tylko alternatywnej wersji / for alternative version
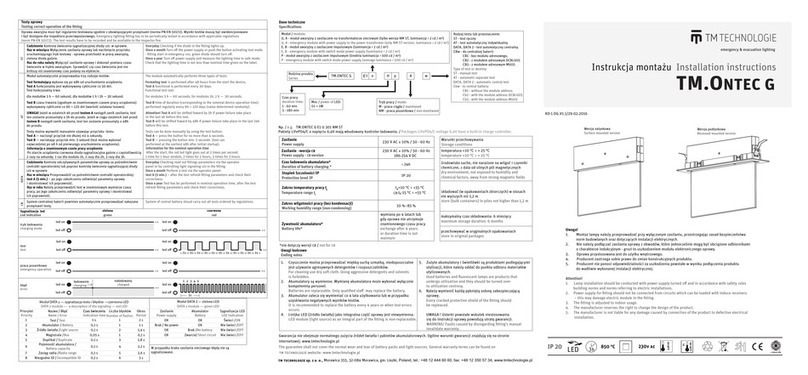
Zasilanie
Power supply 230 V AC / 50 - 60Hz Warunki przechowywania
Storage conditions
Zasilanie wersja
Power supply version
230 V AC / 50 - 60Hz
186 254 V DC
temperatura 10°C ÷ 25°C
temperature 10°C ÷ 25°C
Czas ładowania akumulatora *
Duration of battery charging 24h środowisko suche, nie narażone na wilgoć i czynniki
chemiczne, z dala od silnych pól magnetycznych
dry environment, not exposed to humidity and
chemical factors, away from strong magnetic fields
Stopień Szczelności IP
Protection level IP IP20
Zakres temperatury pracy ta
Temperature range ta
ta 10°C ÷ +50°C
składować (w opakowaniach zbiorczych) w stosach nie
wyższych niż 1,2 m
store (bulk containers) in piles not higher than 1,2 m
Zakres wilgotności pracy (bez kondensacji)
Working humidity range (non-condensing) 10%-85%
Żywotność akumulatora*
Battery life
Wymiana po 4 latach lub
gdy oprawa nie utrzymuje
znamionowego czasu pracy
Exchange after 4 years
or duration time is not
maintain
maksymalny czas składowania 6 miesięcy
maximum storage duration: 6 months
przechowywać w oryginalnych opakowaniach.
store in original packages
Typ
Type
Model
Model
Źródło światła
Light source
Czas
Time
Funkcja
Function
Wersje
Versions
G 3/1 1W / 10×, 12×* 3h , ,
G 3/2 1W / 10×, 12×* 3h , ,
G / 1W / 10× – – G D
Instrukcja montażu Installation instructions
Gwarancja nie obejmuje normalnego zużycia źródeł światła i pakietów akumulatorowych. Ogólne warunki gwarancji znajdują się na stronie
internetowej: www.tmtechnologie.pl
The guarantee shall not cover the normal wear and tear of battery packs and light sources. General warranty terms can be found on
website: www.tmtechnologie.pl
– test automatyczny indywidualny / automatic separate test
– test automatyczny centralny / automatic central test
– do centralnej baterii / to central battery
Dane techniczne
Specifications emergency & evacuation lighting
*nie dotyczy wersji / not for
IP20
-..v1.7 /28.08.2013
Uwaga!
1. Montaż lampy należy przeprowadzać przy wyłączonym zasilaniu, przestrzegając zasad bezpieczeństwa,
norm budowlanych oraz dotyczących instalacji elektrycznych
2. Nie należy podłączać zasilania oprawy z obwodów, które jednocześnie mogą być obciążone odbiornikami
o charakterze indukcyjnym - grozi to uszkodzeniem modułu elektronicznego oprawy.
3. Oprawa przystosowana jest do użytku wnętrzowego.
4. Producent zastrzega sobie prawo do zmian konstrukcyjnych produktu.
5. Producent nie ponosi odpowiedzialności za uszkodzenia powstałe w wyniku podłączenia produktu do
wadliwie wykonanej instalacji elektrycznej.
Attention!
1. Lamp installation should be conducted with power supply turned o and in accordance with safety rules,
building norms and norms referring to electric installations
2. Power supply for fi tting should not be connected from circuits which can be loaded with induce receivers
– this may damage electric module in the fi tting
3. The fi tting is adjusted to indoor usage
4. The manufacturer reserves the right to change the design of the product.
5. The manufacturer is not liable for any damage caused by connection of the product to defective electrical
installation.
Uwagi końcowe
Ending notes
1. Czyszczenie można przeprowadzać miękką suchą szmatką, niedopuszczalne
jest używanie agresywnych detergentów i rozpuszczalników.
For cleaning use dry soft cloth. Using aggressive detergents and solvents
is forbidden.
2. Akumulatory są wymienne. Wymianę akumulatora może wykonać wyłącznie
kompetentny personel.
Batteries are replaceable. Only qualifi ed sta may replace the battery.
3. Akumulator zaleca się wymieniać co 4 lata użytkowania lub w przypadku
uzyskiwania negatywnych wyników testów.
It is recommended to replace the battery every 4 years or when test errors
occurs.
4. Linijka LED (źródło światła) jako integralna część oprawy jest niewymienna.
LED module (light source) as an integral part of the fi tting
is non-replaceable.
5. Podczas montażu oprawy, dla zachowania stopnia szczelności , przewód
zasilający należy wprowadzić przez dławnicę lub gumowy przepust kablowy.
To maintain the degree of protection , power cord should be carry through
the stu ng box or rubber conduit.
6. Zużyte akumulatory i świetlówki są produktami podlegającymi
utylizacji, które należy oddać do punktu odbioru materiałów
utylizowanych.
Used batteries and fl uorescent lamps are products that
undergo utilization and they should be turned over
to utilization centresy.
7. Należy wymienić każdą pękniętą osłonę zabezpieczającą
oprawę.
Every cracked protective shield of the fi tting should
be repleaced.
UWAGA ! Usterki powstałe wskutek niestosowania
się do instrukcji oprawy powodują utratę gwarancji.
WARNING! Faults caused by disregarding fi tting’s manual
invalidate warranty.

Legenda
Key
Pierwsze uruchomienie
W celu zapewnienia prawidłowego sformatowania akumulatora zaleca się, aby pierwsze ładowanie trwało nieprzerwanie przez 48 godzin.
W tym czasie niedopuszczalne jest wyzwalanie jakichkolwiek testów oraz praca modułu w trybie awaryjnym.
Po upływie tego czasu należy doprowadzić do przejścia modułu w tryb pracy awaryjnej (poprzez odłączenie zasilania linii L). Moduł powinien
pracować w tym trybie, aż do całkowitego wyczerpania akumulatora. Przywrócenie napięcia zasilającego i ładowanie akumulatorów przez min.
36 godzin kończy cykl formatowania.
First start-up
Taking into account construction of battery it is recommended to initiate first charging constantly for 48 hours. During first charging
it is forbidden to carry out any test or switch on emergency mode.
After charging time, emergency mode shoud be switched on (disconnecting power supply-line L). Emergency lighting kit shoud work until its
entire discharging. Formatting cycle is completed by switching on the power supply ang again charging for minimum 36 hours.
Po podłączeniu zasilania powinna zaświecić się dioda sygnalizująca ładowanie
akumulatora.
Having connected the power supply diode should lit up that signalizes that the
battery is being charged
(zielona/green)
świeci się podczas ładowania baterii
Lights when the battery is charging
(czerwona/red)
świeci się podczas wykonywania testu
(tylko wersja )
Lights when during test (only version)
Montaż oprawy do ściany (opcjnalnie)
Montage of the fitting do wall (optional)
Wymiana akumulatora
Battery exchange
1. Wyłączyć zasilanie oprawy
Turn o the fitting power supply
2. Wykonać krok 1.2-1.4
Do step 1.2-1.4
3. Odłączyć wtyczkę akumulatora od modułu (krok 1.9)
i wyciągnąć go z oprawy
Disconnect the battery plug from the module (step 1.9)
and remove the battery
4. Założyć nowy akumulator
Put in a new battery
5. Zaznaczyć na akumulatorze datę wymiany
Mark on the battery the date of its exchange
6. Wykonać krok 1.9, 1.12-1.14
Do step 1.9, 1.12-1.14
przycisk testu
(,)
test button
(,)
– wykonać z obu stron / should be repeated on both sides
! – wykonać bardzo ostrożnie /should be done very carefully
Oprawa w wersji nie posiada wyprowadzonych diod ani przycisku testu.
Fitting in version has no diodes nor test button.
przycisk testu
test button
1.2 – (1) numer porządkowy etapu, (.2) numer porządkowy kroku
(1) serial number of the stage, (.2) the serial number step
1.1
1.2
1.3
1.4
1.8
1.7
1.8
1.11
1.12
1.14
1.7
1.6
1.11 1.11
1.11
1.13 2.1
2.2
2.2
ø 10 mm
Montaż oprawy
Montage of the fitting
przekrój maks. 2,5 mm2
the section max. 2,5 mm2
max, długość przewodów ograniczająca spadek
napięcia do 3%
max, limiting the length of the cable
voltage drop to 3%
1.5*
alternatywna wersja
alternative version
1.9
alternatywna wersja
alternative version
wersja version
, ,
1.9
lub
or
*nie dotyczy alternatywnej wersji / not for alternative version
Podłączenie zasilania
Power supply connection
L
1.10
Podłączenie magistrali TMBUS
tylko w wersji
Bus connection TMBUS only in
version
L - przewód fazowy – kolor izolacji brązowy
(stała faza – zasilanie modułu awaryjnego)
N - przewód neutralny – kolor izolacji niebieski
PE- przewód ochronny – kolor izolacji żółto-zielony
L - phase wire – isolation color: brown
(constant phase – power supply of emergency module)
N - neutral wire – isolation color: blue
PE protect wire – isolation color: yellow-green
-
Oprawa w wersji nie posiada akumulatora. Podczas instalacji pominąć krok 1.9
Fitting version does not have a battery. During the installation, skip step 1.9
Other TM Technologie Safety Equipment manuals
Popular Safety Equipment manuals by other brands

A.HABERKORN
A.HABERKORN UNI-4 INSTRUCTIONS FOR USE AND TEST MANUAL
KStrong
KStrong AFX203050 User instruction manual

5.11 Tactical
5.11 Tactical RUSH100 Operator's manual
dynatec
dynatec IN-6000 Instructions for use and maintenance
Kaya Safety
Kaya Safety E-7 user guide
ABS
ABS Lock X-First II LX-FI2 Series installation manual
