manuals.online logo
Brands
  1. Home
  2. •
  3. Brands
  4. •
  5. Dräger
  6. •
  7. Safety Equipment
  8. •
  9. Dräger saver CF Series User manual

Dräger saver CF Series User manual

3359880 (A3-D-P)
saver CF Series
Constant-ow escape equipment Instructions for Use
i
1157
6
3709
4
3697
5
A B C
1
3702
2
3699
3
3694
3700
7
1
2
3
4
5
6
1
3663
8
LRV
402:2003
BA
1 For your safety
1.1 General safety statements
● Before using this product, carefully read the Instructions for
Use.
● Strictly follow the Instructions for Use. The user must fully
understand and strictly observe the instructions. Use the
product only for the purposes specied in the Intended Use
section of this document.
● Do not dispose of the Instructions for Use. Ensure that they are
retained and appropriately used by the product user.
● Only fully trained and competent users are permitted to use
this product.
● Comply with all local and national rules and regulations
associated with this product.
● Only trained and competent personnel are permitted to
inspect, repair and service the product. Dräger recommends a
Dräger service contract for all maintenance activities and that
all repairs are carried out by Dräger.
● Properly trained service personnel must inspect and service
this product as detailed in the maintenance section of this
document.
● Use only genuine Dräger spare parts and accessories, or the
proper functioning of the product may be impaired.
● Do not use a faulty or incomplete product, and do not modify
the product.
● Notify Dräger in the event of any component fault or failure.
1.2 Denitionsofalerticons
Alert icons are used in this document to provide and highlight text
that requires a greater awareness by the user. A denition of the
meaning of each icon is as follows:
WARNING
Indicates a potentially hazardous situation which, if not
avoided, could result in death or serious injury.
CAUTION
Indicates a potentially hazardous situation which, if not
avoided, could result in physical injury or damage to the
product or environment. It may also be used to alert against
unsafe practices.
NOTICE
Indicates additional information on how to use the
product.
2 Description
2.1 Product overview
The Dräger saver CF (constant-ow) is an emergency escape
breathing apparatus that provides respiratory protection to escape
from a contaminated or oxygen-decient environment to a safe
breathing environment.
The main features of the product are:
● The respiratory protection equipment is contained in a carrying
bag that has a soft or hard case. The bag has a neck strap to
carry the product.
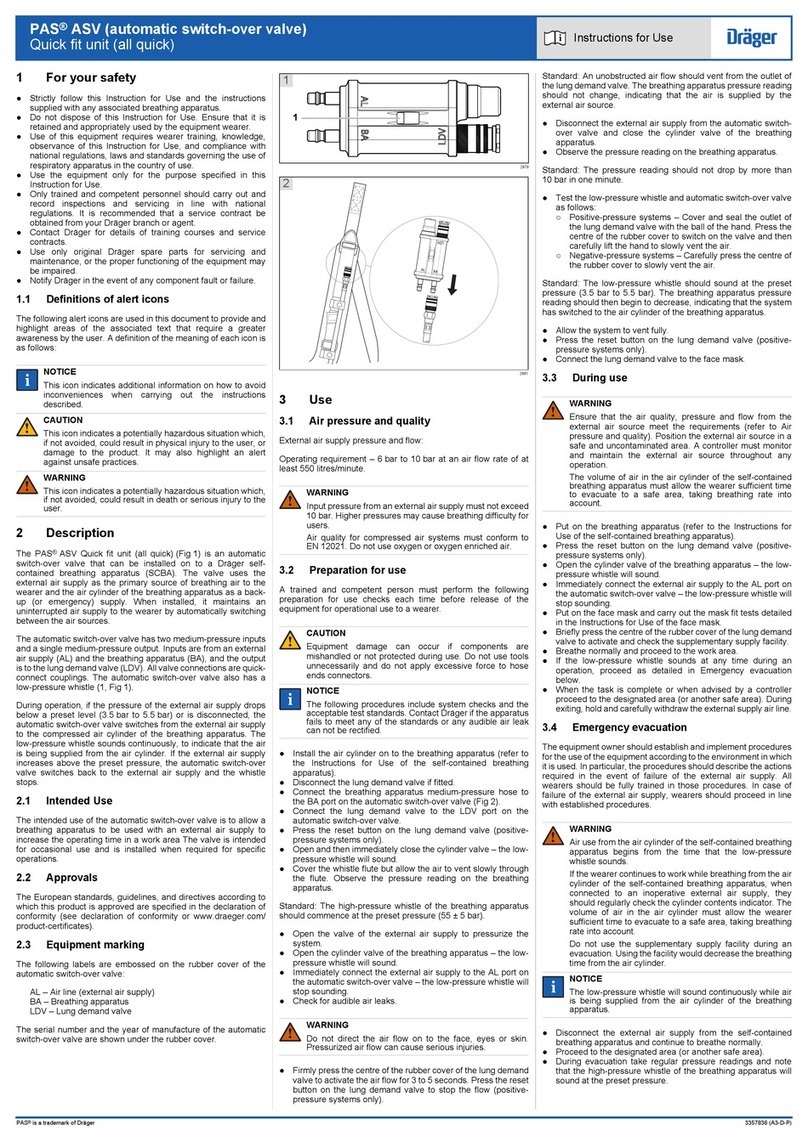
● The air cylinder is tted inside the carrying bag but has a
pressure gauge (Fig 1, Item 6) that is visible outside the bag.
When the cylinder is full it provides a nominal duration of 10 or
15 minutes (see Section 2.1.1).
● The cylinder valve/reducer (Fig 1, Item 4) has an automatic
activation device that is operated by removing a two-pronged
locking clip (Fig 1, Item 3). The locking clip is connected by
a strap to a sprung-gate clip (Fig 1, Item 2) that is in turn
connected to a D-ring (Fig 1, Item 1) on the inside of the lid.
This arrangement automatically removes the locking clip as the
carrying bag is opened. When the valve/reducer is activated,
it reduces the cylinder pressure to a medium pressure, and
a preset nozzle inside the valve/reducer provides a constant
ow of breathing air to the escape hood.
● A whistle (Fig 1, Item 5) on the valve/reducer emits a warning
when the cylinder pressure falls to 10 bar to indicate the end of
the rated duration.
● The escape hood (Fig 2) has a rubber ring that seals around
the neck, and an internal nose cup that ts over the nose and
mouth to supply air to the wearer.
● There is an anti-tamper tag (or tags) (Fig 3) tted on the lid of
the carrying bag to allow an inspector to quickly identify that
the bag has not been opened. The soft-case bag has a single
anti-tamper tag (Fig 3, A), and the hard-case bag has two anti-
tamper tags (Fig 3, B).
2.1.1 Air cylinders
The saver CF10 version has a 2 litre aluminium cylinder –
nominal duration of 10 minutes.
The saver CF15 version has a 3 litre steel cylinder – nominal
duration of 15 minutes.
2.2 Intended use
When this product is used with an approved air cylinder it
provides the wearer with respiratory protection for escaping from
contaminated or oxygen-decient conditions. It is intended for
use in applications where a high level of respiratory protection is
required. The air cylinder used with this product must be a certied
Dräger cylinder; otherwise the operation of the product may be
impaired. Contact Dräger for further information.
!
!
i
i
The product version marked with the
SE
symbol is recommended
where the product is stored in, or regularly exposed to, atmospheres
where airborne hydrocarbons or chemical, fuel or oil vapours may
be present.
Operating temperature range: -15 °C to 60 °C.
2.3 Limitations on use
The saver CF15 version (with 3 litre steel cylinder) exceeds
5 kg. This is considered to be unsuitable (as dened in EN 1146)
to be carried by the wearer for more than 8 hours.
2.4 Approvals
The saver CF Series of emergency escape breathing apparatus
conforms to EN 1146:2005 and ISO 23269-1:2008, and meets the
requirement of EC Council Directives PPE (89/686/EEC), PED
(97/23/EC) and MED (96/98/EC).
PPE - EC Type examiner: DEKRA EXAM GmbH, Dinnendahlstrasse
9, 44809 Bochum, Germany. Notied Body No. 0158.
PPE (89/686/EEC) - 11B examiner: Lloyd's Register Quality
Assurance (LRQA), Hiramford, Middlemarch Ofce Village, Siskin
Drive, Coventry CV3 4FJ, United Kingdom. Notied Body No. 0088.
MED (96/98/EC)/PED (97/23/EC) - Lloyd's Register Verication
(LRV), Hiramford, Middlemarch Ofce Village, Siskin Drive, Coventry
CV3 4FJ, United Kingdom. Notied Body No. 0038.
Use in potentially explosive atmospheres
The saver CF Series is type tested as suitable for use in potentially
explosive atmospheres. The combinations are suitable for use in
hazardous areas up to and including zone 0 and zone 20. The
combinations can be used in atmospheres containing gases of the
gas explosion group IIC.
Do not charge the cylinder in a potentially explosive atmosphere.
3701
9
2.5 Explanation of markings and symbols
The date of manufacture of the product is shown on the carrying
bag in the form MM/YYYY.
is the MED mark of conformity.
3 Use
WARNING
The time required to allow the wearer to escape to a safe
area must be within capacity of the equipment. When
selecting the type and duration of escape equipment it is
essential to consider potential hazards, storage location
and escape routes.
3.1 Preparation for use
WARNING
On receipt of the saver CF from Dräger, the product is
not congured for immediate operational use. The cylinder
automatic activation device is not connected, and the
air cylinder may be discharged. Carry out the following
procedure to prepare the product for use.
Immediately following removal of the equipment from its
packaging:
● If the air cylinder is supplied discharged, see Section 4.2.2 for
cylinder charging instructions.
● If the air cylinder is supplied fully charged, carry out the
following to connect the cylinder automatic activation device:
a. Grip the loop on the lid of the carrying bag and pull up to
open the bag.
b. Seal the lid along the Velcro fastening strip leaving sufcient
opening to insert a hand and, taking care not to detach the
locking clip from the cylinder valve, connect the sprung-
gate clip (Fig 1, Item 2) to the D-ring (Fig 1, Item 1).
c. Fit the anti-tamper tag(s) and close the lid (Fig 3).
3.2 Putting on the carrying bag (ready position)
1. Check that the pointer of the cylinder pressure gauge is inside
the green area, and the anti-tamper device on the lid of the
carrying bag is intact (Fig 3).
2. Place the neck strap over the head (Fig 4, A) and adjust the
strap until the equipment sits in the centre of the chest.
3. If tted with a waist belt (optional accessory), loop the waist
belt around the waist and then fasten the buckle. Pull the free
end of the belt until the equipment is secure and comfortable.
3.3 Putting on the hood and escape procedure
WARNING
The duration begins from the automatic activation of the
cylinder valve and not from time of putting on the hood.
NOTICE
The wearer must be able to reach the required area
before the whistle sounds to indicate the end of the rated
duration.
1. Grip the loop on the lid of the carrying bag and pull rmly upward
to break the anti-tamper tag(s) and open the lid of the bag
(Fig 4, B). This action removes the locking clip, automatically
activating the cylinder valve and the air supply to the hood.
2. Remove the hood from the carrying bag (Fig 4, C).
3. Place both hands inside the neck seal and stretch the hood
over the head (Fig 4, D).
○ Wearers with spectacles – take care when stretching the
neck seal over the spectacles.
○ Wearers with long hair – tuck the hair inside the hood.
4. Position the nose cup over the nose and mouth and breathe
normally.
5. Immediately leave the hazardous area by the shortest and
safest escape route.
WARNING
Do not remove the equipment until in a safe area and clear
of the hazard.
CAUTION
Do not drop or throw down equipment as damage could
occur.
6. Once in a safe breathing environment, remove the hood.
3.4 After use
After any use, the product must be checked and then returned to
the ready-for-use condition. The after use maintenance tasks (see
Section 4.1.2) must be carried out by trained service personnel or
Dräger to prepare the product for use.
!
!
!
i
i
!
!
D
bar
'
2
3359880 (A3-D-P)
saver CF Series
Constant-ow escape equipment Instructions for Use
i
3359880
© Dräger Safety UK Limited
Edition 01 – May 2011
Subject to alteration
Dräger Safety AG & Co. KGaA
Revalstraße Tel +49 451 882-0
D-23560 Fax +49 451 882-2080
Lübeck
Germany Internet http://www.draeger.com
Draeger Safety UK Limited
Ullswater Close Tel +44 1670 352891
Riverside Business Park Fax +44 1670 356266
Blyth
Northumberland NE24 4RG Internet http://www.draeger.com
4 Preparing and maintaining the saver CF
The tasks in this section must be carried out to prepare and maintain the saver CF in a ready-for-use condition.
4.1 Maintenance periods
4.1.1 Daily checks
It is essential that escape apparatus is ready for use at all times, and Dräger therefore recommend a daily check. If the customer’s
on-site risk assessment concludes that less regular checks are acceptable, this can be extended to a maximum of one month. It is the
customer’s responsibility to ensure that the equipment is ready for use at all times.
● Check that the pointer of the cylinder pressure gauge is inside the green area.
● Check the anti-tamper tag(s) on the lid of the bag (Fig 3).
If the pressure gauge is in the red area or if an anti-tamper tag is broken, inform trained service personnel or Dräger immediately.
4.1.2 Maintenance table
Dräger recommend that regular inspection, testing and servicing of the breathing apparatus is carried out in accordance with the table
below. The table applies also to out-of-use (stored) equipment.
Additional inspection and testing may be required in the country of use to ensure compliance with national regulations governing the
use, maintenance, examination and testing of this product.
4.3 Cleaning and disinfecting
CAUTION
Products other than the recommended cleaning and
disinfecting agent are not tested and may damage the
equipment. Contact Dräger before using any other cleaning
or disinfecting agent.
When using cleaning and disinfecting agents, refer to
manufacturers’ instructions, paying particular attention to
concentration and reaction times.
Do not exceed 30 °C for washing and rinsing solutions.
Do not exceed 60 °C or 30 minutes for drying, and remove
components from the dryer immediately when dry.
Do not immerse the carrying system or pneumatic
components in cleaning solutions or water.
Recommended cleaning and disinfecting materials:
● Cleaning and disinfecting agent – Sekusept.
● Disinfecting agent – Incidur.
● Use only or clean lint-free cloths.
1. Clean and disinfect the carrying system and pneumatic
components manually using a cloth moistened with cleaning
and disinfecting solution.
2. Remove all cleaning and disinfecting solution using a cloth
moistened with water.
3. Dry all components using a dry cloth.
4. Contact service personnel or Dräger if more thorough cleaning
or disassembly of the pneumatic system is required.
5 Troubleshooting
There is no user troubleshooting on the saver CF. Contact
trained service personnel or Dräger to report any issues with the
product.
6 Storage
Store the saver CF in a cool dry environment, free from dust and
dirt, in a location where it is not subject to wear or damage due to
abrasion. Note also the following:
● Extend the neck strap and, if tted, the waist belt. On the hard-
case carrying bag, the neck strap can be fed into the bag at the
front and rear slots to tidy the strap.
● Fix the apparatus securely to any raised mounting point to
prevent it from falling.
● Contact Dräger for suitable storage cabinets and wall mounting
kits.
7 Disposal
When required, dispose of the saver CF in accordance with
national or local regulations for waste disposal.
8 Order list
!
Component/System Task After use Every
year
Every 10
years
Complete equipment Visual inspection (see Section 4.2.1) 
Clean and disinfect (see Section 4.3) 
Functional tests (see Note 1) 
Cylinder valve/reducer Basic overhaul. Contact Dräger for the Repair Exchange Service (REX) 
Cylinder Charge to correct pressure (see Section 4.2.2) 
Cylinder pressure test and recertication; check the test date on the cylinder Carry out in line with national
regulations
Notes
 Dräger recommendations
1 These maintenance tasks may only be carried out by Dräger or trained service personnel. Details of the tasks are contained in the
technical manual which is issued to service personnel that have attended a relevant Dräger maintenance course.
4.2 Maintenance tasks
4.2.1 Visual inspection
Carry out a visual inspection, checking the full breathing apparatus
including all component parts and accessories. Check that the
equipment is clean and undamaged, paying particular attention to
pneumatic components, hoses and connectors. Typical signs of
damage that may affect the operation of the breathing apparatus
include impact, abrasion, cutting, corrosion and discoloration. Report
dirty or damaged equipment to trained service personnel or Dräger,
and do not use until faults are rectied and the product is cleaned.
4.2.2 Air cylinder charging
NOTICE
The charging procedure in this section describes recharging
a cylinder that has been fully discharged during use of the
saver CF. If during a check the cylinder pressure gauge is
found to be in the red area, do not use this procedure and
inform trained service personnel or Dräger immediately.
WARNING
Air quality for compressed-air cylinders shall meet the
requirements for breathing air according to EN12021.
● The charging connector is a G5/8 connector as per EN 144-2.
● Refer also to the instructions supplied with the cylinder and the
charging unit for recharging the cylinder.
● Only charge compressed-air cylinders which:
○ Conform to national standards.
○ Feature the original manufacturer’s test date and test mark.
○ Have not exceeded the test date indicated on the cylinder
by the last testing station.
○ Are not damaged.
● Dräger recommend a charge rate of 27 bar/minute (rapid charging
will increase the temperature resulting in an incomplete charge).
● To prevent overcharging of the cylinder, Dräger recommend
using a pressure-limiting device on the charging compressor.
1. If the carrying bag is closed, open the lid and remove the hood
from the bag.
2. Remove the air cylinder as follows:
○ Soft-case carrying bag: release the Velcro strap and
carefully remove the cylinder.
○ Hard-case carrying bag: remove the screws from the
carrying bag body (Fig 5) (5 mm hexagon key and a 10 mm
socket required), fully open the carrying bag body and then
carefully remove the cylinder. Remove the lid from the slot
on the bag.
i
i
!
3. Using the probe (Fig 6, Item 1) (Dräger part no. 3310488),
press the plunger down and insert the locking clip (Fig 6,
Item 2).
4. Remove the protection cap from the charging port and connect
the charging adaptor (Fig 7).
5. Recharge to the rated working pressure of the cylinder
(200 bar).
NOTICE
Compression of cylinder air can cause a small temperature
increase during relling, resulting in an incomplete charge.
If necessary, top-up the cylinder when it cools.
As charging commences, the whistle will sound briey until
the cylinder pressure reaches approximately 10 bar.
6. When the cylinder is fully charged, vent pressure from the
charging hose and then remove the charging adaptor from the
valve.
7. Ret the air cylinder as follows:
○ Soft-case carrying bag:
i. Fully insert the cylinder into the carrying bag.
ii. Fit the pressure gauge shroud into the cut-out section
in the side of the bag.
iii. Connect the Velcro strap around the cylinder.
○ Hard-case carrying bag:
i. Place the cylinder on the fully open case (Fig 8) and t
the neck strap as shown.
ii. Close the carrying bag body, ensuring that the pressure
gauge shroud remains in its holder.
iii. Fit the securing screws (5 mm hexagon key and a
10 mm socket required). Dräger recommend a torque
of 2 Nm (1.5 lbf ft). The nylon in the locknut must exhibit
an interference with screw threads – if interference is
not felt, replace with a new M6 self-locking nut.
iv. Ret the lid into the slot on the bag.
NOTICE
Route the rubber hose in such a way that the bend radius
is not too acute and the hose is not stretched, compressed
or twisted.
8. Carefully fold the escape hood to ensure that the visor is not
creased, and t the hood into the carrying bag (Fig 9).
9. Seal the lid along the Velcro fastening strip leaving sufcient
opening to insert a hand and, taking care not to detach the
locking clip from the cylinder valve, connect the sprung-gate
clip (Fig 1, Item 2) to the D-ring (Fig 1, Item 1).
10. Fit the anti-tamper tag(s) and close the lid (Fig 3).
i
i
i
i
Description Quantity Order code
Sekusept cleaner 4 x 2 litres 7904071
Incidur disinfectant 6 litres 7904072
Incidur disinfectant 30 litres 7904073
Anti-tamper tags 5 3350388
Waist belt 1 3350396
Self-locking nut (M6 with nylon insert) 50 1333062

Other Dräger Safety Equipment manuals

Dräger FPS 7000 RP User manual

Dräger

Dräger FPS 7000 RP User manual

Dräger Bodyguard 1500 User manual

Dräger

Dräger Bodyguard 1500 User manual

Dräger VarioGard User manual

Dräger

Dräger VarioGard User manual

Dräger saver CF Series User manual

Dräger

Dräger saver CF Series User manual

Dräger SPC 2400 Flexothane User manual

Dräger

Dräger SPC 2400 Flexothane User manual

Dräger CDR 4500 User manual

Dräger

Dräger CDR 4500 User manual

Dräger PSS 5000 Series User manual

Dräger

Dräger PSS 5000 Series User manual

Dräger X-plore 8000 User manual

Dräger

Dräger X-plore 8000 User manual

Dräger HPS SafeGuard User manual

Dräger

Dräger HPS SafeGuard User manual

Dräger Interlock 5000 User manual

Dräger

Dräger Interlock 5000 User manual

Dräger CPS 5900 User manual

Dräger

Dräger CPS 5900 User manual

Dräger Panorama Nova PE Series User manual

Dräger

Dräger Panorama Nova PE Series User manual

Dräger Oxy K 30 S User manual

Dräger

Dräger Oxy K 30 S User manual

Dräger PSS 7000 Series User manual

Dräger

Dräger PSS 7000 Series User manual

Dräger SPC 4900 User manual

Dräger

Dräger SPC 4900 User manual

Dräger PSS 3000 Series User manual

Dräger

Dräger PSS 3000 Series User manual

Dräger UCF 6000 User manual

Dräger

Dräger UCF 6000 User manual

Dräger PAS ASV User manual

Dräger

Dräger PAS ASV User manual

Dräger BG ProAir User manual

Dräger

Dräger BG ProAir User manual

Dräger Oxy 3000 MK II User manual

Dräger

Dräger Oxy 3000 MK II User manual

Dräger SPC 4800 User manual

Dräger

Dräger SPC 4800 User manual

Dräger X-plore 8000 User manual

Dräger

Dräger X-plore 8000 User manual

Dräger SPC 4700 User manual

Dräger

Dräger SPC 4700 User manual

Dräger Panorama Nova RA User manual

Dräger

Dräger Panorama Nova RA User manual

Popular Safety Equipment manuals by other brands

Lanex DX020 instruction manual

Lanex

Lanex DX020 instruction manual

Petzl AXIS 11 MM 100 M manual

Petzl

Petzl AXIS 11 MM 100 M manual

Dormakaba PAXOS advance IP operating manual

Dormakaba

Dormakaba PAXOS advance IP operating manual

Kortel Design KONCEPT user manual

Kortel Design

Kortel Design KONCEPT user manual

KRATOS SAFETY KS 4000 instructions

KRATOS SAFETY

KRATOS SAFETY KS 4000 instructions

Guardian 42116 instruction manual

Guardian

Guardian 42116 instruction manual

ProMobility Magnet Vest Harness XS user guide

ProMobility

ProMobility Magnet Vest Harness XS user guide

Ferno Traverse rescue Gazelle Series user manual

Ferno

Ferno Traverse rescue Gazelle Series user manual

Kerbl 37644 Manual instructions

Kerbl

Kerbl 37644 Manual instructions

Kewaunee Interceptor INT-1100A2 Maintenance and Technical Manual

Kewaunee

Kewaunee Interceptor INT-1100A2 Maintenance and Technical Manual

Innotech UNI-EAP-01 manual

Innotech

Innotech UNI-EAP-01 manual

Siemens Cerberus PACE Compact Operation manual

Siemens

Siemens Cerberus PACE Compact Operation manual

Eaton AFDD+ Instruction leaflet

Eaton

Eaton AFDD+ Instruction leaflet

Safety Xpress BOLSM165 PRODUCT INFORMATION & INSTALLATION GUIDE

Safety Xpress

Safety Xpress BOLSM165 PRODUCT INFORMATION & INSTALLATION GUIDE

Simy My-MOB user guide

Simy

Simy My-MOB user guide

Protekt P-16 instruction manual

Protekt

Protekt P-16 instruction manual

Petzl Chester C64 Instructions for use

Petzl

Petzl Chester C64 Instructions for use

SECUMAR 4001S quick start guide

SECUMAR

SECUMAR 4001S quick start guide

manuals.online logo
manuals.online logoBrands
  • About & Mission
  • Contact us
  • Privacy Policy
  • Terms and Conditions

Copyright 2025 Manuals.Online. All Rights Reserved.