Toa CI-600 User manual

COMPUTER INTERFACE
TOA Corporation
Operating Instructions
CI-600

WARNING : (For U. S. A. only)
This equipment generates, uses, and can radiate radio frequency energy and
if not installed and used in accordance with the instructions manual, may
cause interference to radio communications. It has been tested and found to
comply with the limits for a Class A computing device pursuant to Subject J of
Part 15 of FCC Rules, which are designed to provide reasonable protection such
interference when operated in a commercial environment.
Operation
of
this
equipment
in a
residential
area
is
likely
to
cause
interference in which case the user at his own expense w i l l be required to
take whatever measures may be required to correct the interference.
CONTENTS
General Description
........................................................................... 4
Features
......................................................................................
4
CI-600 New Functions
1.
Personal Data Display
...............................................................
5~ 8
2.
Speech Message
......................................................................
9~13
3.
Time Message Service
...............................................................
14~15
4.
Recorded Message Paging
................................................................
16
5.
System
Maintenance
.....................................................................
17
6.
Remote
Function Control
................................................................
17
Installation
.................................................................................
18
PART 1. INITIAL SETTING
1. Connection
1-1.
Initial
Setting
......................................................................
19
1-2.
Application Sett
ing
..................................................................
20
2. DIP
Switch
Setting
.........................................................................
21
3. DEC
Terminal Setting
......................................................................
22
4. Input
4-1.
Control
Keys
.....................................................................
23~24
4-2.
Basic
Input
Method
...................................................................
24
4-3.
Guide Message List
...................................................................
25
- 2-

5. Initial Setting
5-1. Initial
Setting
Flowchart
.............................................................
26
5-2. Initial
Sett
ing
Operation
............................................................
27
(1)
Clock
Setting
...................................................................
27
(2)
New
Programing
.............................................................
28~38
(3)
Tie-line
Data
Transfer
..........................................................
39
(4)
Fixed
Message
Setting
............................................................
40
4-a.
Fixed
Message
Registration
(Status)
.......................................
40
4-b.
Fixed Message
Registration
(Number)
...................................
40~41
(5)
Password Sett
ing
................................................................
41
(6)
Personal Data
Registration
..................................................
42~43
PART 2. APPLICATION SETTING
1.
Application
Setting
Flowchart
.............................................................
44
2.
Initial
Setting
Menu
..................................................................
45~46
3.
System
Programing
Menu
...................................................................
46
3-1.
Programing
Alteration
..............................................................
46~50
3-2.
Programing
Station Status Display
....................................................
50
3-3.
External
Line
Status Display
.........................................................
51
4.
System Maintenance
Menu
...................................................................
52
4-1. Link Control Menu
4-1-a.
Link
Disconnect
ion
............................................................
52
4-1-b.
Link
Reconnect
ion
.............................................................
52
4-2. Line Control Menu
4-2-a.
Line Disconnect
ion
............................................................
53
4-2-b.
Line Reconnect
ion
.............................................................
53
4-3. Speech Path Control Menu
4-3-a.
Stat
ion
Speech
Path Connect
ion
................................................
54
4-3-b.
Stat
ion
Speech
Path Disconnect
ion
.............................................
54
4-4.
Dial
Data
Output
Menu
................................................................
55
4-5.
Exchange
Sequence Display
............................................................
55
4-6.
Exchange Sequence Display
and
Printout
...............................................
56
5.
Personal
Data
Display
Menu
................................................................
56
6.
Remote
Function Control
Menu
...............................................................
57
- 3 -

This booklet explains the CI-600 Computer Interface in two parts: Part 1 Initial
Setting and Part 2 Application Setting. Please read this operating instructions
carefully for correct operation of your computer interface.
General Description
In conjunction with a computer and the EX-610, EX-620 or EX-630 intercom exchange, the CI-600 provides
such functions as system programming and maintenance, personal schedule information, and automatic
message distribution at preset time.
Features
1. Connectable to VT-100 mode DEC terminals.
2. Recorded message distribution during absence.
3. Display of personal IN
/
OUT status, location, return time, etc.
4. Password access to important functions.
5. Connectable to one master terminal and two sub-terminals.
6. Easy programming and maintenance from master terminal.
- 4 -
•
•

CI-600 NEW FUNCTIONS
This chapter explains the performance and operation of the new functions available when the EX-610, EX-
620 or EX-630 exchange is connected to the SI-62 speech interface, SM-600 speech message device, and CI-
600 computer interface.
1. PERSONAL DATA DISPLAY
Register the "status" of Fixed Message as we ll as the "Names", "Personal Number " and "Station Number"
of
Personal
Data
during
initial
setting
of the
CI-600.
(Refer
to the
section
"CI-600
Initial
Setting"
for
registration.)
By programming the personal number, status, time
/
date, etc. locally from any master station such personal
information
as the
location,
conference,
and
return
time
/
date
from
the
conference
or
business
trip
can be
automatically displayed on the data terminal or computer screen for easy reference.
To operate the new functions, use the personal number fo r those registered under the personal number
during
the
Cl-600's
initial
setting,
while
the
station
number
has to be
used
for
those
registered
using
the station number.
- 5 -

< Operation Using the Personal Number>
[Registration]
Press
(0-9) (0101-1231) (0001-2400) (1000-1999)
(Confirmation tone is heard.)
at the destination station to register the status, location and time/date.
(Confirmation tone is heard.)
Press
Personal No.
(1000-1999)
at the destination station to register the location.
[Cancellation]
To cancel the registered data,
Press
(Confirmation tone)
Personal No.
(1000-1999)
to cancel the status, location and time/date data registered.
< Operation Using the Station Number>
[Registration]
Press
(Confirmation tone is heard.)
Status Time/Date
(0-9) (1010-1231)
(0001-2400)
at the originally assigned station to register the status and time/date data.
[Cancellation]
To cancel the registered status and time/date,
press (Confirmation tone is heard) at the assigned station.
Status Time/Date Personal No.
- 6 -

Station No. Personal No. Name Status Location Time
/
Date
1000 Smith, Dick Conference 235 15:00
210 Cash, Tom
(Confirmation tone is heard.)
Station No. Personal No. Name Status Location Time
/
Date
1000 Smith, Dick 210
210 Cash, Tom - -
(Confirmation tone is heard.)
Station No. Personal No. Name Status Location Time
/
Dat
e
1000 Smith, Dick
210 Cash, Tom -
(Confirmation tone is heard.)
Station No. Personal No. Name Status Location Time
/
Date
1000 Smith, Dick
210 Cash, Tom Conference - 15:00
(Confirmation tone is heard.)
Station No. Personal No. Name Status Location Time
/
Date
1000 Smith, Dick
210 Cash. Tom
(Confirmation tone is heard.)
Station No. Personal No. Name Status Location Time
/
Date
1000 Smith, Dick
210 Cash, Tom *
(8-second message) (Confirmation tone is heard.)
- 7 -

The personal information display contains " Station Number ", " Personal Number ", " Name ", " Status ",
" Location ", and " Time
/
Date " columns. The indications in the last three columns change whenever the
new data are entered. (Refer to page 6.)
Operation (1) :
The status column displays the status in word so programmed as to correspond to the selected number
during
initial
setting.
When
the
status
is set for " IN ", the
station
number
at
which
the
entry
has
been
made appears in the Location column. The column, however, shows nothing if the status is " OUT ".
Dialing
for time
/
date displays nothing in the Time
/
Date column.
Operation (2) :
This key sequence turns the Location display into the station number at which the entry has been made,
while displaying nothing in the Status and Time
/
Date columns.
Operation (4) :
Nothing is displayed in the Location column. Both the status and time
/
date indications change as the
new data are registered.
(1) When in Operation (1), such other functions using Personal Number as IN
/
OUT Annunciation and
Location Indication are also affected by the status setting. If, for example, the status is IN,
the indication board lamps come on, and they go out if OUT is entered.
When in Operation (2), such lamps come on, wh i l e they go out when in Operation (3).
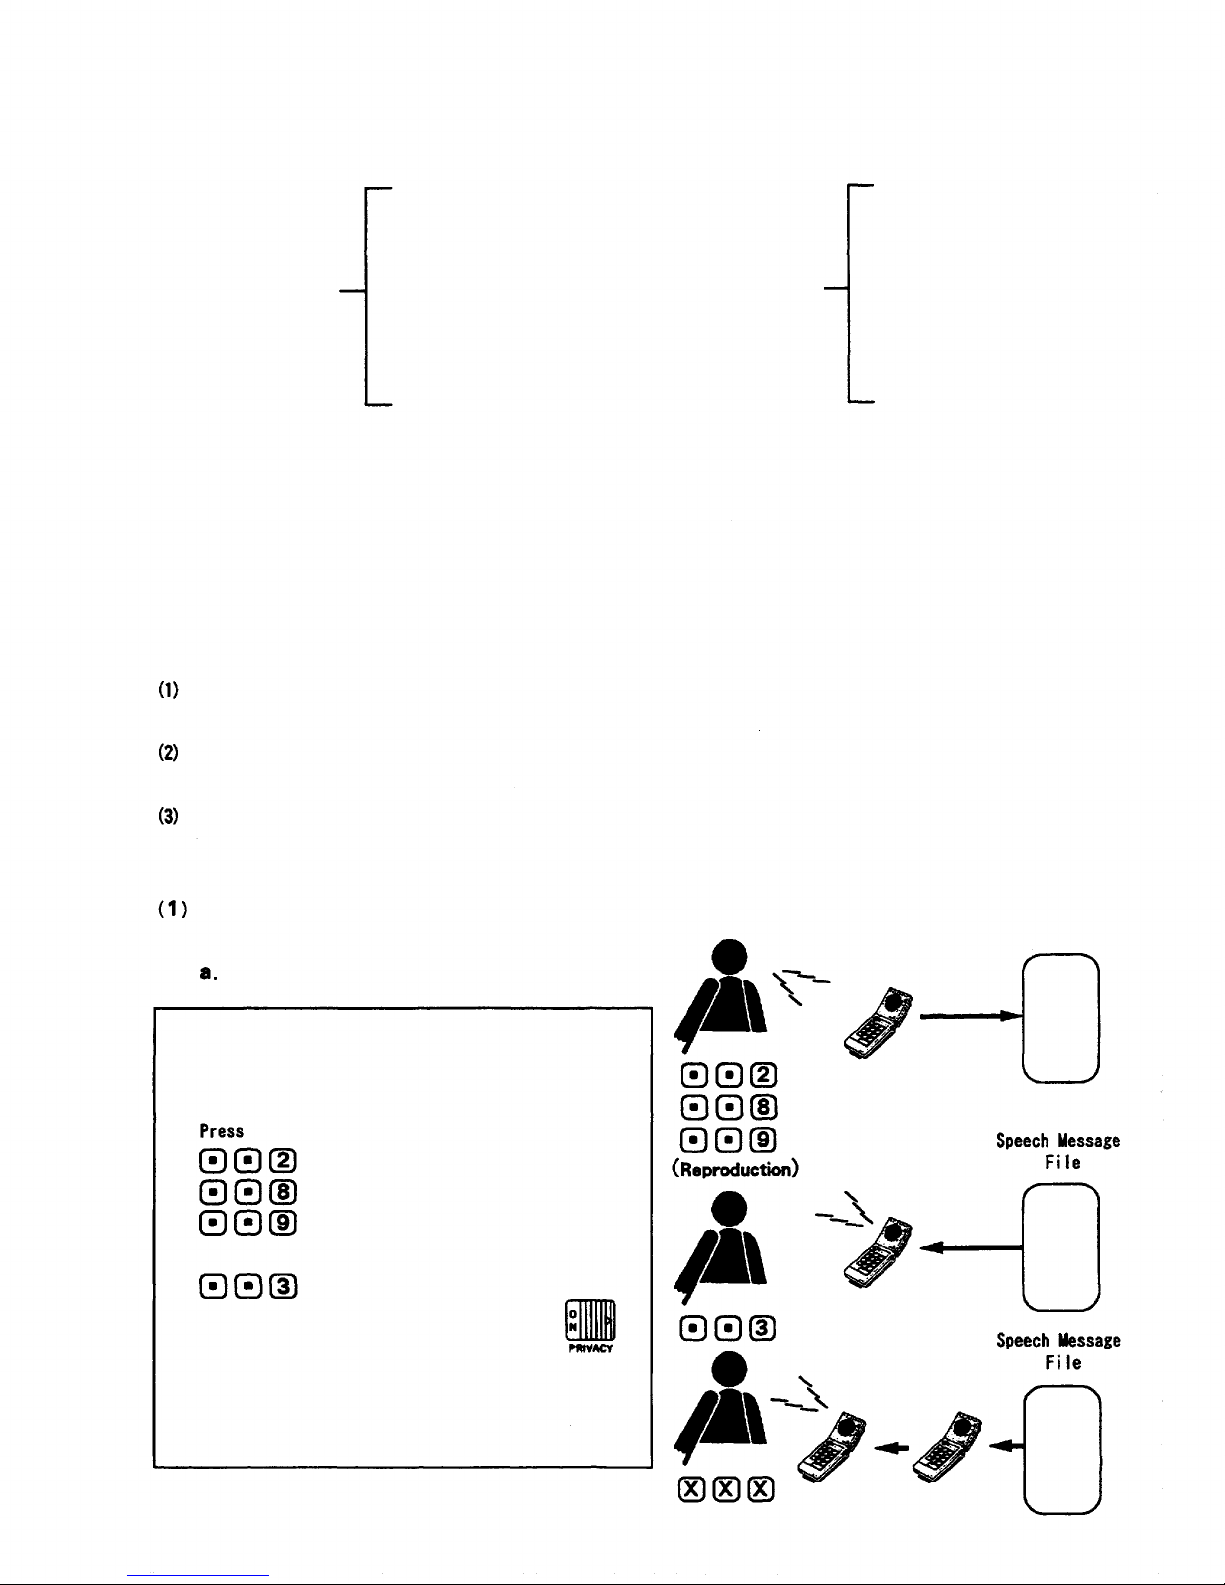
(2) • Key operations in Operation (1) and (4) automatically registers the fixed response message, in
addition to the personal information data. When the personal number registered in Operation (1)
or the station registered in Operation (4) is called, therefore, the call is not connected to the
called party, transmitting only the fixed response message to the calling party. (Refer to the
section " Speech Message " for details.)
• The fixed response message is deleted when dialed as in Operation (2), (3) or (5).
• If the response message is recorded from the station programmed into the CI-600, the status
column display turns into asterisk
erasing the time
/
date column.
- 8 -

2. SPEECH MESSAGE
Speech
Message
comprises
individual
and
fixed
message
files.
A
maximum
of 128
8-second
individual
messages or 96 8-second individual messages and 10 f ix e d messages can be stored.
128 8-second
individual
messages
96 8-second individual
messages and 10 fixed
messages
SM-600 (8-second
message x 32 )
SM-600 (8-second
message x 32 )
SM-600 (8-second
message x 32 )
SM-600 (8-second
message x 32 )
CI-600 (10 fixed
messages)
SM-600 (8-second
message x 32 )
SM-600 (8-second
message x 32 )
SM-600 (8-second
message x 32 )
The
individual
message
file
is
recorded
by
users
for use as a
response
message
transmitted
to the
calling parties during absence. It can also be used to leave a " call me " message when the called party
is busy or absent.
The
Fixed
Message
file
is
pre-recorded
at
time
of
system
installation
and its
content
corresponds
to the
type of status (message number) to be selected. When the status is registered, its corresponding message
is automatically transmitted from the called station to the calling party.
The following functions can be achieved by using these message f acilities:
User's response message as we l l as a " call me " message from the calling party can be recorded into
the user's station. (Absence Mailing Function).
A " call me " message can be recorded into the called station when the called party is busy or
absent. (Message Ma i l ing Function).
The user can retrieve the information stored in the voice mailbox from the remote station. (Remote
Message Pickup Function).
Absence Mailing Function
(Recording)
Response Message Setting
Speech Message
File
SM-600
< Individual Response Message Recording
for Station Number Calls>
SM-600
(for 8-second message recording) or
(for 16-second message recording) or
(for 32-second message recording).
To check for the recorded message, press
Setting the Privacy switch to ON
after confirming the content
automatically transmits the response message to
the party who has made a call using the station
number.
SM-600
- 9 -

The individual response message recording is terminated automatically after a specified period of time.
with a confirmation tone. To terminate the recording immediately, press
To re-record, after erasing a previous recording by pressing
(confirmation tone is heard),
record the message again from the beginning.
< Fixed Response Message Registration
for Station Number Calls>
Press
(Confirmation
tone)
Status Time
/
Date
(0-9) (0101-1231)
(0001-2400)
No. 225
(Confirmation
tone)
and the fixed message is registered as a response
message. To check for the registered message, press
Setting the Privacy switch to ON
after confirming the content
automatically transmits the response message to the
party
who has
made
a
call
using
the
station
number.
Out to lunch. CI-600 Fixed
Message File
CI-600
< Fixed Response Message Registration
for Personal Number Calls>
Press
(Confirma-
tion tone)
Status Time
/
Date Personal No.
(0-9) (0101-1231) (0001-2400)
This registers the fixed message as a response
message, au tomatically transmitting it to the
party
who has
made
a
Personal
Number
call.
To check for the registered message,
press
Note:
(Personal Number).
Time
/
date recording can be confirmed
(reproduced) by DIP switch setting.
CI-600 Fixed
Message Fi l e
Business trip.
CI-600
Time
/
date
file
(10 x 0.7
second
numerical
information)
Fixed
message
file
(10 x
1.5-second
message)
No.
0
1
2
3
Content
Zero
One
Two
Three
No.
0
1
2
3
Content
Business trip
Day off
Out to lunch
In conference
- 10 -

b. "
Call
me "
Message
Recording
(when
response
message
is
transmitted
from
the
station
called
using the station number).
(Recording)
Speech Message
File
SM-600
To leave a " call me " message at the called
station upon hearing a response message, after
either the response message is finished or
pressing
in the middle of reproduction,
press
(for 8-second message) or
(for 16-second message) or
(for 32-second message).
To check for the recorded message, press
To re-record, press
recording is erased).
(previous
SM-600
When
a
call
is
made
from
the
station
in
conference
or
on-hold
mode,
and the
response
message
is
transmitted from the called station, the original conversation is automatically resumed upon completion
of the
response
message.
When
a
busy
tone
is
heard
during
recording,
this
indicates
that
there
is no
message
file
left
over.
c. Cancellation of Absence Mailing Mode
Shifting the Privacy switch back to OFF
reproduces the " call me " messages received
from other stations. To hear messages again,
press
SM-600
Shifting the Privacy switch back to OFF erases the
response message as well as a status asterisk
- 11 -
Speech Message
File
Speech Message
File

(2)
Message
Mailing
Function
(Available
only
for
station
number
calls)
a. " Call me " Message Recording
To leave a " call me " message at the c alle d
station, press
(for recording an 8-second
message) or
(for recording a 16-second
message) or
(for recording a 32-second
message).
To check for the recorded message,
press
To re-record,
press
(confirmation tone) to erase a
previous recording.
(Recording)
(Reproduction)
SM-600
SM-600
No " call me " message can be recorded from the station
in conference or on-hold mode.
b. " Call me " Message Reproduction
To reproduce the " call me " messages received
from other stations, press
The messages recorded during conversation are
automatically reproduced as soon as the
conversation is terminated.
To terminate the message in the middle of
reproduction, press
SM-600
- 12 -
Speech Message
File
Speech Message
File
Speech Message
File

(3) Remote Message Pickup
(Reproduction)
SM-600
By pressing
the user can retrieve the information stored in
his station from any other master station remotely,
with no need to come back to his station.
To terminate the message in the middle of
reproduction, press
(4) Other Functions
a. By establishing station 200 programming a 2-second " Hurry-up " tone can be transmitted to users to
urge them to terminate their recording of the response or " call me " message.
b. The station having the " call me" messages transmits a brief signal at one minute intervals to
indicate the reception of the messages.
c. It is possible to prevent the recorded response message from being erased when the Privacy switch is
switched to OFF. (Station 200 programming must be established.)
- 13 -
Speech Message
File

3. TIME MESSAGE SERVICE
This function automatically transmits a pre-recorded message to the specified stations or paging zones at
the preset time.
< Operation >
(1) If transmitting the message to the station at which the entry is made.
(Confirmation tone)
(2) If transmitting the message to other stations.
(Confirmation tone)
(3) If transmitting the message to paging zones.
(Confirma-
tion tone)
To check for the recorded message, press
after hearing the confirmation tone.
To re-record, erase a previous recording by pressing
and then press
(Confirmation
tone)
Conference in
conference room.
Speech Message
File
Conference in
conference room.
Speech Message
File
SM-600
SM-600
It's 3pm.
- 14 -

Note:
1. A message is audible following a paging pre-announcement tone from the programmed station(s) or
stations
within
the
programmed
paging
zone(s)
at
preset
time.
When
only
one
station
has
been
registered and its Privacy switch is set to ON, a continuous call tone is sounded at the station and
the message is audible if a handset is lifted or the Privacy switch is switched to OFF.
2.
When
one of the
programmed
stations
or
paging
zones
is
busy
at the
preset
time,
the
message
is
distributed 30 seconds after the line is freed.
3. A
maximum
of
four
stations
or
paging
zones
can be
registered
for
this
function
at a
time.
Be sure to first press
when re-recording from the beginning. Pressing
or replacing
the handset for re-recording registers the previous incomplete recording.
<Cancellation or Alteration>
When
cancelling
or
altering
the
registration,
press
(Confirmation tone)
and all registrations are cancelled. To alter the registration, enter the new data from the
beginning after the above key operation is completed.
To cancel only the specified registration, press
have been used for the registration.
after pressing all the numbers that
(Confirmation tone)
- 15 -

4. RECORDED MESSAGE PAGING
This
function
employs
the
SM-600
unit
to
prevent
feedback
caused
when
making
a
paging
call
from
the
station located close to the external PA speaker or when having to increase the sound volume due to
the high ambient noise level.
< Operation >
To
make
a
paging
call,
press
(Confirma-
tion tone)
(Paging
begins.)
Paging zone No. 8-second
(00-31, 80-99) message
To check for the recorded message, press
before pressing the
bar.
To re-record, either press
and then press
or replace a handset
(Confirma-
tion tone)
(Paging
begins.)
To respond to the paging call, press
Paging zone No.
(00-31, 80-99)
Mr. Brown, please
dial Area 3.
Mr. Brown, please
dial Area 3.
The paging party may simply wait for a response or wait by dialing
or replacing a handset. When
simply waiting, the same message can be paged repeatedly if the
bar is pressed.
The Paging Transfer is impossible to operate.
1.
2.
- 16 -

5. SYSTEM MAINTENANCE
By controlling or monitoring the exchange from a computer or data terminal the system maintenance and
inspection can be performed easily. (Refer to the Application section of the CI-600 Operating Instructions
for operation.)
(1) Link Control
Each
individual
link
(speech
path)
can be
made
unusable
to
permit
repair
work
without stopping
the
system
operation
when
the DL
unit
fails.
(2) Line Control
Each individual line can be made unusable to permit repair work without stopping the system operation
when dial related malfunctions are caused by failures of the station, line or LM unit.
(3) Speech Path Control
This function establishes the speech path that permits monitoring of operations of each link or station
at time of system installation or inspection, with no need to actually perform various tests from one
station to another.
(4) Dial Data Output Monitoring
When
dial
related
malfunctions caused by
failures
of the
station,
line
or LM
unit
occur,
this
function
allows the dial data received in each line to be monitored.
(5) Exchange Sequence Display
The most recent operations of the exchange can be checked. This function is instrumental in determining
the cause of the exchange failure.
6. REMOTE FUNCTION CONTROL
A computer or data terminal can be used for function dialing instead of the station. (Refer to the
Application section of the CI-600 Operating Instructions for operation.)
This function not only shortens lengthy station key operations, but also permits alterations of
registered data of such indications as the Location Indication without actually going to the station.
- 17 -

Installation
Refer to the following procedures when installing the CI-600.
Equipment installation
See Installation manual.
Equipment installation
Connection to exchange
Connection to computer or data terminal
DIP switch setting
Initial terminal setting
Power ON
Clock setting
Initial exchange setting
CI-600 data reception
Fixed message registration
Password registration
Personal data registration
Initial setting
CI-600 data transmission
System
programming
System
maintenance
Personal data
display
Remote
function
control
Application Setting
Performed only for new installation.
Performed
only
for
tie-line
system.
- 18 -

PART 1. INITIAL SETTING
1. Connection
1-1 Initial Setting
Connect
equipment
as
follows
when
performing
initial
setting.
Single system
Exchange (CP-66)
CI-600
PROGRAMMING STATION
(PROGRAMMABLE STATION : Normally,
hard-wired station No. 200.)
Master terminal
Tie-line system
Exchange A (CP-66)
Exchange B (CP-66)
CI-600
CI-600
Data Transfer (Connector No. 2)
Transmission
Master terminal
Reception
Master terminal
Connect
the
No.2
RS-232C
connector
located
on the
rear
panel
of
each
CI-600
for
tie-line
system
interconnection. Refer to page 5 of installation manual.
When
setting
up a
3-exchange
tie-line
system,
to
transfer
data
from
CI-600A
to
CI-600C
after
completing
data
transfer
from
CI-600A
to
CI-600B,
first
disconnect
the
RS-232C
line
leading
from
CI-600A to CI-600B and connect the line to CI-600C in its place.
Note:
- 19 -

1-2. Application Setting
After
completion
of
initial
setting,
connect
as
shown
below.
Exchange (CP-66)
CI-600
Sub-terminal
Sub-terminal
Master terminal
Note:
The master terminal can process all CI-600 functions. The sub-terminals can only select Nos.4 and 5 of
the
Main
Menu.
(The
sub-terminals
cannot
be
used
until
initial
setting
is
completed.)
- 20 -
Other manuals for CI-600
1
Table of contents
Other Toa Recording Equipment manuals