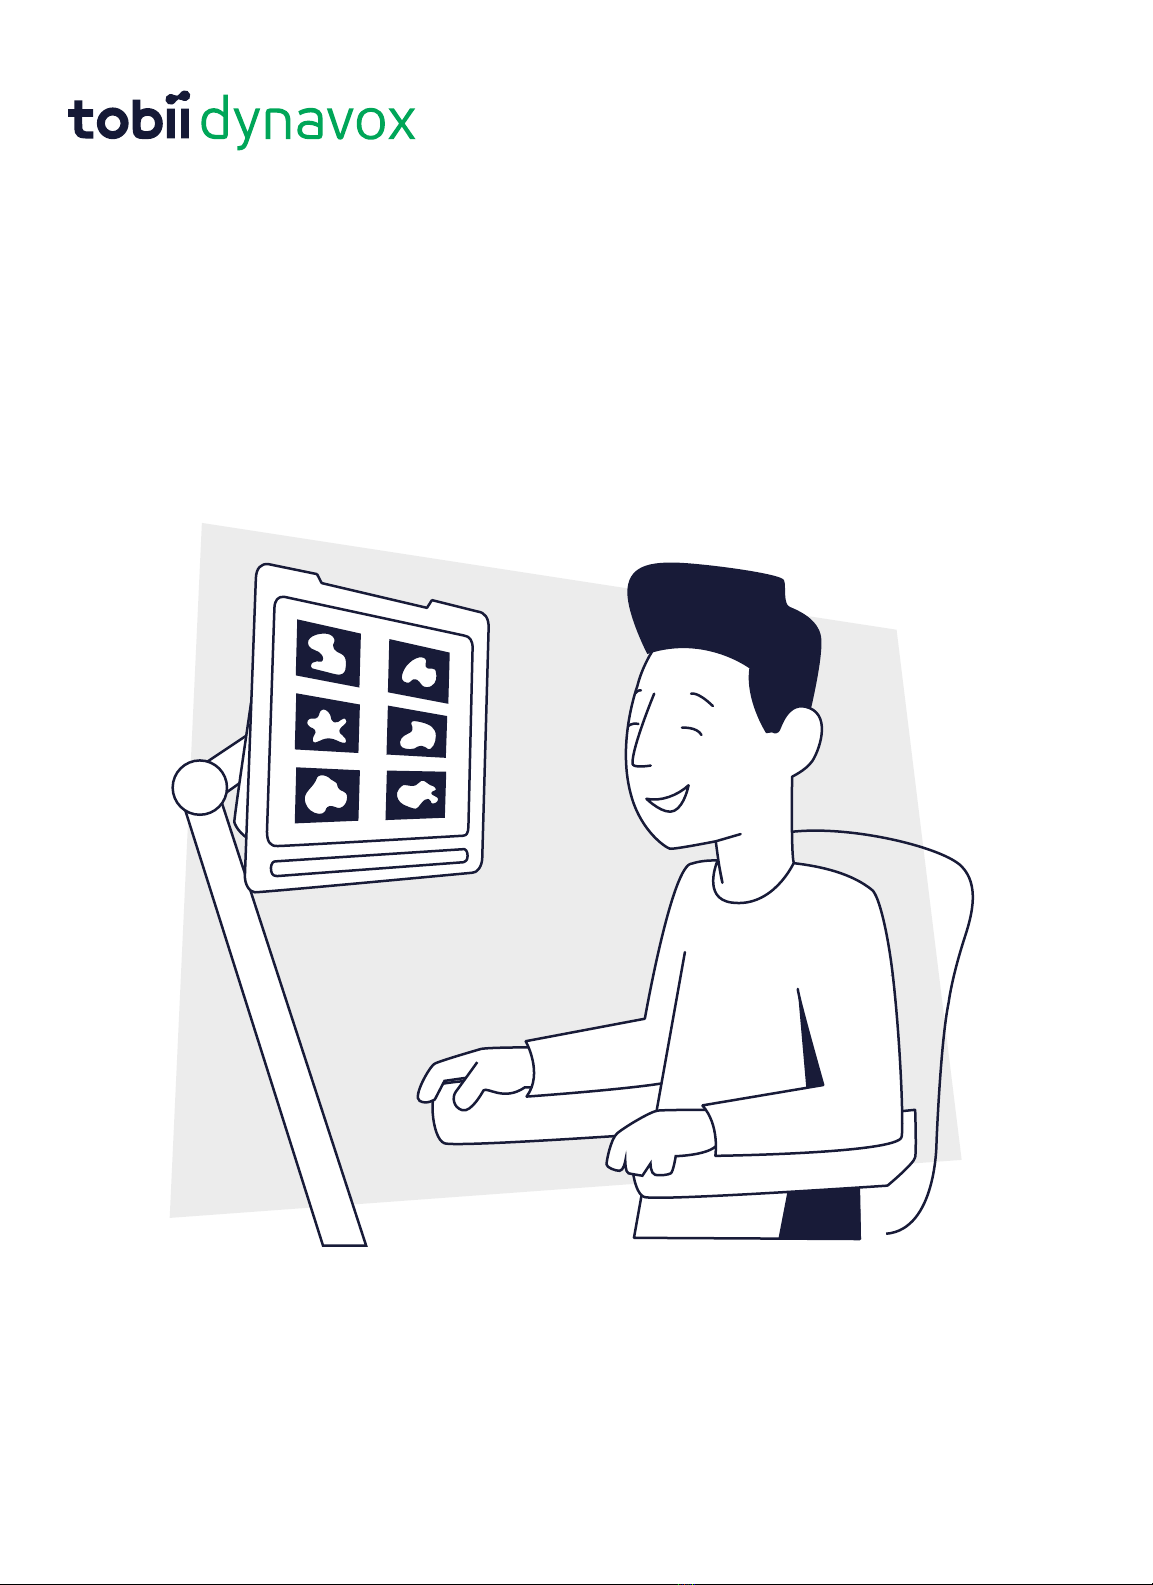
Tobii Dynavox TD Pilot User manual

TD Pilot with TD Snap®
Getting Started Guide

1
What’s in the Box
123
4
5
6
8
9
11
10
7
Pre-assembled device
(iPad Pro 12.9, TD Pilot Base, Protective Case,
ConnectIT/Rehadapt mount plate, Connection Cable
USB-C to USB-C, Pre-Installed Battery)
Connection cable
Lightning – USB C
Charger with cable
Screwdriver
Getting Started Guide
Safety and Compliance document
Adjustable Bracket
TD Snap®Training Cards
Warranty documents
iPad Box
(containing iPad charger)
Carry bag
1
2
3
4
5
6
7
8
9
10
11

Let’s Get Started
This Getting Started Guide is designed for two people: the person who will use the
device to communicate and a helper who can touch the screen and move the device. The
sections with the hand icon must be completed by the helper. The sections with the eye
icon should be completed by the person who will access the device using eye gaze. When
you have completed the steps in this guide, the individual will be able to use eye gaze to
communicate in the TD Snap®app.
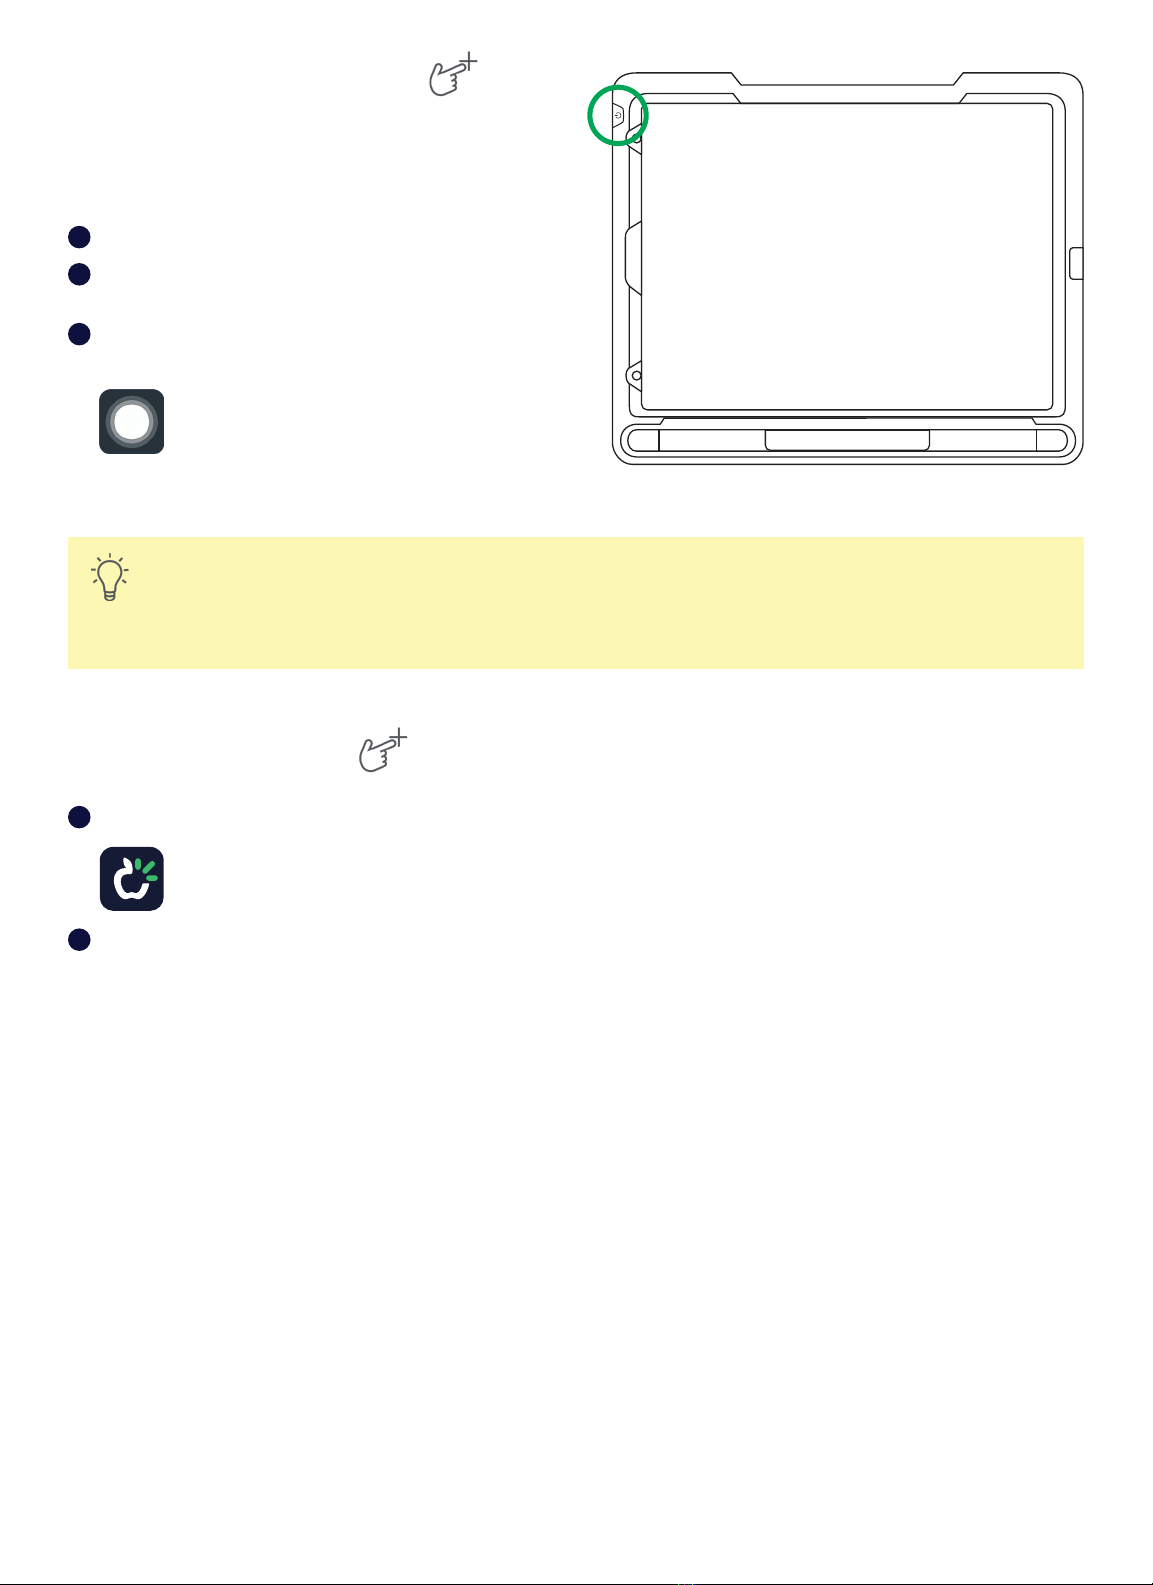
Power On
Helper
User
Open the protective cover over the ports and connect the charger
cable to the charging port on the side of the TD Pilot base. Then
plug the power cord into an outlet.
Press the power button on the back of the TD Pilot to power it on.
Most iPads will power on when the TD Pilot base powers on. If
your iPad does not power on, press the power button on the iPad
to power it on.
1
2
3
3
2
1
iPad Setup
Follow the on-screen prompts to set up the iPad. In order to receive the Tobii Dynavox software included with your
purchase, you will need to make the following selections during setup:
Select your language and region.
On the Quick Start screen select Set up manually.
Join a Wi-Fi network, then select Next.
On the Remote Management screen select Next.
Agree to the Apple Terms and Conditions.
Answer the remaining setup prompts based on your personal preferences.
1
2
3
4
5
6
When you have completed your iPad setup prompts, you’ll see the Home screen containing your app icons.
Note
Remote management, also known as MDM, allows Tobii Dynavox to send software and software updates to
your iPad over Wi-Fi. Through remote management Tobii Dynavox will only have access to information about
your iPad hardware specifications, OS version, installed apps, and security settings. Tobii Dynavox will not be
able to access your personal files, photos, cameras, microphones, or location data.
2

3
TD Pilot Power Management
The TD Pilot must be powered on when connected to external power in order for the iPad to charge too.
When the TD Pilot is powered on, the eye tracker is always active, even when the iPad screen is locked.
Because of this, the batteries will drain when the TD Pilot is turned on and not connected to external power. It
is best to leave the TD Pilot turned on and plugged into the charger whenever you are not using it.
Battery status information is found in TD CoPilot > Settings > Battery.
Additional information about power management is available in the TD Pilot User’s Manual.
Set Up Eye Gaze Access
Configure the display for gaze accuracy
Tap Settings.
1
On the left side, tap the Home Screen & Multitasking category.
On the right side, select Use Large App Icons to make the icons larger.
On the left side, tap the Display & Brightness category.
On the right, tap Dark.
On the right, scroll down and tap Text Size.
Move the Text Size slider all the way to the right.
2
3
4
5
6
7
Note
This increases the text size in all compatible applications.
Tap Display & Brightness on the left side to return to the Display & Brightness settings.
On the right side, scroll down and tap Display Zoom.
8
9
Note
This setting is not available on iPads smaller than 11 inches.
Select Larger Text.
10

Set up AssistiveTouch
Tap Settings.
1
On the left side, tap Accessibility.
On the right side, tap Touch.
Tap AssistiveTouch, then turn it on.
Eye gaze is now enabled. You will see the Pointer, which shows the location of your eye gaze. The AssistiveTouch
menu button also appears on the screen.
2
3
4
Note
If you are prompted to customize the Top Level Menu, tap No.
Drag the AssistiveTouch menu button to the top third of the screen on the right side.
5
What does AssistiveTouch have to do with eye gaze?
AssistiveTouch is designed for people who have difficulty touching the screen. The
AssistiveTouch menu allows you to do “touch” functions, such as tap and scroll, using eye gaze.
It also provides gaze-accessible shortcuts to things like the Home screen and App Switcher,
which are typically accessed through gestures.
4

5
Customize the AssistiveTouch Menu
On the right side, select Customize Top Level Menu.
Tap +to change the number of icons to 8.
Tap Notification Center.
Swipe to the bottom of the list and tap Toggle Pause/
Resume Dwell. Tap outside the list to close it.
Tap the Gestures button.
Swipe to and then tap Move Menu. Tap anywhere
outside the menu to close it.
Continue editing the menu icons until your menu
matches the one shown to the right.
1
2
3
4
5
6
7
Configure Dwell Control
On the left, select Accessibility.
On the right, select Touch.
On the right, select AssistiveTouch.
On the right side, swipe to the bottom of the AssistiveTouch menu. Turn on Dwell Control.
1
2
3
4
Note
If you are prompted to customize the AssistiveTouch Top Level Menu, tap No.
Tap the plus or minus signs next to Seconds to change the dwell time to 1.5 seconds.
5
Tip
This dwell time setting is to get you started. You can change the dwell time again later to suit your needs.
Enable Eye Gaze when iPad is Locked
On the left, select Face ID & Passcode.
Enter your passcode.
Swipe to the bottom and turn on Accessories.
1
2
3

Waking and Unlocking Your iPad
The iPad wakes automatically when the eye tracker
detects the user’s eyes. Unlock the iPad by selecting the
AssistiveTouch Button, then Home.
Try it now:
Press the top button to lock the iPad.
Look at the screen for a few moments. The iPad wakes
and displays the lock screen.
Tap or use your eyes to select the AssistiveTouch
menu button then select Home.
1
2
3
The iPad is now unlocked.
Tip
If you are interested in extra security on your device, we recommend using Face ID. Face ID allows you to
unlock your device without entering a passcode each time. Set up Face ID in iPad OS Settings > Face ID &
Passcode.
Set Up TD Snap®
Select the TD Snap®app.
1
Follow the prompts to set up your TD Snap®user. Remember to choose the Eye Gaze access method.
2
6

7
Mount and Position
Prepare the user to start using eye tracking by positioning them comfortably. If they use glasses, make sure that they are
wearing them and that the lenses are clean.
Place the TD Pilot on your mounting system or a stable surface in front of the user at, or slightly below, their eye level. If
their head is tilted left or right, tilt the TD Pilot to match. It is important that the angle of the screen surface match the
angle of the user’s face. Most users, when seated at a table or desk, will need to have the TD Pilot positioned higher than
the table surface.
You may need to refine the position of the device during the Calibrate steps on the next page. Always adjust the position
of the device to suit the user, not the other way around.
Note
A mounting system is the best option for precise device positioning
that is easy to adjust throughout the day. Several mounting
options are available, including floor mounts, desk mounts, and
wheelchair mounts. Visit TobiiDynavox.com or contact your local
Tobii Dynavox partner.

Calibrate
Tap the CoPilot app.
Follow the on-screen instructions in CoPilot to calibrate the eye tracker to the user’s eyes.
When the user has finished calibrating, swipe up from the bottom of the screen to return to the Home screen.
Ready!
Your TD Pilot is now ready to use. Launch TD Snap®to start communicating.
1
2
3
Continue to the TD Snap®Training Cards
Continue your set up journey with the TD Snap®Training Cards. The training cards walk you through the features of
TD Snap®, basic editing, backing up your data, and some ideas to help you integrate TD Snap®into your daily life.
Tip
Customize your TD Snap®eye gaze settings in
TD Snap®> Edit > User > Access Method.
TD Snap®Training Cards
qrco.de/bdPliQ
Note
Many funding sources require speech generating devices to be sold as dedicated (closed) devices. Closed
devices have limited internet and app store access. Once a speech generating device is delivered to the
user or their representative, they are permitted to open the device for an additional fee, giving them full
access to the internet and the app store. If you would like to learn more about opening a closed device, visit
us.tobiidynavox.com/pages/device-open-key or call 1-800-344-1778.
8

Additional Resources
TD Pilot Support Page
qrco.de/PilotHelp
Apple
apple.com/accessibility
Scan the QR codes or use the links.
North America Technical Support
1-800-344-1778 ext. 1
Tobii Dynavox Learning Hub
(English only)
learn.tobiidynavox.com
Documentation
TD CoPilot > Settings > Help
TD Facebook Community
qrco.de/TDFB
myTobiiDynavox
mytobiidynavox.com
TD Pilot User’s Manual
qrco.de/PilotDocs
Software Training Cards
qrco.de/trainingcards
#13000584 TD Pilot TD Snap®Getting Started Guide v1.5 en-US
Other manuals for TD Pilot
4
Table of contents
Other Tobii Dynavox Educational Equipment manuals