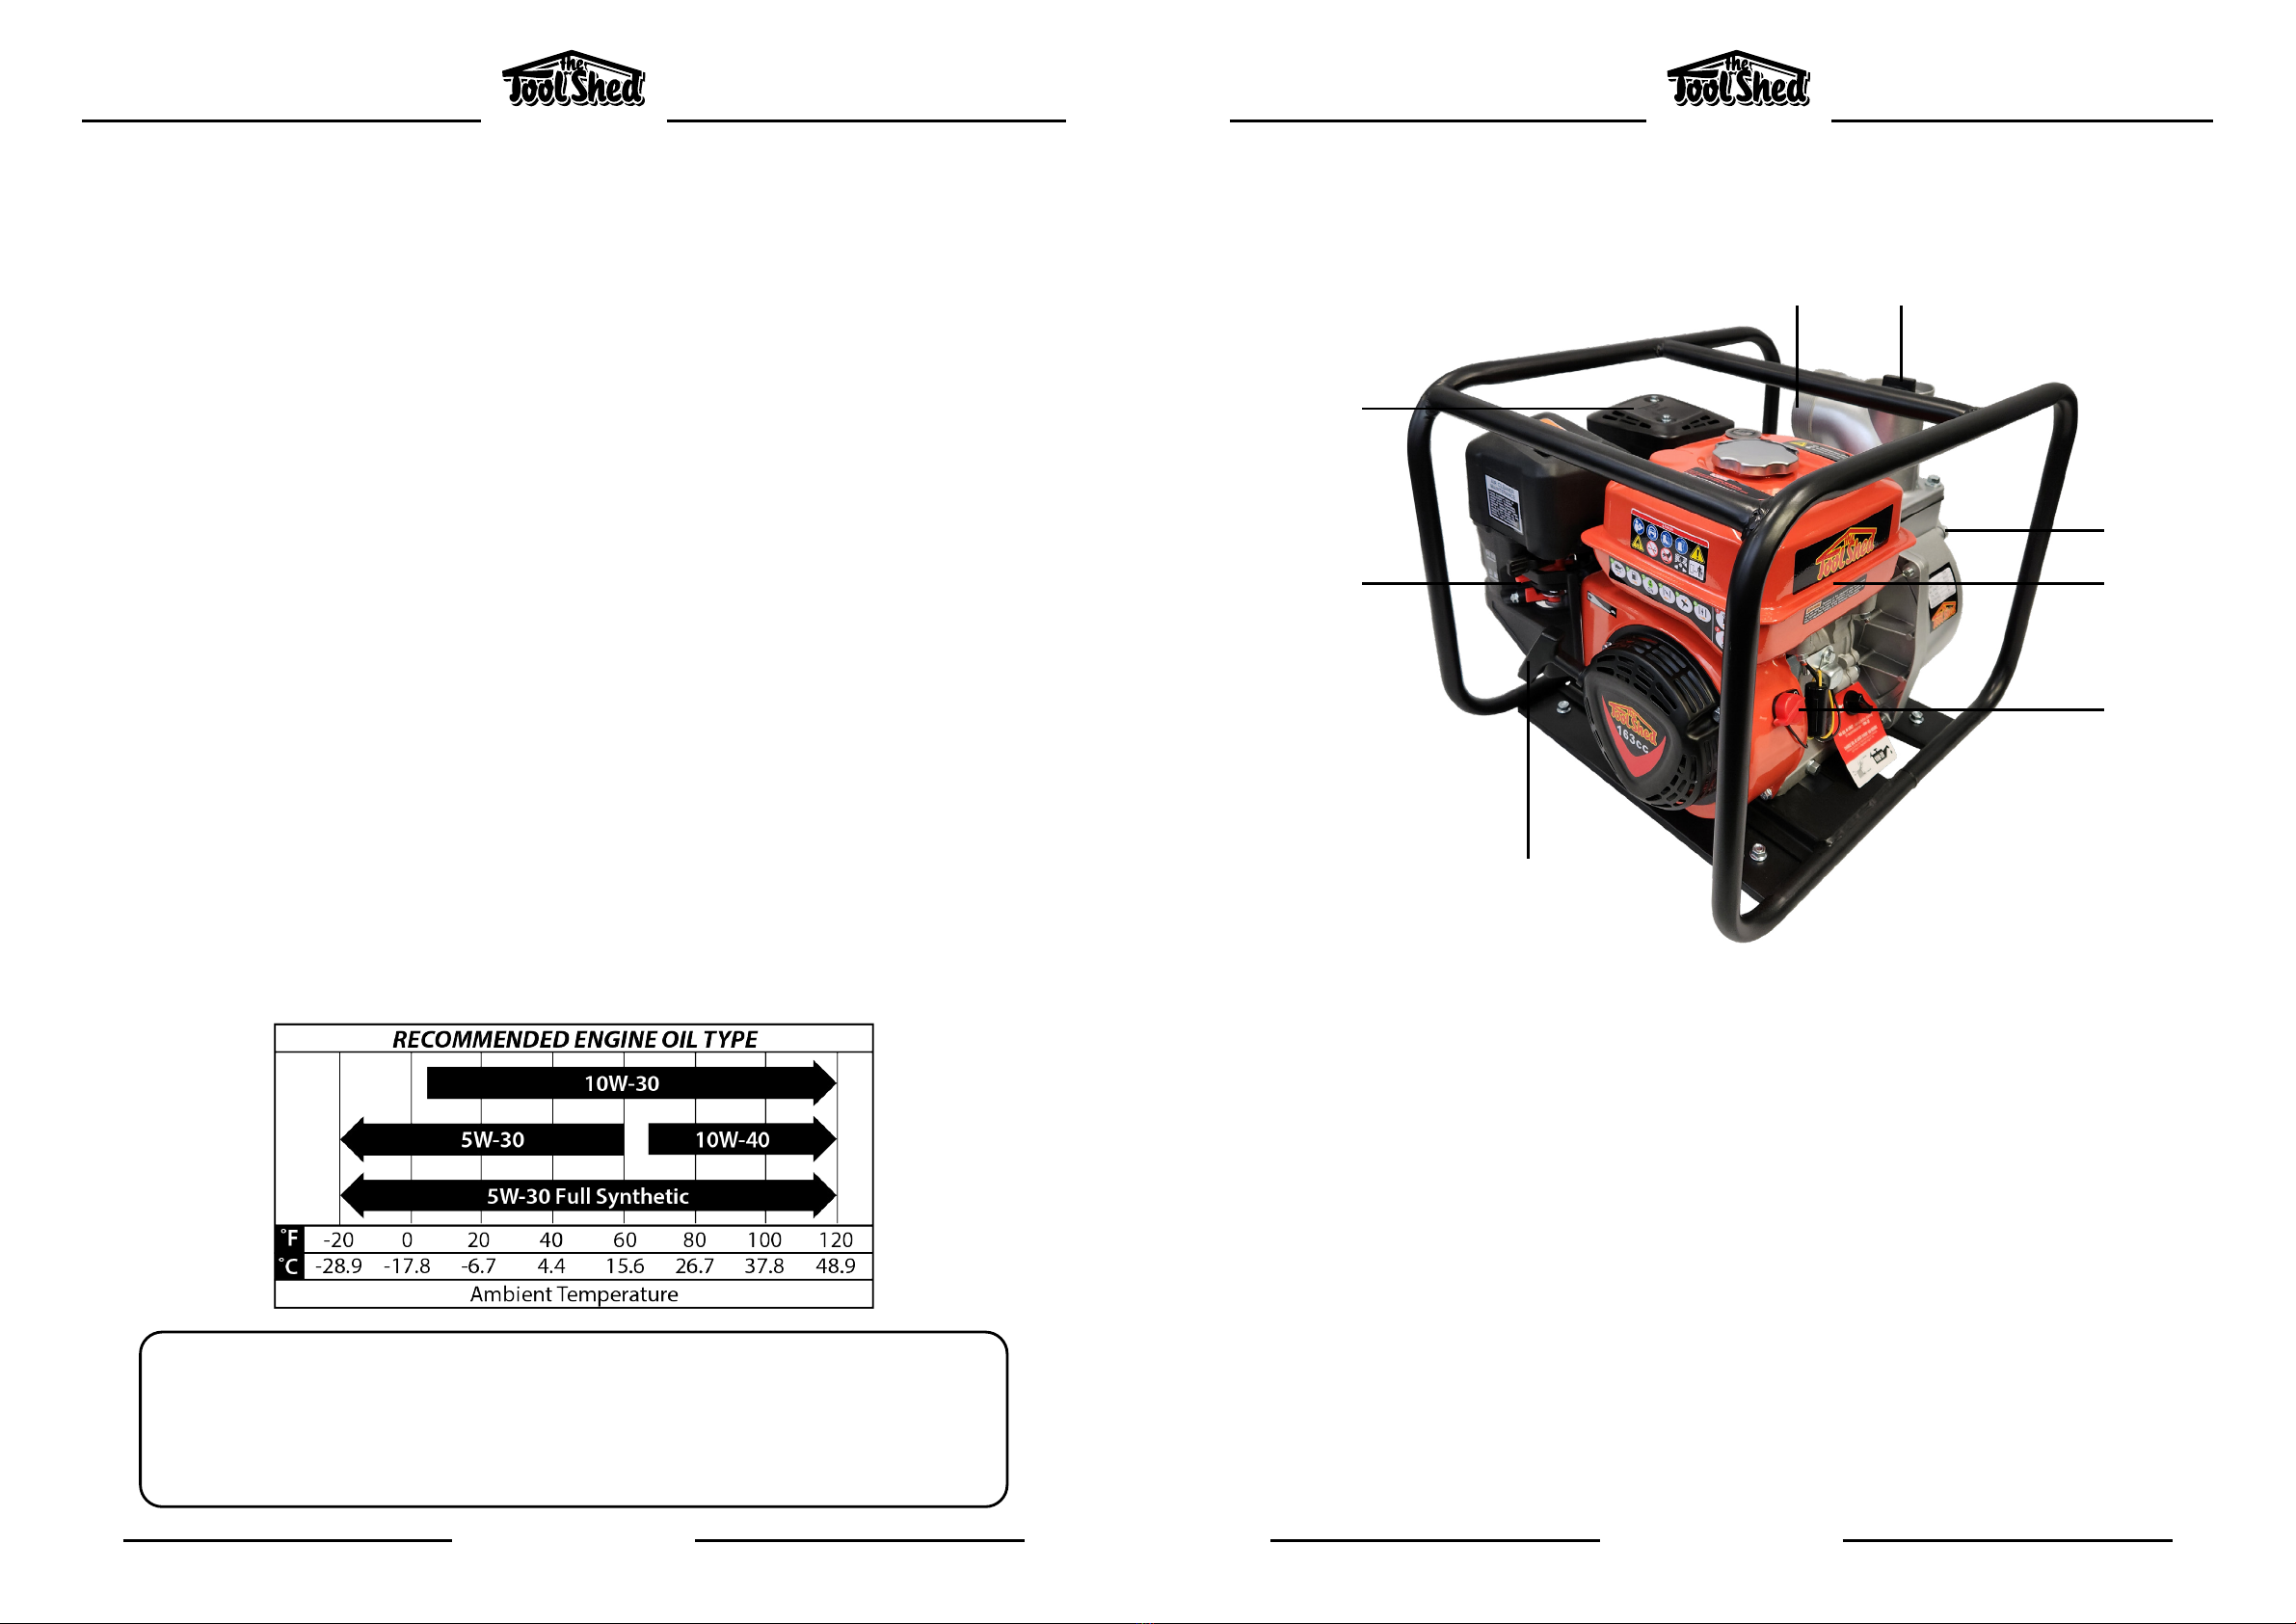
Tool Shed TSPWP User manual

23
OPERATION MANUAL OPERATION MANUAL
WWW.THETOOLSHED.CO.NZWWW.THETOOLSHED.CO.NZ
TABLE OF CONTENTS PRODUCT DETAILS
Product Model ToolShed Petrol Water Pump 3 Inch
Product Code TSPWP
DISTRIBUTED BY:
Product Details 3
Specications 4
Product Identication 5
Safety Guidelines 6
Assembly 11
Operation 17
Maintenance 18
Storage 19
Troubleshooting 20
Exploded View & Parts List 22
Note:
This manual is for your reference only. Due to the continuous improvement of
the ToolShed products, changes may be made at any time without obligation or
notice.
Warranty:
This product may be covered under The ToolShed warranty. For more information, see
our Terms & Conditions at www.thetoolshed.co.nz
Thank You
For the purchase of this ToolShed product. We try our hardest to supply customers like you
with the best quality products available, at the best price possible. We cant wait to continue
working together in the future.
Please contact us for any servicing, replacement parts, or questions you might have about
your ToolShed product by visiting our website, or calling: 0800 948 665.

45
OPERATION MANUAL OPERATION MANUAL
WWW.THETOOLSHED.CO.NZWWW.THETOOLSHED.CO.NZ
SPECIFICATIONS PRODUCT IDENTIFICATION
WATER PUMP SPECIFICATIONS
Inlet/Outlet Diameter 76.2mm (3”)
Fuel Capacity 3.5 Litre
Total Head 28m
Suction Head 7. 5 m
Maximum Delivery Volume 1000 LPM
Max Solid Waste 5mm
Net Weight 25.3 kg
Dimensions (LxWxH) 532 x 410 x 420mm
ENGINE SPECIFICATIONS
Model YF168F
Displacement 163 CC
Engine Type 4-Stroke Air Cooled Petrol
Start Type Recoil
Engine Oil Type 10W-30
Engine Oil Capacity 0.6 Litre
1Pull Cord
2Choke
3Exhaust
4Outlet
5Priming Plug
6Inlet
7Fuel Tank
8On/O Switch
Note on Fuel Specication:
Use regular unleaded gasoline with a minimum octane rating of 87 and an
ethanol content of less than 10% by volume. DO NOT USE E15 or E85. DO NOT
OVERFILL.
1
2
3
4 5
6
7
8

67
OPERATION MANUAL OPERATION MANUAL
WWW.THETOOLSHED.CO.NZWWW.THETOOLSHED.CO.NZ
SAFETY GUIDELINES SAFETY GUIDELINES
• Use the correct tool for the job. Forcing
a tool to do a job it was not designed for
increases the risk of accident or injury.
• Disconnect tools and machinery from
power, or remove batteries before doing
any maintenance or adjustments, or
before storing the tools and machinery.
This reduces or removes the risk of a power
connection that causes the tool or machinery
to accidentally re, which can help prevent
injury or accident.
• Check the general condition of the power
tool for damage or any problems that
could aect the way the tool or machine
works. An unrepaired tool or machine can
lead to accident and injury. Only have your
tool or machine repaired with genuine parts
from The ToolShed.
• Only use the power tool and machinery
with genuine parts or accessories that are
designed to be used with this power tool
and machinery. Failure to do so could result
in accident or injury or damage your tool or
machinery.
• Store your tool or machinery out of reach
of children, and away from untrained
personnel when not in use. Use by some-
body untrained, or a child, could lead to
accident or serious injury.
Power Tool & Machinery Use &
Care
• Always wear personal protective equip-
ment (PPE). Eye protection, ear protection,
dust masks, and other protective equipment
will help to reduce the risk of personal injury
or long-term illnesses.
• Dress appropriately. DO NOT wear loose
clothing that can get caught in moving
parts. Keep hair, loose clothing, jewellery,
and anything else that could be of risk, away
READ ALL SAFETY WARNINGS &
INSTRUCTIONS. Failure to follow
instructions and warnings could lead to
serious injury, electric shock, or re.
from moving parts in the machine, or they
could become caught therein.
• Always remain alert and DO NOT operate
power tools or machinery under the inu-
ence of any substances such as alcohol
or drugs, including prescription medica-
tions. Lack of focus could lead to injury or
accidents while operating these power tools
and machinery.
• Always ensure proper footing and
balance. Overreaching can lead to slipping
and falling which can result in injury or acci-
dent.
• Ensure the power switch is in the OFF
position before connecting any battery,
or power source to the power tool or
machinery. This can cause injury as tools
and machinery can suddenly re incidentally
when live, causing accidents.
• Use all provided dust collection and
extraction attachments, if included. This
equipment, along with the use of PPE dust
masks, can help keep you safe from dust, and
keep your work site clear from hazards.
• Ensure loose parts such as wrenches
or adjusting keys are removed before
starting the power tool or machinery.
WARNING
Work Area Safety
Personal Safety
• Ensure that your work area is kept clean
and well lit. Lack of visibility and clutter
greatly increase the risk of accident when
using tools.
• Keep bystanders, pets, and children
clear when operating this power tool or
machine. They can cause distraction or risk
injury to themselves.
• Ensure you are not operating the power
tool or machinery in the presence of dust,
liquids, ammable gases, or anything
that can create an explosive atmosphere.
Power tools and machinery can create sparks
which can lead to ignition and re hazards in
working environments.

89
OPERATION MANUAL OPERATION MANUAL
WWW.THETOOLSHED.CO.NZWWW.THETOOLSHED.CO.NZ
SAFETY GUIDELINES
DANGER
GASOLINE AND GASOLINE VAPOURS
ARE HIGHLY FLAMMABLE AND
EXPLOSIVE. Fire or explosion can cause
severe burns or death.
Gasoline & Vapours When Adding or Removing
Gasoline
When Starting the Engine
• Gasoline is highly ammable and explosive.
• Gasoline can cause a re or explosion if
ignited.
• Gasoline is a liquid fuel, but its vapours can
ignite.
• Gasoline is a skin irritant and needs to be
cleaned up immediately if spilled on skin or
clothes.
• Gasoline has a distinctive odour; this will help
detect potential leaks quickly.
• In any petroleum gas re, you should not
attempt to extinguish the ames unless it
can be done in such a way by turning the
fuel supply valve OFF. This is because if a re
is extinguished and a supply of fuel is not
turned OFF, then an explosion hazard could
be created.
• Never ll the gas tank to capacity as gasoline
needs room to expand if temperature rises.
• Never use gasoline that is stale, contami-
nated, or mixed. Avoid getting contaminants,
dirt or water in the fuel tank.
• DO NOT light or smoke cigarettes.
• Turn the engine o and let it cool for at least
two minutes before removing the gasoline
cap. Loosen the cap slowly to relieve pressure
in the tank.
• Only ll or drain gasoline outdoors in a
well-ventilated area.
• DO NOT pump gasoline directly into the
engine at the gas station. Use an approved
container to transfer fuel to the engine.
• DO NOT overll the gasoline tank.
• Always keep gasoline away from sparks,
open ames, pilot lights, heat, and other
sources of ignition.
• DO NOT rell the fuel tank while the engine
is running or while the engine is still hot.
• When spills of fuel or oil occur, they must be
cleaned up immediately. Dispose of uids
and cleaning materials as per local regula-
tions.
• DO NOT attempt to start a damaged engine.
• Make certain that the gasoline cap, air lter,
spark plug, fuel lines, and exhaust system are
properly in place.
• Allow spilled gasoline to evaporate fully
before attempting to start the engine.
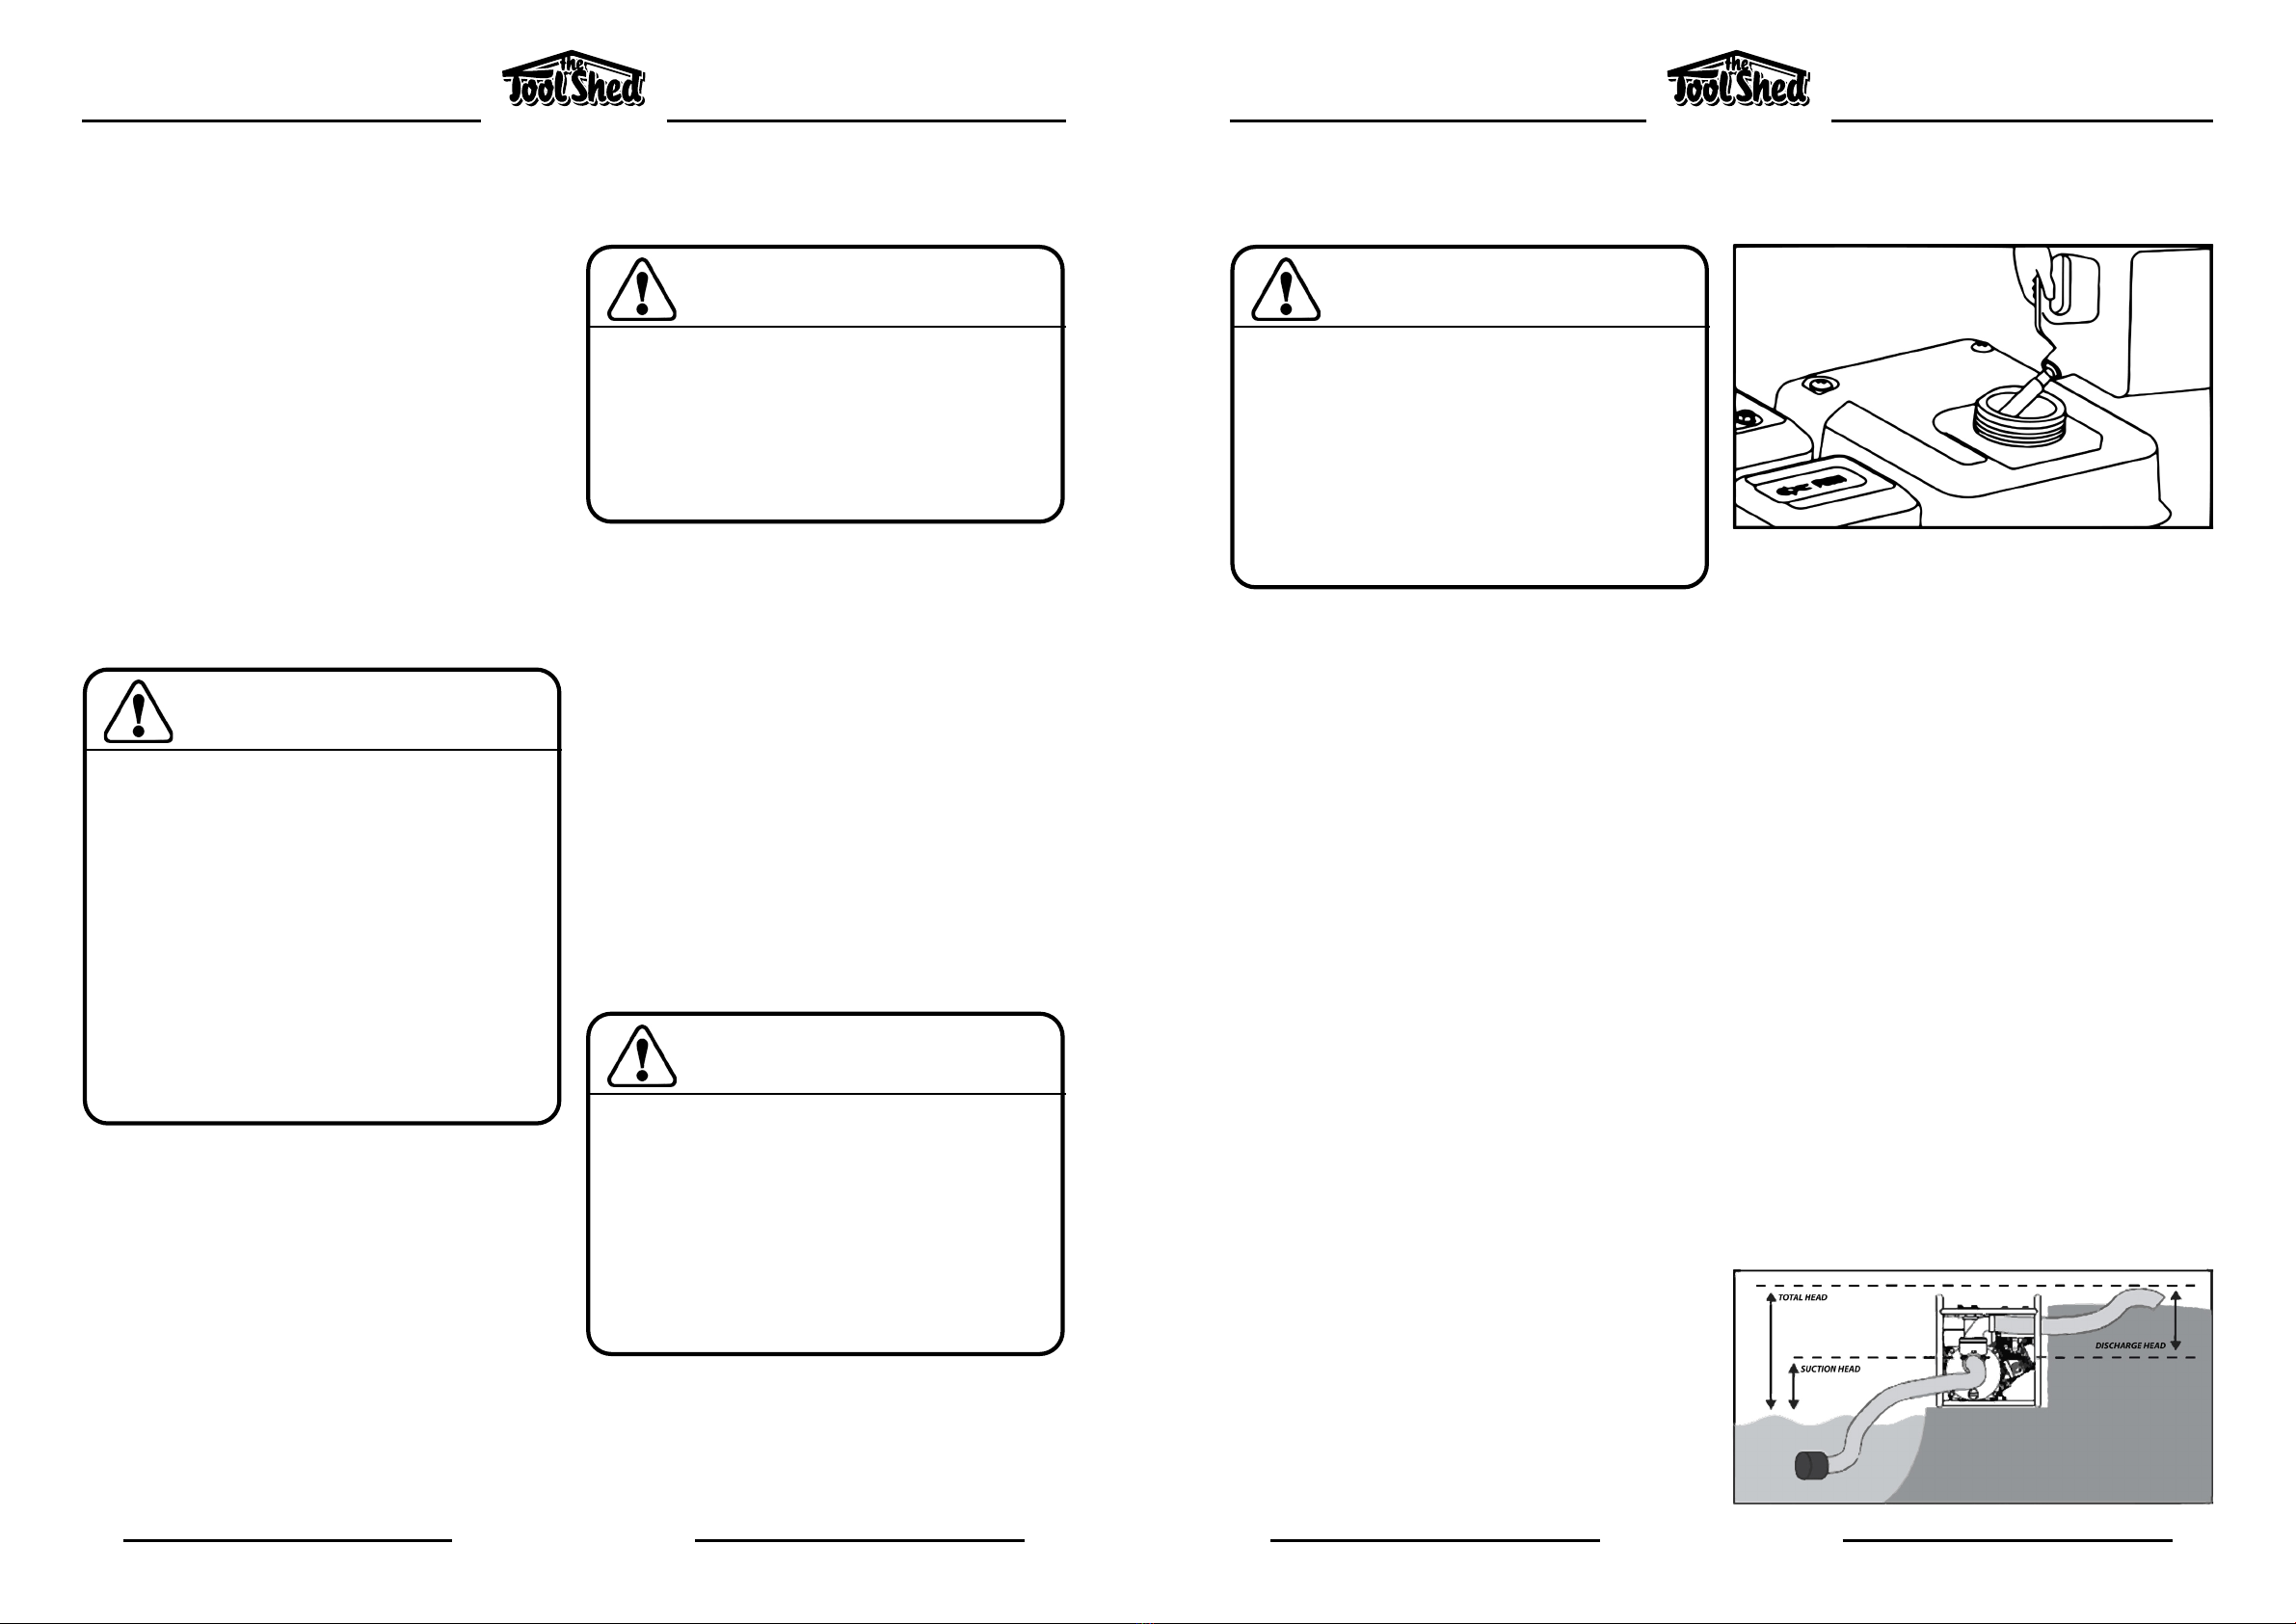
• Make certain that the water pump is resting
rmly on level ground.
• Spark from a removed spark plug wire can
result in re or electrical shock.
SAFETY GUIDELINES
Fuel & Engine Safety
Operate this machine outdoors only
in a well-ventilated area and point the
exhaust away from you.
WARNING
• DO NOT operate the machine inside any
building, including garages, basements,
crawlspaces and sheds, enclosures, or
compartments, including the storage
compartment of a recreational vehicle.
• DO NOT allow exhaust fumes to enter a
conned area through windows, doors,
vents, or other openings.
• NEVER use inside a home or garage, EVEN
IF doors and windows are open. ONLY use
OUTSIDE and far away from windows, doors,
and vents.
WARNING
Using an engine indoors CAN KILL YOU
IN MINUTES. Engine exhaust contains
Carbon Monoxide. This is a poison you
cannot see or smell.
• Engine exhaust contains carbon monoxide, a
colourless, odourless, poison gas. Breathing
carbon monoxide will cause nausea, dizzi-
ness, fainting or death. If you start to feel
dizzy or weak, get fresh air immediately.
Service
• Have your tools and machinery serviced
at The ToolShed with ToolShed replace-
ment parts. This will ensure that the safety
of the power tool or machine is maintained.
WARNING
The warnings and precautions
discussed in this manual cannot cover
all possible conditions and situations
that may occur. It must be understood
by the operator that common sense
and caution are factors which cannot
be built into this product, but must be
supplied by the operator.
WARNING
DO NOT immerse the water pump in
water.
• It is not possible to cover every conceivable
situation you can face. Always exercise care
and use your common sense. If you get into
a situation where you feel unsafe, stop and
seek expert advise. Contact your dealer,
service agent, or an experienced user. Do not
attempt any task you feel unsure of!
Always Use Common Sense

10 11
OPERATION MANUAL OPERATION MANUAL
WWW.THETOOLSHED.CO.NZWWW.THETOOLSHED.CO.NZ
SAFETY GUIDELINES
Water Pump Specic Safety
Adding Engine Oil Location
Adding Fuel
The water pump develops powerful force.
• DO NOT move or tip the water pump when
it is in use.
• DO NOT use hoses or connectors that are
worn, damaged, or frayed.
• DO NOT allowchildren or unqualied persons
to operate or service the water pump.
• DO NOT open the top plug or drain plug.
• DO NOT tip the water pump or allow fuel or
oil to spill.
Check oil often during the break-in period. Refer
to the Maintenance Section for recommended
service intervals.
• Place the water pump on a at, level surface.
• Remove oil ll cap/dipstick to add oil.
• Using a funnel, add oil and replace oil full
cap/dipstick. DO NOT OVERFILL.
• Check engine oil level before every use and
add oil as needed.
• Place the water pump in a well-ventilated
area.
• DO NOT place the water pump near vents or
intakes where exhaust fumes could be drawn
into occupied or conned spaces. Carefully
consider wind and air currents when posi-
tioning the water pump.
• This petrol water pump must have at least
1.5m of clearance from combustible material.
Leave at least 1m of clearance on all sides
of the water pump to allow for adequate
cooling, maintenance, and servicing.
• Place the pump on a level surface free from
any obstructions or potential hazards. The
pump should be placed close to the water
level to ensure maximum pump perfor-
mance.
Use clean, fresh, regular unleaded gasoline with
a minimum octane rating of 87, and an ethanol
content of less than 10 by volume.
DO NOT mix oil with gasoline.
• Place the water pump on a at, level surface.
• Remove the gasoline cap.
• Slowly add gasoline to the tank. DO NOT
OVERFILL. Gasoline can expand after lling.
A minimum of 6.4mm (1/4”) of space left
in the tank is recommended for gasoline
expansion.
• Screw on the gasoline cap and wipe away
any spilled fuel.
• DO NOT expose the water pump to excessive
moisture, dust, or dirt.
• DO NOT allow any material to block the
cooling slots.
DO NOT USE THE ENGINE IF:
• Equipment sparks, smokes, or emits ames.
• Equipment vibrates excessively.
• WARNING: Use of this water pump can
create wet, slippery walking surfaces.
• Use only on a level surface.
• Make sure there is proper drainage in your
work area to dissipate any excess water.
• DO NOT pump salt, sludge, sewer, sea, or any
other type of water containing solid material.
• DONOTrunthepumpdry.Runningthepump
dry can destroy the pump seals and will void
the warranty. If the pump was running while
dry, stop the engine and allow it to cool thor-
oughly before lling the chamber with water.
WARNING
WARNING WARNING
CAUTION
Rapid retraction of the starter cord
will pull your hand and arm towards
the engine faster than you can let go.
Unintentional start-up can result in
entanglement, traumatic amputation,
or laceration. Broken bones, fractures,
bruises, or sprains could result. When
starting the engine, pull the starter cord
slowly until resistance is felt and then
pull rapidly to avoid kickback.
Improper use of this water pump can
damage it, shorten its life, and void
your warranty. Use the water pump
only for its intended uses, and operate
only on level surfaces.
DO NOT attempt to crank or start the
engine before it has been properly
lled with the recommended type
and amount of oil. Damage to the
water pump as a result of failing to
follow these instructions will void your
warranty.
Exceeding the pump specication for
Total Head can damage the pump or
the hose kits connected to it. DO NOT
modify the pump in any way or attempt
to exceed the rated ow. Attempting to
increase the rated ow can damage the
unit and shorten its life.
A SS E M B LY

12 13
OPERATION MANUAL OPERATION MANUAL
WWW.THETOOLSHED.CO.NZWWW.THETOOLSHED.CO.NZ
A SS E M B LY A SS E M B LY
Location (Cont.)
Connecting a Hose Kit
Connecting the Suction Hose
(Green)
• The pumps output will be aected by the
type, length, and size of the suction and
discharge hoses you use. The Pumping
Height, also known as the Total Head, is the
distance from the water level to the point of
discharge. As this distance increases, pump
output decreases as the discharge capacity is
greater than the suction capacity. Therefore,
it is important that the Suction Head is less
than the Discharge Head.
• The time required to draw water from the
source to the pump (self-priming time) can
be decreased by minimising the Suction
Head.
• Thread the assembled connector to the
outlet tting (top of the pump).
• Locate and slide the silver coloured hose
clamp (marked 80–85) over the blue outlet
hose.
• Slide the hose clamp in place about midway
on the outlet hose adapter (as shown).
Tighten to 10±2 Nm with a 12mm wrench.
The hose clamp should be placed behind the
outlet adapter barbs on the smooth part of
the adapter.
• Cut the ties and uncoil the green hose. Use
some weight to help straighten the hose out.
This is best done on a warmer day in the sun.
• Separate the cam lock coupler and tting.
Align the green hose to the coupler and mark
the locations of the ribs on the tting.
• Mark the second rib of the coupler on the
hose.
• You will require the following: cam lock
coupler (coupler and tting together) (A),
80-85 marked hose clamps (B), Teon® tape
(C), green suction hose (D). Once you have
them, align for assembly.
• Slide the blue discharge hose over the outlet
hose tting.
NOTE: Ensure the gasket is properly seated
before threading on the adaptor.
NOTE: You can use a small amount of dish
soap on the outlet hose tting to help ease
the outlet hose on the tting.
To Connect the Discharge Hose (Blue):
• You will require the following: outlet hose
adapter (C), gasket (A), and outlet hose tting
(B). Once you have them, align for assembly.
NOTE
Both the intake and discharge ports
are measured at 7.6 cm (3”). Ensure the
connectors to the suction and discharge
hose are 3 inch (7.6 cm) threaded.

14 15
OPERATION MANUAL OPERATION MANUAL
WWW.THETOOLSHED.CO.NZWWW.THETOOLSHED.CO.NZ
A SS E M B LYA SS E M B LY
• Lay the green hose side by side and place the
clamp marked 80–85 in their approximate
location.
• Slide the clamps marked 80–85 over cam
lock coupler, just past the marks you made
on the hose.
• Once tightened, visually conrm the hose
is raised on the ribs. This indicates you have
clamped it tight enough.
• Thread the tting over the tape and hand
tighten. Use a pipe wrench with 3.7” (94 mm)
opening minimum, hand tighten, then 1-1/2
turn past full tight. It is crucial to ensure the
tting is tight so there are no air leaks.
• Attach the cam lock coupler to the tting.
• Lock in place with the cam levers.
NOTE: If the cam levers do not clamp down
completely, rotate and align the clamp bolts
so you have clearance for the cam levers to
lock. See step 9 earlier.
• Rotate and align the clamp bolts so you have
clearance for the cam levers to lock in place
later.
• Test the connection is tight by twisting the
coupler on the hose to ensure it doesn’t turn.
If the coupling moves, tighten the clamps
further until the coupling cannot turn.
• Wrap the green inlet clockwise with the
Teon® tape provided, ensuring 4 complete
wraps around the hose.
• Tighten each clamp to 15±2 Nm with a 12mm
socket and 3/8” drive ratchet until the clamp
completely tightens. If you do not have a
torque wrench, hand tighten, then ¼ turn
past full tight. These clamps will need to be
as tight as you can make them.
• Slide the clamps back and start to assemble
the green hose to cam lock coupler.
• Insert the cam lock coupler in the green rigid
suction hose until it is properly seated.
NOTE: Along with using a small amount of
dish soap as lubrication to help ease the
green hose onto the tting, it may also help
to dip the green suction hose into boiling
water for 1 minute. This will allow the
material to stretch slightly while assembling
the green hose to the cam lock coupler.

16 17
OPERATION MANUAL OPERATION MANUAL
WWW.THETOOLSHED.CO.NZWWW.THETOOLSHED.CO.NZ
A SS E M B LY OPERATION
• Ensure you have the following: lter (E) and
80–85 marked hose clamp (F).
• Slide the clamp just before the end of the
green hose.
• Tighten the clamp to 10±2 Nm with a 12mm
wrench. If you do not have a torque wrench;
hand tighten, then ¼ turn past full tight.
• You should now have everything connected.
• Snap the lter pieces together.
• Place the clamp marked 80–85 on the other
end of the green hose. Attach the strainer to
the green suction hose.
NOTE: You may use a small amount of dish
soap on the lter to help ease the green hose
onto the lter.
Priming the PumpConnecting the Suction Filter
Starting the Engine
Stopping the Engine
• Located on the outlet ange is the priming
plug. Remove the priming plug and ll the
pump body up with water to the very top of
outlet ange. Reinstall the priming plug.
• As the engine starts up, this will begin the
draw of water into the pump. Located within
the pump assembly is a one-way valve, as you
prime the pump housing, this one-way ap
valve shuts o the opening to the suction
hose.
• The priming process is only required when
the pump housing is not full of water.
• Make sure the water pump is on a at, level
surface.
• Turn the engine switch to the ON position.
• Move the choke lever to the CHOKE position.
• Move the throttle lever to the middle posi-
tion.
• Pull the starter cord slowly until resistance is
felt and then pull rapidly.
• Move the Choke/Throttle to the slow posi-
tion.
• Let the engine run until fuel starvation has
stopped the engine. This usually takes a few
minutes.
• Turn the engine switch to the OFF position.
• NOTE: Ensure the priming plug is secure
before beginning pump operation. If not
secure, the priming plug could be forcefully
ejected, and water or other liquids could be
pumped through the top of the outlet ange.
WARNING
Do Not remove either top or drain
(bottom) plugs while the water pump
is on and running. Loss of pressure and
suction will occur. Injury may also occur.

18 19
OPERATION MANUAL OPERATION MANUAL
WWW.THETOOLSHED.CO.NZWWW.THETOOLSHED.CO.NZ
STORAGEMAINTENANCE
• Before cleaning or performing any mainte-
nance, you must ensure the tool is switched
o and disconnected from the power supply.
• Compressed air is the most eective way to
cleanthistool.AlwayswearPPEsafetygoggles
when cleaning tools with compressed air.
• Ventilation openings and switch levers must
be kept clean. DO NOT attempt to clean by
inserting pointed objects through openings.
• Do not use harsh chemicals or solvents when
cleaning this tool.
• If you discover any damaged or broken parts,
consult your nearest ToolShed for replace-
ments and advise.
• The owner/operator is responsible for all peri-
odic maintenance. Complete all scheduled
maintenance in a timely manner. Correct any
issue before operating the water pump.
Cleaning the Water Pump
Changing the Engine Oil Cleaning the Air Filter Storage for Less Than 30 Days
Storage for More Than 30 Days
Maintenance Schedule
Cleaning and Adjusting the
Spark Plug(s)
• DO NOT spray water pump with water.
• Water can contaminate the fuel system and
can enter the engine through the cooling
slots and damage the engine.
• Use a damp cloth to clean the exterior
surfaces of the engine.
• Use a soft bristle brush to remove dirt and oil.
• Use an air compressor to clear dirt and debris
from the engine.
• Change oil when the engine is warm.
• Remove the drain oil bolt.
• Allow the oil to drain completely into an
appropriate container.
• Replace the oil drain bolt.
• Add oil according to the “Add Engine Oil”
section. DO NOT OVERFILL.
• Dispose of oil at an approved waste manage-
ment facility.
• Unscrew the wing nut to remove the air lter
cover.
• Remove the foam element.
• Wash in liquid detergent and water. Squeeze
thoroughly dry into a clean cloth.
• Saturate the element in clean engine oil.
• Squeeze again into a clean, absorbent cloth
to remove the excess oil.
• Reassemble the lter element.
• Reattach the air lter cover and tighten the
wing nut.
• Allow the engine to cool completely before
storing the pump away.
• Clean the engine accordingly.
• To extend the fuel storage life, add a properly
formulated fuel stabiliser to the tank.
• Add a properly formulated fuel stabiliser to
the tank.
• Run the engine for a few minutes so the
treated fuel cycles run through the fuel
system and carburettor.
• Turn the fuel valve to the OFF position.
• Allow the engine run until fuel starvation has
stopped the engine. This usually takes a few
minutes.
• The engine now needs to cool completely
before cleaning and storage.
• Clean the engine accordingly.
• Change the oil.
• Remove the spark plug and pour about
14.8ml (1/2oz) of oil into the cylinder. Crank
the engine slowly to distribute the oil and
lubricate the cylinder.
• Reattach the spark plug.
First 5 Hours:
• Change oil.
Every 8 Hours, or Prior To Use:
• Check oil level.
• Clean around air intake and muer.
Every 50 Hours or Every Season:
• Clean air lter.
• Change oil if operating under heavy load or
in hot environments.
Every 100 Hours, or Every Season:
• Change oil.
• Clean/adjust spark plug.
• Check/adjust valve clearance.*
• Clean spark arrester.
• Clean fuel tank and lter.*
Every 250 Hours:
• Clean combustion chamber.*
Every 3 Years:
• Replace fuel line*.
* To be performed by knowledgeable, experienced owners,
CPE certied service agents, or your local ToolShed.
• Remove the spark plug cable from the spark
plug.
• Use a spark plug tool to remove the plug.
• Inspect the electrode on the plug. It must
be clean and not worn to produce the spark
required for ignition.
• Carefully thread the plug into the engine.
• Use a spark plug tool to rmly install the plug.
• Attach the spark plug wire to the plug. WARNING
When storing the water pump for short
or long periods of time, or when not
in use, always ensure that the engine
switch is in the OFF position.

20 21
OPERATION MANUAL OPERATION MANUAL
WWW.THETOOLSHED.CO.NZWWW.THETOOLSHED.CO.NZ
TROUBLESHOOTING
FAULT POSSIBLE CAUSE SUGGESTED SOLUTION
Semi-Trash Pump Will Not
Start
No fuel Add fuel.
Faulty spark plug or cable Replace spark plug.
Semi-Trash Pump Will Not
Start; Semi-Trash Pump
Starts But Runs Roughly
Low oil level
Fill crankcase to the proper level;
ensure the semi-trash pump is on
a at, level surface.
Choke is in the wrong position Adjust choke lever.
Spark plug wire is loose
Attach wire to the spark plug.
Review the “Cleaning and
Adjusting the Spark Plug(s)”
section of this manual.
Semi-Trash Pump Shuts
Down During Operation
Out of fuel Fill fuel tank.
Low oil level
Fill crankcase to the proper level;
ensure the semi-trash pump is on
a at, level surface.
Semi-Trash Pump
Overheating or
Performing Poorly
Strainer or hose clogged Remove debris from strainer or
hose.
Pump not primed
Re-prime pump. Review the
“Priming the Pump” section of this
manual.
Suction hose is out of the water Place suction hose under the
surface of the water.
Head limit exceeded
Relocate pump so the suction
head is less than the discharge
head (maximum 98 feet).
Air leak Tighten connectors and clamps or
replace the seal packing.
Pump Will Not Draw
Water
Water has not been added to the
pump
Review the “Priming the Pump”
section of this manual.
Hose clamps on inlet hose are not
tight
Even small pinhole leaks can
result in vacuum loss, preventing
the pump from priming. Check
hose clamps to ensure they are
tight. Adjust the clamp position if
necessary.

1
2345678910 11 12 13
14
14
14
15
15
15
16
16
17
17
18 19
20
21
22
23
24
25
26
27
28
29
30
31 32 33 34
35
1Engine
2Pump Base
3Flange Bolt M8 x 55 X4
4Washer Ø8, Copper X4
5Seal, Water Seal
6Water Seal
7Friction Piece
8Seal, Friction Piece
9Impeller
10 Impeller Cover
11 Seal, Impeller Cover, Ø53xØ7
12 Seal, Base Pump
13 Pump Body
14 Washer Ø10 X11
15 Bolt M10 x 25 X11
16 Seal, Plug, Ø23.6xØ3.55 X2
17 Plug X2
18 One-Way Valve
19 Inlet Flange
20 Seal, Outlet Flange
21 Outlet Flange
22 Bolt M8x25 X4
23 Rubber X4
24 Nut M8 X4
25 Flange Bolt M8x35 X4
26 Lock Nut M8 X4
27 Frame
28 Strainer
29 Clamp, 22x80–85 mm X3
30 Hose Fitting X2
31
32 Seal Ring X2
33 Hose Adapter X2
34 Clamp, 22x74–79 mm
35 Cam Lock Coupler, 3”, G3
TSPWP EXPLODED VIEW & PARTS LIST
1
12345
6
78910
11
11
11
11
11
12
13
14
15 16 17 18
19
20
21 22
22
23 24
25
26
26
27 28 29 30 31
32 33 34
35
36 37
38 39 40
41
42 43
44
45
46
47
47
48
49
50
51
52
53
54
55
56
57 58 59 60
61
62
63
64
65
66
67
68
69
70 71
72
73
74
75
76 77
78
79 80
81
82
83
84
85
86
87
88 89
90
91
92
93 94
95
96
97
98
98
99
100
101
102, 103, 104
105
106
107
108
109
110
111
112
113
114
115
1Flange Bolt M6x8 X6
2Recoil Starter Cover
3Recoil Starter Spring
4Recoil Starter Rope
5Recoil Starter Reel
6Ratchet Spring X2
7Starter Ratchet X2
8Ratchet Guide Spring
9Ratchet Guide
10 Setting Screw
11 Flange Bolt M6x12 X2
12 Fan Cover Comp
13 Switch
14 Recoil Starter Knob
15 Nut M14
16 Start Hub
17 Cooling Fan
18 Fly Wheel
19 Flange Bolt M6x29
20 Governor Washer
21 Governor Weight Holder
22 Oil SealX2
23 Governor Shaft
24 Governor Holder Clip
25 Support Filter
26 Governor Shaft Washer X2
27 Governor Cover
28 Side Place
29 Drain Plug Bolt X2
30 Drain Bolt Washer X2
31 Crankcase
32 Change Wire Flameout
33 Diode Comp
34 Oil Level Switch Assembly
35
36 Connection Rod Comp
37 Crankshaft Comp
38 Radial Ball Bearing X2
39 Case Over Packing
40 Oil Filler Cap Assembly
41 Air Cleaner Assembly
42 Crankcase Cover
43 Flange Bolt 8x32 X6
44 Oil Filler Cap
45 Throttle Return Spring
46 Governor Arm
47 Nut M6 X3
48 Governor Arm Shaft
49 Ignition
50 Flange Bolt 6x25 X2
51 Governor Rod
52 Governor Spring
53 Governor Arm Bolt
54 Lock Pin
55 Wire Sheath
56 Control Assembly
57 Valve Lifter X2
58 Dowel Pin 9x14 X2
59 Camshaft Assembly
60 Key
61 Piston
62 Piston Pin
63 Piston Pin Clip X2
64 Oil Ring Comp
65 Second Ring Set
66 First Ring Set
67 Cylinder Head Gasket
68 Dowel Pin 10x14 X2
69 Intake Valve
70 Exhaust Valve
71 Shroud Comp
72 Spark Plug
73 Flange Bolt 8x60 X4
74 Valve Oil Seal X2
75 Valve Spring X2
76 Exhaust Valve Spring Retainer
77 Intake Valve Spring Retainer
78 Valve Rotator
79 Fuel Gauge Assembly
80 Rocker X2
81 Rectify Bolt X2
82 Lock Nut X2
83 Fuel Filter
84 Grip Sheath, Speed Governor
85 Diode Base Comp
86 Pivot Bolt X2
87 Guide Push Rod
88 Push Rod X2
89 Head Over Packing
90 Head Over Comp
91 Breather Tube
92 Clip X2
93 Stud Bolt X2
94
95 Fuel Tank Cap Comp
96 Fuel Tank Comp
97 Pipe, Fuel
98 Nut M6 X2
99 Fuel Tank Joint
100 Recoil Assembly
101 Air Cleaner Cover
102 Nut M8 X2
103 Washer Ø8 X2
104 Spring Washer Ø8 X2
105 Cylinder Head Comp
106 Stud Bolt 6x113 X2
107 Insulator Packing
108 Carburettor Insulator
109 Carburettor Packing
110 Carburettor Assembly
111 Chock Level Comp
112 Carburettor Washer
113 Base, Air Cleaner
114 Flange Bolt M6x20 X2
115 Element, Air Cleaner
TSPWP ENGINE EXPLODED VIEW & PARTS LIST
Table of contents
Other Tool Shed Water Pump manuals
Popular Water Pump manuals by other brands

Glentronics
Glentronics PRO Series Instruction manual & safety warnings

Ryobi
Ryobi RY31DP18 Operator's manual

ITT
ITT 3196 i-FRAME Installation, operation and maintenance manual

Dover
Dover PSG MOUVEX SUBMERGED AM UNIT ON PLATE Installation operation & maintenance

BUSCH
BUSCH RA 0165 D instruction manual

Graco
Graco ProConnect CS manual