ToolKitRC M6 User manual

@ToolkitRC 2019
1
M6
Manual V1.0
2019.06
www.ToolkitRC.com
ToolkitRC Technology (Shenzhen) Co.. Ltd.

@ToolkitRC 2019
2
Introduction
Thank you for purchasing the M6 Toolkit Charger.
Please read this manual carefully before use.
Key Points
Tips
Important
Information
Further information
To ensure you have the best experience with this
product please scan the QR code below to stay up to date
with news. information and firmware updates for your
charger.

@ToolkitRC 2019
3
Safety
1. The M6 charger allows input from 7-28V. For best
operation ensure the power supply is stable and pay
attention to connection polarity.
2. Do not use this product in excessively hot, wet or
moist conditions or near flammable objects, liquids
or gas.
3. Only use this product while under supervision, do
not leave charging batteries unattended.
4. Disconnect batteries or power supply when not in
use.
5. When charging please select the charge voltage
and current suitable to your battery. Check the
battery manufacturers specifications for further
details. Do not charge batteries above their rated
voltage and amperage specifications.

@ToolkitRC 2019
4
Contents
Introduction.................................................... 2
Key Points........................................................2
Safety............................................................... 3
M6 Layout....................................................... 6
Quick start....................................................... 7
Charge and discharge...................................9
1. Battery type setting....................................9
2. Cutoff voltage setting(TVC)..............11
3. NiMH Setting(PeakV).........................12
4. Battery Setting..........................................12
5. Current setting......................................... 14
6. Working mode.........................................15
Battery Measurement..................................24
Signal output................................................ 27
Power output................................................30
Drone charging............................................ 32
System settings.............................................34
Other functions............................................ 36
Specification..................................................38

@ToolkitRC 2019
5
Product description
M6 is a multi-function charger and discharger
that integrates receiver and servo test functions
along with power supply functions.
• Lipo. LiHV. LiFe Lion1-6S. NiMh 1-16s. PB 1-12s
battery charging and discharging and balance
management
•Charging current: Maximum 10A @150W
•Discharge Current: Recovery MAX 10A@150W
normal mode MAX 2A @8W
•Lithium battery full voltage can be set (TVC)
• can measure battery voltage. battery internal
resistance. lithium battery balance management
• Measurement of signal values such as
PWM/PPM/SBUS with accuracy of up to 1us
• can output PWM/PPM/SBUS standard signal.
accuracy up to 1 microseconds
• constant current constant voltage source output.
can customize 1-28v constant voltage. 1-10A
constant current
• can be adapted to the mainstream UAV battery.
automatically activated and charged.
•Device simulation for USB flash drive. copy upgrade
file to achieve product firmware upgrade
@ToolkitRC 2019
6
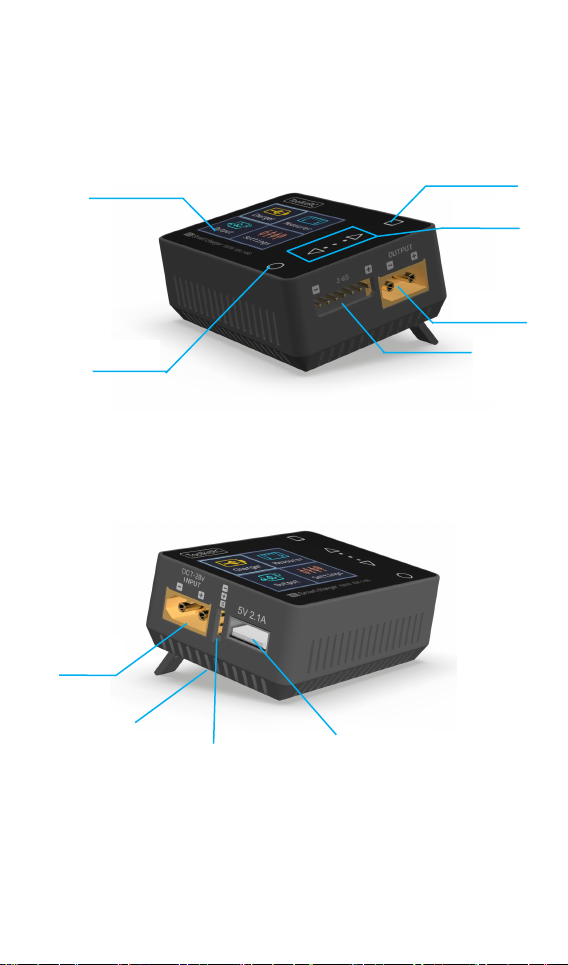
M6 Layout
Front
Back
Display
Exit
Output
Balance
Port
Input
Cooling
USB port
Signal Port
Up/Down
OK

@ToolkitRC 2019
7
Quick start
1. The 7-28V power supply is connected to the
input port on the back of the M6
2. The display shows the bootup logo and stays
for 2 seconds
3. Accompanied with do-re-mi bootup sound
4. the bootup is completed. the display enters
into the main interface as shown below
5. Press [up] or [down]. move the cursor to
select function. press the [OK] button to
enter the selected function and enter the
corresponding interface
6. After entering the related function interface.
Press [up] or [down] to move the cursor to
select the setting item or value. press the [OK]

@ToolkitRC 2019
8
and modify the option or value. After the
modification is completed. press the [OK] to
confirm.
7. Press the [Exit] key to end the modification or
return to the previous screen.
===============================
1. Short press the [OK] once to determine
the key function.
2. Press and hold the [OK] for 2 seconds as the
delete key function.
3.Pressing any button will give a sound prompt.
===============================
@ToolkitRC 2019
9
Charge and discharge
After selecting the [Charge] function on the main
interface press [OK] to enter the charging function.
The following interface is displayed.
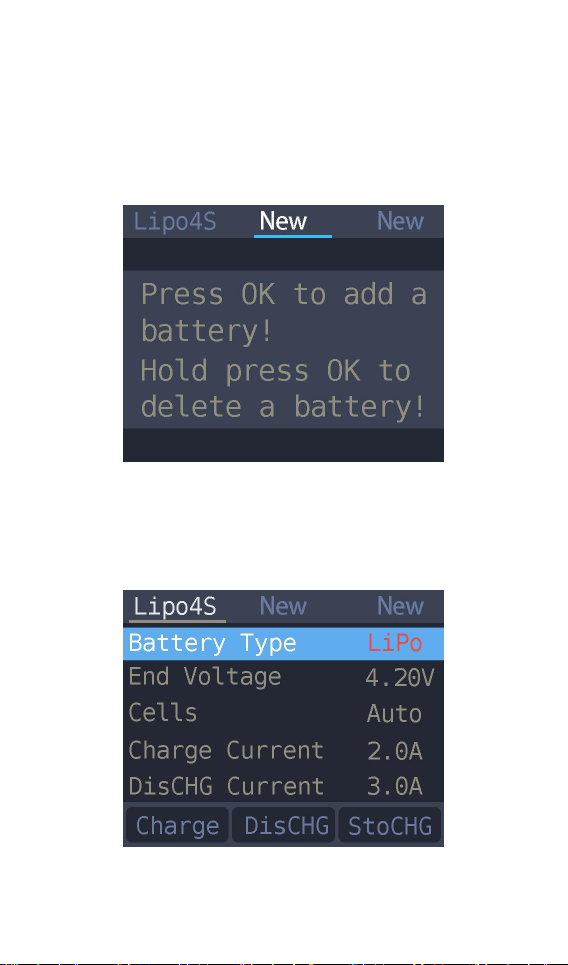
1. Battery type setting
Press [up] or [down] to move the cursor. Select the
battery type to be set. Press [OK] to enter the
battery setting interface as shown below.
Move the cursor to [Lipo] and press [OK] to modify

@ToolkitRC 2019
10
the battery type. The charger supports charging and
discharging five types of batteries: Lipo. LiHV. LiFe.
Lion.NiMh. PB. After selecting the correct battery
that matches the actual battery Short press [OK] and
[Exit] Effective.
===============================
Important:
1. Incorrect battery type charging may
damage the battery. charger. and may lead
risk of burning. etc.. please be double careful.
2. battery that cannot be indicated the
battery type. pls do not use this product to
charge
===============================
Information:
1. Lipo: often referred to as lithium polymer
battery. nominal voltage 3.70V. fully charged
4.20V battery
2. LiHV: often referred to as high-voltage lithium
battery. nominal voltage 3.85V. 4.35V battery
after full
3. LiFe: often referred to as lithium-iron Phosphate
battery. nominal voltage 3.30V. fully charged
3.60V battery
4. Li-ion: often referred to as lithium-ion battery.
nominal voltage 3.60V. fully charged 4.10V battery

@ToolkitRC 2019
11
5. NiMh: Often called nickel-metal hydride battery.
nominal voltage 1.20V
6. PB: often referred to as lead-acid battery. nominal
voltage 2.00V
2. Cutoff voltage setting(TVC)
Move the cursor to [End Voltage] and press [OK] to
modify the battery charge cut-off voltage. Press [up]
or [down] to adjust the value and step 10mV.
===============================
1. only LiPo. LiHV. LiFe.Lion battery can set
the cutoff voltage
2. Do not modify the cutoff voltage when you are
unfamiliar with battery characteristics.
3. the cutoff voltage can be set to the range of
positive and negative 50mV of full voltage
4. vocabulary explanation: TVC: terminal voltage
control
@ToolkitRC 2019
12
===============================
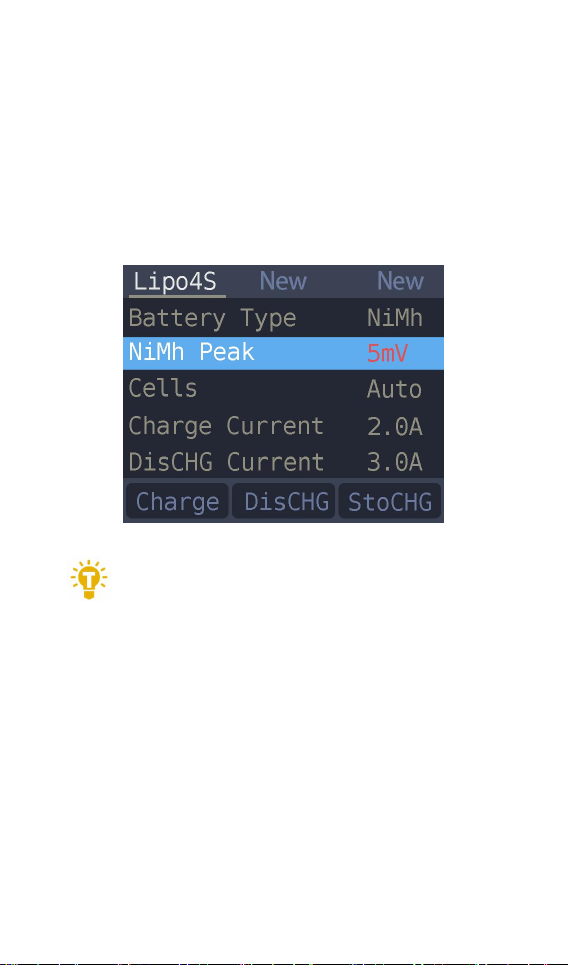
3. NiMH Setting(PeakV)
When the battery type is NiMh. you can set the
negative voltage value when the battery is full. and
the range can be set from 5mV to 20mV. as shown
below.
===============================
Tips:
1. Only NiMh battery can set the battery
negative voltage value
2. vocabulary explanation:PeakV: Peak voltage drop
per piece when NiMH battery is full
===============================
4. Battery Setting
Move the cursor to the [Cells] and press the [OK]
button to change the number of battery cells. Press
[up] or [down] to adjust the value. When set to

@ToolkitRC 2019
13
[Auto]. the charger will automatically recognize the
number of cells on the connected batteries
according to the voltage of battery which connected
with output port
=================================
Tip:1. the battery which was over- discharged
or over-charged. may cause the number of
cells to be recognize falsely. you need to manually
set the correct number of cells.
2. If the number of cells was set incorrectly. The
battery cannot be full charged. or be overcharged
and damaged. please set it carefully.
After the Lixx battery is connected to the
balance port. the number of battery cells can be
more accurately identified.
===============================

@ToolkitRC 2019
14
5. Current setting
Move the cursor to the charging current
[Charge Current] position and press [OK] to modify
the charging current. Press up or down to adjust the
value and step 0.1A. Press and hold up or down to
add or subtract quickly. The charger supports up to
10.0A.
Move the cursor to the [Discharge current]
position and press [OK] to modify the discharge
current. Press up or down to adjust the value and
step 0.1A. Press and hold up or down can be quickly
reduced. The charger supports two discharge
modes. 1. ordinary discharge mode. through internal
heat dissipation discharge. maximum support
2.0A@8W. 2. Recovery discharge mode. When the
input power source is a battery this function can
recover electrical energy to the input battery, the
maximum support 10.0A current.

@ToolkitRC 2019
15
===============================
Tip:
1. Please set the charging rate at 1-2C
according to the battery capacity. For example. if the
battery capacity is 2000mAh. please set the charging
current to 2.0-4.0A.
2. charging and discharging current is only valid in
the corresponding working mode.
3. For the discharge mode setting. refer to the
<System Settings> chapter of this manual.
===============================
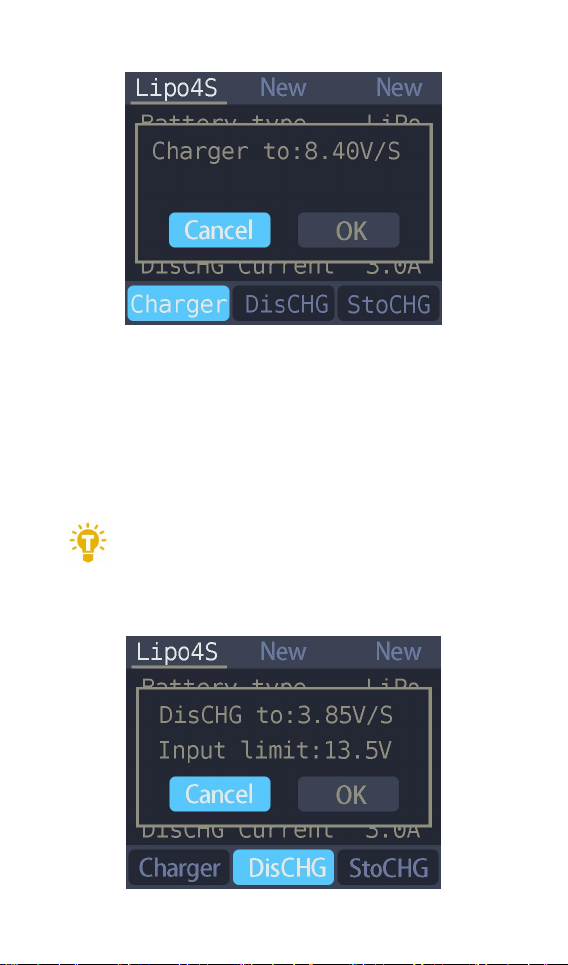
6. Working mode
Move the cursor to [Charge] [DisCHG] [StoCHG]
position. press [OK]. the charger will work in the
mode of the selected function. When selected as
[Charge]. it will indicate the target voltage that will
charge the battery. As shown below
@ToolkitRC 2019
16
When selected as [DisCHG]. it will prompt the target
voltage to discharge the battery to. If the discharge
mode is to recover the discharge. it is also necessary
to set the cutoff voltage of the battery being used as
the power source. As shown
=================================
Tip: 1,To use energy recovery discharge mode
(recycle) please read the details on setting
discharge mode on page 37 of this manual.
=================================
@ToolkitRC 2019
17
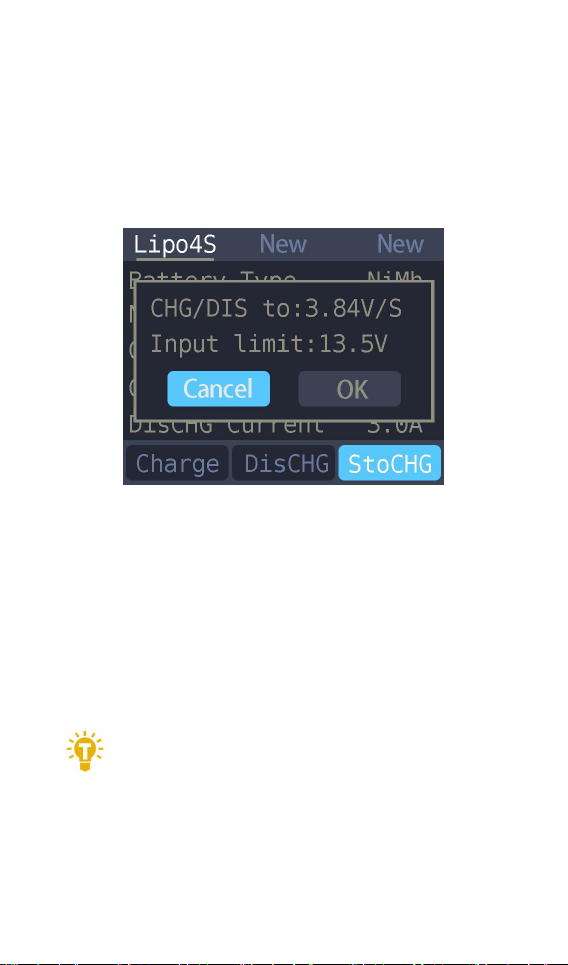
When selected as [StoCHG]. it will prompt the target
voltage to charge and discharge the battery. If the
discharge mode is to recover the discharge to the
power source batter. it is also necessary to set the
cutoff voltage of the battery. As shown below
The high limit voltage of recovered. The default is
0.5V higher than the input voltage. Please set
according to the maximum limit voltage of the input
power supply. To cancel the operation. move the
cursor [Cancel] or press [Exit]. Move the cursor to
[OK]. short press [OK] to start charging. and display
the charging and discharging work interface.
=================================
Tip:The discharge cutoff voltage should be
set.
1. According to the discharge characteristics of the
battery.
2. After the recovery limit voltage is set to the
highest protection voltage of the power supply.

@ToolkitRC 2019
18
the charger will automatically stop the recovery
discharge. Setting a high overvoltage may
damage the input power. Do not set the input
limit higher than the capacity of the power
source battery.
===============================

@ToolkitRC 2019
19
Charge and discharge
When charging and discharging starts the charger
enters the working interface as shown below.
Press [up] or [down] key on this screen to switch
the bottom status display information or press and
hold [OK] for 2 seconds to dynamically set the
working current. As shown below
25.20V: The battery voltage of the output port.
5.0A: Charging or discharging current

@ToolkitRC 2019
20
Current limit flag. P: power. C: maximum current
I: input over current or Power A: activate charging
F: The main port is full voltage or a single cell is full
126W: Charge or discharge power of the charger
32'C: internal temperature of the charger
010:59: The time when the work has started. Unit:
minute: second
80mAh: the capacity that has been charged and
discharged this time
Lipo 6S: currently set battery type and number of
cells
5.0A: Current operating current set. Long press to
modify.
16.8V: Input supply voltage
9.3Wh: Input power that has been discharged from
the power supply.
1 4.20V: 1st battery voltage
2 4.20V: 2nd battery voltage
3 4.21V: 3rd battery voltage
4 4.22V: 4th battery voltage
54.22V: 5th battery voltage (balancing)
6 4.20V: 6th battery voltage
-.--V : no battery connected
To end the charge and discharge work. short press
[Exit]. in the pop-up prompt box. select [OK] to exit.
When charging is complete or charging is wrong
A pop-up windows display and a tone sounds.
Table of contents
Other ToolKitRC Batteries Charger manuals

ToolKitRC
ToolKitRC Q6AC User manual

ToolKitRC
ToolKitRC M8 User manual

ToolKitRC
ToolKitRC M4Q User manual

ToolKitRC
ToolKitRC M7 User manual

ToolKitRC
ToolKitRC M7AC User manual

ToolKitRC
ToolKitRC M6DAC User manual

ToolKitRC
ToolKitRC M6D User manual

ToolKitRC
ToolKitRC C6 User manual

ToolKitRC
ToolKitRC C3 User manual

ToolKitRC
ToolKitRC Q4AC User manual


