TOP VEHICLE TECH KWPOR12 User manual

www.topvehicletech.com
The informaon provided in this document is subject to change without noce due to changes and/or
improvements to the product/s.
This dash image is a visual representaon for display purposes only.
V1.0421
KWPOR12
INSTALLATION MANUAL
PORSCHE

2
www.topvehicletech.com
The KWPOR12 installaon kit allows for the retenon of the vehicle’s steering wheel controls and maintains the
original aesthec of the interior when installing a new car stereo. The KWPOR12 gives you everything you need
for a complete install in one box. The components of this kit are compable for the Porsche Macan (2014-2016)
with amplied PCM 3.1 stereos. The wiring harness and Infodapter interface will retain the steering wheel
controls and factory phone buons, vehicle sengs and Aux and USB retenon. It also aids in generang
parking sensor graphics for the new stereo and provides an input for both an OEM and aermarket reverse
camera (if applicable). Supplied with a Quadlock connector.
Installaons should be carried out by, or under the guidance of an experienced installer. If you do encounter any
problems during the installaon of this product, then please contact our dedicated customer service team at:
Phone: E-Mail:
• 1x Fascia plate (with accessories)
• 1x Instrucon manual
• 1x Steering wheel control harness and Infodapter interface (with USB retenon lead)
• 1x Antenna adapter
• 1x DAB antenna adapter
• 1x Stereo patch lead

3
www.topvehicletech.com
1. Open the passenger side door and proceed to pull away the door trim from the pillar.
2. Using a set of panel removal tools, begin to pry away the pillar casing.
4. The DAB antenna not only has a self adhesive backing, but also features a black earth sheet. When
placing the DAB antenna, the earth sheet be placed onto the metal part of the pillar. The antenna
itself must be located roughly 15cm from the top of the windscreen.
5. Once happy with the placement, take the 3m of wiring extension and feed it down through to the
stereo’s opening. With the wiring adjusted to the appropriate length, feel free to re-install the glovebox.
3. The glovebox will need to be opened/removed to route the antennas wiring.
1. Use a bojo tool to unclip the trim panel that houses both the passenger side and le-central air vent.
3. Remove the 4x screws that secure the main stereo.
3. When happy with the alignment, and the “Stereo Installaon” process is complete, place the stereo
into the dashboard. Once seated correctly, place the fascia plate over the top and screw the fascia to the
cage as well as the dashboard by using the pre-exisng screws.
2. Slide the new stereo into the back of the bracket casing and screw into place using the screws within the
kit. Once aached, oer the whole unit to the back of the fascia to gauge the correct alignment.
2. Then use the bojo tool to remove the air vent just between the radio and the steering wheel.
4. With the boom two screws undone, begin to remove the Porsche branded panel located under the
main radio by liing and pulling out of place.
5. With this boom panel removed, ensure the gear shier is pulled back and begin to pull the main radio
out of place. Once out, disconnect all of the wiring.
1. Start by aaching the clips found within the kit to the back of the new boom trim. You will also need
to relocate the plasc guide clips from the OEM radio to the relevant spokes found on the bracket casing.
4. Once the fascia is installed, clip the boom panel into place and re-locate the air vents.

4
www.topvehicletech.com
12. Aach the addional wiring on the harness to the back of the stereo:
- Speed Pulse - Reverse Gear - Park Brake - Amp Remote - Mute
13. When all the above wires (and any addional accessories) have been connected, nally make the
connecons between the stereo and the vehicles pre-exisng power/stalk connectors.
2. Connect the bullet connector from the stereo patch lead to the ‘steering wheel remote input’ on the
back of the new stereo.
10. Connect the DAB antenna’s SMB connector to the back of the new stereo.
11. Aach the antenna adapter to the vehicles pre-exisng connecon and the back of new stereo.
1. Take the steering wheel control interface in hand and connect both the 12-way stereo patch lead and
the 14-way steering wheel harness connectors to the corresponding sides.
6. Connect the yellow RCA connector to from the camera extension to the reverse camera input of the
stereo.
To retain factory OEM reverse camera: aach the yellow female RCA from on the camera extension
harness to the male yellow RCA on the main wiring harness.
To add an aermarket reverse camera: aach the yellow female RCA from on the camera extension
harness to the male yellow RCA of the aermarket reverse camera.
7. Connect the USB retenon lead between the vehicles OEM connecon and the USB connecon from
the stereo.
8. Connect the Red/White RCA connectors labelled ‘AUX’ to the back of the new stereo.
5. Connect the 4-way connector on the camera extension harness to the interface.
On this parcular interface are a set of dipswitches. These dipswitches have the following properes:
1: OFF - Kenwood. ON - Pioneer.
2: OFF - NTSC reversing camera (default). ON - PAL reversing camera.
3: Change from OFF to ON to ‘reset’ screen seng to factory default.
Note: during this procedure, the screen background will change to red and no sengs adjustments can be made.
4: Not Used.
3. Connect the 8-way molex connector on the harness to the amplier retenon interface.
4. Take the vehicles bre opc amplier connecon and aach this to the remaining port located on the
amplier retenon interface.
9. Connect the Red/White RCA connectors labelled ‘Speaker’ to the front line outputs on the back of the
new stereo.

5
www.topvehicletech.com
Please note: conguraon layout may dier dependent on vehicle model.
12
3 4
5 6
7
1. Volume +/- (Scroll) 2. Instrument Cluster Navigaon
Mute (Short Press) 4. Instrument Cluster Navigaon
5. Pick Up
3. Programmable Funcon 6. Hang Up
(on both Short & Long Press)*
7. Source (Short Press) Voice Assist (Long Press)
1. Menu + / Menu - 2 - 7. Funcons as above.
Select Menu Item (Short Press)
1. Camera / Parking Graphics Toggle (Long Press)
The diamond buon on the steering wheel can be programmed to perform specic radio funcons whilst
in the Infodapter menus on both a long and short press. Funcon opons include:
and . To assign a funcon, enter the Infodapter menu and go to the ‘Preferences’ sub-menu.
Select the desired buon funcon against the ‘Diamond Short Press’ and ‘Diamond Long Press’ opons.
any radio funcon in the
OEM instrument cluster menu
NonePreferences

6
www.topvehicletech.com
Within ‘Infodapter Sengs’ you are able to alter a the look and feel of the Infodapters menu/display:
Screen Size/Posion Picture Sengs
• Horizontal Size • Brightness
• Horizontal Posion • Contrast
• Vercal Size • Saturaon
• Vercal Posion
Preferences
• Camera Connected - Choose the style of camera connected to the vehicle (if applicable).
• *Camera Acve (OEM/Reverse) - Choose whether the image appears on the display when triggered by
the Porsche system, or only when reverse gear is acve.
• *RVC Grid Lines (Yes/No) - Rear view camera guidelines.
• **Reverse Priority (Park Assist/Camera) - Choose whether the display shows the parking graphics or
reverse camera image on screen.
• **Camera Delay (0 to 20) - Increase camera delay to reduce ‘rolling’ eect on screen when switching.
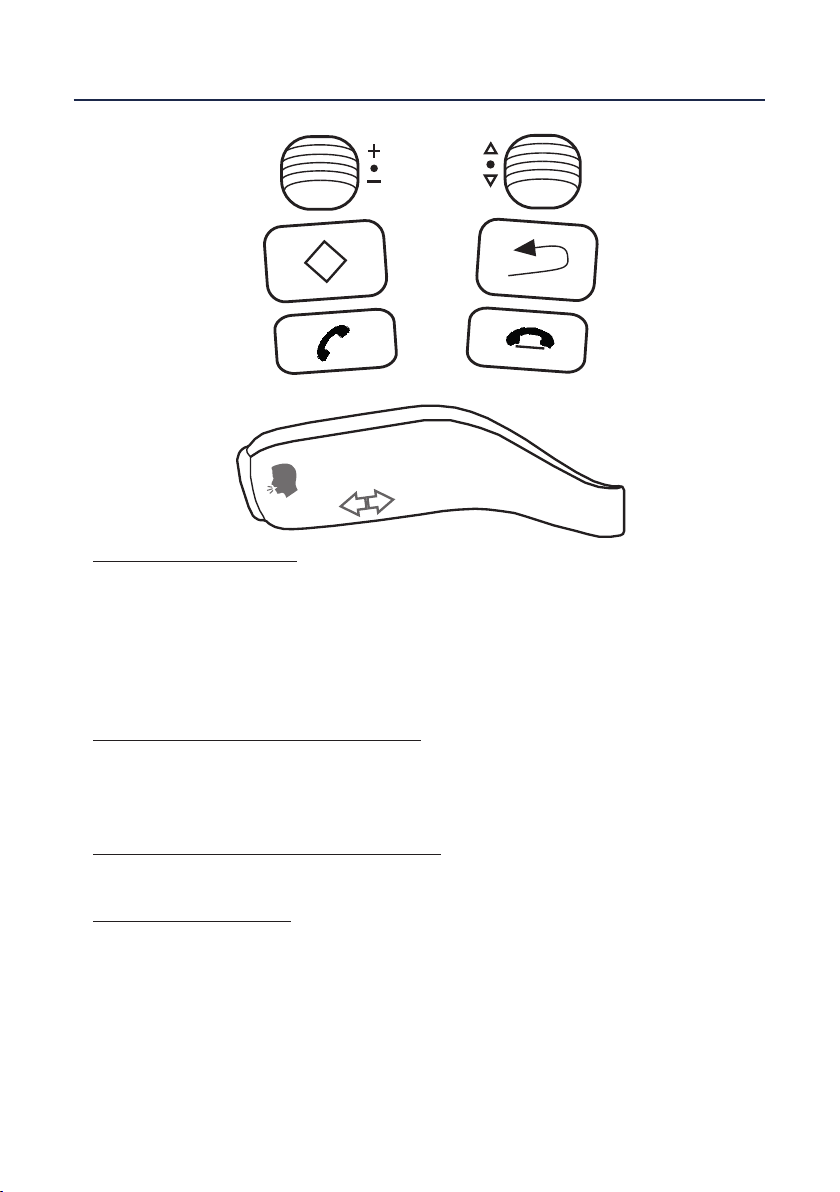
• Diamond Short Press - Select ‘short press’ funcon for steering wheel control
• Diamond Long Press - Select ‘long press’ funcon for steering wheel control
• Park Brake Source - Set ‘Park Brake’ output to acvate when park brake is on (Brake), when speed is less
than 3km/h (Speed) or to remain on at all mes (Always On).
• Restore Factory Sengs - select ‘Yes’ to return all Infodapter sengs to factory defaults.
Within the ‘Language’ menu, you are able to select between a wide array of dialects. This is default to
English upon installaon.
Within ‘Version’, you are able to view the current rmware that is being ulised by the Infodapter.
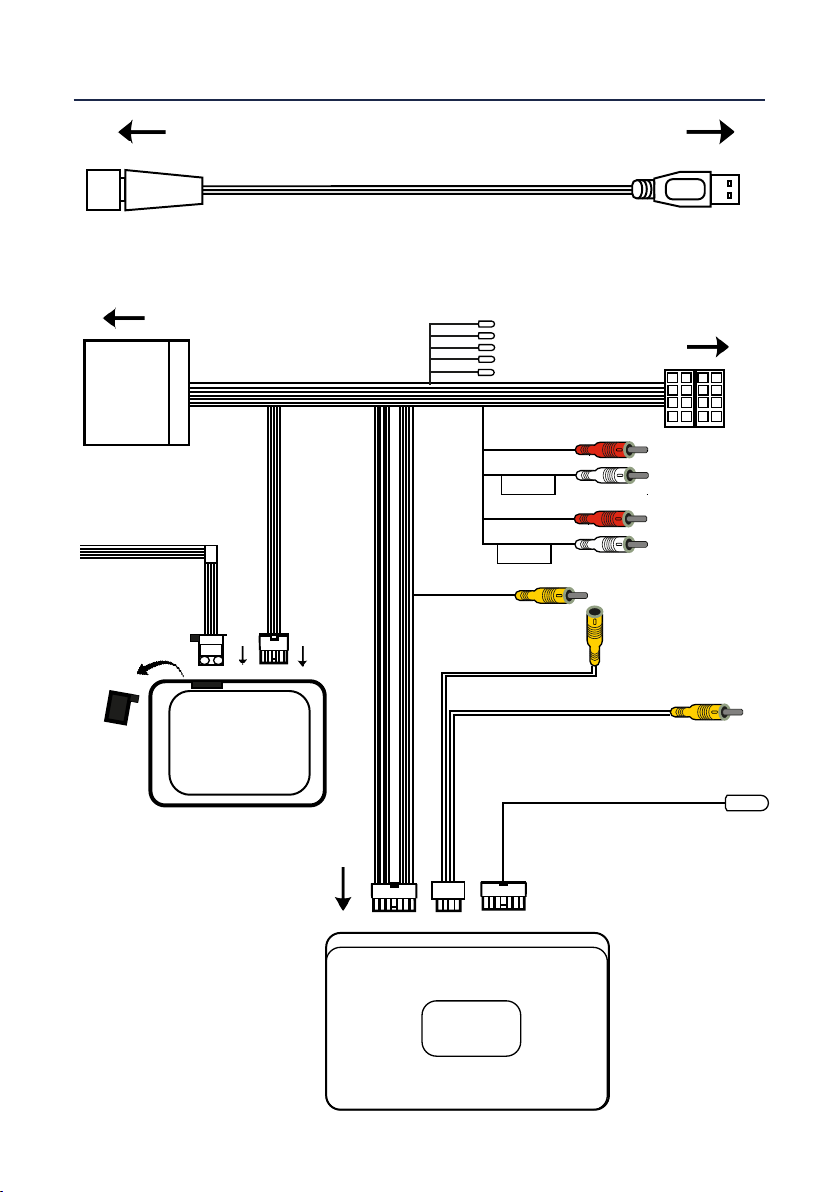
As well as steering wheel control funconality, this interface allows the retenon of key vehicle features
and funcons via a bespoke ‘Infodapter’. Accessing the Infodapter, you are able to navigate through the
following opons and sengs:
*Only available when using OEM camera
**Only available when using OEM or Aermarket camera
The Infodapter interface will automacally generate a replicaon of the OEM front/rear parking sensor
graphics based on the vehicle’s data. These graphics have been designed to replicate the Porsche’s original
data to retain the OEM feel of the system.
To toggle between the reversing camera and the parking graphics while one is acve on screen, hold
down the Volume buon (1) whilst the camera or graphics are acve. This seng can be changed by the
‘Reverse Priority’ seng in the ‘Preferences’ sub-menu.

7
www.topvehicletech.com
ISO Connector
Connect to aftermarket stereo
Quadlock Connector
Connect to quadlock connector from vehicle
Main Wiring Loom
Connector [14 Pin]
Connect to Interface Box
White/Red RCA
Connectors (AUX)
Connect to
aftermarket stereo
Flying Wires
Pink - Speed Pulse
Green - Park Brake
Purple/White - Reverse Gear
Blue/White - Amp Remote
Grey - Mute
Male Yellow RCA Connector
Connect to Female Yellow RCA
for factory camera retention.
AUX
SPKR
White/Red RCA
Connectors (Speaker)
Connect to front line
output on aftermarket
stereo
Molex Connector [8 Pin]
Connect to Amp
Retention Interface
Amp Retention Interface
Male Yellow RCA Connector
Connect to stereos camera input
Female Yellow RCA Connector
Connect to aftermarket camera
or Male Yellow from harness.
Stereo Patch Lead Connector [12 Pin]
Connect to Interface Box
Note: Must be connected first before power
connection is made to the interface
Stereo Patch Lead Bullet Connector
Connect to ‘Steering Wheel Remote Input’
on back of the stereo.
USB Retention Lead
Connect to vehicle Connect to aftermarket stereo
Fiber Amplifier Connector
Firstly remove dust cover
from interface
Then connect fiber
amplifier connection
from vehicle
to interface

8
www.topvehicletech.com
If at any point you experience any problems and need any assistance before, during or aer the
installaon process, please contact us via :
Phone:
E-Mail:
Mon - Fri 9am - 5.30pm GMT
If you would like to download a digital copy of this manual, or any other product, then please
visit the www.topvehicletech.com website.
This manual is considered correct at the me of prinng but is subject to change. For the latest
manuals & updates, refer to our website.
Copyright 2021 by TopVehicleTech.
All rights reserved. No part of this publicaon may be reproduced, distributed or transmied
in any form or by any means, including photocopying, recording, copying or other electronic or
mechanical methods, without the prior wrien permission of the author.
Table of contents
Other TOP VEHICLE TECH Car Video System manuals

TOP VEHICLE TECH
TOP VEHICLE TECH KWBMW3 User manual

TOP VEHICLE TECH
TOP VEHICLE TECH KWBMW9 User manual

TOP VEHICLE TECH
TOP VEHICLE TECH KWPOR7 User manual

TOP VEHICLE TECH
TOP VEHICLE TECH GRKLR06 User manual

TOP VEHICLE TECH
TOP VEHICLE TECH GRKBM02 User manual

TOP VEHICLE TECH
TOP VEHICLE TECH GRKFD04 User manual

TOP VEHICLE TECH
TOP VEHICLE TECH GR3VXL4 User manual

TOP VEHICLE TECH
TOP VEHICLE TECH KWBMW11 User manual

TOP VEHICLE TECH
TOP VEHICLE TECH GRKLR05 User manual

TOP VEHICLE TECH
TOP VEHICLE TECH KWPOR16 User manual