Top 9934160 User manual
www.motorparts.it
CE (IEC, EN)
Cod. 9934160
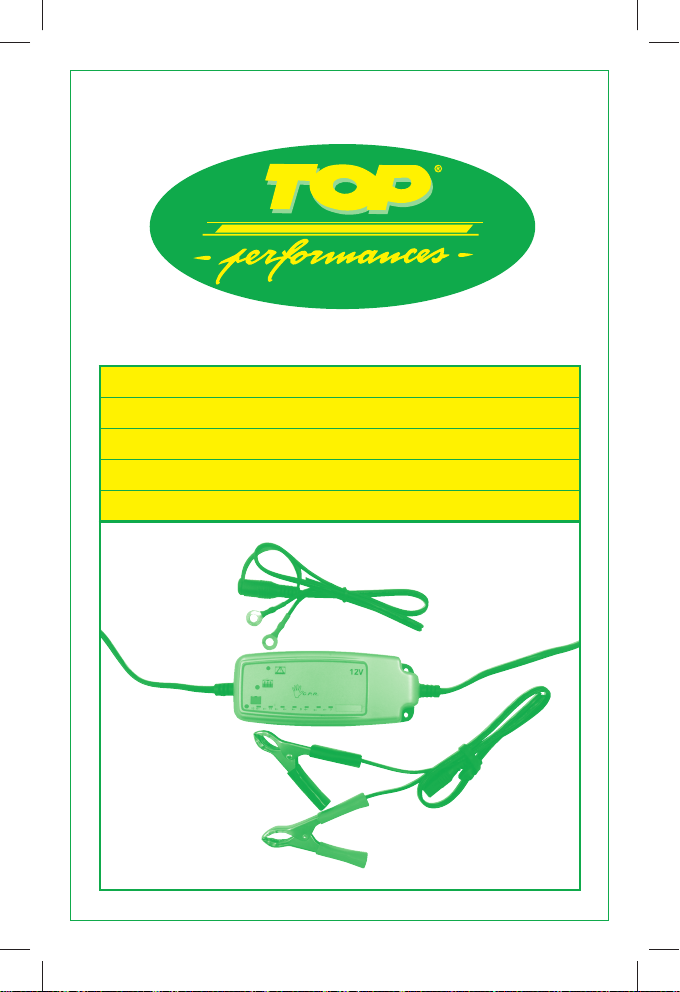
PROFESSIONAL BATTERY CHARGER
PER BATTERIE AL PIOMBO-ACIDO E AL GEL
CAPACITÀ: 2-100 Ah

2
INTRODUZIONE:
CARICATORE - MANTENITORE
Si tratta di un caricatore e mantenitore di carica per tutti i tipi
di batterie al piombo-acido da 12V.
Design moderno e prodotto di ottima qualità per offrire
prestazioni SICURE, SEMPLICI, e AFFIDABILI per caricare
e mantenere in carica quasi tutti i tipi di motocicli/scooter di
ATV con batterie da 12V.
La barra a LED è facile da interpretare e mostra la tensione
della batteria aiutandovi a tenere sotto controllo lo stato della
batteria stessa.
In caso di batteria molto scarica, il pulsante C.P.R. del
caricatore può recuperare la batteria e continuare a ricaricarla.
Mantiene la batteria in funzione, prolungandone la vita.
ISTRUZIONI DI SICUREZZA
1. Il manuale contiene importanti informazioni sulla sicurezza
e istruzioni sul funzionamento del caricabatterie.
2. Durante le operazioni di carica le batterie possono
emettere gas esplosivi, quindi è importante evitare
fiamme libere e scintille.
Il caricatore è progettato per caricare batterie al piombo-
acido da 2 a 32 Ah. Il caricatore può mantenere in carica
le batterie fino a 100 Ah. Non usare per scopi diversi da
quello previsto.
3. È necessario mantenere ben areato il locale dove è in
funzione il caricatore.
4. Utilizzare sempre gli accessori, i collegamenti e i cavi
forniti in dotazione con il caricatore per prevenire il rischio
d’incendio, folgorazione o gravi lesioni alle persone.
5. Quando si scollega il caricatore dalla presa di CA,
scollegare sempre la spina per ridurre il rischio di danni al
cavo e alla spina di alimentazione elettrica.
6. Non utilizzare mai il caricatore in presenza di spina o
cavo danneggiato, in tal caso restituire il caricatore al
rivenditore.
3
7. Non utilizzare mai il caricatore se ha ricevuto un colpo
violento, è caduto o è stato in qualche modo danneggiato;
in tal caso portarlo da un tecnico qualificato per assistenza.
8. Non smontare il caricatore; portarlo da un tecnico
qualificato per assistenza e riparazioni. Un rimontaggio
errato può causare rischio di folgorazione o incendio.
9. Per ridurre il rischio di folgorazione, scollegare il caricatore
dalla presa di CA prima di effettuare qualsiasi operazione
di manutenzione o pulizia. Disabilitare i comandi non è
sufficiente per ridurre tale rischio.
CARICARE LA BATTERIA
Collegare il caricatore ad una batteria montata all’interno o
all’esterno del veicolo:
1. Quando si collega o si scollega il cavo della batteria, la
spina del caricatore deve essere scollegata dalla presa di
corrente CA.
2. Collegare il morsetto positivo del caricatore (rosso) al
cavo positivo della batteria.
Collegare il morsetto negativo del caricatore (nero) al
cavo negativo della batteria.
3. Collegare il cavo di alimentazione CA alla presa. La spia
rossa di allarme indica che la batteria è collegata con
polarità inversa.
4. Quando la batteria è collegata correttamente, il caricatore
mostra la tensione della batteria illuminando la barra a
LED, aiutandovi così a identificare lo stato della batteria.
5. Non posizionarsi di fronte alla batteria durante il
collegamento finale.
6. Per scollegare il caricatore, eseguire la procedura di
collegamento in sequenza inversa. Consultare le istruzioni
d’uso per ulteriori informazioni sulle operazioni di carica.
** Il caricabatterie deve essere collegato alla batteria
seguendo le istruzioni descritte in precedenza.

4
AVVIAMENTO DEL PROCESSO DI CARICA
AUTOMATICO
1. Assicurarsi che il cavo della batteria sia correttamente
collegato e iniziare il processo di carica inserendo la
spina del caricatore nella presa CA.
2. La spia di carica o di mantenimento si illumina. Quando
la spia di mantenimento si illumina la batteria è
completamente carica. Se la tensione della batteria cala,
il caricatore manda un impulso alla batteria. La lunghezza
dell’impulso dipende dal calo di tensione della batteria.
La ricarica può essere ripetuta con cadenza mensile.
Tuttavia si raccomanda di monitorare la batteria durante
le procedure di carica.
3. Il LED rosso indica che la batteria è collegata con polarità
inversa.
4. Se non succede nulla: se non si illumina nessuna spia,
ci potrebbe essere un problema con il collegamento ai
cavi della batteria, o la batteria può essere difettosa. Se
il processo di carica non si è avviato, questo potrebbe
essere dovuto al fatto che la presa di corrente o l’utenza
CA è guasta.
5. L’interruzione del processo di carica, in qualsiasi momento,
non comporta rischi. È necessario inoltre scollegare
la spina del caricatore dalla presa di corrente. Prima di
scollegare il cavo della batteria, scollegare sempre la spina
del caricatore dalla presa di corrente. Se si interrompe il
processo di carica di una batteria montata su un veicolo, il
cavo della batteria deve sempre essere scollegato prima
dal telaio e poi dall’altro cavo della batteria.
6. Se gli indicatori di carica e di mantenimento lampeggiano in
modo alternato, questo può dipendere dalle seguenti cause:
– Interruzione del processo di carica dovuto a un
collegamento instabile o dovuto alla non conduttività
della batteria.
– Se gli indicatori della batteria lampeggiano per più di
30 minuti la batteria può essere difettosa e deve essere
sostituita.
5
- Se il segnale lampeggiante lampeggia ad intervalli di più
di 10 secondi, c’è un autoscaricamento della batteria
elevato, indice di batteria difettosa. Si raccomanda
quindi di sostituire la batteria.
PULSANTE PER RECUPERARE LA BATTERIA (C.P.R.)
Se il caricatore indica che la tensione della batteria è
troppo bassa e non può passare alle procedure di carica
automatica, premere l’unico pulsante per recuperare la
batteria per 1-10 sec.; il caricatore tenterà di recuperare
la batteria fino a quando la tensione della stessa risale
sufficientemente permettendo il passaggio alle procedure di
carica automatica. Per determinare se la batteria sia buona o
meno, fare riferimento al manuale.
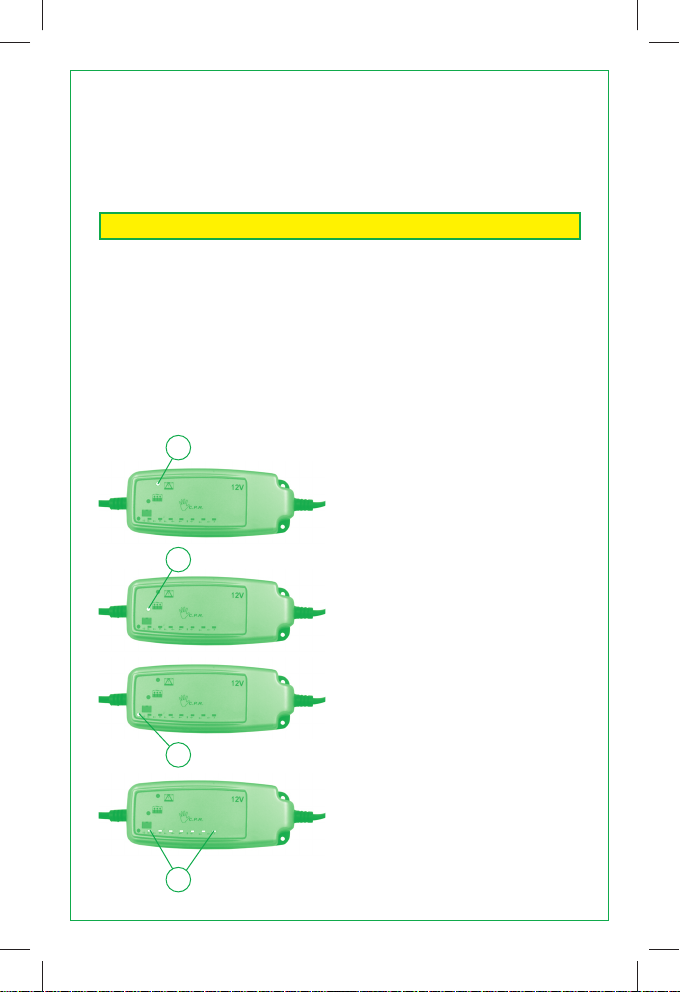
1
2
3
4
Figura (1) indica se collegata
con polarità inversa.
Figura (2) indica batteria da
12V e attualmente in carica
Figura (3) indica carica
completa
Figura (4) indica avvio carica
Table of contents
Languages:


