Topcom Speedopulse 1000W User manual

1
TOPCOM Speedopulse 1000w
Speedopulse 1000w
0681

2
Speedopulse 1000w
GB -
NL -
FR -
D -
SE -
DK -
N -
SF -
The features described in this manual are published with reservation to
modifications.
De in deze handleiding beschreven mogelijkheden worden gepubliceerd
onder
voorbehoud van wijzigingen.
Les possibilités décrites dans ce manuel sont publiées sous réserve de
modifications.
Die in dieser Bedienungsanleitung beschriebenen Leistungsmerkmale
werden
unter dem Vorbehalt von Änderungen veröffentlicht.
Funktionerna i denna bruksanvisning publiceras med reservation för
ändringar.
Vi forbeholder os retten til ændringer af de specifikationer, der er
beskrevet i denne brugsanvisning.
Funksjoner beskrevet i denne manualen kan endres uten nærmere
informasjon.
Tässä ohjekirjassa julkaissut tiedot voivat muuttua ilman
ennakkoilmoitusta.
This product is in compliance with the essential requirements and other relevant provisions of the R&TTE directive 1999/5/EC.
The Declaration of conformity can be found on :
http://www.topcom.net/support/cedeclarations.php

3
TOPCOM Speedopulse 1000w
ENGLISH
1 INTRODUCTION
Congratulations on your purchase of the Speedopulse 1000w.
The Speedopulse 1000w features a cycling computer in combination with a heartbeat
monitor. It is an effcient device for fitness cycling.
2 SAFETY NOTES
Using a Heart Monitor is NOT a substitute for professional medical attention. If you
suffer from heart disorder, illness or have recently taken up fitness training, it is
advisable that you seek a doctor or talk to your trainer and work out a fitness plan that
suits you.
Your Speedopulse 1000w is NOT a medical device.
The included heart rate monitor should only be used as a guide in maintaining a safe
heart beat rate for exercises. It should NOT be relied upon as a medical heart rate
monitor. If you are uncertain about how your exercise program will impact on your
heart, please consult a physician.
To ensure your safety, please use the Speedopulse 1000w under a doctor or coach's
direction if you have one of the following conditions:
• Cardiopulmonary disease
• Obesity.
• No exercise for an extended period of time.
3 CE MARK EN RESTRICTIONS
The CE symbol on the unit, user guide and giftbox indicates that the unit complies with
the essential requirements of the R&TTE directive 1995/5/EC.
The (!) symbol next to the CE mark, indicates that the radio standard is not allowed in
all European countries.
It can be used in the following countries
Austria, Belgium, Denmark, Finland, Germany, Italy, The Netherlands, Portugal,
Spain, Sweden, UK, Switzerland, Norway
4 DISPOSAL OF THE DEVICE AND BATTERIES
Dispose of the unit and used batteries in an environment friendly
manner.
Do not dispose of batteries in a normal household garbage.
Check the local regulations before using it
outside the country where it was purchased.
The standard may be prohibited in this country.

4
TOPCOM Speedopulse 1000w
5 CARE AND MAINTENANCE
Never use force to open the case or backside cover. DO NOT expose the unit to
extreme weather conditions or cleaning agents and solvents. Avoid dropping or rough
handling of the unit. Clean the device with a dry soft cloth or a soft cloth moistened
with water and mild detergent. Store the device in a dry place when not in use.
Take care of you chest belt. Wash the chest belt with water. Let it dry naturally,
avoiding putting the chest belt under the environment of high temperature or touching
the corrosive as strong acid or alkalis material.
6 BATTERY INSTALLATION
6.1 MAIN UNIT
Remove the battery cover from the bottom of the Main Unit
using a small coin. Install the 3 V battery (included in the
packaging) with the positive (+) pole facing the battery cover
and replace the cover.
Main Unit Battery: CR2032 (3V)
6.2 FORK MOUNTED TRANSMITTER
Remove the battery cover from the top of the Main Unit using a small
coin.
Install the 12 V battery (included in the packaging) in the transmitter
with the positive (+) pole facing the battery cap. Re-install the cap
with a small coin. Be sure it is sealed correctly to ensure water
resistance
Transmitter Battery: 12V/ VR22 / L1028 / A23
6.3 CHEST BELT
Remove the rubber pad.
Remove the battery cover by using a screwdriver.
Insert the 12V-battery (included in the packaging)
in the transmitter as per diagram. The positive(+)
pole should point to the CE mark.
Replace the metal cover with a screwdriver and
then attach the adhesive rubber plate on top of it.
Chest Belt Battery: 12V/ VR22 / L1028 / A23
+

5
TOPCOM Speedopulse 1000w
ENGLISH
7 INSTALLATION
7.1 MAGNET AND SENSOR
• Attach the magnet (7) to the spoke (8) at the right
side of the front wheel (5) approximately half the
length from the hub.
• Attach the SENSOR (3) loosely to the right fork
blade by using the cable ties (2)
Use a rubber shim (1) to ensure the sensor
fits tight.
• Position the SENSOR so that the MAGNET
passes within 2mm (6) of the alignment mark (5) on
the transmitter as the wheel rotates
• Tighten the zip ties to hold the SENSOR securely
in place and cut off the excess.
7.2 INSTALLING THE HANDLEBAR BRACKET
• Attach the mounting bracket to the right of the handlebar stem by using a screw-
driver.
• Use the rubber shims (provided) to ensure the bracket fits snuggly.
• Adjust the position of the bracket to desired angle. Tighten screws to secure
bracket.
8
7
6
1
2
3
4
5
8

6
TOPCOM Speedopulse 1000w
7.3 INSTALLING THE MAIN UNIT
• Slide the Main Unit into the mounting bracket until it snaps firmly into position (1).
• To remove Main Unit from mounting bracket, press the release button (2) on the
bracket and push the Main Unit forward with your thumb (3).
7.4 WEARING THE CHEST BELT
• To ensure good transmission, make sure the transmitter's conductive pads (1)
are moist, you can use water, saliva or ECG-gel (available at your local drug
store or chemist shop).
• Adjust the elastic belt so that it fits tightly around your chest just below the pecto-
ral muscles.
• Position the Chest Belt as per the diagram.
2
3
1
1

7
TOPCOM Speedopulse 1000w
ENGLISH
8 SETTINGS
After installing the batteries, you will automatically enter the setting menu.
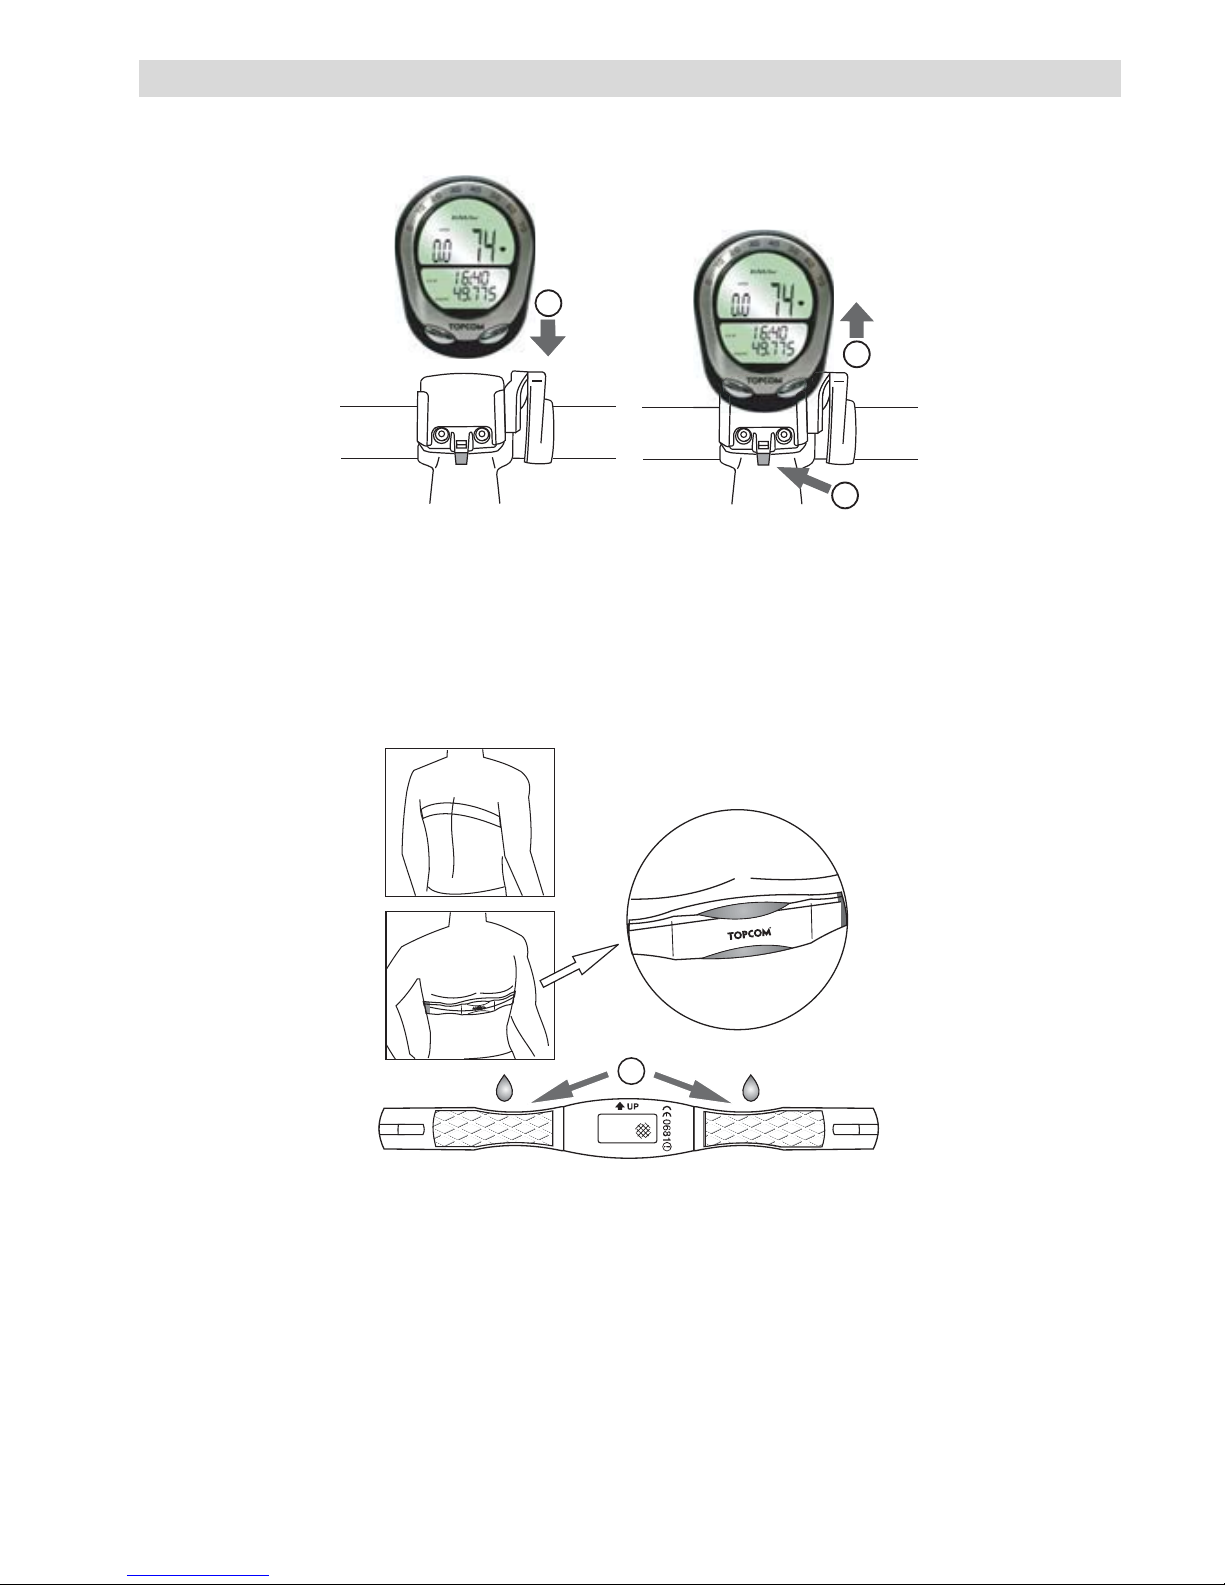
If you are in the measure mode, press and hold the right and left button together for 4
seconds. The unit will reset and it will enter the setting menu.
8.1 BIKE WHEEL SIZE
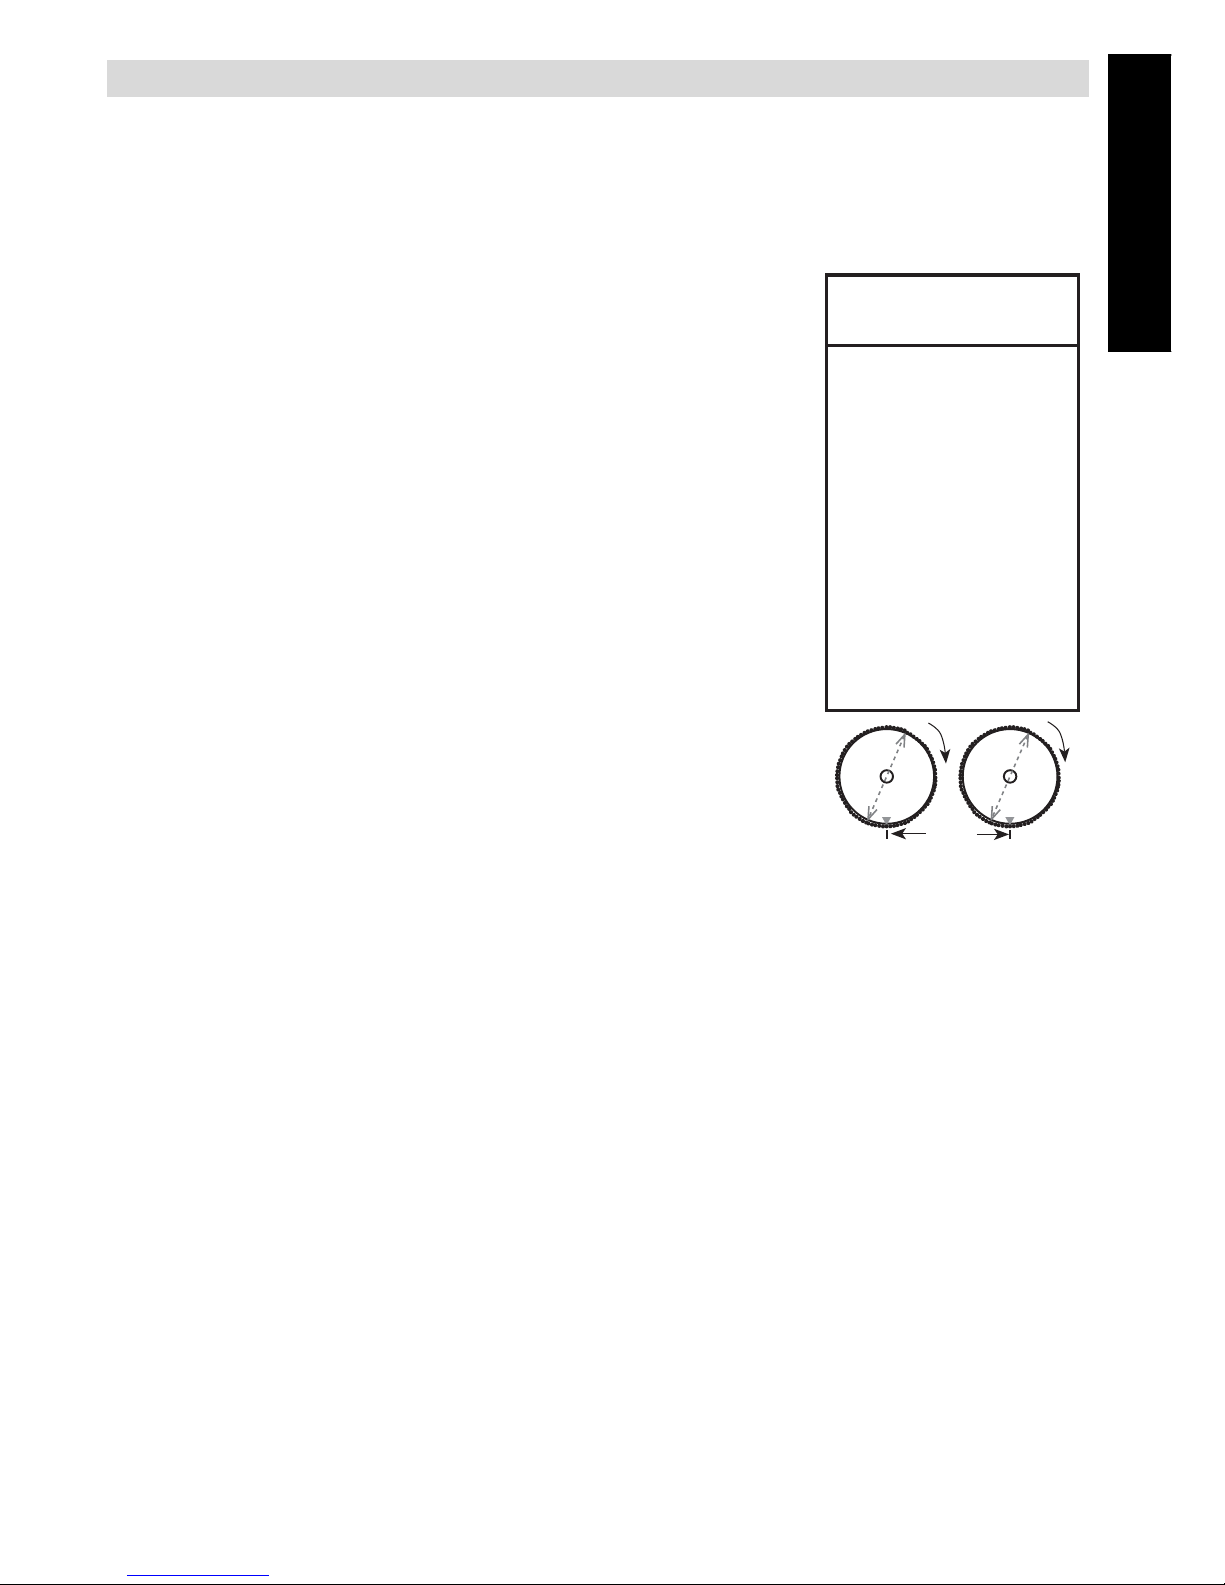
After initalisation, the 4 digit wheel circumference will flash
on the display. On the bike wheel you can find an indication
of the wheel diameter (d). The chart indicates your wheel's
circumference (c).
For a more precise circumstance, multiply your wheel's
diameter (d) in millimeters by 3.1416 to determine your
wheel's circumference (c).
• Press the RIGHT button to adjust the first digit (hold the
RIGHT button for fast forward).
• Press the LEFT button to confirm and select the next
digit.
• Once all four digits are entered, press the LEFT button
again to go to the KM/MILE selection.
8.2 KILOMETERS (KM) OR MILE
SELECTION
After setting the wheel size:
• Press the RIGHT button to select Kilometer (KM) or Mile (M) indication.
• Press the LEFT button to confirm.
8.3 AGE
After setting the KM/ Mile selection, you will see the default value for age (23) flashing.
By entering your actual age and weight you will get a more accurate calculation of
calories and fat burned.
• Press the RIGHT button to adjust the first digit of your age.
• Press the LEFT button to confirm.
• Repeat previous steps to enter the second digit.
8.4 WEIGHT
Note: based on your selection of KM or MILE your weight default will be kilograms (80
KG) or pounds (180 lbs.) respectively.
• After setting your age, the 1st digit of the weight will be flashing. Press the RIGHT
button to adjust to desired value.
• Press the LEFT button to confirm.
• Repeat the steps to enter the second and third digits.
dc
20" ------ 1596
22" ------ 1759
24" ------ 1916
26" (650A) ------ 2073
26.5" (Tubular) ------ 2117
26.6" (700x25C) ------ 2124
26.8" (700x28C) ------ 2136
27" (700x32C) ------ 2155
28" (700B) ------ 2237
(w/tire)
ATB 24"x1.75 ------ 1888
ATB 26"x1.4 ------ 1995
ATB 26"x1.5 ------ 2030
ATB 26"x1.75 ------ 2045
ATB 26"x2 (650B) ------ 2099
27"x1 ------ 2136
27"x1 1/4 ------ 2155
c
d d

8
TOPCOM Speedopulse 1000w
8.5 SETTING THE CLOCK
After the weight is confirmed, "24" should be flashing.
• Press the RIGHT button to select 12 or 24 Hour format.
• Press the LEFT button to confirm. The hour indication will flash.
• Press the RIGHT button to adjust the hour.
• Press the LEFT button to confirm. The minutes will flash.
• Press the RIGHT button to adjust the minutes.
• Press the LEFT button to confirm
8.6 MAINTENANCE WARNING INDICATOR DISTANCE
After setting the clock, the number "600" will flash. This is the default distance in KM
or MILES for the Maintenance Warning function.
This function is used to remind you to maintain the key components of your bike, e.g.
lubricating the chain.
• Press the RIGHT button to select 200, 400, 600 or 800
• Press the LEFT button to confirm.
Note: a "wrench" ( ) icon will flash on your screen whenever
your odometer passes any multiple of your designated distance.
Press the LEFT button to reset the flashing icon.
8.7 TEMPERATURE INDICATION SELECTION
After setting the maintenance warning distance:
• Press the Right button to choose between °C and °F.
• Press LEFT button to confirm and leave the setting menu.
9 DISPLAY & FUNCTIONS
9.1 START / STOP
Press any button to turn on the display and the wireless mounting system. The unit
will automatically stop when left unused for over 5 minutes.
9.2 TOP DISPLAY
1. SPEED COMPARATOR
A "+" or "-" sign will appear in the top right hand corner
of the screen to indicate whether your Current Speed is
higher or lower than your Average Speed.
1
23
4

9
TOPCOM Speedopulse 1000w
ENGLISH
2. CURRENT AND AVARAGE HEART RATE
When you wear the chest belt and your heart rate is detected, the current heart rate
will be indicated on the display.
Press the right button to switch to the average heart rate. After 5 seconds it will
automatically return to current heart rate.
3. CURRENT SPEED
When you ride the bike, the first number on the left side of the display indicates the
current speed.
4. SPEED BAR
The current speed is also indicated by a Speed Bar that arcs across the top of the
screen to match the numbers printed on the stainless steel bezel.
9.3 LOWER DISPLAY
When you press the right button, you will scroll through 6 difference display modes.
1. TRIP DISTANCE (DST) - TRIP TIMER (TM)
•Trip Distance (DST) measures your distance for any particular ride. To reset trip
distance press and hold the LEFT button for two seconds.
• The Trip Timer (TM) is turned on and off automatically based on input from the
wheel sensor. Therefore, it counts only your actual riding time. To reset TM, press
and hold the LEFT button for 2 seconds.
Note: Whenever DST is reset, TM and AVS will also be reset.
1 2
3
4
5
6

10
TOPCOM Speedopulse 1000w
2. AVERAGE SPEED (AVS) - MAXIMUM SPEED (MXS)
• Your Average Speed (AVS) is calculated by Trip Distance (DST) divided by Trip
Timer (TM).
• The Maximum Speed (MXS) indicates the maximum speed reached during any
trip. To reset MXS, make sure MXS is displayed on your screen, then press and
hold the LEFT button for two seconds.
3. CLOCK (CLK) - ODOMETER (ODO)
•Clock (CLK) indicates the current time.
•The odometer (ODO) is the total distance ridden since you installed your speed-
ometer battery.
To keep this value when installing a new battery, follow this procedure.
Within 12 minutes of installing the battery, program the Main Unit as usual. Then
enter the ODO mode. Press and hold the LEFT button until the last digit flashes,
press the RIGHT button to adjust the desired value. Press LEFT button to con-
firm. Repeat to enter all digits.
Note :Odometer saving function is allowed ONLY at the first 12
minutes after battery installation. After 12 minutes, only clock
setting is possible.
4. CALORIE COUNTER (CAL) - FAT BURNED (FAT)
•Calorie Counter (CAL) is the approximate amount of calories burned during
your ride. It is depending on your set age and weight (see §8.2 - §8.3)
To reset CAL, press and hold the LEFT button for 2 seconds.
Note: whenever CAL is reset, FAT will also be reset.
•Fat Burned (FAT) is the approximate number of grams of fat burned during your
ride.To reset FAT, press and hold the LEFT button for 2 seconds.
5. TEMPERATURE (TEMP) - STOP WATCH (SW)
•Temperature (TEMP) ranges between -10°C to 50°C (14°F to 122°F) with a res-
olution of 0.1 °C.

11
TOPCOM Speedopulse 1000w
ENGLISH
•Elapsed Time / Stopwatch (SW)
Press the LEFT button to start / stop the stop watch. It counts up to 99'59"
To reset the stopwatch, press and hold the LEFT button until all digits show zeros
(00'00"0).
Note: Stopwatch (SW) must be turned on and off manually and
can be used to track total elapsed time regardless of whether you
are riding or not.
The Trip Timer (TM) is activated by the rotation of the wheel and
records only actual riding time.
6. SCAN MODE
After scrolling through all modes, the scan mode will be activated and the different
display modes will appear sequentially. The scan icon appears.
Press the right button again to stop scanning.
10 SPECIFICATIONS
Heartbeat belt frequency : 77kHz - 1 channel
Cycling computer frequency : 101.3 kHz - 1 channel
Modulation: P1D - Simplex
Battery Main unit : CR2032
Battery Fork mounted unit : 12V/ VR22 / L1028 / A23
Battery Chest belt : 12V/ VR22 / L1028 / A23
Operation temperature :
Operation humidity :
SCAN
The Top display will show the Heart Rate data on the right side in larger digits
and Current Speed on the left side in smaller digits.
To reverse the locations of this data:
• Enter the DST / TM mode.
• Press and hold the LEFT button to reset DST to zero.
• Then again press the LEFT button and hold for 2 seconds, now
Current Speed will be displayed on the right in large digits and
the Heart Rate data on the left.

12
TOPCOM Speedopulse 1000w
11 TOPCOM WARRANTY
11.1 WARRANTY PERIOD
The Topcom units have a 24-month warranty period. The warranty period starts on
the day the new unit is purchased. Consumables or defects causing a negligible effect
on operation or value of the equipment are not covered.
The warranty has to be proven by presentation of the original purchase receipt, on
which the date of purchase and the unit-model are indicated.
11.2 WARRANTY HANDLING
A faulty unit needs to be returned to a Topcom service centre including a valid
purchase note.
If the unit develops a fault during the warranty period, Topcom or its officially
appointed service centre will repair any defects caused by material or manufacturing
faults free of charge.
Topcom will at its discretion fulfil its warranty obligations by either repairing or
exchanging the faulty units or parts of the faulty units. In case of replacement, colour
and model can be different from the original purchased unit.
The initial purchase date shall determine the start of the warranty period. The warranty
period is not extended if the unit is exchanged or repaired by Topcom or its appointed
service centres.
11.3 WARRANTY EXCLUSIONS
Damage or defects caused by incorrect treatment or operation and damage resulting
from use of non-original parts or accessories not recommended by Topcom are not
covered by the warranty.
The warranty does not cover damage caused by outside factors, such as lightning,
water and fire, nor any damage caused during transportation.
No warranty can be claimed if the serial number on the units has been changed,
removed or rendered illegible.

13
DEUTCH
TOPCOM Speedopulse 1000w
1 EINLEITUNG
Wir gratulieren Ihnen zum Kauf des Speedopulse 1000w.
Der Speedopulse 1000w ist ein Radfahrcomputer in Kombination mit einem
Herzfrequenzmonitor. Es ist ein effizientes Gerät für Fitness-Radsport.
2 SICHERHEITSHINWEISE
Die Verwendung eines Herzfrequenzmonitors ist KEIN Ersatz für professionelle
medizinische Betreuung. Wenn Sie an Herzbeschwerden leiden, krank sind oder erst
kürzlich das Fitnesstraining begonnen haben, ist es empfehlenswert, dass sie einen
Arzt aufsuchen oder mit Ihrem Trainer sprechen um einen Fitnessplan auszuarbeiten,
der zu Ihren Bedürfnissen passt.
Ihr Speedopulse 1000w ist KEIN medizinisches Gerät.
Der integrierte Herzfrequenzmonitor sollte nur als Hilfsmittel beim Erhalt einer
sicheren Herzfrequenz bei Übungen verwendet werden. Er sollte NICHT als
medizinischer Herzfrequenzmonitor verwendet werden. Wenn Sie sich unsicher sind,
wie Ihr Übungsprogramm Ihr Herz belastet, sollten Sie sich an einen Arzt wenden.
Zur Gewährleistung Ihrer Sicherheit sollten Sie den Speedopulse 1000w unter
Aufsicht eines Arztes oder Trainers verwenden, wenn eine der folgenden
Bedingungen auf Sie zureffen:
• Kardiopulmonare Erkrankung
• Fettleibigkeit.
• Lange Zeit nicht mehr trainiert.
3 CE-SYMBOL UND BESCHRÄNKUNGEN
Das CE-Symbol auf dem Gerät, der Gebrauchsanweisung und der
Geschenkverpackung zeigt, dass das Gerät die Grundvoraussetzungen der R&TTE
Richtlinie 1995/5/EC erfüllt.
Das (!) Symbol neben dem CE-Zeichen zeigt an, dass die Funknorm nicht in allen
europäischen Ländern zugelassen ist.
Sie kann in den folgenden Ländern verwendet werden
Österreich, Belgien, Dänemark, Finnland, Deutschland, Italien, Niederlande,
Portugal, Spanien, Schweden, Großbritannien, Schweiz, Norwegen
Überprüfen Sie erst die lokalen Richtlinien,
bevor Sie das Gerät außerhalb des Landes, in
dem es gekauft wurde, verwenden. Diese

14
TOPCOM Speedopulse 1000w
4 ENTSORGUNG VON GERÄT UND BATTERIEN
Entsorgen Sie das Gerät und verwendete Batterien
umweltfreundlich.
Entsorgen Sie Batterien nicht im normalen Hausmüll.
5 PFLEGE UND WARTUNG
Benutzen Sie nie Gewalt um das Gehäuse oder die Abdeckung der Rückseite zu
öffnen. Setzen Sie das Gerät KEINEN extremen Wetterbedingungen oder
Reinigungs- und Lösungsmitteln aus. Lassen Sie das Gerät nicht fallen und
vermeiden Sie es grob zu behandeln. Reinigen Sie das Gerät mit einem trockenen
weichen Tuch oder einem weichen Tuch, das mit Wasser und einem milden
Reinigungsmittel befeuchtet ist. Lagern Sie das Gerät trocken, wenn Sie es nicht
verwenden.
Achten Sie auf den Brustriemen. Waschen Sie den Brustriemen mit Wasser. Lassen
Sie ihn an der Luft trocknen, setzen Sie ihn keinen hohen Temperaturen aus und
vermeiden Sie Kontakt mit korrosiven und stark sauren oder alkalischen Materialien.
6 EINLEGEN DER BATTERIEN
6.1 HAUTPGERÄT
Entfernen Sie die Batterieabdeckung an der Unterseite des
Hauptgeräts mit einer kleinen Münze. Legen Sie die 3 V
Batterie (in der Verpackung enthalten) mit dem positiven Pol
(+) zur Batterieabdeckung ein und schließen Sie die
Abdeckung.
Batterie des Hauptgeräts: CR2032 (3V)
6.2 GABELMONTIERTES ÜBERTRAGUNGSGERÄT
Entfernen Sie die Batterieabdeckung an der Oberseite des
Hauptgeräts mit einer kleinen Münze.
Legen Sie die 12 V Batterie (in der Verpackung enthalten) in das
Übertragungsgerät ein, mit dem positiven (+) Pol zur
Batterieabdeckung. Schließen Sie den Deckel mit einer kleinen
Münze. Sorgen Sie dafür, dass er korrekt verschlossen ist, um die
Wasserbeständigkeit zu gewährleisten
Batterie des Übertragungsgeräts: 12V/ VR22 / L1028 / A23
+

15
DEUTCH
TOPCOM Speedopulse 1000w
6.3 BRUSTRIEMEN
Legen Sie die 12V-Batterie (in der Verpackung
enthalten) wie abgebildet in das
Übertragungsgerät ein. Der positive(+) Pol sollte in
Richtung CE-Symbol zeigen.
Schließen Sie die Metallabdeckung mit einem
Schraubenzieher und befestigen Sie darauf die
haftende Gummiplatte.
Batterie Gürtelriemen: 12V/ VR22 / L1028 / A23
7 INSTALLATION
7.1 MAGNET UND SENSOR
• Befestigen Sie den Magneten (7) an der Speiche
(8) an der rechten Seite des Vorderrads (5) ungefähr
auf halber Höhe zur Nabe.
• Befestigen Sie den SENSOR (3) mit den Kabel-
verbindungen (2) locker an der rechten Gabelseite.
Verwenden Sie eine Ausgleichscheibe aus
Gummi (1) damit der Sensor fest passt.
• Positionieren Sie den SENSOR so, dass der MAG-
NET innerhalb eines Bereichs von 2mm (6) von der
Ausrichtungsmarkierung (5) des Übertragungsgeräts
passiert, wenn das Rad sich dreht
• Ziehen Sie die Bänder an, damit der SENSOR
sicher befestigt ist und schneiden Sie die Reste ab.
7.2 INSTALLATION DER LENKERHALTERUNG
• Befestigen Sie mit einem Schraubenzieher die Montagehalterung rechts vom
Lenkervorbau.
• Verwenden Sie die Gummischeiben (enthalten) damit die Halterung gut passt.
• Stellen Sie die Position der Halterung auf den gewünschten Winkel ein. Ziehen
Sie die Schrauben an um die Halterung zu befestigen.
8
7
6
1
2
3
4
5
8

16
TOPCOM Speedopulse 1000w
7.3 INSTALLATION DES HAUPTGERÄTS
• Schieben Sie das Hauptgerät auf die Montagehalterung, bis es fest in seine Posi-
tion klickt(1).
• Zum Entfernen des Hauptgeräts aus der Montagehalterung, drücken den Freiga-
beknopf (2) auf der Halterung und drücken das Hauptgerät mit Ihrem Daumen
nach vorn (3).
7.4 TRAGEN DES BRUSTRIEMENS
• Zum Gewährleistung einer guten Übertragung, sollten Sie die Leitkissen des
Übertragungsgeräts (1) befeuchten. Sie können Wasser, Speichel oder ECG-Gel
(in der Drogerie oder Apotheke erhältlich) verwenden.
• Stellen Sie den elastischen Riemen so ein, dass er fest um Ihren Brustkasten,
gerade unter den Brustmuskeln anliegt.
• Positionieren Sie den Brustriemen wie abgebildet.
2
3
1
1

17
DEUTCH
TOPCOM Speedopulse 1000w
8 EINSTELLUNGEN
Nachdem die Batterien eingelegt wurden, wird automatisch das Einstellungsmenü
geöffnet.
Wenn Sie sich im Messmodus befinden, drücken Sie 4 Sekunden lang zusammen die
rechte und linke Taste. Das Gerät wird zurückgestellt und das Einstellungsmenü wird
geöffnet.
8.1 GRÖßE DER FAHRRADREIFEN
Nach der Initalisierung blinkt der 4stellige Radumfang im
Display. Auf dem Fahrradrad finden Sie eine Angabe des
Raddurchmessers (d). Den Radumfang (c) entnehmen Sie
bitte der Tabelle.
Für einen genaueren Umfang multiplizieren Sie Ihren
Raddurchmesser (d) in Millimetern mal 3.1416 um Ihren
Radumfang (c) zu bestimmen.
• Drücken Sie die RECHTE Taste zum einstellen der
ersten Ziffer (halten Sie die RECHTE Taste für schnel-
len Vorlauf).
• Drücken Sie die LINKE Taste als Bestätigung und um
die nächste Ziffer zu selektieren.
• Wenn alle vier Ziffern eingegeben wurden, drücken Sie
die LINKE Taste erneut um zur Auswahl KM/MEILE zu
gelangen.
8.2 AUSWAHL KILOMETER (KM)
ODER MEILEN
Nach Einstellung der Radgröße:
• Drücken Sie die RECHTE Taste um die Anzeige Kilometer (KM) oder Meile (M)
zu selektieren.
• Drücken Sie die LINKE Taste als Bestätigung.
8.3 ALTER
Nach der KM/MEILEN-Einstellung blinkt der Standardwert für Alter (23). Wenn Sie Ihr
aktuelles Alter und Gewicht eingeben, bekommen Sie eine genauere Berechnung der
verbrauchten Kalorien und des verbrannten Fetts.
• Drücken Sie die RECHTE Taste um die erste Ziffer Ihres Alters einzugeben.
• Drücken Sie die LINKE Taste als Bestätigung.
• Wiederholen Sie die vorigen Schritte um die zweite Ziffer einzugeben.
dc
20" ------ 1596
22" ------ 1759
24" ------ 1916
26" (650A) ------ 2073
26.5" (Tubular) ------ 2117
26.6" (700x25C) ------ 2124
26.8" (700x28C) ------ 2136
27" (700x32C) ------ 2155
28" (700B) ------ 2237
(w/tire)
ATB 24"x1.75 ------ 1888
ATB 26"x1.4 ------ 1995
ATB 26"x1.5 ------ 2030
ATB 26"x1.75 ------ 2045
ATB 26"x2 (650B) ------ 2099
27"x1 ------ 2136
27"x1 1/4 ------ 2155
c
d d

18
TOPCOM Speedopulse 1000w
8.4 GEWICHT
Anmerkung: Entsprechend Ihrer Auswahl von KM oder MEILE
wird Ihr Gewicht standardmäßig in Kilogramm (80 KG) oder
Pfund (160 lbs.) angegeben.
• Nachdem Sie Ihr Alter eingegeben haben, blinkt die erste Ziffer der Gewich-
tsangabe. Drücken Sie die RECHTE Taste um den gewünschten Wert einzustel-
len.
• Drücken Sie die LINKE Taste als Bestätigung.
• Wiederholen Sie die vorigen Schritte um die zweite und dritte Ziffer einzugeben.
8.5 DIE UHR EINSTELLEN
Nachdem das Gewicht bestätigt wurde, sollte "24" blinken.
• Drücken Sie die RECHTE Taste um das 12- oder 24-Stundenformat auszuwäh-
len.
• Drücken Sie die LINKE Taste als Bestätigung. Die Stundenanzeige blinkt.
• Drücken Sie die RECHTE Taste um die Stunde einzustellen.
• Drücken Sie die LINKE Taste als Bestätigung. Die Minuten blinken.
• Drücken Sie die RECHTE Taste um die Minuten einzustellen.
• Drücken Sie die LINKE Taste als Bestätigung.
8.6 WARTUNGSANZEIGE ENTFERNUNGSANZEIGE
Nachdem die Uhr eingestellt wurde, blinkt die Zahl "600". Das ist die
Standardentfernung in KM oder MEILEN für die Wartungsanzeigefunktion.
Diese Funktion wird verwendet um Sie daran zu erinnern die wichtigen Teile Ihres
Fahrrads zu warten, zum Beispiel die Kette zu schmieren.
• Drücken Sie die RECHTE Taste um 200, 400, 600 oder 800 zu selektieren
• Drücken Sie die LINKE Taste als Bestätigung.
Anmerkung: In Ihrem Bildschirm blinkt ein "Schraubenschlüssel"
( ) Symbol, wenn Ihr Kilometerzähler ein Vielfaches der
gewünschten Entfernung passiert. Drücken Sie die LINKE Taste
um das blinkende Symbol zurückzustellen.
8.7 AUSWAHL TEMPERATURANZEIGE
Nachdem die Wartungsanzeige eingestellt wurde:
• Drücken Sie die rechte Taste um zwischen °C und °F zu wählen.
• Drücken Sie die LINKE Taste als Bestätigung und verlassen Sie das Einstel-
lungsmenü.

19
DEUTCH
TOPCOM Speedopulse 1000w
9 DISPLAY & FUNKTIONEN
9.1 START / STOPP
Drücken Sie irgendeine Taste um das Display und das drahtlose Befestigungssystem
einzuschalten. Das Gerät stopp automatisch, wenn es 5 Minuten nicht verwendet
wird.
9.2 OBERES DISPLAY
1. GESCHWINDIGKEITSVERGLEICH
Ein "+" oder "-" erscheint in der oberen rechten Ecke des
Bildschirms, je nachdem, ob Ihre aktuelle
Geschwindigkeit höher oder niedriger ist als Ihre
Durchschnittsgeschwindigkeit.
2. AKTUELLE UND DURCHSCHNITTLICHER HERZSCHLAG
Wenn Sie den Brustriemen angelegt haben und Ihr Herzschlag gemessen wird, wird
der aktuelle Herzschlag im Display angezeigt.
Drücken Sie die rechte Taste um zum durchschnittlichen Herzschlag zu wechseln.
Nach 5 Sekunden kehrt er automatisch zum aktuellen Herzschlag zurück.
3. AKTUELLE GESCHWINDIGKEIT
Wenn Sie Fahrrad fahren, zeigt die erste Zahl in der linken Seite des Displays die
aktuelle Geschwindigkeit an.
4. GESCHWINDIGKEITSBALKEN
Die aktuelle Geschwindigkeit wird auch durch einen Geschwindigkeitsbalken
angezeigt, der sich über den oberen Teil des Bildschirms biegt um mit den gedruckten
Zahlen auf der Edelstahleinfassung überein zu stimmen.
1
23
4

20
TOPCOM Speedopulse 1000w
9.3 UNTERES DISPLAY
Wenn Sie die rechte Taste drücken, scrollen Sie durch die 6 verschiedenen
Displaymodi.
1. TAGESZÄHLER (DST) - TAGESTIMER (TM)
•Tageszähler (DST) misst Ihre Entfernung für jede einzelne Fahrt. Um den Tag-
eszähler zurückzustellen drücken Sie zwei Sekunden lang die LINKE TASTE.
• Der Tagestimer (TM) wird automatisch an- und ausgeschaltet, je nach Eingabe
vom Radsensor. Dafür zählt nur Ihre aktuelle Fahrzeit. Um den TM zurück-
zuschalten, drücken Sie 2 Sekunden lang die LINKE Taste.
Anmerkung: Wenn DST zurückgestellt wird, wird auch TM und
AVS zurückgestellt.
2. DURCHSCHNITTSGESCHWINDIGKEIT (AVS) - MAXIMUMGESCHWINDIG-
KEIT (MXS)
• Ihre Durchschnittsgeschwindigkeit (AVS) wird berechnet indem der Tag-
eszähler (DST) durch den Tagestimer (TM) dividiert wird.
• Die Maximalgeschwindigkeit (MXS) zeigt die Maximalgeschwindigkeit an, die
während jeder Fahrt erreicht wurde. Um MXS zurückzustellen, sollten Sie dafür
sorgen, das MXS in Ihrem Bildschirm angezeigt wird, drücken Sie zwei
Sekunden lang die LINKE Taste.
1 2
3
4
5
6
Table of contents
Languages:
Other Topcom Watch manuals

Topcom
Topcom HB 2M00 User manual

Topcom
Topcom OUTDOOR SPORTSWATCH 2000 User manual

Topcom
Topcom HBM Watch 1000 User manual

Topcom
Topcom HB 4M00 User manual

Topcom
Topcom HB 2F00 User manual

Topcom
Topcom HBM DUO WATCH 2500 User manual

Topcom
Topcom HB 6M00 User manual

Topcom
Topcom HBM Sensor Watch 2002 User manual

Topcom
Topcom HB 4F00 User manual

Topcom
Topcom HBM Watch 1010 Elelgant User manual