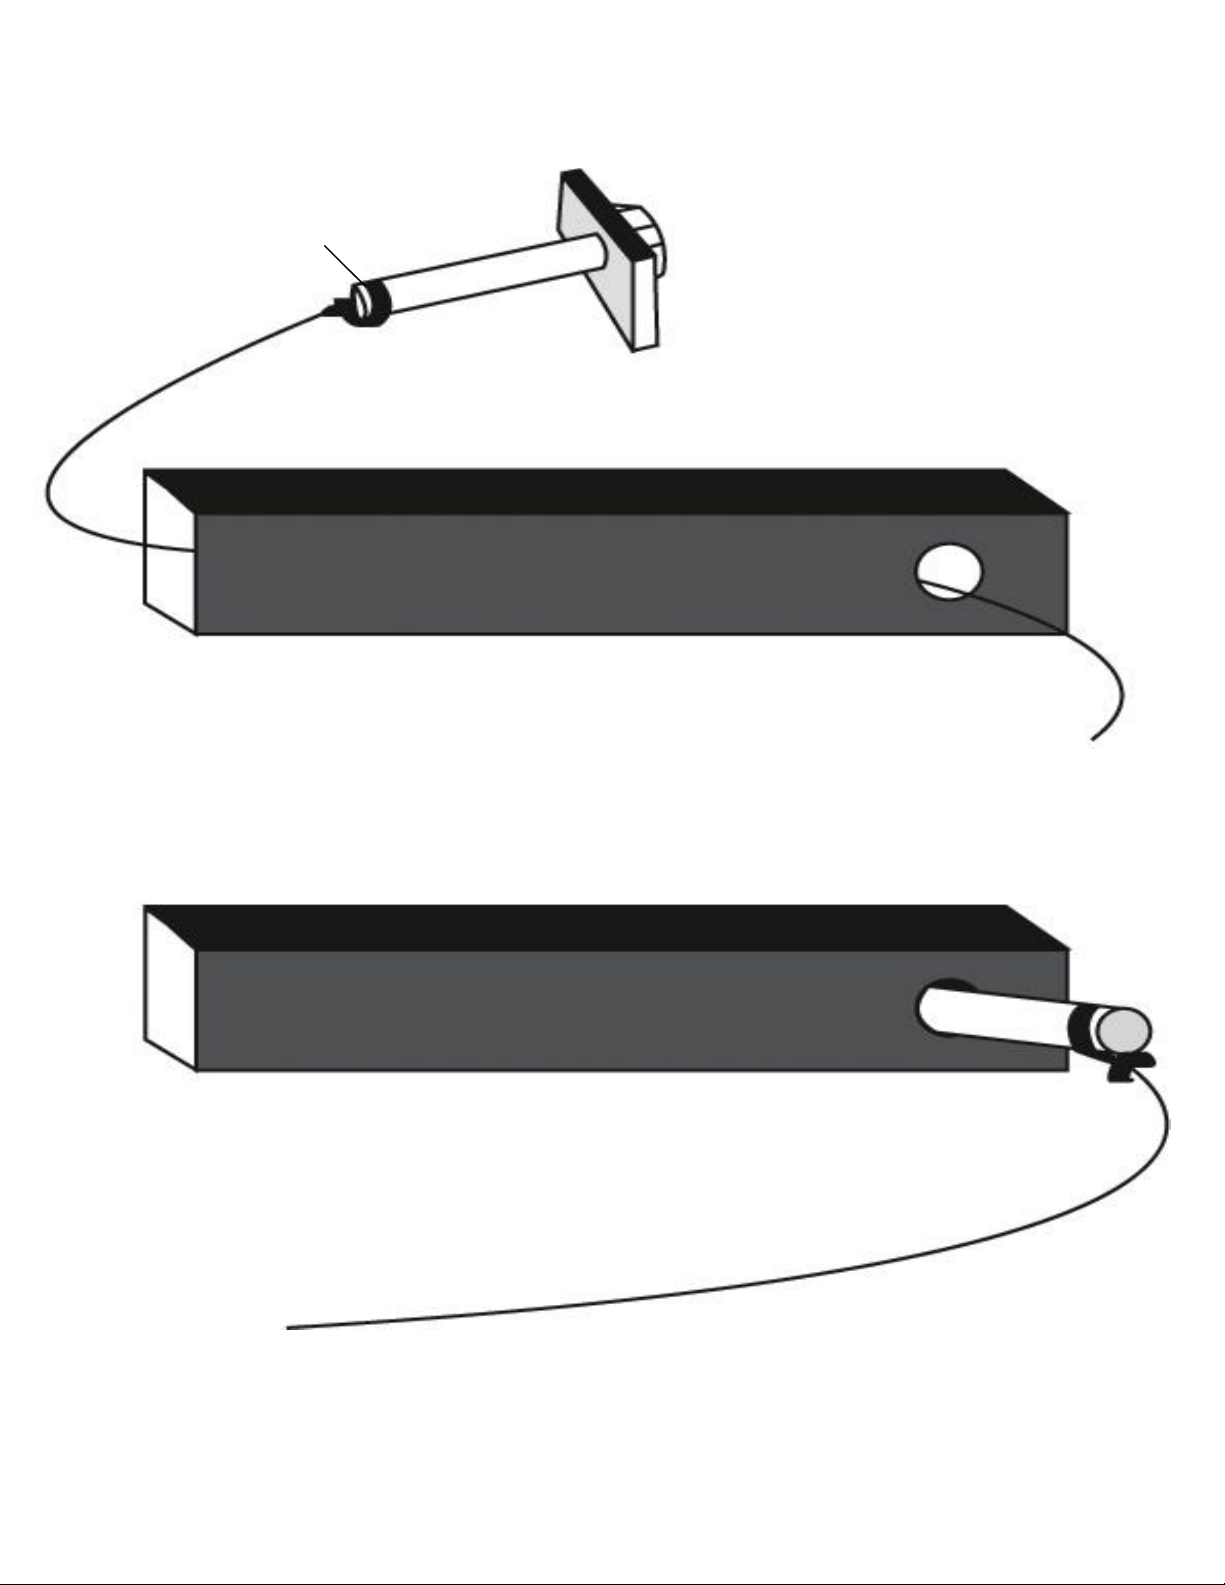
Torklift C2205 User manual

1
IMPORTANT OWNER-OPERATOR INSTALLATION INSTRUCTIONS
C2205
REVISED vers7 BY JL 08/5/15
TECH SUPPORT (800) 246-8132
AFTER INSTALL, PLEASE GIVE
THIS BOOKLET TO YOUR CUSTOMER

2
Warnings
Truck Bed and Camper Protection
Torklift does not recommend installing your camper on top of a plastic bed liner (or other
compressible material such as foam). These materials can act as a spring, causing increased
vertical truck camper movement independent of the vehicle. Plastic bed liners can slide on the
truck bed surface, and the truck camper can slide on top of the bed liner. Using a plastic bed
liner or similar compressible material will void your warranty and may additionally cause truck
bed and/or camper damage.
Minor movement or settling can occur in some incidental harsh driving conditions (on or off-
road). A rubber bed mat is recommended to protect the truck bed and camper, but is not a
requirement to maintain the Torklift legendary lifetime warranty.
Suspension
To significantly reduce body roll, sag and sway Torklift strongly recommends the StableLoad.
Torklift International StableLoads improve safety, handling, and to help level your truck. More
information can be found at (www.Torklift.com/stableload).
If your truck is additionally equipped with suspension air bags Torklift cautions against over
pressurization as this may lead to unsafe vehicle handling characteristics. We have found that
airbags used in conjunction with StableLoads have allowed operators to lower air bag pressure
by 50% or more. Only pressurize suspension air bags enough to level the truck.

3
INSTALLATION DIAGRAM
UPPER SUPPORT STRAP
TRUCK FRAME
WELDED
BOLTS
CLAMP STRAP
FRAME MOUNTED TIEDOWN RECIEVER
PLATE

4
C2205 PARTS INVENTORY
2- TIE-DOWN RECEIVERS 2- STRAIGHT INSERTS
2- 12MM X 1.75 X 50MM HEX BOLT 2- CLAMP STRAPS
4- 1/2” LOCK WASHERS 2- BENT SUPPORT STRAPS
6- 1/2” FLAT WASHERS 2- 1/4” PINS
4- 1/2” FLANGE NUTS 2- 1/2” GRADE 5 NUTS
2- 1/2” X 1-1/2” HEX BOLTS 2- TORKLIFT STICKERS
NOTE: YOU MAY NEED TO SPRAY SOME WD-40 TO THE FACTORY
FASTENERS BEFORE BREAKING THEM LOOSE.
INSTALLATION
There is enough room to install the C2205 Tie Down between the
frame and the gas tank, but if the tank is closer than normal, you may
choose to loosen the straps for the tank and move it away from the
frame while performing the installation.
Attention: This No-Drill application does not utilize any factory holes
in the vehicle’s frame (as there are no factory holes). The tie down
receiver will be attached via heavy-duty clamp straps on the inside of
the truck frame.
Step 1-
Remove the factory bed bolt from the bed support tower. Locate a bent support strap and align
the hole in the bent support strap with the factory hole in the bed support tower. Place a lock washer
and 2 flat washers onto the supplied 12mm x 1.75 x 50mm bolt that is supplied in your kit and install
hand tight (Photo 1.1). PROPER FASTENER ASSEMBLY IS (LOCK WASHER ONTO THE
BOLT FIRST, THEN 2 FLAT WASHERS)
Step 2-
Locate a clamp strap with the welded on bolts and place the clamp strap into the inside of the
frame (as seen in Photo C) the clamp strap is located on the inside of the c-frame and the two welded
on bolts are facing toward the center of the vehicle.

5
NOTE:
THE LONG TAPERED END OF THE CLAMP STRAP SHOULD POINT TOWARD THE FRONT OF THE TRUCK AND
SHOULD FACE DOWN.
NOTE:
This is a no-drill application and the threaded bolts will not go through any holes in the frame! If you feel
that you need to drill the frame, please call our tech support line as you may be installing wrong or you
may have the wrong tie down for your application.
Step 2- Continued
Now, lift the back of the tie down receiver over the two welded on bolts (as seen in Photo D)
the photo of the tie down receiver is positioned in the inside of the frame (unlike our other tie down
applications, the receiver will not be positioned on the outside of the frame). Notice that the clamp
strap is sandwiched between the inside of the frame and the receiver in PHOTO D. Install a flanged
lock nut onto each of the bolts and hand tighten at this time.
NOTE:
THE CLAMP STRAP BOLTS WILL BE SLIGHTLY ANGLED AND THE FLANGE NUTS WILL
NOT SIT FLAT, THIS IS NORMAL.
Step 3-
Hold tie down receiver in front of the bent support strap so that the hole in the support strap
aligns with the hole on the support strap pocket on the tie down receiver. Install the 1/2” x 1-1/2”
hex bolt securing with a 1/2” lock washer, 1/2” flat washer and a 1/2” grade 5 nut. (As seen in Photo
B).
Step 4-
TIGHTENING OF THE BOLTS MUST TORQUED IN THE ORDER THAT IS GIVEN
IN THIS STEP. Lift the tie down receiver until it touches the bottom of the frame and tighten the
two flanged lock nuts on the back of the frame to 60ft lbs.(81Nm) Next tighten the flanged lock nut
that attaches the bent support strap to the tie down receiver to 60ft lbs.(81Nm) Finally, tighten the
metric bolt attaching to the bed support tower to 60ft lbs. (81Nm)
Step 5-
After all bolts have been tightened, check to be certain that the tie down receiver is touching the
bottom of the frame.
Step 6-
Find one insert and one 1/4” pin; put the insert into the tie down receiver. Install the 1/4” pin.
Make sure that the triangle plate located on the end of the insert is pointing towards the front of the
truck. This bracket is designed to increase the angle of the chain/turnbuckle.

6
You should have at least 1” clearance between the insert and the lip of
the bed or after market accessory.
ILLUSTRATED DIAGRAMS
PHOTO A
PHOTO B

7
PHOTO C (PASSENGER SIDE)

8
PHOTO D (DRIVER SIDE)

9
PHOTO E
E-BRAKE CABLE RUNS BELOW THE CAMPER TIE DOWN

10
TORKLIFT’S BOLT FISHING GUIDE
Your guide to understanding the installation of our frame mounted tie downs.
Note: The hardware may vary as to
-Coiled End of Bolt Fisher- what is being fished along with the
bolt. In this instance a 1” X 2” plate
washer is being fished along with the
hex bolt. Different applications may
require fishing through various star
washers and flat washers for example.
Desired Hole on Vehicle (Place the coiled end of the bolt fisher through this hole).
This side of the Bolt Fisher should come
out of a hole where the required hardware
(for example 1” X 2” plate washer) can pass through.
This bottom example shows the bolt when it’s completely fished through
the vehicle. You may find it easier to keep the bolt fisher attached until
you get the tie down receiver in place so that the bolt doesn’t fall into the
vehicle frame.
WARNING: PULLING TOO HARD ON THE BOLT FISHER CAN RESULT IN
LOST FASTENERS, OR BROKEN BOLT FISHER.

11
TIEDOWN INSERT INSTALLATION
INSTRUCTIONS
On one end of each of your tie down inserts is a triangular plate referred to
by Torklift as a bullet plate. Your tie down inserts should be installed with the
shorter side of the bullet plate facing away from each other, i.e.. The shorter
side of the front insert should point to the front of the truck and the shorter
side of the rear insert should point towards the rear of the truck.
Once installed, attach the TorkLift directional stickers to the face of the
bullet plate on the insert as a reminder.
DRIVERS SIDE FRONT DRIVERS SIDE REAR
IMPORTANT NOTE: Your tie down inserts are designed to have clearance
inside of the receiver. This is to account for road debris, as well as aid in
installation and removal. Some rattle may be expected if the inserts are left
installed while not under load from the camper.

12
INSTRUCTIONS FOR FINISH MAINTENANCE
OF TORKLIFT PRODUCTS
POWDER COATED STEEL:
To keep your Torklift products looking good follow these guidelines. All steel
powder coated Torklift products are sandblasted for maximum adhesion and use a
high quality industrial urethane based powder coat. Due to the extreme, harsh,
undercar environment that your Torklift products live in, (consistently sprayed with
corrosive road chemicals such as salt, and road debris), Torklift does not warranty
the power coated finish.
To minimize corrosion from these factors on powder coated steel products, Torklift
recommends regularly cleaning and inspecting the powder-coated surface and
touching up any affected areas with enamel or urethane based aerosol paint
product. If there are any areas of surface rust, there are also aerosol spray rust
converters available on the market that can be used as a preparation to touch-up
paint application. These finish maintenance products are available at any
automotive parts supplier.
POLISHED STAINLESS STEEL:
Torklift utilizes quality grade 304 stainless steel in our stainless steel polished
products. 304 stainless steel is well known for its anti-corrosive properties.
However, in some environments such as coastal regions or when coming in contact
with some road chemicals, corrosion may occur.
For a quick clean simply use WD40 and a cloth rag. We also recommend occasional
polishing of our polished stainless products to maintain their attractive finish. Use
an approved stainless steel chrome or aluminum mag wheel polish cleaning product,
which can be purchased from any automotive parts supplier.

13
Torklift International Limited Lifetime
Warranty Information
322 Railroad Ave North, Kent, WA 98032
Torklift will require proof of purchase to register, with pictures of any defective product
before issuing a replacement. Torklift will not register any product without proof of
purchase, which can be faxed, scanned, emailed, or mailed to the information provided
below. Torklift warrants it’s hitches, custom hitch receivers, frame mounted tie downs,
turnbuckles, and accessories (excluding wire harnesses which carry a 90 day warranty)
from date of purchase against defects in material and workmanship under normal use and
service for the ownership life of the original consumer purchaser. ALL COMMERCIAL
APPLICATIONS ARE WARRANTED FOR A PERIOD OF 90 DAYS FROM THE
DATE OF INSTALLATION/SERVICE. Torklift will replace FREE OF CHARGE any
part, which proves defective in material or workmanship when presented to Torklift,
TRANSPORTATION CHARGES PREPAID by purchaser, at the address above. THIS
WARRANTY IS LIMITED TO DEFECTIVE PARTS REPLACEMENT ONLY.
LABOR CHARGES AND/OR DAMAGE INCURRED IN INSTALLATION OR
REPLACEMENT, AS WELL AS INCIDENTAL AND CONSEQUENTIAL
DAMAGES CONNECTED THEREWITH ARE EXCLUDED. This warranty does not
include the finish or paint on our products. Rusting, cracking or peeling of the finish is
also excluded. Some states do not allow the exclusion or limitation of incidental or
consequential damages, so the above limitation or exclusion may not apply to you. Any
damage to Torklift products as a result of misuse, abuse, neglect, accident, improper
installation or any use violation of instructions furnished by Torklift or WHEN USED IN
ANY COMMERCIAL APPLICATION WILL VOID THE WARRANTY. This warranty
gives you specific legal rights, and you may also have rights, which vary from state to
state. With warranty service, you may be able to go to a small claims court, a state court
or a federal district court.

14
322 Railroad Ave North, Kent, WA 98032
Phone (800) 246-8132 Fax(253) 854-8003
or visit our website: www.TorkLift.com
Dear Valued Customer,
Thank you for making TorkLift your choice for truck, camper packages and accessories
for your vehicle. By choosing TorkLift products, you have chosen a company that has
been serving the RV industry for nearly 40 years and whose name has become
synonymous with strength, quality and advanced design and installation.
Please take a few moments of your time to complete the Product Registration
Warranty Card on the next page. When registering your newly purchased TorkLift
products, you can be assured that your contact information is secure and that you and
your product are getting the attention and respect that you deserve.
Thank you again for choosing TorkLift quality products.
Register for your lifetime warranty and receive a free Torklift
International gift.
To Fax: Send copies of the questionnaire, warranty card and receipt to
253-854-8003
To E-mail: Send copies of the questionnaire, warranty card and receipt to
warranty@torklift.com
To Mail: Send to Torklift International 322 Railroad Ave North, Kent, WA 98032

15
Frame Mounted Tie Downs
Leading the camper tie down industry in strength,
quality, advanced design and installation. TorkLift
TRUE frame mounted tie downs are far superior
to all tie down systems available.
The TorkLift system is unique in its design and is
patented. Four independent tie down points (with
no belly or crossbar) working much like your
receiver type trailer hitch as the inserts are
removable allowing the system to be virtually
undetectable when not in use.
They are designed for each make and model to fit tight to the frame so as not to compromise
ground clearance. TorkLift tie downs are not universal ‘one size fits all’ therefore all the
problems with correct fit for each particular application have been eliminated.
Original SuperHitch & SuperHitch Magnum
High strength extended hitch system engineered for safely towing all types of trailers
behind your truck and camper. With a max towing capacity of 14,000 lbs(6350Kg). with
an extension*, (17,000 lbs.(7711Kg) to 20,000 lbs.(9071Kg) without*) the Original
SuperHitch and SuperHitch Magnum are rated the strongest in the industry.
CONTACT YOUR LOCAL DEALER FOR MORE DETAILS
*Weight capacity varies depending on the SuperHitch and SuperTruss extension setup.

16
PLEASE FILL OUT THIS FORM COMPLETELY AND RETURN TO TORKLIFT WITHIN
30 DAYS OF PURCHASE ACCOMPANIED BY A COPY OF YOUR ORIGINAL RECEIPT
1. PART(S) PURCHASED
2. PURCHASER INFORMATION
3. TRUCK INFORMATION
YEAR: ______________ MAKE: _________________
4. CAMPER INFORMATION
YEAR: ___________ MAKE: _______________ MODEL: ________________
5. DEALER INFORMATION
PURCHASED FROM: ______________________________________________
CITY: _________________ STATE: _____ ZIP / POSTAL: ______________
INSTALLED BY: OWNER ABOVE DEALER ANOTHER DEALER
IF ANOTHER DEALER, WHO: _______________________________________
PART#: ___________________ PART#: _______________________
OFFICIAL WARRANTY REGISTRATION CARD
PART#: ___________________ PART#: _______________________
NAME: _____________________________________________________________
EMAIL: ______________________________
ADDRESS: __________________________________________________________
CITY: _________________ STATE: _____ ZIP / POSTAL CODE: ______________
PHONE: ( ) -_________
MODEL:_____________ BED LENGTH: ___________
ADDRESS:______________________________________________________
TODAY’S DATE: _________________________
Table of contents
Other Torklift Automobile Accessories manuals

Torklift
Torklift A7901 User manual

Torklift
Torklift A7202 User manual

Torklift
Torklift D3102 User manual

Torklift
Torklift A7708R User manual

Torklift
Torklift S9050A User manual

Torklift
Torklift F3004/FMTFDRO5 User manual

Torklift
Torklift C3215A User manual

Torklift
Torklift C4201 User manual

Torklift
Torklift A7726 Hidden Power User manual

Torklift
Torklift Hidden Power E Series User manual