Toro 23210 User manual

FormNo.3365-305RevC
STX-26StumpGrinder
ModelNo.23210—SerialNo.310000001andUp
ModelNo.23210G—SerialNo.310000001andUp
ToregisteryourproductordownloadanOperator'sManualorPartsCatalogatnocharge,gotowww.Toro.com.OriginalInstructions(EN)

WARNING
CALIFORNIA
Proposition65Warning
Thisproductcontainsachemicalorchemicals
knowntotheStateofCaliforniatocausecancer,
birthdefects,orreproductiveharm.
Theengineexhaustfromthisproduct
containschemicalsknowntotheStateof
Californiatocausecancer,birthdefects,
orotherreproductiveharm.
Useofthisproductmaycauseexposureto
chemicalsknowntotheStateofCalifornia
tocausecancer,birthdefects,orother
reproductiveharm.
DANGER
Theremaybeburiedpower,gas,and/ortelephone
linesintheworkarea.Shockorexplosionmay
occurifyoudigintothem.
Havethepropertyorworkareamarkedforburied
linesanddonotdiginmarkedareas.Contactyour
localmarkingserviceorutilitycompanytohavethe
propertymarked(forexample,intheUnitedStates,
call811forthenationwidemarkingservice).
ThissparkignitionsystemcomplieswithCanadian
ICES-002.
Becauseinsomeareastherearelocal,state,orfederal
regulationsrequiringthatasparkarresterbeusedonthe
engineofthismachine,asparkarresterisavailableas
anoption.Ifyourequireasparkarrestor,contactyour
AuthorizedToroServiceDealer.
GenuineTorosparkarrestersareapprovedbytheUSDA
ForestryService.
Important:ItisaviolationofCaliforniaPublic
ResourceCodeSection4442touseoroperate
theengineonanyforest-covered,brush-covered,
orgrass-coveredlandwithoutasparkarrester
mufermaintainedinworkingorder,ortheengine
constricted,equipped,andmaintainedforthe
preventionofre.Otherstatesorfederalareasmay
havesimilarlaws.
Theenclosed
Engine Owner's Man ual
issupplied
forinformationregardingtheUSEnvironmental
ProtectionAgency(EPA)andtheCalifornia
EmissionControlRegulationofemissionsystems,
maintenance,andwarranty.Replacementsmaybe
orderedthroughtheenginemanufacturer.
©2012—TheToro®Company
8111LyndaleAvenueSouth
Bloomington,MN554202
Contactusatwww.Toro.com.
PrintedintheUSA.
AllRightsReserved

Introduction
Thismachineisdesignedtogrindandremovetree
stumpsandsurfaceroots.Itisnotintendedtocutrock
oranyothermaterialotherthanwoodandthesoil
aroundastump.
Readthisinformationcarefullytolearnhowtooperate
andmaintainyourproductproperlyandtoavoidinjury
andproductdamage.Youareresponsibleforoperating
theproductproperlyandsafely.
YoumaycontactTorodirectlyatwww .Toro.comfor
productandaccessoryinformation,helpndingadealer,
ortoregisteryourproduct.
Wheneveryouneedservice,genuineToroparts,
oradditionalinformation,contactanAuthorized
ServiceDealerorToroCustomerServiceandhave
themodelandserialnumbersofyourproductready.
Figure1illustratesthelocationofthemodelandserial
numbersontheproduct.Writethenumbersinthe
spaceprovided.
Figure1
1.Modelandserialnumberplate
ModelNo.
SerialNo.
Thismanualidentiespotentialhazardsandhassafety
messagesidentiedbythesafetyalertsymbol(Figure2),
whichsignalsahazardthatmaycauseseriousinjury
ordeathifyoudonotfollowtherecommended
precautions.
Figure2
1.Safetyalertsymbol
Thismanualuses2otherwordstohighlightinformation.
Importantcallsattentiontospecialmechanical
informationandNoteemphasizesgeneralinformation
worthyofspecialattention.
Contents
Introduction.................................................................3
Safety...........................................................................4
SafeOperatingPractices.......................................4
SlopeIndicator.....................................................7
SafetyandInstructionalDecals.............................8
Setup.........................................................................11
1InstallingtheGrinderControlLever.................11
2CheckingFluidLevels......................................11
3ChargingtheBattery........................................11
ProductOverview......................................................12
Controls.............................................................12
Specications.....................................................14
Attachments/Accessories...................................14
Operation...................................................................15
AddingFuel.......................................................15
CheckingtheEngineOilLevel............................16
CheckingtheHydraulicFluidLevel.....................16
StartingandStoppingtheEngine........................17
StoppingtheMachine.........................................18
MovingaNon-functioningMachine...................18
GrindingaStump...............................................18
SecuringtheMachineforTransport....................19
LiftingtheMachine............................................19
OperatingTips...................................................19
Maintenance...............................................................21
RecommendedMaintenanceSchedule(s)................21
PremaintenanceProcedures....................................21
RemovingtheCoverPlate...................................22
InstallingtheCoverPlate....................................22
RemovingtheBottomShield..............................22
InstallingtheBottomShield................................22
Lubrication.............................................................23
GreasingtheMachine.........................................23
EngineMaintenance...............................................23
ServicingtheAirCleaner....................................23
ServicingtheEngineOil.....................................24
3

ServicingtheSparkPlug.....................................25
FuelSystemMaintenance.......................................27
DrainingtheFuelTank.......................................27
ReplacingtheFuelFilter.....................................27
ElectricalSystemMaintenance................................28
ServicingtheBattery...........................................28
ReplacingtheFuses............................................30
DriveSystemMaintenance.....................................30
ServicingtheTracks............................................30
BeltMaintenance....................................................33
ReplacingthePumpDriveBelt...........................33
ControlsSystemMaintenance.................................33
AdjustingtheTractionControl
Alignment......................................................33
AdjustingtheTractionControlNeutral
Position..........................................................35
AdjustingtheTrackingoftheTraction
Control,FullForwardPosition........................35
HydraulicSystemMaintenance...............................35
ReplacingtheHydraulicFilter.............................35
ChangingtheHydraulicFluid.............................35
CheckingtheHydraulicLines.............................37
GrinderMaintenance..............................................37
ReplacingtheTeeth............................................37
Cleaning.................................................................38
RemovingDebrisfromtheMachine....................38
Storage.......................................................................38
Troubleshooting.........................................................40
Schematics.................................................................41
Safety
Improperuseormaintenancebytheoperatoror
ownercanresultininjury.Toreducethepotential
forinjury,complywiththesesafetyinstructions
andalwayspayattentiontothesafetyalert
symbol,whichmeans:
Caution
,
W ar ning
,or
Danger
—personalsafetyinstruction.Failureto
complywiththeinstructionmayresultinpersonal
injuryordeath.
SafeOperatingPractices
Thisproductiscapableofamputatinghandsandfeet.
Alwaysfollowallsafetyinstructionstoavoidserious
injuryordeath.
WARNING
Engineexhaustcontainscarbonmonoxide,an
odorless,deadlypoisonthatcankillyou.
Donotruntheengineindoorsorinanenclosed
area.
Training
•ReadtheOperator'sManualandothertraining
material.Iftheoperator(s)ormechanic(s)cannot
readEnglish,itistheowner'sresponsibilityto
explainthismaterialtothem.
•Becomefamiliarwiththesafeoperationofthe
equipment,operatorcontrols,andsafetysigns.
•Alloperatorsandmechanicsshouldbetrained.The
ownerisresponsiblefortrainingtheusers.
•Neverletchildrenoruntrainedpeopleoperateor
servicetheequipment.Localregulationsmayrestrict
theageoftheoperator.
•Theowner/usercanpreventandisresponsiblefor
accidentsorinjuriesoccurringtohimselforherself,
otherpeopleorproperty.
Preparation
•Evaluatetheterraintodeterminewhataccessories
andattachmentsareneededtoproperlyand
safelyperformthejob.Onlyuseaccessoriesand
attachmentsapprovedbythemanufacturer.
•Wearappropriateclothingincludinghardhat,
safetyglasses,longpants,safetyshoes,andhearing
protection.Longhair,looseclothingorjewelrymay
gettangledinmovingparts.
•Inspecttheareawheretheequipmentistobeused
andremoveallobjectssuchasrocks,toys,andwire
whichcanbethrownbythemachine.
4

•Useextracarewhenhandlinggasolineandother
fuels.Theyareammableandvaporsareexplosive.
–Useonlyanapprovedcontainer
–Neverremovethegascaporaddfuelwiththe
enginerunning.Allowtheenginetocoolbefore
refueling.Donotsmoke.
–Neverrefuelordrainthemachineindoors.
•Checkthattheoperatorpresencecontrols,safety
switches,andshieldsareattachedandfunctioning
properly.Donotoperateunlesstheyarefunctioning
properly.
Operation
•Neverrunanengineinanenclosedarea.
•Onlyoperateingoodlight,keepingawayfromholes
andhiddenhazards.
•Besurealldrivesareinneutralbeforestartingthe
engine.Onlystarttheenginefromtheoperator's
position.
•Slowdownanduseextracareonhillsides.Besure
totravelintherecommendeddirectiononhillsides.
Turfconditionscanaffectthemachine'sstability.
•Slowdownandusecautionwhenmakingturnsand
whenchangingdirectionsonslopes.
•Neveroperatewiththeguardsnotsecurelyinplace.
Besureallinterlocksareattached,adjustedproperly,
andfunctioningproperly.
•Donotchangetheenginegovernorsettingor
overspeedtheengine.
•Stoponlevelground,lowerthegrinder,disengage
thehydraulics,andshutofftheenginebeforeleaving
theoperator'spositionforanyreason.
•Keephandsandfeetawayfromthemovinggrinder
wheelandteeth.
•Lookbehindanddownbeforebackinguptobesure
ofaclearpath.
•Nevercarrypassengersandkeeppetsandbystanders
away.
•Slowdownandusecautionwhenmakingturnsand
crossingroadsandsidewalks.
•Donotoperatethemachineundertheinuenceof
alcoholordrugs.
•Usecarewhenloadingorunloadingthemachine
intoatrailerortruck.
•Usecarewhenapproachingblindcorners,shrubs,
trees,orotherobjectsthatmayobscurevision.
•Ensurethattheareaisclearofotherpeoplebefore
operatingthemachine.Stopthemachineifanyone
entersthearea.
•Neverleavearunningmachineunattended.Always
lowerthegrinder,stoptheengine,andremovethe
keybeforeleaving.
•Neverjerkthecontrols;useasteadymotion.
•Watchfortrafcwhenoperatingnearorcrossing
roadways.
•Donottouchpartswhichmaybehotfrom
operation.Allowthemtocoolbeforeattemptingto
maintain,adjust,orservice.
•Ensurethatyouoperatethemachineinareaswhere
therearenoobstaclesincloseproximitytothe
operator.Failuretomaintainadequatedistancefrom
trees,walls,andotherbarriersmayresultininjury
asthemachinebacksupduringoperationifthe
operatorisnotattentivetothesurroundings.Only
operatetheunitinareaswherethereissufcient
clearancefortheoperatortosafelymaneuverthe
product.
•Beforedigging,havetheareamarkedfor
undergroundutilities,anddonotdiginmarkedareas.
•Locatethepinchpointareasmarkedonthemachine
andkeephandsandfeetawayfromtheseareas.
•Lightningcancausesevereinjuryordeath.If
lightningisseenorthunderisheardinthearea,do
notoperatethemachine;seekshelter.
SlopeOperation
Slopesareamajorfactorrelatedtoloss-of-controland
tip-overaccidents,whichcanresultinsevereinjuryor
death.Allslopesrequireextracaution.
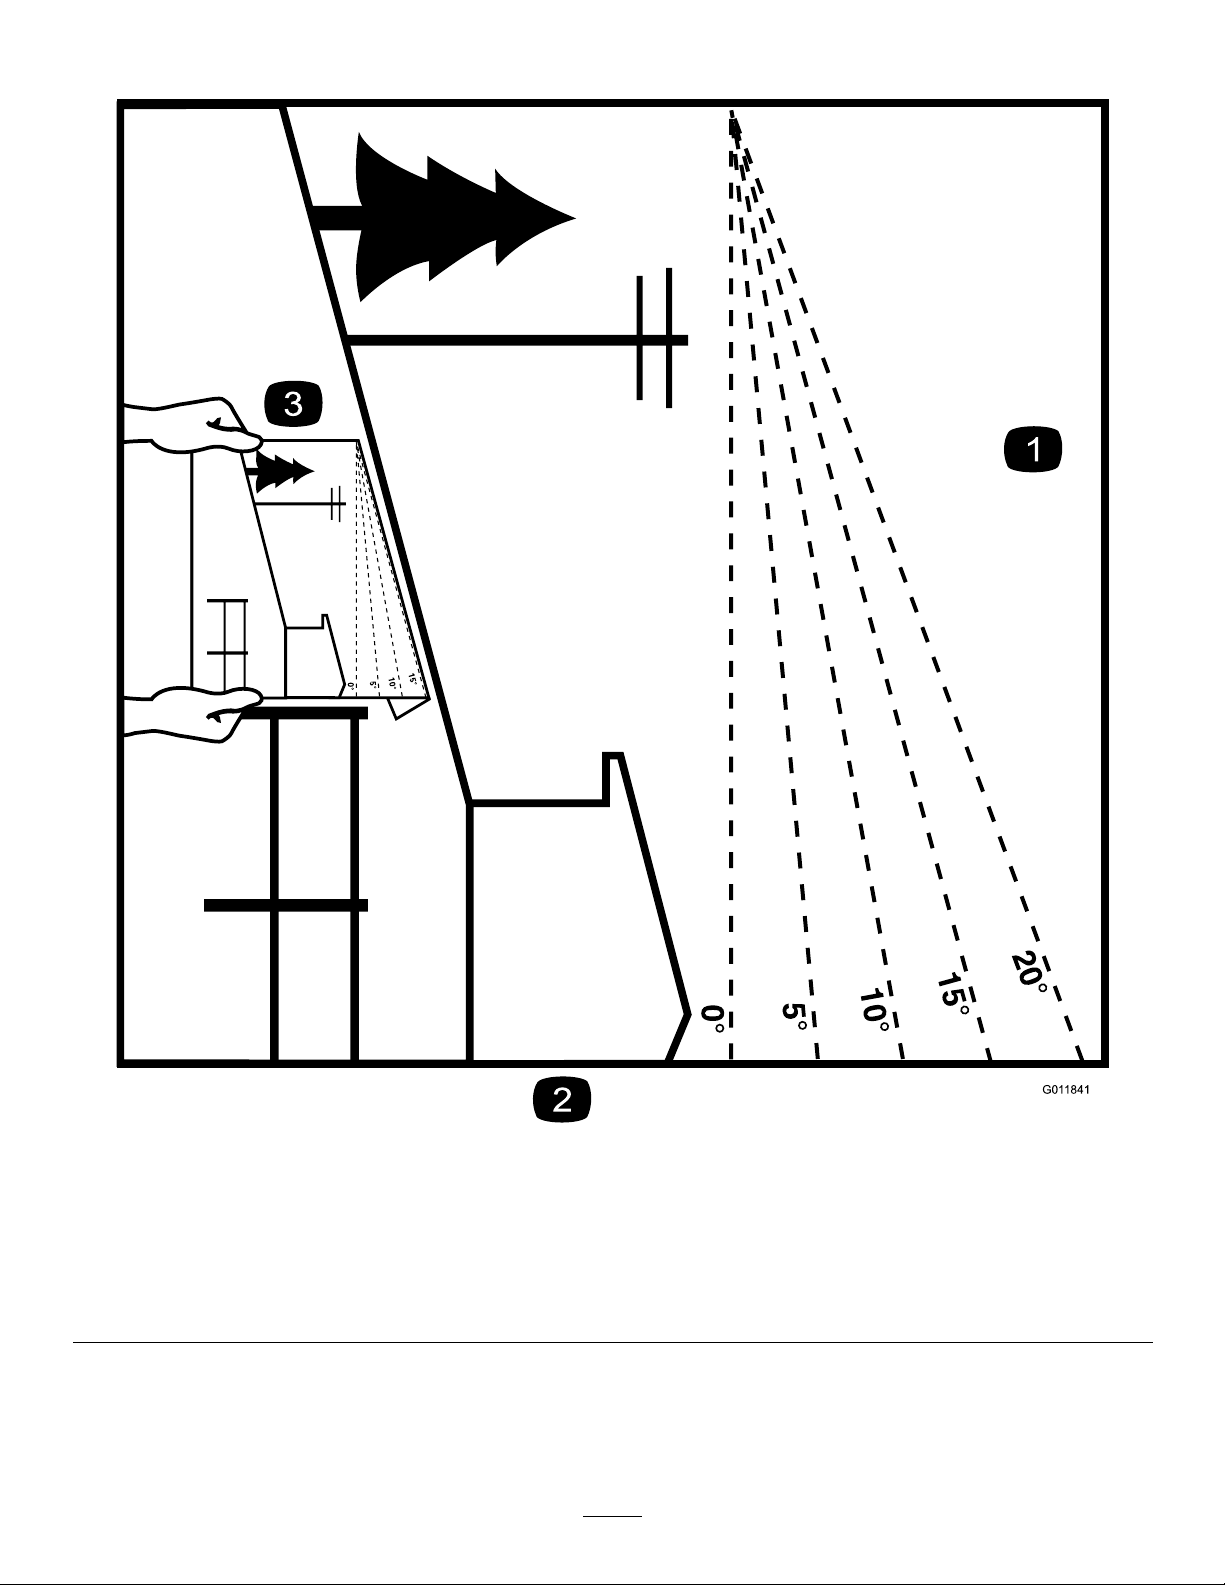
•Donotoperatethemachineonhillsidesorslopes
exceedingtheanglesrecommendedinthefollowing
table.
FrontFacing
Uphill
RearFacingUphillSideFacingUphill
12°18°16°
Note:SeealsotheSlopeIndicator(page7).
•Operateupanddownslopeswiththefrontend
ofthemachineuphill.
•Removeobstaclessuchasrocks,treelimbs,etc.
fromtheworkarea.Watchforholes,ruts,orbumps,
asuneventerraincouldoverturnthemachine.Tall
grasscanhideobstacles.
•UseonlyToro-approvedaccessories.Accessoriescan
changethestabilityandtheoperatingcharacteristics
ofthemachine.Warrantymaybevoidedifusedwith
unapprovedaccessories.
•Keepallmovementsonslopesslowandgradual.Do
notmakesuddenchangesinspeedordirection.
5

•Avoidstartingorstoppingonaslope.Ifthemachine
losestraction,proceedslowly,straightdownthe
slope.
•Avoidturningonslopes.Ifyoumustturn,turn
slowlyandkeeptheheavyendofthemachineuphill.
•Donotoperateneardrop-offs,ditches,or
embankments.Themachinecouldsuddenlyturn
overifatrackgoesovertheedgeofaclifforditch,
orifanedgecavesin.
•Donotoperateonwetgrass.Reducedtractioncould
causesliding.
•Donotparkthemachineonahillsideorslope
withoutloweringthegrindertothegroundand
chockingthetracks.
MaintenanceandStorage
•Disengagethehydraulics,lowerthegrinder,stopthe
engine,andremovethekey.Waitforallmovement
tostopbeforeadjusting,cleaning,orrepairing.
•Cleandebrisfromthegrinder,drives,mufers,and
enginetohelppreventres.Cleanupoilorfuel
spillage.
•Lettheenginecoolbeforestoringanddonotstore
nearame.
•Donotstorefuelnearamesordrainindoors.
•Parkthemachineonlevelground.Neverallow
untrainedpersonneltoservicethemachine.
•Usejackstandstosupportcomponentswhen
required.
•Carefullyreleasepressurefromcomponentswith
storedenergy.
•Disconnectthebatteryorremovethesparkplug
wiresbeforemakinganyrepairs.Disconnect
thenegativeterminalrstandthepositivelast.
Reconnectpositiverstandnegativelast.
•Keephandsandfeetawayfrommovingparts.If
possible,donotmakeadjustmentswiththeengine
running.
•Keepallpartsingoodworkingconditionandall
hardwaretightened.Replaceallwornordamaged
decals.
•Keepnutsandboltstight.Keepequipmentingood
condition.
•Nevertamperwithsafetydevices.
•Keepthemachinefreeofgrass,leaves,orother
debrisbuild-up.Cleanupoilorfuelspillage.Allow
themachinetocoolbeforestoring.
•Useextracarewhenhandlinggasolineandother
fuels.Theyareammableandvaporsareexplosive.
–Useonlyanapprovedcontainer.
–Neverremovethegascaporaddfuelwhen
theengineisrunning.Allowtheenginetocool
beforerefueling.Donotsmoke.
–Neverrefuelthemachineindoors.
–Neverstorethemachineorfuelcontainerinside
wherethereisanopename,suchasneara
waterheaterorfurnace.
–Neverllacontainerwhileitisinsideavehicle,
trunk,pick-upbed,oranysurfaceotherthanthe
ground.
–Keepcontainernozzleincontactwiththetank
duringlling.
•Stopandinspecttheequipmentifyoustrikean
object.Makeanynecessaryrepairsbeforerestarting.
•UseonlygenuineTororeplacementpartstoensure
thatoriginalstandardsaremaintained.
•Batterysafety:
–Chargebatteriesinanopen,wellventilated
area,awayfromsparkandames.Unplugthe
chargerbeforeconnectingordisconnectingit
fromthebattery.Wearprotectiveclothingand
useinsulatedtools.
–Batteryacidispoisonousandcancauseburns.
Avoidcontactwithskin,eyes,andclothing.
Protectyourface,eyes,andclothingwhen
workingwithabattery.
–Batterygasescanexplode.Keepcigarettes,
sparksandamesawayfromthebattery.
•Keepyourbodyandhandsawayfrompinhole
leaksornozzlesthatejecthighpressurehydraulic
uid.Usecardboardorpapertondhydraulic
leaks;neveruseyourhands.Hydraulicuidescaping
underpressurecanpenetrateskinandcauseinjury
requiringsurgerywithinafewhoursbyaqualied
surgeonorgangrenemayresult.
6

SlopeIndicator
G01 1841
Figure3
Thispagemaybecopiedforpersonaluse.
1.Todeterminethemaximumslopeyoucansafelyoperatethemachineon,refertoSlopeOperation(page5).Usetheslope
indicatortodeterminethedegreeofslopeofhillsbeforeoperating.Donotoperatethismachineonaslopegreaterthanthat
speciedinSlopeOperation(page5).Foldalongtheappropriatelinetomatchtherecommendedslope.
2.Alignthisedgewithaverticalsurface,atree,building,fencepole,etc.
3.Exampleofhowtocompareslopewithfoldededge.
7

SafetyandInstructionalDecals
Safetydecalsandinstructionsareeasilyvisibletotheoperatorandarelocatednearanyareaof
potentialdanger.Replaceanydecalthatisdamagedorlost.
93-6686
1.Hydraulicoil
2.ReadtheOperator'sManual.
93-7321
1.Cutting/dismembermenthazardofhandsandfeet,rotating
knives/blades—stayawayfrommovingparts.
93-7814
1.Entanglementhazard,belt—stayawayfrommovingparts.
100-4650
1.Crushinghazardofhand—keepbystandersasafedistance
fromthemachine.
2.Crushinghazardoffoot—keepbystandersasafedistance
fromthemachine.
107-9366
1.Thrownobjecthazard—keepbystandersasafedistance
fromthemachine.
115-4020
1.Turnright3.Reverse
2.Forward4.Turnleft
8

119-4560
1.Ignitionkey
2.Engine—start
3.Engine—run
4.Engine—stop
5.Fast
6.Enginespeed
7.Slow
8.On/Closed
9.Choke
10.Off/Open
11.ReadtheOperator'sManualbeforestartingtheengine;
placethetractioncontrolinNeutral,movetheenginespeed
toFastandthechoketoOn/Closed,turntheignitionkey
torun.
119-4561
1.ReadtheOperator'sManualbeforeoperatingthecutter;
engagethesideleverandtopbuttonofthejoystickto
startthecutterblade;continueengagingthesideleverto
maintaincutterrotation.
2.Lowerthecutterhead
3.Pivotthecutterheadtotheright
4.Raisethecutterhead
5.Pivotthecutterheadtotheleft
BatterySymbols
Someorallofthesesymbolsareonyourbattery
1.Explosionhazard6.Keepbystandersasafe
distancefromthebattery.
2.Nore,opename,or
smoking.
7.Weareyeprotection;
explosivegasescan
causeblindnessandother
injuries
3.Causticliquid/chemical
burnhazard
8.Batteryacidcancause
blindnessorsevereburns.
4.Weareyeprotection9.Flusheyesimmediately
withwaterandgetmedical
helpfast.
5.ReadtheOperator's
Manual.
10.Containslead;donot
discard.
9

119-4606
1.Warning—readtheOperator'sManual.5.Explosionandelectricshockhazard—donotdiginareaswith
buriedutilitylines;contactlocalpowerorganizationsbefore
digging.
2.Cutting/dismembermenthazard;cutter—keepbystandersa
safedistancefromthemachine;donotoperatethecutter
headwhiletransportingthemachine.
6.Tipping/crushinghazard—lowerthecutterheadwhen
operatingonslopes.
3.Warning—stayawayfrommovingparts;waitforallmoving
partstostop.
7.Explosionhazard,fueling—stoptheengineandextinguish
allameswhenfueling.
4.Warning—donotoperatethismachineunlessyouaretrained.8.Warning—lowerthecutterhead,settheparkingbrake(if
applicable),stoptheengine,removetheignitionkeybefore
leavingthemachine.
10

Setup
LooseParts
Usethechartbelowtoverifythatallpartshavebeenshipped.
ProcedureDescriptionQty.Use
Grindercontrollever1
1Jamnut1Installthegrindercontrollever.
2Nopartsrequired–Checktheuidlevels.
3Nopartsrequired–Chargethebattery.
1
InstallingtheGrinderControl
Lever
Partsneededforthisprocedure:
1Grindercontrollever
1Jamnut
Procedure
1.Threadthejamnutontothegrindercontrollever
(Figure4).
Figure4
1.Grindercontrollever3.4-pinconnector
2.Jamnut
2.Threadthegrindercontrolleverintotherecepticle
onthecontrolpanel(Figure4).
3.Withthetriggerorientedforward,tightenthejam
nutagainstthereceptacletosecuretheleverinplace
(Figure4).
4.Connectthewireonthelevertothe4-pinconnector
underthecontrolpanel(Figure4).
2
CheckingFluidLevels
NoPartsRequired
Procedure
Beforestartingtheengineforthersttime,check
theengineoilandhydraulicuidlevels;referto
CheckingtheEngineOilLevel(page16)and
CheckingtheHydraulicFluidLevel(page16)formore
information.
3
ChargingtheBattery
NoPartsRequired
Procedure
Chargethebattery;referto
ChargingtheBattery(page29)formoreinformation.
11

ProductOverview
Figure5
1.Reverse
safety
plate
3.Engine5.Tie-down/
liftpoint
7.Chip
shield
2.Control
panel
4.Battery6.Track8.Grinder
Controls
Becomefamiliarwithallthecontrols(Figure6)before
youstarttheengineandoperatethemachine.
Figure6
1.Keyswitch5.Tractioncontrol
2.Throttlelever6.Referencebar
3.Chokelever7.Grindercontrollever
4.Hourmeter
KeySwitch
Thekeyswitchhasthreepositions:off,run,andstart.
Tostarttheengine,rotatethekeytothestartposition.
Releasethekeywhenenginestartsanditwillmove
automaticallytotherunposition.
Tostoptheengine,rotatethekeytotheoffposition.
ThrottleLever
Movethecontrolforwardtoincreasetheenginespeed
andrearwardtodecreasespeed.
ChokeLever
Beforestartingacoldengine,movethechokelever
forward.Aftertheenginestarts,regulatethechoketo
keeptheenginerunningsmoothly.Assoonaspossible,
movethechokeleverallthewayrearward.
Note:Awarmenginerequireslittleornochoking.
HourMeter
Whentheengineisoff,thehourmeterdisplaysthe
numberofhoursofoperationthathavebeenlogged
onthemachine.
ReferenceBar
Whendrivingthemachine,usethereferencebarasa
handleandaleveragepointforcontrollingthetraction
control.Toensuresmooth,controlledoperation,donot
takebothhandsoffofthereferencebarwhileoperating
themachine.
TractionControl
Figure7
1.Referencebar(doesnotmovetogiveyouareferencepoint
andaxedhandletoholdwhileoperatingthetractionunit)
2.Tractioncontrol(movestocontrolthemachine)
•Tomoveforward,movethetractioncontrolforward
(Figure8).
Figure8
•Tomoverearward,movethetractioncontrol
rearward(Figure9).Whenreversing,lookbehind
forobstructionsandkeepyourhandsonthe
referencebar(Figure7).
12

Figure9
•Toturnright,rotatethetractioncontrolclockwise
(Figure10).
G008131
Figure10
•Toturnleft,rotatethetractioncontrol
counterclockwise(Figure11).
G008132
Figure11
•Tostop,releasethetractioncontrol(Figure7).
Note:Thefartheryoumovethetractioncontrolin
anydirection,thefasterthemachinewillmoveinthat
direction.
GrinderControlLever
Operatethegrinderusingthegrindercontrolleveras
follows:
•Tostartthegrinder(Figure12),presstheredbutton
onthetopofthelever,thensqueezethetrigger.
Oncethegrinderhasstarted,youcanreleasethe
redbutton.
•Tostopthegrinder(Figure12),releasethetrigger
formorethanahalfsecond.
Note:Ifyouareoperatingthegrinderan
momentarilyreleasethetrigger(i.e.,lessthanahalf
second)thegrinderwillcontinueoperation.
Figure12
1.Neutral3.Runthegrinder
2.Startthegrinder4.Stopthegrinder
•Toraisethegrinder,pullbackonthelever
(Figure13).
13

Figure13
•Tolowerthegrinder,pushtheleverforward
(Figure14).
Figure14
•Torotatethegrindertotherightorleft,movethe
leverinthedesireddirection.
Figure15
Specications
Note:Specicationsanddesignaresubjecttochange
withoutnotice.
Width33.15inches(84.2cm)
Length78.15inches(198.5cm)
Height44.61inches(113.3cm)
Weight1200lb(544Kg)
Attachments/Accessories
AselectionofToroapprovedattachmentsand
accessoriesareavailableforusewiththemachineto
enhanceandexpanditscapabilities.Contactyour
AuthorizedServiceDealerorDistributororgoto
www.Toro.comforalistofallapprovedattachments
andaccessories.
14

Operation
Note:Determinetheleftandrightsidesofthe
machinefromthenormaloperatingposition.
Important:Beforeoperating,checkthefueland
oillevel,andremovedebrisfromthemachine.
Also,ensurethattheareaisclearofpeopleand
debris.Youshouldalsoknowandhavemarkedthe
locationsofallutilitylines.
AddingFuel
Useunleadedgasoline(87pumpoctaneminimum).
Leaded,regulargasolinemaybeusedifunleadedisnot
available.
DANGER
Incertainconditions,gasolineisextremely
ammableandhighlyexplosive.Areorexplosion
fromgasolinecanburnyouandothersandcan
damageproperty.
•Fillthefueltankoutdoors,inanopenarea,
whentheengineiscold.Wipeupanygasoline
thatspills.
•Neverllthefueltankinsideanenclosedtrailer.
•Donotllthefueltankcompletelyfull.Add
gasolinetothefueltankuntilthelevelis1/4to
1/2inch(6to13mm)belowthebottomofthe
llerneck.Thisemptyspaceinthetankallows
gasolinetoexpand.
•Neversmokewhenhandlinggasoline,andstay
awayfromanopenameorwheregasoline
fumesmaybeignitedbyaspark.
•Storegasolineinanapprovedcontainerand
keepitoutofthereachofchildren.Neverbuy
morethana30-daysupplyofgasoline.
•Donotoperatewithoutentireexhaustsystem
inplaceandinproperworkingcondition.
DANGER
Incertainconditionsduringfueling,static
electricitycanbereleasedcausingasparkwhich
canignitethegasolinevapors.Areorexplosion
fromgasolinecanburnyouandothersandcan
damageproperty.
•Alwaysplacegasolinecontainersontheground
awayfromyourvehiclebeforelling.
•Donotllgasolinecontainersinsideavehicle
oronatruckortrailerbedbecauseinterior
carpetsorplastictruckbedlinersmayinsulate
thecontainerandslowthelossofanystatic
charge.
•Whenpractical,removegas-powered
equipmentfromthetruckortrailerandrefuel
theequipmentwithitswheelsontheground.
•Ifthisisnotpossible,thenrefuelsuch
equipmentonatruckortrailerfromaportable
container,ratherthanfromagasolinedispenser
nozzle.
•Ifagasolinedispensernozzlemustbeused,
keepthenozzleincontactwiththerimofthe
fueltankorcontaineropeningatalltimesuntil
fuelingiscomplete.
Important:Donotusemethanol,gasoline
containingmethanol,orgasoholcontainingmore
than10%ethanolbecausethefuelsystemcouldbe
damaged.Donotmixoilwithgasoline.
UsingStabilizer/Conditioner
Useafuelstabilizer/conditionerinthemachineto
providethefollowingbenets:
•Keepsgasolinefreshduringstorageof90daysor
less.Forlongerstorageitisrecommendedthatthe
fueltankbedrained.
•Cleanstheenginewhileitruns
•Eliminatesgum-likevarnishbuildupinthefuel
system,whichcauseshardstarting
Important:Donotusefueladditivescontaining
methanolorethanol.
Addthecorrectamountofgasstabilizer/conditioner
tothegas.
Note:Afuelstabilizer/conditionerismosteffective
whenmixedwithfreshgasoline.Tominimizethe
chanceofvarnishdepositsinthefuelsystem,usefuel
stabilizeratalltimes.
15

FillingtheFuelTank
1.Parkthemachineonalevelsurface,lowerthe
grinder,andstoptheengine.
2.Removethekeyandallowtheenginetocool.
3.Cleanaroundthefueltankcapandremoveit
(Figure16).
Figure16
1.Fueltankcap
4.Addunleadedgasolinetothefueltank,untilthe
levelis1/4to1/2inchbelowthebottomofthe
llerneck.
Important:Thisspaceinthetankallows
gasolinetoexpand.Donotllthefueltank
completelyfull.
5.Installthefueltankcapsecurely.
6.Wipeupanygasolinethatmayhavespilled.
CheckingtheEngineOilLevel
ServiceInterval:Beforeeachuseordaily
1.Parkthemachineonalevelsurface,lowerthe
grinder,andstoptheengine.
2.Removethekeyandallowtheenginetocool.
3.Cleanaroundtheoildipstick(Figure17).
Figure17
1.Oilllerhole3.Fullmark
2.Oildipstick4.Addmark
4.Removethedipstickandwipetheendclean
(Figure17).
5.Slidethedipstickfullyintothedipsticktubewithout
threadingitintothellerneck(Figure17).
6.Pullthedipstickoutandlookattheend.The
oilshouldbebetweentheAddandFullmarks
(Figure17).
7.IftheoilisbelowtheAddmark,add10w30engine
oiltothellerhole,checkingthelevelfrequently
withthedipstick,untiltheoillevelreachestheFull
mark.
8.Replacethedipstick.
CheckingtheHydraulicFluid
Level
ServiceInterval:Every25hours
HydraulicTankCapacity:6USgallons(23l)
RefertoChangingtheHydraulicFluid(page35)for
hydraulicuidspecications.
1.Parkthemachineonalevelsurfaceandlowerthe
grinder.
2.Stoptheengine,removethekey,andallowthe
enginetocool.
3.Lookintotheglassbubbleontherightsideofthe
machine.Ifyoucannotseehydraulicuidinthe
bubble,continuethisproceduretoadduid.
16

Figure18
1.Hydraulicuidcheckbubble
4.Removethecoverplate;referto
RemovingtheCoverPlate(page22).
5.Cleantheareaaroundthellerneckofthehydraulic
tankandremovethecapandlterfromtheller
neckusingasocket(Figure19).
Figure19
1.Fillerneckcap2.Hydraulicuidlter
6.Ifthelevelislow ,adduiduntilitisvisibleinthe
glassbubble.
7.Installthecapandlteronthellerneckandtorque
boltontopto110to140inch-lb(13to15.5N-m).
8.Installthecoverplate;referto
InstallingtheCoverPlate(page22).
StartingandStoppingthe
Engine
StartingtheEngine
1.MovethethrottlelevermidwaybetweenSlowand
Fastpositions(Figure20).
g013178
1 2
3
Figure20
1.Throttlelever3.Key
2.Chokelever
2.MovethechokelevertotheOnposition(Figure20).
Note:Awarmorhotenginemaynotrequire
choking.
3.TurnthekeytotheOnposition(Figure20).When
theenginestarts,releasethekey.
Important:Donotengagethestarterformore
than10secondsatatime.Iftheenginefails
tostart,allowa30secondcool-downperiod
betweenattempts.Failuretofollowthese
instructionscanburnoutthestartermotor.
4.GraduallymovethechokelevertotheOffposition
(Figure20).Iftheenginestallsorhesitates,engage
thechokeagainuntiltheenginewarmsup.
5.Movethethrottlelevertothedesiredsetting
(Figure20).
Important:Iftheengineisrunathighspeeds
whenthehydraulicsystemiscold(i.e.,when
theambientairtemperatureisnearfreezingor
lower),hydraulicsystemdamagecouldoccur.
Whenstartingtheengineincoldconditions,
allowtheenginetoruninthemiddlethrottle
positionfor2to5minutesbeforemovingthe
throttletofast(rabbit).
Note:Iftheoutdoortemperatureisbelowfreezing,
storethemachineinagaragetokeepitwarmerand
aidinstarting.
StoppingtheEngine
1.Stopthegrinderandlowerittotheground.
2.MovethethrottlelevertotheSlowposition
(Figure20).
17

3.Turnthekeyoff(Figure20).
Note:Iftheenginehasbeenworkinghardor
ishot,letitidleforaminutebeforeturningthe
ignitionkeyoff.Thishelpscooltheenginebefore
itisstopped.Inanemergency,theenginemaybe
stoppedimmediately.
4.Removethekey.
StoppingtheMachine
Tostopthemachine,releasethetractioncontrol,move
thethrottlelevertoslow(turtle),lowerthegrinderto
theground,stoptheengine,andremovethekey.
CAUTION
Achildoruntrainedbystandercouldattemptto
operatethemachineandbeinjured.
Removethekeyfromtheswitchwhenleavingthe
machine,evenifjustforafewseconds.
MovingaNon-functioning
Machine
Important:Donottoworpullthemachine
withoutrstopeningthetowvalves,orthe
hydraulicsystemwillbedamaged.
1.Stoptheengine.
2.Removethebottomshield.
3.Usingawrench,turnthetowvalvesonthehydraulic
motorstwicecounter-clockwise(Figure21).
Figure21
1.Towvalves
4.Installthebottomshieldandtowthemachineas
required.
5.Whenthemachinehasbeenrepaired,closethetow
valvesbeforeoperatingit.
GrindingaStump
DANGER
Thegrinderwillcutandamputatehandsandfeet.
•Stayintheoperator'spositionwhilethegrinder
isrunningandkeepawayfromthegrinder.
•Keepallbystandersasafedistancefromthe
grinder.
•Stopthegrinderimmediatelyifanypeopleor
animalsentertheworkarea.
WARNING
Grindingastumpwillthrowwoodchips,soil,and
otherdebrisintotheairwhichcouldinjureyouor
bystanders.
•Alwaysweareyeprotectionwhenusingthe
grinder.
•Keepallbystandersasafedistancefromthe
grinder.
WARNING
Thegrinderisveryloudwhencuttingastumpand
candamageyourears.
Alwayswearhearingprotectionwhenusingthe
grinder.
1.Starttheengine,raisethegrinder,setthethrottle
levertotheFastposition,andmovethemachineto
thestumptobeground.
2.Usethegrindercontrolleverandthetraction
controltopositionthegrindertoonesideofthe
frontofthestump,aboutaninchbelowthesurface
(Figure22).
18

Figure22
3.Startthegrinderandwaitforittogetuptofull
speed.
4.Usethegrindercontrollevertoswingthegrinder
slowlyacrossthefaceofthestump,cuttingawaya
swathofchips(Figure22).
Important:Donotforcethegrindertomove
toofast.Insteadallowittocutthroughthe
woodwithoutboggingdownorlosingspeed.
5.Movethemachineforwardafewinchesandrepeat
step4(Figure22).
6.Repeatsteps4through5untilyouhavegroundoff
theentirefaceofthestump(Figure22).
7.Backupthemachine,positionthegrindertothe
sideofthefrontofthestump,andlowerittoabout
aninchbelowthesurface.
8.Repeatsteps4through7untilthestumpisground
away.
9.Ifthereareanylargerootstobeground,position
thegrinderovereachrootandusethetraction
controlandgrindercontroltomovethegrinder
alongtheroot,grindingitaway.
SecuringtheMachinefor
Transport
Whentransportingthemachineonatrailer,alwaysuse
thefollowingprocedure:
Important:Donotoperateordrivethemachine
onroadways.
1.Stoptheengine.
2.Lowerthegrinder.
3.Securethemachinetothetrailerwithchainsor
strapsusingthetie-down/liftloopsatthefrontand
rearofthemachine(Figure23andFigure24).Refer
toyourlocalordinancesfortrailerandtie-down
requirements.
Figure23
1.Fronttie-downloop
Figure24
1.Reartie-downloops
LiftingtheMachine
Youcanliftthemachineusingthetie-down/liftloops
asliftpoints(Figure23andFigure24).
OperatingTips
•Cleantheareaoftrash,branchesandrocksbefore
operatingtopreventequipmentdamage.
•Alwaysusefullthrottle(maximumenginespeed)
whengrinding.
19

•Cuttheedgesofthestumpformoreefcient
grinding.Onceyourcuttingswathiscloseto1/4of
thewheeldiameter(),liftthegrinder,moveforward
andbegincuttingontheedgeagain.
Figure25
•Listentotheengineandwatchthegrinderwheel
speedtomaintainthespeedofthewheel.Slow
downtheheadsweepbyfeatheringthejoystickas
cuttingbecomesdifcult.
•Asyougrindfromlefttoright,mostofthedebris
willgototheleftofthegrinderwheel.Whenyou
grindfromtherighttoleft,thedebriswillgotothe
right.
•Youmayalsogrindastumpfromthesidetolessen
turfdamage.
20
This manual suits for next models
2
Table of contents
Other Toro Lawn And Garden Equipment manuals

Toro
Toro 140-4508 User manual

Toro
Toro 09501 User manual

Toro
Toro Pro Control 138-7588 User manual

Toro
Toro TRX-19 User manual

Toro
Toro 03655 User manual

Toro
Toro VS-70 User manual

Toro
Toro 58630 User manual

Toro
Toro Flex-Force Power System 88714 User manual

Toro
Toro TRX-20 User manual

Toro
Toro 22305A User manual
Popular Lawn And Garden Equipment manuals by other brands

Green-Qube
Green-Qube Quick-Qube QQ1224 Assembly instructions

PPI
PPI H2grO - Greywater for Gardens Owner's operating manual

Husqvarna
Husqvarna Solar Hybrid quick guide

Evergreen
Evergreen Flamingo Pair Assembly instructions

Makita
Makita UV3200 Original instruction manual

PondMAX
PondMAX PA Series instruction manual