Toro 08743 User manual

FormNo.3444-285RevA
SandPro®3040and5040Traction
Units
ModelNo.08743—SerialNo.400000000andUp
ModelNo.08745—SerialNo.400000000andUp
Registeratwww.Toro.com.
OriginalInstructions(EN)*3444-285*

ThisproductcomplieswithallrelevantEuropean
directives.Fordetails,pleaseseetheseparate
productspecicDeclarationofConformity(DOC)
sheet.
ItisaviolationofCaliforniaPublicResourceCode
Section4442or4443touseoroperatetheengineon
anyforest-covered,brush-covered,orgrass-covered
landunlesstheengineisequippedwithaspark
arrester,asdenedinSection4442,maintainedin
effectiveworkingorderortheengineisconstructed,
equipped,andmaintainedforthepreventionofre.
Theenclosedengineowner'smanualissupplied
forinformationregardingtheUSEnvironmental
ProtectionAgency(EPA)andtheCaliforniaEmission
ControlRegulationofemissionsystems,maintenance,
andwarranty.Replacementsmaybeorderedthrough
theenginemanufacturer.
WARNING
CALIFORNIA
Proposition65Warning
Theengineexhaustfromthisproduct
containschemicalsknowntotheStateof
Californiatocausecancer,birthdefects,
orotherreproductiveharm.
Batteryposts,terminals,andrelated
accessoriescontainleadandlead
compounds,chemicalsknownto
theStateofCaliforniatocause
cancerandreproductiveharm.Wash
handsafterhandling.
Useofthisproductmaycauseexposure
tochemicalsknowntotheStateof
Californiatocausecancer,birthdefects,
orotherreproductiveharm.
Introduction
Thismachineisaride-onpieceofutilityequipment
intendedtobeusedbyprofessional,hiredoperators
incommercialapplications.Itisprimarilydesigned
forconditioningsandtrapsonwell-maintainedgolf
coursesandcommercialgrounds.Usingthisproduct
forpurposesotherthanitsintendedusecouldprove
dangeroustoyouandbystanders.
Readthisinformationcarefullytolearnhowtooperate
andmaintainyourproductproperlyandtoavoid
injuryandproductdamage.Youareresponsiblefor
operatingtheproductproperlyandsafely.
Visitwww.Toro.comforproductsafetyandoperation
trainingmaterials,accessoryinformation,helpnding
adealer,ortoregisteryourproduct.
Wheneveryouneedservice,genuineToroparts,or
additionalinformation,contactanAuthorizedService
DealerorT oroCustomerServiceandhavethemodel
andserialnumbersofyourproductready.Figure1
identiesthelocationofthemodelandserialnumbers
ontheproduct.Writethenumbersinthespace
provided.
Important:Withyourmobiledevice,youcan
scantheQRcode(ifequipped)ontheserial
numberdecaltoaccesswarranty,parts,andother
productinformation.
g339454
Figure1
1.Modelandserialnumberlocation
ModelNo.
SerialNo.
©2021—TheToro®Company
8111LyndaleAvenueSouth
Bloomington,MN554202
Contactusatwww.Toro.com.
PrintedintheUSA
AllRightsReserved

Thismanualidentiespotentialhazardsandhas
safetymessagesidentiedbythesafety-alertsymbol
(Figure2),whichsignalsahazardthatmaycause
seriousinjuryordeathifyoudonotfollowthe
recommendedprecautions.
g000502
Figure2
Safety-alertsymbol
Thismanualuses2wordstohighlightinformation.
Importantcallsattentiontospecialmechanical
informationandNoteemphasizesgeneralinformation
worthyofspecialattention.
Contents
Safety.......................................................................4
GeneralSafety...................................................4
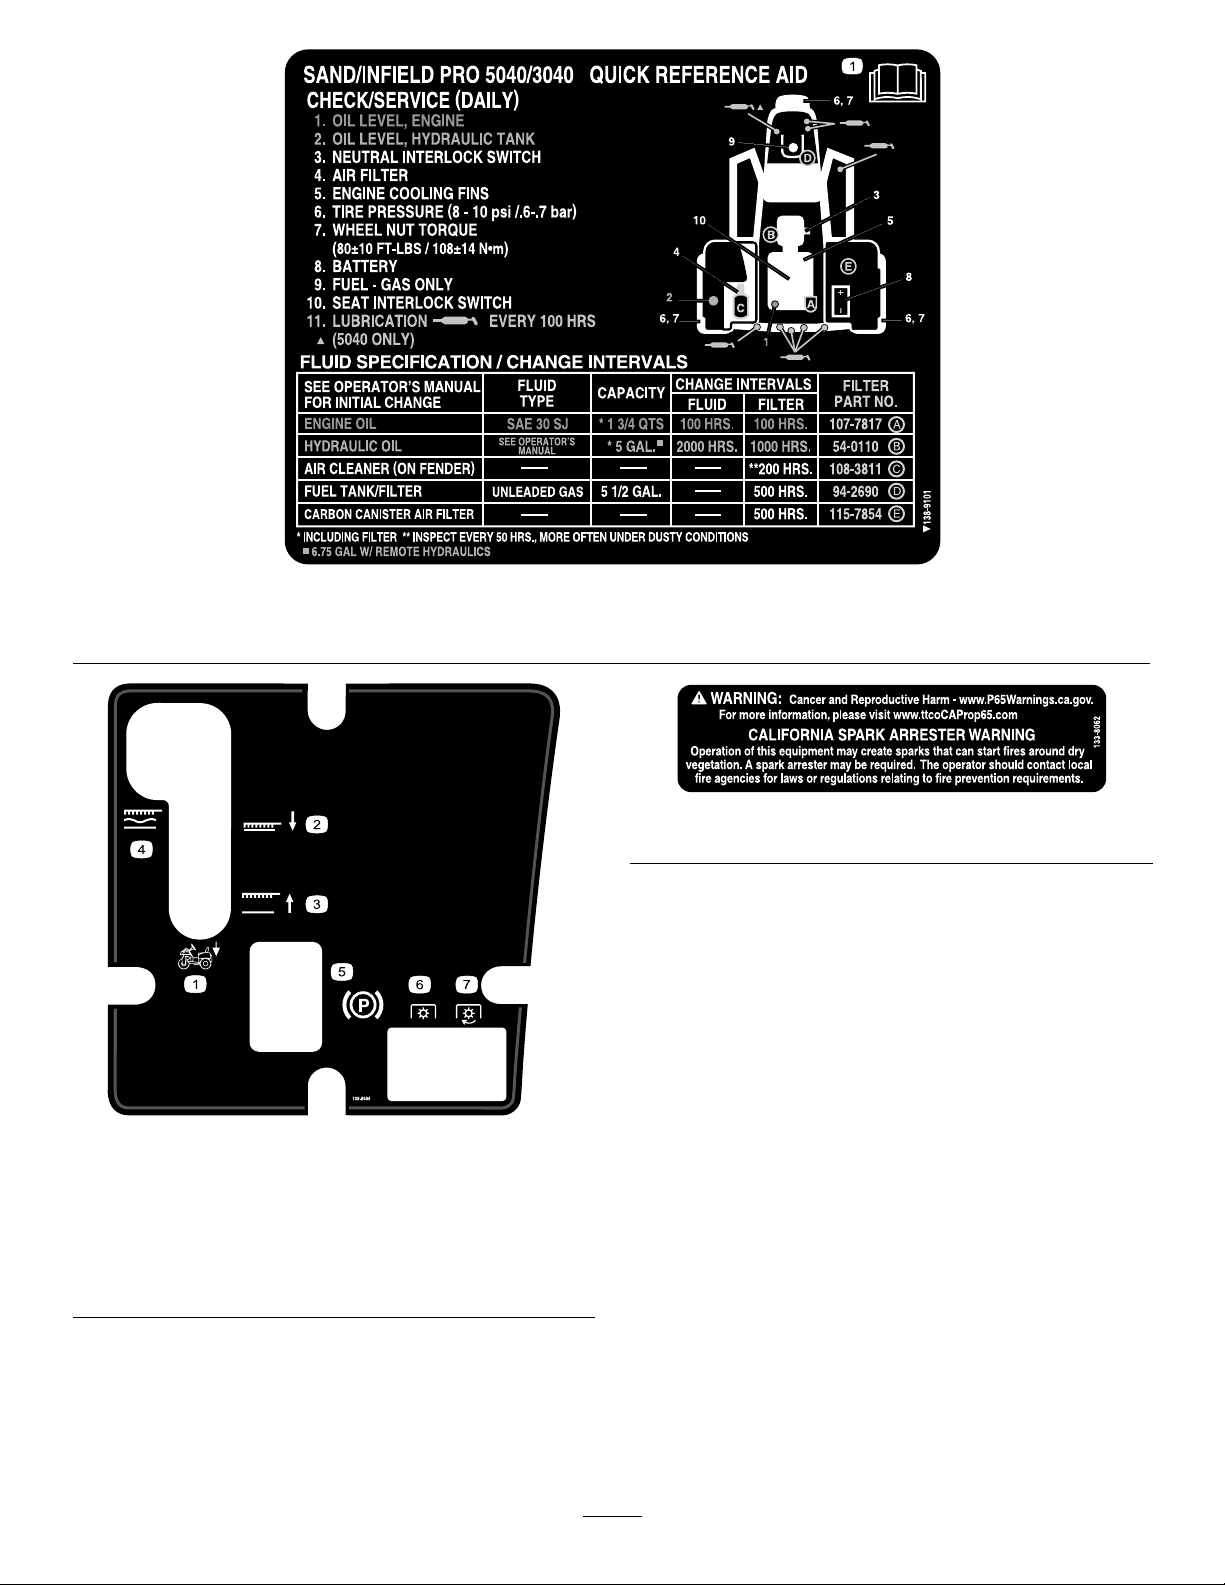
SafetyandInstructionalDecals..........................4
Setup........................................................................7
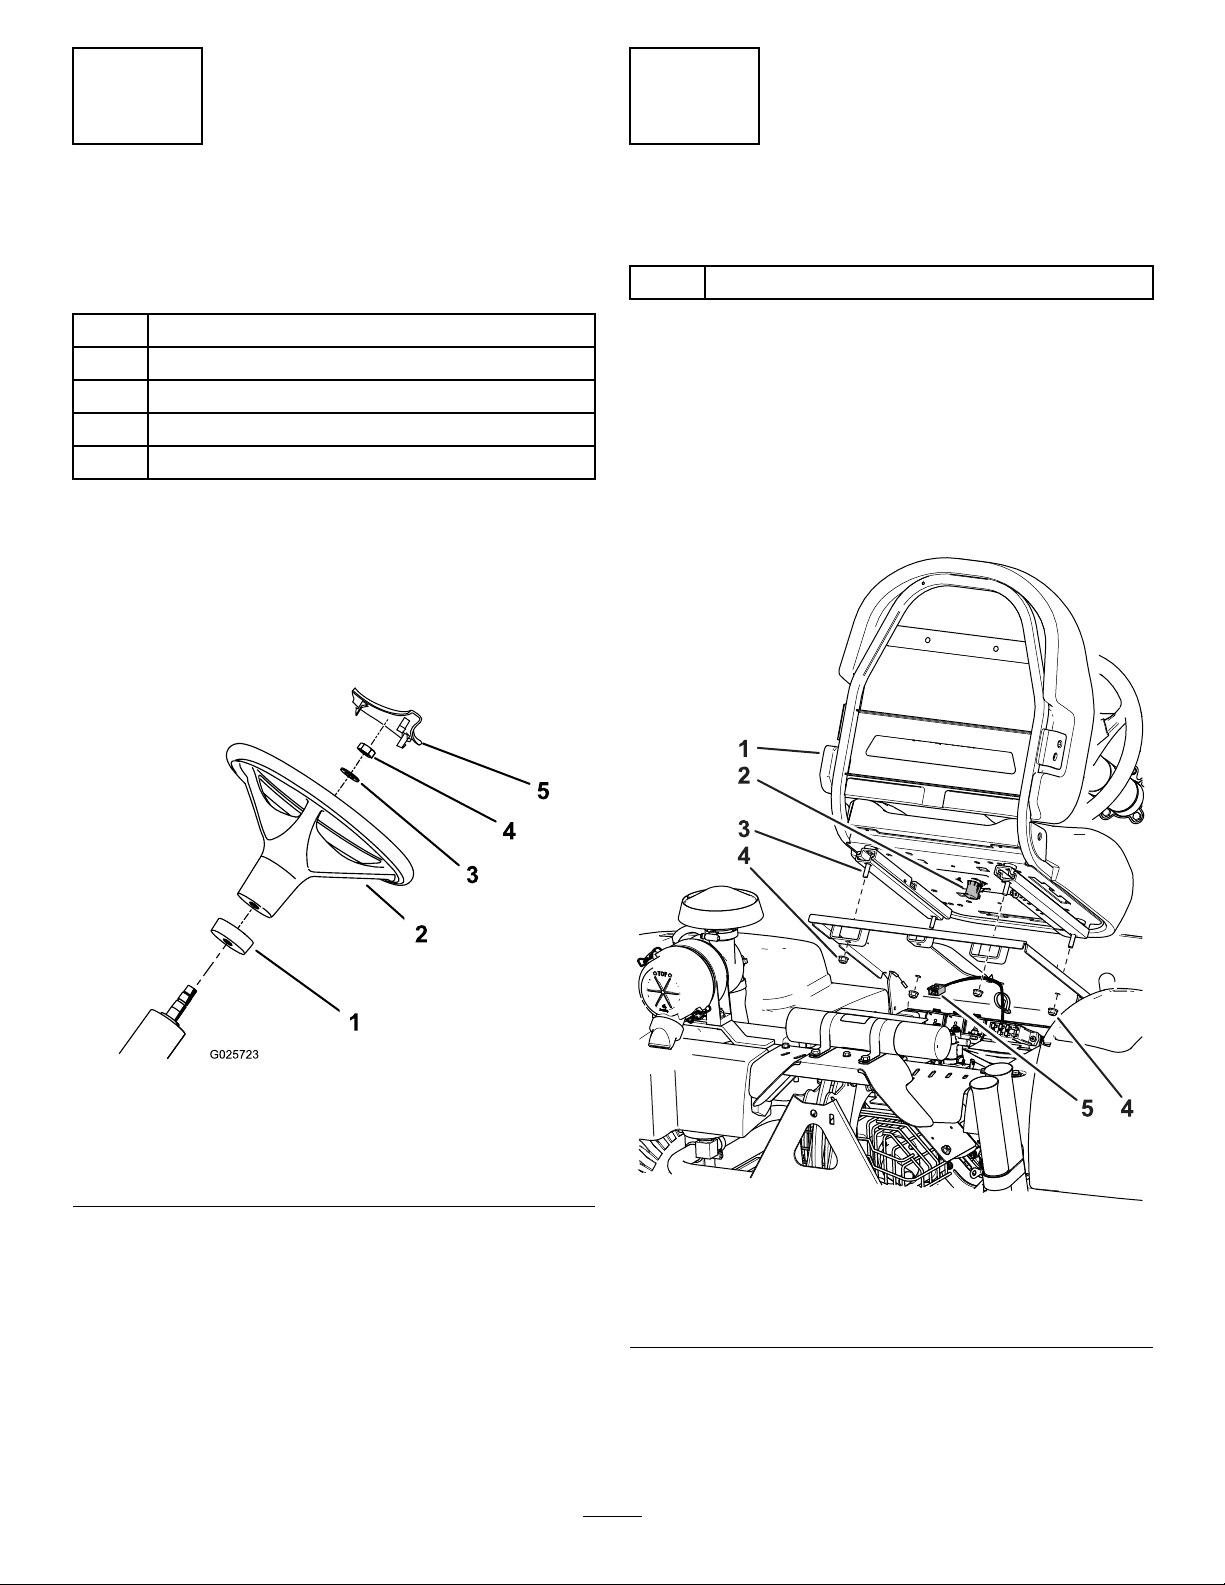
1InstallingtheSteeringWheel............................8
2InstallingtheSeat............................................8
3InstallingtheBattery........................................8
4InstallingtheFrontWeights............................10
5ApplyingtheProductionYearDecaland
CEDecal.......................................................10
ProductOverview....................................................11
Controls............................................................11
Specications..................................................13
Attachments/Accessories.................................13
BeforeOperation.................................................14
BeforeOperationSafety...................................14
FillingtheFuelTank..........................................14
BeforeOperationsChecks................................15
CheckingtheInterlockSystem..........................15
DuringOperation.................................................16
GeneralSafety.................................................16
SlopeSafety.....................................................16
StartingandShuttingOfftheEngine.................17
BreakingintheMachine...................................17
BecomingFamiliarwiththeMachine.................17
AfterOperation....................................................18
AfterOperationSafety......................................18
TowingtheMachine..........................................18
HaulingtheMachine.........................................18
Maintenance...........................................................19
MaintenanceSafety..........................................19
RecommendedMaintenanceSchedule(s)...........19
DailyMaintenanceChecklist.............................20
Pre-MaintenanceProcedures..............................21
LiftingtheMachine...........................................21
Lubrication..........................................................22
GreasingtheMachine.......................................22
EngineMaintenance...........................................23
EngineSafety...................................................23
EngineOilSpecication....................................23
CheckingtheEngine-OilLevel..........................23
ChangingtheEngineOilandFilter....................24
ServicingtheAirCleaner..................................25
ReplacingtheSparkPlugs................................26
FuelSystemMaintenance...................................26
ReplacingtheFuelFilter...................................26
ChangingtheCarbon-CanisterFilter................27
ElectricalSystemMaintenance...........................28
ElectricalSystemSafety...................................28
Jump-StartingtheMachine...............................28
ReplacingFuses...............................................28
MaintainingtheBattery.....................................28
DriveSystemMaintenance..................................29
CheckingtheTirePressure...............................29
TorquingtheWheelLugNuts............................29
AdjustingtheTransportSpeed..........................29
ControlsSystemMaintenance.............................30
AdjustingtheLiftLever.....................................30
HydraulicSystemMaintenance...........................31
HydraulicSystemSafety...................................31
CheckingtheHydraulicLinesand
Hoses............................................................31
HydraulicFluidSpecications...........................31
CheckingtheHydraulic-FluidLevel...................32
ReplacingtheHydraulicFilter...........................33
ChangingtheHydraulicFluid............................33
Cleaning..............................................................34
CleaningandInspectingtheMachine...............34
CleaningtheOilCooler.....................................34
Storage...................................................................35
PreparingtheMachine......................................35
PreparingtheEngine........................................35
PreparingtheBattery........................................35
3

Safety
Thismachinehasbeendesignedinaccordance
withANSIB71.4-2017.However,when
attachmentsareinstalledonthemachine,
additionalweightisrequiredtocomplytothe
standards.
GeneralSafety
Thisproductiscapableofcausingpersonalinjury.
Alwaysfollowallsafetyinstructionstoavoidserious
personalinjury.
•Readandunderstandthecontentsofthis
Operator’sManualbeforestartingtheengine.
Ensurethateveryoneusingthisproductknows
howtouseitandunderstandsthewarnings.
•Useyourfullattentionwhileoperatingthe
machine.Donotengageinanyactivitythat
causesdistractions;otherwise,injuryorproperty
damagemayoccur.
•Donotputyourhandsorfeetnearmoving
componentsofthemachine.
•Donotoperatethemachinewithoutallguards
andothersafetyprotectivedevicesinplaceand
workingonthemachine.
•Keepthemachineawayfrombystanderswhileit
ismoving.
•Keepchildrenoutoftheoperatingarea.Never
allowchildrentooperatethemachine.
•Stopthemachineandshutofftheenginebefore
servicingorfuelingthemachine.
Improperlyusingormaintainingthismachinecan
resultininjury.T oreducethepotentialforinjury,
complywiththesesafetyinstructionsandalways
payattentiontothesafety-alertsymbol,which
meansCaution,Warning,orDanger—personalsafety
instruction.Failuretocomplywiththeseinstructions
mayresultinpersonalinjuryordeath.
SafetyandInstructionalDecals
Safetydecalsandinstructionsareeasilyvisibletotheoperatorandarelocatednearanyarea
ofpotentialdanger.Replaceanydecalthatisdamagedormissing.
decal93-7272
93-7272
1.Cutting/dismembermenthazard;fan—stayawayfrom
movingparts.
decal93-9051
93-9051
1.ReadtheOperator'sManual.
decalbatterysymbols
BatterySymbols
Someorallofthesesymbolsareonyourbattery.
1.Explosionhazard6.Keepbystandersaway
fromthebattery.
2.Nore,opename,or
smoking
7.Weareyeprotection;
explosivegasescan
causeblindnessandother
injuries.
3.Causticliquid/chemical
burnhazard
8.Batteryacidcancause
blindnessorsevereburns.
4.Weareyeprotection.9.Flusheyesimmediately
withwaterandgetmedical
helpfast.
5.ReadtheOperator's
Manual.
10.Containslead;donot
discard
4

decal138-9101
138-9101
1.ReadtheOperator’sManualbeforeperformingmaintenance.
decal108-8484
108-8484
1.Attachmentcontrol5.Parkingbrake
2.Attachmentlowerposition6.PTO—disengaged
3.Attachmentraiseposition7.PTO—engaged
4.Attachment,lockedinoat
position
decal133-8062
133-8062
5

decal137-3387
137-3387
1.Lights10.Tractioncontrol—Forward,Neutral,andReverse
2.Engine—Shutoff11.Warning—readtheOperator’sManual.
3.Engine—Run12.Warning—donotoperatethismachineunlessyouaretrained.
4.Engine—Start13.Warning—wearhearingprotection.
5.Choke–On14.Crushinghazard,machine—keepbystandersaway.
6.Choke—Off15.Entanglementhazard,driveshaft;hotsurface/burn
hazard—donotremovecover.
7.Fast16.Tippinghazard—donotoperateonslopes;driveslowlywhen
turning;donotturnsharplywhiletravelingfast.
8.Slow17.Warning—donotparkthemachineonaslope;parkthe
machineonalevelsurface,shutofftheengine,andremove
thekeybeforeleavingthemachine.
9.ReadtheOperator’sManualforhydraulicuidinformation.18.Warning—readtheOperator’sManual;donottowthe
machine.
6

Setup
LooseParts
Usethechartbelowtoverifythatallpartshavebeenshipped.
ProcedureDescriptionQty.Use
Steeringwheel1
Foamcollar1
Washer1
Locknut1
1
Steering-wheelcover1
Installthesteeringwheel.
2Seat1Installtheseat.
Bolt(1/4x5/8inch)2
3Locknut(1/4inch)2Installthebattery
4Frontweightkit(s)asneeded–Installthefrontweightsifneeded.
Productionyeardecal1
5CEdecal1
Applytheproductionyeardecalandthe
CEdecal.
MediaandAdditionalParts
DescriptionQty.Use
Operator'sManual1
Engineowner’smanual1Readthemanualsbeforeoperatingthemachine.
CerticateofCompliance1ThisdocumentindicatesCEcompliance.
Key2Starttheengine.
Note:Determinetheleftandrightsidesofthemachinefromthenormaloperatingposition.
Note:Removeanddiscardalltheshippingbracketsandfasteners.
7

1
InstallingtheSteering
Wheel
Partsneededforthisprocedure:
1Steeringwheel
1Foamcollar
1Washer
1Locknut
1Steering-wheelcover
Procedure
1.Movethefrontwheelsothatitpointsstraight
ahead.
2.Slidethefoamcollar,smallendrst,ontothe
steeringshaft(Figure3).
g025723
Figure3
1.Foamcollar4.Nut
2.Steeringwheel5.Steering-wheelcover
3.Washer
3.Slidethesteeringwheelontothesteeringshaft
(Figure3).
4.Securethesteeringwheeltothesteeringshaft
withawasherandalocknut(Figure3).
5.Torquethelocknutto27to35N∙m(20to26
ft-lb).
6.Pressthesteering-wheelcoverintopositionon
thesteeringwheel(Figure3).
2
InstallingtheSeat
Partsneededforthisprocedure:
1Seat
Procedure
1.Removeanddiscardthelagboltssecuringthe
seattothecrate.
2.Removethenutsfromtheshippingbracketand
discardthebracket.Savethenuts.
3.Securetheseattotheseatbasewiththe4
previouslyremovednuts;refertoFigure4.
g334906
Figure4
1.Seat4.Flangenut
2.Seatswitch5.Machinewireharness
3.Seatbolts
4.Locatethemachinewireharnessandconnect
ittotheseatswitch(Figure4).
5.Securethewireharnesstotheseatbasewith
acabletie.
8

3
InstallingtheBattery
Partsneededforthisprocedure:
2Bolt(1/4x5/8inch)
2Locknut(1/4inch)
Procedure
1.Setthebatteryinplaceinthetraybehindthe
rightwheel,withthenegativeterminalpositioned
totherearofthemachine(Figure5).
g351419
Figure5
1.Battery3.Negative(-)battery
terminal
2.Positive(+)battery
terminal
4.Topbatteryhold-down
WARNING
Incorrectbatterycableroutingcould
damagethemachineandcablesand
causesparks.Sparkscancausethe
batterygassestoexplode,resultingin
personalinjury.
•Alwaysdisconnectthenegative
(black)batterycablebefore
disconnectingthepositive(red)
cable.
•Alwaysconnectthepositive(red)
batterycablebeforeconnectingthe
negative(black)cable.
WARNING
Batteryterminalsormetaltools
couldshortagainstmetalmachine
components,causingsparks.Sparks
cancausethebatterygassestoexplode,
resultinginpersonalinjury.
•Whenremovingorinstallingthe
battery,donotallowthebattery
terminalstotouchanymetalpartsof
themachine.
•Donotallowmetaltoolstoshort
betweenthebatteryterminalsand
metalpartsofthemachine.
2.Securethepositivecable(red)tothepositive
(+)terminalwithabolt(1/4x5/8inch)anda
locknut(Figure6).
g351421
Figure6
1.Smallblackcable3.Negative(-)batterycable
2.Positive(+)batterycable
9

3.Securethesmallblackwireandthenegative
cable(black)tothenegative(-)terminalofthe
batterywithabolt(1/4x5/8inch)andlocknut
(1/4inch)(Figure6).
4.Coattheterminalsandmountingfastenerswith
petroleumjellytopreventcorrosion.
5.Slidetherubberbootoverthepositive(+)
terminaltopreventapossibleshortfrom
occurring.
6.Installthetopbatteryhold-downtotheside
batteryhold-downsandsecureitwiththe
washersandwingnuts.
4
InstallingtheFrontWeights
Partsneededforthisprocedure:
–Frontweightkit(s)asneeded
Procedure
Thismachinehasbeendesignedinaccordancewith
ANSIB71.4-2017.However,whenattachmentsare
installedonthemachineadditionalweightmaybe
requiredtocomplytothestandards.
1.Usethechartbelowtodeterminethe
combinationsofadditionalweightrequired.
OrderpartsfromyourauthorizedTorodistributor.
AttachmentWeight
Required
WeightKitKitQuantity
SpikerKit
Rahn
Groomer
23kg(50lb)PartNo.100-64421
Note:ForModel08745machines,donotinstall
theweightkitifyourmachineisequippedwith
thefrontliftframekit.
2.Installtheweightkit;refertotheInstallation
Instructionsfortheweightkit.
5
ApplyingtheProduction
YearDecalandCEDecal
CEOnly
Partsneededforthisprocedure:
1Productionyeardecal
1CEdecal
Procedure
ApplytheproductionyeardecalandtheCEdecalto
themachineintheareashown(Figure7).
g339442
Figure7
1.Applytheproductionyeardecalhere.
2.ApplytheCEdecalhere.
10

ProductOverview
g012207
Figure8
1.Fuel-tankcap3.Controlpanel5.Aircleaner7.Steeringwheel
2.Tractionandstoppingpedal4.Parkinglever6.Hydraulic-tankcap
Controls
TractionandStoppingPedal
Thetractionpedal(Figure9)has3functions:tomove
themachineforward,tomoveitbackward,andto
stopthemachine.Usingtheheelandtoeofyourright
foot,pressthetopofthepedaltomoveforwardand
thebottomofthepedaltomovebackwardortoassist
instoppingwhenmovingforward(Figure10).Allow
thepedaltomoveormoveittotheNEUTRALposition
tostopthemachine.
Important:Whendrivingthemachineforward,
restyourheelonthefootrest;donotrestyour
healonthereversepadofthetractionpedal.
g002708
Figure9
1.Tractionandstoppingpedal
g002709
Figure10
Thegroundspeedisproportionatetohowfaryou
pressthetractionpedal.Formaximumgroundspeed,
pressthepedalfullywhilethethrottleisintheFAST
position.Togetmaximumpowerorwhenascending
ahill,havethethrottleintheFASTpositionwhile
pressingthepedalslightlytokeeptheenginespeed
high.Whentheenginespeedbeginstodecrease,
releasethepedalslightlytoallowthespeedto
increase.
Important:Formaximumpullingpower,move
thethrottletotheFASTpositionandlightlypress
thetractionpedal.
Important:Usethemaximumgroundspeedonly
whendrivingbetweenjobsites.
11

Donotusethemaximumspeedwhenusinga
mountedortowedattachment.
Important:Donotoperatethemachineinreverse
withtheattachmentinthedown(operating)
position,ortheattachmentcouldbeseverely
damaged.
IgnitionSwitch
Theignitionswitch(Figure11),usedtostartandshut
offtheengine,has3positions:OFF,RUN,andSTART.
RotatethekeyclockwisetotheSTARTpositionto
engagethestartermotor.Releasethekeywhenthe
enginestarts,andthekeymovestotheONposition.
Toshuttheengineoff,rotatethekeycounterclockwise
totheOFFposition.
g002710
Figure11
1.Ignitionkey3.Chokecontrol
2.Throttlecontrol
ChokeControl
Tostartacoldengine,closethecarburetorchoke
bymovingthechokecontrol(Figure11)uptothe
CLOSEDposition.Aftertheenginestarts,regulatethe
choketokeeptheenginerunningsmoothly.Assoon
aspossible,openthechokebymovingitdownto
theOPENposition.Awarmenginerequireslittleor
nochoking.
ThrottleControl
Thethrottlecontrollever(Figure11)connectstoand
operatesthethrottlelinkagetothecarburetor.The
controlhas2positions:SLOWandFAST.Theengine
speedcanbevariedbetweenthe2settings.
Note:Youcannotshutofftheenginebyusingthe
throttlecontrol.
LiftLever
Toraisetheattachment,pulltheliftlever(Figure12)
back;tolowertheattachment,pushtheleverforward.
FortheFLOATposition,movetheleverintothedetent
position.Whenyouattainthedesiredposition,release
theleveranditwillreturntoneutral.
g002711
Figure12
1.Liftlever4.Frontliftcontrol(optional)
2.Parkingbrake5.Rearremotehydraulics
control(optional)
3.Hourmeter
Note:Themachinehasadouble-actingliftcylinder.
Youcanapplydownpressuretotheattachmentfor
certainoperatingconditions.
ParkingBrake
Toengagetheparkingbrake(Figure12),pullback
ontheparking-brakelever.Todisengageit,pushthe
leverforward.
Note:Youmayhavetorotatethetractionpedal
slowlyforwardandbackwardtodisengagetheparking
brake.
HourMeter
Thehourmeter(Figure12)indicatesthetotalhoursof
machineoperation.Thehourmeterstartstofunction
wheneveryourotatethekeyswitchtotheONposition.
12

Seat-AdjustmentLever
Movetheleverontheleftsideoftheseat(Figure13)
forward,slidetheseattothedesiredposition,and
releasethelevertolocktheseatintoposition.
g335735
Figure13
1.Seat-adjustmentlever
Fuel-ShutoffValve
Closethefuel-shutoffvalve(Figure14)whenstoring
themachineortransportingitonatrailer.
g002713
Figure14
1.Fuel-shutoffvalve
Specications
Note:Specicationsanddesignaresubjectto
changewithoutnotice.
Widthwithoutattachment148cm(58inches)
Widthwithrake,Model08751191cm(75inches)
Lengthwithoutattachment164cm(64-1/2inches)
Height115cm(45-1/4inches)
Wheelbase109cm(42-3/4inches)
LowIdleEngineSpeed1,650to1,850rpm
HighIdleEngineSpeed3,350to3,450rpm
Netweight
Model08703452kg(996lb)
Model08705461kg(1,017lb)
Attachments/Accessories
AselectionofToroapprovedattachmentsand
accessoriesisavailableforusewiththemachine
toenhanceandexpanditscapabilities.Contact
yourAuthorizedServiceDealerorauthorizedToro
distributororgotowww.Toro.comforalistofall
approvedattachmentsandaccessories.
Toensureoptimumperformanceandcontinuedsafety
certicationofthemachine,useonlygenuineT oro
replacementpartsandaccessories.Replacement
partsandaccessoriesmadebyothermanufacturers
couldbedangerous,andsuchusecouldvoidthe
productwarranty.
13

Operation
BeforeOperation
BeforeOperationSafety
GeneralSafety
•Parkthemachineonalevelsurface;engagethe
parkingbrake;shutofftheengine;removethekey;
andwaitforallmovementtostopbeforeleaving
themachine.
•Neverallowchildrenoruntrainedpeopleto
operateorservicethemachine.Localregulations
mayrestricttheageoftheoperator.Theowner
isresponsiblefortrainingalloperatorsand
mechanics.
•Becomefamiliarwiththesafeoperationofthe
equipment,operatorcontrols,andsafetysigns.
•Knowhowtostopthemachineandenginequickly.
•Checkthatoperator-presencecontrols,safety
switches,andshieldsareattachedandfunctioning
properly.Donotoperatethemachineunlessthey
arefunctioningproperly.
•Beforeoperating,alwaysinspectthemachine
toensurethatthecomponentsandfasteners
areingoodworkingcondition.Replacewornor
damagedcomponentsandfasteners.
•Inspecttheareawhereyouwillusethemachine
andremoveallobjectsthatthemachinecould
throw.
FuelSafety
•Useextremecareinhandlingfuel.Itisammable
anditsvaporsareexplosive.
•Extinguishallcigarettes,cigars,pipes,andother
sourcesofignition.
•Useonlyanapprovedfuelcontainer.
•Donotremovethefuelcaporllthefueltank
whiletheengineisrunningorhot.
•Donotaddordrainfuelinanenclosedspace.
•Donotstorethemachineorfuelcontainerwhere
thereisanopename,spark,orpilotlight,such
asonawaterheaterorotherappliance.
•Ifyouspillfuel,donotattempttostarttheengine;
avoidcreatinganysourceofignitionuntilthefuel
vaporshavedissipated.
FillingtheFuelTank
•Fuel-tankcapacity:25L(5-1/2USgallons).
•Recommendedfuel:
–Forbestresults,useonlyclean,fresh(less
than30daysold),unleadedgasolinewithan
octaneratingof87orhigher((R+M)/2rating
method).
–Ethanol:Gasolinewithupto10%ethanol
(gasohol)or15%MTBE(methyltertiarybutyl
ether)byvolumeisacceptable.Ethanoland
MTBEarenotthesame.Gasolinewith15%
ethanol(E15)byvolumeisnotapprovedfor
use.Neverusegasolinethatcontainsmore
than10%ethanolbyvolume,suchasE15
(contains15%ethanol),E20(contains20%
ethanol),orE85(containsupto85%ethanol).
Usingunapprovedgasolinemaycause
performanceproblemsand/orenginedamage
whichmaynotbecoveredunderwarranty.
–Donotusegasolinecontainingmethanol.
–Donotstorefueleitherinthefueltankor
fuelcontainersoverthewinterunlessafuel
stabilizerisused.
–Donotaddoiltogasoline.
Important:Donotusefueladditivesother
thanafuelstabilizer/conditioner.Donotuse
fuelstabilizerswithanalcoholbasesuchas
ethanol,methanol,orisopropanol.
1.Cleantheareaaroundthefuel-tankcap(Figure
15).
2.Removethefuel-tankcap.
3.Fillthetanktoabout25mm(1inch)belowthe
topofthetank(bottomofthellerneck).Donot
overll.
g027112
Figure15
1.Fuel-tankcap
4.Installthecap.
5.Wipeupanyfuelthatmayhavespilledto
preventarehazard.
14

Important:Neverusemethanol,gasoline
containingmethanol,orgasoholcontaining
morethan10%ethanolbecausethefuel
systemcouldbedamaged.Donotmixoil
withgasoline.
BeforeOperationsChecks
Performthefollowingdailyproceduresbefore
operatingthemachine:
•CheckingtheInterlockSystem(page15)
•CheckingtheEngine-OilLevel(page23)
•CheckingtheTirePressure(page29)
•CheckingtheHydraulicLinesandHoses(page
31)
•CheckingtheHydraulic-FluidLevel(page32)
•Ensurethatthetemperatureisgreaterthan-6.7°C
(20°F)beforeoperatingthemachineorthemain
tractionpumpmaybedamaged.
CheckingtheInterlock
System
CAUTION
Ifsafetyinterlockswitchesaredisconnected
ordamagedthemachinecouldoperate
unexpectedlyandcausepersonalinjury.
•Donottamperwiththeinterlockswitches.
•Checktheoperationoftheinterlock
switchesdailyandreplaceanydamaged
switchesbeforeoperatingthemachine.
Thepurposeoftheinterlocksystemistopreventthe
enginefromcrankingorstartingunlessthetraction
pedalisintheNEUTRALposition.Also,theengine
shouldshutoffifthetractionpedalismovedeither
forwardorreversewithoutanoperatorintheseat.
Important:Ifthetractionunithaseithertherear
remotehydraulickitModel08781orhydraulic
switchkitModel08783installed,thereare
additionalinterlockconditions:
Themachinedoesnotstartwhentheremote
hydraulicswitchisturnedON.
Ifthemachineisrunningwiththehydraulic
switchturnedON,themachineshutsoffwhenthe
operatorleavestheseat.
1.Positionthemachineinawide-openareafreeof
debrisandbystanders.Shutofftheengine.
2.Sitontheseatandengagetheparkingbrake.
3.Pressthetractionpedalinforwardandreverse
whiletryingtostarttheengine.
Note:Iftheenginecranks,theremaybea
malfunctionintheinterlocksystem.Repairit
immediately.
Iftheenginedoesnotcrank,thesystemis
operatingcorrectly.
4.Stayseatedontheseat,withthetractionpedal
intheNEUTRALpositionandtheparkingbrake
engaged,andstarttheengine.
5.Riseofftheseatandslowlypressthetraction
pedal.
Note:Theengineshouldshutoffin1to3
seconds.Correcttheproblemifthesystem
doesnotoperateproperly.
15

DuringOperation
Note:Determinetheleftandrightsidesofthe
machinefromthenormaloperatingposition.
GeneralSafety
•Theowner/operatorcanpreventandisresponsible
foraccidentsthatmaycausepersonalinjuryor
propertydamage.
•Wearappropriateclothing,includingeye
protection;slip-resistant,substantialfoot
protection;longpants;andhearingprotection.Tie
backlonghairanddonotwearloosejewelry.
•Donotoperatethemachinewhileill,tired,or
undertheinuenceofalcoholordrugs.
•Nevercarrypassengersonthemachineandkeep
bystandersandpetsawayfromthemachine
duringoperation.
•Operatethemachineonlyingoodvisibilitytoavoid
holesorhiddenhazards.
•Avoidoperatingonwetgrass.Reducedtraction
couldcausethemachinetoslide.
•Beforeyoustarttheengine,ensurethatalldrives
areinneutral,theparkingbrakeisengaged,and
youareintheoperatingposition.
•Lookbehindanddownbeforebackinguptobe
sureofaclearpath.
•Usecarewhenapproachingblindcorners,shrubs,
trees,orotherobjectsthatmayobscureyour
vision.
•Donotoperateneardrop-offs,ditches,or
embankments.Themachinecouldsuddenlyroll
overifawheelgoesovertheedgeoriftheedge
givesway.
•Stopthemachineandinspecttheattachment
afterstrikinganobjectorifthereisanabnormal
vibrationinthemachine.Makeallnecessary
repairsbeforeresumingoperation.
•Slowdownandusecautionwhenmakingturns
andcrossingroadsandsidewalkswiththe
machine.Alwaysyieldtheright-of-way.
•Neverrunanengineinanareawhereexhaust
gassesareenclosed.
•Neverleavearunningmachineunattended.
•Beforeleavingtheoperatingposition,dothe
following:
–Parkthemachinealevelsurface.
–Lowertheattachments.
–Engagetheparkingbrake.
–Shutofftheengineandremovethekey.
–Waitforallmovingpartstostop.
•Donotoperatethemachinewhenthereistherisk
oflightning.
•Donotusethemachineasatowingvehicle.
•Whennecessary,wetsurfacespriortoconditioning
tominimizedustcreation.
•Useaccessories,attachments,andreplacement
partsapprovedbyT oroonly.
SlopeSafety
•Establishyourownproceduresandrulesfor
operatingonslopes.Theseproceduresmust
includesurveyingthesitetodeterminewhich
slopesaresafeformachineoperation.Always
usecommonsenseandgoodjudgmentwhen
performingthissurvey.
•Slopesareamajorfactorrelatedtolossofcontrol
androlloveraccidents,whichcanresultinsevere
injuryordeath.Theoperatorisresponsiblefor
safeslopeoperation.Operatingthemachineon
anysloperequiresextracaution.
•Operatethemachineatalowerspeedwhenyou
areonaslope.
•Ifyoufeeluneasyoperatingthemachineona
slope,donotdoit.
•Watchforholes,ruts,bumps,rocks,orother
hiddenobjects.Uneventerraincouldoverturnthe
machine.Tallgrasscanhideobstacles.
•Choosealowgroundspeedsoyouwillnothave
tostoporshiftwhileonaslope.
•Arollovercanoccurbeforethetireslosetraction.
•Avoidoperatingthemachineonwetgrass.Tires
maylosetraction;regardlessifthebrakesare
availableandfunctioning.
•Avoidstarting,stopping,orturningthemachine
onaslope.
•Keepallmovementonslopesslowandgradual.
Donotsuddenlychangethespeedordirectionof
themachine.
•Donotoperatethemachineneardrop-offs,
ditches,embankments,orbodiesofwater.The
machinecouldsuddenlyrolloverifawheelgoes
overtheedgeortheedgecavesin.Establisha
safetyareabetweenthemachineandanyhazard
(2machinewidths).
16

StartingandShuttingOff
theEngine
1.Removeyourfootfromthetractionpedal,
ensurethatthepedalisintheNEUTRALposition,
andengagetheparkingbrake.
2.PushthechokeleverforwardtotheONposition
(whenstartingacoldengine)andthethrottle
levertotheSLOWposition.
Important:Whenoperatingthemachinein
temperatureslessthan0°C(32°F)allowthe
machinetimetowarmupbeforeusingit.
Thispreventsdamagetothehydrostatand
thetractionloop.
Donotoperatethemachineintemperatures
lessthan-6.7°C(20°F)orthemaintraction
pumpmaybedamaged.
3.Insertthekeyintotheignitionswitchandrotate
itclockwisetostarttheengine.Releasethekey
whentheenginestarts.
Note:Regulatethechoketokeeptheengine
runningsmoothly.
Important:Topreventoverheatingthe
startermotor,donotengagethestarter
longerthan10seconds.After10secondsof
continuouscranking,wait60secondsbefore
engagingthestartermotoragain.
4.Toshutofftheengine,movethethrottlecontrol
totheSLOWpositionandrotatetheignitionkey
toOFF.
Note:Removethekeyfromtheswitchto
preventaccidentalstarting.
5.Closethefuel-shutoffvalvebeforestoringthe
machine.
CAUTION
Inspectingthemachinewhiletheengine
isrunningcouldresultininjury.
Shuttheengineoffandwaitforall
movingpartstostopbeforechecking
foroilleaks,looseparts,andother
malfunctions.
BreakingintheMachine
Newenginestaketimetodevelopfullpower.Drive
systemshavemorefrictionwhentheyarenew,
placingadditionalloadontheengine.
Allowtherst8hoursofoperatingtimeforthe
break-inperiod.
Sincethersthoursofoperationarecriticaltofuture
dependabilityofthemachine,monitorthefunctions
andperformancecloselysothatyoucannoticeand
correctminordifculties,whichcouldleadtomajor
problems.Inspectthemachinefrequentlyduring
thebreak-inperiod,forsignsofoilleakage,loose
fasteners,oranyothermalfunction.
BecomingFamiliarwiththe
Machine
RefertotheattachmentOperator'sManualforspecic
operatinginstructionsfortheattachment.
Practicedrivingthemachine,becauseitsoperating
characteristicsaredifferentthansomeutilityvehicles.
2pointstoconsiderwhenoperatingthevehicleare
transmissionspeedandenginespeed.
Tomaintainconstantenginespeed,pressthetraction
pedalslowly.Thisallowstheenginetokeepup
withthegroundspeedofthevehicle.Bycontrast,
pushingdownquicklyonthetractionpedalreduces
theenginespeed;asaresult,therewillnotbeenough
torque-powertomovethevehicle.Therefore,to
transfermaximumpowertothewheels,movethe
throttletoFASTandslightlypressthetractionpedal.
Bycomparison,maximumgroundspeedwithnoload
resultswhenthethrottleisintheFASTpositionandthe
tractionpedalisslowlybutfullypressed.Alwayskeep
theenginespeedhighenoughtodelivermaximum
torque-powertothewheels.
CAUTION
Operatingthemachinedemandsattentionto
preventtippingorlossofcontrol.
•Usecarewhenenteringandleavingsand
traps.
•Useextremecautionaroundditches,
creeks,orotherhazards.
•Usecautionwhenoperatingthemachine
onasteepslope.
•Reduceyourspeedwhenmakingsharp
turnsorwhenturningonhillsides.
•Avoidsuddenstopsandstarts.
•Donotgofromreversetofullforward
withoutrstcomingtoacompletestop.
17

Note:Iftheattachmentadapterbecomesstucktothe
tractionunitadapter,insertaprybarorascrewdriver
intothepryslottodisengagetheparts(Figure16).
g003783
Figure16
1.Pryslot
AfterOperation
AfterOperationSafety
•Parkthemachineonalevelsurface;engagethe
parkingbrake;shutofftheengine;removethekey;
andwaitforallmovementtostopbeforeleaving
themachine.
•Cleangrassanddebrisfromthemuferand
enginecompartmenttohelppreventres.Clean
upoilorfuelspills.
•Allowtheenginetocoolbeforestoringthemachine
inanyenclosure.
•Shutoffthefuelbeforestoringortransportingthe
machine.
•Neverstorethemachineorfuelcontainerwhere
thereisanopename,spark,orpilotlight,such
asonawaterheateroronotherappliances.
•Keepallpartsofthemachineingoodworking
conditionandallhardwaretightened.
•Replaceallworn,damaged,ormissingdecals.
TowingtheMachine
Incaseofemergency,youcantowthemachinefora
shortdistance.However,wedonotrecommendthis
asastandardprocedure.
Important:Donottowthemachinefasterthan1.6
km/h(1mph),becausedrivesystemdamagemay
occur.Ifyoumustmovethemachinemorethan
50m(55yd),transportitonatruckoratrailer.
Thetiresmaylockupifyoutowthemachinetoo
fast.Ifthisoccurs,stoptowingthemachineand
waitforthetractioncircuitpressuretostabilize
beforeresumingtowingataslowerspeed.
HaulingtheMachine
•Usefull-widthrampsforloadingthemachineonto
atrailerortruck.
•Tiethemachinedownsecurely.
18

Maintenance
Note:Toobtainanelectricalschematicorahydraulicschematicforyourmachine,visitwww.T oro.com.
MaintenanceSafety
•Beforeadjusting,cleaning,repairing,orleaving
themachine,dothefollowing:
–Parkthemachineonalevelsurface.
–Movethethrottleswitchtothelow-idleposition.
–Lowertheattachment.
–Ensurethatthetractionisinneutral.
–Engagetheparkingbrake.
–Shutofftheengineandremovethekey.
–Waitforallmovingpartstostop.
–Allowmachinecomponentstocoolbefore
performingmaintenance.
•Ifpossible,donotperformmaintenancewhilethe
engineisrunning.Keepawayfrommovingparts.
•Usejackstandstosupportthemachineor
componentswhenrequired.
•Carefullyreleasepressurefromcomponentswith
storedenergy.
RecommendedMaintenanceSchedule(s)
MaintenanceService
IntervalMaintenanceProcedure
Aftertherst8hours•T orquethewheellugnuts.
Beforeeachuseordaily
•Checkthesafetyinterlocksystem.
•Checktheengine-oillevel.
•Checkthetirepressure.
•Checktheconditionofthehydrauliclinesandhoses.
•Checkthehydraulic-uidlevel.
Aftereachuse•Cleanandinspectthemachine.
Every25hours•Checkthecableconnectionsandthelevelofthebatteryuid.
Every100hours
•Greasethemachine.
•Changetheengineoilandlter(moreofteninextremelydirtyordustyconditions).
•Replacethesparkplugs.
•T orquethewheellugnuts.
Every200hours•Servicetheaircleaner(earlierinextremelydusty,dirtyconditions).
•Replacetheairlter.
Every500hours
•Replacethefuellter.
•Changethecarbon-canisterlter.
•Cleantheoilcooler.
•Checktheenginespeed(atidleandfullthrottle).ContactyourauthorizedT oro
distributorforservice.
Every800hours
•Ifyouarenotusingtherecommendedhydraulicuidorhaveeverlledthereservoir
withanalternativeuid,replacethehydrauliclter.
•Ifyouarenotusingtherecommendedhydraulicuidorhaveeverlledthereservoir
withanalternativeuid,changethehydraulicuid.
•De-carbonthecombustionchamber.ContactyourauthorizedT orodistributorfor
service.
•Adjustthevalvesandtorqueheadbolts.ContactyourauthorizedT orodistributorfor
service.
•Drainandcleanthefueltank.
Every1,000hours•Ifyouareusingtherecommendedhydraulicuid,replacethehydrauliclter.
Every1,500hours•Replacemovinghoses.
•Replacetheneutralandseatinterlockswitches.
Every2,000hours•Ifyouareusingtherecommendedhydraulicuid,changethehydraulicuid.
19

Important:Refertoyourengineowner'smanualforadditionalmaintenanceprocedures.
DailyMaintenanceChecklist
Duplicatethispageforroutineuse.
Fortheweekof: MaintenanceCheckItem
Mon.Tues.Wed.Thurs.Fri.Sat.Sun.
Checkthesafetyinterlock
operation.
Checkthesteering
operation.
Checkthefuellevel.
Checktheleveloftheengine
oil.
Checktheconditionofthe
airlter.
Cleanthecoolingnsonthe
engine.
Checkunusualengine
noises.
Checkunusualoperating
noises.
Checkthelevelofthe
hydraulicuid.
Checkthehydraulichoses
fordamage.
Checkforuidleaks.
Checkthetirepressure.
Checktheinstrument
operation.
Touch-updamagedpaint.
NotationforAreasofConcern
Inspectionperformedby:
ItemDateInformation
20
This manual suits for next models
3
Table of contents
Other Toro Tractor manuals

Toro
Toro wheel horse 268H User manual

Toro
Toro Wheel Horse 520xi User manual

Toro
Toro Maxi Sneaker 370 User manual

Toro
Toro 14AK81RK744 User manual

Toro
Toro 8884 User manual

Toro
Toro Reelmaster 7000-D User manual

Toro
Toro 8884 User manual

Toro
Toro 25429 User manual

Toro
Toro 8887 User manual

Toro
Toro 260 series User manual

Toro
Toro 30383 User manual

Toro
Toro 8886 User manual

Toro
Toro 25450 User manual

Toro
Toro 03781TE User manual

Toro
Toro GT2200 User manual

Toro
Toro 08881 SAND PRO 5000 User manual

Toro
Toro 55200 Operation manual

Toro
Toro 73547 Wheel Horse 520Lxi User manual

Toro
Toro Reelmaster 5010- H User manual

Toro
Toro Groundsmaster 4100-D User manual