Toro 25450W User manual

FormNo.3390-971RevA
RT1200TractionUnit
ModelNo.25450W—SerialNo.314000501andUp
Registeratwww.Toro.com.
OriginalInstructions(EN)*3390-971*A

WARNING
CALIFORNIA
Proposition65Warning
ThisproductcontainsachemicalorchemicalsknowntotheStateofCaliforniato
causecancer,birthdefects,orreproductiveharm.
DieselengineexhaustandsomeofitsconstituentsareknowntotheStateofCalifornia
tocausecancer,birthdefects,andotherreproductiveharm.
Introduction
Thismachineisdesignedtodigtrenchesinsoiltobury
cablingandpipingforvariousapplications.Itisnotintended
tocutanyothermaterialotherthansoilandrock.
Readthisinformationcarefullytolearnhowtooperateand
maintainyourproductproperlyandtoavoidinjuryand
productdamage.Youareresponsibleforoperatingthe
productproperlyandsafely.
YoumaycontactTorodirectlyatwww.Toro.comforproduct
andaccessoryinformation,helpndingadealer,ortoregister
yourproduct.
Wheneveryouneedservice,genuineToroparts,oradditional
information,contactanAuthorizedToroServiceDealer
orToroCustomerServiceandhavethemodelandserial
numbersofyourproductready.Figure1illustratesthe
locationofthemodelandserialnumbersontheproduct.
Writethenumbersinthespaceprovided.
Figure1
1.Locationofthemodelandserialnumberplate
ModelNo.
SerialNo.
Thismanualidentiespotentialhazardsandhassafety
messagesidentiedbythesafetyalertsymbol(Figure2),
whichsignalsahazardthatmaycauseseriousinjuryordeath
ifyoudonotfollowtherecommendedprecautions.
Figure2
1.Safetyalertsymbol
Thismanualuses2wordstohighlightinformation.
Importantcallsattentiontospecialmechanicalinformation
andNoteemphasizesgeneralinformationworthyofspecial
attention.
StorethisOperator’sManualandtheengineowners’smanualin
themanualcompartmentthatisequippedwiththismachine.
Figure3
1.Manualcompartment
©2014—TheToro®Company
8111LyndaleAvenueSouth
Bloomington,MN554202
Contactusatwww.Toro.com.
PrintedintheUSA.
AllRightsReserved

Contents
Safety...........................................................................4
............................................................................4
ElectricalLineSafety...............................................6
GasLineSafety.......................................................7
CommunicationLineSafety......................................7
WaterLineSafety....................................................7
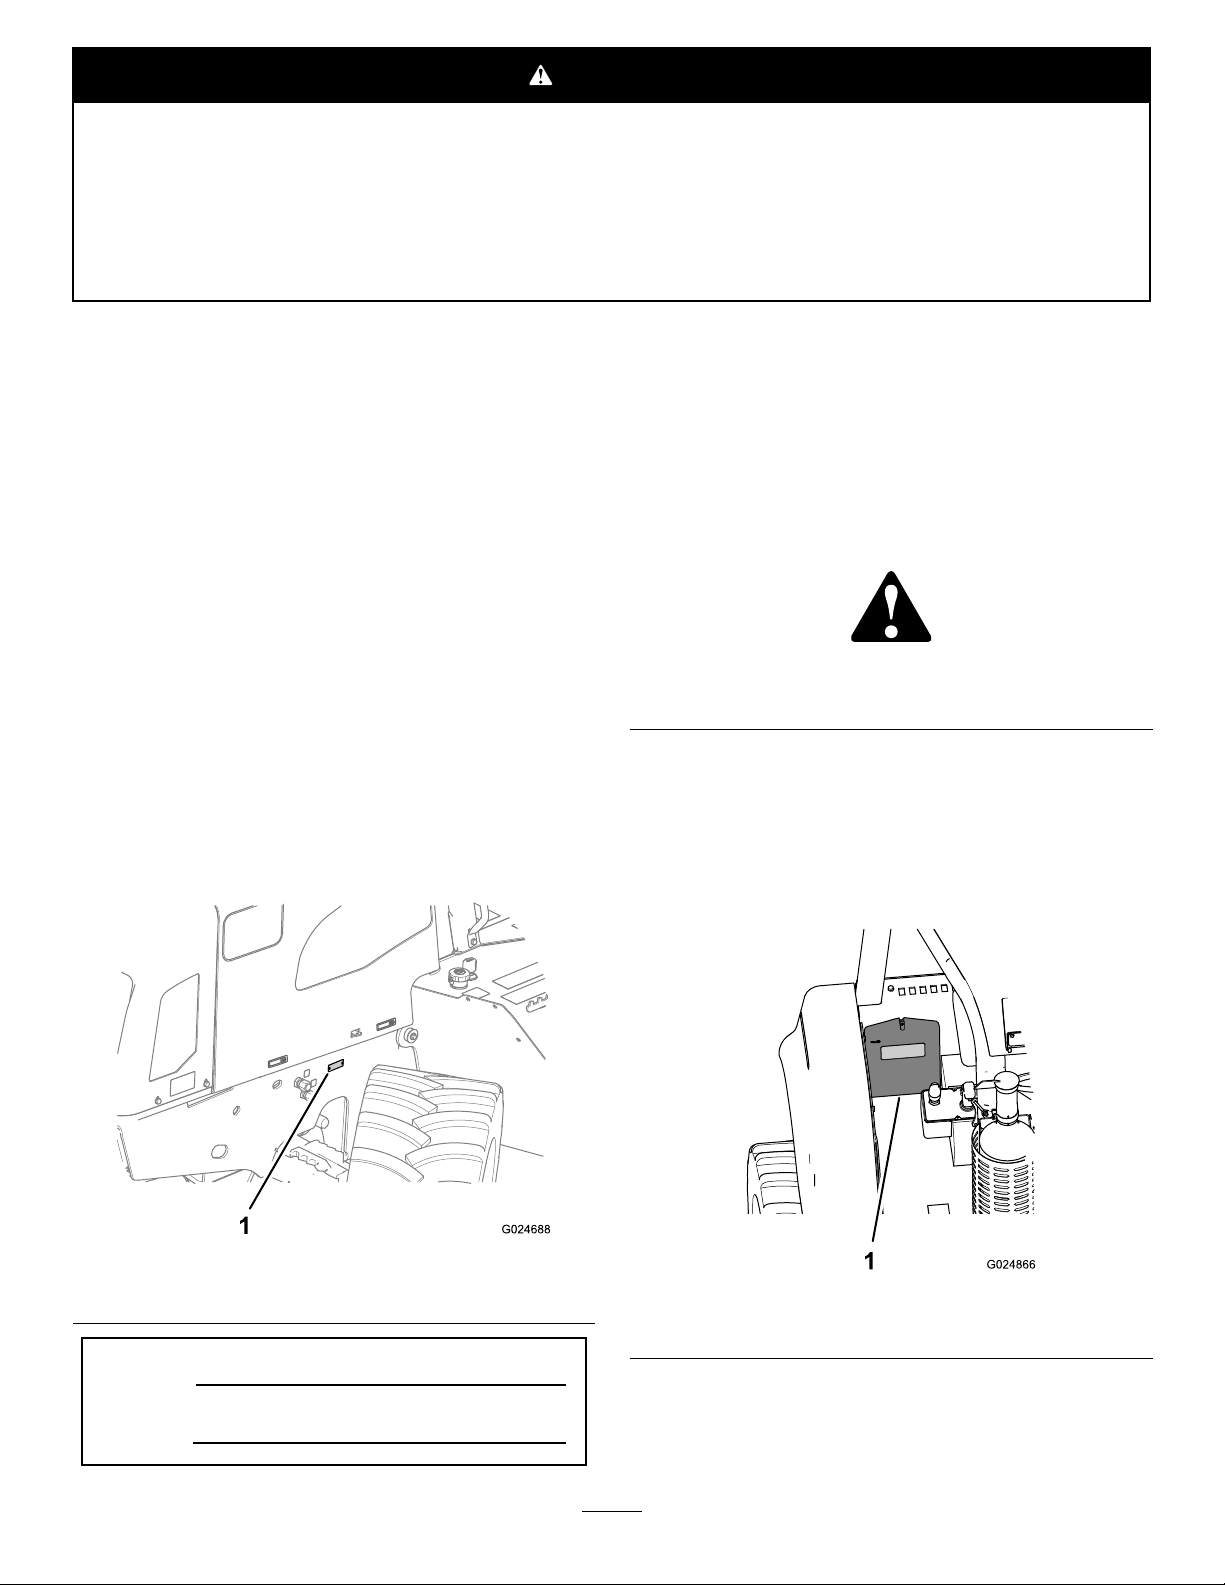
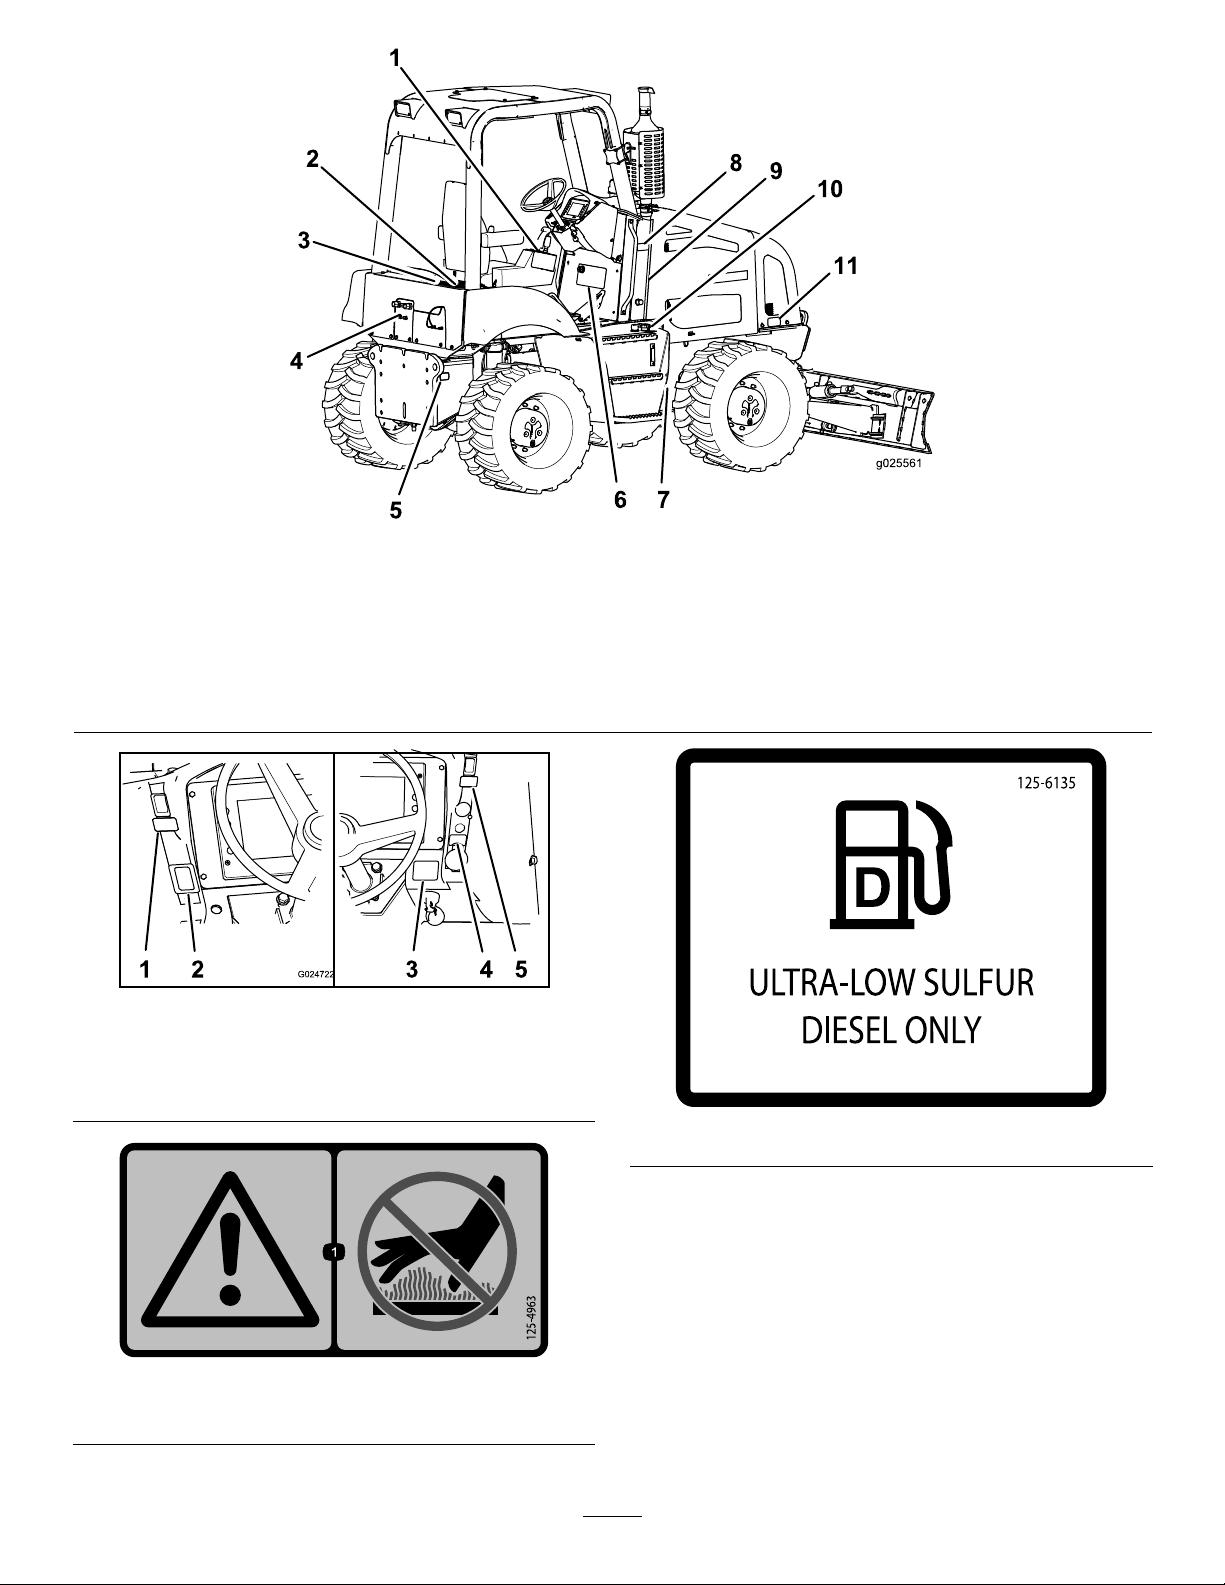
SafetyandInstructionalDecals.................................8
ProductOverview.........................................................16
Controls...............................................................17
CommandCenter...............................................17
MachineControls...............................................17
Traction-ControlCluster.....................................18
Attachment-ControlCluster.................................19
OperatorSeatandSeatBelt.................................20
Specications........................................................22
Attachments/Accessories........................................22
Operation....................................................................22
PreparingforWork.................................................22
AddingFueltotheEngine.......................................22
CheckingtheEngine-OilLevel.................................25
CheckingtheCoolantLevelintheReservoir...............26
CheckingtheHydraulic-FluidLevel..........................26
CheckingtheRestrictedAir-CleanerIndicator............27
InspectingtheMachine...........................................27
OperatingtheCommandCenter...............................28
OperatingtheEngine..............................................33
OperatingtheMachineinExtreme
Conditions.........................................................34
OperatingtheParkingBrake....................................35
DrivingandStoppingtheMachine............................35
OperatingtheTransmission.....................................37
OperatingtheMachineTiltFeature...........................37
PreparingtoOperatetheMachine.............................38
UsingtheBackllBlade...........................................39
UsingthePowerPort..............................................40
TransportingtheMachine........................................40
CompletingtheWorkfortheDay.............................41
CompletingtheProject...........................................41
Maintenance.................................................................42
RecommendedMaintenanceSchedule(s)......................42
PremaintenanceProcedures........................................43
GeneralSafety........................................................43
Lubrication...............................................................43
GreasingtheMachine.............................................43
EngineMaintenance..................................................45
AccessingtheEngine..............................................45
ServicingtheEngineOilandFilter............................47
CheckingtheCrankcaseBreatherTube......................48
CheckingtheCharge-airPiping................................49
ServicingtheAir-cleanerSystem...............................49
FuelSystemMaintenance...........................................50
ServicingtheFuelSystem........................................50
ElectricalSystemMaintenance....................................53
MaintainingtheBattery...........................................53
ReplacingaFuse.....................................................55
DriveSystemMaintenance.........................................56
ServicingtheTires..................................................56
ServicingtheAxles.................................................58
ServicingtheTransmission......................................62
CoolingSystemMaintenance......................................65
ServicingtheCoolingSystem...................................65
BeltMaintenance......................................................69
ServicingtheEngineDriveBelt................................69
ReplacingtheEngineDriveBelt...............................69
HydraulicSystemMaintenance....................................70
ServicingtheHydraulicSystem.................................70
ROPSMaintenance....................................................74
CheckingandServicingtheROPS.............................74
WeldingontheMachine..............................................75
PreparingtoDisconnecttheComponents..................75
DisconnectingtheAlternatorWiring.........................75
DisconnectingtheComputer-module
Connectors........................................................75
ConnectingtheComputer-module
Connectors........................................................76
ConnectingtheAlternatorWiring.............................76
ClosingtheMachine...............................................76
Cleaning...................................................................76
RemovingDirtandDebrisfromtheMachine.............76
Storage........................................................................77
PreparingforSeasonalStorage.................................77
Troubleshooting...........................................................78
3

Safety
Improperlyusingormaintainingthismachinecan
resultininjury.Toreducethepotentialforinjury,comply
withthesesafetyinstructionsandalwayspayattentionto
thesafetyalertsymbol(Figure2),whichmeansCaution,
Warning,orDanger—personalsafetyinstruction.Failure
tocomplywiththeinstructionmayresultinpersonal
injuryordeath.
Important:Thismachinewasmanufacturedaccording
totheappropriateregulatorystandardsineffectatthe
timeofmanufacture.Modifyingthismachineinany
waymaycauseittobeoutofcompliancewiththose
standardsandwiththeinstructionsinthis
Operator’ s
Man ual.
Modicationstothismachineshouldbemade
onlybyanAuthorizedToroServiceDealer.
WARNING
Welding,cutting,ordrillingpartsofthemachine
couldcausethemtobreakduringoperation,which
inturncouldresultininjuryordeath.
Donotweld,cut,ordrilltorepairortoattachitems
topartsonthismachine.
Alwaysfollowallsafetyinstructionstoavoidseriousinjury
ordeath.
Youcanpreventandareresponsibleforinjuriesoccurringto
yourselfandtoothersandfordamagetoproperty.
Donotusethismachineforapplicationsotherthanthose
whicharedescribedinthismanual.
Beforeoperatingthismachine,itisyourresponsibilityto
knowwhereallutilitylinesareburiedintheprojectareaand
toavoidthem.
Alwaysensurethatalllocalutilitycompaniesmark
thelocationoftheirlines.IntheUSAandCanada,
calla“One-callSystemDirectory”service.Inthe
USA,call811oryourlocalnumber.Ifyoudonotknow
yourlocalnumber,callthenationalnumber(USAand
Canadaonly)at1-888-258-0808.Also,contactanyutility
companiesthatarenotparticipantsofthe“One-call
SystemDirectory”service.
Checkwithlocalauthoritiesforalllawsandregulationsthat
requireyoutolocateandavoidexistingutilities.
Refertothefollowingtablefortheproperutilitylineandthe
correspondingutilitylinecolor(USAandCanadaonly):
UtilityLineColor
ElectricRed
Telecommunication,alarmorsignal,cables,
orconduit
Orange
Naturalgas,oil,steam,petroleum,orother
gaseousorammablematerial
Yellow
SeweranddrainGreen
DrinkingwaterBlue
Reclaimedwater,irrigation,andslurrylinesPurple
TemporarysurveymarkingsPink
ProposedexcavationlimitsWhite
Afterlocatingalltheutilitylines,carefullydigaholetothe
utilitylinebyhandtoverifythelocationandthedepthof
theline.
Training
•ReadtheOperator'sManualandothertrainingmaterial.If
theoperator(s)ormechanic(s)cannotreadEnglish,itis
theowner'sresponsibilitytoexplainthismaterialtothem.
•Becomefamiliarwiththesafeoperationoftheequipment,
operatorcontrols,andsafetysigns.
•Alloperatorsandmechanicsmustbetrained.Theowner
isresponsiblefortrainingtheusers.
•Neverletchildrenoruntrainedpeopleoperateorservice
themachine.Localregulationsmayrestricttheageof
theoperator.
•Ensurethatyouunderstandthehandsignalsusedonthe
jobsite.Followtheinstructionsofthesignalperson.
Preparation
•Beforeusingthemachine,havetheareamarkedfor
undergroundutilities,anddonotdiginmarkedareas.
Also,beawareofthelocationofobjectsandstructures
thatmaynotbemarked,suchasundergroundstorage
tanks,wells,andsepticsystems.
•Evaluatetheterraintodeterminewhataccessoriesand
attachmentsareneededtoproperlyandsafelyperform
thejob.Useonlyaccessoriesandattachmentsapproved
bythemanufacturer.
•Markthejobsiteclearlyandkeepbystandersaway.
•Reviewthejobsitehazards,safetyandemergency
procedures,andpersonnelresponsibilitieswithall
workersbeforebeginningthework.
•Wearappropriateclothing,includinghardhat,safety
glasses,longpants,safetyshoes,andhearingprotection;
somejobsmayalsorequirethatyouwearareectivevest
and/orarespirator.Securelonghair,looseclothing,and
jewelrytopreventthemfromgettingtangledinmoving
parts.
4

•Beforeoperatingthemachinewithanattachment,ensure
thattheattachmentisproperlyinstalled.
•Useextracarewhenhandlingfuels.Theyareammable
andvaporsareexplosive.
–Useonlyanapprovedcontainer.
–Donotremovethefuelcaporaddfuelwiththe
enginerunning.Allowtheenginetocoolbefore
fueling.Donotsmokenearthemachinewhilethe
engineisrunning.
–Donotrefuelordrainthemachineindoors.
•Checkthattheoperator'spresencecontrols,safety
switches,andshieldsareattachedandfunctioning
properly.Donotoperatethemachineunlessthese
controls,switches,andshieldsarefunctioningproperly.
GeneralOperation
•Alwaysweartheseatbeltwhenoperatingthismachine.
•Donotruntheengineinanenclosedarea.
•Donotoperatethemachinewithoutalloftheguards
andpanelssecurelyinplace.Ensurethatallinterlocksare
attached,adjustedcorrectly,andfunctioningproperly.
•Decreasethegroundspeedofthemachineanduse
cautionwhenmakingturnsandcrossingroadsandrough
oruneventerrain.
•Donotoperatethemachinewhileundertheinuence
ofalcoholordrugs.
•Ensurethattheareaisclearofotherpeoplebefore
operatingthemachine.Stopthemachineifanyoneenters
thearea.
•Excessivevibrationfromatrencheroraplowcancausea
trench,anoverhang,orahighbanktocollapse,resulting
inpossibleinjuryordeath.
•Ifyourviewoftheworkareaisnotclear,alwayshavea
signalpersondirectthemovementofthemachine.
•Donotleavearunningmachineunattended.Stopthe
engineandremovethekeywheneveryouleavethe
machine.
•UseonlyToro-approvedattachments.Attachmentscan
changethestabilityandtheoperatingcharacteristicsof
themachine.
•Watchfortrafcwhenoperatingthemachinenearor
acrossroadways.
•Onlyoperatethemachineinareaswherethereareno
obstaclesincloseproximitytoyou.Failuretomaintain
anadequatedistancefromtrees,walls,andotherbarriers
whileoperatingthemachinemayresultininjuryand/or
damage.Operatethemachineonlyinareaswherethere
issufcientclearanceforyoutosafelymaneuverthe
machine.
•Locatethepinchpointareasthataremarkedonthe
machineandattachments;keephandsandfeetawayfrom
theseareas.
•Lightningcancausesevereinjuryordeath.Iflightning
isseenorthunderisheardinthearea,donotoperate
themachine;seekshelter.
SlopeOperation
•Avoidoperatingthismachineonslopes,ifpossible.
•Keepallmovementsonslopesslowandgradual.Donot
makesuddenchangesinspeedordirection.
•Avoidstartingorstoppingthemachineonaslope.Ifthe
machinelosestraction,keeptheheavyendofthemachine
uphillandproceedslowly,straightdowntheslope.
•Avoidturningthemachineonslopes.Ifyoumustturn,
turnslowlyandkeeptheheavyendofthemachineuphill.
•Donotoperatethemachineneardrop-offs,ditches,or
embankments.Themachinecouldsuddenlyturnoverif
atireortrackgoesovertheedgeofaclifforditch,orif
anedgecavesin.
RolloverProtectionStructure(ROPS)
System
•Beforeoperatingthemachine,ensurethattheseatbeltis
ingoodconditionandissecurelyattachedtothemachine.
•InspecttheROPSattheintervalrecommendedinthis
manualorwhentheROPShasbeeninanaccident.
•ReplaceadamagedROPSusingonlygenuineToro
replacementparts;donotrepairormodifytheROPS.
•Checkcarefullyforoverheadclearances(i.e.branches,
doorways,electricalwires)beforedrivingunderany
objects,anddonotcontactthem.
•DonotremovetheROPSexceptwhenreplacingit.
•Donotaddweighttothemachinethatexceedsthegross
weightdisplayedontheROPSlabel.
TransportingSafety
Whenyoutransportthemachinetoorfromthejobsite,
observethefollowingsafetyprecautions:
•Donotcarrypassengersonthemachine.
•Keepallbystandersawaywhileyouaremovingthe
machine.
•Usecarewhenloadingorunloadingthemachineintoa
trailerortruck.
•Watchfortrafcwhenyouarecrossingroadwayswith
themachine.
•Checkforoverheadclearances(i.e.,branches,doorways,
electricalwires)beforedrivingunderanyobjects,anddo
notcontactthem.
5

MaintenanceandStorage
•Lowertheattachment(s),stoptheengine,waitforall
movingpartstostop,andremovethekeywheneveryou
adjust,clean,orrepairthemachine.
•Donottouchpartsthatmaybehotfromoperation.
Allowthemtocoolbeforeattemptingtomaintain,adjust,
orservicethemachine.
•Cleandebrisfromallattachments,drives,mufers,and
theenginetohelppreventres.Cleanupoilandfuel
spills.
•Lettheenginecoolbeforestoringthemachine,anddo
notstoreitnearanopename.
•Parkthemachineonlevelground.
•Donotallowuntrainedpersonneltoservicethemachine.
•Usejackstandstosupportcomponentswhenrequired.
•Carefullyreleasepressurefromcomponentswithstored
energy.
•Keephandsandfeetawayfrommovingparts.Ifpossible,
donotmakeadjustmentswiththeenginerunning.
•Keepallpartsingoodworkingconditionandallhardware
tightened.Replaceallwornordamageddecals.
•Keepnutsandboltstight.Keepallequipmentingood
condition.
•Donottamperwithsafetydevices.
•Useextracarewhenhandlingfuels.Theyareammable
andvaporsareexplosive.
–Useonlyanapprovedcontainer.
–Donotremovethefuelcaporaddfuelwhenthe
engineisrunning.Allowtheenginetocoolbefore
refueling.Donotsmoke.
–Donotrefuelthemachineindoors.
–Donotdrainthefuelindoors.
–Donotstorethemachineorafuelcontainerinside
wherethereisanopename,suchasnearawater
heaterorfurnace.
–Donotllacontainerwhileitisinsideavehicle,
trunk,pickupbed,oranysurfaceotherthanthe
ground.
–Keepthecontainernozzleincontactwiththetank
duringlling.
•UseonlygenuineTororeplacementparts.
•Disconnectthebatterybeforemakinganyrepairs.
Disconnectfromthenegativebatteryterminalrstand
fromthepositivebatteryterminallast.Connecttothe
positiveterminalrstandtothenegativeterminallast.
•Chargethebatteryinanopen,well-ventilatedarea,
awayfromsparkandames.Unplugthechargerbefore
connectingordisconnectingitfromthebattery.Wear
protectiveclothinganduseinsulatedtools.
•Batteryacidispoisonousandcancauseburns.Avoid
contactwithskin,eyes,andclothing.Protectyourface,
eyes,andclothingwhenworkingwithabattery.
•Batterygasescanexplode.Keepcigarettes,sparks,and
amesawayfromthebattery.
•Keepyourbodyandhandsawayfrompinholeleaks
ornozzlesthatejecthigh-pressurehydraulicuid.Use
cardboardorpapertondhydraulicleaks;neveruse
yourhands.Hydraulicuidescapingunderpressurecan
penetrateskinandcauseinjury,requiringsurgerywithin
afewhoursbyaqualiedsurgeon;otherwise,gangrene
mayresult.
•Allowthemachinetocoolbeforestoringit.
ElectricalLineSafety
WARNING
Ifyouleavetheseatofthemachineortouch
anypartofthemachinewhenitischargedwith
electricity,seriousinjuryordeathcouldresult.
Donotleavetheseatofthemachineifthemachine
ischargedwithelectricity.
Important:Intheeventthemachinebecomes
electricallycharged,immediatelycontacttheproper
emergencyandutilityauthoritiestosecurethearea.
Ifyouareoperatingthemachineanditbecomes
electricallycharged,donotleavetheseatuntilthesource
ofelectricalenergyisremovedfromthemachine.Keep
otherpeopleawayfromthemachineifitiselectrically
charged.
Note:Itispossibletostrikeautilitylinewithoutthemachine
becomingcharged.
•Itislikely(butnotalwaysthecase)thatthepower-source
interrupterorbreakerwilltrip,buttoensureyoursafety,
alwaysassumethatthemachinemaybeconducting
electricity.
Note:Youwillbesafeaslongasyoudonotleavethe
seatofthemachine.
•Touchinganypartofanelectricallychargedmachinewhile
youareonthegroundmaycauseasevereelectricshock.
Note:Donotallowanotherindividualtotouchor
approachthemachinewhenitischarged.
6

GasLineSafety
WARNING
Ifyoudamageagasline,animmediateexplosion
andrehazardcouldoccur.Leakinggasisboth
ammableandexplosiveandmaycauseserious
injuryordeath.
•Donotsmokewhileoperatingthemachine.
•Shutoffthemachineandremovethekey.
•Removeallindividualsfromtheworkarea.
•Immediatelycontacttheproperemergencyand
utilityauthoritiestosecurethearea.
CommunicationLineSafety
CAUTION
Ifyoudamagetheberopticcableandlookinto
theexposedhighly-intenselight,youmayharm
youreyes.
•Shutoffthemachineandremovethekey.
•Removeallindividualsfromtheworkarea.
•Immediatelycontacttheproperemergencyand
utilityauthoritiestosecurethearea.
WaterLineSafety
Ifyoudamageawaterline,apotentialoodhazard
couldoccur.
•Shutoffthemachineandremovethekey.
•Removeallindividualsfromtheworkarea.
•Immediatelycontacttheproperemergencyand
utilityauthoritiestosecurethearea.
7

SafetyandInstructionalDecals
Safetydecalsandinstructionsareeasilyvisibletotheoperatorandarelocatednearanyareaofpotential
danger.Replaceanydecalthatisdamagedorlost.
Figure4
1.Decal125-66897.Decal1230–7541(2decals,1oneachside)
2.Decal125-84798.Decal125-6694(2decals,1oneachside)
3.Decal125-49639.Decal125-8481
4.Decal125-848010.Decal125-8482
5.Decal125-613511.Decal125-6135
6.Decal125-849912.Decal125-6139
8

Figure5
1.Decal125-84967.Decal127-1829
2.Decal125-8473(ontheoorpanelcoveringthebattery)8.Decal125-8480
3.Decal125-84959.Decal125-6157(undertheleft-sidecowl)
4.Decal127-182810.Decal125-8483
5.Decal125-613911.Decal125-6689
6.Decal130-7540
Figure6
1.Decal131–04394.Decal125-8484
2.Decal127-18305.Decal131–0440
3.Decal130-7539
125-4963
1.Warning—donottouchhotsurfaces.
125–6135
9

125–6139
1.Liftpoint;tiedownpoint
0000
0000
0000
125-6157
1.Disconnectthebattery
power.
3.On/Start
2.Off/Stop4.ReadtheOperator’s
Manual.
125-6671
1.Explosionhazard;electricshockhazard—calllocalutilities
beforedigging.
125-6689
1.Warning—keepawayfrom
hotsurfaces.
2.Cutting/dismemberment
hazard,fan—keepaway
frommovingparts;keep
allguardsandsafety
devicesinplace.
125-6694
1.Tie-downpoint
10

125–8473
1.Explosionhazard—wear
eyeprotection.
3.Firehazard—keepopen
amesaway.
2.Causticliquid/chemical
burnhazard—rinse
affectedareaandseek
medicalassistance.
4.Poisonhazard—donot
tamperwiththebattery.
125-8479
1.Burnhazardfromcontentsunderpressure—readthe
Operator’sManual.
125-8480
1.Warning—donotclimbonROPS.
125-8481
1.Hydraulicsupply
125-8482
1.Hydraulicreturn
125–8483
1.Hydraulicuid;readtheOperator’sManual.
11

125-8484
1.12-voltreceptacle
125-8499
1.Warning—readthe
Operator'sManual.
3.Forward
2.Reverse4.Transmission—gear
selection
125-8495
1.Tiltthemachineleft6.Sideshift—left(optional
attachment)
11.Auxiliaryhydraulic(optional
kit)
16.Trencher—fastrotation
(optionalaccessory)
2.Tiltthemachineright7.Lowerthecrumber/rotate
theplowforward(optional
attachment)
12.Vibratoryplowdepth—oat
on(optionalaccessory)
17.Trencher—slowrotation
(optionalaccessory)
3.Autoframelevelingon
(optionalkit)
8.Raisethecrumber/rotate
theplowbackward(optional
attachment)
13.Vibratoryplowdepth—oat
off(optionalaccessory)
18.Warning—readthe
Operator'sManual.
4.Autoframelevelingoff
(optionalkit)
9.Rocksawstabilizer—lower
(optionalaccessory)
14.Vibratoryplowswing—oat
on(optionalaccessory)
19.Explosionhazard;electric
shockhazard—donotdig
beforecontactinglocal
utilityservices.
5.Sideshift—right(optional
attachment)
10.Rocksawstabilizer—raise
(optionalaccessory)
15.Vibratoryplowswing—oat
off(optionalaccessory)
130-7541
1.Warning—keepbystandersawayfromthemachine.
131-0439
1.Differential—lock2.Differential—unlock
12

125-8496
1.Backllblade/vibratoryplow—tilt/swingleft8.Rearwheelsteering—turnthewheelsright;machinewillturn
left
2.Backllblade/vibratoryplow—tilt/swingright9.Rearwheelsteering—autocenter(optionalkit)
3.Backllblade/vibratoryplow—lower10.Lowertheattachments
4.Backllblade/vibratoryplow—raise11.Raisetheattachments
5.Backllblade/vibratoryplowhead—angleleft12.Rearattachment—forwardspeed
6.Backllblade/vibratoryplowhead—angleright13.Rearattachment—reversespeed
7.Rearwheelsteering—turnthewheelsleft;machinewillturn
right
127-1828
1.Hydraulicpressure4.Raisetheattachment.
2.Lowertheattachment.5.Hydraulicreturn
3.Casedrain
13

127-1829
1.Oildrain
127-1830
1.ReadtheOperator's
Manual.
3.Lowertheattachment
2.Raisetheattachment
131-0440
1.Parkingbrake—engage2.Parkingbrake—disengage
130-7539
1.Electricalpower3.Engine—run
2.Engine—stop4.Engine—start
14

130-7540
1.Warning—readtheOperator'sManual.4.Warning—keepbystandersawayfrom
themachine.
7.Explosionhazard;electricshock
hazard—beforediggingcallthelocal
utilitiesservice.
2.Warning—donotoperatethemachine
unlessyouhavereceivedinstruction.
5.Warning—keepawayfrommoving
parts;keepallguardsandshieldsin
place.
8.ReadtheOperator'sManualfor
informationonstartingtheengine—1)
Engagetheparkingbrake;2)Setthe
tractiondriveandallattachmentsto
neutral;3)Turnthekeytotheengine
startposition.
3.Warning—wearaseatbelt.6.Warning—wearhearingprotection.9.ReadtheOperator'sManualfor
informationonstoppingtheengine—1)
Parkthemachineonalevelsurface;
2)Engagetheparkingbrake;3)Set
thetractiondriveandallattachments
toneutral;4)Lowerallattachments;
5)Turnthekeytotheenginestop
position;6)Removethekeyfromthe
ignition.
15

ProductOverview
Figure7
1.Nosepanel5.Backllblade
2.Leftsidepanel6.Fuelreservoir
3.Grabhandles7.Fuelcap
4.ROPSenclosure8.Steps
Figure8
1.Grabhandles4.Steps
2.Rightsidepanel5.Hydraulic-uidsightgauge
3.Nosepanel6.Hydraulic-tankcap
16

Controls
Becomefamiliarwithallthecontrols(Figure9throughFigure
16)beforeyoustarttheengineandoperatethemachine.
CommandCenter
HomeScreenControls
Usethebuttonsonthecommandcentertocontrolthe
operationofmachinefunctions,andtonavigatetothe
machinesetupanddiagnosticscreens(Figure9).
Figure9
Homescreenshown
1.Button1(lightOn/Off
button—usedwiththelight
kitoption)
8.Button8(decreasethe
enginespeed)
2.Button2(increasethe
setpointfortheload
control—usedwiththe
load-controlkit)
9.Escape(usedtoreturnto
thehomescreen)
3.Button3(decreasethe
setpointfortheload
control—usedwiththe
load-controlkit)
10.Previousscreen(usedto
movetoapreviousscreen
functionwithinascreen
mode)
4.Button4(loadcontrol
On/Off—usedwiththe
load-controloption)
11.OK(usedtomakea
selection)
5.Button5(control
select—usetodetermine
whichattachmentthe
backll-blade/vibratory-plow
joystickoperates)
12.Nextscreen(usedtomove
tothenextscreenfunction
withinascreenmode)
6.Button6
(advanced-steering
mode—usedwiththe
advanced-steeringkit)
13.Downscreen(usedto
movedowntotheprevious
screenmodeandenter
diagnosticandcalibration
screens)
7.Button7(increasethe
enginespeed)
14.Upscreen(usedtomove
upthenextscreenmode)
ThrottleButton
•Throttle-upButton—Pressthethrottle-upbutton
(button7),locatedatthebottom-rightcornerofthe
commandcenter,toincreasetheenginespeed(Figure9).
Note:Pressthebuttonrepeatedlytoincreasetheengine
speeduptothemaximumenginespeed(2,450rpm).
•Throttle-downButton—Pressthethrottle-downbutton
(button8),locatedatthebottom-rightcornerofthe
commandcenter,tolowertheenginespeed(Figure9).
Note:Pressthebuttonrepeatedlytodecreasetheengine
speeddowntotheengine-idlespeed(950rpm).
MachineControls
Differential-LockSwitch
Usethedifferential-lockswitchtocontrolthetransmissionof
powertoall4wheels(Figure10).
•Tolockthefrontandreardifferentials—pushtheswitch
up.
•Tounlockthefrontandreaddifferentials—stopthe
machine,pushtheswitchdown,andmovethemachine
backwardforashortdistance.
Figure10
1.Differential-lockswitch2.Hornbutton
Parking-BrakeSwitch
•Settheparkingbrakebypushingdowntheparking-brake
switch(Figure11).
17

Figure11
1.Parking-brakeswitch3.Keyswitch
2.Powerport
Note:Theredparkingbrakeindicatorwillappearinthe
commandcenterdisplay(Figure12).
Figure12
1.Parkingbrakeindicator(commandcenterdisplay)
•Releasetheparkingbrakebypushinguptheparking-brake
switch.
Note:Whentheparkingbrakeisreleasedandthe
machineismovedforwardorbackward,theHomescreen
willstopdisplayingtheparkingbrakeindicator.
•Ifyoustoptheenginewithoutsettingtheparkingbrake,
themachinewillsettheparkingbrakeandtheyellow
parkingbrakeindicatorwillappearinthecommand
centerdisplay(Figure12).
KeySwitch
Usethekeyswitchtopowertheelectricalaccessories,startthe
machine,andstopthemachine(Figure11).The4key-switch
positionsareasfollows:
•Accessory—Rotatethekeyswitchtothispositionto
energizethelampswitchcircuits.
•Stop—Rotatethekeyswitchtothispositiontostopthe
engineandde-energizetheelectricalsystem.
Note:Alwaysremovethekeybeforeleavingthe
machine.
•Run—Thispositionallowstheenginetorunandwill
energizeallelectricalsystems.
•Start—Rotatethekeyswitchtothispositiontostartthe
engine.
Note:Whenyoureleasethekey,itwillautomaticallygo
totheRunposition.
FootPedal
Thefootpedalcontrolsthedirectionandspeedoftravelof
themachine(Figure13).
Figure13
1.Heelpedal(reverse)2.Toepedal(forward)
Traction-ControlCluster
Thetraction-controlclusterislocatedattheoperatorseat,
adjacenttotheleftarmrest.
Utility-TractionJoystick
Whentrenching,plowing,orboring,usetheutility-traction
joysticktochangethedirectionandspeedofthemachine
(Figure14).Thefurtheryoumovethejoystickineither
direction,thefasterthemachinewillmoveintheselected
direction.
18

•Movetheutility-tractionjoystickforwardtomovethe
machineforward(Figure14).
•Movethetractionjoystickrearwardtomovethemachine
inreverse(Figure14).
•Movethetractionjoysticktothecenter(Neutral)position
tostopthemachine(Figure14).
3
Figure14
1.Traction-controlcluster3.Utility-tractionjoystick
2.Gear-selectorswitch
Note:Theenginespeediscontrolledwiththethrottle
buttonsonthehomescreenofthecommand-centerpanel;
refertoThrottleButton(page17).
Gear-SelectorSwitch
Thegear-selectorswitchislocatedontopoftheutility-traction
joystick(Figure14),andisusedtoselectthetransmissiongear.
Thecurrentgearisdisplayedonthehomescreenofthe
commandcenter,aboveandtotheleftofthetachometer
display.
Attachment-ControlCluster
Theattachment-controlclusterislocatedattheoperatorseat
andisadjacenttotherightarmrest.
Backll-Blade/Vibratory-PlowJoystick
Thebackll-blade/vibratory-plowjoystickoperateseither
thebackllbladeorthevibratoryplow ,whicheverisselected
anddisplayedonthecommandcenter.Movethejoystick
controlstochangethebackllbladeorthevibratoryplow
positionasfollows:
•Pushthejoystickforwardtolowerthebackllbladeor
vibratoryploworpullthejoystickrearwardtoraisethe
backllbladeorvibratoryplow(Figure15).
Note:Thefunctionofthejoystickdependsonthe
attachmentselectedinthecommandcenter.
•Movethejoysticktothelefttotiltthebackllbladetothe
left,ormovethejoysticktotherighttotiltthebackll
bladetotheright(Figure15).
•Swingthebackllbladeorsteerthevibratoryplowleftor
rightasfollows:
–Twistthethumbcontrollefttoswingthebackll
bladeleft,ortwistthethumbcontrolrighttoswing
thebackllbladeright(Figure15).
–Twistthethumbcontrollefttosteerthevibratory
plowleft,ortwistthethumbcontrolrighttosteerthe
vibratoryplowright(Figure15).
Note:Thefunctionofthethumbcontroldepends
ontheattachmentselectedinthecommandcenter.
•Pullthetriggeronthejoysticktooatthebackllblade
upanddown(Figure15).
Figure15
1.Thumbcontrol4.Vibratoryplow/trencher
motorjoystick
2.Backllblade/vibratory
plowjoystick
5.Attachmentelevation
switch
3.Rear-wheelsteering
switch
6.Backll-blade-oattrigger
Rear-Wheel-SteeringSwitch
Theswitchfortherear-wheelsteeringisusedtocontrolthe
steeringdirection(leftorright)oftherearwheels.Theswitch
fortherear-wheelsteeringislocatedbehindthebackll
blade/vibratoryplowjoystick.
Vibratory-Plow/Trencher-MotorJoystick
VibratoryPlow
Note:Thefunctionofthevibratoryplow/trenchermotor
joystickdependsontheattachmentselectedinthecommand
center.
19

•Movethejoystickrearwardtostartthevibrationofthe
plowblade(Figure15).
•Movethejoystickfurtherrearwardtoincreasethe
vibration(Figure15).
•MovethejoysticktowardtheNeutralpositiontodecrease
andstopthevibration(Figure15).
Trencher
•Movethejoystickforwardtostartthediggingchaininthe
forwarddirection(Figure15).
•Movethejoystickfurtherforwardtoincreasethechain
speed(Figure15).
•MovethejoysticktotheNeutralpositiontostopthe
trencherchain(Figure15).
Attachment-ElevationSwitch
Theattachment-elevationswitchraisesandlowersan
attachmentmountedattherearofthemachine.
•Presstheswitchonthelefttolowertheattachmentboom
(Figure15).
•Presstheswitchontherighttoraisetheattachment
boom(Figure15).
Auxiliary-ControlPanel
Theauxiliary-controlpanelincludestherockerswitchthat
controlsthemachinetiltactuator(Figure16).Thepanelalso
haslocationsforrockerswitchesthatareinstalledwiththe
optionalattachmentsorkitsforthemachine.
Figure16
1.Machinetilt—left/right6.Auxiliaryhydraulic
(reservedforanoptional
attachment)
2.AutotiltOn/Off(reserved
foranoptionalkit)
7.Vibratoryplowboomoat
On/Off(reservedforan
optionalattachment)
3.Sideshiftleft/right
(reservedforanoptional
attachment)
8.Vibratoryplowswingoat
On/Off(reservedforan
optionalattachment)
4.Lower/raisethe
crumber/rotatetheplow
forward(reservedforan
optionalattachment)
9.TrencherspeedFast/Slow
(reservedforanoptional
attachment)
5.Lower/raisetherocksaw
stabilizers(reservedforan
optionalattachment)
OperatorSeatandSeatBelt
Seat-InterlockSystem
WARNING
Theseat-interlocksystemprotectstheoperator
frominjury.
Donotdisabletheseat-interlocksystem.
Theseat-interlocksystemrequirestheoperatortositinthe
operatorseatwhileoperatingthismachine.
Note:Theneutral-indicatorlightturnsonwhenyou
turnthekeyswitchtotheOnpositionandboththe
utility-traction-controlandattachment-controlleversarein
theNeutralposition.
Note:Iftheoperatordoesnotremainseatedwhenthe
utility-tractionleverisnotintheNeutralposition,theengine
willstopin1second.Donotlayaheavyobjectontheseator
tamperwiththeseat-interlocksysteminanyway.
20
This manual suits for next models
1
Table of contents
Other Toro Tractor manuals

Toro
Toro Reelmaster 7000-D User manual

Toro
Toro 08881 SAND PRO 5000 User manual

Toro
Toro Maxi Sneaker 370 User manual

Toro
Toro Wheel Horse 523Dxi User manual

Toro
Toro 13AX60RG544 User manual

Toro
Toro 03781TE User manual

Toro
Toro 8886 User manual

Toro
Toro 8884 User manual

Toro
Toro Wheel Horse 73560 User manual

Toro
Toro 8703 User manual