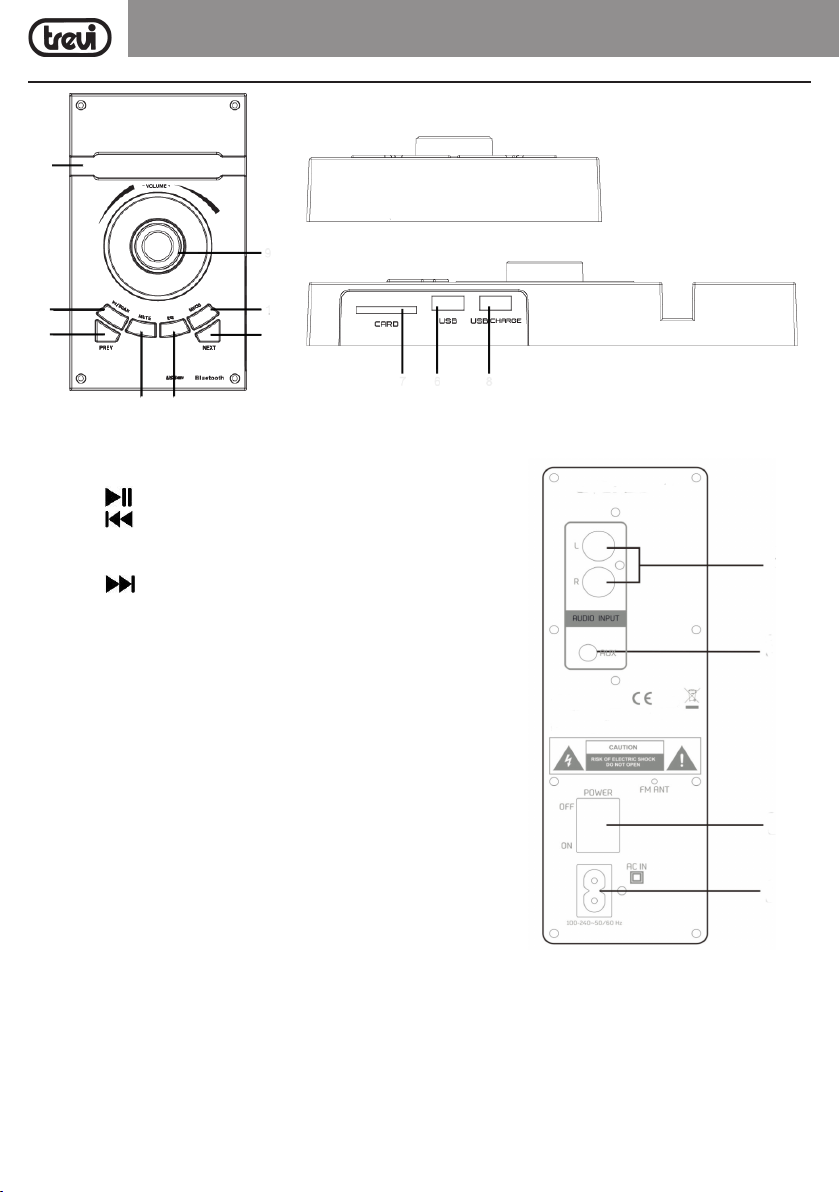
Trevi XT 10A8 BT User manual

BT
BLUETOOTH
XT 10A8 BT
Guida d’uso/ User guide
ALTOPARLANTE AMPLIFICATO A
TORRE CON BLUETOOTH MP3/USB/
SD/AUX-IN
Manuale d'uso e collegamento
TOWER LAUTSPRECHER MIT
BLUETOOTH MP3/USB/SD/AUX-IN
VERSTÄRKT
Gebrauchs- und Anschlusshandbuch
AMPLIFIED TOWER SPEAKER WITH
BLUETOOTH MP3/USB/SD/AUX-IN
Connection and Operation Manual
ALTAVOZ AMPLIFICADO CON
BLUETOOTH MP3/USB/SD/AUX-IN
Manual para el uso y la conexión
HAUT-PARLEUR AMPLIFIÉ AVEC
BLUETOOTH MP3/USB/SD/AUX-IN
Mode d'emploi et branchement
USB
CHARGE
USB/SD
PLAYER
60W
POWER
2.1
SOUND
2x
AUX-IN
• Per informazioni integrative ed aggiornamenti su questo prodotto visita www.trevi.it
• For additional information and updates of this product see www.trevi.it


3
XT 10A8 BTWARNING!
ATTENZIONE
RISCHIO DI SCOSSE
ELETTRICHE!
NON ESPORRE A PIOGGIA E
UMIDITÀ
ATTENZIONE: NON APRITE L'APPARECCHIO. ALL'INTERNO NON VI
SONOCOMANDIMANIPOLABILIDALL'UTENTENEPARTIDIRICAMBIO.
PERTUTTE LEOPERAZIONI DISERVIZIO RIVOLGERSIAD UNCENTRO
DI ASSISTENZA AUTORIZZATO TREVI
WARNING!
WARNING: DO NOT OPEN THE SET. NEITHER CONTROLS OR SPARE
PARTS TO BE USED BY THE USER ARE TO BE FOUND INSIDE IT.
APPLYTOAUTHORISEDTREVICENTERSFOR SERVICEOPERATIONS.
DANGER OF ELECTRIC SHOCK!
DO NOT EXPOSE TO
RAIN OR HUMIDITY
ATTENTION
ATTENTION:NEPASOUVRIRL’APPAREIL,AL’INTERIEURILN’YAPAS
DE COMMANDES A MANIPULER PAR L’UTILISATEUR OU DE PIECES
DE RECHANGE. POUR TOUTES LES OPERATIONS DE SERVICE IL
FAUT S’ADRESSER A UN SERVICE D’ASSISTANCE AUTORISE TREVI.
RISQUE DE DECHARGES
ELECTRIQUES
NE PAS EXPOSER A LA PLUIE
ET A L’HUMIDITE
ACHTUNG
ACHTUNG: DAS GERÄT NICHT ÖFFNEN. IM INNERN BEFINDEN SICH
KEINEVOMBENUTZERSELBSTINSTANDSETZBARENTEILEUNDAUCH
KEINEERSATZTEILE.FÜRJEGLICHESERVICEARBEITEN,WENDENSIE
SICHBITTEANEINE TREVI AUTORISIERTENKUNDENDIENSTSTELLE.
GEFAHR ELEKTRISCHER
SCHLÄGE NICHT DER FEUCH-
TIGKEIT UND DEM REGEN
AUSSETZEN
ATENCION
ATENCION:NOABRIRELAPARATO,ENSUINTERIORNOHAYMANDOS
QUE PUEDAN SER MANIPULADOS POR EL USUARIO NI PARTES DE
REPUESTO.PARATODASLASOPERACIONESDESERVICIODIRIGIRSE
A UN CENTRO DE ASISTENCIA AUTORIZADO TREVI.
PELIGRO DE CHOQUES
ELECTRICOS
NO EXPONER A LLUVIA Y
HUMEDAD
UK PLUG ONLY
WIRES CONNECTIONS TO A UKTHREE-PIN PLUG
The wires in this mains lead are coloured in accordance with the
following wiring codes:
Blue:........................................ Neutral
Brown: .................................... Live
The wires in this mains lead must be connected to the terminals
in the plug as follows:
Blue wire:................................ N or Black
Brown wire:............................. L or Red
Neither wire is to be connected to the earth (E or W) terminal of
three-pin plug.
Should the fuse fail in the plug remove the plug form the wall socket
and replace the fuse with a 3 Amp. ASTA approved BS 1362 fuse.

4
XT 10A8 BT
AVVERTENZE E NOTE D'USO
• Posizionare l’apparecchio su una superficie piana.
• Posizionare l’apparecchio in modo che ai suoi lati ci sia sempre abbastanza spazio per la libera
circolazione dell’aria (almeno 10 cm).
• Non collocare nessun oggetto sopra l’apparecchio.
• L’apparecchio non deve essere esposto a stillicidio o a spruzzi d’acqua. Nessun oggetto pieno di
liquido, quali vasi, deve essere posto sull’apparecchio.
• Se dei liquidi penetrano all’interno dell’apparecchio scollegare immediatamente la spina dalla presa
e portare l’apparecchio al più vicino centro assistenza autorizato TREVI.
• Nessuna sorgente di fiamma nuda, quali candele accese, deve essere posta sull’apparecchio.
• I cavi devono essere nascosti e protetti onde evitare l’inciampo da parte di qualcuno e la conseguente
caduta dell’apparecchio.
• Tenere l’apparecchio lontano dai seguenti luoghi:
vicino a campi magnetici;
vicino a fonti di calore (caloriferi, stufe, raggi diretti del sole, ecc...);
vicino a zone umide (stanze da bagno, piscine, ecc...);
zone polverose; zone soggette a forti vibrazioni.
• Scollegare il cavo di alimentazione durante i temporali o per lunghi periodi di inutilizzo.
• Istruire al corretto utilizzo bambini e persone con scarse conoscenze del prodotto.
• Non avvicinare l’orecchio all’altoparlante durante le fasi di messa punto e regolazioni del volume, e
in particolare tenere il volume al minimo nella fase di accensione.
• Ascoltare a volume alto per lungo tempo, potrebbe danneggiare il vostro udito.
• Conservare il seguente manuale d’uso.
CURA E MANUTENZIONE
Per la pulizia si consiglia l’uso di un panno morbido, leggermente inumidito. Evitate solventi o sostanze
abrasive.
IMPORTANTE
La buona costruzione di questo apparecchio ne garantisce per lungo tempo il perfetto funzionamento.
Se tuttavia dovesse presentarsi qualche inconveniente, sarà opportuno consultare il più vicino Centro
Assistenza autorizzato TREVI.
TREVI persegue una politica di continua ricerca e sviluppo. Pertanto i prodotti possono presentare
caratteristiche diverse da quelle descritte.
MONTAGGIO BASE
1. Ruotare la torre e individuare, sul lato opposto della tastiera, i fori;
2. Posizionare la base cercando di far combaciare i fori della torre e
quelli della base;
3. Inserire le viti nei fori e fissarle ruotandole in senso orario;
4. Non serrare eccessivamente le viti per non danneggiare il mobile.
ITALIANO
Per evitare possibili danni all’udito, limitare il tempo di ascolto a volumi elevati.

5
XT 10A8 BTITALIANO
PANNELLO COMANDI E PRESE
1
2
36
7
13
12
4 5
14
15
1. Supporto dispositivi esterni.
2. Tasto : riproduzione/pausa.
3. Tasto : selezione traccia precedente.
4. Tasto MUTE.
5. Tasto EQ.
6. Tasto : selezione traccia successiva.
7. Tasto M (MODE): selezione funzione.
8. Regolazione VOLUME.
9. Ingresso SD Card.
10. Presa USB per riproduzione file audio.
11. Presa USB CHARGE per ricarica dispositivi esterni (5V, 1A).
12. Presa di alimentazione da rete.
13. Tasto POWER ON/OFF, accensione/spegnimento.
14. Presa AUX-IN tramite ingresso Jack 3,5mm.
15. Presa AUX-IN tramite ingresso RCA.
8
9 10 11

6
XT 10A8 BT
ALIMENTAZIONE
Inserire il cavo di alimentazione nella presa (12) sul dispositivo e la spina in una presa di corrente.
FUNZIONI DI BASE
ACCENSIONE/SPEGNIMENTO
Per accendere l'apparecchio premere l'interruttore POWER ON/OFF (13) e portarlo in posizione "I".
Per spegnere l'apparecchio premere l'interruttore POWER ON/OFF (13) e portarlo in posizione "0" .
STAND-BY
1. Premere il tasto (16) sul telecomando per accendere l'apparecchio;
2. Premere il tasto (16) sul telecomando per portare l'apparecchio in modalità Stand-by.
SELEZIONE DELLA FUNZIONE
Per cambiare la modalità di funzionamento, premere piu' volte il tasto M (7) sull'unità, oppure premere
più volte il tasto MODE (24) sul telecomando.
REGOLAZIONE DEL VOLUME
Ruotare la manopola (8) sull'unità oppure utilizzare i tasti VOL + /VOL - (25) sul telecomando per au-
mentare o diminuire il Volume dell'apparecchio.
FUNZIONE RADIO FM (PRESENTE IN VERSIONE EXPORT)
RICERCA AUTOMATICA
1. Accendere l'apparecchio e premere più volte il tasto M (7) sull'unità oppure premere il tasto MODE (24)
sultelecomandoperselezionare la funzioneRADIO(suldisplaycompariràl'indicazione della frequenza);
2. Tenere premuto per qualche secondo
il tasto (2) sull'unità oppure premere il tasto SEARCH
(19) sul telecomando per avviare la memorizzazione automatica delle emittenti (la radio inizia
una ricerca delle stazioni radio e le salverà automaticamente nelle memoria). Il numero delle
stazioni memorizzate dipende dal segnale radio nella vostra zona. L'apparecchio può memo-
rizzare fino a 80 stazioni;
3. Utilizzare i tasti (3) o (6) sull'unità, oppure i tasti /CH- (17) o /CH+ (27) sul teleco-
mando per l'ascolto delle varie emittenti radio salvate in memoria.
- Premere più volte il tastoTUN +/TUN - (26) sul telecomando per ricercare manualmente le emittenti
radio o effettuare una regolazione fine della ricezione.
Nota: per una migliore ricezione, assicurarsi che l'antenna FM sia completamente estesa.
ITALIANO
16
18
19
22
29
24
26
27
28
23
17
16. Tasto : accensione/Stand-by.
17. Tasto /CH-: selezione traccia/canale precedente.
18. Tasto FOLDER.
19. TastoSEARCH:memorizzazione automatica stazioni Radio.
20. Tasti Numerici.
21. Tasto MUTE.
22. Tasto EQ: pre equalizzazioni.
23. Tasto REPEAT: funzione ripetizione brano.
24. Tasto MODE: selezione funzione.
25. Tasto VOL +/VOL - : regolazione Volume.
26. Tasto TUN +/TUN - : sintonizzazione Radio.
27. Tasto /CH+: selezione traccia/canale successivo.
28. Tasto : Stop.
29. Tasto : riproduzione/pausa.
TELECOMANDO
21 25
20

7
XT 10A8 BT
INGRESSO USB/SD
1. Inserire una memoria USB nella presa (10) oppure una scheda SD nell'ingresso (9);
2. Accendere l'apparecchio, la riproduzione dei brani si avvierà automaticamente, se questo non
dovesse avvenire premere più volte il tasto M (7) sull'unità oppure premere il tasto MODE (24) sul
telecomando e selezionare la funzione USB/SD Card;
3. Per mettere in pausa la riproduzione, premere il tasto
(2) sull'unità, oppure il tasto (29)
sul telecomando;
4. Per riprendere la riproduzione, premere nuovamente il tasto
(2) sull'unità, oppure il tasto
(29) sul telecomando;
5. Premere il tasto (3) o (6) sull'unità, oppure i tasti /CH- (17) o /CH+ (27) sul teleco-
mando,
durante l’ascolto per passare alla traccia precedente o successiva.
Nota:
- Il lettore potrebbe non supportare alcuni dispositivi USB, questo è dovuto all'incompatibilità di alcuni
processori.
- Per evitare interferenze dannose, collegare sempre le periferiche USB direttamente all'unità, non
utilizzare cavi di prolunga.
- Dal computer formattare le memorie USB/SD in FAT (16 o 32).
RICARICA DEI DISPOSITIVI ESTERNI
L'apparecchio puo essere utilizzato anche per ricaricare dispositivi esterni come Smartphone, lettori
MP3, ecc...
Assicurarsichelatensioneelacorrentefornitadall'apparecchiosianocorrettiper il dispositivo da ricaricare.
Collegare il dispositivo esterno alla presa USB CHARGE (11).
BLUETOOTH
1. Accendere l'apparecchio e premere più volte il tasto M (7) sull'unità, oppure premere il tasto MODE
(24) sul telecomando e selezionare la funzione BLUETOOTH;
2. La scritta "bt" apparirà sul display e il sistema entrerà automaticamente in modalità accoppiamento
con dispositivi esterni;
3. Attivare la funzionalità Bluetooth sul dispositivo esterno da accoppiare ed avviare la ricerca dei
dispositivi. Al termine selezionare il dispositivo "XT 10A8 BT";
4. Inserire la password "0000" se richiesto;
5. Ad accoppiamento avvenuto verrà emesso un breve suono di conferma;
6. Premere il tasto (2)
sull'unità, oppure il tasto (29) sul telecomando
per avviare la ripro-
duzione; premerlo nuovamente per arrestare momentaneamente la riproduzione;
7. Premere il tasto (3) o (6) sull'unità, oppure i tasti /CH- (17) o /CH+ (27) sul teleco-
mando,
durante l’ascolto per passare alla traccia precedente o successiva.
INGRESSO AUX-IN
- Utilizzare un cavo con presa jack 3.5mm Stereo oppure un cavo RCA per collegare gli ingressi
AUX-IN (14 e 15), posti dietro all'apparecchio, all'uscita audio del TV, DVD, PC o altro dispositivo/
sorgente;
1. Accendere l'apparecchio;
2. Premere più volte il tasto M (7) sull'unità, oppure premere il tasto MODE (24) sul telecomando e
selezionare la funzione AUX;
3. Regolare il dispositivo esterno dai propri comandi, automaticamente verrà riprodotto il segnale
presente sull'ingresso AUX-IN.
ITALIANO

8
XT 10A8 BT
PROBLEMI E SOLUZIONI
Se il vostro apparecchio non funzionasse correttamente controllare questa breve lista prima di portarlo
presso un centro assistenza autorizzato TREVI.
In ogni caso NON tentare di riparare l’apparecchio da soli, questo farebbe decadere la garanzia. Solo i
centri assistenza tecnica TREVI sono autorizzati ad eseguire interventi su questo prodotto.
Assenza di suono:
- Controllare che non sia inserita la funzione PAUSE.
- Controllare di avere selezionato l'ingresso corretto.
- Controllare e regolare il volume dell'apparecchio o del TV (o del dispositivo collegato).
L'apparecchio non si accende o si spegne automaticamente:
- Controllare di avere correttamente inserito il cavo di alimentazione.
Problemi di accoppiamento con dispositivi Bluetooth:
- Se dopo l'accoppiamento Bluetooth con un dispositivo esterno la qualità audio è scarsa, portare il
dispositivo esterno più vicino alla Tower o rimuovere qualsiasi ostacolo tra di loro.
- Se la connessione tra la Tower e il dispositivo non avviene, verificare che la funzione di accoppia-
mento del dispositivo sia abilitata; fare riferimento al manuale del dispositivo per abilitare la funzione.
- Se l'accoppiamento con il dispositivo esterno si attiva e disattiva continuamente, portare il disposi-
tivo esterno più vicino all'apparecchio o rimuovere qualsiasi ostacolo tra di loro. In alcuni dispositivi
esterni l'accoppiamento Bluetooth può disattivarsi automaticamente per salvaguardare i consumi
della sua batteria, questo non è un malfunzionamento dell'apparecchio.
I comandi non rispondono:
- Scollegare il cavo di alimentazione dell’apparecchio per 30 secondi per effettuare un reset.
ITALIANO

9
XT 10A8 BT
CARATTERISTICHE TECNICHE
Alimentazione:......................................... 100-240V 50-60Hz
Consumo in Stand-by:............................. <0,5W
Potenza Audio massima in uscita:........... 60W (
15W x2 + 30W Sub-woofer)
Altoparlanti:.............................................. 2x 3inch + 1x 5inch
Potenza di trasmissione Bluetooth: ......... 0,8mW
Frequenza di trasmissione Bluetooth: ..... 2,4GHz
Dimensioni Unità: .................................... 120x200x1000mm
Dimensioni Base:..................................... 230x150x9,5mm
Peso: ....................................................... 5,9Kg
ITALIANO

10
XT 10A8 BT
NOTES ON USE
This is a precision electronic appliance; avoid using it in the following cases:
• Place the device on a flat surface.
• Place the device so that its sides there is always enough space for air to circulate freely (at least 10
cm).
• Do not place anything on top of the unit.
• The apparatus shall not be exposed to dripping or splashing water. No objects filled with liquid, such
as vases, should be placed on the unit.
• If liquids penetrate inside the device immediately disconnect the plug from the socket and take it to
the nearest service center autorizato TREVI.
• No naked flame sources, such as lighted candles, should be placed on.
• Cables should be hidden and protected in order to avoid stumbling from someone and the consequent
fall of the appliance.
• Keep the unit away from the following places:
near magnetic fields;
near heat sources (radiators, stoves, direct sunlight, etc...);
near wetlands (bathrooms, swimming pools, etc...);
dusty areas; areas subject to strong vibration.
• Disconnect the power cord during storms or for long periods of inoperation.
• Unplug the power cable during thunderstorms or long periods of inactivity.
• Instruct the proper use children and people with little knowledge of the product.
• Do not close the ear to the loudspeaker during step setting and volume adjustments, and in particular
keep the volume at idle during power-up.
• Listen at high volume for a long time, can damage your hearing.
• Keep the following user manual.
CARE AND MAINTENANCE
Use a slightly damp soft cloth for cleaning. Do not use solvents and abrasive substances.
IMPORTANT
This appliance has been carefully built to ensure long-lasting perfect performance. However, should any
inconvenience occur, please contact your local authorised TREVI Service Centre.
TREVI follows a policy of ongoing research and development. Therefore products may have different
features from those described.
INSTALLATION
1. Rotate the tower and locate the holes (in the opposite side of the keyboard);
2. Fit the base with the body aligning the holes on the base with the holes on
the tower;
3. Screws the base into the body;
4. Do not over tighten the screws to avoid damaging the cabinet;
5. Place the speaker standing on the floor and it's ready to use.
Topreventpossiblehearingdamage,do not listen at high volumeslevelsforlongperiods.
ENGLISH

11
XT 10A8 BT
TOP PANEL AND REAR PANEL DESCRIPTIONS
ENGLISH
1
2
36
7
13
12
4 5
14
15
1. Support for external devices.
2. : Play/Pause button.
3. : Skip to previous track.
4. MUTE button.
5. EQ button.
6. : Skip to next track.
7. M button: MODE switching.
8. VOLUME.
9. SD Card slot.
10. USB port for playback.
11. USB port for charging external mobile device (5V, 1A).
12. AC Input.
13. Power Switch ON/OFF.
14. AUX 3.5mm Jack input.
15. AUX RCA input.
8
9 10 11

12
XT 10A8 BT
POWER SUPPLY
Plug the power cord into the socket (12) on the device and plug into a power outlet.
BASIC FUNCTION
POWER ON/OFF
Press the POWER ON/OFF switch (13) and turn it to the "I" position to switch the appliance on.
Press the POWER ON/OFF switch (13) and turn it to the "0" position to switch off the appliance.
STAND-BY
1. Press the button (16) on the remote control to turn ON the unit.
2. Press the button (16) on the remote control to turn OFF the unit.
MODE FUNCTION
To change the operating mode, press the M button (7) on the unit or press the MODE button (24) on
remote control repeatedly.
VOLUME ADJUSTMENT
Turn the knob (8) on the unit or use the VOL + /VOL - buttons (25) on remote control to increase or de-
crease the volume of the appliance.
FM RADIO
AUTOMATIC SEARCH
1. Switch on the appliance and press M button (7) on the unit several times or press the MODE button (24)
on the remote control to select the RADIO function (the frequency indication will appear on the display);
2. Hold the button (2) on the unit for a few seconds or press the SEARCH button (19) on remote
control to start the automatic search of the stations (the radio starts searching for radio stations and
will automatically save them in the memory). The number of stored stations depends on the radio
signal in your area. The device can store up to 80 stations;
3. Press (3) or (6) button on the unit, or /CH- (17), /CH+ (27) buttons on remote control
to select the next or the previous radio channel.
- If the channel signal is not good, it can be fine tuned by pressing the TUN +/TUN - (26) button on
the remote control to adjust the signal.
Note: For a better sound quality, please make sure that the FM Antennahas been fully extended.
ENGLISH
REMOTE CONTROL
16
18
19
22
29
24
26
27
28
23
17
16. button: Stand-by/ON.
17. /CH- button: previous track /channel.
18. FOLDER button.
19. SEARCH button: automatic storage Radio stations.
20. Numbers button.
21. MUTE button.
22. EQ button.
23. REPEAT button.
24. MODE button: function selection.
25. VOL +/VOL - buttons.
26. TUN +/TUN - buttons.
27. /CH+ button: next track /channel.
28. button: Stop.
29. button: play/pause.
21 25
20

13
XT 10A8 BT
USB/SD INPUT
1. Insert a USB memory in the socket (10) or an SD card in the input (9);
2. Turn on the unit, the playback of the tracks will start automatically, if this does not happen press the
M button (7) on the unit several times and select the USB/SD Card function, or press MODE button
(24) on the remote control;
3. To pause playback, press
button (2) on the unit, or button (29) on the remote control;
4. To resume playback, press
button again;
5. Press (3) or (6) button on the unit, or /CH- (17), /CH+ (27) button on the remote
control, while listening to move to the previous or next track.
Note:
- The player may not support some USB devices, this is due to the incompatibility of some processors.
- To avoid harmful interference, always connect USB devices directly to the unit, do not use extension
cables.
- From the computer format the USB memory in FAT (16 or 32).
RECHARGE OF EXTERNAL DEVICES
The device can also be used to charge external devices such as smartphones, MP3 players, etc...
Make sure that the voltage and current supplied by the device are correct for the device to recharge.
Connect the external device to the USB CHARGE (11) jack.
BLUETOOTH
1. Turn on the unit and press the M button (7) on the unit repeatedly, or press the MODE button (24)
on the remote control and select the BLUETOOTH function;
2. The "bt" word will appear on the display and the system will automatically enter pairing mode with
external devices;
3. Activate the Bluetooth functionality on the external device to be paired and start searching for the
devices. At the end select the "XT 10A8 BT" device;
4. Enter the "0000" password if required;
5. Once paired, a short confirmation tone will sound;
6. Press (2) button on unit, or
(29) button on the remote control to start playback; press it
again to stop playback temporarily
;
7. Press (3) or (6) button on the unit, or /CH- (17), /CH+ (27) button on the remote
control, while listening to move to the previous or next track.
AUX-IN INPUT
- Use a 3.5mm Stereo jack cable or an RCA cable to connect the AUX-IN inputs (14 and 15), located
behind the unit, to the audio output of the TV, DVD or another device/source;
1. Press the "Power" button to turn the speaker on;
2. Press the M button (7) on the unit repeatedly, or press the MODE button (24) on the remote control
and select AUX-In mode:
3. Use the controls on the connected device to begin playing music.
ENGLISH

14
XT 10A8 BT
TROUBLESHOOTING
If the Soundbar does not work properly, check this short list before taking it to a TREVI authorised
service centre.
In any case, do not try to repair the device, this will void the warranty. Only TREVI authorised service
centres are authorised to perform operations on this product.
No Sound:
- Check if MUTE function on AUX mode, or PAUSE function on USB or Bluetooth mode, are enabled.
- Check that the correct input has been selected.
- Check and adjust the volume of the Soundbar and the TV (or the device connected).
The unit does not turn on or turns off automatically:
- Check that you have properly connected the adapter jack.
Pairing problems with Bluetooth devices:
- If the audio quality is poor after pairing Bluetooth with an external device, bring the external device
closer to the tower or remove any obstructions between them.
- If the connection between the tower and the device does not occur, check that the coupling function
of the device is enabled; refer to the device manual to enable the function.
- If the coupling with the external device is activated and deactivated continuously, bring the external
device closer to the tower or remove any obstacle between them. In some external devices, the
Bluetooth pairing can be switched off automatically to safeguard the consumption of its battery, this
is not a malfunction of the device.
I can't find the Bluetooth name of this unit on my Bluetooth device for Bluetooth pairing:
- Ensure that the unit is switched on.
- Ensure that the Bluetooth function is activated on your Bluetooth device.
The device does not react to any operation:
- Disconnect the power cable from the device for 30 seconds to reset it.
ENGLISH

15
XT 10A8 BT
TECHNICAL FEATURES
Power source:.......................................... 100-240V 50-60Hz
Stand-by consumption:............................ <0,5W
Output power:.......................................... 60W (
15W x2 + 30W Sub-woofer)
Speaker drives:........................................ 3x 3inch +1x 5inch
FM Radio band reception: ....................... 87,5MHz - 108MHz
Bluetooth power transmission: ................ 0,8mW
Bluetooth transmission: ........................... 2,4GHz
Unit size:.................................................. 120x200x1000mm
Base size:................................................ 230x150x9,5mm
Weight: .................................................... 5,9Kg
ENGLISH

16
XT 10A8 BT
NOTES D’EMPLOI
Cet appareil est un instrument électronique de haute précision; évitez donc de l’utiliser dans les cas
suivants:
• Placer l'appareil sur une surface plane.
• Placer l'appareil de sorte que ses côtés, il y a toujours assez d'espace pour l'air de circuler librement
(au moins 10cm).
• Ne placez rien sur le dessus de l'appareil.
• L'appareil ne doit pas être exposé à des éclaboussures d'eau. Aucun objet rempli de liquide, comme
des vases, doivent être placés sur l'appareil.
• Si des liquides pénètrent à l'intérieur du dispositif immédiatement débrancher la fiche de la prise et
le prendre au centre de service le plus proche autorizato TREVI.
• Aucune source de flamme nue, telle que des bougies allumées, doivent être placés sur.
• Les câbles doivent être cachés et protégés afin d'éviter d'achoppement de quelqu'un et la chute
conséquente de l'appareil.
• Gardez l'appareil dans les endroits suivants:
à proximité de champs magnétiques;
sources proches de chaleur (radiateurs, fours, lumière directe du soleil, etc...);
zones humides à proximité (les salles de bains, piscines, etc...);
zones poussiéreuses, les zones soumises à de fortes vibrations.
• Débranchez le câble d'alimentation pendant les orages ou de longues périodes d'inactivité.
• Demandez à la bonne utilisation des enfants et des personnes avec peu de connaissance du produit.
• Pendant les phases de réglages d'installation et de volume, ne portez pas le haut-parleur d'oreille
et en particulier de garder le volume au minimum dans la phase d'allumage.
• Écoutez à un volume élevé pendant une longue période, peut endommager votre ouïe.
• Conservez le mode d'emploi ci-dessous.
MANIEMENT ET ENTRETIEN
Pour le nettoyage, il est conseillé d’utiliser un chiffon doux légèrement humide. Évitez l’emploi de solvants
ou de substances abrasives.
IMPORTANT
La bonne fabrication de cet appareil garantit un fonctionnement parfait pour une longue période. Si
toutefois quelques inconvénients devaient se présenter, adressez-vous au Centre d’Assistance agréé
TREVI le plus proche.
TREVI observe une politique de recherche et de développement continus. C’est pourquoi ses produits
peuvent présenter des caractéristiques différentes par rapport à celles qui sont décrites.
MONTAGE DE BASE
1. Tournez la tour et localisez les trous (sur le côté opposé du clavier);
2. Placez la base, en essayant de faire correspondre les trous de la tour
et ceux de la base;
3. Insérez les vis dans les trous et fixez-les en les tournant dans le sens
des aiguilles d'une montre;
4. Ne serrez pas trop les vis pour éviter d'endommager le boîtier.
FRANÇAIS
Pouréviterd'éventuelsdommagesauditifs, n'écoutez pas àdesniveauxdevolumeélevés
pendant de longues périodes.

17
XT 10A8 BTFRANÇAIS
DESCRIPTIONS DU PANNEAU SUPÉRIEUR ET DU PANNEAU ARRIÈRE
1
2
36
7
13
12
4 5
14
15
1. Supporte les périphériques externes.
2. Bouton : lecture/pause.
3. Bouton : sélection la piste précédente.
4. Bouton MUTE.
5. Bouton EQ.
6. Bouton : sélection la piste suivante.
7. Bouton M: sélection de la fonction.
8. VOLUME.
9. Entrée de carte SD.
10. Prise USB pour la lecture de fichiers audio.
11. PriseUSB CHARGE pour charger desappareilsexternes
(5V, 1A).
12. Prise de courant.
13. Bouton POWER ON/OFF, marche/arrêt.
14. Prise AUX-IN via une entrée jack 3,5 mm.
15. Prise AUX-IN via l'entrée RCA.
8
9 10 11

18
XT 10A8 BT
CONNEXION À L'ALIMENTATION
Branchez le cordon d'alimentation dans la prise (12) de l'appareil et branchez-le sur une prise de courant.
FONCTION BASIQUE
MARCHE/ARRÊT
Appuyez sur l'interrupteur POWER ON/OFF (13) et tournez-le sur la position "I" pour allumer l'appareil.
Appuyez sur l'interrupteur POWER ON/OFF (13) et tournez-le sur la position "0" pour éteindre l'appareil.
FONCTION DE VEILLE
1. Appuyez sur le bouton (16) de la télécommande pour allumer l'appareil.
2. Appuyez sur le bouton (16) de la télécommande pour mettre l'appareil en mode Stand-by.
SÉLECTION DE LA FONCTION
Pour changer le mode de fonctionnement, appuyez plusieurs fois sur le bouton M (7) de l'appareil ou
appuyez plusieurs fois sur le bouton MODE (24) de la télécommande.
RÉGLAGE DU VOLUME
Tournez le bouton (8) sur l’appareil ou utilisez les bouton VOL + /VOL - (25) de la télécommande pour
augmenter ou diminuer le volume de l’appareil.
FONCTION RADIO
RECHERCHE AUTOMATIQUE
1. Allumez l'appareil et appuyez plusieurs fois sur la touche M (7) de l'appareil ou appuyez sur la tou-
che MODE (24) de la télécommande pour sélectionner la fonction RADIO (l'indicateur de fréquence
apparaît à l'écran);
2. Maintenez le bouton (2) de l'appareil enfoncé pendant quelques secondes ou appuyez sur le
bouton SEARCH (19) de la télécommande pour lancer la recherche automatique des stations (la radio
commence à rechercher des stations de radio et les enregistre automatiquement dans la mémoire).
Le nombre de stations mémorisées dépend du signal radio de votre région. L'appareil peut stocker
jusqu'à 80 stations;
3. Appuyez sur la touche (3) ou (6) de l'appareil, ou sur les touches / CH- (17), / CH
+ (27) de la télécommande pour sélectionner le canal radio suivant ou précédent.
FRANÇAIS
TELECOMMANDE
16
18
19
22
29
24
26
27
28
23
17
21 25
20
16. Bouton : marche/veille.
17. Bouton /CH-: sélection de la piste précédente.
18. Bouton FOLDER.
19. Bouton SEARCH: sauvegarde automatique des stations de
radio.
20. Clés numériques.
21. Bouton MUTE.
22. Bouton EQ: pré égalisation.
23. Bouton REPEAT: fonction de répétition.
24. Bouton MODE: sélection de la fonction.
25. Bouton VOL +/VOL - : Réglage du volume.
26. Bouton TUN +/TUN - Réglage de la radio.
27. Bouton /CH+: sélection de piste suivante.
28. Bouton : Arrêt.
29. Bouton : lecture/pause.

19
XT 10A8 BT
- Si le signal de la chaîne n’est pas bon, vous pouvez l’affiner en appuyant sur la touche TUN +/ TUN
- (26) de la télécommande pour régler le signal.
Remarque: Veuillez vous assurer que l'antenne FM a été complètement étendue.
ENTRÉE USB/CARTE MICRO SD
1. Insérez une mémoire USB dans la prise (10) ou une carte SD dans la fente pour carte (9);
2. Allumez l'appareil, la lecture des plages commencera automatiquement, si cela ne se produit pas,
appuyez plusieurs fois sur le bouton M (7) de l'appareil et sélectionnez la fonction USB/SD Card, ou
appuyez sur le bouton MODE (24) sur le télécommande;
3. Pour interrompre la lecture, appuyez sur le bouton (2) de l'appareil ou sur le bouton (29)
de la télécommande;
4. Pour reprendre la lecture, appuyez à nouveau sur le bouton ;
5. Appuyez sur la bouton (3) ou (6) de l'appareil ou sur les bouton /CH- (17) ou /CH+
(27) de la télécommande, tout en écoutant pour passer à la piste précédente ou suivante.
Remarque:
- Le lecteur peut ne pas prendre en charge certains périphériques USB, cela est dû à
l'incompatibilité de certains processeurs.
- Pour éviter les interférences nuisibles, connectez toujours les périphériques USB directement
à l'appareil, n'utilisez pas les rallonges.
- Du format informatique, la mémoire USB en FAT (16 ou 32).
RECHARGE DE DISPOSITIFS EXTERNES
L'appareil peut également être utilisé pour charger des appareils externes tels que des smartphones,
des lecteurs MP3, etc...
Assurez-vous que la tension et le courant fournis par l'appareil sont corrects pour que l'appareil puisse
se recharger.
Connectez l'appareil externe à la prise USB CHARGE (11).
BLUETOOTH
1. Allumez l'appareil et appuyez plusieurs fois sur le bouton M (7) de l'appareil ou appuyez sur le bouton
MODE (24) de la télécommande et sélectionnez la fonction BLUETOOTH;
2. Le mot "bt" apparaîtra à l'écran et le système entrera automatiquement en mode de couplage avec
des périphériques externes;
3. Activez la fonctionnalité Bluetooth sur l'appareil externe à jumeler et démarrez la recherche des
appareils. A la fin, sélectionnez l'appareil "XT 10A8 BT";
4. Entrez le mot de passe "0000" si nécessaire;
5. Une fois jumelé, une courte tonalité de confirmation retentira;
6. Appuyez sur le bouton (2) de l'appareil ou sur le bouton
(29) de la télécommande pour
démarrer la lecture; appuyez à nouveau pour arrêter la lecture temporairement;
7. Appuyez sur le bouton (3) ou (6) de l'appareil, ou sur le bouton /CH- (17) ou /CH+
(27) de la télécommande, tout en écoutant pour passer à la piste précédente ou suivante.
ENTRÉE AUX-IN
- Utilisez un câble jack stéréo 3,5mm ou un câble RCA pour raccorder les entrées AUX-IN (14 et 15)
situées derrière l'appareil à la sortie audio du téléviseur, du lecteur DVD ou d'un autre appareil/source;
1. Allumez l'unité;
2. Appuyez plusieurs fois sur le bouton M (7) de l'appareil ou appuyez sur le bouton MODE (24) de la
télécommande et sélectionnez la fonction AUX;
3. Ajustez le périphérique externe à partir de ses commandes, le signal présent sur l'entrée AUX-IN
sera automatiquement reproduit.
FRANÇAIS

20
XT 10A8 BT
PROBLÈMES ET SOLUTIONS
Si votre Soundbar ne fonctionne pas correctement, lisez attentivement cette liste avant de confier l'ap-
pareil à un centre d’assistance agréé TREVI.
De toute façon, ne cherchez pas à réparer vous-mêmes l’appareil, car la garantie ne serait plus valable.
Seuls les centres d'assistance technique TREVI sont autorisés à effectuer des interventions sur cette
Soundbar.
Pas de son:
- Vérifiez que la fonction MUTE sur mode AUX, ou fonction de PAUSE sur USB ou Bluetooth mode,
sont activés.
- Vérifiez que l'entrée correcte a été sélectionnée.
- Vérifiez et réglez le volume de la Soundbar et du téléviseur (ou de l'appareil connecté).
L'appareil ne s'allume pas ou ne s'éteint pas automatiquemen:
- Vérifiez que vous avez correctement connecté la prise de l'adaptateur.
Jumelage des problèmes avec les appareils Bluetooth:
- Si la qualité audio est médiocre après le jumelage de Bluetooth avec un appareil externe, rapprochez
l'appareil externe de la tour ou éliminez toute obstruction entre eux.
- Si la connexion entre la tour et l'appareil ne se produit pas, vérifiez que la fonction de couplage de
l'appareil est activée; reportez-vous au manuel du périphérique pour activer la fonction.
- Si le couplage avec l'appareil externe est activé et désactivé en permanence, rapprochez l'appareil
externe de la tour ou éloignez tout obstacle entre eux. Dans certains appareils externes, l'appariement
Bluetooth peut être automatiquement désactivé pour protéger la consommation de sa batterie, il ne
s'agit pas d'un dysfonctionnement de l'apparei.
L'appareil ne s'allume pas:
- Assurez-vous que l'appareil est allumé.
- Assurez-vous que la fonction Bluetooth est activée sur votre appareil Bluetooth.
Les commandes ne répondent pas:
- Débranchez le câble d'alimentation de l'appareil pendant 30 secondes pour le réinitialiser.
FRANÇAIS
Table of contents
Languages:
Other Trevi Speakers manuals

Trevi
Trevi XR 130 BT User manual

Trevi
Trevi SR 8410BT User manual

Trevi
Trevi X Jump XJ 90 User manual

Trevi
Trevi XF 4000 DJ User manual

Trevi
Trevi XR 8A15 User manual

Trevi
Trevi XR 82 BT User manual

Trevi
Trevi XR 9A5 User manual

Trevi
Trevi XP 72 BT User manual

Trevi
Trevi SH 8420 BT User manual

Trevi
Trevi XR 200 BT User manual

Trevi
Trevi SB 8312 TV User manual

Trevi
Trevi XR 8A12 User manual

Trevi
Trevi AVX 530 BT User manual

Trevi
Trevi XT 101 BT User manual

Trevi
Trevi AVX 570 S2 User manual

Trevi
Trevi XB 75 BT User manual

Trevi
Trevi AVX 565 User manual

Trevi
Trevi AVX 575 BT User manual

Trevi
Trevi XR 85 BT User manual

Trevi
Trevi XF 500 User manual