TRU-BLU K9000 2.0 User manual
K9000 2.0 Twin Dog Wash
Operators Manual
© Copyright 2016, Tru Blu Dog Wash, All rights reserved. K9000® is a registered trademark
of Tru Blu Dog Wash.

Z:\Build\K9000 2.0 Twin\K9000 2.0 Twin Operators Manual July 2019 v1.0.docx Page ii
Last edited 16/11/2016
© Tru Blu Dog Wash 2016
© Copyright 2016, Tru Blu Dog Wash, All rights reserved. K9000® is a registered trademark
of Tru Blu Dog Wash.
All requests and enquiries regarding the use of, and availability of this manual are to be
directed to:
Tru Blu Dog Wash
Factory No. 1
34 Caramut Road
Warrnambool
Victoria 3280
Australia
Tel: +61 (0)3 5562 9088
Fax: +61 (0)3 5562 9022
Email: [email protected]m.au
Website: www.trubludogwash.com.au
www.findadogwash.com

Z:\Build\K9000 2.0 Twin\K9000 2.0 Twin Operators Manual July 2019 v1.0.docx Page iii
Last edited 16/11/2016
© Tru Blu Dog Wash 2016
Explanation of symbols used in this manual
Warning
Tip
Important - Take note
Regulatory Compliance Mark
Electrical Hazard
European Conformity
Date
Summary of Changes
Sections Changed
/Added
Author/s
Version
13/02
/201
9
New
Manual
All
Phil Worrell
V
1.0
Version
1.0
Status
Published
Date
1
5/07
/2019
Author/s
Phil Worrell
Build Approver
Darryn Polack
Sales Approver
Tim
Darmanin

Z:\Build\K9000 2.0 Twin\K9000 2.0 Twin Operators Manual July 2019 v1.0.docx Page iv
Last edited 16/11/2016
© Tru Blu Dog Wash 2016
Table of Contents
1 K9000 2.0 Twin Inspection and Acceptance on Delivery: ............................................... 6
1.1 K9000 2.0 Twin System Specifications .................................................................... 7
2 Installation ...................................................................................................................... 8
2.1 Assembling the Dog Wash .....................................................................................10
2.2 Levelling and Positioning the Dog Wash ................................................................13
2.3 Connecting the Water Supply and Waste connection to the Dog Wash. .................14
2.3.1 Connecting the Water Supply ..........................................................................14
2.3.2 Adjusting the Water Pressure ..........................................................................15
2.3.3 Hot Water ........................................................................................................16
2.3.3.1 Site Supplied Hot Water ...........................................................................16
2.3.3.2 On Board Instantaneous Hot Water Unit ..................................................17
2.3.4 Connecting the Waste .....................................................................................20
2.3.4.1 Existing Sites ...........................................................................................20
2.3.4.2 New Sites .................................................................................................20
2.3.5 Back Flow Protection Device ...........................................................................21
2.4 Connecting the Power – For Your Electrician .........................................................21
2.5 Completing the Installation .....................................................................................23
3 Commissioning the Unit.................................................................................................24
4 Main Board Components ...............................................................................................25
4.1 Dog Wash Main Board with Iwaki EJ Series Pumps ...............................................25
4.1.1 Control Module ................................................................................................26
4.1.2 Product Dosing Pump Factory Settings (Iwaki EJ Series Pumps) ...................27
4.1.3 Bleeding Product Dosing Pumps (Iwaki - EJ Series Pumps) ...........................28
4.1.4 Iwaki Dosing Pump – EJ Series Exploded View ..............................................29
5 Approved Products ........................................................................................................30
6 Water Temperature .......................................................................................................31
6.1 K9000 2.0 Twin with Site Supplied Hot Water ........................................................31
6.2 K9000 2.0 Twin with On Board Hot Water Unit .......................................................32
7 Cash Box Components .................................................................................................33
7.1 Coin, Note & Credit Card Box with highlighted components ...................................33
7.2 Coin Acceptor – Coin Activation .............................................................................34
7.3 Coin Acceptor – Removal .......................................................................................36
7.4 Coin Acceptor Cleaning ..........................................................................................37
8 Note Acceptor (Mei) ......................................................................................................38
8.1 Note Acceptor Fault Codes ....................................................................................38
8.2 Note Acceptor Removal .........................................................................................39
8.3 Note Acceptor Cleaning .........................................................................................40

Z:\Build\K9000 2.0 Twin\K9000 2.0 Twin Operators Manual July 2019 v1.0.docx Page v
Last edited 16/11/2016
© Tru Blu Dog Wash 2016
9 Note Acceptor (GBA ST1) .............................................................................................41
9.1 Cassette Fitting / Removal .....................................................................................41
9.2 Cleaning the Validator Note Path ...........................................................................42
9.3 Clearing a Note Jam...............................................................................................43
9.4 Troubleshooting .....................................................................................................44
10 Dryer ..........................................................................................................................45
10.1 By-Pass Dryer - Operation (Summer/Winter)..........................................................45
10.2 Heated Dryer - Operation (Heat Settings) ...............................................................46
10.3 Dryer Hose Connection ..........................................................................................47
11 Override Key (Wash down Key) .................................................................................48
12 Dog Wash K9000ECU Board Operating & Service Menu Programming Instructions .49
12.1 Service Menus .......................................................................................................49
12.1.1 Service Menu 1: PROGRAM MODE ...............................................................50
12.1.2 Service Menu 2: TEST ....................................................................................51
12.1.3 Service Menu 3: AUDIT ...................................................................................52
12.1.4 Service Menu 4: INFO .....................................................................................52
12.1.5 Service Menu 5: IMPORT ...............................................................................52
12.1.6 Service Menu 6: EXPORT ...............................................................................52
13 Floor Lifting Tool ........................................................................................................53
14 Operator Maintenance ...............................................................................................54
14.1 Maintenance Schedule ...........................................................................................54
14.2 External Maintenance Items ...................................................................................56
14.3 Dryer Maintenance .................................................................................................57
14.4 Cleaning .................................................................................................................58
15 General Information ...................................................................................................61
15.1 Canine parvovirus ..................................................................................................61
15.2 Instruction “How to Videos” ....................................................................................61
16 MSDS Attachments ...................................................................................................62
16.1 Material Safety Data Sheet (MSDS) Fido’s Everyday Shampoo .............................62
16.2 Material Safety Data Sheet (MSDS) Fido’s Crème Conditioner ..............................62
16.3 Material Safety Data Sheet (MSDS) Fido’s Fre-Itch Rinse Concentrate .................62
16.4 Material Safety Data Sheet (MSDS) Fido’s Hydrobath Flush ..................................62
17 Maintenance Record ..................................................................................................63
Z:\Build\K9000 2.0 Twin\K9000 2.0 Twin Operators Manual July 2019 v1.0.docx Page 6
Last edited 16/11/2016
© Tru Blu Dog Wash 2016
1
K9000 2.0 Twin Inspection and Acceptance on Delivery:
Inspect the K9000 2.0 Twin on arrival and prior to unwrapping to ensure there is no travel
damage. If there is any damage, please contact Tru Blu Dog Wash before accepting delivery.
The K9000 Twin Dog Wash is delivered in two parts with a total weight of approximately
350kg. The larger of the two parts weighs approximately 260kg and measures 2200mm in
length, 1850mm in height & 600mm in depth. The smaller of the two parts weighs
approximately 90kg and measures 1500mm in length, 1850mm in height & 600mm in depth.
Ensure a qualified operator of the unloading equipment is used to lift or move the Dog Wash.
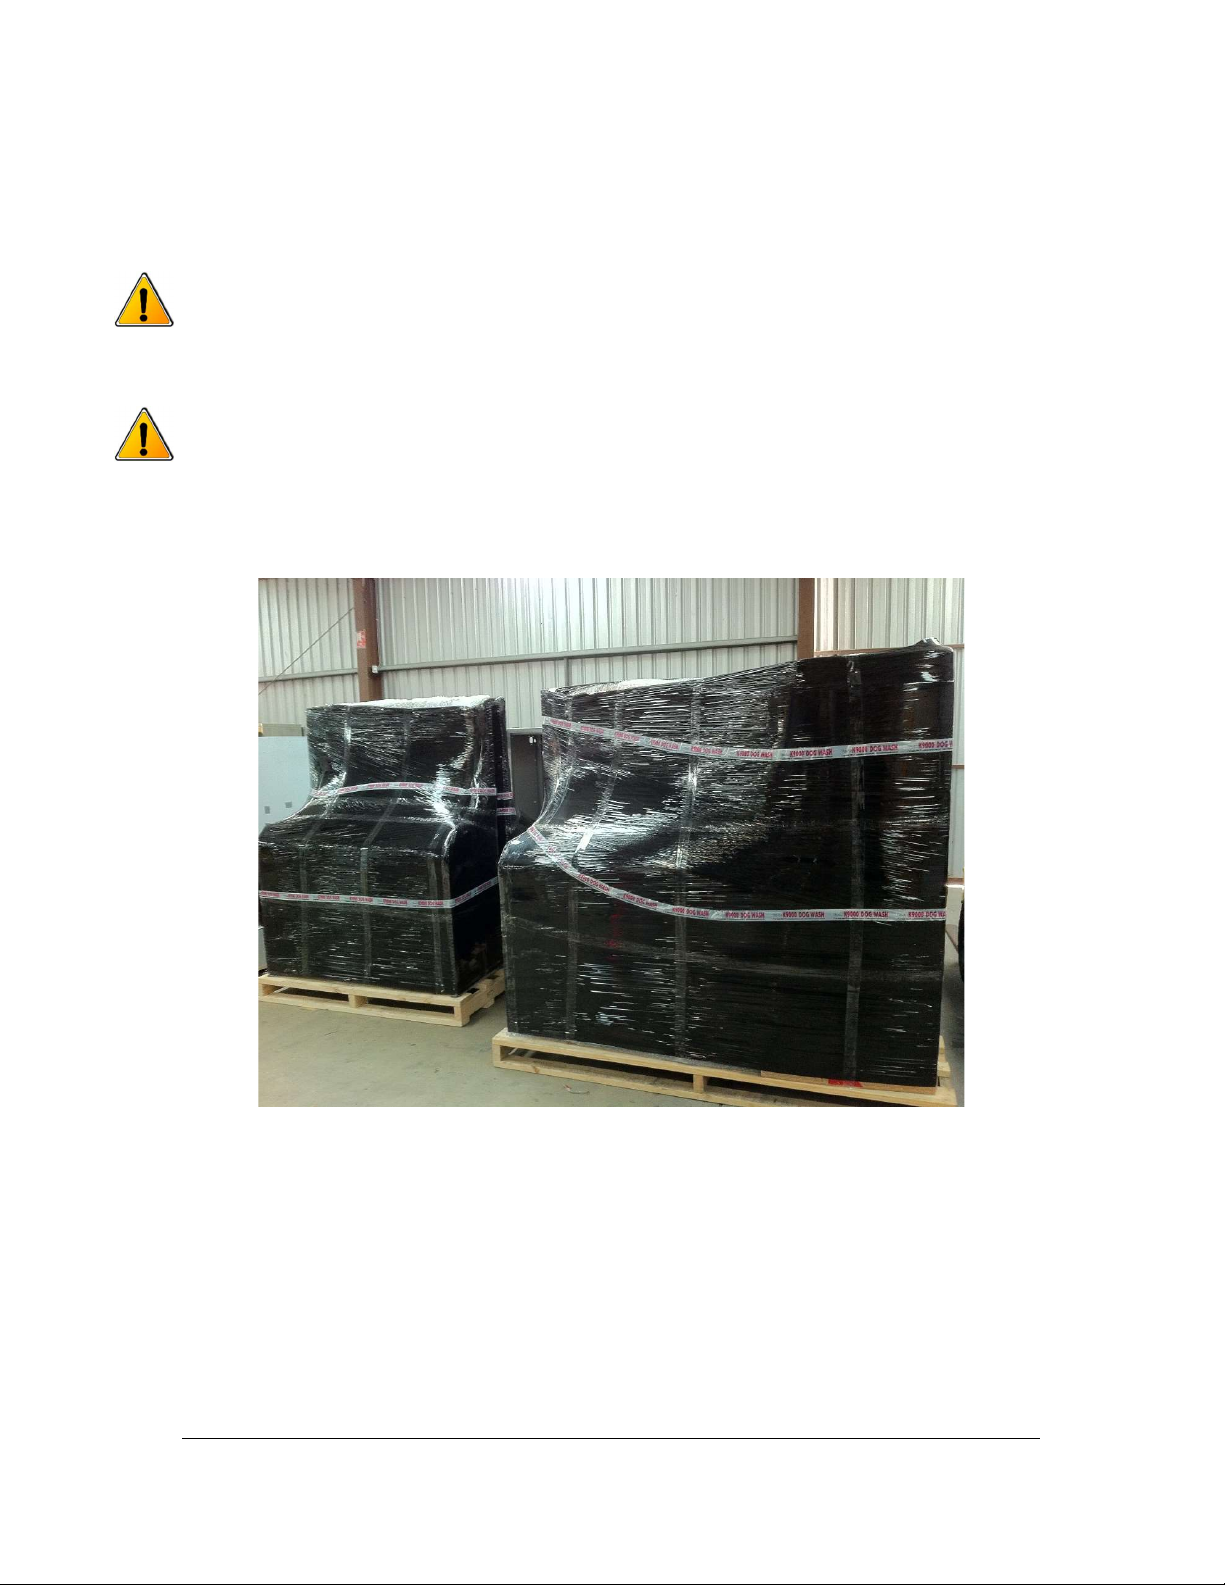
Each of the two parts of the Dog Wash (Within Australia) are first bubble wrapped and then
wrapped in black plastic cargo wrap. They are secured to individual pallets with a tie down
strap over the cabinet and 6 screws (4 screws for the smaller part).
Position the Dog Wash while on the pallets near their final location. The larger section of the
Dog Wash goes to the left-hand side, with the highest point being the back of the Dog Wash.
Take caution removing the plastic and bubble wrap avoid using a knife as it may scratch the
stainless steel or decals. With a screw gun remove the screws from the feet and the tie down
straps.
A second inspection should be undertaken to ensure no damage has occurred during travel.

Z:\Build\K9000 2.0 Twin\K9000 2.0 Twin Operators Manual July 2019 v1.0.docx Page 7
Last edited 16/11/2016
© Tru Blu Dog Wash 2016
1.1 K9000 2.0 Twin System Specifications
SYSTEM WITHOUT ON BOARD HOT WATER UNIT
Power 240V 25 AMP
WATER Inlet Pressure (Min)
40psi / 275kpa
Hot
½
” Ball valve
Cold
½
” Ball
valve
WATER Inlet Pressure (Max)
72psi / 500kpa
Hot
½
” Ball valve
Cold
½
” Ball valve
COLD WATER Inlet temperature
Minimum
5 Degrees Celsius
Maximum
30 Degrees Celsius
HOT WATER Inlet temperature Minimum 55 Degrees Celsius
Maximum
6
5
Degrees Celsius
Factory Set water temperature
35 Degrees Celsius at wash gun
WATER Maximum Operating Pressure
50psi / 350kpa
Factory set via water regulator
FILTRATION x2 Primary Stainless steel mesh filter
Secondary
Vinidex DBA Lic. No.
WMKA20071
Back Flow Prevention Device Connections to be protected by a “high hazard” backflow prevention device. i.e.
“RPZ” or Registered “Air-GAP” Recommended Watts 009M3-AUS RP 15 or
20mm AS2845.1 Lic WMKA1335
WASTE x2 50mm DIA Outlets as well as, a minor trade waste application to be made to the
local water regulator (Contact your local water authority trade waste division)
SYSTEM WITH ON BOARD HOT WATER UNIT
Power Unit 240V 25 AMP
Power Hot Water
Stiebel Eltron DHB
-
E 27 AU
415V 40 AMP
WATER Inlet Pressure (Min)
40psi / 275kpa
Cold ¾” Ball valve
WATER Inlet Pressure (Max)
72
psi /
5
00kpa
Cold ¾” Ball valve
COLD WATER Inlet temperature
Minimum
5 Degrees Celsius
Maximum
30 Degrees Celsius
Factory Set water temperature 35 Degrees Celsius at wash gun
WATER Maximum Operating Pressure
50psi / 350kpa
Factory set via water regulator
FILTRATION x2
Primary
Stainless steel mesh filter
Secondary
Vinidex DBA Lic. No. WMKA20071
Back Flow Prevention Device Connections to be protected by a “high hazard” backflow prevention device. i.e.
“RPZ” or Registered “Air-GAP” Recommended Watts 009M3-AUS RP 15 or
20mm AS2845.1 Lic WMKA1335
WASTE x2 50mm DIA Outlet as well as, a minor trade waste application to be made to the
local water regulator (Contact your local water authority trade waste division)
DIMENSIONS / WEIGHT
Dimensions
Length
3
7
00
mm / Height 1850mm / Depth 600mm
Weight
Left Hand Side 260
kg
–
Right Hand Side 90kg (Total weight 350kg)
APPROVALS
Risk assessment performed by IAPMO (NATA accredited laboratory)
IEC 61000-6-3:2006 Electromagnetic compatibility (EMC) – Part 6.3: Generic standards – Emission standard for residential,
commercial and light
-
industrial environments
AS/NZS 60335.2.75:2005 + Admt 2009 in relation to vending machines AS 60204.1:2005 ‘Safety of machinery – Electrical
equipment of machines, General Requirements’
IEC 61000-6-1: 2005 Electromagnetic compatibility (EMC) Generic standards. Immunity for residential, commercial and light-
industrial environments
.
ATS 5200.101:2005
–
Strength of
Assembly
EPA Registered Noise tested rating of 66dba @ 4 meters
USAGES
Water usage: 16 to 20 litres per minute, where both units in operation (40
-
50 litres per single dog wash)
Average power usage per wash cycle is .76kwh (dependent on hot water sourc
e)

Z:\Build\K9000 2.0 Twin\K9000 2.0 Twin Operators Manual July 2019 v1.0.docx Page 8
Last edited 16/11/2016
© Tru Blu Dog Wash 2016
2 Installation
The K9000 2.0 Twin Dog Wash (Dog Wash) can be installed either indoor or outdoor.
Caution should be taken when the Dog Wash has been delivered and is
being unloaded. The K9000 2.0 Twin Dog Wash is delivered in two parts with a total weight
of approximately 350kg. The larger of the two parts weighs approximately 260kg and
measures 2200mm in length, 1850mm in height & 600mm in depth. The smaller of the two
parts weighs approximately 90kg and measures 1500mm in length, 1850mm in height &
600mm in depth.
Ensure a qualified operator of the unloading equipment is used to lift or move the Dog Wash.
Inspect the Dog Wash when you receive it to ensure there is no damage. If there is any
damage, please contact Tru Blu Dog Wash before accepting it.
Each of the two parts of the Dog Wash (Within Australia) are first bubble wrapped and then
wrapped in black plastic cargo wrap. They are secured to individual pallets with a tie down
strap over the cabinet and 6 screws (4 screws for the smaller part).
Position the Dog Wash while on the pallets near their final location. The larger section of the
Dog Wash goes to the left-hand side, with the highest point being the back of the Dog Wash.
Take caution removing the plastic and bubble wrap avoid using a knife as it may scratch the
stainless steel or decals. With a screw gun remove the screws from the feet and the tie down
straps.
Inside the cabinet you will find an Install Pack, open and verify the parts against the check
list. There will also be an operator’s manual, product MSDS’s and product order forms in a
purpose built sleave within the cabinet.
Z:\Build\K9000 2.0 Twin\K9000 2.0 Twin Operators Manual July 2019 v1.0.docx Page 9
Last edited 16/11/2016
© Tru Blu Dog Wash 2016
It is recommended that the front kicker plate be removed from the left-hand tub prior
to installation and handling as this will allow safer lifting and the required access during
installation. Care should be taken not to damage the plumbing fittings during lifting and
positioning of the unit.
The kicker plate for the right-hand tub can be found in the tub, it will be wrapped for
protection during travel.
It is also recommended that the white film protecting the unit is not removed until after install
as this will help prevent any installation damage.
A 4mm allen key is used
to remove the kicker
plate.
The kicker plate allen
key bolt positions (2 at
each end)

Z:\Build\K9000 2.0 Twin\K9000 2.0 Twin Operators Manual July 2019 v1.0.docx Page 10
Last edited 16/11/2016
© Tru Blu Dog Wash 2016
2.1 Assembling the Dog Wash
You need to assemble the two parts of the K9000 2.0 Twin Dog Wash using the stainless
bolts, washers, nuts and industrial grade silicone which are supplied.
Make sure the assembly occurs as near as possible to the installation point, keeping in mind
you will need to work behind the dog wash to join the 2 sections together. Assembly will be
easier if the units are on an even surface as we need to align guides into the main cabinet
from the wash tub.
Prior to removing the timber framing from the right-hand side wash tub, you will need to place
some type of chock or support to take the weight and keep the parts aligned to make for
easy assembly.
When removing the timber framing you can discard the 2 of the 3 nuts, the bolts are used as
guides passing into the main cabinet. You will notice 2 washes attached to the timber frame
with a screw these are required in assembly. Now remove the four screws (2 with washes)
from the rear of the main cabinet and set these aside as they will be used to join the two
parts.
The photo left shows the timber framing as
shipped, only the nuts are removed with one
being re-used in assembly.
The picture on the right shows the shelf that
the wash tub sits upon as well as the 4 screws
that need to be removed and then re-instated
when the tub & cabinet joined.
The picture below shows the timber framing
removed and the chock/support holding the
part in alignment.
Shelf

Z:\Build\K9000 2.0 Twin\K9000 2.0 Twin Operators Manual July 2019 v1.0.docx Page 11
Last edited 16/11/2016
© Tru Blu Dog Wash 2016
Now that we have the two parts aligned and ready for joining, we need to use the silicone
supplied to water proof the join. The silicone is run down from the top rear of the cabinet and
along the bottom out to the front (along the seams). Refer to the below photo.
Silicone

Z:\Build\K9000 2.0 Twin\K9000 2.0 Twin Operators Manual July 2019 v1.0.docx Page 12
Last edited 16/11/2016
© Tru Blu Dog Wash 2016
The 3 guide bolts from the wash tub, two at the bottom and one at the top are used to guide
the tub into place. Once in position the right-hand tub will sit on the stainless-steel ledge and
the three back plates will align with the 4 pre-drilled holes in the main cabinet (these holes
had the 4 screws removed earlier).
Of the 3 guide bolts, only the front lower bolt is used to secure the tub to the cabinet. Using
the 2 washers and 1 of the 3 nuts removed from the timber frame attach the bolt to the
cabinet. Washers and nut go inside the cabinet.
Using the four screws and 2 washers removed from the back of the cabinet use these to
attach the back of the right-hand tub to the cabinet. The two screws without washers are top
and bottom, while the washers are used in the middle join.
Using 4 of the 5 supplied coach bolts, flat washers and nylon lock nuts (1 spare) attach the
base of the wash tub to the main cabinet.
Two
bottom
guide bolts
Top guide
bolt
Location of screws
joining the tub to the
cabinet, the two centre
screws have the washers.
Front guide
bolt to have
2 washers
and nut
fixed

Z:\Build\K9000 2.0 Twin\K9000 2.0 Twin Operators Manual July 2019 v1.0.docx Page 13
Last edited 16/11/2016
© Tru Blu Dog Wash 2016
Now that the K9000 2.0 Twin Dog Wash is assembled you need to silicone the inside of the
tub where it has been attached to the cabinet.
2.2 Levelling and Positioning the Dog Wash
The Dog Wash needs to be placed in a level horizontal position to operate correctly.
There are 6 adjustable feet and 2 mounting feet, place a level along the back of the Dog
Wash and adjust the feet according to get the Dog Wash Level, place the level along the top
of the cabinet running back to front to make sure it is not tilting forward or backwards.
ENSURE all doors open and close freely before securing the Dog Wash!
Once the Dog Wash is level, use the supplied spacer washes and anchor screws to secure
the Dog Wash to the ground.
Silicone
Base of tub
with 1 of
the 4 bolts
in place
Inside of cabinet
with 1 of the 4
washer & nylon lock
nuts in place

Z:\Build\K9000 2.0 Twin\K9000 2.0 Twin Operators Manual July 2019 v1.0.docx Page 14
Last edited 16/11/2016
© Tru Blu Dog Wash 2016
2.3 Connecting the Water Supply and Waste connection to the Dog Wash.
Before connecting the Dog Wash to Water and Waste ensure local regulations are
considered. Please refer to the installation manual for more detail.
2.3.1 Connecting the Water Supply
Flush the pipes prior to connecting to the DOG WASH. Maximum allowable inlet water
pressure is 72psi (0.5mpa / 500kpa).
The picture at left shows the hot and cold-water entry points for a K9000 2.0 Twin without an
on-board hot water unit. While the picture on the right shows the water entry point for a
K9000 2.0 Twin with an on-board hot water unit.
Cold water
connection
Hot water
connection
Cold water
connection
HW unit

Z:\Build\K9000 2.0 Twin\K9000 2.0 Twin Operators Manual July 2019 v1.0.docx Page 15
Last edited 16/11/2016
© Tru Blu Dog Wash 2016
2.3.2 Adjusting the Water Pressure
Once connected the regulator can be adjusted to ensure the Dog Wash has water
pressure of 50 psi (0.35mpa / 345kpa). Ensure that the waste has been connected
prior to testing, refer section 2.3.2
The below pictures show the pressure gauge for each tub and pressure regulator for the dog
wash (both tubs). You will also see a water pressure setting sticker confirming the settings.
The pressure is increased by turning the screw clockwise or decreased by turning the screw
counter clockwise.
Increase
Decrease
Pressure
Gauges
Pressure
Regulator
Pressure
Setting
Sticker
Z:\Build\K9000 2.0 Twin\K9000 2.0 Twin Operators Manual July 2019 v1.0.docx Page 16
Last edited 16/11/2016
© Tru Blu Dog Wash 2016
2.3.3 Hot Water
Hot water can be sourced from the site or the dog wash can include an on-board hot water
service.
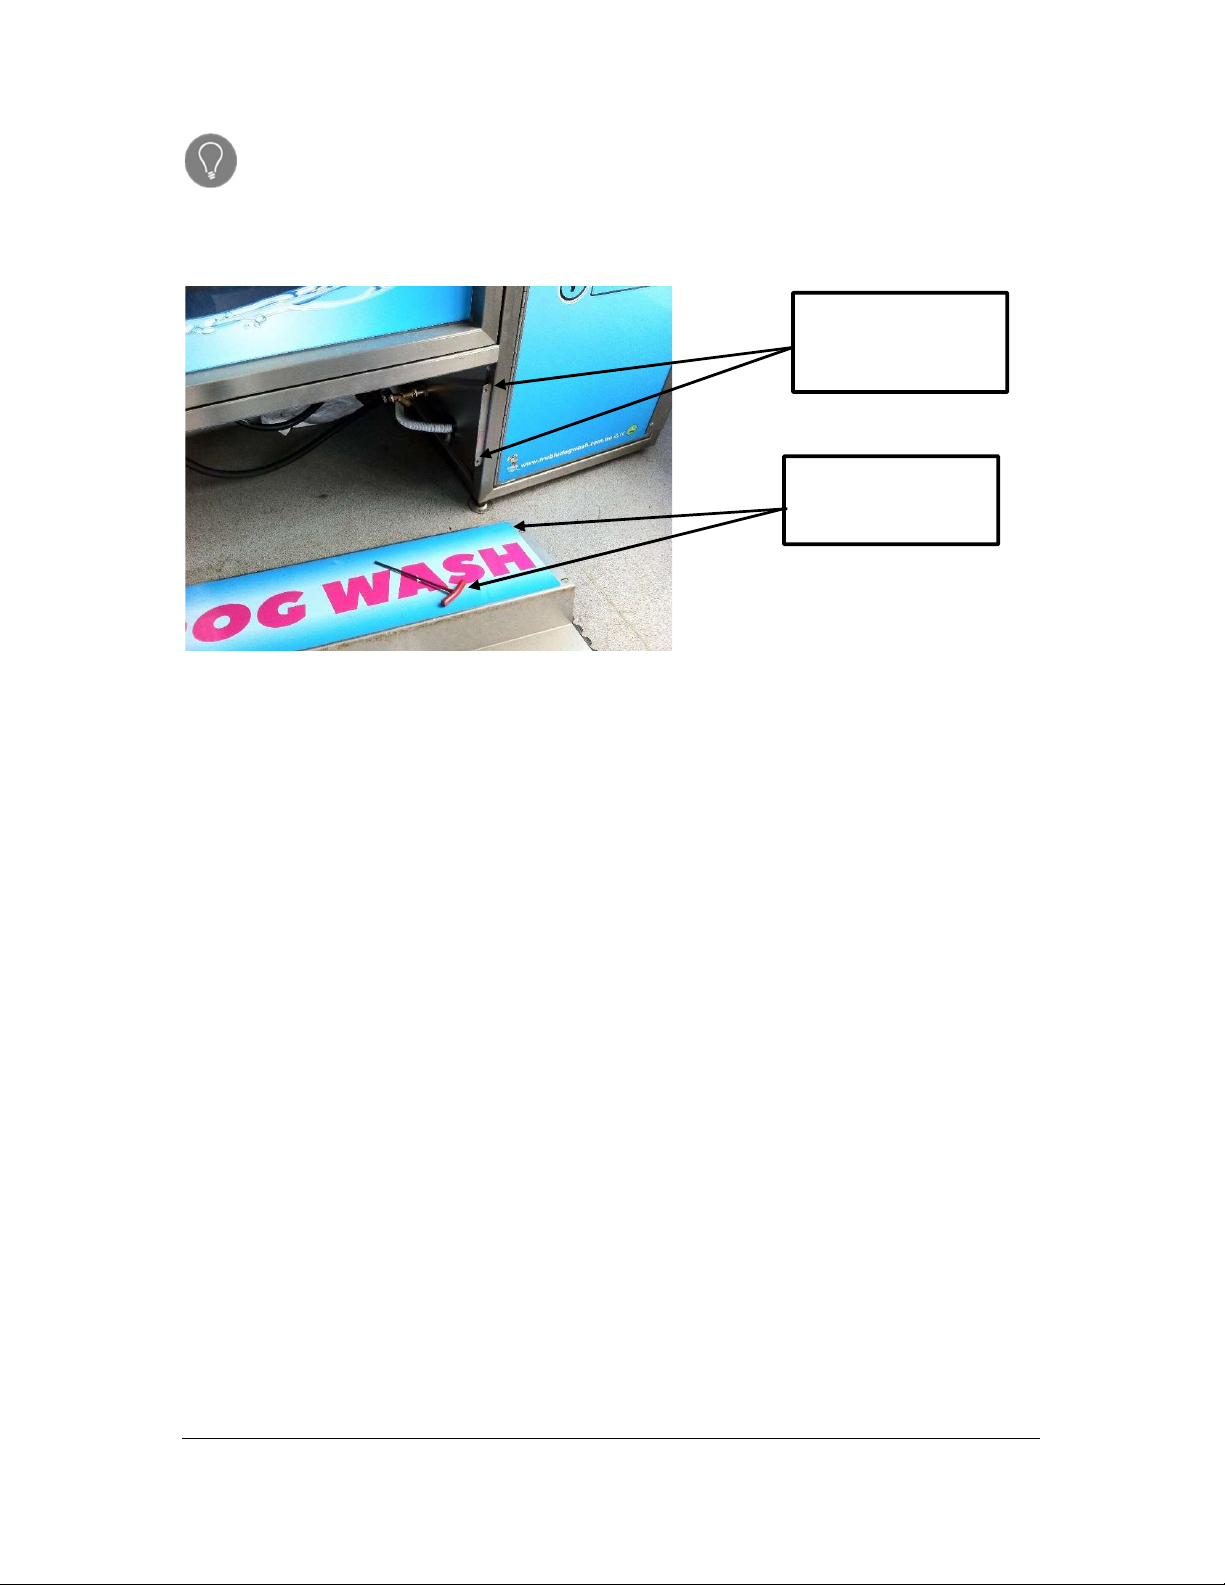
2.3.3.1 Site Supplied Hot Water
Shown below is a K9000 2.0 Twin that was installed at a site that supplied HOT water, and
as such the unit did not require to have an on-board hot water service.
*Please consult with Tru Blu Dog Wash to ensure your existing hot water supply is adequate.
Hot Water Cold Water
Approximately
150 to 200mm
above ground
level – needs
to fit below
bottom of dog
wash

Z:\Build\K9000 2.0 Twin\K9000 2.0 Twin Operators Manual July 2019 v1.0.docx Page 17
Last edited 16/11/2016
© Tru Blu Dog Wash 2016
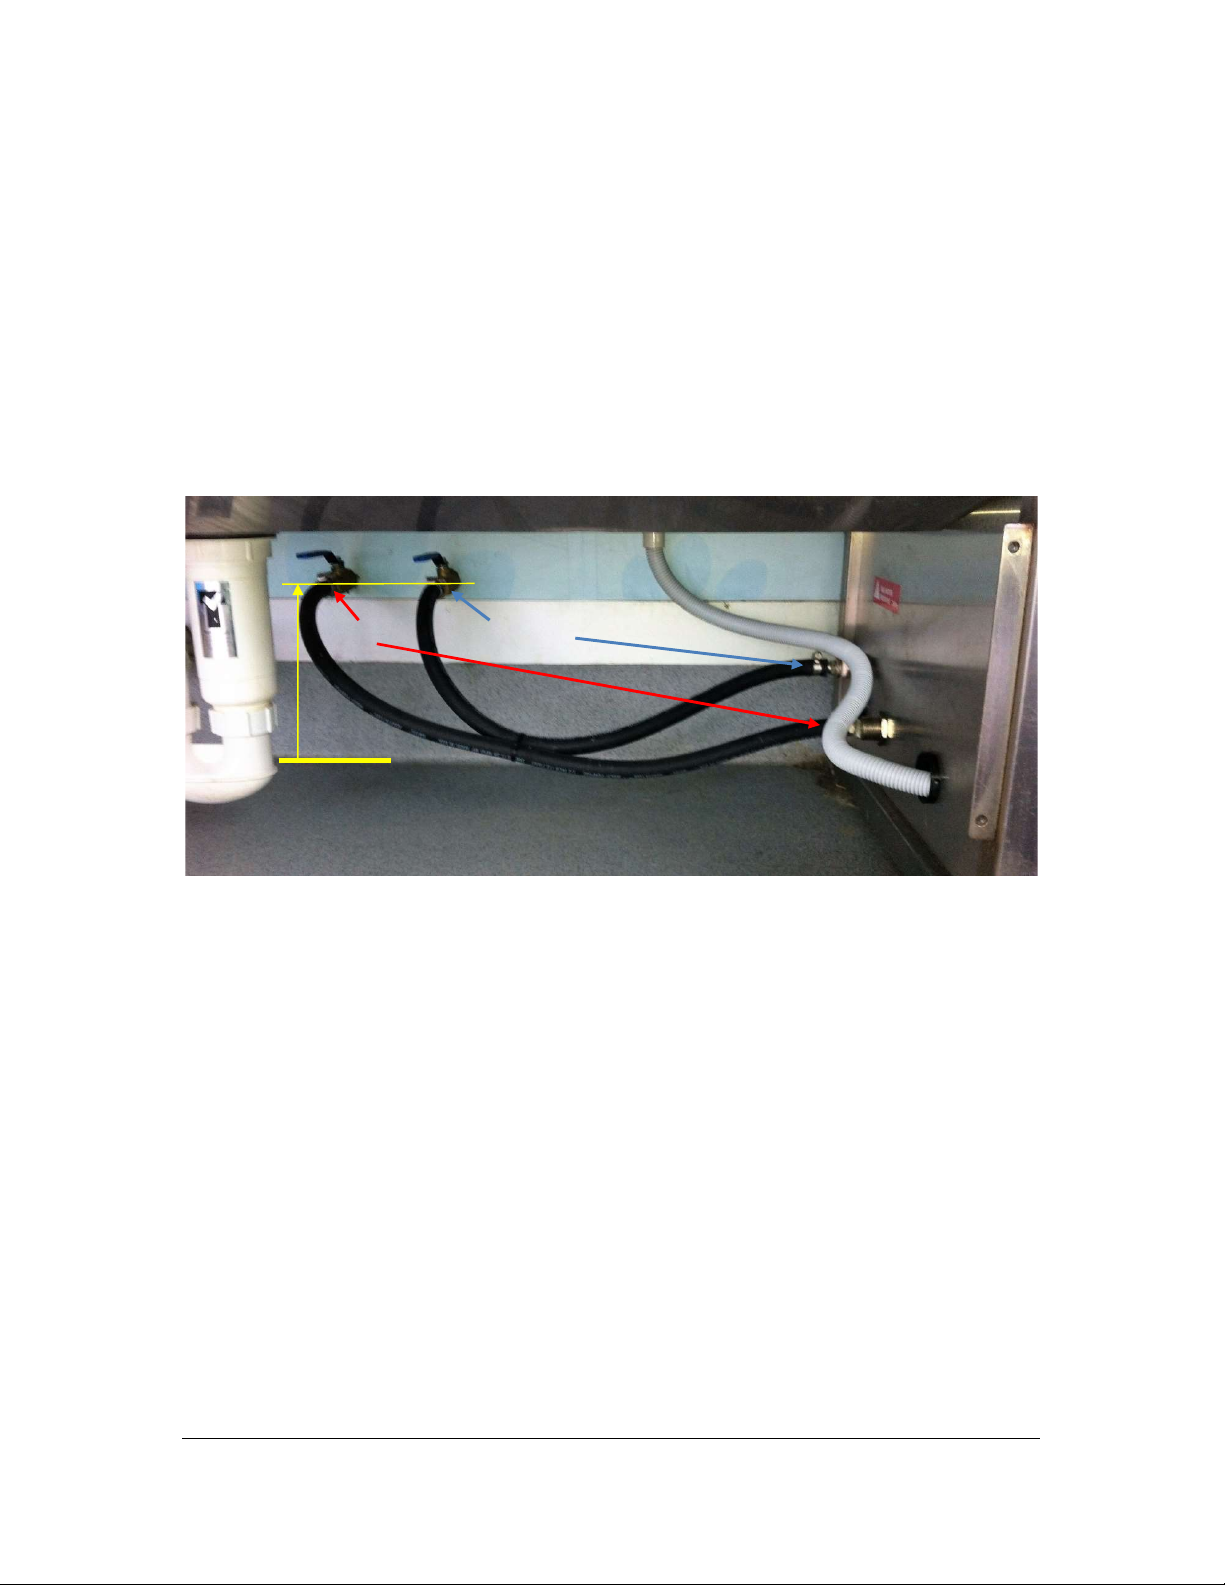
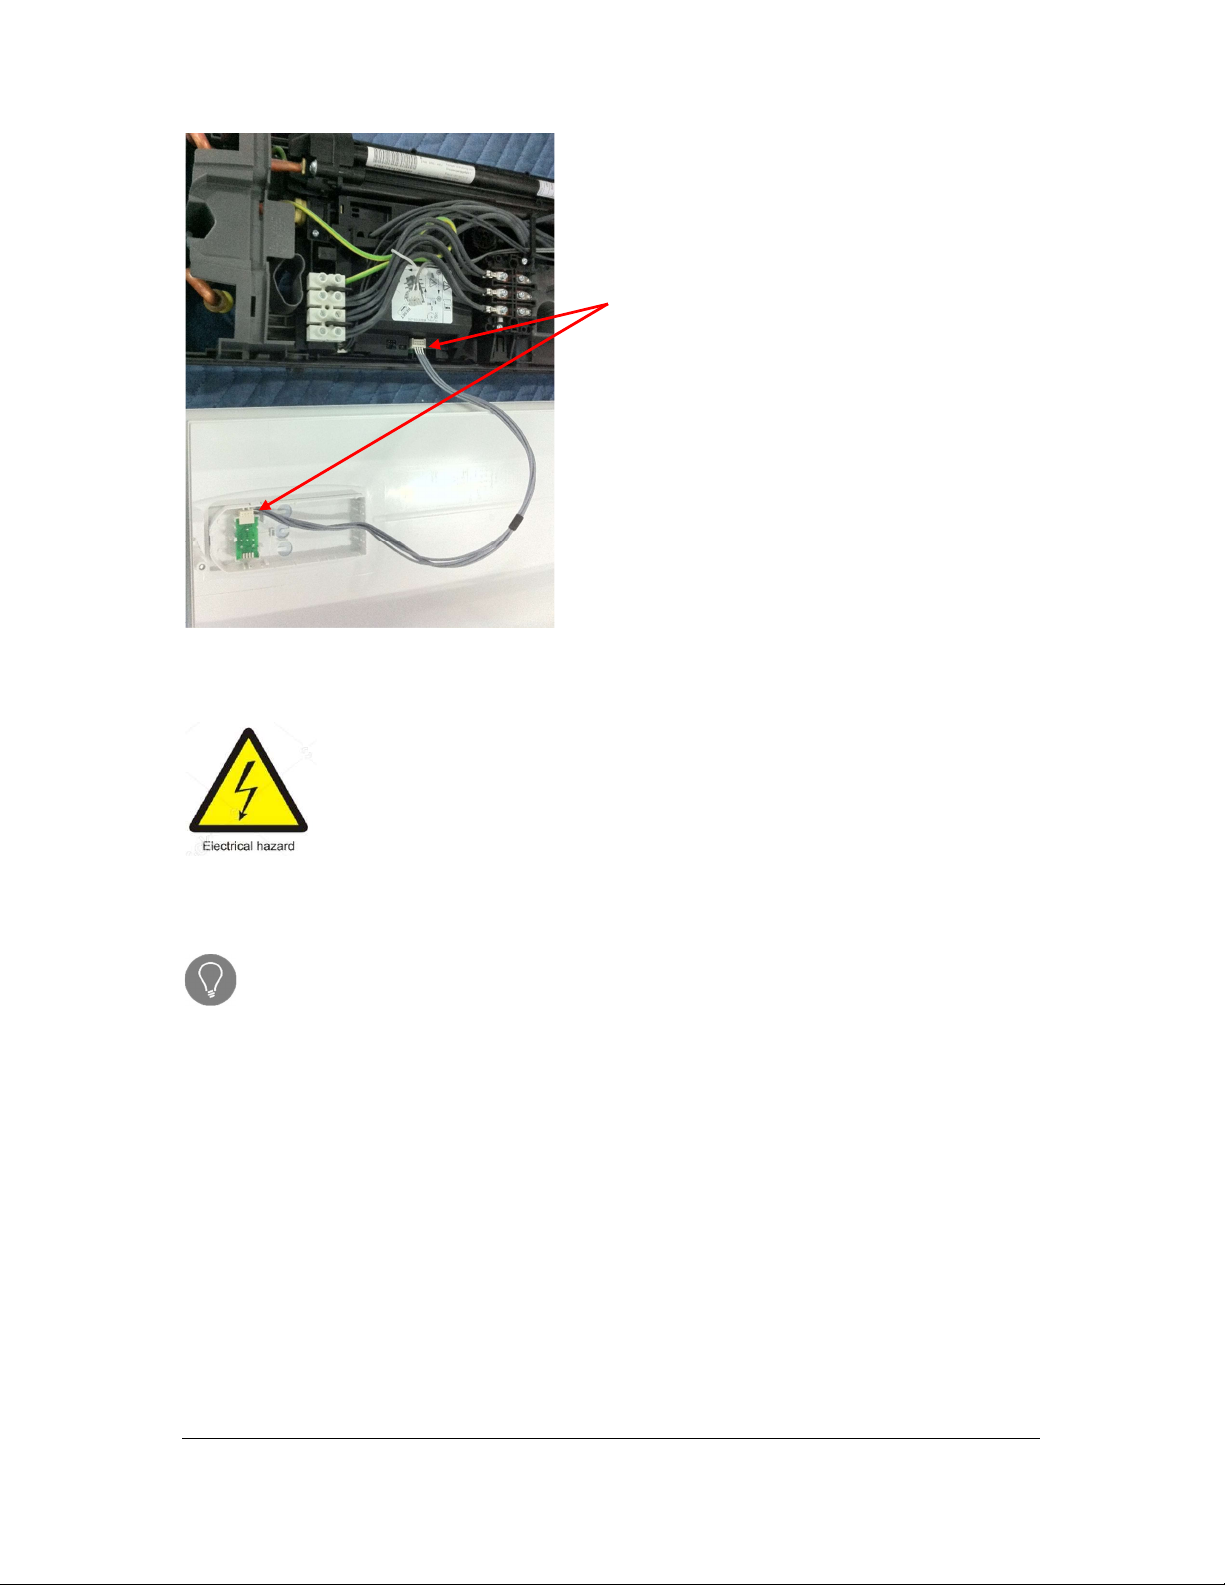
2.3.3.2 On Board Instantaneous Hot Water Unit
Below left is a photo of the water fittings for the hot water unit leading in and out of the
service. The picture on the right is the actual Stiebel Eltron DHB-E 27 AU hot water unit
which is fitted inside the dog wash cabinet, bottom left.
2.3.3.2.1 Initial Start Up of the Stiebel Eltron DHB-E 27 AU Hot Water Unit
The initial start-up of the Stiebel Eltron should be conducted by an electrician referencing the
Stiebel AU Operation and Installation guide.
The below is an extract showing how to activate the safety pressure limiter for flow pressure
using the reset button. For detailed instructions refer to the Stiebel Eltron AU Operation and
Installation guide.
Power is to be turned off
Turn water on
Hot Water
Temperature
Knob
Water
from
mains
Hot
water
out of
HW
Unit
Hot water from
HW unit to dog
wash

Z:\Build\K9000 2.0 Twin\K9000 2.0 Twin Operators Manual July 2019 v1.0.docx Page 18
Last edited 16/11/2016
© Tru Blu Dog Wash 2016
Take the front cover of the Stiebel Eltron to expose the
reset button.
Pictured left is the Stiebel Eltron with the cover removed.
The close up below is highlighted to assist locating the
reset button.
The below is a close up of the reset button.
Activate the safety pressure limiter
for flow pressure by firmly pressing
in the reset button (the appliance is
delivered with the safety pressure
limiter disabled).
Picture left shows the reset button
being pressed down using a small
screw driver
Z:\Build\K9000 2.0 Twin\K9000 2.0 Twin Operators Manual July 2019 v1.0.docx Page 19
Last edited 16/11/2016
© Tru Blu Dog Wash 2016
Re-Fit the Stiebel Eltron cover and secure with supplied screw.
Power can now be turned on.
For detailed instructions refer to the Stiebel Eltron AU Operation and Installation guide
supplied with the K9000 dog wash.
Push the temperature selector plug
into the "set temperature" PCB.
The plug is already attached to the
cover it needs to be “plugged” into the
base.
Picture left shows the reset button
being pressed down using a small
screw driver
Z:\Build\K9000 2.0 Twin\K9000 2.0 Twin Operators Manual July 2019 v1.0.docx Page 20
Last edited 16/11/2016
© Tru Blu Dog Wash 2016
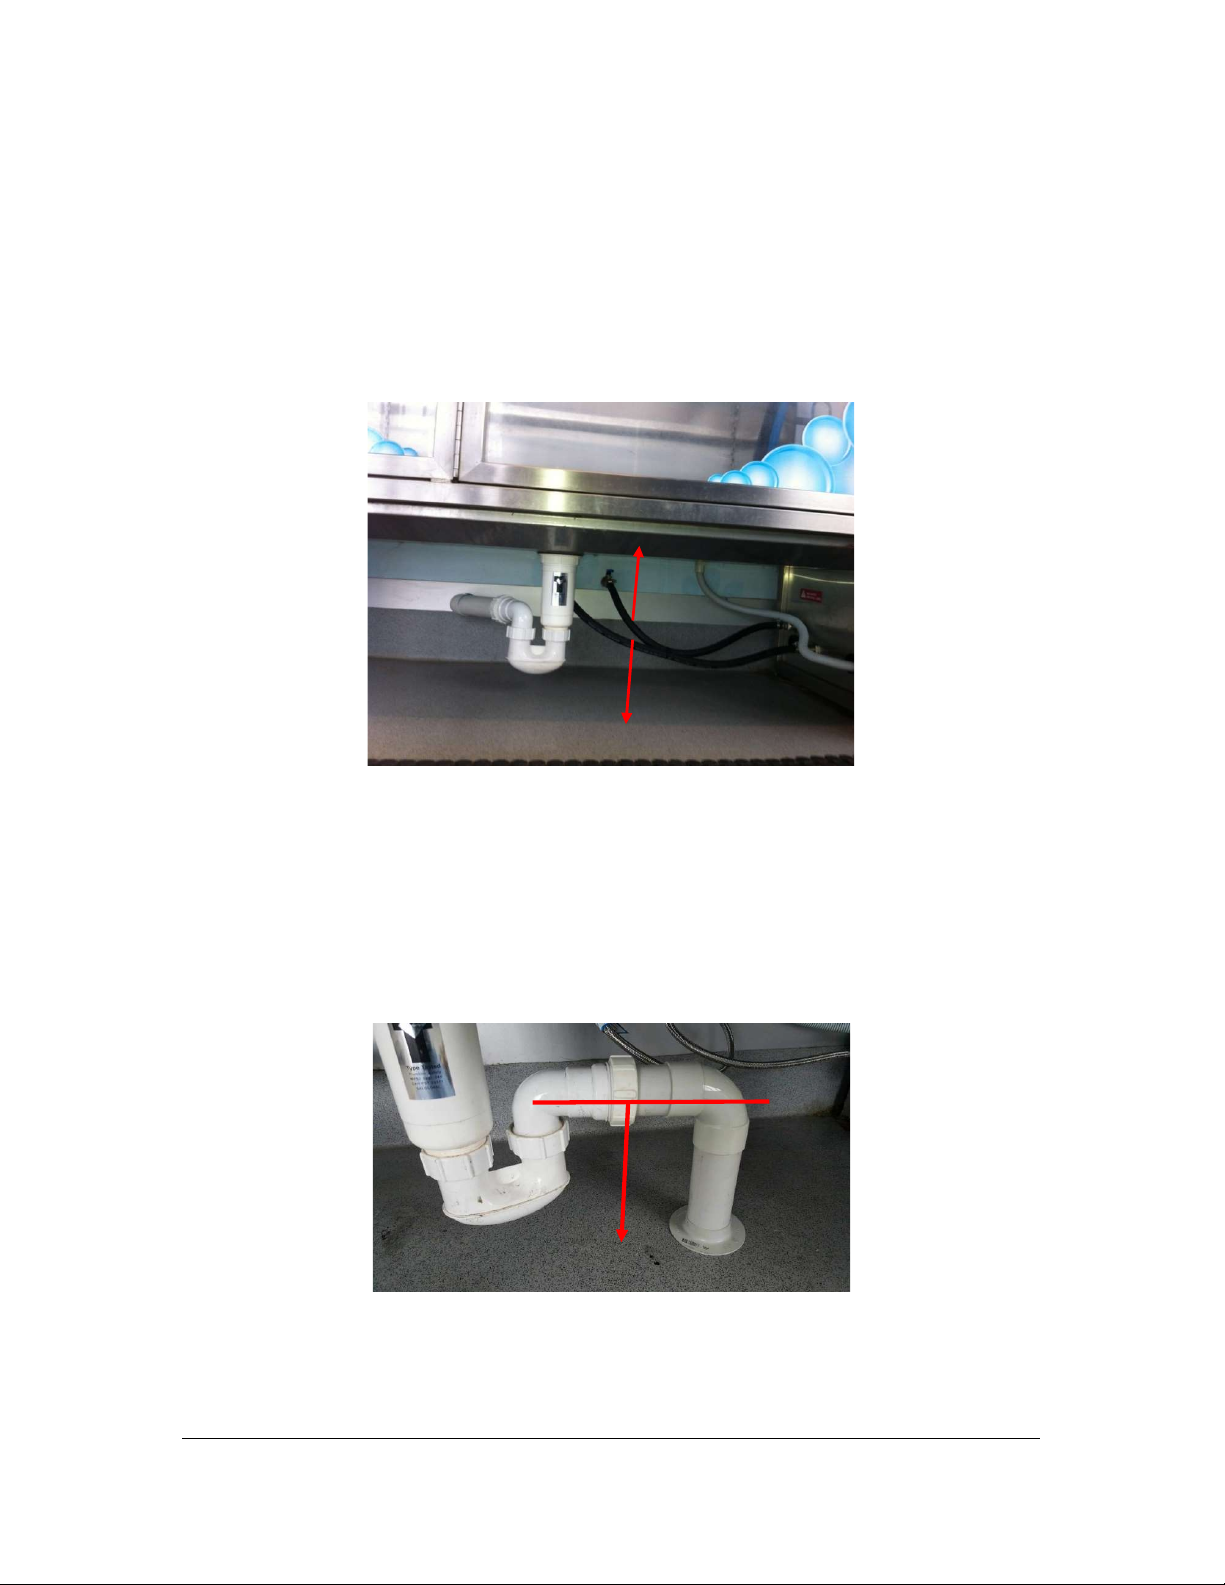
2.3.4 Connecting the Waste
2.3.4.1 Existing Sites
Shown below is a K9000 2.0 Twin that has been installed into an existing room. The two
50mm connection points were run through the back wall to an existing waste point (Note:
only 1 of the 2 waste points shown in photo). Other possibilities are to run the two 50mm
connection points along the walls to an existing waste point/s.
The connections are made to the 50mm waste using the two P-traps supplied in the install
kit.
2.3.4.2 New Sites
Shown below is a K9000 2.0 Twin that has been installed at a new site were the site has
allowed for the waste points as part of construction (Note: only 1 of the 2 waste points shown
in photo). Note, new sites may also utilise external waste points, and run the connections
through or along the walls.
The connections are made to the 50mm waste using the two P-traps supplied in the install
kit.
The approximate
measure for a Dog
Wash is 230mm
(pipe centre) on a
level ground service.
370mm
Other manuals for K9000 2.0
2
This manual suits for next models
1
Table of contents
Other TRU-BLU Pet Care Product manuals


