TRU-BLU K9000 Mini User manual
i
Z:\Build\K9000 Mini\K9000 Mini Operators Manual May 2019 v3.0.docx
© Tru Blu Dog Wash 2016
K9000 Mini
Operators Manual
© Copyright 2016, Tru Blu Dog Wash, All rights reserved. K9000® is a registered trademark
of Tru Blu Dog Wash.

Z:\Build\K9000 Mini\K9000 Mini Operators Manual May 2019 v3.0.docx Page ii
© Tru Blu Dog Wash 2016
© Copyright 2016, Tru Blu Dog Wash, All rights reserved. K9000® is a registered trademark
of Tru Blu Dog Wash.
All requests and enquiries regarding the use of, and availability of this manual are to be
directed to:
Tru Blu Dog Wash
Factory No. 1
34 Caramut Road
Warrnambool
Victoria 3280
Australia
Tel: +61 (0)3 5562 9088
Fax: +61 (0)3 5562 9022
Email: [email protected]m.au
Website: www.trubludogwash.com.au
www.findadogwash.com
Z:\Build\K9000 Mini\K9000 Mini Operators Manual May 2019 v3.0.docx Page iii
© Tru Blu Dog Wash 2016
Explanation of symbols used in this manual
Warning
Tip
Important - Take note
Regulatory Compliance Mark
Date
Summary of Changes
Sections Changed/Added
Author/s
Version
14/08/2017
1
st
Edition
All as new model
Phil Worrell
V
1.0
13/12/2018
New EJ pump exploded view 4.1.4 Phil Worrell V2.0
08/04/2019
New How to videos added
11.2
Phil Worrell
22/05/2019 How to open coin mech &
added error codes
5.1.4, 5.1.5 & 5.1.6 Phil Worrell V3.0
Version
3.0
Status
Published
Date
27
/05/2019
Author/s
Phil Worrell
Build Approver
Tim Darmanin
Sales Approver
Sarah Clausen

Z:\Build\K9000 Mini\K9000 Mini Operators Manual May 2019 v3.0.docx Page iv
© Tru Blu Dog Wash 2016
Table of Contents
1 K9000 Mini Inspection and Acceptance on Delivery: ...................................................... 1
1.1 K9000 Mini System Specifications ........................................................................... 2
2 Installation ...................................................................................................................... 3
2.1 Levelling and Positioning the K9000 Mini ................................................................ 3
2.2 Connecting the Water Supply and Waste connection to the K9000 Mini. ................. 4
2.2.1 Connecting the Water Supply ........................................................................... 4
2.2.2 Hot Water Breaker ........................................................................................... 5
2.2.3 Connecting the Waste ...................................................................................... 6
2.3 Connecting the Power – For Your Electrician .......................................................... 7
2.4 Completing the Installation ...................................................................................... 8
3 Commissioning the Unit.................................................................................................. 8
4 Main Board Components ................................................................................................ 9
4.1 K9000 Mini Main Board with Iwaki EJ Series Pumps ............................................... 9
4.1.1 Control Module ................................................................................................10
4.1.2 Product Dosing Pump Factory Settings (Iwaki EJ Series Pumps) ...................11
4.1.3 Bleeding Product Dosing Pumps (Iwaki - EJ Series Pumps) ...........................12
4.1.4 Iwaki Dosing Pump – EJ Series Exploded View ..............................................13
4.2 Approved Products .................................................................................................14
5 Cash Box Components .................................................................................................15
5.1 SP Coin Acceptor ...................................................................................................16
5.1.1 SP On Board Programming (OBP) Instructions ...............................................17
5.1.2 Coin Acceptor Removal ...................................................................................19
5.1.3 Coin Acceptor Cleaning ...................................................................................19
5.1.4 Coin Acceptor Error Messages ........................................................................20
5.1.4.1 Coin Acceptor Error Message Table.........................................................20
5.1.4.2 Coin Acceptor Error Processes ................................................................21
6 Temperature Valve ........................................................................................................23
6.1 Temperature Adjustment ........................................................................................23
7 Dryer .............................................................................................................................24
7.1 Non-Heated Dryer Details ......................................................................................24
8 Override Key (Wash down Key) ....................................................................................25
9 Floor Lifting Tool ...........................................................................................................26
10 Operator Maintenance ...............................................................................................27
10.1 Maintenance Schedule ...........................................................................................27
10.2 External Maintenance Items ...................................................................................29
10.3 Rotary Dial Maintenance ........................................................................................29

Z:\Build\K9000 Mini\K9000 Mini Operators Manual May 2019 v3.0.docx Page v
© Tru Blu Dog Wash 2016
10.4 Dryer Maintenance .................................................................................................30
10.5 Cleaning .................................................................................................................31
11 General Information ...................................................................................................34
11.1 Canine parvovirus ..................................................................................................34
11.2 Instruction “How to” Videos ....................................................................................34
12 MSDS Attachments ...................................................................................................35
12.1 Material Safety Data Sheet (MSDS) Fido’s Everyday Shampoo .............................35
12.2 Material Safety Data Sheet (MSDS) Fido’s Crème Conditioner ..............................35
12.3 Material Safety Data Sheet (MSDS) Fido’s Fre-Itch Rinse Concentrate .................35
12.4 Material Safety Data Sheet (MSDS) Fido’s Hydrobath Flush ..................................35
13 Maintenance Record ..................................................................................................36
1
Z:\Build\K9000 Mini\K9000 Mini Operators Manual May 2019 v3.0.docx
© Tru Blu Dog Wash 2016
1
K9000 Mini Inspection and Acceptance on Delivery:
Inspect the K9000 Mini Dog Wash (K9000 Mini) on arrival and prior to unwrapping to ensure
there is no travel damage. If there is any damage, please contact Tru Blu Dog Wash before
accepting delivery.
Caution should be taken when the K9000 Mini has been delivered and is
being unloaded. The K9000 Mini weighs approx. 170kg. Ensure a qualified operator of the
unloading equipment is used to lift or move the K9000 Mini Dog Wash.
The K9000 Mini (Within Australia) is first bubble wrapped and then wrapped in black plastic
cargo wrap. It is secured to the pallet with a tie down strap over the cabinet and 6 screws.
Position the K9000 Mini while on the pallet near its final location. Take caution removing the
plastic and bubble wrap avoid using a knife as it may scratch the stainless steel or decals.
With a screw gun remove the screws from the feet and the tie down strap.
A second inspection should be undertaken to ensure no damage has occurred during travel.
It is recommended that the front kicker plate be removed prior to installation and
handling as this will allow safer lifting and the required access during installation. Care
should be taken not to damage the plumbing fittings during lifting and positioning of the unit.
It is also recommended that the white film protecting the unit is not removed until after install
as this will help prevent any installation damage.
A 4mm allen key is used
to remove the kicker
plate.
The kicker plate allen
key bolt positions (2 at
each end and 1 top
centre)
2
Z:\Build\K9000 Mini\K9000 Mini Operators Manual May 2019 v3.0.docx
© Tru Blu Dog Wash 2016
1.1 K9000 Mini System Specifications
SYSTEM WITHOUT ON BOARD HOT WATER UNIT
Power
240V
15 AMP (with heated dryer)
Power
240V
10 AMP (without heated dryer)
WATER Inlet Pressure (Min)
40psi / 275kpa
Hot
½” Ball valve
Cold
½” Ball valve
WATER Inlet Pressure (Max)
72psi / 500kpa
Hot
½” Ball valve
Cold ½” Ball valve
COLD WATER Inlet temperature
Minimum
5 Degrees Celsius
Maximum
30 Degrees Celsius
HOT WATER Inlet temperature
Minimum
55 Degrees Celsius
Maximum
6
5 Degrees Celsius
Factory Set water temperature
35 Degrees Celsius at wash gun
WATER Maximum Operating Pressure
50psi / 350kpa
Factory set via water regulator
FILTRATION
Primary
Stainless steel mesh
filter
Secondary
Vinidex DBA Lic. No. WMKA20071
Back Flow Prevention Device Connections to be protected by a “high hazard” backflow prevention device. i.e.
“RPZ” or Registered “Air-GAP” Recommended Watts 009M3-AUS RP 15 or
20mm AS2845.1 Lic
WMKA1335
WASTE 50mm DIA Outlet as well as, a minor trade waste application to be made to the
local water regulator (Contact your local water authority trade waste division)
SYSTEM WITH ON BOARD HOT WATER UNIT
Power
240V
25
AMP
WATER Inlet Pressure (Min)
40psi / 275kpa
Cold ½” Ball valve
WATER Inlet Pressure (Max)
72
psi /
5
00kpa
Cold ½” Ball valve
COLD WATER Inlet temperature Minimum 5 Degrees Celsius
Maximum
30 Degrees Celsius
Factory Set water temperature
35
Degrees Celsius at wash gun
WATER Maximum Operating Pressure
50psi / 350kpa
Factory set via water regulator
FILTRATION Primary Stainless steel mesh filter
Secondary
Vinidex DBA Lic. No. WMKA20071
Back Flow Prevention Device Connections to be protected by a “high hazard” backflow prevention device. i.e.
“RPZ” or Registered “Air-GAP” Recommended Watts 009M3-AUS RP 15 or
20mm AS2845.1 Lic WMKA1335
WASTE 50mm DIA Outlet as well as, a minor trade waste application to be made to the
local water reg
ulator (Contact your local water authority trade waste division)
Tundish
Required for hot water relief pipe
DIMENSIONS / WEIGHT
Dimensions Length 1650mm / Height 1750mm / Depth 550mm
Weight
K9000
Mini
-
170
kg
APPROVALS
Risk assessment
performed by IAPMO (NATA accredited laboratory)
CE conformity with the following European Union Directives: EMC Directive 2004/108/EC & Low Voltage Directive
2006/95/EC
IEC 61000-6-3:2006 Electromagnetic compatibility (EMC) – Part 6.3: Generic standards – Emission standard for residential,
commercial and light
-
industrial environments
AS/NZS 60335.2.75:2005 + Admt 2009 in relation to vending machines AS 60204.1:2005 ‘Safety of machinery – Electrical
equipment of machines, General Requirements’
IEC 61000-6-1: 2005 Electromagnetic compatibility (EMC) Generic standards. Immunity for residential, commercial and light-
industrial environments
.
ATS 5200.101:2005
–
Strength of Assembly
EPA Registered Noise tested rating of 66dba @ 4 meters
USAGES
Water
usage: 8 to 12 litres per minute (40
-
60 litres per single dog wash)
Average power usage per wash cycle is .76kwh (dependent on hot water source)

3
Z:\Build\K9000 Mini\K9000 Mini Operators Manual May 2019 v3.0.docx
© Tru Blu Dog Wash 2016
2 Installation
The K9000 Mini Dog Wash can be installed either indoor or outdoor.
2.1 Levelling and Positioning the K9000 Mini
The K9000 Mini needs to be placed in a level horizontal position to operate correctly.
There are 8 adjustable feet, place a level along the back of the K9000 Mini and adjust the
feet according to get the K9000 Mini Level, place the level along the top of the cabinet
running back to front to make sure it is not tilting forward or backwards.
There are 2 different types of adjustable feet, four* exposed that are adjusted by hand
turning the actual feet and four* inside the cabinet floor that have rubber grommet covers,
you will need to remove the rubber grommets and adjust these with a large flat head screw
driver.
*Note: depending on the model the number of adjustable feet numbers will vary. It will be
either 4 hand adjusted with 2 requiring a screw driver or 2 hand adjusted with 4 requiring a
screw driver.
ENSURE all doors open and close freely before securing the K9000 Mini!
Once the K9000 Mini is level, use the anchor screws supplied to bolt the K9000 Mini to the
floor/surface.
The picture left shows the
location and how to adjust the
feet within the cabinet.
Note: The hot water unit will
need to be moved forward to
allow access to the internal
feet adjusted with the large
flat head screw driver. It does
not need to be removed.
4
Z:\Build\K9000 Mini\K9000 Mini Operators Manual May 2019 v3.0.docx
© Tru Blu Dog Wash 2016
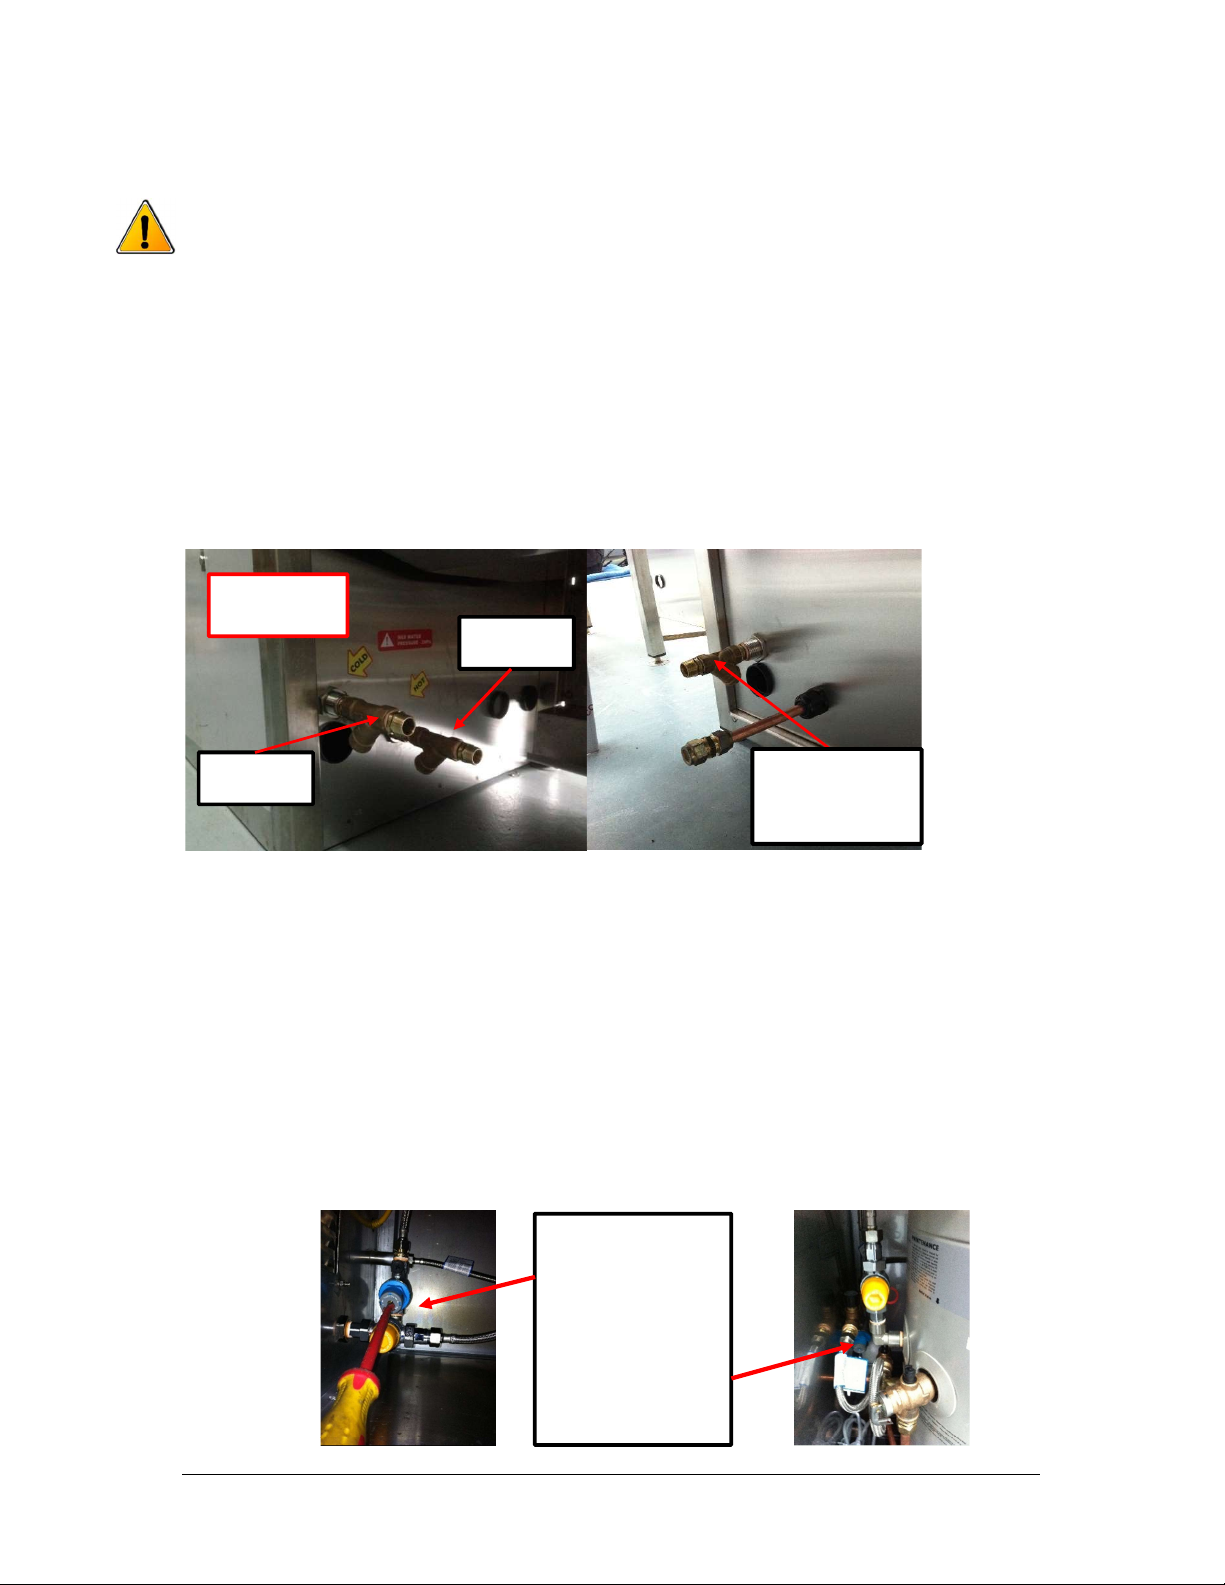
2.2 Connecting the Water Supply and Waste connection to the K9000 Mini.
Before connecting the K9000 Mini to water and waste ensure local regulations are
considered. Some sites may require an additional back flow prevention device. Local
regulations may also require sites to use copper pipes for waste.
2.2.1 Connecting the Water Supply
Flush the pipes prior to connecting to the K9000 Mini.
Maximum allowable inlet water pressure is 450kpa. (72 Psi / 0.5 Mpa)
The picture at left shows the hot and cold-water entry points for a K9000 Mini without an on-
board hot water unit. While the picture on the right shows the water entry point for a K9000
Mini with an on-board hot water unit.
Once connected the regulator can be adjusted to ensure the K9000 Mini has water pressure
of between 20 & 30 psi when the pressure gun is in use and between 40 & 50 psi when
pressure gun is not being utilised.
To verify the pressure when the gun is not being utilised you need to view the gauge at the
moment the pressure gun is turned off as it will give a true indication of the psi prior to
resetting to the hold psi of approximately 40.
The psi verification can be done with the override key and a wash setting of stop or
with money/token and the rinse setting selected.
If adjustment required, you will need adjust the regulator. The regulator is adjusted using a
screw driver, where pressure needs to be increased turn the screw anticlockwise and to
decrease pressure turn in a clockwise direction.
Cold water
connection
Cold water
connection
Hot water system
on board
Hot water
connection
Site Supplied
Hot Water
The picture left shows
regulator being
adjusted in a mini with
no hot water system
on board.
The picture right
shows the regulator
position in a mini with
a hot water system on
board.

5
Z:\Build\K9000 Mini\K9000 Mini Operators Manual May 2019 v3.0.docx
© Tru Blu Dog Wash 2016
2.2.2 Hot Water Breaker
After the water is connected the hot water tap is to be turned on and the hot water system
filled and bled.
Once the hot water system is filled the hot water circuit breaker located in the control
box is to be turned on. The power must be isolated prior to removing the cover from
the Control Module refer to section 4 Main Board Components.
Hot water tap to be
turned on
Bleeding the hot water
system by pulling the
pressure valve until
water runs. (Top valve
only)
6
Z:\Build\K9000 Mini\K9000 Mini Operators Manual May 2019 v3.0.docx
© Tru Blu Dog Wash 2016
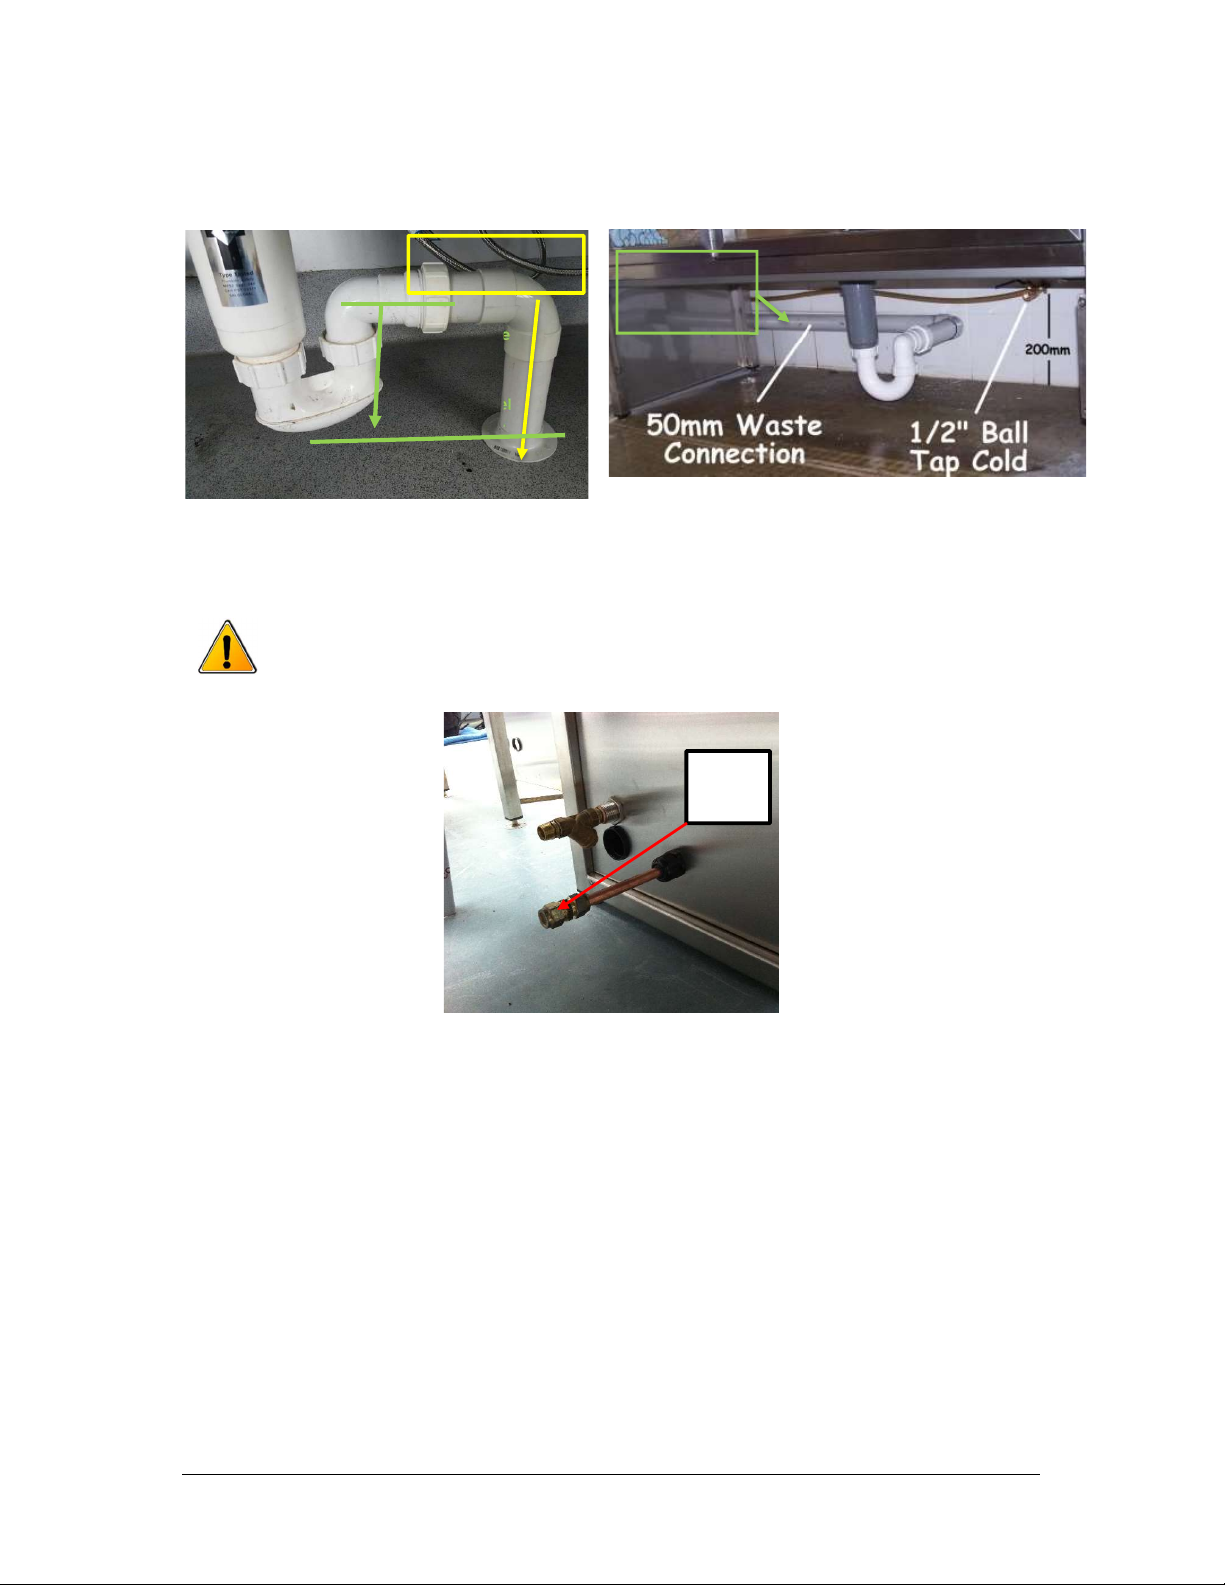
2.2.3 Connecting the Waste
Connect the 50mm waste using the P-trap (supplied in the install kit)
The copper waste pipe connected to the hot water unit relief valves needs to be run into a
waste point or tundish (not supplied). The same waste point as the P-trap can be utilised.
Before connecting to the waste point or tundish ensure local regulations are
considered as some sites may require copper pipe.
If unsure with any of the above steps please phone (03) 5562 9088 for assistance.
The approximate
measure for a
K9000 Mini is
300mm (pipe
centre) on a level
ground service.
Waste
plumbed away
to waste point
Waste
point
Waste plumbed
directly into ground

7
Z:\Build\K9000 Mini\K9000 Mini Operators Manual May 2019 v3.0.docx
© Tru Blu Dog Wash 2016
2.3 Connecting the Power – For Your Electrician
Shown on the right is the main electrical
cable inside the dog wash. It enters
through the gland at the bottom of the
dog wash close to the ground.
Run the power cable in 20mm flexible
conduit as there is a socket already
installed into the bottom of the main
circuit breaker box shown.
Shown below is a photo taken from the
rear of the dog wash of the main
electrical cable enter point to the dog
wash cabinet.
Once you run the cable and conduit to
this point, and then leave another
800mm for the termination inside the dog
wash.
Term
inate Here
800mm
20mm Flex
Conduit
Electrical Cable Entry
Point of Dog Wash
20mm Flex
Conduit
Expansion Valve
outlet if hot water
system on board
OR
Site Hot Water Inlet
Cold Water
Inlet

8
Z:\Build\K9000 Mini\K9000 Mini Operators Manual May 2019 v3.0.docx
© Tru Blu Dog Wash 2016
2.4 Completing the Installation
Now that the K9000 Mini has been installed you can now refit the front kicker plate removed
earlier to allow the installation to proceed and peel the protective white film from the unit.
You are now ready to commission the K9000 Mini.
Please ensure that the hot water breaker has been turned on refer section 2.2.2.
3 Commissioning the Unit
The K9000 Mini is delivered with sufficient product for approximately 100 washes and it is
recommended that commissioning the unit occurs after installation.
Commissioning the unit requires the following tests to be undertaken;
Override key wash (refer section 8)
Insert Coins
Insert Notes (if applicable)
Insert Tokens (if applicable)
During the tests check the following;
water pressure gauge: when pressure gun is being utilised the pressure range should
be between 20 & 30 psi and when gun is off the psi should be in the range 40 to 50
psi. Refer section 2.2.1 re regulation of water pressure.
water temperature, should be cool at a 40cm distance from the wash gun, refer
section 6.1 for water temperature adjustment.

9
Z:\Build\K9000 Mini\K9000 Mini Operators Manual May 2019 v3.0.docx
© Tru Blu Dog Wash 2016
4 Main Board Components
4.1 K9000 Mini Main Board with Iwaki EJ Series Pumps
Product
Injectors x
2
Product Dosing Pumps
(Iwaki) EJ Series x 2
Dryer Unit
Pressure
Switch
Rinse Solenoid
Control Module
Pressure Gauge
Product Dosing
Pumps (Iwaki) EJ
CE Isolator Switch
Hot water breaker is left in the off position
from Factory. Ensure hot water system has been filled
with water before switching on.
Circuit Breakers
Located Behind this
cover
10
Z:\Build\K9000 Mini\K9000 Mini Operators Manual May 2019 v3.0.docx
© Tru Blu Dog Wash 2016
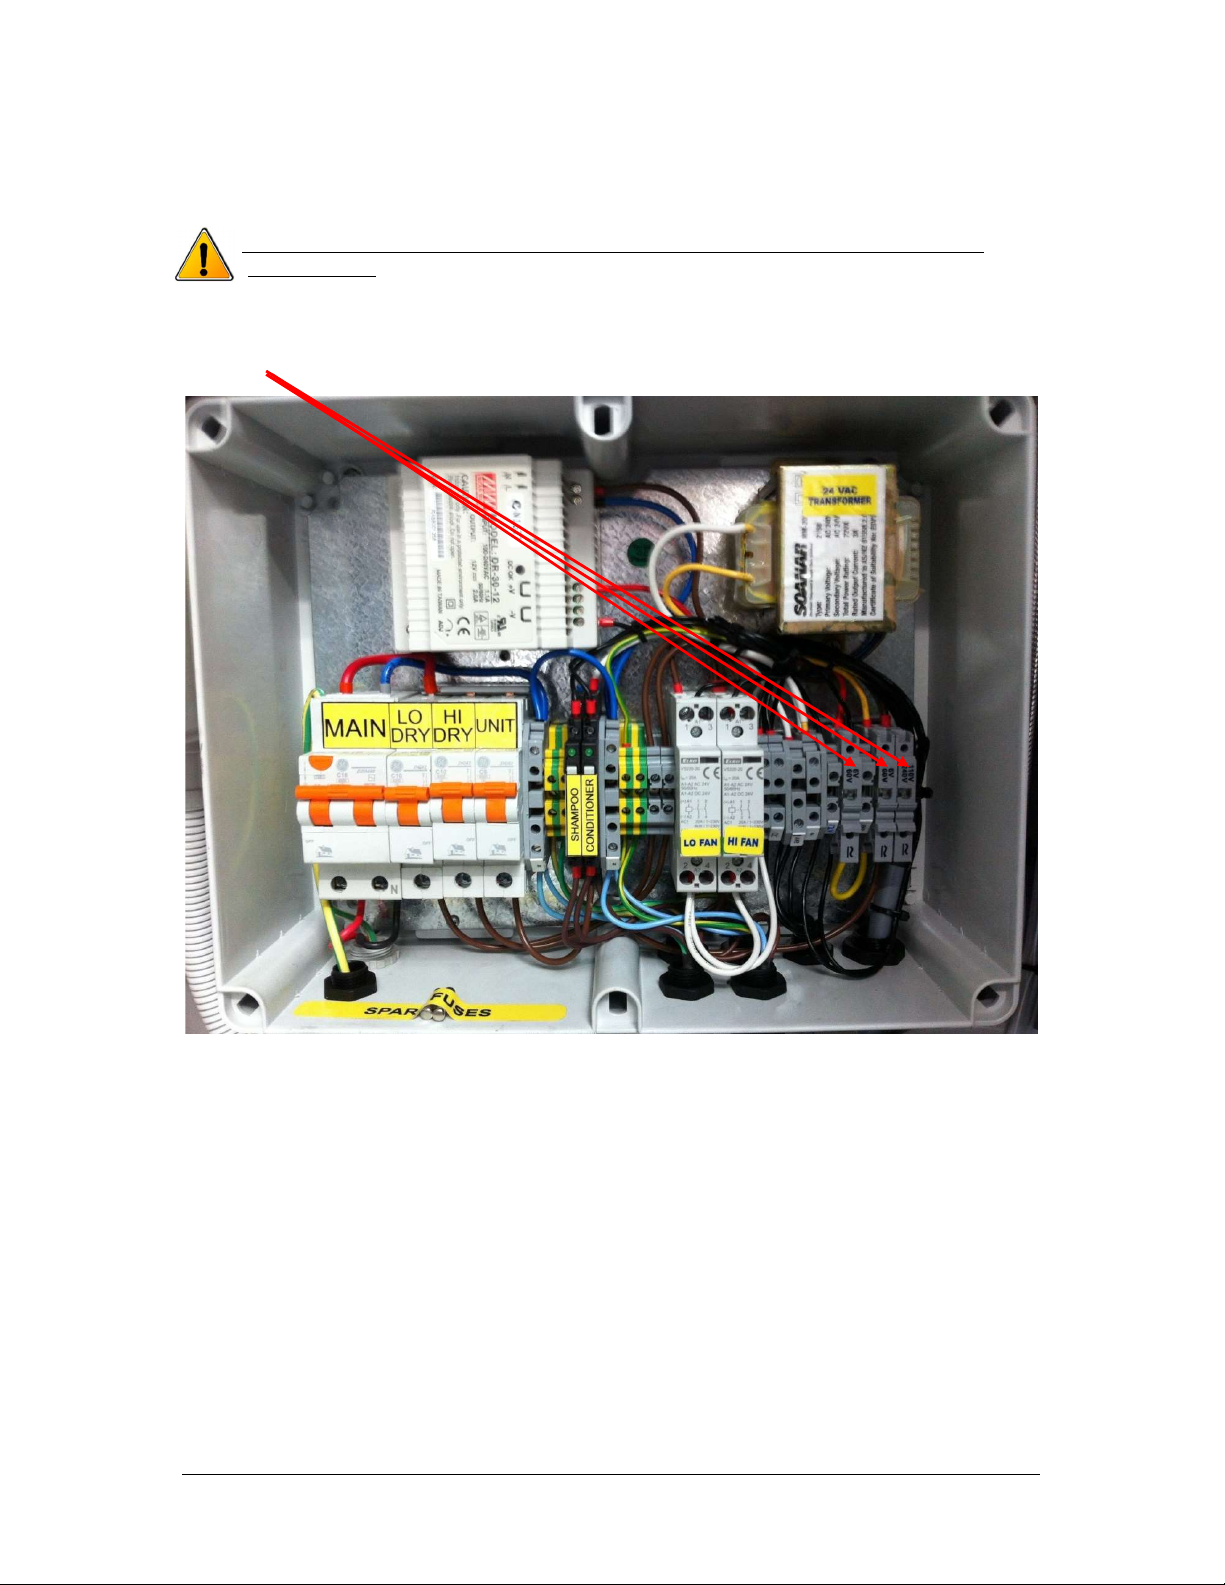
4.1.1 Control Module
The Control Module contains the fuses, transformer, relays etc.
The cover from the Control Module should never be removed unless the power is
disconnected.
The below picture has the main components of the Control Module labelled. It should be
noted that there is a red LED light on each of the 3 fuses and if this is lit then the fuse has
blown.
11
Z:\Build\K9000 Mini\K9000 Mini Operators Manual May 2019 v3.0.docx
© Tru Blu Dog Wash 2016
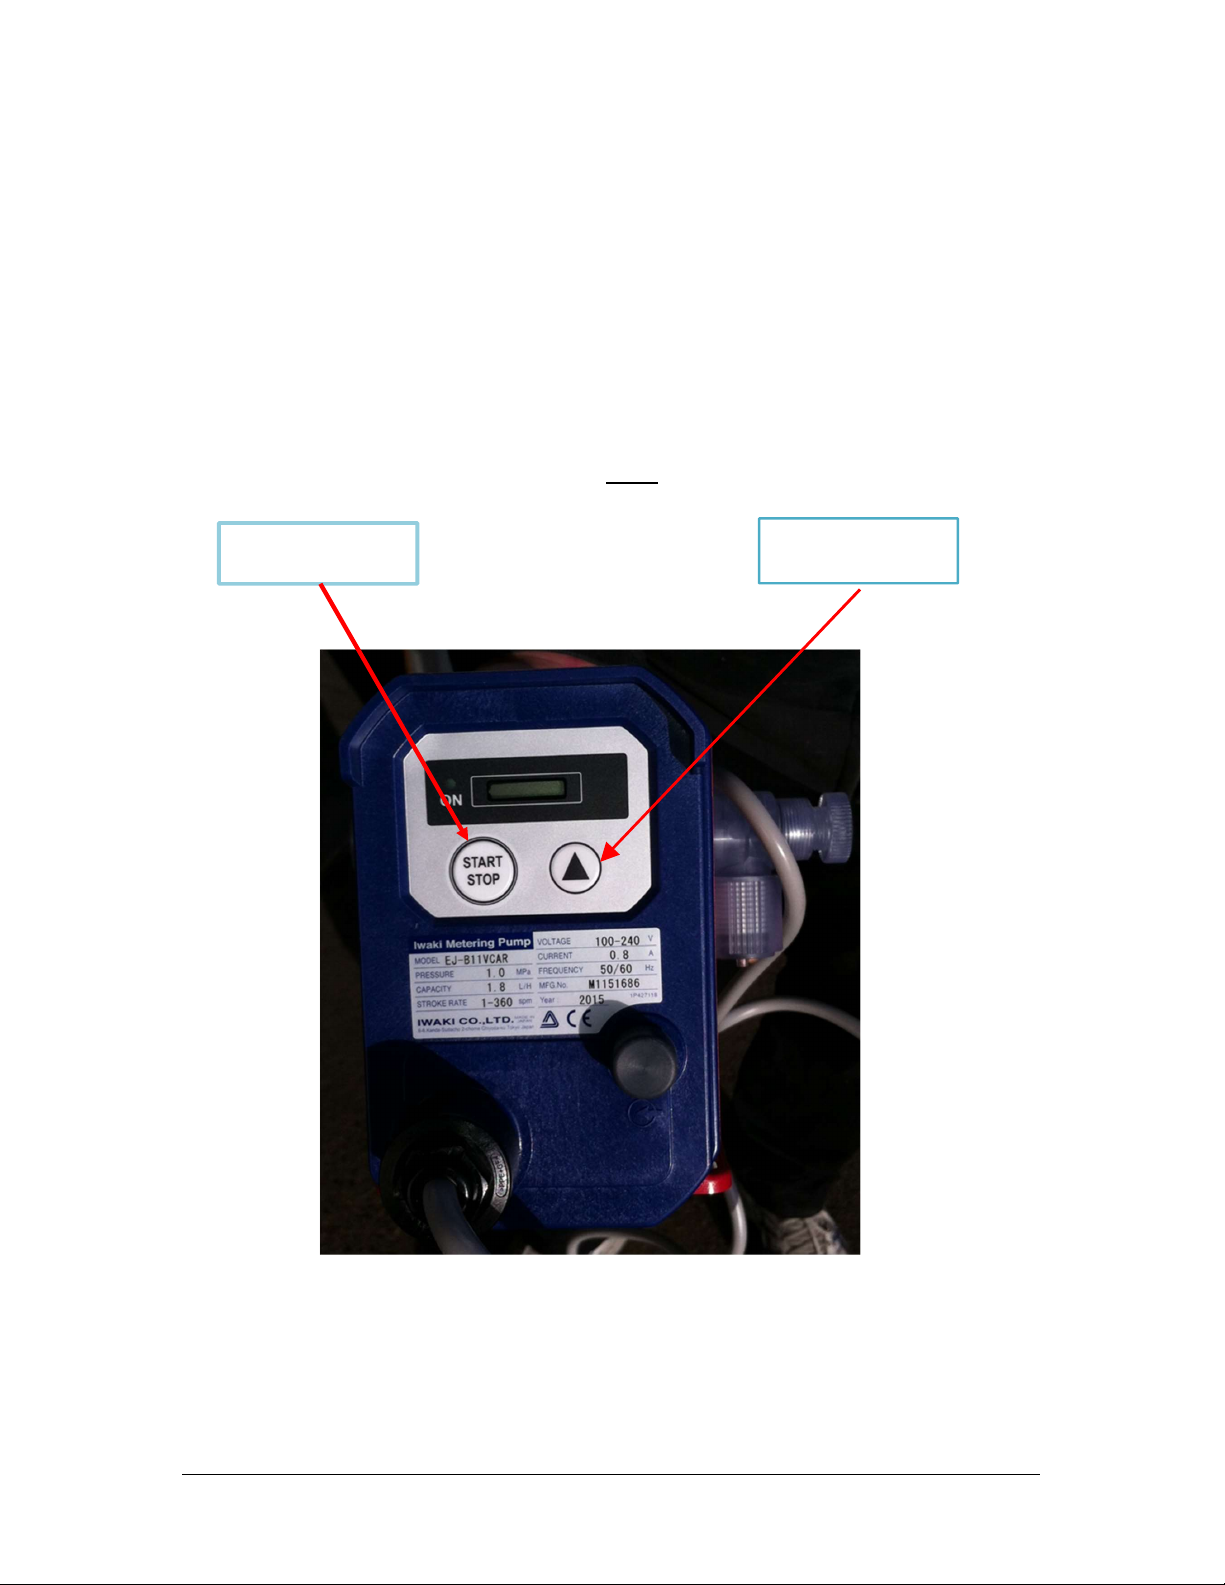
4.1.2 Product Dosing Pump Factory Settings (Iwaki EJ Series Pumps)
Settings are guidelines/recommendations for Fido’s or other approved high-quality
concentrated products:
Shampoo: 200 SPM*
Condition rinse: 180 SPM*
*Note: Strokes Per Minute
To adjust settings, depress the up arrow* to the recommended SPM rate, as detailed above.
*Note: The pump must be in operation when making an adjustment. The arrow will only increase the
SPM, so to reduce the rate you must fully increase the rate to 360, release the Stroke Rate button and
repress it. This will reset the SPM to 1, you can then increase to the required SPM rate. Once the
required rate is reached press the start/stop button twice to save the required rate.
‘Stroke Rate’
Button
‘Start / Stop’
Button
12
Z:\Build\K9000 Mini\K9000 Mini Operators Manual May 2019 v3.0.docx
© Tru Blu Dog Wash 2016
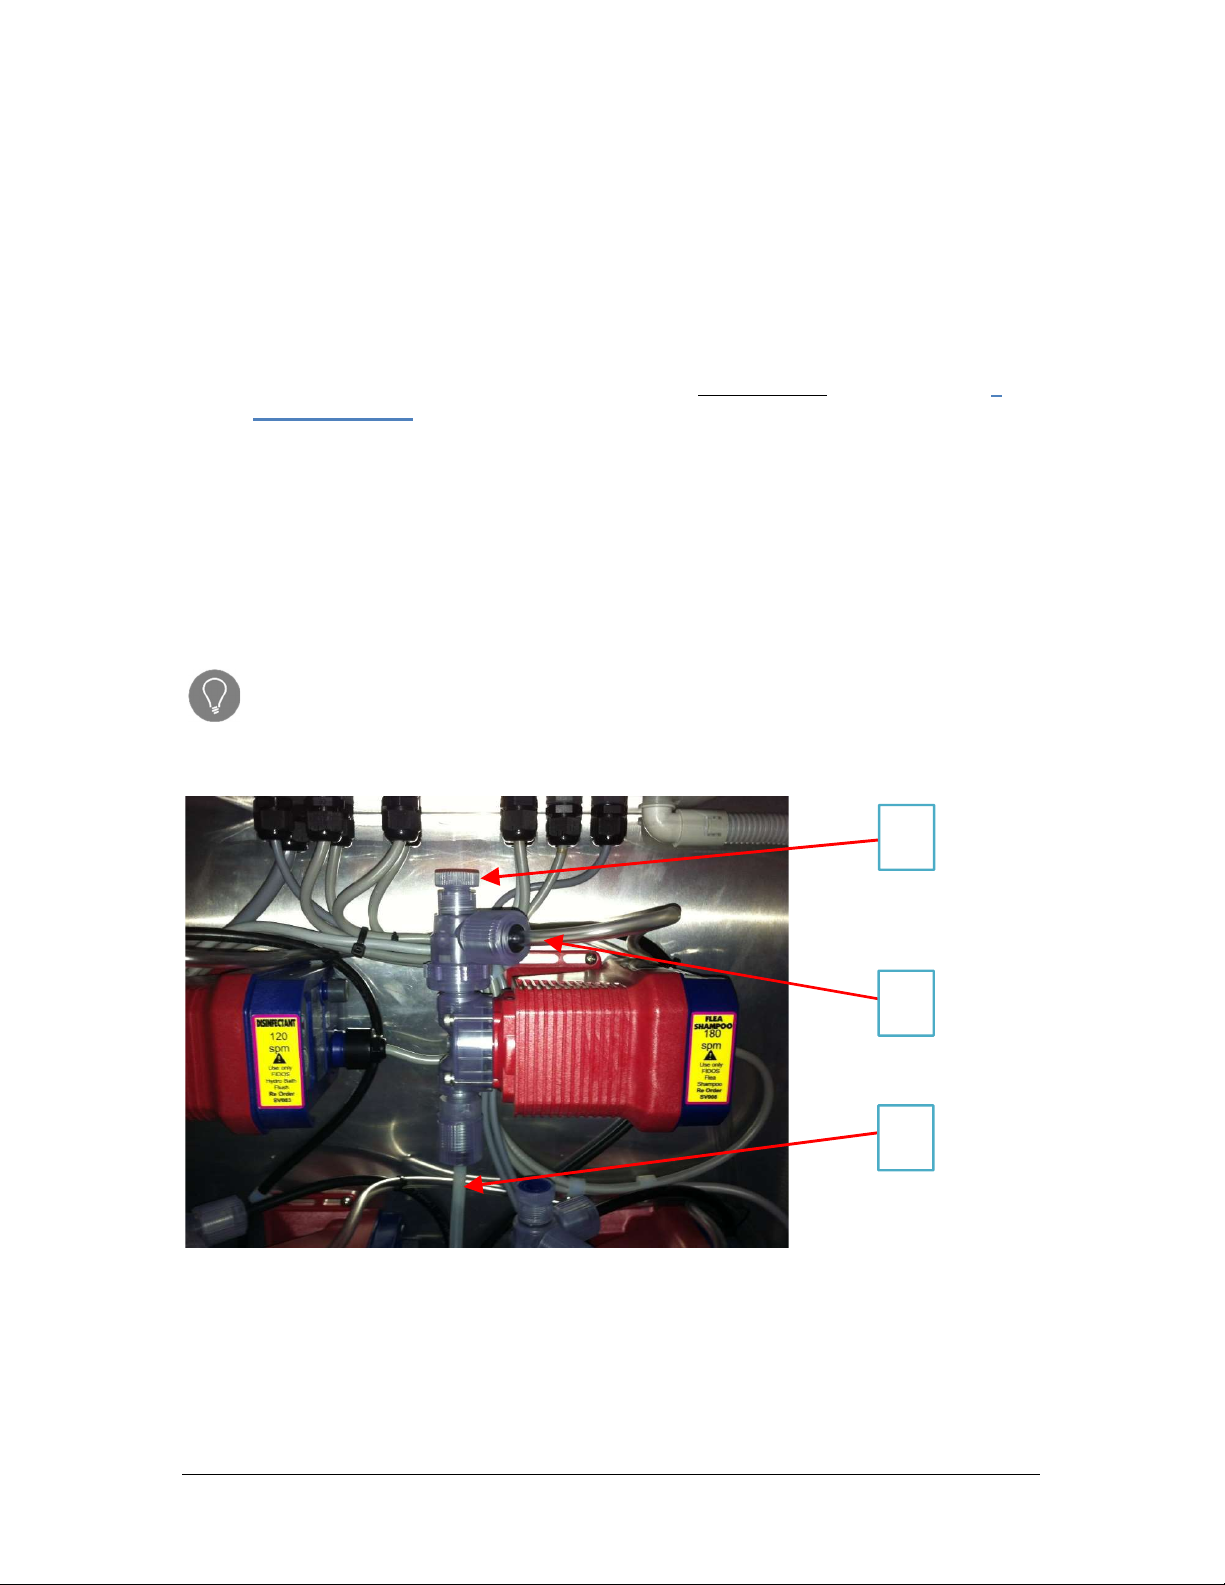
4.1.3 Bleeding Product Dosing Pumps (Iwaki - EJ Series Pumps)
The need to bleed product dosing pump will arise when products have run out or in some
case when products have been replaced and air has become trapped in the tube.
Bleeding procedure:
1. Select the product you wish to bleed by turning the rotary switch e.g.: shampoo
2. Release bleeder valve (item A below) by turning anti-clockwise as shown below; 3
turns maximum.
3. Once product reaches the clear waste tube (item B below) re-tighten the bleeder
valve by turning clock-wise;
4. After process is complete visually inspect the suction line for air pockets-if air pockets
are present repeat process.
NOTE: After pump has been bled, there will be a distinctive change in the sound of the pump
(pump will sound quieter).
If there are problems bleeding heavier concentrates rattle the suction line (item C
below), and/or squeeze it to assist with shifting the product up into the pump head.
A
B
C
13
Z:\Build\K9000 Mini\K9000 Mini Operators Manual May 2019 v3.0.docx
© Tru Blu Dog Wash 2016
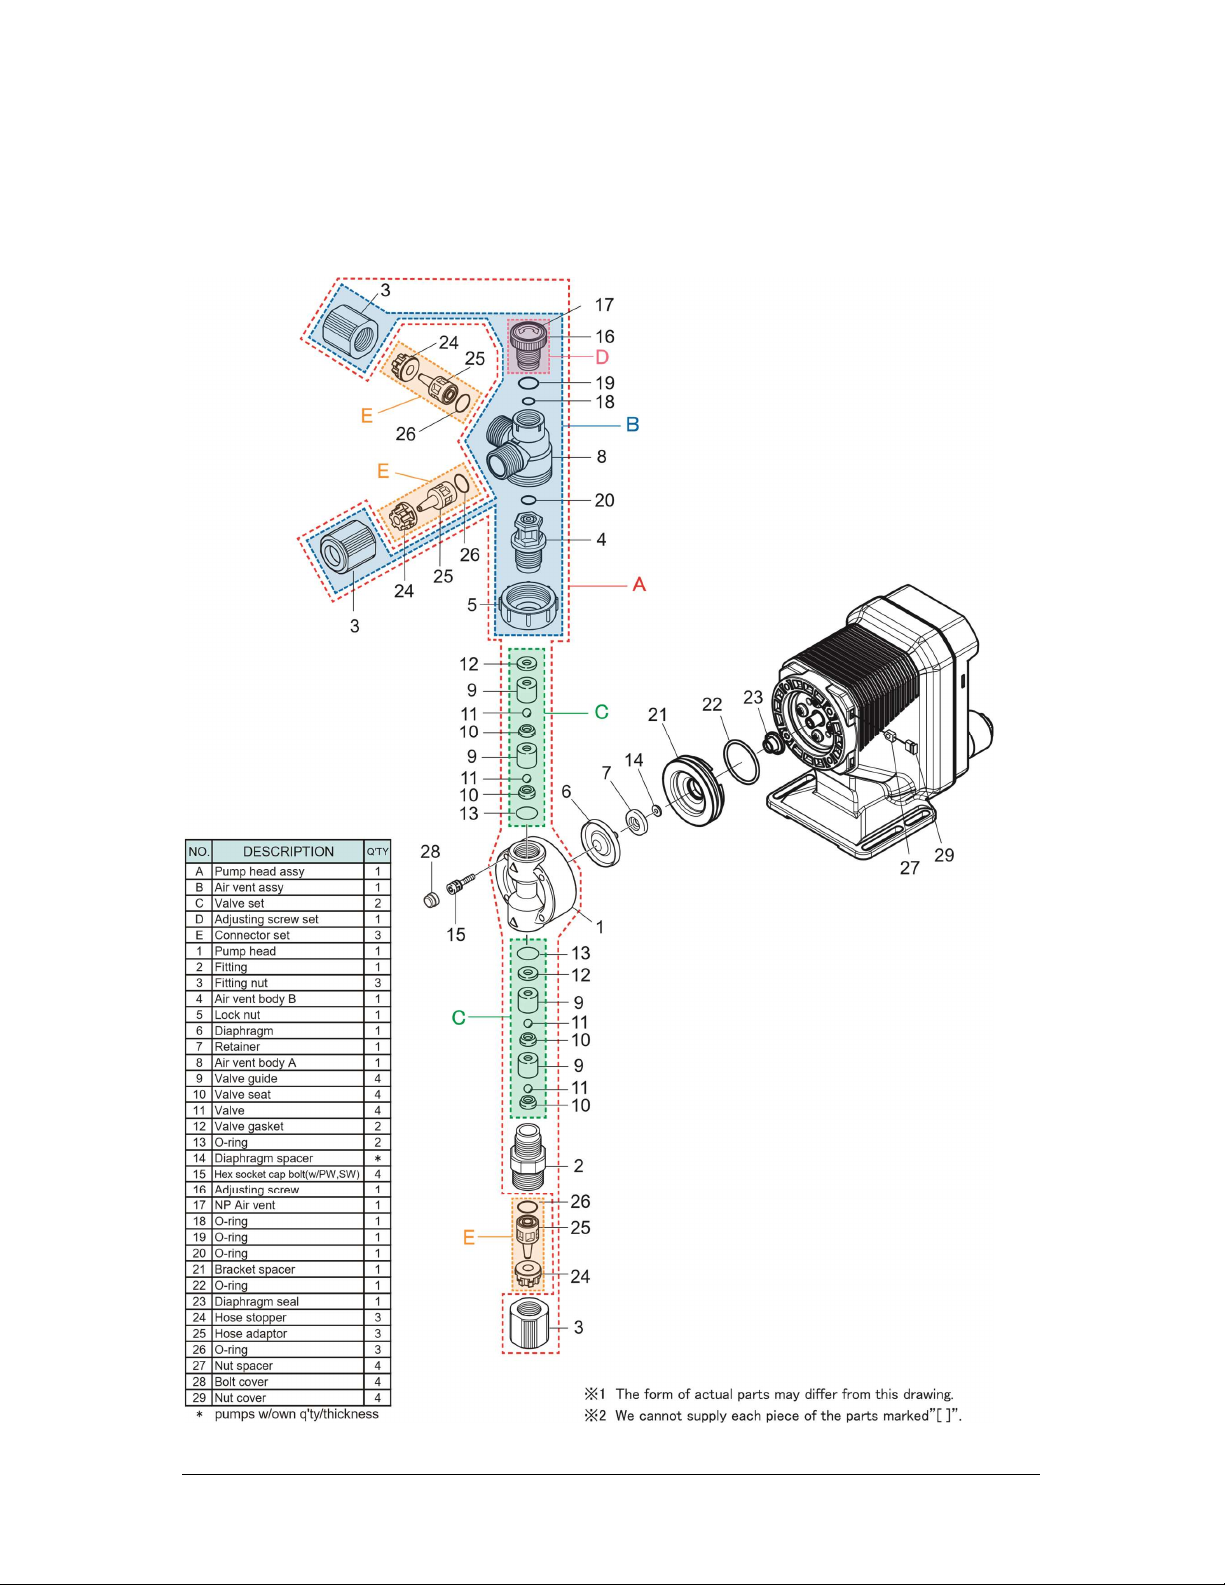
4.1.4 Iwaki Dosing Pump – EJ Series Exploded View
The pump in the diagram below is completely dismantled. Do not dismantle the pump
beyond the extent shown in this instruction manual.

14
Z:\Build\K9000 Mini\K9000 Mini Operators Manual May 2019 v3.0.docx
© Tru Blu Dog Wash 2016
4.2 Approved Products
The Australian Pesticides and Veterinary Medicines Authority (APVMA) contact details
are:
Office: 18 Wormald Street, Symonston, ACT, 2609, Australia
Office hours: 9.00am - 5.00pm Mon - Fri EST
Mailing address: APVMA, PO Box 6182, Kingston, ACT, 2604, Australia
Email: contact@apvma.gov.au
Phone: +61 2 6210 4701
Web: www.apvma.gov.au
Q: How do I check the current registration status of a chemical product?
A: Your supplier can check the registration status of chemicals, or you can access the
information on the database of all registered agricultural and veterinary products
in Australia from the Public Chemical Registration Information System – PUBCRIS,
accessed through the APVMA website.
Q: How do I know if a product has been registered?
A: The APVMA (known before March 2003 as the NRA) allocates a unique
registration number which is printed on the bottom of the product label. The
APVMA uses this approval number to verify the registration status of products. The
words "NRA Approval No." always appears in front of the number. The last four
digits tell you when the product was last assessed by the APVMA. However, some
older chemical products may not have an NRA number. In this case, ask your
supplier to check that the product you want is registered.
Approved Fido’s products
1. K9000 Shampoo (Registration not req’d) 2. Conditioner (Registration not req’d)
FIDOS K9000 Clear Bottled Every Day Shampoo FIDOS K9000 CLEAR Bottled Crème Conditioner
MSDS (see MSDS attached) MSDS (see MSDS attached)
3. Flea & Tick (APVMA No. 37433) 4. Disinfectant (APVMA No. 57855)
FIDO F Rinse Concentrate Fido Hydro Bath Flush
MSDS (see MSDS attached) MSDS (see MSDS attached)
The use of non-approved products may be harmful to the dog. Damage may also be caused
to the Tru Blu dog wash equipment and possible voiding of the units’ warranty.
The only products that are approved for use in the Tru Blu K9L Dog Wash
are Fido’s products produced in Australia by Mavlab Pty Ltd
(www.mavlab.com.au) and those registered as a “veterinary chemical
product” by the Australian Pesticides and Veterinary Medicines Authority
(APVMA) for use on dogs.

15
Z:\Build\K9000 Mini\K9000 Mini Operators Manual May 2019 v3.0.docx
© Tru Blu Dog Wash 2016
5 Cash Box Components
The below picture has the major components of the cash box labelled;
Warning Beeper (time running out, more coins required)
Override lock
Coin Acceptor
Rotary Switch
Interface board
Warning
Beeper
Interface Board
Rotary
Switch
Coin
Acceptor
Override
Key
Other manuals for K9000 Mini
1
Table of contents
Other TRU-BLU Pet Care Product manuals


