TruSteel AV15 User manual

Copyright © 2020 byTruSteel LLC. All Rights Reserved.
AV15 INSTALLATION MANUAL
TruSteel AutoVap15 Installation Instructions
Version: 1.3

AV15 INSTALLATIONMANUAL | TruSteelAutoVap15 Installation Instructions | v. 1.3
2 / 43
Table of contents
INTRODUCTION ................................................................................................ 3
ABOUT AUTOVAP15 ...................................................................................... 3
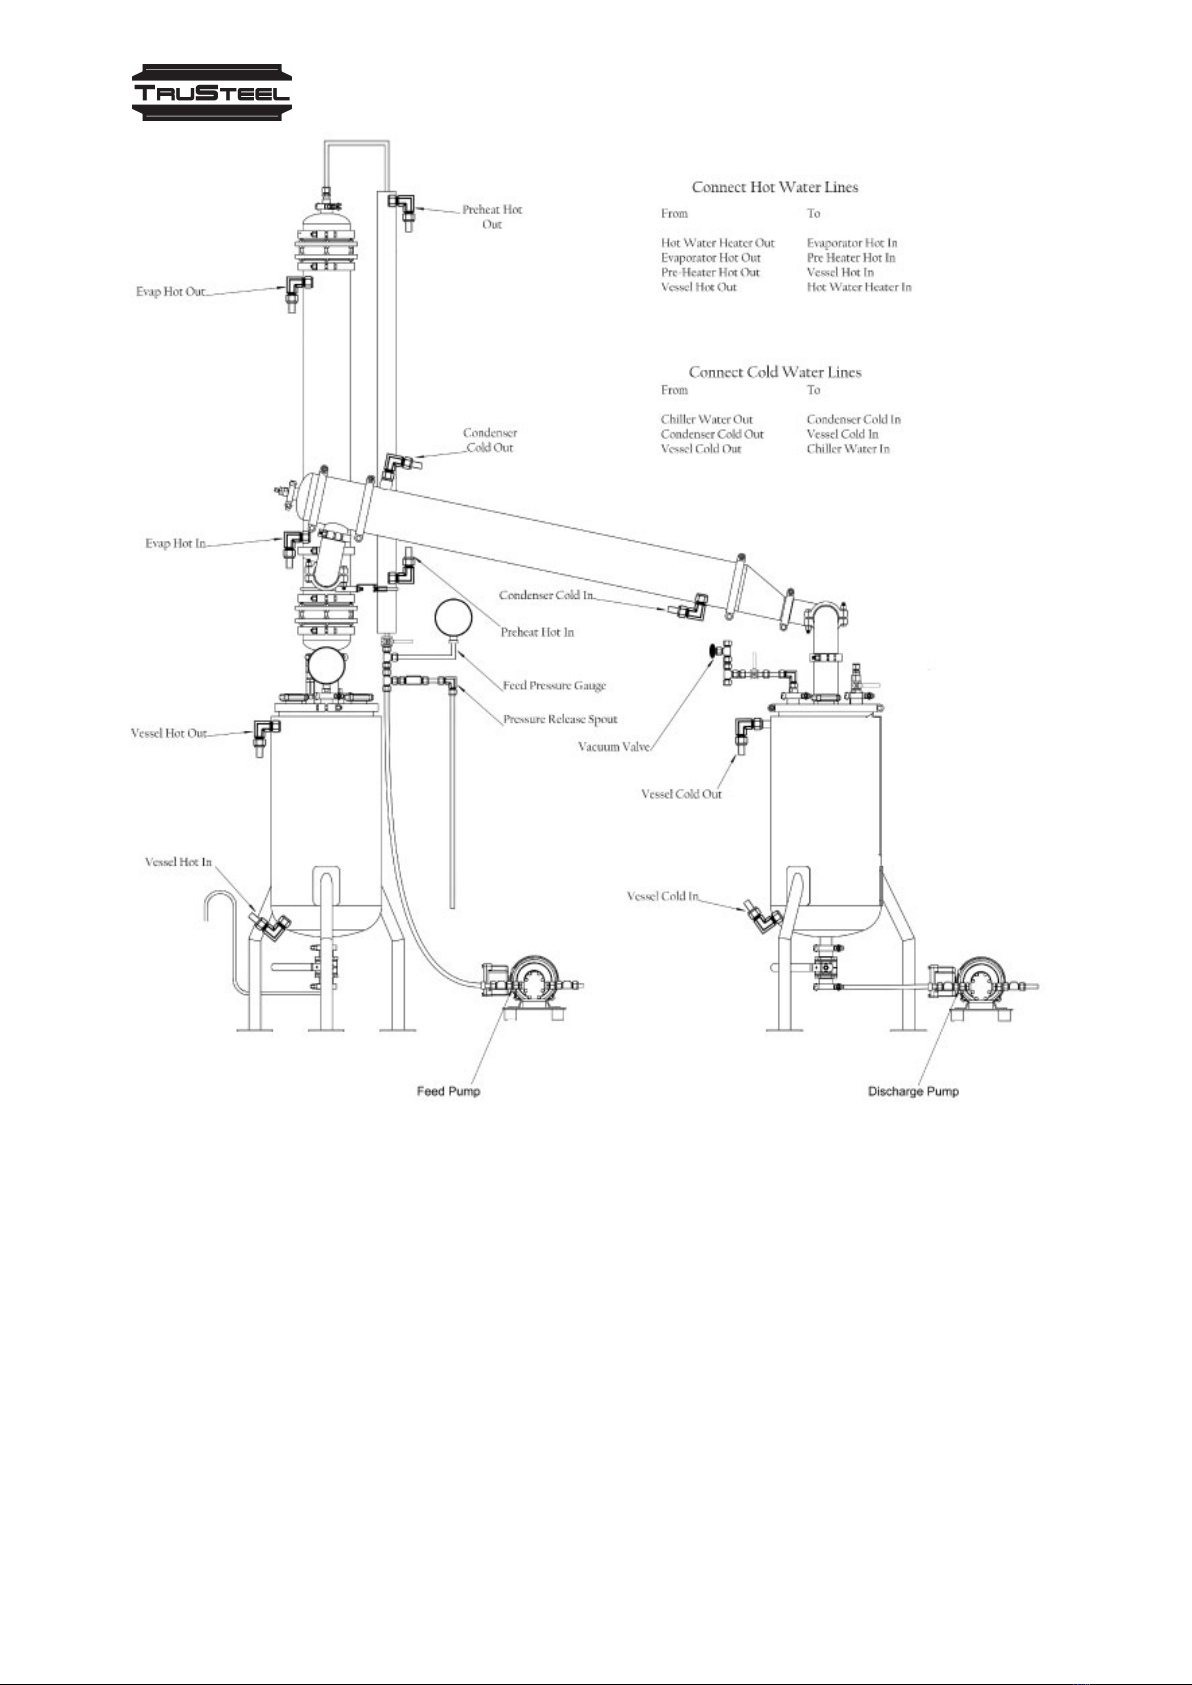
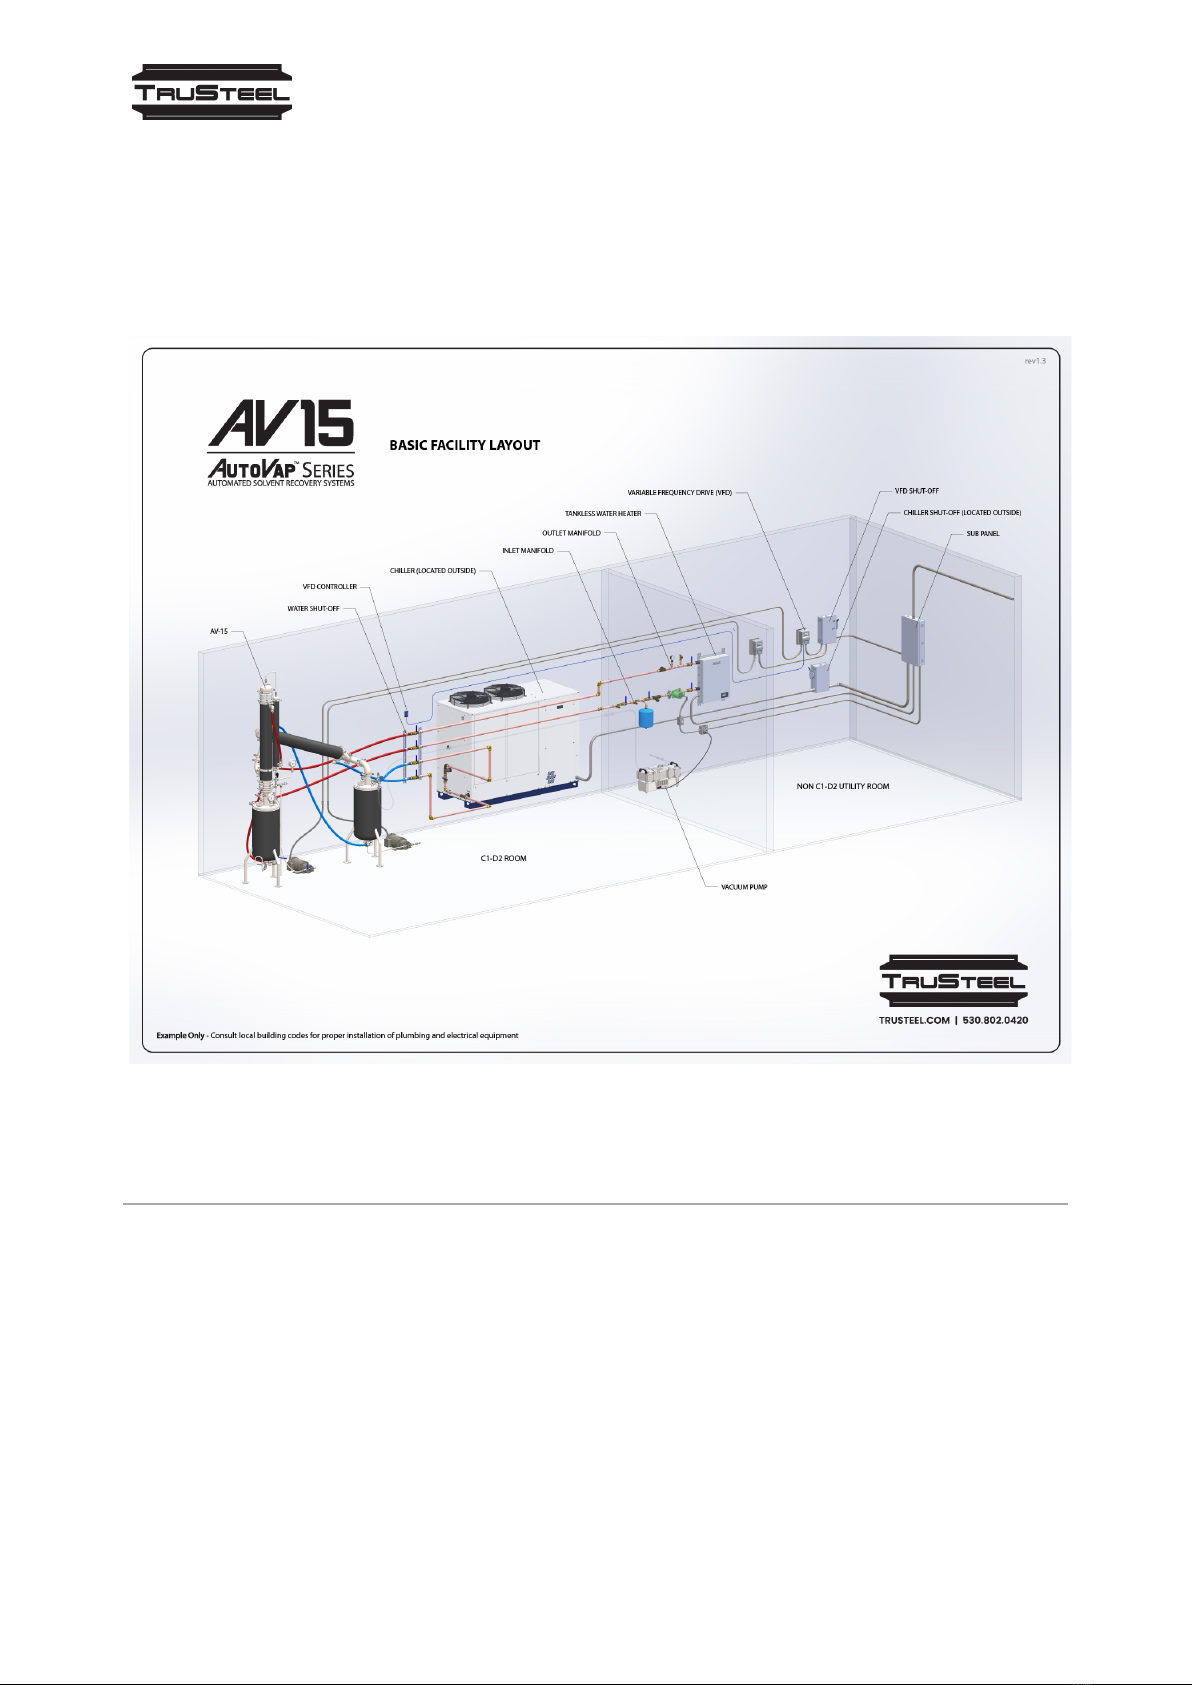
FACILITY LAYOUT ........................................................................................ 4
CHECKLISTS ..................................................................................................... 5
EQUIPMENT MANIFEST .................................................................................. 6
AV15 REQUIREMENT CHECKLIST .................................................................... 8
EQUIPMENT SPECIFICATIONS .......................................................................... 10
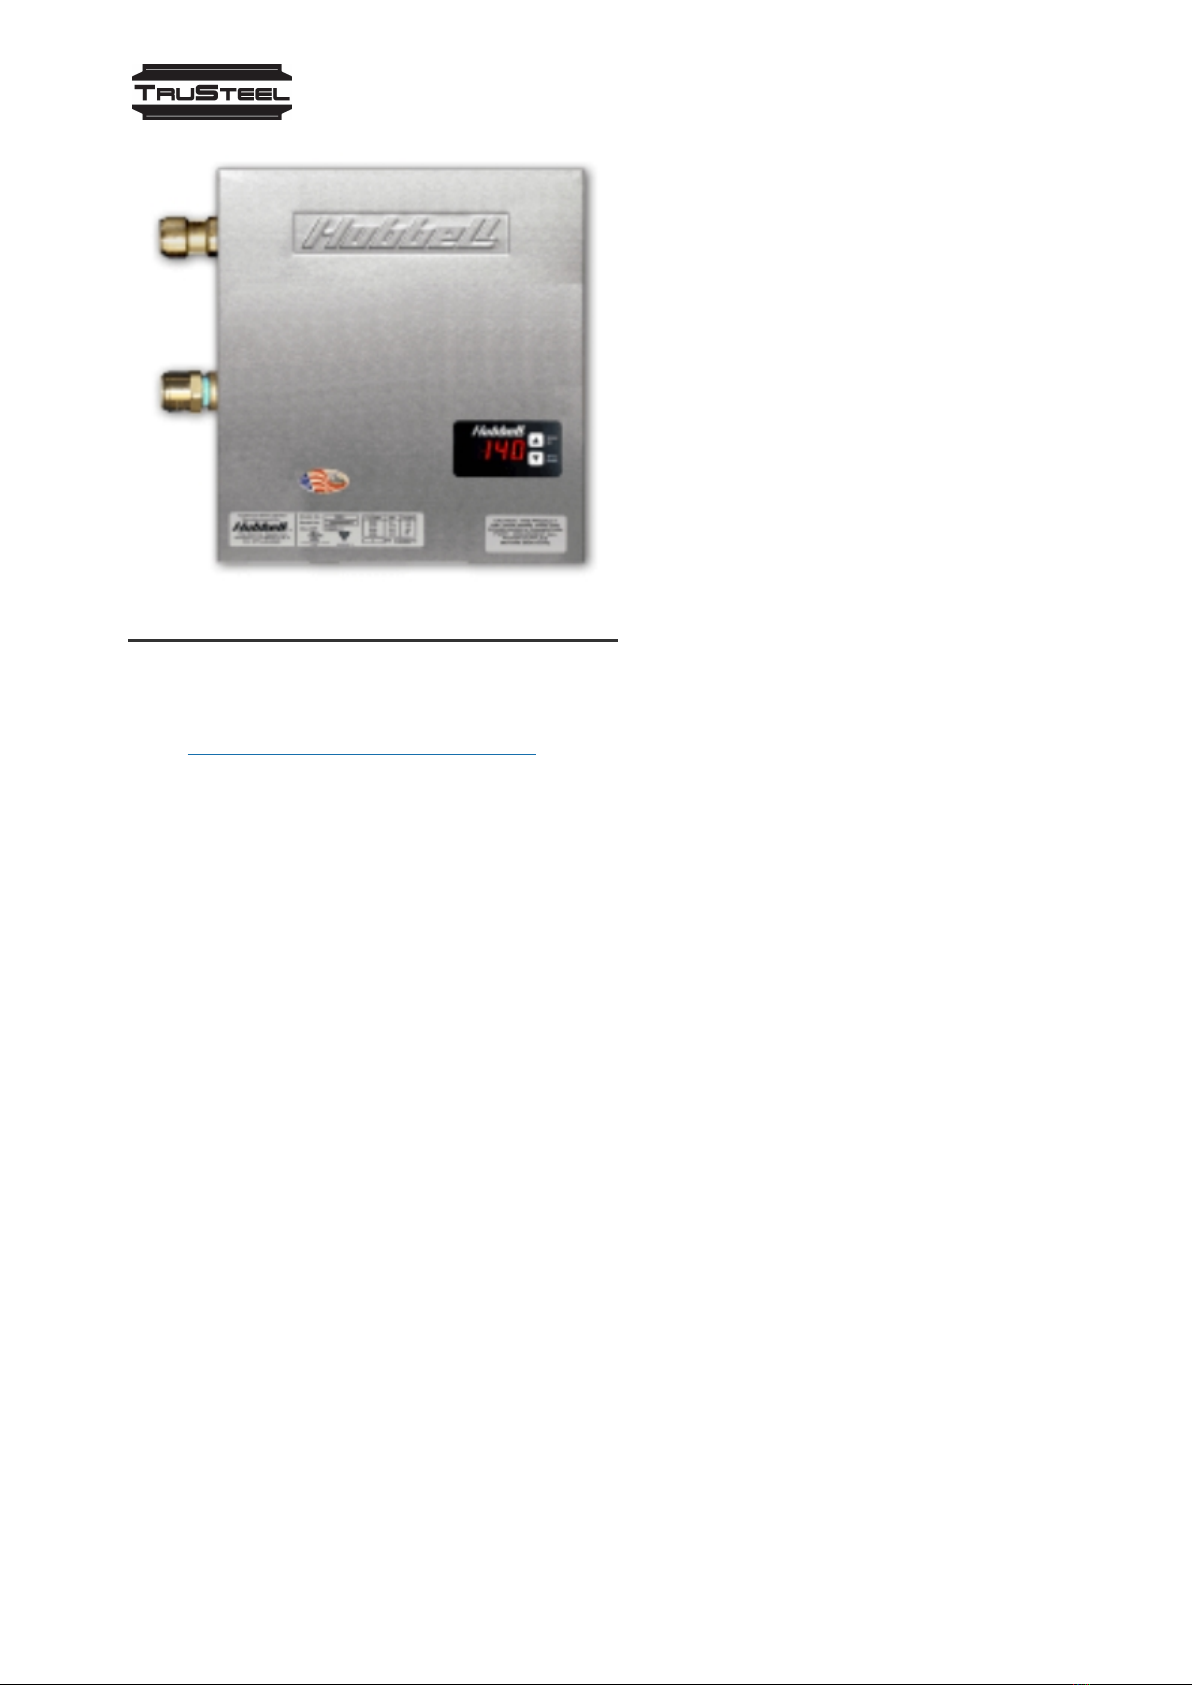
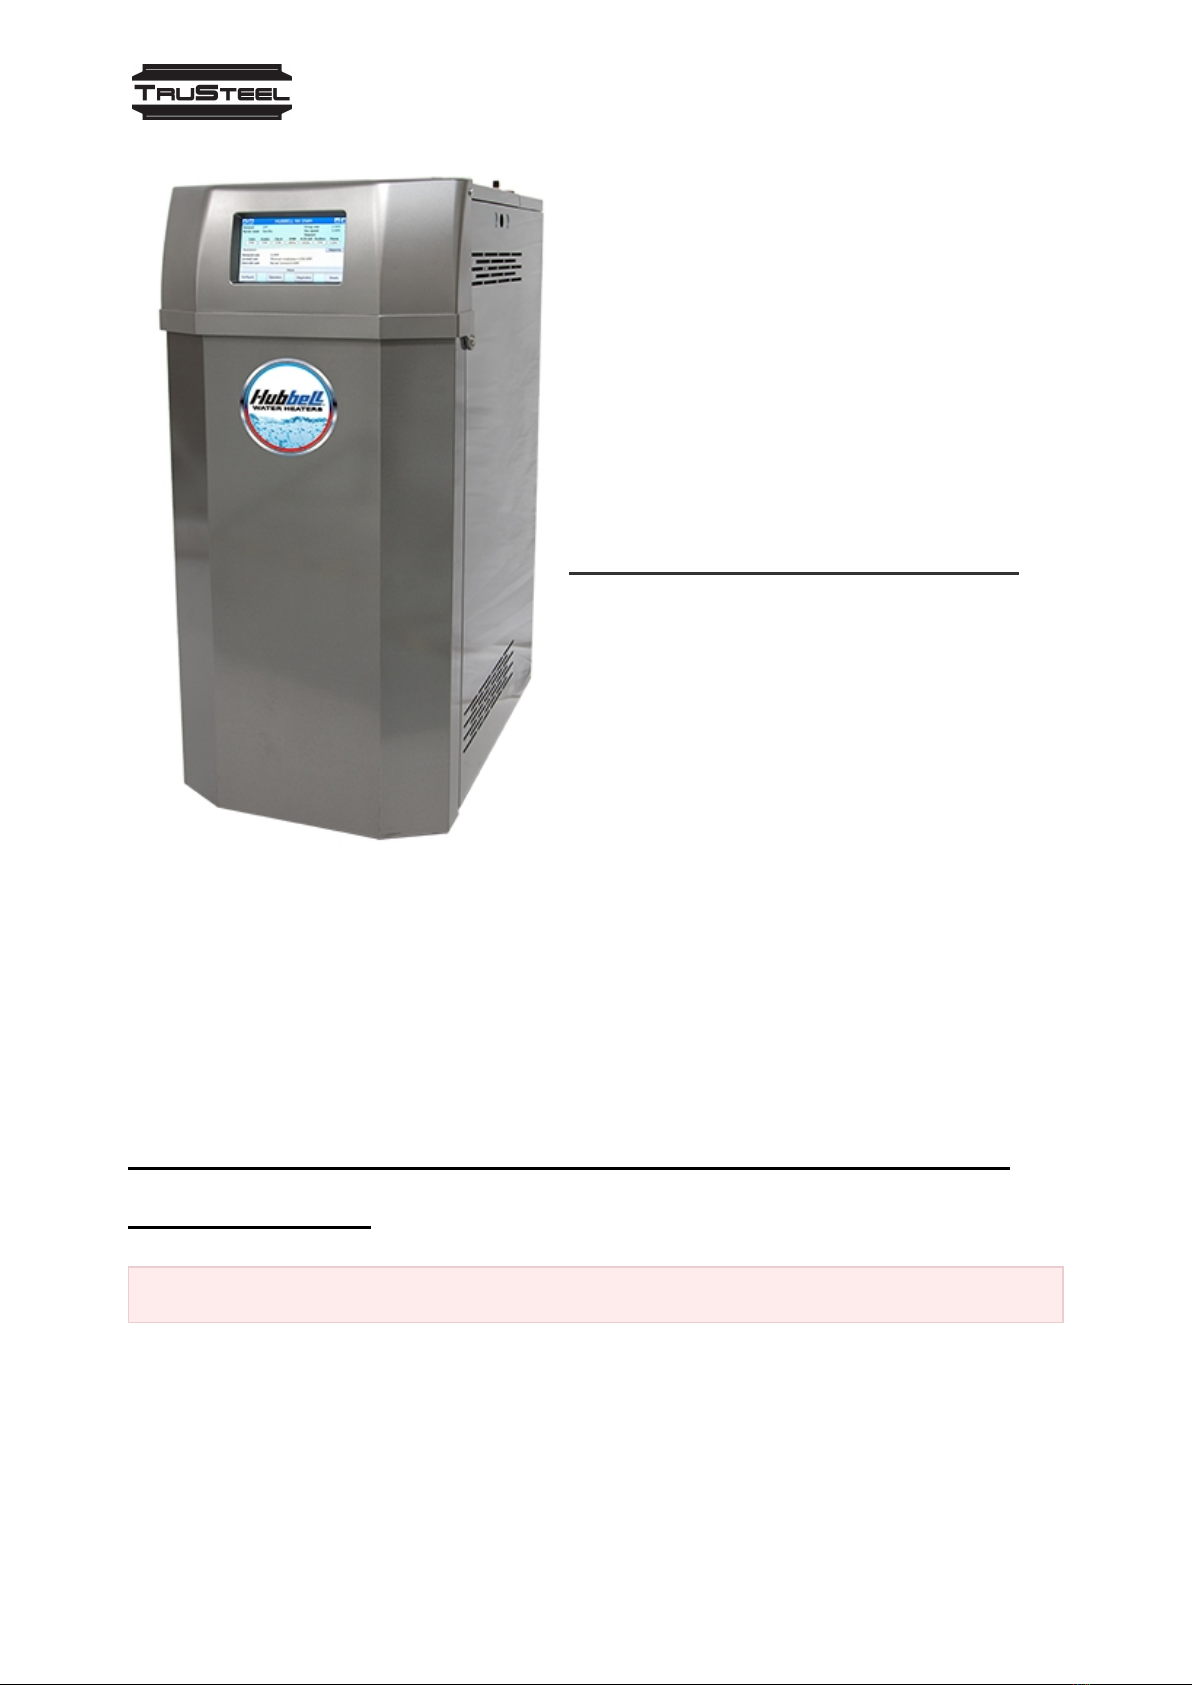
WATER HEATER ......................................................................................... 10
WATER HEATER MANIFOLD ..................................................................... 13
CHILLER ..................................................................................................... 15
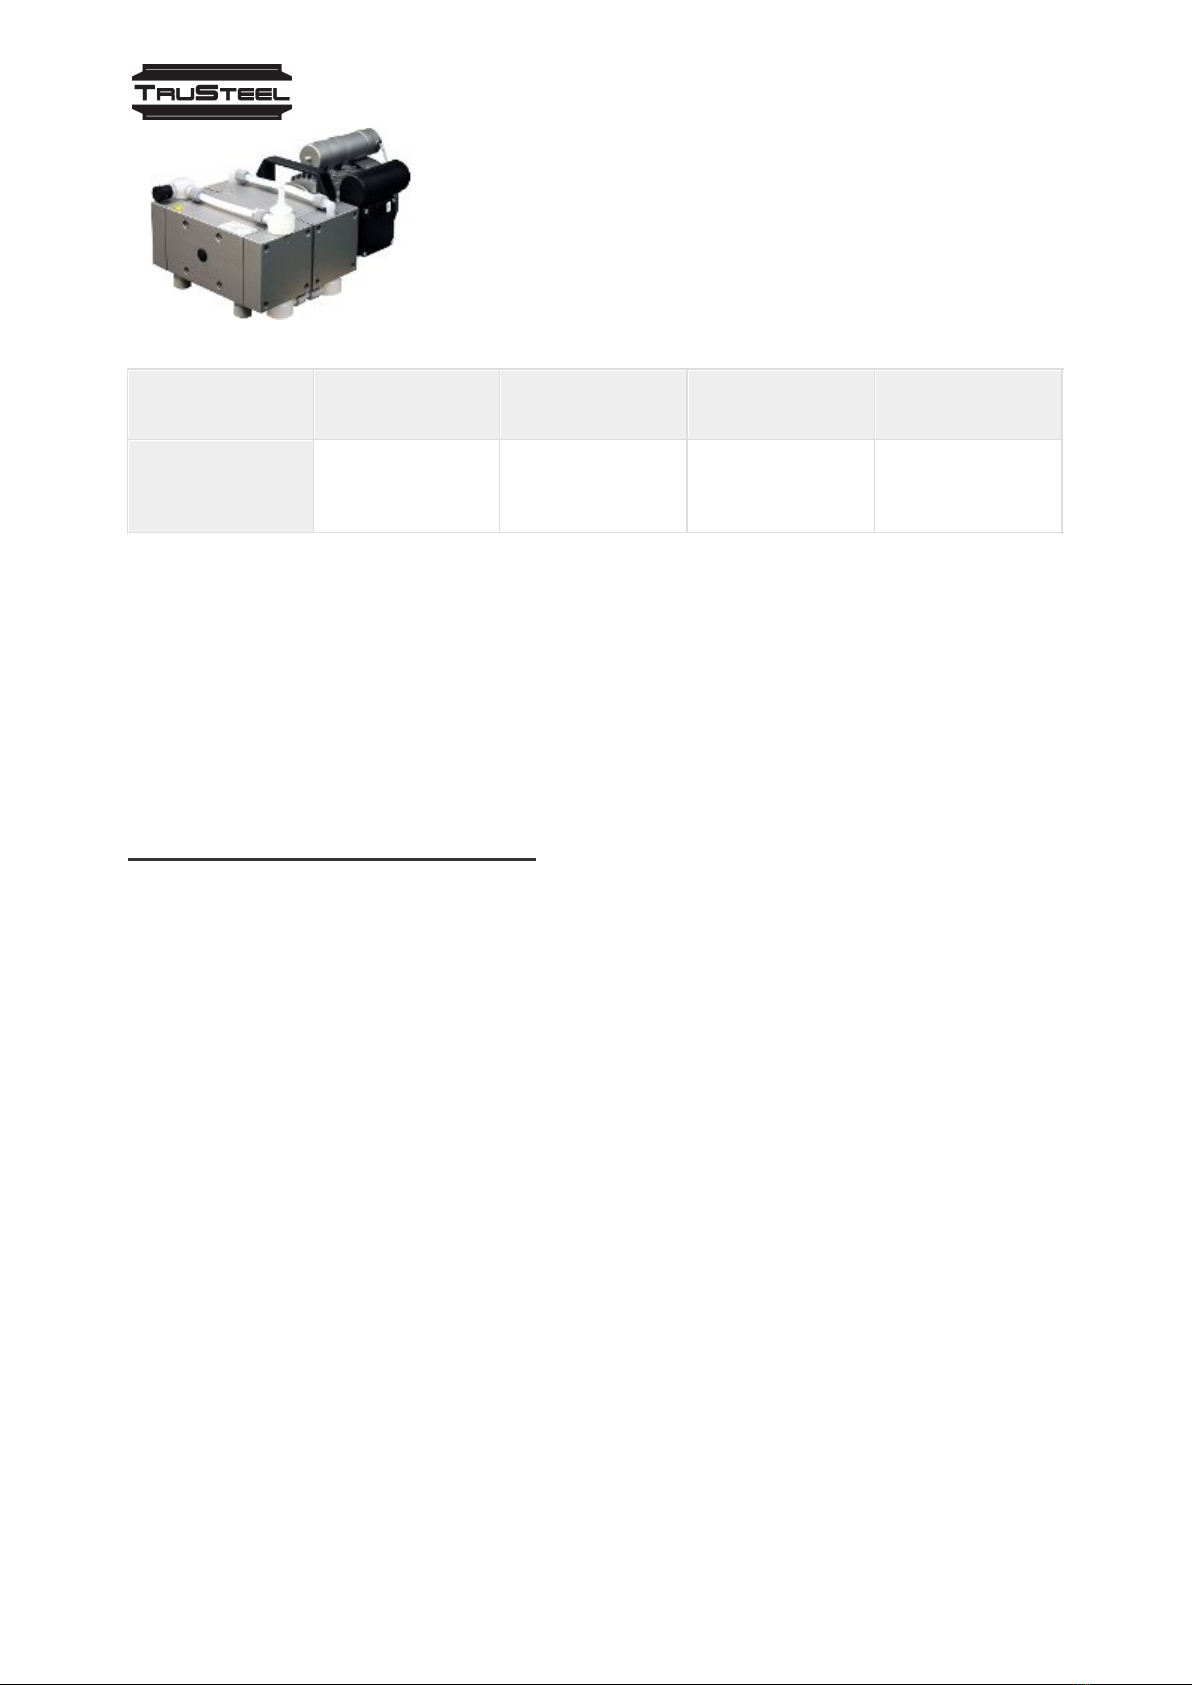
VACUUM PUMP ............................................................................................ 16
PUMPS (VFD'S) ............................................................................................ 17
REQUIRED COMMODITIES ............................................................................... 19
AUTOVAP15 INSTALLATION & STARTUP INSTRUCTIONS .................................. 20
AUTOVAP15 ASSEMBLY ............................................................................... 20
UNBOXING .............................................................................................. 22
ASSEMBLY .............................................................................................. 26
CHILLER FILL & STARTUP ............................................................................ 32
SYSTEM REQUIREMENTS ......................................................................... 32
FILL CHILLER .......................................................................................... 32
Troubleshooting ................................................................................... 33
Alarm Reset Procedure ..................................................................... 33
b1AC Set Point ................................................................................ 34
ALc1 ALARM ON START-UP .............................................................. 35
Contact MTA ............................................................................................ 35
HEATING SYSTEM FILL & STARTUP .............................................................. 36
Prepare Equipment ................................................................................... 36
Prepare To Fill PreHeater (Use Port #1) ...................................................... 37
Fill the System ......................................................................................... 38
Allow Pressure To Rise In System .............................................................. 39
Power On Heater and Recirculating Pump and check system for leaks ............ 39
Adjust Pressure On System (To compensate for heat expansion) ................... 41
Contact Hubbell Support ........................................................................... 41
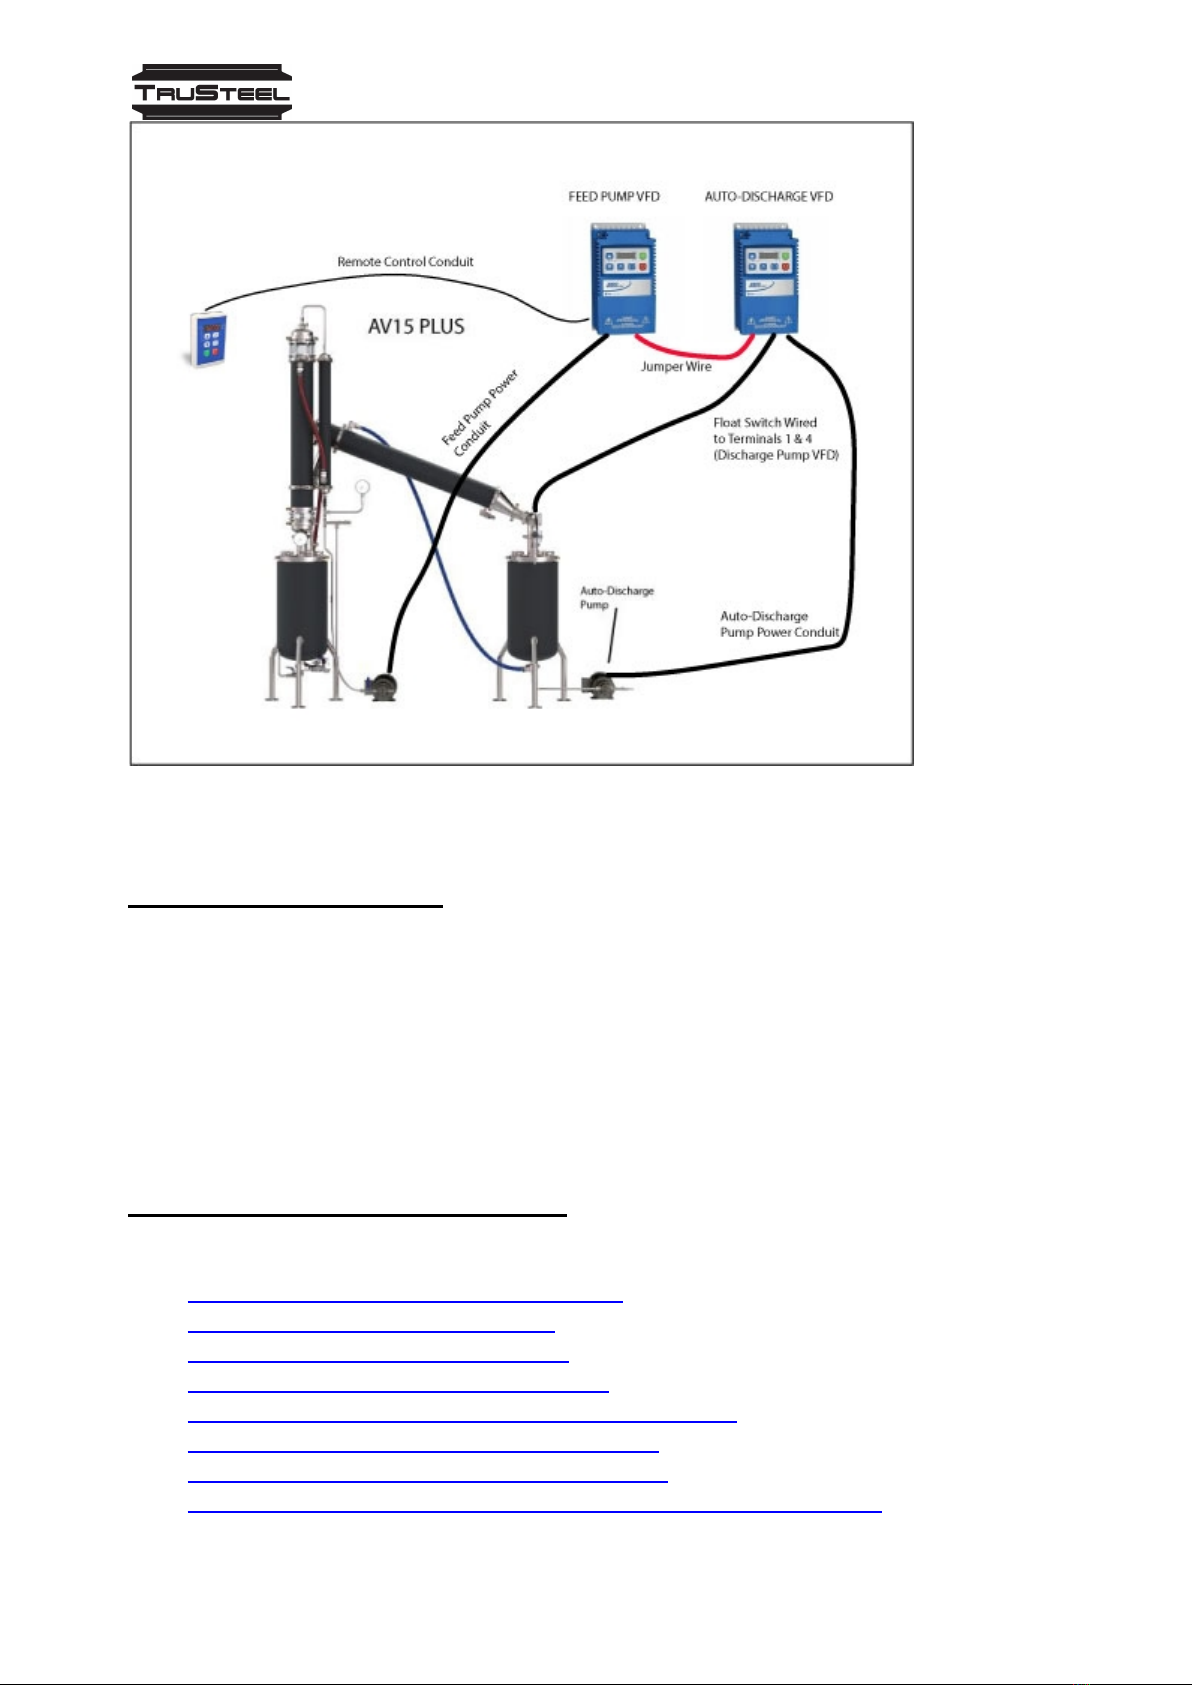
AUTODISCHARGE VFD WIRING .................................................................... 41
SCHEDULE ON-SITE TRAINING AND IQ/OQ ...................................................... 43

AV15 INSTALLATIONMANUAL | TruSteelAutoVap15 Installation Instructions | v. 1.3
3 / 43
INTRODUCTION
Congratulations on your TruSteel equipment purchase! We here at TruSteel are sure you're
going to be impressed at how efficient the the AutoVap recovers your solvent and how EASY
the system is to use.
But, before your AutoVap15 can be installed and run at maximum efficiency, we have to be
sure that your facility is properly set up with all the equipment TruSteel provides you with.
By following the requirements throughout this checklist, you can be sure you will have a quick,
easy install and your AutoVap system will run great for years to come. Setting the stage
properly the first time will save you valuable time and money in the future.
Please take the time to carefully review this manual and refer to it throughout your AutoVap
Installation process.
ABOUT AUTOVAP15
For entry-level solvent recovery, the AV15+ is the best solution. Witha recoveryrate of up
to 20 gallons per hour,theAV15+ recovers up to 99% solvent onthe first pass withthe
added benefit of automated solvent discharge.
Lower your footprint, costs, and time ofoperationwhile eliminating anybottlenecks withthe
AutoVap. Find outwhyallthe leaders inthe extractionindustryare turning to TruSteel.
How the AutoVap15 Works
TheAutoVap15 works bypumping your tincture up througha preheaterbefore being
atomized througha sprayer. The material thanfalls througha heated, jacketed exchanger
where the solvent evaporates,and is "pulled" byvacuum into the condenser exchanger
whichis cooled from a chiller.
The "crude" material is collected inthe Residue Vessel (left vessel indiagram below). For
theAV15+, the solvent collects inthe Solvent Vessel and then is automaticallydischarged
out of the discharge pump.
Note, innon-discharge models, the solvent collects inthe Solvent Vessel and must be
manuallydischarge used pressure.
TheAutoVap15 is simple to cleanand canensure the longevityof yourAutoVap15 system.
AV15 FOOTPRINT
84 x36 x114 (LxWxH inches)

AV15 INSTALLATIONMANUAL | TruSteelAutoVap15 Installation Instructions | v. 1.3
4 / 43
FACILITY LAYOUT
This layout diagram is onlya suggestion to how a facility could layout. The customer is
responsible for consulting with their local fire marshal in order to ensure code
compliance. TruSteel is not responsible for setting up the customer facilityin order to
comply with anylocal codes.
TheAutoVap15 is C1D2 compliant. The ancillary, however, is not and should be placed outside
of the solvent recovery room.
The chiller unit should be placed in a well ventilated area, preferably outside of the facility in the
open air (on a concrete slab or on the roof).
The chiller should be within 50 feet of theAutoVap15 unit in order to be most efficient.

AV15 INSTALLATIONMANUAL | TruSteelAutoVap15 Installation Instructions | v. 1.3
5 / 43
The water heater should be placed outside of the C1D2 room. The electric water heater does not
require ventilation, while the gas heater will require proper ventilation. The water heater, ideally,
should be within 30 feet of theAutoVap15 for full efficiency.
The vacuum pump and heater manifold inline pump should all be outside of the C1D2 solvent
recovery room.
CLICK HERE FOR PDF VERSION
CHECKLISTS
Use the following checklists to keep track of your projects progress. Please print eachof
the following checklists for your records.

AV15 INSTALLATIONMANUAL | TruSteelAutoVap15 Installation Instructions | v. 1.3
6 / 43
EQUIPMENT MANIFEST
Use this checklist as a manifest to ensure all equipmentis delivered and onsite.
Chiller
Your chiller will mostlikelybe shipping directlyfrom the manufacturer via LTL freight.
TruSteel will provide tracking when available.
Please check the delivered chiller for damage before receiving.
Chiller Model #:
Chiller Serial #:
☐ ChillerArrived WithNo Damage
☐ ExpansionTank
☐ Remote Control
Water Heater
The heater unit will be delivered directlyfrom the manufacturer. Please be aware that the
heaterwill take at least 2 weeks to be manufactured.
Tracking will be provided whenavailable.
Heater Model #:
Heater Serial #:
Manifold Package
The manifold package willbe shipped directlyfrom TruSteel. It will include: VFD [Variable
FrequencyDrives], Taco Recirculating Water Pump, Chiller Bypass Manifold, Water Heater
Manifold.
Note: If we determined are using your ownchiller, or heater, we maynot need to send this
package.
(See boxfor packing slip)
Click here to download a copyof a blank packing slip
Inline Pump
Model #:

AV15 INSTALLATIONMANUAL | TruSteelAutoVap15 Installation Instructions | v. 1.3
7 / 43
Inline Pump
Serial #:
Vacuum Pump
Vacuum Pump
Model #:
Vacuum Pump
Serial #:
AutoVap15
TheAutoVap15 will be shipped directlyfrom TruSteel via freightshipment. It is separated
into 2 crates, the VesselBoxand the CoffinBox.
(See Boxfor Packing Slip)
Click here to download a copyof a blank packing slip

AV15 INSTALLATIONMANUAL | TruSteelAutoVap15 Installation Instructions | v. 1.3
8 / 43
AV15 REQUIREMENT CHECKLIST
For your review below are the pre-installationrequirements for theAV15. It is important to
us thatwe caninstall your equipment ina timelyfashionand to do so,the installation
locationneeds to be ready. Allthe items onthis list are required to be
completed BEFORE the arrivalof TRUSTEEL installationtechnicians.
Chiller Requirements
☐ The chiller has power and is wired correctly. (Note:youcan turnthe poweron and see
STANDBYdisplayed)
☐ There is a power disconnect within10 feet of the chiller.
☐ The chiller has sufficient airflow as per the manufacturerʼs suggestion.
☐ The remote controlis wired up and ina mounted ina convenient location.
☐ The expansiontank is properlyinstalled.
☐ The bypass manifold is installed onthe chiller.
☐ The plumbing for the chiller is complete to the ball valves/hose barbs,whichare ona
unistrutonthe wallbehind where theAV15 will be.
Water Heater Requirements
☐ There is power to the water heater.
☐ The water heater manifold, provided byTruSteel, is connected to the heater and mounted
securelyonthe wall.
☐ The manifold is oriented inthe correct position(ports are facing out/Taco Pump control
screenis facing out)
☐ The Taco pump arrow is pumping toward the water heater.
☐ The Taco pump is powered bya wall switch
☐ The gardenhose coupleris installed
☐ The plumbing runis no more than30 feetwithfewer than4 total 90° turns.
☐ The plumbing line is runallthe wayto the ball valves behind where theAutoVap15 will be.
(Note: Runyour lines as straight as possible withas few 90s to maximize the flow)
ForGas Heater,Add the following Requirements
☐ Proper supply of gas to water heater
☐ Flow Meter Switch is installed
☐ Aquastat is properly installed on water line

AV15 INSTALLATIONMANUAL | TruSteelAutoVap15 Installation Instructions | v. 1.3
9 / 43
☐ Altitude was taken into account when calabrating (over 2000 ft. needs calibration)
Vacuum Pump Requirements
☐ There is a 110V outlet, or switch, located where the Welch2052 Vacuum Pump willbe.
☐ The vacuum pump hosing is able to go throughyourwallfrom the AutoVap to the Vacuum
Pump
Variable Frequency Drives for Pumps (Auto Discharge)
☐ The Variable Frequency Drives (Lenze) are mounted and wired in, outside of the solvent
recovery room.
☐ The VFD's are wired together and the solvent recovery float system is wired to the VFD.
☐ Bothconduits are runto the pump/motors
☐ The remote control for the feed pump is wired.
Required Commodities to have on-site
☐ Sump Pump: A clean/new sump pump (1/2 hp or greater) with a short piece of hose (with
hose fittings)…used to fill the water heater line.
☐ ~35 gallon CLEAN reservoir
☐ (2) ~15-20 foot hoses with standard hose fittings on both ends
☐ Distilled Water: At least 50 Gallons of DISTILLED WATER, NOT TAP WATER, on-site.
☐ Propylene Glycol: See Chiller Manual to determine how many gallons you require. Minimum
20 gallons.
☐ Clean Solvent: At least 20 gallons of clean solvent. (To run cleaning cycle)
☐ Tincture: At least 30 gallons of tincture. (To run for training and performance testing)
Required personnel on-site during installation
☐ Anelectricianavailable onthe dayof the installationincase something was wired in
wrong,or if something needs to be altered.
☐ A plumber available throughout the AutoVap installation.

AV15 INSTALLATIONMANUAL | TruSteelAutoVap15 Installation Instructions | v. 1.3
10 / 43
EQUIPMENT SPECIFICATIONS
This sectionprovides important informationfor each piece of equipment that needs to be
installed. Most equipment will have manuals withthem whenthey arrive, but we have also
provided links to the manuals and,insome cases, some extra installationmaterials.
Chiller Electrical Specifications [Plumbing Size: 1"]
TaeEvoTECH121 240V/3Ø/65A
TaeEvoTECH121 480V/3Ø/43A
TaeEvoTECH051 240V/3Ø/26.5A
TaeEvoTECH051 480V/3Ø/13A
Water Heater Specifications [Plumbing Size: 1"]
HX036-6R 208V/3Ø/99.9A Draw
HX033-6T240V/3Ø/86.6ADraw
HX036-6T4 480V/3Ø/43.3ADraw
HX033-6S 240/1Ø/137.5A Draw
HX016-3R 16kW 208V/3Ø/44.4A Draw
HX016-3T16kW 240V/3Ø/38.5ADraw
HX016-3T7 16kW 415V/3Ø/22.3A Draw
Gas Heater - Hubbell NX200 120V/1-Phase/12A Draw
Gas Heater - Hubbell NX300 120V/1-Phase/12A Draw
Variable Frequency Drive Specifications (2 units required forAV15+ [Auto-Discharge]
VFD ESV751--2Y-- 208-240V 1HP/1-3Ph/NEMA1/5A/0-500Hz
VFD ESV751--4T-- 400-480V 1HP/3Ph/NEMA1/2.5A/0-500Hz
Water Recirculating Pump Specifications (Water Heater Manifold)
Taco VR3452-HY1-FC1A00 115v/1Ø/2.5A
Vacuum Pump Specifications
Welch2052 110V/1Ø/3A
WATER HEATER

AV15 INSTALLATIONMANUAL | TruSteelAutoVap15 Installation Instructions | v. 1.3
11 / 43
ELECTRIC WATER HEATER: Model
HX
Tankless Electric Water Heater
Available in33-36 KW Three Phase
Voltages
The Hubbell model HX Tankless electric
water heater is a highlyreliable and
easilymaintained heater designed for
operationina commercial or industrial
application. The Hubbell HX Tankless
heater is compact, extremelyefficient,
takes up minimal space and reduces
operating costs.
Electric Water Heater Technical Documents
·Model HX / TX Brochure PDF
·Model HX / TX WrittenSpec PDF
·Model HX / TX O&M Manual PDF

AV15 INSTALLATIONMANUAL | TruSteelAutoVap15 Installation Instructions | v. 1.3
12 / 43
GAS WATER HEATER: Model NX300
Tankless Electric Water Heater
Available in33-36 KW Three Phase Voltages
The Hubbell model HX Tankless electric water
heateris a highlyreliable and easilymaintained
heater designed for operationina commercial
or industrial application. The Hubbell HX
Tankless heateris compact, extremelyefficient,
takes up minimal space and reduces operating
costs.
Gas Water Heater Technical Documents
·HubbellModel NX Brochure PDF
·HubbellNX O&M PDF
·HubbellNX300 Submittal Sheet PDF
·Model NX300 Spec PDF
Water Heater Requirements
See Water Heater Requirements (SectionAV30 REQUIREMENTS CHECKLIST)
Link To Helpful Video
Important Information
1. The water heatershould be placed OUTSIDE of the room that theAutoVap will be
running in. The heater is NOT C1D2. Place the heater onthe outside of the wall from the
AutoVap withthe manifold attached, and thenplumb your copper (NO FLUX), or PEX,
throughthe wall,into the room. Note: The closer your heater, and the more direct the
plumbing runis, the more efficientyourheater will work withtheAutoVap.

AV15 INSTALLATIONMANUAL | TruSteelAutoVap15 Installation Instructions | v. 1.3
13 / 43
2. The heater manifold, provided byTruSteel, will be installed directlyinto the water heater.
To Install Manifold:
a. Remove plastic pexfitting inside ofthe Sharkbite fitting onthe water heater inletand
outlet.
b. Insert straight copper end into Sharkbite fitting.
c. Make sure manifold is securelymounted withunistrut
3. The copper (NO FLUX) will be runto the shark bite side ofthe ball valves provided. The
ball valves are mounted ona unistrut.
4. The TACO inline water pump will be used to recirculate the water inthe system. This will
essentiallypower up the heater since it needs flow to run.
We suggest putting the Taco pump on wallswitch,rather thana plug outlet, for
convenience. This will essentiallybe your on/off switchfor your heater since the flowpowers
up the heater.
Commodities Needed ByCustomer
Needed to prime the system and for maintenance
1. Youwill need a sump pump (minimum 25 ft. head pressure) to prime the system.
Click Here to Purchase a Sump Pump (or see example)- Amazon.com
2. Short piece of garden hose, withhose fittings to connect sump pump to manifold intake.
Click Here to Purchase (or see example) - Amazon.com
3. Distilled Water (about 20 gallons): You'll need around 50-60 gallons total, including the
chiller requirements.
4. ~35 gallonreservoir
Click Here to Purchase a Reservoir (or see example)-Amazon.com
Contact Hubbell Heaters
Call: (800) 647-3165
Or: (203) 378-2659
WATER HEATER MANIFOLD
The TACO Inline Recirculating Pump is part of the heater manifold that is supplied by TruSteel.
It is highly suggested to connect the power of the pump to a wall switch. Place the wall switch in
a convenient location for your facility operators. This pump essentially powers on the water
heater by supplying flow.
RECIRCULATING PUMP

AV15 INSTALLATIONMANUAL | TruSteelAutoVap15 Installation Instructions | v. 1.3
15 / 43
CHILLER
MODEL TaeEvoTECH
Air Cooled Chillers
The TAEevo range of air-cooled chillers are a packaged unit
designed for industrial applications. They are supplied with
hermetic scroll or reciprocating compressors and an
innovative finned pack evaporation inside the storage tank.
Technical Documents
·Complete Installation Instructions (PDF)
·TaeEvoTech Data Sheet
SEE CHILLER REQUIREMENTS

AV15 INSTALLATIONMANUAL | TruSteelAutoVap15 Installation Instructions | v. 1.3
16 / 43
Important Information
1. The chiller should be placed OUTSIDE of the facility, either on a roof, or a concrete
slab. If placed inside, proper HVAC ventilation is required. The
chiller CANNOT operate in a closed space; the unit dissipates a lot of heat. Please
contact MTA (Manufacturer) if you have any doubt of chiller placement.
2. The bypass manifold, provided by TruSteel, should be properly installed by a
plumber.
3. The copper plumbing(Crimped or Push Connect – NO FLUX) will be run to the shark
bite side of the ball valves provided. The ball valves are mounted on a unistrut.
4. The chiller requires a propylene glycol/water mixture. Please refer to the
Installation Instructions to verify how much propolyene glycol your unit will require.
(Ratio is climate dependant) Link to Purchase
5. Please note that the chiller IS NOT powered by the 15. The chiller is not controlled
by the AutoVap15.
6. Don't forget to wire up your remote control for the chiller. The remote will make it
very
convenient to put the chiller into STANDBY mode when not in use.
Helpful Information
Link To Purchase Propylene Glycol
Contact MTAfor Installation Inquiries
West Coast Customer Service
Joel Gordon (206) 851-8456
jgordon@mta-usa.com
East Coast Customer Service
Jim Kirchoff (248) 880-4025
jkirchoff@mta-usa.com
VACUUM PUMP

AV15 INSTALLATIONMANUAL | TruSteelAutoVap15 Installation Instructions | v. 1.3
17 / 43
Model Welch 2052
Welch 2052 2.3 cfm Full Chemical-Resistant 4-Head
Diaphragm Pump
The original Welch 2052 is a full chemical-resistant (not like
its cheaper version), 4-head, oil-free dry diaphragm vacuum
pump with all-PTFE contact surfaces and deep vacuum
capability. Oil-Free, portable, full chemical-resistant, means
less maintenance and no more frequent and costly oil
change, or cross contamination.
MODEL ELECTRICAL R
EQUIREMENTS PUMPING RATE UNIT DIMENSI
ONS WEIGHT
WELCH 2052 110V 60Hz single
phase 0.53 HP,
390 watts 2.3 cfm 9 × 15 × 7 inches 40.3 Lb
Vacuum pump is connected toAutoVap with a braided silicone hose (provided by TruSteel)
The customer may choose to run a discharge line from the vacuum pump in the event that
solvent gets “pulled” through the vacuum.
TruSteel suggests putting the vacuum pump on a wall switch to make easy on/off for facility
operators.
Technical Document
·Welch 2052 Operation Manual
SEE VACUUM PUMP REQUIREMENTS
PUMPS (VFD'S)

AV15 INSTALLATIONMANUAL | TruSteelAutoVap15 Installation Instructions | v. 1.3
18 / 43
TheAV15+ has (2) pumps that are powered byVFD's:The feed pump (located onthe left)
and theAuto-Discharge Pump (located onthe right).
How Auto-Discharge Works:
The feed pump,controlled bythe remote control, continuouslyfeeds material throughthe
system. As the solventcollects inthe Solvent Vessel(about 3-4 gallons),the bottom float
switchwill trigger. This will activate theAuto-Discharge Pump and discharge the solvent.
Whenthe solvent is completelydischarged,theAuto-Discharge Pump will deactivate.
There is a second, higher float switchinthe Solvent Vessel that will automaticallySTOP the
feed pump if triggered. This ensures youwill never overfill your Solvent Vessel inthe event
the bottom float mechanism ever fails.
Technical Documents and Instructions
Lenze VFD InstallationManual
·AC TechLenze SMVector NEMA 4X Flyer
·AC TechLenze SMVector Brochure
·AC TechLenze SMVector Datasheet
·AC TechLenze SMVector Wiring Tutorial
·Lenze SMV FrequencyInverter Operating Instructions
·AC TechLenze SMVector 1HP CAD Drawing
·AC TechLenze Keypad InstallationInstructions
·AC TechLenze SMVector EMP Programmer Operating Instructions
Note: Onlythe Feed Pump VFD will have a remote control.

AV15 INSTALLATIONMANUAL | TruSteelAutoVap15 Installation Instructions | v. 1.3
19 / 43
IMPORTANT DOCUMENT: Use these instructions to connectyour two VFD's to "talk" so
the auto discharge works correctly.
Auto-Discharge Wiring Instructions
REQUIRED COMMODITIES
The following is a list of required commodities required to have on site for installation. You
will be asked to have these commodities shownduring your FacilityVideo Call prior to your
installation.
Please note that youshould buyallthis equipment NEW. Unsanitary equipment can
damage theAutoVap system.
Required Commodities to have on-site
☐ Asump pump (with at least 25 ft. head pressure) with a short piece of hose (with hose
fittings) and 35+ gallon reservoir/tote…used to fill the water heater line.
Link to Purchase Sump Pump (Amazon)
Link to Purchase Sump Pump (Home Depot)
Link to Purchase Hose (Amazon)
Link to Purchase Reservoir
☐ An air compressor dedicated to use with theAutoVap (used for discharge at 3-5psi).
Link to PurchaseAir Compressor (Home Depot)
☐ At least 50 gallons of DISTILLED WATER, NOT tap water, on site.
Purchase this locally from the store or from a water distributor.
☐ At least 20 gallons of PROPYLENE GLYCOL on-site at the date of installation. (To fill the
Chiller)
Link to Purchase Dowfrost Propylene Glycol (96%) - 5 Gallons
☐ At least 20 gallons of clean solvent. (To run the cleaning cycle on theAutoVap)
This should be the same solvent you are using in your extraction.
☐ Tincture: At least 30 gallons of tincture. (To run for training and performance testing)

AV15 INSTALLATIONMANUAL | TruSteelAutoVap15 Installation Instructions | v. 1.3
20 / 43
AUTOVAP15 INSTALLATION & STARTUP INSTRUCTIONS
AUTOVAP15 ASSEMBLY
LINK TO AV15 UNBOX VIDEO
Tools You will need
• 2 People
• Ladder
• 7/8” Wrench
• 5/8” Wrench
Here is a picture of the AutoVap15 (with Auto Discharge) fully assembled.
Note, this picture does not show the hoses from the chiller and water
heater, the vacuum pump hose, or the conduits run to the motors for the
pumps.
Table of contents
Other TruSteel Industrial Equipment manuals
Popular Industrial Equipment manuals by other brands

Progres
Progres AGRONIC 2500 Assembly manual

Magnescale
Magnescale DT32N instruction manual

ITEM
ITEM Linear Unit LRE 8 D14 80x40 KU 80 Notes on Use and Installation

C.E. Nierhoff & Co
C.E. Nierhoff & Co C815 troubleshooting guide

Parker
Parker 20-606 Installation, operation and maintenance manual

MR
MR ECOTAP VPD 3 30D-24 operating instructions