manuals.online logo
Brands
  1. Home
  2. •
  3. Brands
  4. •
  5. Tsun
  6. •
  7. Inverter
  8. •
  9. Tsun TSOL-MS800 Original operating instructions

Tsun TSOL-MS800 Original operating instructions

Microinveer Installation
Installation Steps
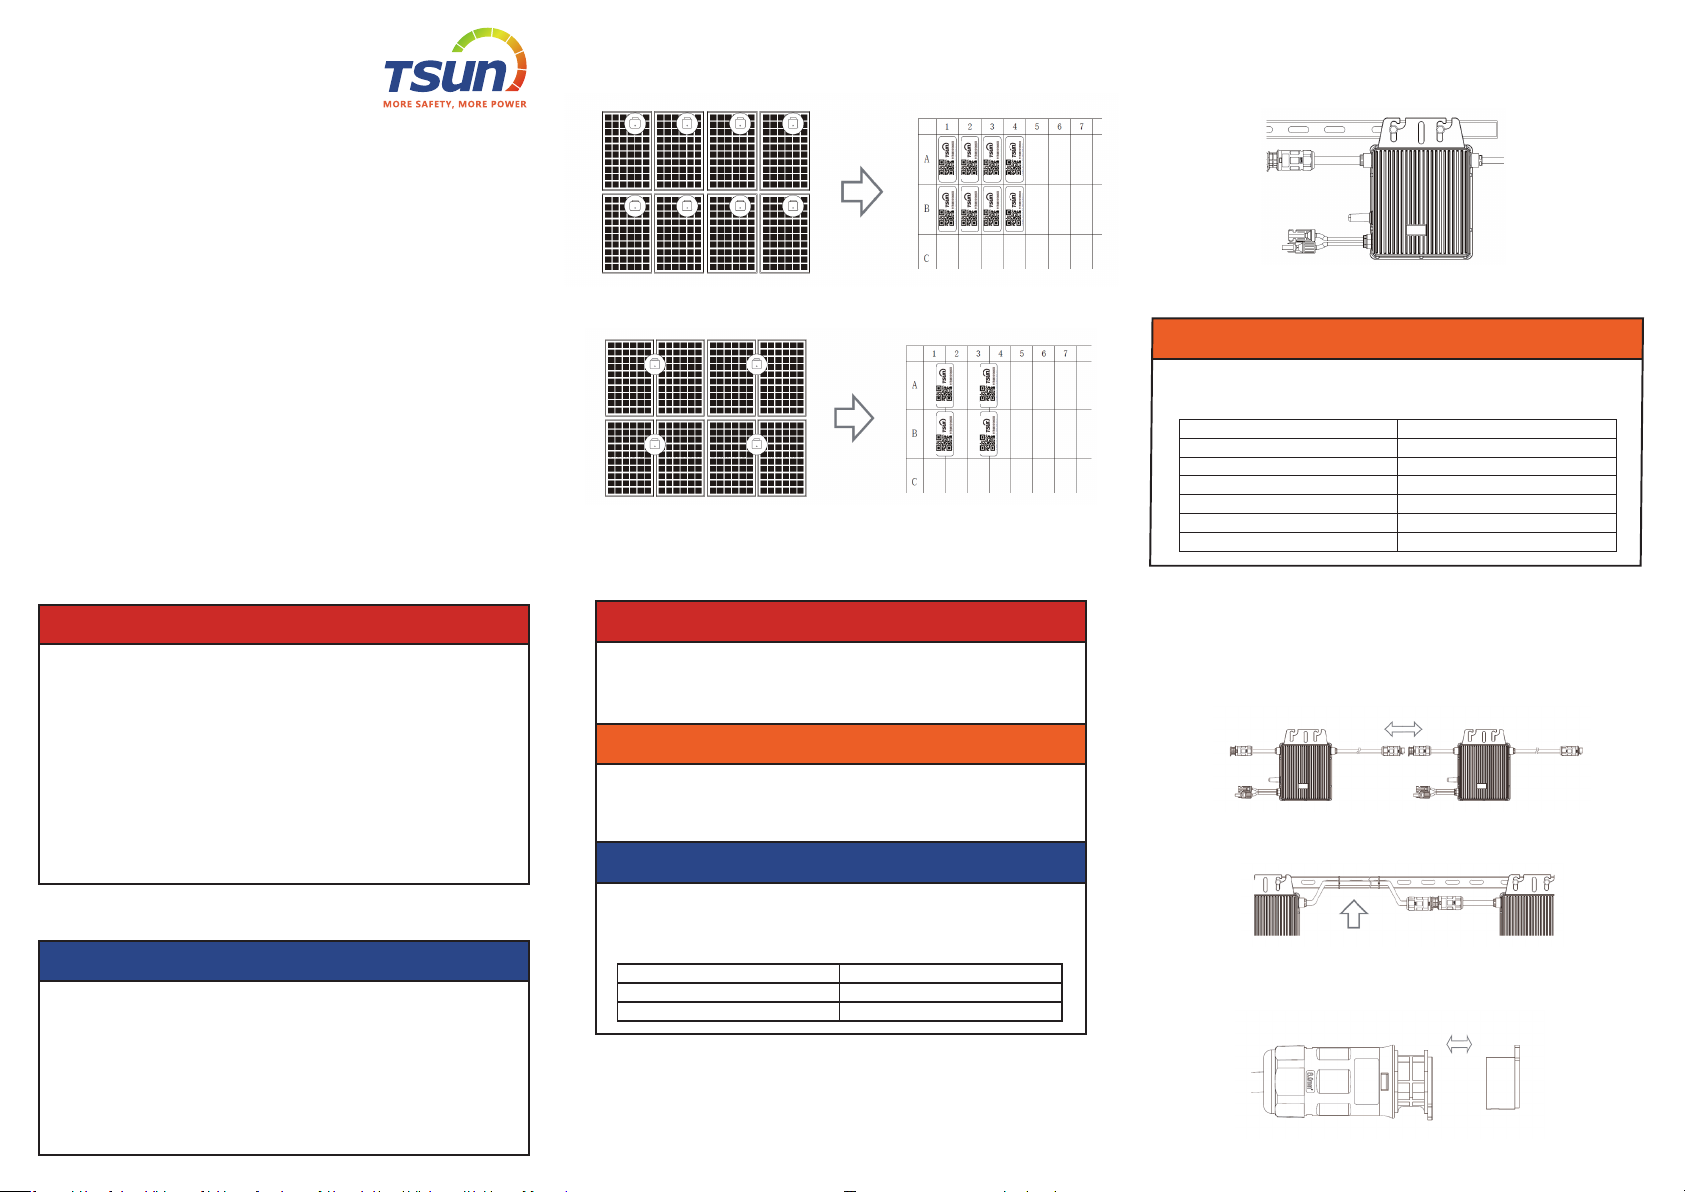
Step 1. Make an installation map
Step 2. Fix the microinveer.
Step 3. Connect the AC cable of two microinveers
DANGER
CAUTION
MICROINVERTER
Quick Installation
When choosing the position of installation, comply with the following
conditions:
Take out the SN labels and installation map from the package. Paste
the SN labels on the installation map as below and complete the
information of the solar plant.
TSOL- MS400/MS350/MS300
TSOL- MS800/MS700/MS600
Choose an installation position. Using two pairs of screws and nuts
to x the microinveer on the frame. Make sure that the label of
microinveer should be upside.
Eve micro-inveer could be connected to the other one by its
AC cables.
Plug the female AC connector of one microinveer into a male AC
connector of another micro-inveer to form a continuous AC
branch circuit.
Use Nylon cable ties to x the AC cables onto the frame.
Use a Connector Protective Cap to make sure the unused AC
connector to be closed.
· To avoid unwanted power derating due to an increase in the
internal temperature of the inveer, do not expose it to direct
sunlight.
· To avoid overheating, always make sure the ow of air around the
inveer is not blocked.
· Do not install in places where gasses or ammable substances
may be present.
· Avoid electromagnetic inteerence that can compromise the
correct operation of electronic equipment.
· It’s recommended to install microinveer on structures under-
neath the photovoltaic modules so that they work in the shade.
· Use a mobile phone to check the Wi-Fi signal strength at the
installation position. If the Wi-Fi signal is bad, t to install the
microinveer at another position or move the Wi-Fi router.
·Only qualied personnel should install, troubleshoot, or replace TITAN
micro inveers or the cable and accessories.
·Before installation, check the unit to ensure absence of any transpo
or handling damage, which could aect insulation integrity or safety
clearances.
·Unauthorized removal of necessa protections, improper use,
incorrect installation and operation may lead to serious safety and
shock hazards or equipment damage.
·Be aware that installation of this equipment includes risk of electric
shock.
·If there are more than one installation site, please make the
installation map separately and give a clear description about the
installation site.
·The row of the table corresponds the shoer side of PV module and
the column of the table corresponds the longer side of PV module.
The direction on the upper left corner means the actual installation
orientation.
DANGER
WARNING
CAUTION
·Do not install the equipment in adverse environment conditions such
as ammable, explosive, corrosive, extreme high or low temperature,
and humid.
·Choose installation location carefully and adhere to specied cooling
requirements. Micro-inveer should be installed in a suitable position
with good ventilation and no directly sunshine.
·There are no screws and nuts in the package.
·The distance between eve two micro-inveers should meet the
length of AC cables. The length of AC cables are shown as below:
WARNING
·According to the max current of the AC cables, there is a max
installation quantity for the micro-inveer in each cable section.
Model
Model
TSOL-MS800
TSOL-MS700
TSOL-MS600
TSOL-MS400
TSOL-MS350
TSOL-MS300
Quantities for each cable section
4
5
6
9
10
12
Cable Length
2.5 m
1.4 m
TSOL-MS800/MS700/MS600
TSOL-MS400/MS350/MS300
Step 4. Connect the AC end cable of each cable
section
Step 6. Sta the System
Step 5. Connect the DC cable
Take out the AC connector from the package. Separate the AC
connector as shown below.
Get the AC cable through the shell of AC connecter and connect
the cable to the right po.
The denition of the po is shown below:
If the microinveer is connected to 120/240V split-phase power
grid, connect two live lines to po L and po N.
If the microinveer is connected to 230/400V three-phase WYE
power grid, connect the live line to po L and connect the neutral
line to po N, as the connection of single-phase power grid.
If the microinveer is connected
to 127/220 V three-phase
power grid, connect one live line
to po L and connect another
live line to po N.
Reassemble the AC connector
as shown below.
Plug the AC connector into the microinveer and connect the AC
cable to the AC distribution box.
While installation is all nished, turn on the main utility-grid AC
circuit breaker. Your system will sta producing power after about
a two-minute wait time.
The LED will ash green and red at sta up. The denition of LED
is shown as below.
Install the PV modules and connect the DC cable to the microin-
veer.
CAUTION
·If the DC cable is too sho for installation, use a DC Extension Cable
to connect PV modules to the microinveer.
·Use MC4 compatible DC connectors in the inveer side of DC
extension cable, or get the DC connectors form TSUN.
·Contact PV module manufacturers for the requirements of DC
connectors in the module side of DC extension cable.
DANGER
CAUTION
·Only qualied personnel should connect this system to the utility grid.
·Do not connect micro-inveers to the grid or energize the AC
circuit(s) until you have completed all the installation procedures and
have received prior approval from the electrical utility company.
·When the photovoltaic array is exposed to light, it supplies a DC
voltage to the inveer.
·Ensure that all DC cables are correctly wired and that none of the
wires are pinched or damaged.
·The DC conductors of this photovoltaic system are ungrounded and
may be energized.
·The maximum open circuit voltage of the PV module must not exceed
the specied maximum input DC voltage of the TSOL micro inveer.
Status
Solid Green Standby/Waiting/Checking Status
Working normally
Working abnormally
Fault
Fishing Green (1s)
Fishing Red
Solid Red
Indicates
DANGER
WARNING
CAUTION
·Do not install the AC junction box without rst removing AC power
from the system.
·To prevent electrical hazards, make sure the micro-inveer system is
disconnected from the home distribution network and the AC breaker
is open.
·Ensure that all AC cables are correctly wired and that none of the
wires are pinched or damaged.
·Use AWG 12 ( 4 mm²) cable for AC end cable.
The installation technician is responsible for selecting a kind of AC
cable and connecting the micro-inveer system into the home
distribution network correctly.
·The AC connecters may be provided by dierent suppliers. The po
denitions are subject to actual objects.
L: Live (Brown/Red)
N: Neutral (Blue/Black)
PE: Ground (Yellow-Green)
DANGER
WARNING

This manual suits for next models

5

Other Tsun Inverter manuals

Tsun TSOL-MS400 User manual

Tsun

Tsun TSOL-MS400 User manual

Tsun TSOL-M350 User manual

Tsun

Tsun TSOL-M350 User manual

Tsun TSOL-M350 User manual

Tsun

Tsun TSOL-M350 User manual

Tsun TSOL-ESK350-E User manual

Tsun

Tsun TSOL-ESK350-E User manual

Tsun TSOL-ESK400-Air (V) User manual

Tsun

Tsun TSOL-ESK400-Air (V) User manual

Tsun TSOL-ACU3.0K User manual

Tsun

Tsun TSOL-ACU3.0K User manual

Tsun TITAN TSOL-MP3000 Original operating instructions

Tsun

Tsun TITAN TSOL-MP3000 Original operating instructions

Tsun TSOL-MS2000 User manual

Tsun

Tsun TSOL-MS2000 User manual

Tsun TSOL-ESK400-Air(V) User manual

Tsun

Tsun TSOL-ESK400-Air(V) User manual

Tsun TSOL-MX400 User manual

Tsun

Tsun TSOL-MX400 User manual

Tsun TITAN TSOL-MP3000 User manual

Tsun

Tsun TITAN TSOL-MP3000 User manual

Tsun TSOL-MS400 Original operating instructions

Tsun

Tsun TSOL-MS400 Original operating instructions

Tsun TSOL-ACU3.0K User manual

Tsun

Tsun TSOL-ACU3.0K User manual

Tsun TSOL-MS400 Original operating instructions

Tsun

Tsun TSOL-MS400 Original operating instructions

Tsun TSOL-ACU3.0K User manual

Tsun

Tsun TSOL-ACU3.0K User manual

Tsun SOL-RSDM-DD User manual

Tsun

Tsun SOL-RSDM-DD User manual

Tsun TITAN TSOL-MP3000 User manual

Tsun

Tsun TITAN TSOL-MP3000 User manual

Tsun TSOL-Easy Solar Kit 400-U User manual

Tsun

Tsun TSOL-Easy Solar Kit 400-U User manual

Tsun TSOL-ESK400-SE User manual

Tsun

Tsun TSOL-ESK400-SE User manual

Popular Inverter manuals by other brands

Onan NH Operator's manual

Onan

Onan NH Operator's manual

Mitsubishi Electric FR-F800 Sample Screen Manual

Mitsubishi Electric

Mitsubishi Electric FR-F800 Sample Screen Manual

SMA SUNNY TRIPOWER X 12 technical information

SMA

SMA SUNNY TRIPOWER X 12 technical information

SolarEdge BI-EU1P Quick installation guide

SolarEdge

SolarEdge BI-EU1P Quick installation guide

Champion 100238 Owner's manual & operating instructions

Champion

Champion 100238 Owner's manual & operating instructions

Srne HF2430S80-H user manual

Srne

Srne HF2430S80-H user manual

Hoymiles MI-1000NT user manual

Hoymiles

Hoymiles MI-1000NT user manual

Samlexpower Evolution EVO-2212 owner's manual

Samlexpower

Samlexpower Evolution EVO-2212 owner's manual

Analytic Systems IPS2000 Installation & operation manual

Analytic Systems

Analytic Systems IPS2000 Installation & operation manual

Mitsubishi Electric Freqrol-A100 instruction manual

Mitsubishi Electric

Mitsubishi Electric Freqrol-A100 instruction manual

Mastervolt Whisper 6 user manual

Mastervolt

Mastervolt Whisper 6 user manual

V-TAC VT-11024-4G installation instructions

V-TAC

V-TAC VT-11024-4G installation instructions

R&S SGS100A Getting started

R&S

R&S SGS100A Getting started

Keysight M8194A user guide

Keysight

Keysight M8194A user guide

SOtM sCLK-OCX10 operating instructions

SOtM

SOtM sCLK-OCX10 operating instructions

Chilicon Power CP-720 Residential Design and Installation Guide

Chilicon Power

Chilicon Power CP-720 Residential Design and Installation Guide

Industrial Scientific Solar Power Supply quick start guide

Industrial Scientific

Industrial Scientific Solar Power Supply quick start guide

York RVHC-09 Service manual

York

York RVHC-09 Service manual

manuals.online logo
manuals.online logoBrands
  • About & Mission
  • Contact us
  • Privacy Policy
  • Terms and Conditions

Copyright 2025 Manuals.Online. All Rights Reserved.