Tuff Luff 1205 User manual

1. Insure the crew is not sheeting the Genoa too soon before the sail is fully hoisted and
proper Luff tension is applied. Sheeting the Genoa too soon will result in
compressing the boltrope and pulling the boltrope out of the feeder and prefeeder, and
can damage the TuffLuffjust above the feeder.
2. The Luff sail tape should be the correct length. Please insure the Lufftape is 6
below the feeder. A short Lufftape can pull out of the TuffLuff and can crack the
foil.The feeder supports the foil and the loo tape ..The tape should clear the
prefeeder and be 6 longer than the main feeder.
3. Careful attention to proper halyard lead is very important.Insure that the lead is
parallel to the TuffLuft:' An improper lead aloft can pull the sail out of the top of the
foil.
4. Ensure the Lrifftape is clean and the Tuff Luff is clean. Ifnecessary, have your
sailmaker make a cleaner device in order to clean your TuffLuff. Use a dry
lubricant, such ~ McLube on the boltrope.
5. When not sailing, it is important to tension the TuffLuffto prevent the foil from
resonating (vibrating) at the dock or during winter storage. The foil is an advanced
PVC formulation, but is plastic. A 2-foot length ofLufftape with grommets can be
manufactured by your sailmaker to allow the TuffLuffto be tensioned.
6. If stored on the headstay during the winter, insure the TuffLuff is straight and
protected properly during winter storage, as improper care is not covered under
warranty. Do not remove the TuffLuff once installed. Re-installing the Tuff Luff in
cold conditions can lead to br~e.
7. Not all Lufftape is the same both in quality and sizing and this can cause problems
with the foil. Some #5 boltrope as well as #6 boltrope is fractionally different.
Ensure that your sailmaker is aware of this. .
8. Check the Lufftape for tears, damage, as a poor lufftape can damage the TuffLUff
foil.

Rigging
Hints and
Tips
Correct Incorrect
,
..
~
,
Correct halyard lead is critical to reducethe chances of damage to the head of the Tuff Luff extrusion.
Proper halyard lead should be parallel to the headstay,notat a reduced a.q.gle.
*
Avoid striking the TuffLuffwith
spinnaker poles.
*
Never raise or lower the sail without
the feeder.
*
Always inspect the TuffLufffor wear
and damage.
*
Always use the pre-feeder when raising
sail.
*
Avoid chafing sheets against foil.
*Abuse of system does not qualify for
warrantYreplacement.
*
Use ofa dry lubricant may reduce
friction between sail and Tuff Luff.
*
Do not sheet in genoa untilsail is
fully raised.
*
Loading of sail while hoisting·will
damage the foil.
Correct Incorrect
Headsaillufftapemust extend'belowthe TuffLuff
feeder when sail is raised fully. Too shortof a tape·
willallowthe sails to be pulled down without running
through the feeder.
Luff tape should extend 6 below thefeeder.
Any questions regarding the safe and proper operation ofTuffLuff
headstay systems should be directed to Schaefer Mqrine.Proper
SCHAEFER
use of this prod~ct should pr~vide ye~rs of use without hassle.
LEG END A RY5T
RE
NGrH
Improper use will cause plastic extrusion to deform and break.
Schaefer Marine Inc.,
158Duchaine Boulevard
New Bedford, MA 02745-1293
Phone:508.995.9511
Fax:508.995.4882.
Web: www.schaefennarine.com
E-mail address:sales@schaefermarine.com

7J.
o=/ff
1=1=,.
The Unique One-
1I1i1iILIi/IiIiPiece Headstay System
(-.
ASSEMBLY INSTRUCTIONS
MODEL1205 1706 and 2206
METHOD A: Installing
lU lu ~
Headstay Luff System with mast stepped: When using Model 1205with a-12 headstay,
use Method C.The 'zero clearance' with-12 rod prevents sliding TUFF LUFF as employed with Method A or B.
y-
1
Tools required:
1) Hacksaw or fine-toothed saw
2) Slotted screwdriver\~
3) Pliers
4)Tape measure
2Unpack system. Partsincluded
are:
1) Coiled extrusion withfeeder
2)Feeder with 4-40 SS machine
screw
3)Prefeederwith seizing line
4) Two spacer tubes, 4" and44"
5) White marine tape
4
Use jib halyard 'to raise tape mea-
sure to masthead, measure to mark
(from step 3), and then subtract 4"
for top spacer tube.
7.
Tape lull length of top spacer tube
'wl{-
the tape provided (Black tape
is used in Photos fO-1:picture
clarity).
5
Layout and cut extrusion tothis
length. Cut only from top end(end
without
feeder attached).
\
8
Insure that headstay is taut.Start
extrusion onto headstay by spread-
ing it with screwdriver ..
3
Mark headstaywith tape or a felt
marker 42" up from deck line.
6
Snap on 4 inch spacer tube using
pliers, if necessary.
9
Now extrusion is snapped on by
pulling aft with one hand while
sliding it up with other hand.

10 Remove feeder screw when ex-
trusion is almost all the way on.
3 Snap on the lower spacer tube,
using pliers if necessary,and cut
it to length as shown .
11 Remove feeder by sliding it
downward.
14
Tape full length of lower spacer
tube with tape provided.
.
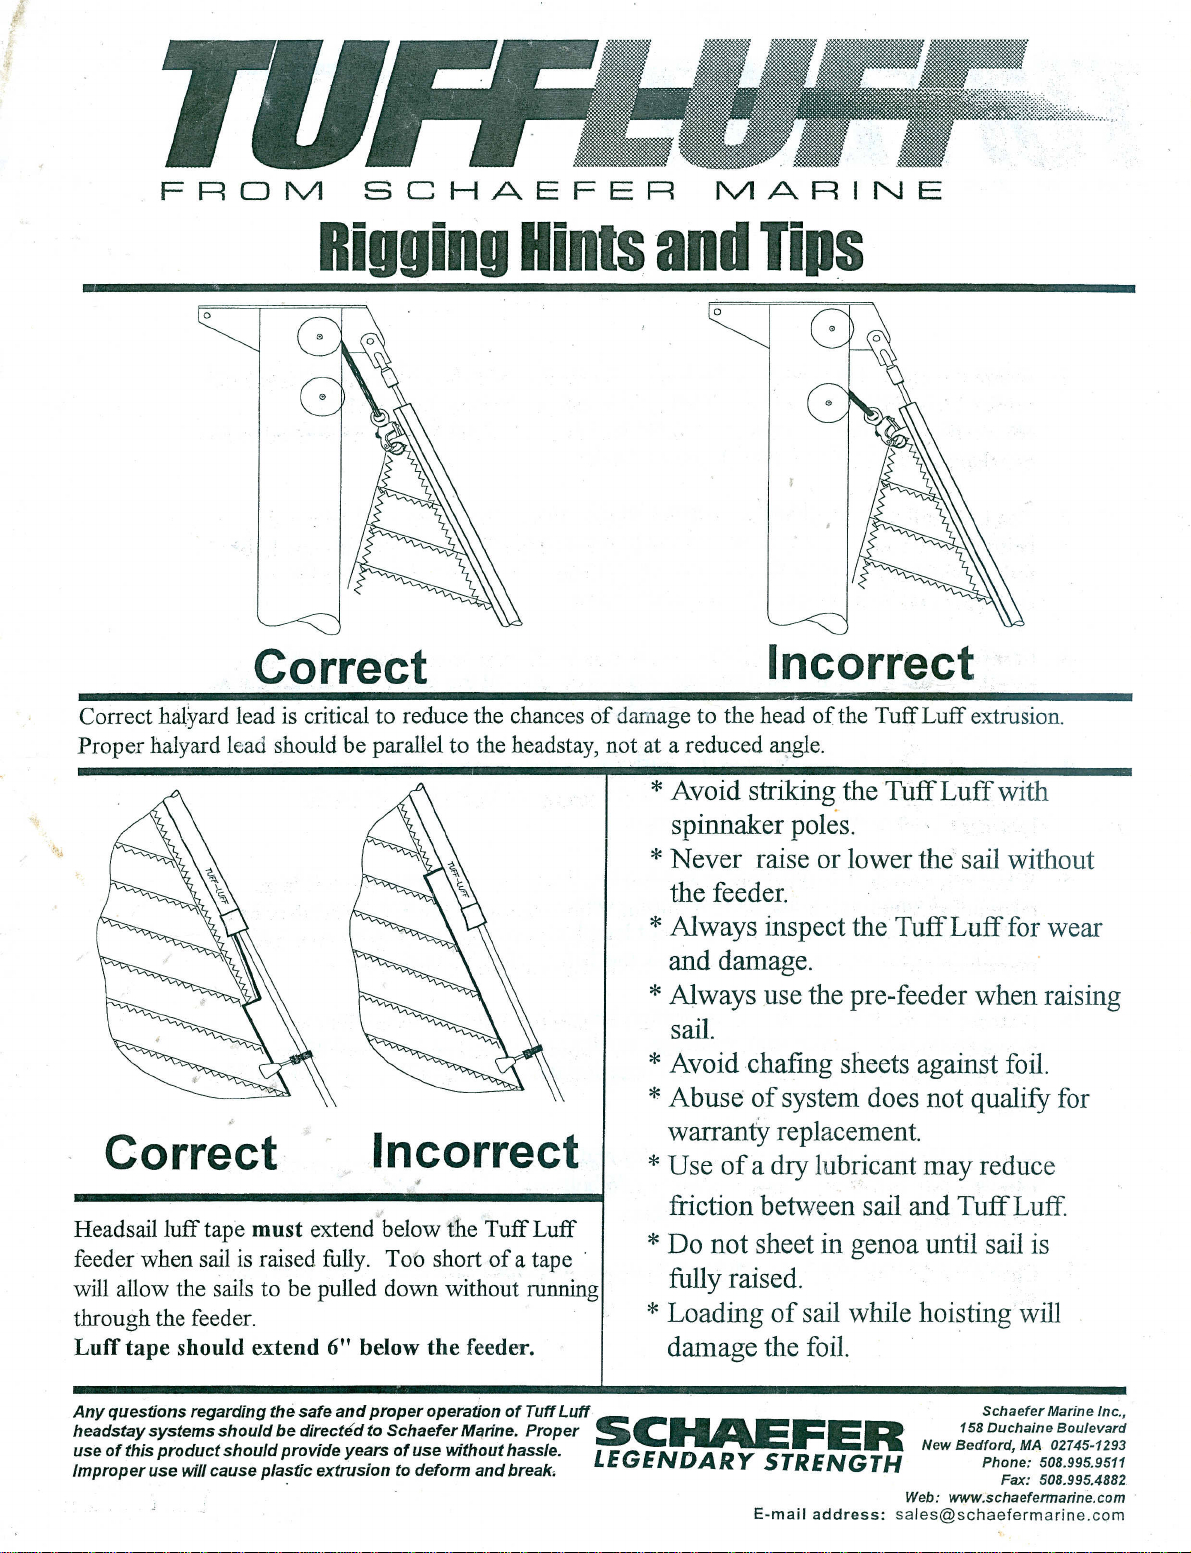
16 T,ape seizing line with the tape 17With sail raised, luff tape should
provided.protrude 6" below feeder.
/
ASSEMBLY TIME:Approximately 14 minutes.
METHOD B:
Installing extrusion with mast stepped without measuring
forestay:
Step 1:Snap on 4" top spacer tube and tape as shown in
Steps 6 and 7,Method A.
Step 2: Slide extrusiononto headstay UPSIDE DOWN (with
feeder removed).
Step 3: Cut off 42" above deck.
Step 4: Pull extrusion off headstay and slide on ag~i,nright
side up. .
f.
Step 5: Proceed with Step 12 from Method A.,
'ii·
12Finish snapping extrusion on
and replace feeder, taking care
to"catch"the port groove behind
ridge inside feeder. Screw
should be just flush with port
side of feeder when installed.
DO NOT OVERTIGHTEN.
15 Seize roller prefeeder 12" below
feeder.
Sail with it When raising sails,
always use both feeder and roller
prefeeder to prevent chafe.
METHODC:
Installing with mast unstepped: Stretch headstay
very
taut at
a good working height (waist level) and proceed as with
Method A or B.
SCH EFER
IIIIAR NE
I-
158 Duchaine Blvd., Indus-trial Park
.New Bedford, MA 02745-1293
Phone:508-995-9511 Fax: 508-995-4882
E-mail address:sales@schaefermarine.com
i
This manual suits for next models
2