Tuffcare R250 User manual

Smooth Series Knee
Walker R250, R270, R290
©TUFFCARE, INC. ALL RIGHTS RESERVED Smooth Knee Walker VS1.1
ATTENTION
Before using this Medical Device read this manual. If you are
unable to understand, contact your equipment provider for
technical support before attempting to use this product.

Table of Contents
Forward 2
Warning 3
Unpacking 3
Assembly R250 4 - 7
R270 8 - 12
R290 13 - 16
Adjustment 17 - 19
Operation 20
Maintenance 21
1
Forward
Tuffcare’s Smooth series knee walker is
designed for ankle or lower leg individuals
recovering from a broken foot, broken ankle,
broken leg, foot surgery, or ankle surgery. More
comfortable and stable than crutches, these
affordable knee walkers are made for both
indoor and outdoor use, with four wheels for
easy steering and balance..
2

1. front wheel assembly 2. main frame
3. steering handle 4. knee pad assembly
5. three pentagram knobs
R250 Components
①
④②
⑤
HANDGRIP
STEERING SHAFT
KNEE PAD
BRAKE LOCK
BRAKE HANDLE
PENTAGRAM
KNOB
STEERING
COLUMN LOCK
8” CASTER
WHEELS
4
BRAKE PADS
③
Warning
•Do not operate your knee walker until you have read
and fully understand this manual.
•Do not operate your knee walker until its fully assembled
and checked.
•Do not leave your knee walker unattended without locking
its brakes.
•Do not stop on a grade or ramp.
•Do not store this product at extreme temperatures (<0 >40o).
•Do not exceed weight limit of 300 lbs or serious injury
could result..
When traveling up and down on an incline:
•Do not make sharp turns.
•Do not turn or reverse on an incline.(maximum 10% incline)
•Apply the brakes while walking to maintain speed and control.
When kneeling or sitting on the Smooth Knee Walker:
•Do not kneel or sit on the walker without applying the parking
brakes.
•Do not lean over your knee walker for any reason. Check
before use that the product is stable, rigid and that all rivets
and screws are fastened.
Unpacking
Dispose of the removed packaging at your local recycling
centre. Discard the wrapper and box separately. Dispose
of the end-of-life item at a clean point.
3

Remove the 5 major components from packaging.
Follow the four assembly steps in the next two pages
to complete assembly.
5
R250 Assembly
6
Raise the steering column to it’s upright position and follow
steps (1) to (6) in page 17 to lock steering column. The
locking mechanism at the base of the steering column has
had an added security pin to prevent it from collapsing during
use.
Insert the front wheel assembly into the bottom tube of the
steering column. Align hole in wheel assembly with the
post. Insert the pentagram knob screw through the holes
tighten pentagram knob by turning it clockwise to secure.

7
Insert the steering handle into the steering column, making
sure not to twist the brake cables. Align holes in tiller, then
insert the pentagram knob screw through the steering tiller.
Align holes in tiller to desired height tighten with pentagram
knob screw and secure.
Insert knee platform post into main frame, set to desired
height. Align holes in posts, then insert the pentagram
knob screw through the main frame knee post. Tighten the
pentagram knob by turning it clockwise to secure.
8
1. front wheel assembly 2. main frame 3. basket
4. seat assembly 5. steering handle 6. calf pad
7. basket hardware 8. calf pad pentagram knob
9. three pentagram knobs 10. hex key 11. footrest pad
R270 Components
①
⑤
④
②
③
HANDGRIP
STEERING SHAFT
GEL SEAT
BRAKE LOCK
BRAKE HANDLE
PENTAGRAM
KNOB
STEERING
COLUMN LOCK
8” CASTER
WHEELS
DRUM BRAKE
CALF PAD
BASKET
⑦
⑥
⑧⑨
⑩
⑪

Remove the 11 major components from packaging.
Follow the four assembly steps in the next two pages
to complete assembly.
9
R270 Assembly
10
Raise the steering column to it’s upright position and follow
steps (1) to (6) in page 17 to lock steering column. The
locking mechanism at the base of the steering column has
had an added security pin to prevent it from collapsing during
use.
Insert the front wheel assembly into the bottom tube of the
steering column. Align hole in wheel assembly with the
post. Insert the pentagram knob screw through the holes
tighten pentagram knob by turning it clockwise to secure.

12
Slide the calf pad onto the side where the injury leg is
located. Align the hole in footrest post with the oval space
at the back part of the calf pad. Insert the large pentagram
knob screw through the oval space into the hole tighten
pentagram knob by turning it clockwise to secure.
Slide the round footrest pad onto the opposite side of the
injury leg. Use the footrest pad when leg not paddling.
11
Insert seat platform post into main frame, set to desired
height. Align holes in posts, then insert the pentagram
knob screw through the main frame seat post. Tighten the
pentagram knob by turning it clockwise to secure.
Attach basket by lining up the bracket on basket with the
screws on the knee walker. Secure by turning clockwise
with the hex key provided

1. main frame 2. steering handle
3. knee pad assembly 4. 2 pentagram knobs
R290 Components
①③
④
②
HANDGRIP
STEERING SHAFT
KNEE PAD
BRAKE LOCK
BRAKE HANDLE PENTAGRAM
KNOB
STEERING
COLUMN LOCK
10” PNEUMATIC
CASTER
WHEELS
13
DRUM BRAKE
FRAME
FOLDING
HINGE
Remove the 4 major components from packaging.
Follow the four assembly steps in the next two pages
to complete assembly.
R290 Assembly
14

15
Raise the steering column to it’s upright position and follow
steps (1) to (6) in page 17 to lock steering column. The
locking mechanism at the base of the steering column has
had an added security pin to prevent it from collapsing during
use.
Insert knee platform post into main frame, set to desired
height. Align holes in posts, then insert the pentagram
knob screw through the main frame knee post. Tighten the
pentagram knob by turning it clockwise to secure.
16
Insert the steering handle into the steering column, making
sure not to twist the brake cables. Align holes in tiller, then
insert the pentagram knob screw through the steering tiller.
Align holes in tiller to desired height tighten with pentagram
knob screw and secure.
Fold the main frame in the middle for easy transport or
space saving storage.

18
To Adjust Height of Handlebars
Handlebars should be set at wrist level to keep your back
straight. Turning the pentagram knob counter clockwise to
remove, extend the steering shaft up or down to desired
height. Align holes in tiller, then insert the pentagram knob
screw through the steering tiller. Tighten pentagram knob
by turning it clockwise to secure.
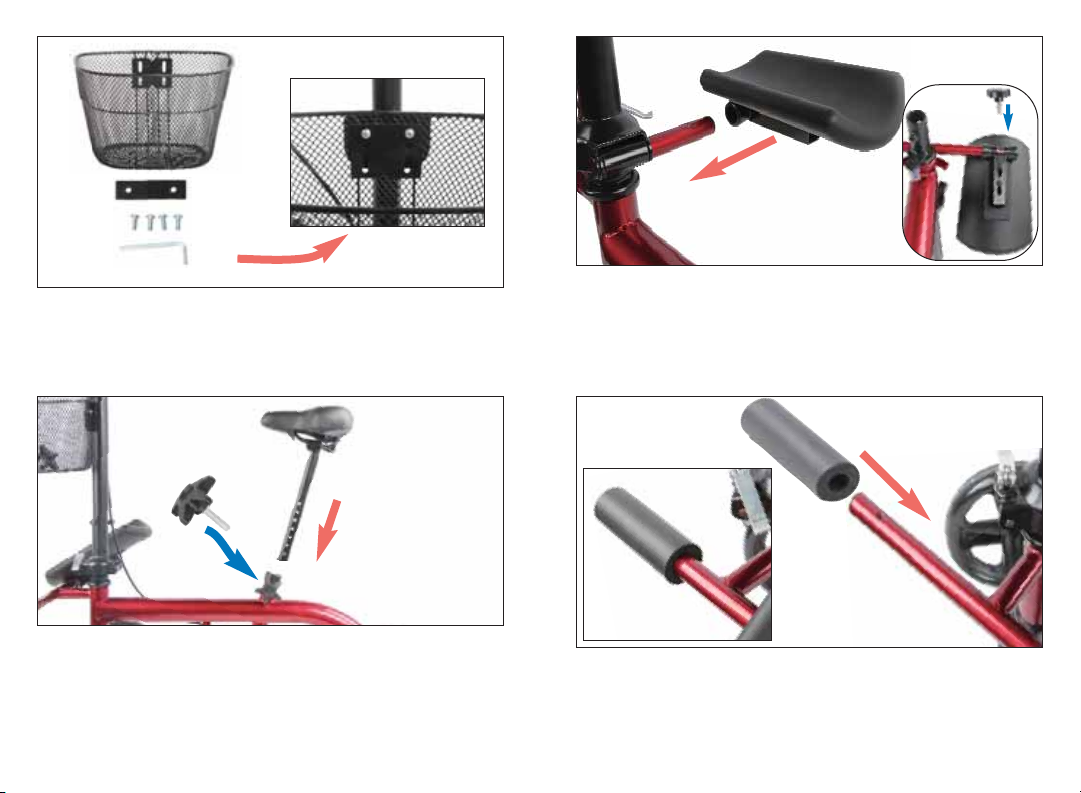
To Adjust Height of Seat or Knee Platform
Turning the pentagram knob counter clockwise to remove,
extend the platform post up or down to desired height.
Align holes in posts, then insert the knob screw through
the seat post holes. Tighten pentagram knob by turning it
clockwise to secure.
17
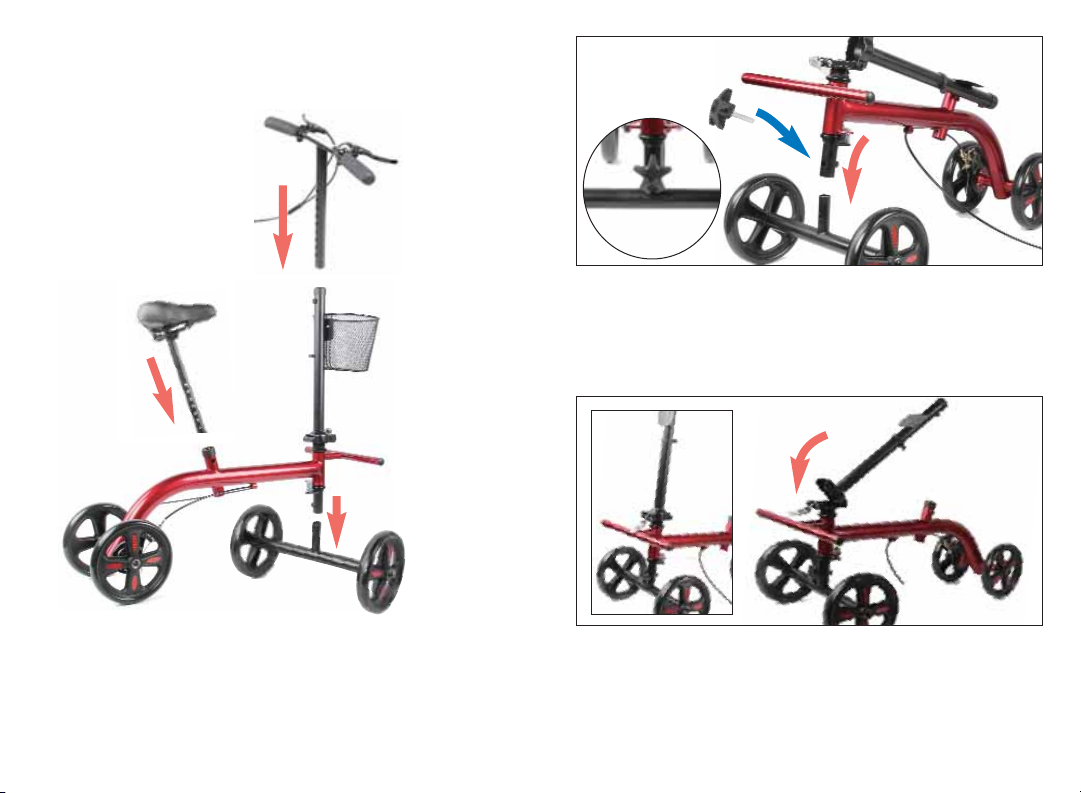
To Raise the Steering Column -
Push the steering column upward until it is in the full
upright position(1,2). Push the lever to the left(3) and
downward at the same time to disengage the pin(4) And
push the steering column upward until it is in the full
upright position. Pull the locking mechanism up so that
the circular pad rests on top of the steering column folding
hinge cutout(5). Push the lever down so the end of the
lever is pointing towards the ground to lock the steering
column in the upright position(6).
To Lower the Steering Column -
Reverse the procedure in opposite order from (6) to (1).
① ②
④
⑤
③
⑥

Operation
1. When mounting/dismounting, always make sure
the brakes are engaged. You should stand naturally
with your injured leg supported on the knee rest at a
90-degree angle..
2. Your hips should be even, and your uninjured foot
placed flat on the floor. The handlebars should be set
at a comfortable distance in front of your body, normally
about waist height. You should not be hunched over
the unit, but in your normal, upright posture.
3. Before mounting the knee walker, ensure the hand
brakes are fully engaged, to prevent it from rolling,
then with both hands firmly on the handlebars, mount
the knee scooter from one side and place the knee
of your injured leg on the knee rest.
4. Once balanced, disengage the hand brakes and
use your other leg to propel you (much like a child’s
scooter). Go slowly to start and progress up to a normal
walking speed. Use your best judgement and be
cautious on inclines and uneven sidewalks.
2019
Brake Adjustment The tightness can be adjusted with the
nuts at either end of the brake cable. Turning the screw
clockwise will loosen the brake and turning the screw
counter clockwise will tighten it. The pressure of the brake
mechanism on the brake
wheel should be enough so
that, when the hand lever is in
the fully squeeze position, the
brake wheel does not turn but
is not too tight.
Braking The brake is engaged by holding the brake lever
on the handlebar. The braking wheel must be in contact with
the floor and the brake works best with weight on the
knee walker. Set
the brake -squeeze the brake lever and on
the brake lever holder.
To unlock the brake
-squeeze the
brake lever.
R250 R270 R290

Keep For Your Records
Name of dealer where you purchased:
Dealer’s phone number where you purchased
Serial number ( if applicable ):
Please keep this information for your records to help
us in assisting you if you need a part replaced.
Thank you.
West Coast Distribution
Tel 800-367-6160
East Coast Distribution
Tel 800-548-6596
WWW.TUFFCARE.COM
22
Maintenance
With routine use, nuts and bolts on the
steering column, knee platform, can
become loose. To ensure safe continuous
operation of the Smooth knee walker, it is
important to periodically inspect the product
for loose nuts and bolts and re-tighten as
appropriate.
Always test the brakes by both walking
and squeezing the brakes and by stopping,
pushing down on the brakes to a locked
position, and then trying to push the knee
walker. If the brakes do not lock the
wheels, the brakes need to be adjusted. If
adjustment does not tighten the brakes,
DO NOT use the knee walker.
Use soapy water and a soft cloth to
clean the surface of the walker. Wipe off
any moisture after cleaning. Using abra-
sive clothes or other products can cause
grates.
21
This manual suits for next models
2
Table of contents
Other Tuffcare Mobility Aid manuals
Popular Mobility Aid manuals by other brands

Innova
Innova AirRise260 Quick user guide

Sunrise Medical
Sunrise Medical Guardian Sidestepper 07770 User Instructions & Warranty

identités
identités CORFOU 823125 instruction manual

Besco Medical
Besco Medical SPRING instruction manual

Timago
Timago TGR-R RTA 891L Instructions for use

Cobi Rehab
Cobi Rehab 0130-071-000 Product sheet

Drive Medical
Drive Medical Roomba operating instructions

Graco
Graco Walker Owner's manuel

Drive
Drive Q-011000 quick start guide

Max-Ability
Max-Ability Pressalit Care LS-FO Giraffe Changing Table... Installation drawing

Careline
Careline G-270 user manual

FirstStreet
FirstStreet PERFECT WALKER II Setup guide