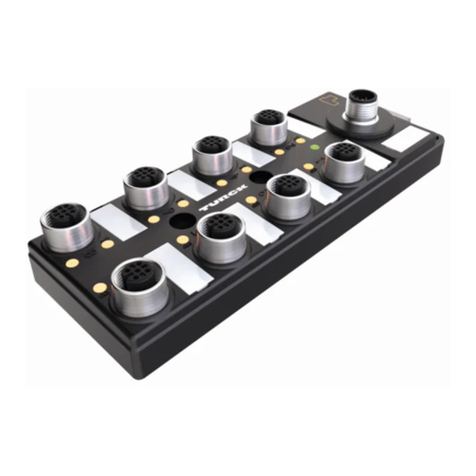
turck TBIP-L 16DXP-AUX Series User manual

Your Global Automation Partner
Instructions for Use
TBIP-L…-16DXP-AUX
I/O Hub with IO-Link

Table of Contents
Hans Turck GmbH & Co. KG | T +49 208 4952-0 | [email protected] | www.turck.com V01.00 | 2022/09 | 2
Table of Contents
1 About these instructions ...................................................................................................................5
1.1 Target groups ...................................................................................................................5
1.2 Explanation of symbols used.........................................................................................5
1.3 Additional documents ....................................................................................................5
1.4 Feedback about these instructions ..............................................................................5
2 Notes on the product .........................................................................................................................6
2.1 Product identification .....................................................................................................6
2.2 Scope of delivery..............................................................................................................6
2.3 Turck service .....................................................................................................................6
3 For your safety.....................................................................................................................................7
3.1 Intended use .....................................................................................................................7
3.2 Notes on the use in safety-related applications ........................................................7
3.3 General safety notes........................................................................................................7
4 Product description ............................................................................................................................8
4.1 Device overview...............................................................................................................8
4.1.1 Display elements ..............................................................................................................................8
4.2 Properties and features ..................................................................................................9
4.3 Functions and operating modes...................................................................................9
5 Installing ............................................................................................................................................ 10
6 Connecting ........................................................................................................................................ 11
6.1 Connecting the supply voltage.................................................................................. 11
6.1.1 Supply concept .............................................................................................................................. 12
6.2 Connecting IO-Link....................................................................................................... 12
6.3 Connecting digital sensors and actuators ............................................................... 13
7 Using the device in safety applications ....................................................................................... 14
7.1 Safety function .............................................................................................................. 14
7.2 Safety planning ............................................................................................................. 15
7.3 Safe commissioning ..................................................................................................... 15
7.3.1 Installing connecting cables safely......................................................................................... 15
7.3.2 Switch off supply voltage safely .............................................................................................. 15
7.3.3 Connecting sensors and actuators ......................................................................................... 15
7.4 Function tests ................................................................................................................ 15
7.5 Cited standards ............................................................................................................. 16
8 Parameterizing and configuring................................................................................................... 17
8.1 Parameters ..................................................................................................................... 17
9 Operating........................................................................................................................................... 23
9.1 Process input data ........................................................................................................ 23
9.2 Process output data ..................................................................................................... 24
9.3 LED displays ................................................................................................................... 25
9.3.1 IO-Link ............................................................................................................................................... 25
9.3.2 Channel LEDs .................................................................................................................................. 25

Table of Contents
Hans Turck GmbH & Co. KG | T +49 208 4952-0 | [email protected] | www.turck.com V01.00 | 2022/09 | 3
9.4 Diagnostic data ............................................................................................................. 26
9.5 IO-Link error codes ....................................................................................................... 27
10 Troubleshooting............................................................................................................................... 28
11 Maintenance ..................................................................................................................................... 29
12 Repair ................................................................................................................................................. 29
12.1 Returning devices ......................................................................................................... 29
13 Disposal.............................................................................................................................................. 29
14 Technical data................................................................................................................................... 30
15 Turck subsidiaries — contact information.................................................................................. 33

Table of Contents
Hans Turck GmbH & Co. KG | T +49 208 4952-0 | [email protected] | www.turck.com V01.00 | 2022/09 | 4

About these instructions
Feedback about these instructions
Hans Turck GmbH & Co. KG | T +49 208 4952-0 | [email protected] | www.turck.com V01.00 | 2022/09 | 5
1 About these instructions
These instructions for use describe the structure, functions and the use of the product and will
help you to operate the product as intended. Read these instructions carefully before using the
product. This is to avoid possible damage to persons, property or the device. Retain the instruc-
tions for future use during the service life of the product. If the product is passed on, pass on
these instructions as well.
1.1 Target groups
These instructions are aimed at qualified personal and must be carefully read by anyone
mounting, commissioning, operating, maintaining, dismantling or disposing of the device.
1.2 Explanation of symbols used
The following symbols are used in these instructions:
DANGER
DANGER indicates a dangerous situation with high risk of death or severe injury if
not avoided.
WARNING
WARNING indicates a dangerous situation with medium risk of death or severe in-
jury if not avoided.
CAUTION
CAUTION indicates a dangerous situation of medium risk which may result in minor
or moderate injury if not avoided.
NOTICE
NOTICE indicates a situation which may lead to property damage if not avoided.
NOTE
NOTE indicates tips, recommendations and useful information on specific actions
and facts. The notes simplify your work and help you to avoid additional work.
uCALL TO ACTION
This symbol denotes actions that the user must carry out.
aRESULTS OF ACTION
This symbol denotes relevant results of actions.
1.3 Additional documents
The following additional documents are available online at www.turck.com:
nData sheet
nCommissioning manual IO-Link devices
nIO-Link parameter manuals for IO-Link devices
nEU Declaration of Conformity (current version)
nApprovals
1.4 Feedback about these instructions
We make every effort to ensure that these instructions are as informative and as clear as pos-
sible. If you have any suggestions for improving the design or if some information is missing in
the document, please send your suggestions to [email protected].

Note on the product
Turck service
Hans Turck GmbH & Co. KG | T +49 208 4952-0 | [email protected] | www.turck.com V01.00 | 2022/09 | 6
2 Notes on the product
2.1 Product identification
This instruction is valid for following devices:
nTBIL-L…-16DXP-AUX
2.2 Scope of delivery
The scope of delivery includes:
nI/O hub
nDummy plugs for M12-connectors
nLabel clips
nQuick Start Guide
2.3 Turck service
Turck supports you with your projects, from initial analysis to the commissioning of your applic-
ation. The Turck product database under www.turck.com contains software tools for program-
ming, configuration or commissioning, data sheets and CAD files in numerous export formats.
The contact details of Turck subsidiaries worldwide can be found on p. [}33].

For your safety
General safety notes
Hans Turck GmbH & Co. KG | T +49 208 4952-0 | [email protected] | www.turck.com V01.00 | 2022/09 | 7
3 For your safety
The product is designed according to state-of-the-art technology. However, residual risks still
exist. Observe the following warnings and safety notices to prevent damage to persons and
property. Turck accepts no liability for damage caused by failure to observe these warning and
safety notices.
3.1 Intended use
The block module TBIL-L…-16DXP-AUX is an IO-Link device (Class A) and serves as I/O hub
between field devices (sensors and actuators) and the IO-Link master. The hub has 16 I/O chan-
nels. Each I/O channel can be used as either a digital input or output without additional config-
uration. The device is designed in IP65/IP67/IP69K and can be mounted directly in the field.
The devices can also be used in safety applications up to Performance Level d (according to
ISO 13849) and SIL 2 (according to IEC 61508) [}14].
The devices may only be used as described in these instructions. Any other use is not in accord-
ance with the intended use. Turck accepts no liability for any resulting damage.
3.2 Notes on the use in safety-related applications
nFor the use in safety applications: Observe chapter “Using the device in safety applications”.
nThe device is part of a safety-related overall system. The overall system must always be eval-
uated as a whole with regard to the requirements of EN IEC 61508 and EN ISO 13849-1.
nThe devices are not specified for a certain application. Make sure that application-specific as-
pects are considered.
nReplace the devices before the expiration of the permissible duration of use (see ”Safety
characteristic data for the galvanic isolation”).
nIf there is a fault, e.g. a defective housing, do not use the device.
nDuring operation, surface temperatures may occur that could cause burns if touched.
nPerform a function test every 12 months.
nThe devices must not be repaired. If problems occur with regard to functional safety, notify
Turck immediately and return the devices immediately to:
Hans Turck GmbH & Co. KG
Witzlebenstraße 7
45472 Mülheim an der Ruhr
Germany
3.3 General safety notes
nThe device may only be assembled, installed, operated, parameterized and maintained by
professionally-trained personnel.
nThe device may only be used in accordance with applicable national and international regu-
lations, standards and laws.
nThe device meets the EMC requirements for industrial areas. When used in residential areas,
take measures to avoid radio interference.

Product description
Device overview
Hans Turck GmbH & Co. KG | T +49 208 4952-0 | [email protected] | www.turck.com V01.00 | 2022/09 | 8
4 Product description
The I/O hub TBIL-L…-16DXP-AUX connects up to 16 digital sensors or actuators with one IO-
Link master port.
Eight M12 connectors are available for connecting the field devices. Each I/O channel of the
TBIL-L…-16DXP-AUX can be used either as a digital input or output without additional config-
uration. The I/O hub is connected to the IO-Link master via an M12 socket. An additional 7/8''
connector is available for connecting the auxiliary voltages V1 and V2 to supply connected field
devices. The devices are designed in a fully encapsulated housing with degree of protection
IP65/IP67/IP69K.
4.1 Device overview
C3 C2 C1 C0
C7 C6 C5 C4
166.0 [6.54"]
179.1 [7.05"]
60.1 [2.37"]
33.7 [1.33"]
27.4 [1.08"]
18.2 [0.72"]
M12x1
7/8-16UN
Ø6.5 [Ø0.26"]
Fig.1: Dimensions TBIL-L4-16DXP-AUX
C3 C2 C1 C0
C7 C6 C5 C4
166.0 [6.54"]
179.1 [7.05"]
60.1 [2.37"]
33.7 [1.33"]
27.4 [1.08"]
18.2 [0.72"]
M12x1
7/8-16UN
Ø6.5 [Ø0.26"]
Fig.2: Dimensions TBIL-L5-16DXP-AUX
4.1.1 Display elements
The device has the following LED indicators:
nIO-Link communication
nI/O status
nSupply voltage (V1, V2, VIOL)

Product description
Functions and operating modes
Hans Turck GmbH & Co. KG | T +49 208 4952-0 | [email protected] | www.turck.com V01.00 | 2022/09 | 9
4.2 Properties and features
nFibre-glass reinforced housing
nShock and vibration tested
nFully potted module electronics
nProtection class IP65/IP67/IP69K
nIO-Link Class A device with 3 galvanically isolated supply voltages (V1/V2/VIOL)
nIO-Link diagnostics for short-circuit and supply over- and undervoltage
n2 universal digital channels per connector
nMetal connectors
4.3 Functions and operating modes
The I/O hub TBIL-L…-16DXP-AUX is an IO-Link Class A device with three galvanically isolated
supply voltages V1, V2 VIOL. The connectors C0…C3 are supplied from V1, the connectors
C4…C7 from V2. In addition, VIOL supplies the internal module electronics via the standard IO-
Link connector. The galvanic isolation of V1, V2 and VIOL allows that V1 and V2 for the outputs at
connectors C0…C3 or respectively C4…C7 can be safely switched off or not safely for the pur-
pose of energy management.
The device provides diagnostics for power supply and overload or short circuit of the sensors
and actuators via IO-Link.

Mounting
Hans Turck GmbH & Co. KG | T +49 208 4952-0 | [email protected] | www.turck.com V01.00 | 2022/09 | 10
5 Installing
The device is mounted via two M4 screws on a flat and pre-drilled mounting surface.
Fasten the module to the mounting surface with two M4 screws. The maximum tighten-
ing torque for the screws is 0.5 Nm
164.2…167.8 mm
M4 (2×)
max. 0.5 Nm
Fig.3: Mounting the device on a mounting plate

Connecting
Connecting the supply voltage
Hans Turck GmbH & Co. KG | T +49 208 4952-0 | [email protected] | www.turck.com V01.00 | 2022/09 | 11
6 Connecting
NOTICE
Intrusion of liquids or foreign bodies through leaking connections
Loss of protection class IP65/IP67/IP69K, device damage possible
Tighten M12 connectors with a tightening torque of 0.6 Nm.
Only use accessories that guarantee the protection class.
Always seal unused connectors with suitable screw caps or blind caps. The tight-
ening torque for the screw caps is 0.5Nm.
6.1 Connecting the supply voltage
For the connection to the power supply, the device has a 7/8" connector. The connector is de-
signed as 4-pin (TBIL-L4) or 5-pin (TBIL-L5) connector. V1 and V2 are galvanically isolated from
each other. The maximum tightening torque is 0.8 Nm.
Fig.4: TBIL-L4… – 7/8” connector (P2) for connecting the supply voltage
Fig.5: TBIL-L5… – 7/8” connector (P2) for connecting the supply voltage
Connect the device to the power supply according to the pin assignment.
1 = 24 VDC (V2)
2 = 24 VDC (V1)
3 = GND (V1)
4 = GND (V2)
2
1
4
3
Fig.6: TBIL-L4– Pin assignment supply voltage (P2)
1 = GND (V2)
2 = GND (V1)
3 = FE
4 = 24 VDC (V1)
5 = 24 VDC (V2)
5
4
1
2
3
Fig.7: TBIL-L5– Pin assignment supply voltage (P2)

Connecting
Connecting IO-Link
Hans Turck GmbH & Co. KG | T +49 208 4952-0 | [email protected] | www.turck.com V01.00 | 2022/09 | 12
6.1.1 Supply concept
The I/O hub TBIL-L…-16DXP-AUX is supplied with two galvanically isolated auxiliary voltages
V1 and V2 via the 7/8'' connector. This divides the IO-Link channels into two electrically isolated
potential groups C0…C3 (supplied from V1) and C4…C7 (supplied from V2).
The galvanic isolation of the potential group allows a safety shutdown of parts of an installation
via emergency-off circuits.
V1 Supply of connectors C0…C3 and the connected sensors and actuators
V2 Supply of connectors C4…C7 and the connected sensors and actuators
VIOL Power supply of the IO-Link electronic
V1
VIOL
V2
Fig.8: Supply concept TBIL-L…-16DXP-AUX
6.2 Connecting IO-Link
The device provides a 5-pin M12 connector for the connection to IO-Link and the supply
voltage.
Fig.9: M12 connector (P1) for the connection to IO-Link
Connect the device to IO-Link and the supply voltage according to the pin assignment
below.
1 = 24 VDC (VIOL)
2 = n.c.
3 = GND (VIOL)
4 = C/Q (IO-LINK)
5 = n.c.
3
2
1
4
5
Fig.10: Pin assignment IO-Link

Connecting
Connecting digital sensors and actuators
Hans Turck GmbH & Co. KG | T +49 208 4952-0 | [email protected] | www.turck.com V01.00 | 2022/09 | 13
6.3 Connecting digital sensors and actuators
For connecting digital sensors and actuators, 5-pin M12 connectors are available.
Fig.11: M12 connector for connecting digital sensors and actuator (C0…C3)
Connect the sensors and actuators to the device according to the pin assignment.
1 = VAUX1 (V1)
2 = In/Out (odd)
3 = GND (V1)
4 = In/Out (even)
5 = FE
C0...C3
4
3
2
1
5
Fig.12: Pin assignment TBIL-L…-16DXP-AUX (C0…C3)
Fig.13: M12 connector for connecting digital sensors and actuator (C4…C7)
1 = VAUX2 (V2)
2 = In/Out (odd)
3 = GND (V2 )
4 = In/Out (even)
5 = FE
C4...C7
4
3
2
1
5
Fig.14: Pin assignment TBIL-L…-16DXP-AUX (C4…C7)
External supply of sensors and actuators
Sensors and actuators, which are supplied via an external power supply, can also be connected
to the TBIL I/O hub. If sensors or actuators are supplied via an external power supply, the fol-
lowing safety regulations have to be observed:
Supply sensors and actuators from SELV or PELV power supplies.
Decouple external circuits that are not designed as SELV or PELV systems by opto-
couplers, relays or other measures.

Commissioning
Safety function
Hans Turck GmbH & Co. KG | T +49 208 4952-0 | [email protected] | www.turck.com V01.00 | 2022/09 | 14
7 Using the device in safety applications
The device is designed in accordance with EN ISO 13849-1 “Safety of machinery - Safety-related
parts of control systems”.
7.1 Safety function
The safety function is executed by the higher-level system.
The supply voltage V1 of the outputs at C0…C3 and the supply voltage V2 of the outputs at
C4…C7 can be safely switched off by an external safety relay or a safe control.
Safe state
In the safe state, the outputs are switched off (0 V). The disconnection is done externally in the
higher-level system.
Performance Level (PL)/SIL Level
Due to the galvanic isolation of load and operating voltage, the design of the devices allows
the fault exclusion of voltage carry-over to safely disconnected equipment with a single fault
safety of category 3 for safety functions up to performance level d (according to EN ISO 13849).
The maximum achievable Safety Integrity Level is SIL CL2 (according to EN 62061:2016, section
6.7.7).
The device is part of a safety-related overall system. The overall system must always be evalu-
ated as a whole with regard to the requirements of EN ISO 13849-1 and EN 62061.
Safety characteristic data for the galvanic isolation
Characteristic data Value
MTTF See ”Technical data”
Lifetime 20 years
Diagnostic coverage 0…99 % Determination via FMEA
according to ISO 13849-2: 2013
NOTE
The calculation of MTTFD data of electronic components is done according to ISO
13849-1:201, Annex C.5: "MTTFD data of electrical components" and D.1: "Parts count
method".

Commissioning
Function tests
Hans Turck GmbH & Co. KG | T +49 208 4952-0 | [email protected] | www.turck.com V01.00 | 2022/09 | 15
7.2 Safety planning
The operator is responsible for the safety planning.
Prerequisites
Perform a hazard and risk analysis.
Develop a safety concept for the machine or plant.
Calculate the safety integrity for the complete machine or plant.
Validate the complete system.
7.3 Safe commissioning
7.3.1 Installing connecting cables safely
NOTICE
Incorrect connection of connecting cables
Danger of cross connections
Install and connect the cables safely and separately in accordance with
EN60204-1.
Install cables with cross-circuit protection if the safe installation of the cables is
not possible.
7.3.2 Switch off supply voltage safely
WARNING
1-pole switch-off the supply voltage
Safe separation not guaranteed
Always switch-off the supply voltage on both poles.
7.3.3 Connecting sensors and actuators
WARNING
External feed
Deactivation of the galvanic isolation
If the galvanic isolation is used, ensure on the application side that no external
feed can occur.
DXP channels that operate with safe disconnectable potential must be supplied
by the corresponding conenctor.
7.4 Function tests
Have the function test carried out by qualified personnel only.
Before commissioning the system, check and document the switch-off of the V1 and V2
voltage group by an upstream safety relay.
Control the switching behavior of he output circuits.

Commissioning
Cited standards
Hans Turck GmbH & Co. KG | T +49 208 4952-0 | [email protected] | www.turck.com V01.00 | 2022/09 | 16
7.5 Cited standards
Standard Title
DIN EN ISO 13849-1:2016-06 Safety-related parts of control systems
EN 62061:2005 + Cor.:2010 + A1:2013 + A2:2015
IEC 62061:2005 + A1:2012 + A2:2015
Safety of machinery - Functional safety of
safety-related electrical, electronic and
programmable electronic control systems
DIN EN 61508:2011
IEC 61508:2010
Functional safety of electrical/electronic/
programmable electronic safety-related
systems
DIN EN 61131-2:2008
IEC 61131-2:2007
Programmable controllers
EN ISO 12100:2010
DIN EN ISO 12100:211-03
Safety of machinery - General principles
for design - Risk assessment and risk re-
duction

Setting
Parameters
Hans Turck GmbH & Co. KG | T +49 208 4952-0 | [email protected] | www.turck.com V01.00 | 2022/09 | 17
8 Parameterizing and configuring
8.1 Parameters
IO-Link object directory — ISDU device parameters: Direct Parameter Page
ISDU
Index
Hex. (dec.)
Sub index Object name Access Length
in bytes
Meaning/default value
0x00
(0)
Direct Parameter Page 1 read
only
16
0x03 Min. cycle time read
only
1
0x05 IO-Link version ID read
only
1 17
0x08 Vendor ID read
only
2 ID for Turck:
0x013D
0x09
0x0A Device ID read
only
3 E. g.: TBIL-L…-16DXP-AUX:
0xE330…
0x0B
0x0C
IO-Link object directory — ISDU device parameters: Identification
ISDU
Index
Hex.
(dec.)
Object name Access Length
in bytes
Meaning/
default value
Comment
0x10
(16)
Vendor
name
read
only
16 Turck
0x11
(17)
Vendor text read
only
32 www.turck.com
0x12
(18)
Product
name
read
only
32 TBIL-L…-16DXP-AUX
0x13
(19)
Product ID read
only
16 ID of the device
0x14
(20)
Product text read
only
32 I/O hub
0x15
(21)
Serial
number
read
only
16 Sequential serial number
0x16
(22)
Hardware ID read
only
8 Hardware revision of the device, e. g. V1.0
0x17
(23)
Firmware
revision
read
only
16 Firmware revision of the device, e. g. V1.0.7.0
0x18
(24)
Application
Specific Tag
read/
write
32 Default "***" Field for customer or
application specific
data

Setting
Parameters
Hans Turck GmbH & Co. KG | T +49 208 4952-0 | [email protected] | www.turck.com V01.00 | 2022/09 | 18
ISDU
Index
Hex.
(dec.)
Object name Access Length
in bytes
Meaning/
default value
Comment
0x19
(25)
Function Tag read/
write
32 Default "***" Field for the applica-
tion specific device
function
0x1A
(26)
Location Tag read/
write
32 Default "***" Field for the applica-
tion-specific installa-
tion location of the
device
IO-Link object directory — ISDU device parameters: Preferred Index (parameters and
diagnostics of the digital in- and outputs)
ISDU
Index
Hex.
(dec.)
Object name Access Length
in bytes
Meaning
0x40
(64)
Parameter ID read/
write
4 Customer-specific ID, for free use
0x41
(65)
Inverting input read/
write
2 Invert digital input
0x42
(66)
Activate output read/
write
2 Activate output
0x43
(67)
Impulse
stretching input
read/
write
16 Pulse stretching input
0x44
(68)
Short circuit re-
covery
read/
write
2 Manual output reset after overcurrent
0x45
(69)
Failsafe read/
write
4 Output after error
0x46
(70)
Under voltage
diagnostics
read/
write
2 Enable V1 and V2 undervoltage diagnostics/
threshold values for undervoltage diagnostics
V1, V2 and VIOL
Diagnostics
0x50
(80)
Supply error read
only
2nUndervoltage supply V1, V2 and VIOL
nOvercurrent VAUX connector C0…C7
Diagnostics
0x51
(81)
Output short
circuit
read
only
2 Overcurrent output 0…15

Setting
Parameters
Hans Turck GmbH & Co. KG | T +49 208 4952-0 | [email protected] | www.turck.com V01.00 | 2022/09 | 19
Invert digital input — 0x41 (65), sub index 0
This parameter inverts the state of the digital input in the process image.
Format Length
Byte 2 byte 1 bit per channel
Default values are shown in bold.
Value Meaning
0 No
1 Yes Input signal inverted
Byte 0 Byte 1
Bit offset Bit offset
7 6 5 4 3 2 1 0 15 14 13 12 11 10 9 8
Sub index Sub index
9 10 11 12 13 14 15 16 1 2 3 4 5 6 7 8
C7P2
(B)
C7P4
(A)
C6P2
(B)
C6P4
(A)
C5P2
(B)
C5P4
(A)
C4P2
(B)
C4P4
(A)
C3P2
(B)
C3P4
(A)
C2P2
(B)
C2P4
(A)
C1P2
(B)
C1P4
(A)
C0P2
(B)
C0P4
(A)
Activate output — 0x42 (66), sub index 0
This parameter activates or deactivates the output function of the digital channel.
Format Length
Byte 2 byte 1 bit per channel
Default values are shown in bold.
Value Meaning
0 No Output function deactivated, channel can only be used as in-
put
1 Yes Output function activated, channel can be used as in- or out-
put
Byte 0 Byte 1
Bit offset Bit offset
7 6 5 4 3 2 1 0 15 14 13 12 11 10 9 8
Sub index Sub index
9 10 11 12 13 14 15 16 1 2 3 4 5 6 7 8
C7P2
(B)
C7P4
(A)
C6P2
(B)
C6P4
(A)
C5P2
(B)
C5P4
(A)
C4P2
(B)
C4P4
(A)
C3P2
(B)
C3P4
(A)
C2P2
(B)
C2P4
(A)
C1P2
(B)
C1P4
(A)
C0P2
(B)
C0P4
(A)
NOTE
This parameter can also be set for all connectors of the module via the IODD.

Setting
Parameters
Hans Turck GmbH & Co. KG | T +49 208 4952-0 | [email protected] | www.turck.com V01.00 | 2022/09 | 20
Pulse stretching input — 0×43 (67)
This parameter defines the duration of the pulse stretching for digital input edges in multiples
of 10 ms. This allows that even short signals with longer PLC cycle times can be detected.
Format Length
Array of byte 16 byte 1 byte per channel
Default values are shown in bold.
Value Meaning
0 Disabled Pulse stretching deactivated
1 1…255 Pulse stretching (in steps of 10 ms)
Bit offset Bit offset
0 8 16 24 32 40 48 56 64 72 80 88 96 104 112 120
Sub index Sub index
16 15 14 13 12 11 10 9 8 7 6 5 4 3 2 1
C7P2
(B)
C7P4
(A)
C6P2
(B)
C6P4
(A)
C5P2
(B)
C5P4
(A)
C4P2
(B)
C4P4
(A)
C3P2
(B)
C3P4
(A)
C2P2
(B)
C2P4
(A)
C1P2
(B)
C1P4
(A)
C0P2
(B)
C0P4
(A)
NOTE
This parameter can also be set for all connectors of the module via the IODD.
Manual output reset after overcurrent — 0x44 (68), sub index 0
This parameter defines if a manual reset is necessary after an overcurrent occurred at the digital
channel.
Format Length
Byte 2 byte 1 bit per channel
Default values are shown in bold.
Value Meaning
0 No Automatic recovery mode
1 Yes Controlled recovery mode (output has to be reset manually)
NOTE
This parameter can also be set for all connectors of the module via the IODD.
Byte 0 Byte 1
Bit offset Bit offset
7 6 5 4 3 2 1 0 15 14 13 12 11 10 9 8
Sub index Sub index
9 10 11 12 13 14 15 16 1 2 3 4 5 6 7 8
C7P2
(B)
C7P4
(A)
C6P2
(B)
C6P4
(A)
C5P2
(B)
C5P4
(A)
C4P2
(B)
C4P4
(A)
C3P2
(B)
C3P4
(A)
C2P2
(B)
C2P4
(A)
C1P2
(B)
C1P4
(A)
C0P2
(B)
C0P4
(A)
This manual suits for next models
2
Table of contents
Other turck Switch manuals

turck
turck TBIL-S Series User manual

turck
turck TBIL-M1-16DXP User manual

turck
turck TBEN-L SE-M2 Series User manual

turck
turck IM1-451EX Series User manual

turck
turck TBIL-M1-16DIP User manual

turck
turck TBIL-S Series User manual

turck
turck TBEN-L-SE-U1 Series User manual

turck
turck FMX-IM-3UP63X User manual