Turnigy B405 User manual

Operating Manual
Please read this entire operating manual completely and carefully as it
contains a wide variety of specific programming and safety information .
The selection of the correct operating parameters is the responsibility of
the user. Keep this manual in a safe place , and be sure to pass it on to
the new owner if you ever sell your B405.

- 2 -
CONTENTS
Performance Parameters
Special Features
Important Precautions
Input Power
Controls and Connections
Determining Battery Type and Specifications
Getting Started
Charging Guidelines
Battery Connection
Operating Proceedure
Starting Charge
Charge Complete
Care and Handling of NiMH Batteries
Care and Handling of LiPo, Li-Ion and LiFe Batteries
Warning and Error Messages
Warranty and Service
3
3
4
4
5
5
6
7
8
9
9
11
12
12
13
14

A DC power lead with alligator clips easily connects to many 12V DC power sources.
Easy to read LCD shows battery voltage, charge current, time and capacity.
A custom Constant Current/Constant Voltage (CC/CV) algorithm carefully charges
LiPo, Li-Ion or Li-Fe batteries fully and safely.
A precise peak detection system with automatic trickle charge charges NiCd/NiMH
packs completely, for optimum battery voltage and run time.
Push button controls and audible tones make for easy setup and control.
Solid state reverse polarity and current overload protection ensure trouble-free
operation.
•
•
•
•
•
•
DC Input voltage range DC 10.0V-18.0V Built in Lead
Alligator Clips
Crucial Protection Solid State Reverse Polarity
and Current Overload
Dimensions 110x83x39mm
Weight 110g
Battery Types 1-10S NiCd/NiMH,1-4S LiPo/LiFe/LiIon
6-12V Pb
0.1-4.5A
Charge Rate
Charge Power 45W Max
Battery Capacity Range 100-9900mAh(6000mAh Default)
Fast Charge Termination Peak Detection for NiCd/NiMH,
CC/CV Lithiums
Fast Charge Safety Timer 180 Minutes (Default)
NiCd/NiMH Peak Sensitivity 8mV for NiCd, 5mV for NiMH (Default)
Lithium Balancing Accuracy 10mV per cell
Performance Parameters
Special Features
- 3 -

- 4 -
Important Precautions
DO NOT leave the charger unattended while in use.
Disconnect the battery and remove the input power from the charger immediately if
the charger or battery becomes hot!
DO NOT attempt to charge incompatible types of rechargeable batteries as this
could result in permanent damage to the battery and charger.
DO NOT use automotive type battery chargers to power the charger.
DO NOT allow water, moisture or foreign objects into the charger.
DO NOT attempt to use batteries with more cells or total voltage than listed in the
specifications.
DO NOT overcharge batteries as this can cause permanent damage. Do not use a
charge current rate which exceeds the safe levels of the battery.
DO NOT place the charger or battery on flammable surfaces or near combustable
materials while in use, such as a carpet, cluttered workbench, paper, plastic, vinyl,
leather and wood, inside an R/C model or full size car.
The circuit is designed to be powered by an 11~18V DC source only. NEVER
CONNECT BOTH AT THE SAME TIME.
Allow the charger and battery to cool down between charges.
Always disconnect the charger from the power source when not in use.
•
•
•
•
•
•
•
•
•
•
Input Power
•
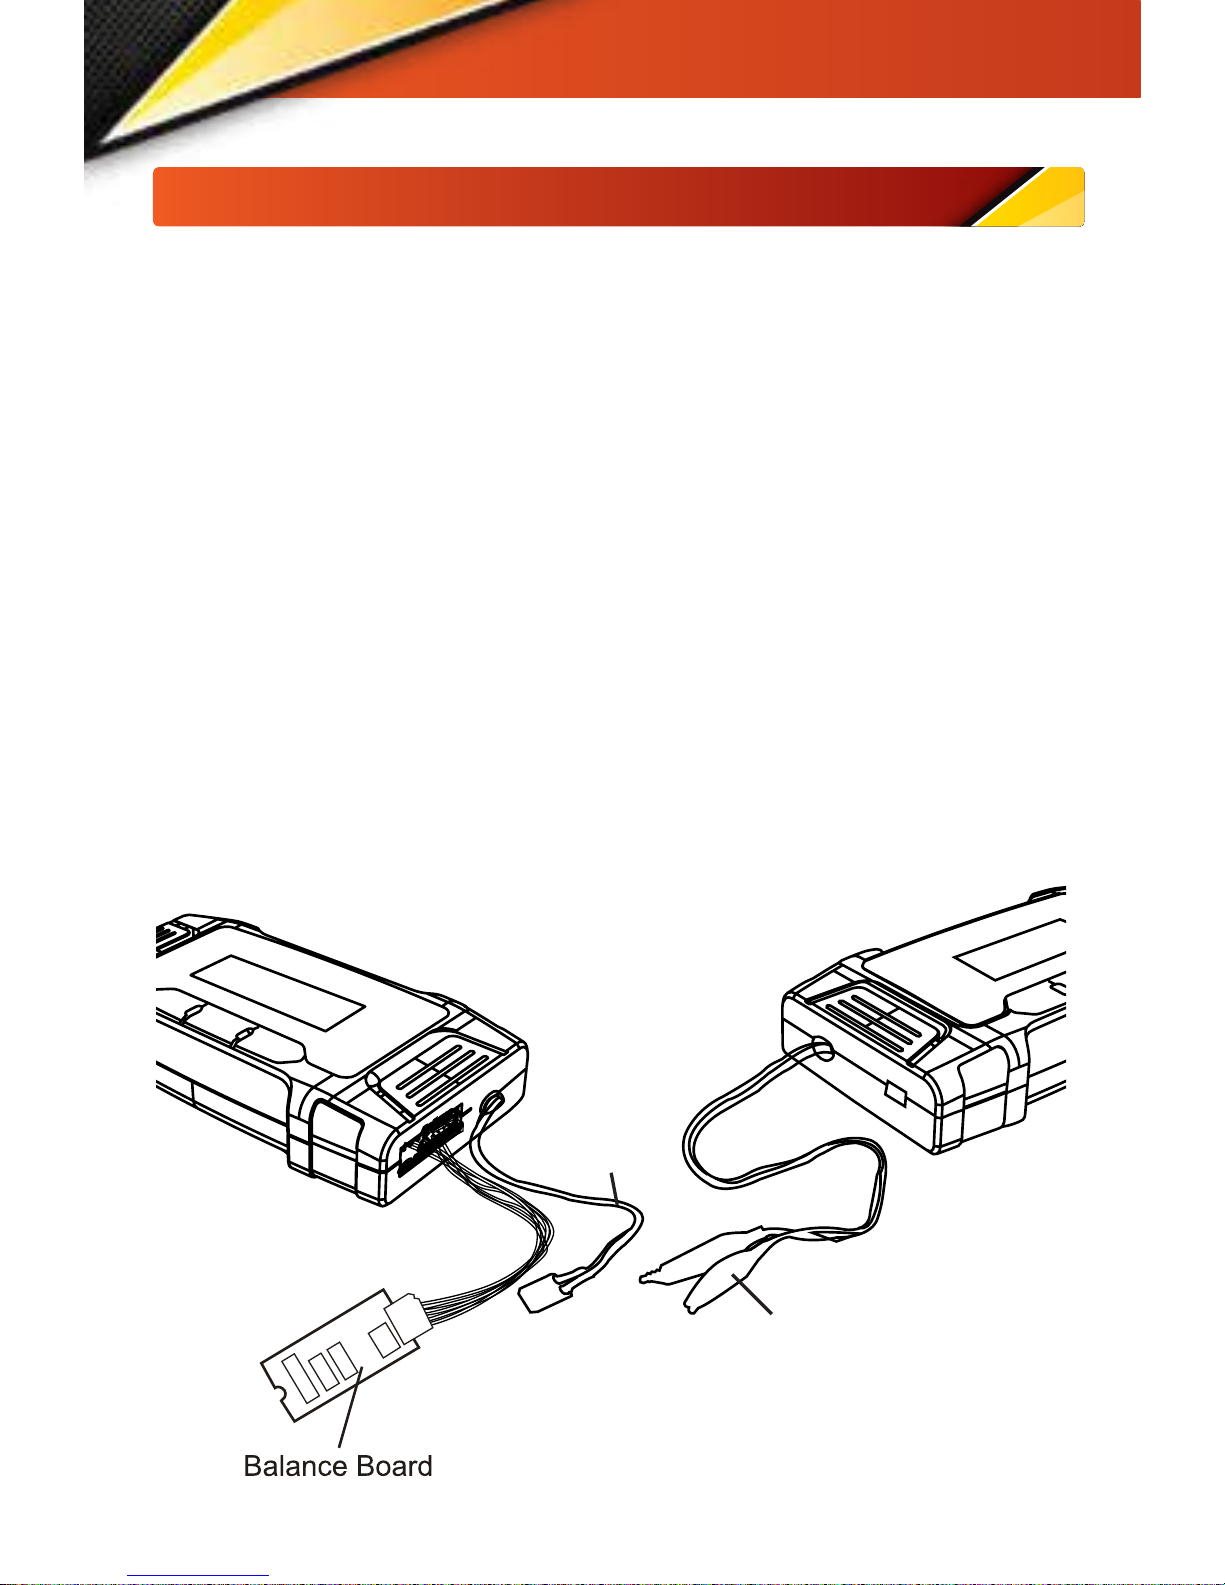
DC Input: This charger can be powered by a portable 12V DC power source for use at
the field/track. On the left side of the charger, connect the DC power cord’s alligator
clips directly to the output terminals on the 12V DC power source.Always match
polarities (red lead to red ‘ +’ terminal, black lead to black ‘ -’ terminal). To utilise the
charger’s absolute maximum power capabilities the DC power source must be capable
of delivering at least 5 amps while maintaining 12 volts DC.
WARNING! Never accidentally short together the positive (+) and negative (-) input
connections when connected to the 12V DC power. Doing so could result in permanent
damage to the power source and the charger.
This charger is rated for a maximum output power of 45 watts. Depending on certain
conditions (if the charge current is set to maximum, the maximum number of cells are
connected to the output, and input voltage is low), the actual current delivered to the
battery might be slightly less than the setting. This is normal.
The charger will be on all times when connected to input power. Disconnect the charger
from input power when not in use.

- 5 -
Controls and Connections
Out
Lea
put Charge
d XT60 sockets
/START
starting charge and
DECREASE
For
decreasing values.
INCREASE DISPLAY
For selecting different
data to be viewed on
the LCD and increasing
values.
TYPE/STOP
For selecting NiCd, NiMH,
LiPo, LiFe and Li-Ion
battery type and the
charge current rate. Also
for manually stopping
charge.
Individual Cell
Balance Ports
Input Power Cable
10-18V DC
(Continued)
Always connect the charge lead to the charger first . Then connect the battery to the
charge lead. Always match polarities on the battery wires, charge leads and banana
jacks - black connections to black (-), red connections to red (+).
Balance Ports: To connect an adapter of balancing of lithium batteries
Determining Battery Type and Specifications
Rated Voltage: If not printed on the battery’s label, consult your battery supplier or
determine the proper pack voltage as follows (refer to the chart below).
LiPo, Li-Ion and LiFe Pack Voltages
Number of Cells Li/Fe Li-Ion LiPo
1 Cell 3.3V 3.6V 3.7V
2 Cells 6.6V 7.2V 7.4V
3 Cells 9.9V 10.8V 11.1V
4 Cells 13.2V 14.4V 14.8V
A. NiMH and NiCd: number of cells x 1.20
B. LiPo batteries: Number of cells x 3.70
C. Li-Ion batteries: number of cells x 3.60
D. LiFe batteries (LiFe Source): number of cells x 3.30

- 6 -
Getting Started
WARNING! NEVER set the battery type to a type that does not match your battery!
For example, accidentally charging a LiPo battery in the NiCd setting could result in an
overcharge condition on the battery, which could result in fire and risk of personal injury.
LiPo
Li-Fe
Li-Ion
Ni-MH
Ni-Cd
Pb
Set
>3 secs.
>3 secs.
>3 secs.
>3 secs.
>3 secs.
>3 secs.
TYPE
STOP
TYPE
STOP
TYPE
STOP
TYPE
STOP
TYPE
STOP
TYPE
STOP
TYPE
STOP
>3 secs.
Charge Current Start Charge
TYPE
STOP
INCREASE
DISPLAY
TYPE
STOP
DECREASE
START >3 secs.
NiMH/NiCd Sensitivity D.Peak
Key Beep
Capacity
Cut-Off
TYPE
STOP
TYPE
STOP
DECREASE
START
INCREASE
DISPLAY
TYPE
STOP
INCREASE
DISPLAY
DECREASE
START
Safety
Timer
INCREASE
DISPLAY
DECREASE
START
2 Hours
60*100mAh
ON-OFF
TYPE
STOP
TYPE
STOP
TYPE
STOP
TYPE
STOP
Start Charge
INCREASE
DISPLAY
>3 secs.
INCREASE
DISPLAY
>3 secs.
INCREASE
DISPLAY
>3 secs.
INCREASE
DISPLAY
>3 secs.
Start Charge
Start Charge
Start Charge
INCREASE
DISPLAY
DECREASE
START
TYPE
STOP
Start Charge
INCREASE
DISPLAY
>3 secs.
TYPE
STOP

- 7 -
Charging Guidelines
Nominal Voltage level: 1.2V/cell.
Recommended fast charge current: 1C-2C, depending on the
performance of the cell. Higher discharge batteries can charge at 2C.
x
C = ÷ 1000 (Where x= Battery capacity eg: 2200mAh).
Lilon (Lithium Ion)
Nominal Voltage level: 3.6V/cell
Max. charge voltage: 4.1V/cell
Recommended fast charge current: 1C or less (0.5C recommended).
LiPo (Lithium Polymer)
Nominal Voltage level: 3.7V/cell
Max. charge voltage: 4.2V/cell
Recommended fast charge current: 1C or less. Some of the very latest LiPo cells
can accept 2C charging or more but check with the battery manufacturer first.
If in doubt, never exceed 1C.
Life (Lithium Phosphate)
Nominal Voltage level: 3.3V/cell
Max. charge voltage: 3.6V/cell
Recommended fast charge current: 3C or less.
Check with the battery maunfacturer to be sure.
Pb (Lead Acid)
Nominal voltage level: 2.0V/cell
Max. charge voltage: 2.46V/cell
Recommended fast charge current: 0.3C or less.
NiCd/NiMH

- 8 -
Battery Connection
1. For NiCd/NiMH: Plug the adapter into the charger FIRST. Then connect the battery
to the adapter ONLY after it has been connected to the charger.
Proceed to the “Starting Charge” section.
2. For LiPo, Li-Ion or LiFe: Lithium batteries for R/C are commonly available in two
different assembly/wiring configurations: wired for balancing and non-balanced.
It’s important to know which configuaration you have before proceeding.
Consult your battery supplier if you are unsure if your battery is wired for balancing,
if it is not wired for balancing but has a built-in safety circuit, or neither.
WARNING! It is NOT recommended to charge a LiPo battery which is not wired for
balancing. Such types of LiPo have NO means to protect the equipment or the user
from damage that could result from an overcharge condition of any cell in the pack.
NON-BALANCED packs are wired so the charger can only detect the voltage of
the entire pack (not individual cells), so there is only one charge lead. It’s highly
recommended to ONLY use such types of LiPo packs if they have a built-in charge
safety circuit which prevents any single cell in the pack from being overcharged.
Simply connect the battery’s main power lead to the charger’s banana jacks
(noting correct polarity).
The image to the right shows the
LiPo set up with the balance board
Input Power Cable
10-18V DC
Output Charge
Lead XT60

- 9 -
Operating Proceedure
Starting Charge
1. Once the proper settings and connection have been made , the battery is ready to
be charged.
2. To start the charging process.
3. During charge, the LCD screen will alternate between the battery voltage and charge
current screens so you can quickly determine if charge is processing correctly.
4. Processing the Display button during charge will manually scroll the LCD through
these screens.
CAUTION: Always turn the charger on before connecting the battery as this will prevent
damage to the battery and charger.
Please follow the process below in order to begin charging.
1. Connect power supply to power source.
2. Turn on the power supply.
3. Connect charger to power supply.
4. Make program selections in the charger for battery charging.
5. Connect charger adapters to charger.
6. Connect battery to charger adapters (connect main charging connectors before
connecting cell-balancing connectors).
7. Start battery charging.

- 10 -
Starting Charge (Continued)
Shows actual voltage
of Cell 4 on lithium
battery.
1S
2S
3S
4S
V
A
mAh
Time
1S
2S
3S
4S
V
A
mAh
Time
1S
2S
3S
4S
V
A
mAh
Time
1S
2S
3S
4S
V
A
mAh
Time
Shows actual voltage
of lithium battery.
Shows actual voltage of
Cell 3 on lithium battery.
1S
2S
3S
4S
V
A
mAh
Time
Shows actual oltage f
vo
Cell 2 on lithium battery.
Shows actual voltage of
Cell 1 on lithium battery.
INCREASE
DISPLAY
Shows the actual
voltage measured
on the output.
Shows the actual
current being sent to
the battery, in amps
Shows how much
charge energy has
been sent to the
battery, in milli-amp
hours
The number of times
the battery has been
charging.
1S
2S
3S
4S
V
A
mAh
Time
1S
2S
3S
4S
V
A
mAh
Time
1S
2S
3S
4S
V
A
mAh
Time
1S
2S
3S
4S
V
A
mAh
Time
DECREASE
DISPLAY N.B. Screens shown on this page apply
only to lithium based batteries.

Starting Charge (Continued)Starting Charge (Continued)
Charge Complete
For NiCD and NiMH batteries, a linear charge current will be delivered to the battery.
The peak detection method will be used to accurately look for the highest battery
voltage during charge. Once this is detected, the charger will automatically stop fast
charge and go to trickle charge mode.
CAUTION: Make sure the charge current setting is safe for your battery to prevent
overheating of the cells. ‘AAA’, ‘AA’,’A’ and ‘2/3A’ size batteries generate heat more
quickly than large sub-C batteries. Most radio batteries should NOT be charged at
currents greater than 1.5A. Failure to follow this recommendation could permanently
damage the battery.
Lithium Batteries are charged using the “constant current /constant voltage” method
(CC/CV). Constant current is delivered during the first part of fast charge . When the
battery reaches pre-set voltage, constant current is no longer delivered, and constant
voltage is applied to the battery . As the battery’s voltage becomes equalised to the
voltage on the charger’s output, charge current will steadily begin to drop.
This is normal. When current reaches an approximate value of 1/10C, the charge
process will end completely.
When the charger has determined the battery is full, it will stop the charge process
automatically and show ‘FULL’ on the LCD screen. Audible tones will sound for
about 10 seconds (pressing STOP while the tones are sounding will turn them of f).
Information regarding the finished charge can be recalled by pressing the DISPLA Y
button. Please refer to the flow chart for the data that can be recalled .
1S
2S
3S
4S
V
A
mAh
Time
1S
2S
3S
4S
V
A
mAh
Time
1S
2S
3S
4S
V
A
mAh
Time
1S
2S
3S
4S
V
A
mAh
Time
1S
2S
3S
4S
V
A
mAh
Time
1S
2S
3S
4S
V
A
mAh
Time
1S
2S
3S
4S
V
A
mAh
Time
1S
2S
3S
4S
V
A
mAh
Time
DISPLAY
DISPLAY
DISPLAY
DISPLAY DISPLAY
DISPLAY
DISPLAY
DISPLAY
- 11 -

- 12 -
DO NOT allow NiMH batteries to overheat (above 50°C)! Disconnect overheated
batteries from the charger immediately and allow to cool.
DO NOT attempt to use the charger’s lithium functions with NiMH batteries and
vice versa.
Store NiMH packs with some voltage remaining on the cells (refer to battery
supplier).
It is important to recharge NiMH batteries immediately prior to use, as they have
a higher self discharge rate.
WARNING! DO NOT try to charge lithium-polymer (LiPo) lithium-ion (Li-Ion) or LiFe
cells in the same way as other battery types! Always read the instructions that are
included with your lithium batteries carefully before use. Failure to follow these
care and handling instructions can quickly result in severe, permanent damage
to the batteries and their surroundings and even start a fire!
ALWAYS charge lithium batteries in a fireproof location, which could be a
container made of metal or ceramic tile. Monitor the area with a smoke or fire
alarm, and have a lithium approved fire extinguisher available at all times.
For NiCd and NiMH batteries, the trickle charge current value is set automatically by the
charger as shown in the chart below and shown in amp “A”. The charger will remain
in trickle charge mode until the battery is disconnected from the charger, or the STOP
button is pressed again.
Trickle charge will NOTbe applied to lithium batteries. When fast charge ends, lithium
batteries can be disconnected from the charger and are ready to use.
If the fast charge 180 minute backup safety timer expires before the battery is fully
charged, the LCD display will show STOP. Should this occur, you might want to attempt
to re-charge the battery by starting another charge. Refer to the Trouble Shooting Guide
on page 14 for more details.
NEVER attempt to extinguish a lithium fire with water or a non-lithium approved
fire extinguisher! Use ONLY a Class D (CO2 or powder) fire extinguisher.
ALWAYS provide adequate ventilation around LiPo/Li-Ion/LiFe batteries during
charge, while in use, and during storage.
•
•
•
•
•
•
•
•
Starting Charge (Continued)Care and Handling of NiMH Batteries
Starting Charge (Continued)Care and Handling of LiPo, Li-Ion and LiFe Batteries

Starting Charge (Continued)
Care and Handling of LiPo, Li-Ion and LiFe Batteries
(Continued)
Starting Charge (Continued)
Warning and Error Messages
NEVER charge LiPo, Li-Ion or LiFe batteries at currents greater than the maximum
rated current as specified by the battery’s manufacturer.
NEVER allow LiPo cells to come into contact with moisture or water at any time.
NEVER allow the electrolyte from LiPo, Li-Ion or LiFe batteries to get in the eyes
or on the skin - wash affected areas immediately if they come in contact with the
electrolyte and contact your doctor.
NEVER attempt to use the charger’s NiCd and NiMH functions for LiPo or Li-Ion
batteries.
ALWAYS keep lithium batteries away from children.
NEVER attempt to charge a lithium battery that is swollen or where one cell is
under 3.0V
NEVER allow LiPo, Li-Ion or LiFe cells to overheat at any time as they can become
physicaly damaged and could possibly explode or catch fire! If a battery becomes
overheated (over 140°F, 60°C), disconnect it from the charger IMMEDIATELY.
NEVER continue to charge LiPo, Li-Ion or LiFe batteries if the charger fails to
recognise a full charge. LiPo and LiFe cells which swell or emit smoke may be in
overcharge condition and should be disconnected from the charger immediately.
NEVER set the charger’s LiPo/Li-Ion or LiFe battery voltage settings to a voltage
that is HIGHER than the nominal rating of the battery itself, as such cells cannot
handle overcharging in any way.
The B405 incorporates various functions to protect and monitor the system,to verify
functions and the state of its electronics . In the case of an error , the screen will
display the cause of the error. This is also warned via an audible sound.
The DC input voltage is below 10.0V or exceeds 18V DC. Make sure
that the input voltage is within this range.
A battery is not connected to the output . Make sure a good connection
exists between the battery and charger and re-try.
•
•
•
•
•
•
•
•
•
- 13 -

- 14 -
Starting Charge (Continued)
Warranty and Service
We warrant this product for a period of one year (12 months) from the date of purchase.
This guarantee applies to materials or operational defects, which are present at the time
of purchasing the product. During that period we will replace, without service charge,
any product deemed defective due to those causes . You will be required to present
proof of purchase (invoice or receipt). This warranty does not cover the damage due
to wear, overloading, incorrect handling or use of incorrect accessories.
The battery is connected backwards (reverse polarity) to the output.
Re-connect the battery to the charger’s output with the correct polarity.
The battery has become disconnected during charge. Re-establish a
good physical connection between the battery and charger, and re-start
the charge.
Some type of electronic interuption or malfunction has occoured. If you
believe that some external force might have caused the charger to Err,
and that a true circuit malfunction has not occoured, you might attempt
a re-start charge. Otherwise, if you believe the charger is not functioning
properly, disconnect the battery from the charger, and the charger from
the input power source and contact your retailer for further details.
The battery is full.
The 180 minute backup safety timer has expired. You can re-start the
charge or disconnect the batery from the charger.
Balance voltage error. When charging Li-XX with the balance cable
connected to the charger and the balance cell voltage is more or less
than the acceptable voltage for each cell this error will occur.
The charger has somehow fallen out of calibration.
Li-XX Bat Low and Hi voltage error. When pack voltage of the connected
lithium battery is not certain.

- 15 -
NOTES

- 16 -
Table of contents
Other Turnigy Batteries Charger manuals

Turnigy
Turnigy T240 Reactor User manual

Turnigy
Turnigy REAKTOR User manual

Turnigy
Turnigy Reactor User manual

Turnigy
Turnigy Reaktor 300W 20A User manual

Turnigy
Turnigy 4x100W User manual

Turnigy
Turnigy ACCUCELL-6 User manual

Turnigy
Turnigy REAKTOR User manual

Turnigy
Turnigy 2S/3S User manual

Turnigy
Turnigy M8 User manual

Turnigy
Turnigy MEGA 400WX2 User manual