manuals.online logo
Brands
  1. Home
  2. •
  3. Brands
  4. •
  5. TWIG
  6. •
  7. Emergency Phone
  8. •
  9. TWIG Bracer User manual

TWIG Bracer User manual

TWIG Bracer
Getting Started Guide
TWIG Bracer is a safety phone with dedicated lone worker alarm functions.
0700
Publication number: YZ6000-01-EN
All rights reserved. © Twig Com Ltd.
RG310 HW made in China
WHAT TO DO FIRST
INSERT SIM CARD
•Insert your SIM card to the upper left SIM holder, put the battery in its place and close the back cover with the
screwdriver included in the sales package. (Note! Only upper left SIM card holder is compatible with TWIG
Bracer application. Lower SIM reader can be used for other phone functionalities.)
START DEVICE
•Start the device by pressing the red ON/OFF key.
•When location consent notification appears reply Agree. Network-based positioning is not working without it.
•Set up Wi-Fi network by changing OFF to ON, select the available network and press Next.
•When Congratulations!is displayed, click Finish.
•When SIM card changed is displayed, select Change. Scroll down and select data connection by
clicking the displayed operator. Press back key of numerical keypad to go back to idle view.
CHECK DATA SETTINGS
•Drag the status bar down to access the notification panel. Use the settings icon in the top right corner to
access system settings. Check the Data connection, GPS and Wi-Fi are switched on and Airplane
mode is switched off.
OPEN DEVICE SETTINGS (password: 1908)
Select Settings, write device settings password in the box below Please input password and click login.
VERIFY APN AND ROAMING SETTINGS
•Scroll down and select More.. > Mobile networks > Access Point Names
•Select SIM management > Roaming > Data roaming
START TWIG BRACER APPLICATION
•Scroll to right by swiping the display, select More app and select Bracer.
TWIG BRACER CONFIGURATION
TWIG POINT REMOTE CONFIGURATOR
•TWIG Bracer device can be configured only with TWIG Point Remote Configurator. (More information in TWIG
Software and Services leaflet in your sales package).
CONFIGURATION PROCESS
•Login to your TWIG Point SP account. Instructions have been sent with e-mail.
•Click Add device
•Add device phone number and click Add. Naming the device is not obligatory. It is not needed to select GPRS
operator and international roaming block.
•Click Update
•Message Device updated successfully! is displayed.
•Click Configuration. If Configuration page is empty, refresh the page after a while. Settings will appear after
Bracer has completed configuration synchronization with TWIG Point.
•Select settings according to your needs. Detailed information concerning device configuration in TWIG
Configuration Guide also downloadable on website: https://twigcom.com/page/documents.
•When all settings have been selected, click Write to Device. Note! Synchronization may take about an
hour. For faster synchronization, click menu key of your TWIG Bracer device and select Reconnect or select
Open GPRS Connection in TWIG Point Remote Configurator.
IMPORTANT INFORMATION
CHECK TWIG BRACER APPLICATION IS RUNNING
•Drag the status bar down to access the notification list and check TWIG Bracer application is on the list. If not,
start TWIG Bracer application again.
LONE WORKER ALARM KEYS
•To start SOS cycle with the side SOS key, keep it pressed few seconds.
•To start the SOS cycle with the front SOS key, press it twice or keep it pressed during few seconds. (Your
SOS cycle option depends on device configuration!)
•To start Amber alert press number 5 on numerical or soft keypad (Check your device configuration first!)
•To set ON/OFF ManDown alarm, press number 6 on numerical or soft keypad (Check your device
configuration first!)
•Numeric and soft key functions are identical!
CHECK DEVICE FUNCTIONS
•Drag the status bar down to access the notification panel. Use the settings icon in the top right corner to
access system settings.
•GPS and Wi-Fi have to be switched on for positioning. CAUTION! User is able to switch GPS and Wi-Fi on/off!
AVAILABLE LANGUAGES
TWIG Bracer UI is available in English, French, German, Spanish, Portuguese, Italian and Danish
LONE WORKER ALARM FUNCTION KEYS
SIDE SOS KEY
•opens display and
TWIG Bracer
•start SOS cycle
•opens display locks
TWIG BRACER SOFT KEYS
•Assistance call (1,2,3,4)
•Amber alert (5)
•ManDown alarm (6)
MENU KEY
FRONT SOS KEY
•starts SOS cycle
•opens display locks
SOFT SOS KEY
•starts SOS cycle
BACK KEY
•closes application
•cancel
ON/OFF KEY
•Power on / off
•rejects / ends calls
•sets display on / off
LONE WORKER ALARM SYMBOLS
GENERAL STATUS SYMBOLS
SOS cycle is active.
SOS cycle is in post emergency mode. Position requests are possible from emergency numbers.
Tracking is active to one or more destinations.
ManDown alarm is active. Automated emergency cycles are possible.
Amber alert is active.
SOFT KEY SYMBOLS
Assistance call
Enable ManDown
Amber alert
Disable ManDown
Accept/Yes
Failed DIN test
Increase Amber alert time
Close OSM message or Restart failed DIN
test or continue started Amber alert
Decrease Amber alert time
CALL AND MESSAGE SYMBOLS
Pressing SOS key or Amber alert key. Displayed when SOS key or Amber alert key (number 5) has
been pressed.
Sending a position report.
ALARM SYMBOLS
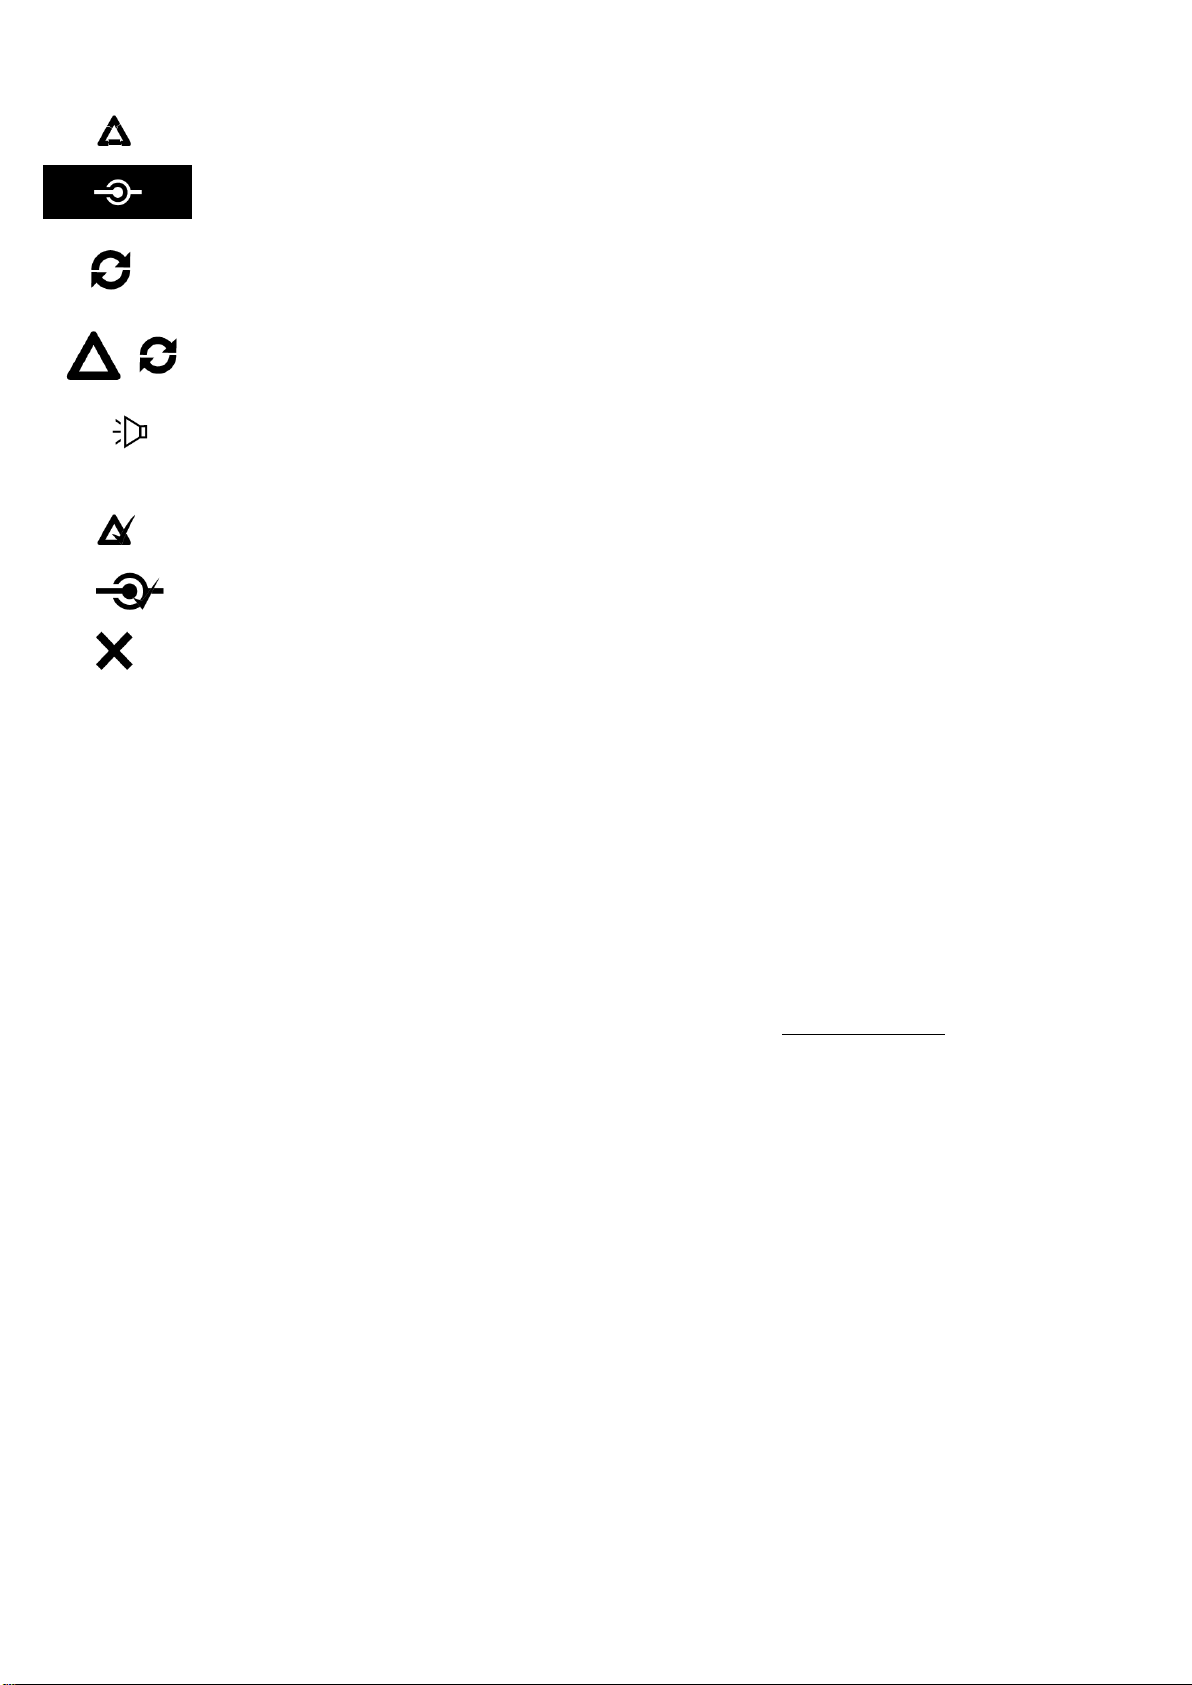
Emergency cancellation. Displayed when cancellation period is processing.
Pre-alarm for ManDown alarm is set. To cancel the emergency cycle, lift the device to vertical position. Do it while this
notification is displayed. To let the emergency cycle take place: Do nothing.
Waiting for location update. Displayed at the beginning of SOS cycle when device tries to update the location.
Emergency call retry. Emergency numbers can be voice call numbers. The notification is displayed when the device makes
another call attempt to a number.
Post-alarm state. Displayed when the emergency cycle is completed, and the device makes audible alarms at regular
intervals. Displayed with ManDown alarm and Amber alert symbols when in post-alarm state of ManDown alarm and Amber
alert.
Emergency completed. Displayed when the emergency cycle ends normally, or when the emergency mode is ended manually.
Alert state completed. Displayed right after the emergency cycle is finished, or the sensor alert is cancelled.
General failure. Displayed when an operation fails.
HANDLING AND MAINTENANCE
NOTE: The instructions below apply to the device, its accessories, batteries in use as well as batteries taken out of use.
•Dust and dirt may damage the moving parts of the device. Do not use or keep the device in dusty or dirty surroundings.
•Do not open the device or battery by yourself or pierce holes in it.
•Rough handling may break the circuitry inside the device. Do not drop, knock, twist or shake the device or its battery.
•Keep the device dry. Liquids contain minerals which could corrode electronic circuits. If the device gets wet, turn it off and dry the device and the battery
immediately. Put the device into an upright position and let it dry. It is recommended that a reseller or service personnel check that the device functions
properly.
•Even though the device is waterproof, do not wet the device unnecessarily or immerse it in water.
•Protect the device from heat. High temperatures may shorten the life of the electronical devices, melt or warp plastics and damage batteries. Do not
warm up the device or battery or use it near fire.
•Do not short-circuit the battery or battery contacts. Exposing the metal strips of the battery to a close contact with a metallic object, such as a coin, a clip
or a set of keys can cause accidental short-circuiting and damage the battery.
•Charge and recharge the battery only with the charger provided in the sales box. Use the battery only for the purpose it is intended.
•Clean the device with a soft cloth, dampened slightly with mild soapy water. Do not clean the device with harsh chemicals, solvents or other corrosive
substances.
•Only allow service personnel authorised by Twig Com Ltd. to repair the device. Contact information: support@twigcom.com.
SAFETY AND PRECAUTIONS
TELEMATICS PROTOCOL
MPTP (Mobile Phone Telematic Protocol) allows, among other things, tracking of the device over the SMS communication. Automatically sent telematics
messages are only allowed to authorised numbers configured in the device. Such numbers can be, e.g. emergency and service center numbers. Position
of the device is retrieved by the GPS*, or by the network parameters - the latter is a network dependent service. The carrier for telematics messages is a
SMS message. Deliveries of all messages is fully handled by and in the responsibility of the GSM network operator and services can vary substantially.
The charge of a protocol message is determined on the contract by the service provider.
GPS
The Global Positioning System (GPS) is operated by the government of the United States, which is solely responsible for its accuracy and maintenance.
The system is subject to changes that could affect the accuracy and performance of all GPS equipment.
EMERGENCY CALLS
The device is an aid and should never be relied upon as an only emergency device. Its functionality is dependent on GSM network and GPS satellites
which may not be available all the time. To make emergency calls, the device must be turned on and located in an area with adequate GSM network
signal strength. Making an emergency call also requires GPS satellite coverage and a valid SIM card. Emergency calls may not be possible on all GSM
phone networks or when certain network services or phone features are in use. In unclear cases, consult the network operator.
CARE, MAINTENANCE AND DISPOSAL
The continuous operating time is less when using an old battery than a new battery. When storing device for a long time, it should be kept cool and with
fully charged battery in a dry place. Li-Ion batteries do not contain heavy metals which can damage the environment. Device and Li-Ion batteries should
be disposed according to the country-specific regulations.
ENVIRONMENTAL EFFECTS IN USAGE SIGHT
The device must have an unobstructed view to satellites at any time. In marginal conditions (e.g. when staying in surroundings with heavy tree cover or
next to high-rise buildings) GPS positioning may not work properly. If the device is mounted somehow, it must be attached to the surface so that the back
of the device is facing up and the top of the phone upwards. To ensure proper functioning of the GPS and GSM/3G, the unit can be covered with thin low
loss material such as plastic, fibre glass or clothes, but not with metal. This concerns particularly GSM and GPS antenna areas!

Popular Emergency Phone manuals by other brands

CareTech Gina user guide

CareTech

CareTech Gina user guide

Linear PERS-2400A Installation and operation instructions

Linear

Linear PERS-2400A Installation and operation instructions

Tunstall Lifeline Vi user guide

Tunstall

Tunstall Lifeline Vi user guide

MP FONOMAC 3 manual

MP

MP FONOMAC 3 manual

Rath 2100-CP9 Installation & operation manual

Rath

Rath 2100-CP9 Installation & operation manual

Beacon Assist Call BACM Installation and operation manual

Beacon

Beacon Assist Call BACM Installation and operation manual

Pixel EM-1 user guide

Pixel

Pixel EM-1 user guide

SkyLink ED-100 Guide

SkyLink

SkyLink ED-100 Guide

Wind Crest ILO1 quick start guide

Wind Crest

Wind Crest ILO1 quick start guide

Viking E-1600A-BLT-EWP Technical practice

Viking

Viking E-1600A-BLT-EWP Technical practice

Code Blue CB 5 Series Admin guide

Code Blue

Code Blue CB 5 Series Admin guide

GAI-Tronics Red Alert 300 Series manual

GAI-Tronics

GAI-Tronics Red Alert 300 Series manual

LogicMark 30911 operating instructions

LogicMark

LogicMark 30911 operating instructions

Dahua VTA2302A quick start guide

Dahua

Dahua VTA2302A quick start guide

GAI-Tronics 234WM-202 user manual

GAI-Tronics

GAI-Tronics 234WM-202 user manual

Studer EXICALL NIT 960 Brief description

Studer

Studer EXICALL NIT 960 Brief description

Talkaphone VOIP-500 Series Quick installation guide

Talkaphone

Talkaphone VOIP-500 Series Quick installation guide

Linear Personal Emergency Reporting System... Installation & operating instructions

Linear

Linear Personal Emergency Reporting System... Installation & operating instructions

manuals.online logo
manuals.online logoBrands
  • About & Mission
  • Contact us
  • Privacy Policy
  • Terms and Conditions

Copyright 2025 Manuals.Online. All Rights Reserved.