Tyent NMP-5000T User manual

W A T E R I O N I Z E R
MADE INKOREA UserManual
■This product is intended for domestic use only.
■Keep this user manual handy for easy reference.
■Carefully read this User Manual, particularly “all safety warnings.”
pH Chart
How to Measure: Place 10-15 mL of test water in a container
and add 2-3 drops of reagent. Then mix well and check the
color of the water with the pH chart above.
(The color depends on water quality and reagent.)
The user should be responsible for failure or improper
selection or improper use of the products such as use
in any manner for which the product was not originally
intended.
This product is subject to changes that enhance its
performance without prior notification.
If the supply cord is damaged, it must be replaced by the
manufacturer, its service agent or similarly qualified persons
in order to avoid ahazard.
This appliance is not intended for use by persons (including
children) with reduced physical sensory or mental capabilities
or lack of experience and knowledge, unless they have
been given supervision or instruction concerning use of the
appliance by a person responsible for theirsafety.
Children should be supervised to ensure that they do
not play with the appliance.
Tyent Australia

To O u r Valu ed C u s t om e r s T a b le of contents
Table of C o nt e nt s
To Our Valued Customers
Tableof Contents
BeforeUsage
Safety Precautions and Warnings
2
3
4
5
Product Features 10
PackageContents 12
Unit Overview 13
LCD Display and Touch Pad Overview 14
How to Install the Unit 16
Water Hose Installation 18
Directions for Product Use 20
System Setup Mode 22
Cleaning Function 24
Customer Serviceable Parts 25
How to Change the Filters 26
How to Reset the Filters 27
TURBO Function 28
Unit Specifications 29
Troubleshooting 30
Product Warranty 31
Table of Contents
Thankyou for purchasingthe NMP series Water Ionizer.
Pleasereadall safetywarningsand thisUserManualcarefullybeforeusingthis product
to ensureproper product usage. (Keep the manualhandyforeasyreference.)
I ntendedUse
Thisdevice creates functional alkaline ionized water.It changes the properties of
regular tap water through the use of electrolysis. Following are the changes normal
tap water undergoesviathis process:
Wearenot responsiblefor any accidentsand/ormalfunctionsdue to the
improperuseof this machine
Pleasekeep themanualand warrantycard in a safe place,so that it’s
easilyaccessible when you need it
Pleasereferto this manualoftenwhen you havequestions when using or
when troubleshootingthis unit
An increase or decrease in pH level
Creation of negativelycharged hydrogen ions (antioxidants)
Purificationthrough filtration
To Our ValuedCustomers
23

Before Usage
Safety Precautions and Warnings
Do not use ifthe power cord is damaged or ina
loose power outlet.
Do not pull the power cord. Never touchthe power
cord or the power outlet with wet hands.
Do not forciblybend, squeeze, damage or crush
the power cord under heavy objects.
Unplug the power cordduringgeneral maintenance,
repairand inspection and while replacing parts.
Do not use power surge protectors with this unit.
Use unit with its own dedicated power source.
Regarding the PowerSupply
Before Usage
Safety precautions are provided for the safe and proper use of this unit and can prevent
danger, bodily harm and/or possible damage due to misuse. Please make sure you are
familiar with all the safety precautions and warnings associated with this unit.
DANGER (Red Warning Sign) indicates an imminent hazard that could result in serious injury
or death. Ifyou see this sign, stop using this unit immediately.
WARNING (Orange Warning Sign) indicates a potential hazard that could result insignificant
bodily harm ordamage to the unit. Ifyou see this sign, stop the use of this unit.
ATTENTION (Yellow Warning Sign) indicatesa potentialhazard that could resultin minor
bodily harm ordamage to the unit.
1. Do not drinkfunctionalwaterwithmedication.Whentakingmedication,use“clean H2O”
filtered water thirty minutes prior to taking medication as well as with medication.
You mayresume drinking functional water thirty minutes after taking medication.
2. Always consult your primary care physician before drinking functional water. Only
drink a small amount near a neutral pH level for the first week. This will give the body
time to adjust to functional water during the detoxification period. See Welcome
Guide for fulldetails on getting started.
3. If you notice any negative effects from drinking functional water, stop drinking the
functional water immediately and consult your primary care physician about
changes in your body’s pH level.
4. If you are currently under the care of a primary care physician for an existing condi-
tion, consult your primary care physician about how changes in pH and other
characteristicsof functional water could affectyourmedical condition.
5.If you suffer from gastric anacidity, kidney failure or potassium excretion, you should
not drink functional water.
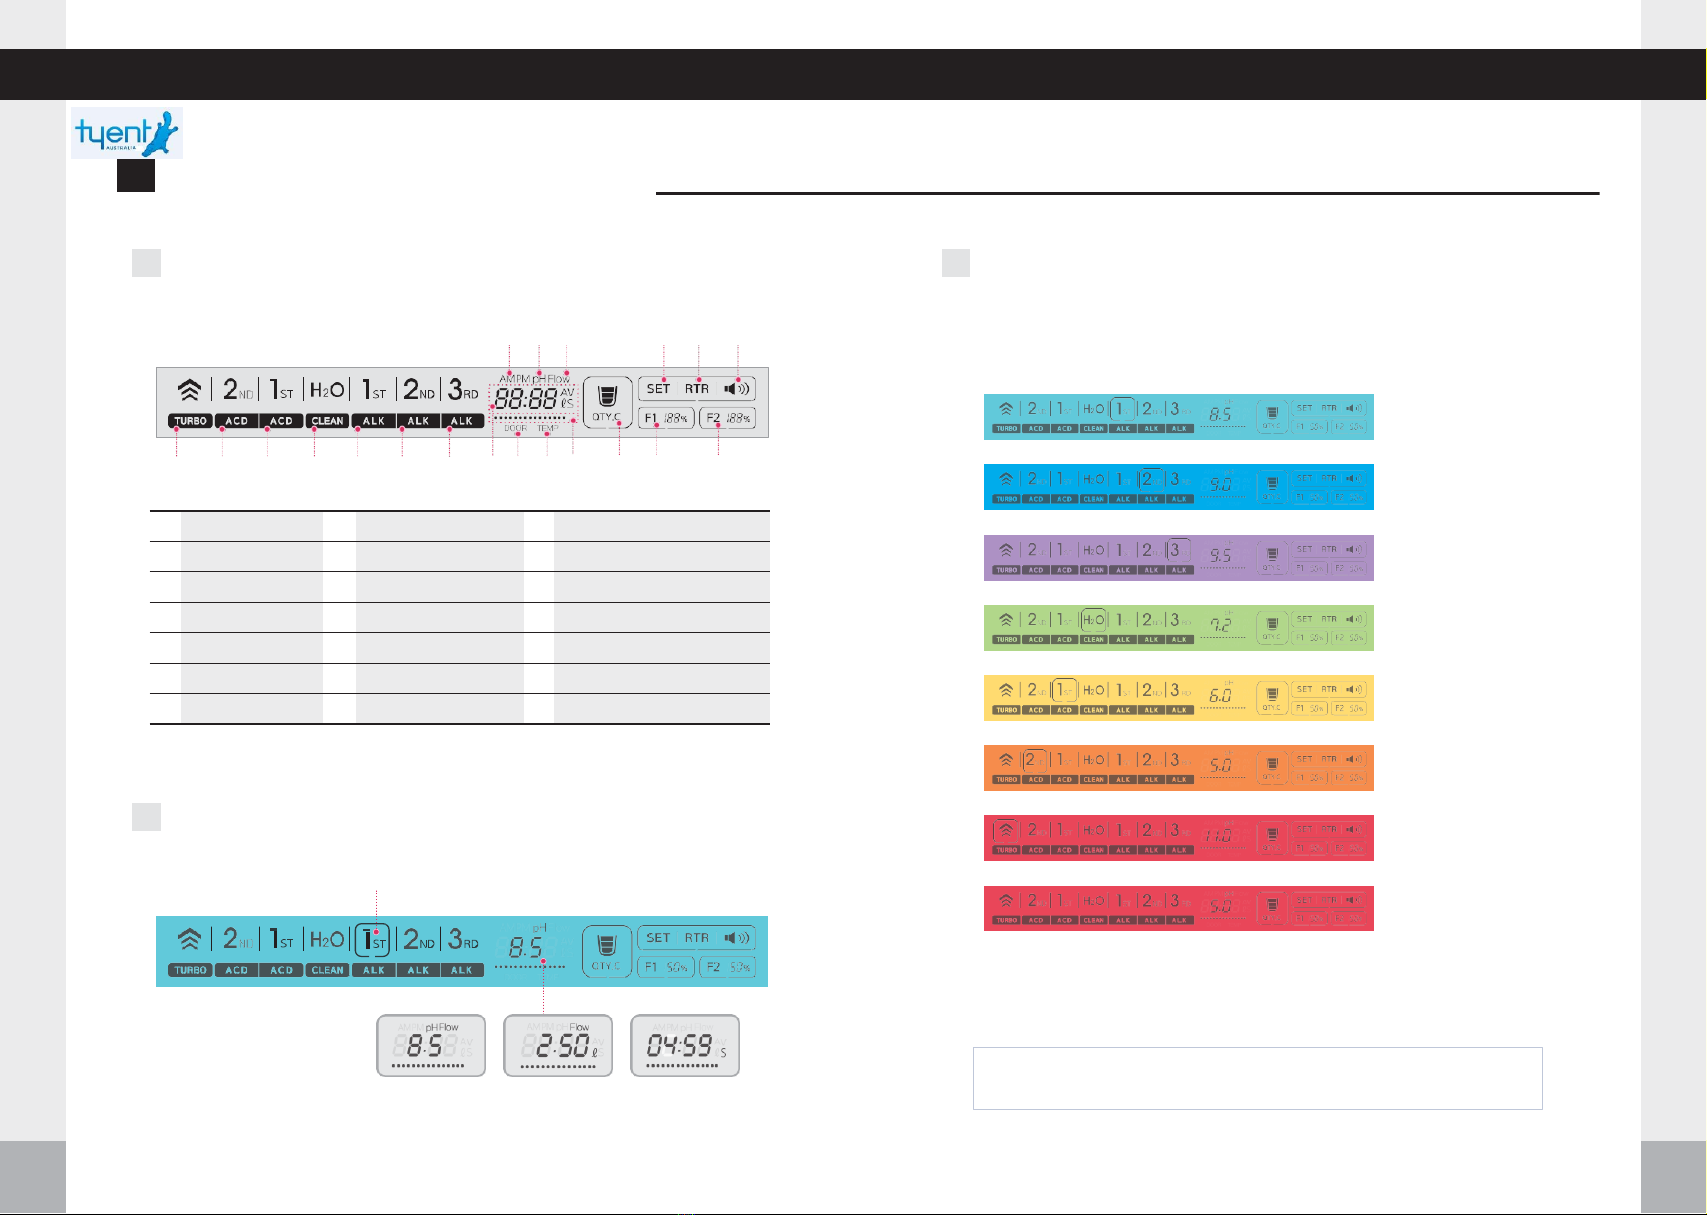
6.Verify the pH levels of the functional water dispensed from this unit on a monthly
basis to ensure proper function. This can be done with the supplied reagent drops
and apH color chart.
7.When switching from one pH to another, it is good practice to let the water run for
severalseconds before using.
8.It is common to drink half your body weight in ounces. Forexample, if you weigh 180
pounds, it maybe wise to drink 90 ounces every day of water per day. This especially
applies after you have givenyour body some timeto adjustto the new pH level.
9.The recommended drinking level for functional water is 9.5 pH (+-0.3). It is not
recommended to drink functional water above apH of 10.
10.If you wish to store functional water, use a glass or other nonleaching material with
an airtight lid and store it in the refrigerator. Functional water will begin to weaken
immediatelyand willlosemost of itsbenefitsafter3 days.
11.Neverrunhot waterthroughthis unit.
12.Neverdrinkacidic water.
B e f or e U s a g e Safety Pr ec au tion s andWa r nin gs
45

Safety Precautions and Warnings
To reduce the risk of electric shock, do not remove
the cover; there are no user-serviceable parts
inside. Refer servicing to qualified service person-
nel. Removing the cover will void the warranty.
Only use the unit with the correct voltage.
Do not place this unit near heat sources.
Do not place this unit on an uneven surface.
Do not drop or use excessive force on this unit.
Do not connect the water line to a hot water supply.
Do not use unfit raw water in accordance with the
standards of the water service act.
Installation
Do not use in areas of high humidity and/or high
temperature.
Usage
Install the drain faucet near sink and adjust the
position of drainfaucet to drain away to the sink.
Make surethe drainfaucet is positioned lower than
the unit.
Do not discharge water over 1 hour.
Ifthe unit won't be used for a long time, shut off the
valve and unplug the power cord.
If you hear strange noises, smell a burning odor or
see smoke, unplug the power cord immediately
and call qualified personnel for service.
Replacefiltersevery6 monthsto optimizethepurifica-
tion performance of this unit even if the replacement
indicator lightisn’t turned on.
Iftheunit is not usedfor afewdays, let thewater run
for 1-2 minutes before drinking functional water.
Safety Prec a utions andWarn in gs Safety Pr e caut io ns andW arnin g s
67

Safety Precautions and Warnings
Do not poke or scratch the touch pad or LCD
display with sharp objects.
Do not place any objects on top of this unit no
matter how smallthey are.
If water leaks out of the unit (other than the
hoses) or if the unit is standing in a puddle of
water, shut off the water supply, unplug the
power cord and contact qualified service personnel
for service.
Do not use alkaline or acidic water in fish bowls
or aquariums. The sudden change in pH could
be harmfulor fatal to some marine life.
In areas of hard water (calcium scaling present
on faucets), notify your service provider and
install a cell safe antiscale prefilter to protect the
ionizer from scaling.
It is beneficial for the maintenance of the
machine to run a strong acidic level for 5-minute
cycles twice weekly. This will help to maintain a
clean chamber.
It is normal for condensation to be present on the
unit during humid summer months. If condensa-
tion persists despite weather conditions, unplug
the power cord and refer servicing to qualified
service personnel.
Turn off
Cleaning
Do not store the unit near chemicals, food,
metals or medication
Do not spray water on the main unit. Do not
clean the unit with benzene or other chemicals,
which may leak into the unit. If using a damp
cloth, be verycareful not to get electronic display
wet.
Storage
Ifthe original packaging is not available, cover
the unit in plastic to avoid scratching the surface.
Store the unit inits original packaging in acool,
dry place when not in use.
Carefully remove this unit from its packaging.
Keep the original packaging for future storage
and unit transportation.
Remove the filtersand turn them upside down to
remove excess water before storing.
Safety Prec a utions andWarn in gs Safety Pr e caut io ns andW arnin g s
89

Product Features
Product Features
P r o d u c t F e a t u r e s P r o d u c t F e a t u r e s
Product Features
Fixed quantity discharge function
It generates desired amount of water by convienet operation.
SMPS type power supply
A CPU monitors the power that is supplied to different parts of
the unit, thereby ensuring efficient performance.
Automatic water flow
Simply pressing the touch button allows you to start and stop
the flow of functional water.
Voice announcement
Voice announcement for different functions and safetywarnings
ensure safe and convenient use.
RTR(Real Time Refresh)
Automatic cleaning function
Unit features an automatic plate cleaning function using polarity
oscillation.
Automatic Stop Function
15 minutes after a function is selected, water outflow will stop to
prevent overflow or flooding.
Temperature Sensor Function for SafeOperation
If the temperature of the source water exceeds 95℉(35℃) then
water will stop flowing and a warning message will appear on
the screen.
Eco mode
The LCD backlight will be turned off automatically during periods
of non-use and the Time function is displayed.
Filter replacement cycle
This unit features a filter life cycle display and voice announce-
ments designed to let you know when it is time to change the
filters.Every 6 months is best for optimal performance.
Touch LCD display color backlight
The color back light on the LCD displayallows you to distinguish
alkali water from acidic water.
Advanced water purification system
The advanced performance of the primary filter and functional
secondary filter enable optimal purifying conditions for tap water.
Detects if filter door isopen
Whendoor is open, thewatersupplywillbe suspendedforyour safety.
15min
Safety Functions
The outflow of functional water stops automatically when raw water is not
supplied, preventing the electrolytic cell and power supply unit from being
damaged due to current overflow, water from being wasted and accidental
water leaks. This function also allows you to set pH and ORP levels according
to the amount of water inflow, to distinguish pH from backlight colors and set
the auto cleaning function.
Fully automatic system with embedded central
processing unit (CPU)
Everyaspect of creating functional wateris controlledby theCPU
chip that automatically finds an optimal operating condition using.
10 11

Unit Overview
Package C ontents
P a c k a g e Contents Unit Ove rv ie w
Package Contents Unit Overview
Tools You WillNeed
Make sure you are familiarwith the parts and featuresof this unit, and carefullyread
the user manual and other important information
Water Outlet Tube
WaterIonizer
Faucet Diverter
pH Testing
SolutionBottle
8.2 ft (2.5 m)
of Hose
Tube Suction Cup
Assortment of Connectors
and Rubber Washers
Adjustable
Wrench
Utility
Scissors Plumb er’s Tape
Rear View
①Hanging
Groove
②RearCase
③PowerCord
BottomView
①WaterInflow
②Water
Outflow
Wrench
1
56
4
7
2
1 2
3
2
3
1
Front View
①WaterOutlet Unit
②LCD Display
③Front Cover
④DoorCase
⑤FrontCase
⑥WaterOutlet Tube
⑦JOG Dial
(Model: NMP-9000T, S11T, S13T)
DrainFaucet
Tube Elbow Stem Elbow
- Drain Hose
- User Manual
12 13

LCD Display and T o u c h P a d O ve rview LCD Display and T o u c h P a d Ov er view
How to Install the Uni
t
How to Install the Uni
t
LCD Display and Touch Pad Overview
ⓐ ⓑ ⓒ ⓓ ⓔ ⓕ ⓖ
ⓗⓘ ⓙ ⓟ ⓠ ⓡ
ⓣⓚ ⓛ ⓜ ⓝ ⓞ ⓢ
ⓐ
Turbo
ⓗ
Time
ⓞ
Fixed quantity
discharge
ⓑ
Acidic level 2
ⓘ
pH
ⓟ
System set up
ⓒ
Acidic level 1
ⓙ
Water
flow
ⓠ
Cleaning
ⓓ
Purify water
ⓚ
Voltage/Flow/Time
ⓡ
VolumeOn / Off
ⓔ
Alkaline level 1
ⓛ
Door
open
ⓢ
1st Filter reset
ⓕ
Alkaline level 2
ⓜ
Temperature
ⓣ
2nd Filter reset
ⓖ
Alkaline level 3
ⓝ
Remaining
time
WhenAlkaline Water(1, 2 & 3), PurifiedWater(H2O), Acidic Water (1 & 2)
and Turbo Watericons are selected, backlight colors are as follows :
Alkaline level 1
Light Alkalinewater
Alkaline level 2
Medium Alkalinewater
Alkaline level 3
Strong Alkalinewater
Purify water
Creates purifiedwater
Acidic level1
Non-Drinkable
Acidic level2
Non-Drinkable
Turbo mode
Non-Drinkable
1 Standby screen
2 Water Outflow screen
3 Display color
Backlight of LCD displaywill match the pH level color according to water pH level
beingusedaftericon is pressed.
Below information willbe ▶
rotating on the display.
Selected pH level Amount of
supplywater Remaining
discharge time
Real Time Refresh
Non-Drinkable
※pH value is standard value based on test water.
※Errors may occur between actual output water according to raw water condition such as
water quality, amount of water and temperature.
Theselected icon flickersduring water outflow.
14 15

H o w to Install the Unit H o w to Install the Unit
How to Install the Uni
t
How to Install the Uni
t
How to Install theUnit
Determinewhether you will connect the unit directly to the cold water supply line
(under sink) or to the faucet (see image).
Option A l Faucet: A faucetconnectionrequires a faucetdiverter (included).
Option B l Under-Sink: Anundersinkconnectionrequiresan under-sinkadapterkit
(notincluded)oracompatiblet-valve(availablefrommosthardwarestores).Formore
informationseeWelcomeGuideorcallsupport.
Option A –Faucet Installation
Many faucets vary in design, and your faucet may require different setup instruc-
tions than those featured in this manual. Please consult a qualified service profes-
sionalif you are unable to correctlycomplete the installation.
①Shutoffboththehot and coldwatermainsupplyat thepipe underthesink.
②If yourfaucetfeaturesa screw-on style aerator, removeit by unscrewingit fromthe
tip ofthefaucet.
③If theincludedfaucetdiverter doesnot fit directlyto thetip of the faucet,selectan
appropriatesizeconnectorandrubberwasher(included).
④Whenconnectingthediverter or adapterto the faucet,be sureto useplumbingpipe
threadsealtape(notincluded)to preventleaks.
⑤Ifnecessary,connect the faucetdiverter with the appropriateconnectortothefaucet.
⑥Besureall connectionsaresecurebut do not overtightenthem.
①Purchaseeitheranunder-sinkinstallationkit (notincluded)or purchasea T-
connection(withshut-offvalve)fromahardwareor plumbingsupplystore.
②Shutoffboththehot andcoldwater mainsupplyat thepipeunderthesink.
③Locatethe cold water supplylinevalve.
④Disconnectthefaucetcoldwatersupplylinefrommaincoldwaterpipe.Usea
towel to catchthesmallamountof waterthatmaycomefromthefaucetsupply
line.
⑤WhenconnectingtheT-connectionto cold water pipe, be sureto useplumbing
pipe threadsealtape(notincluded)topreventleaks.
⑥Reconnectthe faucetcold water supplyline to theT-connection(nowsecuredto
themaincoldwaterpipe).
⑦Besureall connectionsaresecurebut do not overtightenthem.
Option B –Under-SinkInstallation
Both Options
Do not turn on the main water supply until all hoses are properly installed to the
unit. Theunit andcomponents are subject to change without prior notification in
order to enhance performance.
16 17

W a t e r H o s e Installation W a t e r H o s e Installation
Water Hose Installation
Inflow
①Place the unit on the planned installation
location and screw the flexible tube clockwise
into the water outlet hole positioned at the top of
the unit.Do not over tighten.
②Press the stem elbows into the water inflow
and outflow holes on the bottom of the unit untilyou
hear a click and feel the hose sit firmly in place.
⑤Cut an appropriate length of drain hose and
connect it the drain faucet. When drain hose is
connected, put the drain faucet in the inner part
of sink to run water.
⑥Installthe drain faucet near sink and adjust the
position of drain faucet to drain away to the sink.
⑦Turn on both the cold and hot water supply.
Make sure there are no leaks at any of the
connections. Make sure the faucet is working
with both hot and cold water. Make sure there
are no leaks from the hose connections on the
bottom of the unit. Make sure the hoses arefirmly
seated in the unit holes.
③Measure between wherethe unit will be located
(on the counter)and the water faucet (or under-
sink T-connection) where the diverter(or T-
connection) will be installed.Cut enough hose to
allow connection from the rear of the unit to the
water supply (eitherfaucet diverter or under-
sink T-connection).
Note: Keep the length under-16 feet (5 meters) from
the unit to the faucet. You may need a pressure pump
or larger size hose if the pressure is too low. Be sure to
leave a few extra inches (centimeters) of length so the
faucet can stillbe rotated.
④Connect the hose from the inflow hole to the
cold water supply, either at the faucet diverter
(Option A - remove the nut from the diverter,
slide the nut on to the hose, firmly seat the hose
on the faucet diverter, and screw the nut over
the hose and back on to the faucet diverter) or the
under-sink T-connection.
(Option B: route the hose through the counter-top
to the T-connection, firmly seat the hose on the
T-connection, make sure the connection is sealed
completely)
Inflow Drain
hose tofaucet
⑧Plug in the power cord. You should hear a
series of tones when you power up the unit.
※Be careful not to touch the touch screen at initial
power up. Thetouch sensor may not operate caused
by touch sensibility change. If the touch sensor does
not operate due to contact with a part of the body,
reconnect the power cord.
Drainfaucet
tosink
Drain
18 19

Directions f o r P r o d u c t U s e Directions f o r P r o d u c t U s e
Directions for Product Use
D irections for ProductUse
1 When using the Touchscreen
When using fixed quantity dischargefunction
》 》
15min 15min
》
①Select a desiredwater mode.
②Water Outflow: The selected icon flickers during water outflow. If the selected
icon is not pressed again, the unit will automatically stop after 15 minutes of
water outflow.
③WaterOutflow Stop: Lightlytouch the blinkingiconagain to stop water flow.
※NOTE: Remember, a LIGHT TOUCH is all that is requiredwhen pressingthe LCD.
①TouchtheQTY,Ciconandchooseafixedamountof water. (0.5ℓ,
1.0ℓ,1.5ℓ) (0.5 》1.0 》1.5 》release)
②Select a desired watermode.
③Wateroutflow stopsautomatically.
(Fixed quantity discharge function isreleased after water comes out.)
》 》
①Touch the "QTY,C"button.
②Select thefixed amount of water you need by turning the jogdial.
- Clockwise: Increasingby 100ml (Max.5L )
- Counterclockwise: Decreasingby 100ml (Min. 200ml )
③Pushthe discharge levelyouneed.
④Automaticstop afterdischarging fixed amountof wateryou selected.
(Dischargeof water will stop whenyoutouchthebuttonwhile water iscoming out.)
⑤After water comes out, fixed quantitydischarge functionisreleased.
2 When using the Jogdial
(model: NMP-9000T, S11T, S13T)
①TurnDialeitherdirectionto select function.
②Pushcenterof Dialto start water outflow. Theselected icon flickers
duringwateroutflow.
③Pushcenterof Dialto stop wateroutflow.
》
》 》
20 21

Syste m setup mo d e Syste m setup m ode
system setup mode
system setup mode
S ystem setupmode
①The voiceicon will disappear by selecting the voiceicon in this sequence.
②Voice message- On: “ Voice function works ”
Off : “ Voice functionterminates ”
2 pH ControlFunction
3 Volume LevelAdjustment
4 Selecting Voice On /Off
③PressF1to raisepH. PressF2to lower pH.
(Adjustableby Jog dial)
④Once setup is complete, press the water level
button you selectedfor 3 seconds.
(beeps2 times)
1 Setting thetime
①Change to the systemsetting mode by pressing
the SETicon on the LCDfor 3 seconds.
(beeps 2 times.Voicesays,“System setup mode”)
①Change to the systemsetting mode by pressing
the SETicon on the LCD for 3 seconds.
(beeps 2 times.Voicesays,“System setup mode”)
①Change to the systemsetting mode by pressing
the SETicon on the LCD for 3 seconds.
(beeps 2 times.Voicesays,“System setup mode”)
②Pressthe fixed quantitydischargeicon for
3 seconds. (beeps2 times)
③The mode (AM-Hour-Minute) will be changed by
selecting the fixed quantity discharge icon in this
sequence.
④PressF1or F2to set the time.
(Adjustableby Jog dial)
⑤Once setup is complete, press the fixed quantity
dischargeicon for 3 seconds. (beeps2 times)
⑥Push setup icon for 3 seconds to return to
standby screen.
(beeps 2 times.Voicesays,“Setup wascompleted”)
⑤Push setup icon for 3 seconds to return to
standby screen.
(beeps 2 times.Voicesays,“Setup wascompleted”)
④Push setup icon for 3 seconds to return to standby screen.
(beeps 2 times.Voicesays,“Setup wascompleted”)
③Control the voicevolume by F1 and F2
button on the bottom. Current voice
volumelevelis displayedon LCD.
- F1icon : Volume decrease
- F2icon : Volume increase
②Pressthe voice icon to control volume.
②Pressthe desiredwater levelbutton for 3 seconds.
(beeps2 times)
~
22 23

1st Filter
ATTENTION: The consumer accepts any and all responsibility and/or liability if
replacement filters and/or purchased parts are not manufacturer specific. This unit
contains high-performance purifyingfilters and an advanced control system.
The life of the filter can vary greatly due to use, water pressure, water quality and the
changing of the seasons. Filters may need to be replaced sooner than the scheduled time
due to these reasons, you may notice reduced water quality or declining water taste.
Primary Filter: YT20 1st Filter
Recommended filter replacement cycle:
951.0 gallons(3,600 L)/ Every 6 months
Removes harmful chemicals like chlorine,
compounds such as agrichemicals and deter-
gents, large suspended matters like rust and
sediments as well as other volatile organic
compounds through an efficient, an activated
absorption method. It also eliminates bad
smells and any remaining dissolved chlorine.
Secondary Filter: YT20 2nd Filter
Recommended filter replacementcycle:
951.0 gallons(3,600 L)/ Every 6 months
2nd Filter Fine artificial film filters contaminated materials
including ordinary bacteria while maintaining
essential minerals in the water.
Cleaning Function Customer Serviceable Parts
Other Icon Display Custo mer Se rvice a ble P a r t s
Customer Serviceable Parts
Cleaning Function
①Performed duringwater outflow after morethan12 hours of non-operation.
(Note: RTR icon and backlight will flickerbefore automatic cleaning isperformed)
②Performedafter 30 liters of water outflow. Performedeach time power is
turned on.
(Note: RTRicon and backlight will flickerbefore automatic cleaning is performed)
①Pressthe RTRbutton on stand-by screen.
②The cleaning (Voice message: “It’s under washing, do not drink”)
- Automatic stop: Thecleaning will be stop automaticallywhen the washing
timeis done.
- Manual stop: The cleaning will be stop when touching the screen during
under washing
③The screen changes to the standby screen once the cleaning is done.
1 Auto Cleaning Function (15 Sec)
2 Manual Cleaning Function (15 Sec)
24 25

How to Reset theFilters
H o w to Change the F il te rs H o w to R e se t the Filters
How to reset t h e filters
how to change the filters
How to Change the Filters
①Shut off the water supply to the unit.
Turn the power off and unplug the
power cord. Open the door in front of
the product.
②Raise the filter to be replaced and turn
it counter clockwise to remove it.
③Put the new filter into the right position
by turning it clockwise.
④When installing the filter, the connec-
tion bump of the head and the connec-
tion groove on the top of the filter
should be completely combined.
⑤Close the door, plug the power cord
back in, reengage the water supply
and switch the unit back on.
Close
Open
①Replacethe target filter.
②After replacingthe filter, press the F1icon for 3 seconds.
Selectedfilter is initializedand beeps twice.
Voice announcement : "1st Filter / initializingwas performed."
③Next, pressthe F2icon for 3 seconds.
Selectedfilter is initializedand beeps twice.
Voiceannouncement: "2nd Filter / initializingwas performed."
④Filter usageis displayed in 0 percent(0%) when the filter is
initializedproperly.
⑤The water outflow selection mode is available for operation.
After initializing the filter, press the H2O button and run purifiedwater for 3minutes.
Youarehighly recommended to follow this process to usethe machine properly.
Unlessthequantity filteredisreset, thecorresponding filterreplacement
messagekeeps responding.
26 27

29
T u r b o Function Unit specifications
28
Unit specifications
Turbo function
Turbo Function Unit specifications
The TURBO function allows you to create strong alkaline and strong acidicwater.
These types of waters are ONLY to be used for cleaning, sanitizing, and disinfecting
purposes. NEVER DRINK THESE TYPES OF WATER.
TURBO
Strong AcidicWater pH 2.5
~ pH3.8 Used to Disinfect
and Sterilize
TURBO
Strong Alkaline Water
pH 10.0
~ pH11.8 To remove stains from
fabrics/carpet/upholstery.
Alkaline Turbo WaterOutflow Acidic Turbo WaterOutflow
※To make the best functionality, there may be some change without notices.
●Thewaters produced in TURBO mode arenot intended for drinking.
DO NOT DRINK these types of waters.
●DO NOT Use the TURBO function inamannerotherthan directed.
●While operating the TURBO function, the machine will automatically
stop dispensing water after 5 minutes. This feature prevents accidental
overflowor flooding.
Model Number NMP-5000T NMP-7000T NMP-9000T NMP-S11T NMP-S13T
Electrolytic Cell
Quantity ofPoles 5 7 9 11 13
Power
Consumption Max 220W
TURBO Function O
Product Name WaterIonizer
Rated Voltage 100 -130 V~ , 200 -240 V~ v/ 50-60 Hz
Available
temperatur
e4-35ºC (39 -95ºF)
Operating
PressureRange 0.1- 0.5 MPa
pH Levels 3 Alkaline, 1 Neutral, 2 Acidic, Turbo
Adjustable pH User adjustable pH levels control
FiltersConfihuration 2 Filters System
Filter Life Display LCD filterreplacement and announcement
WaterCellPlate
Materials Platinum and Titanium
Product Size W300 x D135 x H355 mm (11.8 x 5.3 x 13.9 inches)
Product Weight approx 5.0kg (11.1 Lbs )

32
Troubleshooting M u ltip l e La ng u a ge s
30
30
Product Languages
Troubleshootingn
VariousLanguages
Multiple Languages
Supported
Diversified language guide support is available by
selecting 1 out of 5 languages featured.
English, Chinese, German, French,Italian
Troubleshooting Multiple Languages Supported
Troubleshooting
Symptoms Checkpoints
Check period ofuse.
Measuresto be Taken
Rununit for one minute,draining stagnant
water.
AbnormalTaste Check filter for replacementtime. Replace filter.
Check if valveon watersupplyis closed. OpenValve.
Check if hose is bent or folded. Stretch out hose.
Water Outflow Change Check if flow rates are low.
(less than 14/min.) Contact us to install water pump.
Check if water supply is cut ou or if the
water supply line is frozen.
Wait until water comes out of the water
supply pipe.
Check filters forclog. Change filter.
Check water forsolidity. Water quality varies byregion.
Incorrect pH levels Check flow rates for higher levels. Reduce amount of raw water.
Check if amount of drained wateris
small. Contact us. Request after-salesservice.
Filter replacement icon
remains“on”even after
filter has beenreplaced
Check if the filter flow rate is initiated.
Initialize filter flow rate.
(System setting mode.)
or Request service
Unit stops duringuse. Check if the operating timeexceeds
15 min. ※Turbo : 5 min Unit stops automatically after 15 min.
Unit leaks.
Check filter for propermounting.
Unplug unit. Contactus.
Check other areas ofunit.
Settlement in extracted water. Check for excessive calcium in source
water. Contact usfor additional filter.
Only purified water is extracted. Check if flow rate is high. (5kgf/cm2
or faster.)
Contact us to install apressure reducing
valve.
Check if amount of working water
exceeds 304.
TheUnit doesn’tnot operate
in cleaningmode.
Theunitreturns to normalafterperforming
auto cleaning for 15 seconds.
Check if operating time exceeds 12 hrs.
Check if cleaning icon is pressed.
The screen turnsou. Check if non-operating time
exceeds 10 minutes.
Whennon-using theunit for
10 minutes,it changesto theECO mode
automatically. The unit returns to
normal after touching the screen.
T
TT
31

Tyent Water is the First People choice all around the World
33 34
3332
28

Incomparable certifications
Throughout the world.
Incomparable Certifications Throughout the World With Multiple Languages Supported
35 36
3534
This manual suits for next models
4
Table of contents
Other Tyent Air Ionizer manuals
Popular Air Ionizer manuals by other brands

AtmosAir
AtmosAir Matterhorn Series Installation, operation and maintenance guide

AQUAVIC
AQUAVIC Aqua Soleil manual

AtmosAir
AtmosAir Matterhorn 1000 Series Installation, operation and maintenance guide

DH Lifelabs
DH Lifelabs Sciaire Pro H100 instruction manual

MYAIR
MYAIR MYA54CA instruction manual

ITW
ITW SIMCO ION COBRA Installation and operating instructions