TytoCare TytoPro User manual

Quick Start Guide

1
Getting Started
This guide instructs you how to set up and operate your TytoPro product. Please follow
the instructions below to start your examination process.
Please note the following instructions are also explained and demonstrated in video
tutorials in the Tyto App, which walk you through your rst steps in the Tyto exam.
Please view carefully all the video tutorials before use, as they are critical for
successful and safe operation and examination.
For complete instructions, please refer to the User Manual, which is available through
the Tyto App either through the About screen before login, or through the Menu icon
at the top-right corner after login. Please read carefully before use the enclosed Safety
Information, detailing warnings and precautions concerning the operation of this device.
Product Overview
Otoscope
Stethoscope
Tongue
Depressor
Blade
Tongue
Depressor
Holder
Camera
Blue dot guiding
insertion direction
LCD Touch
Screen
Charging
Indicator
Stethoscope
Headphones
Socket
Built-in
Illumination
Infrared
Thermometer
Connector to tip
Turn on Tyto Device
770-00035 Rev. A01

2
1. Make sure your iPhone/iPad is connected to a Wi-Fi network with internet
connection.
2. On your iPhone/iPad, open the App Store, search for TytoCare and download the
Tyto App.
3. Open Tyto App and log in, using your username and password.
a. if you’re a healthcare professional, contact your system administrator to obtain
your username and password.
b. If you’re a patient, press Sign up to register as a new user.
4. Perform the following Pairing process, which connects the Tyto device to the Tyto
App:
a. The Device Pairing screen will be displayed in the Tyto App.
I. If it is not displayed automatically, press the red pairing icon .
b. Enter your Wi-Fi password and press Next. A barcode will be displayed.
c. Turn on the Tyto device, using the button on the top of the device. Press I have
the App and Scan Barcode in the device.
i. If you’re not using TytoCare for the rst time, to access pairing, swipe down
the device screen, and choose Pairing in the menu.
d. When the device camera is on, scan the barcode as shown in gure 1.
e. Pairing status is indicated on the Tyto App: - Device is paired; - Device is
disconnected.
i. If pairing is unsuccessful, make sure the Wi-Fi password is correct and scan
the barcode again.
5. If you’re a patient, you should add your family members as patients by pressing Add
a patient (see Figure 2).
Setting Up TytoPro For First Time Use
TM
Figure 1 - Pairing Figure 2 - Add a Patient

3
1. Place your iPhone/iPad on a stand to allow
easier operation of both Tyto device and App.
a. If an iPhone is used, use the stand
supplied in the top compartment of the
carrying case, as shown on Figure 3.
2. Log in to Tyto App and make sure device is
paired .
a. If not paired automatically, follow step
#4 in Setting up TytoPro for rst time
use.
3. Patient Selection:
a. If you’re a healthcare professional, type
the patient’s name or ID in the search
box. Select the desired patient from the
list, and press Select patient.
i. If the patient is not yet dened in the
system, press Add new patient
.
b. If you’re a patient, select the name of the
patient.
c. Unidentied Visit:
i. Healthcare professionals have the
option to start the examination
immediately, without identifying the
patient in advance.
ii. Unidentied mode allows occasional
use of TytoCare without the App or a
network.
iii. Press Start Unidentied Visit in the
device, before or after login, to use this
mode (see gure 4).
iv. This icon indicates you’re in unidentied mode.
v. To save the visit or send it, you’ll have to identify the patient at the end of
the visit.
4. Select the type of visit you would like to perform online or exam-and-forward (ofine).
5. See below further instructions on how to perform exams, based on the type of visit
you chose (online or ofine).
6. After the visit has ended, Tyto App will notify you when the clinician’s notes are ready.
Then log in, select patient and select Inbox to view the notes.
Figure 4 - Starting Unidentied Visit
Starting and Ending a Visit
Setting Up TytoPro For First Time Use
Figure 3 - TytoCare kit placement

4
Starting an Online Virtual Visit
with a Clinician:
1. Following patient selection (see instructions above), select See a Clinician Online.
2. Select your preferred clinician from the list that has status Available .
3. Add the patient’s symptoms and complete the short questionnaire, to let the clinician
know your main complaints.
4. Wait until the clinician starts the online visit. Do not exit this screen.
5. Once the clinician starts the visit, you’ll be asked to join. Press Join to start the video
conference with the clinician.
6. The video conference with the clinician starts. During the online visit, the clinician
controls your device remotely, and will guide you through the examinations.
7. During exams, you will need to connect the tips to the device as follows:
a. Stethoscope - for Heart, Lungs or Heart Rate exam.
b. Otoscope - for Ears exam.
Figure 5 - Select Clinician Figure 6 - Online Lungs Exam

5
1. Following login and patient selection (see
instructions above), select Exam and
Forward.
2. On the Tyto device, select the exam you
would like to perform (see gure 7)
3. Stethoscope Exams (Heart, Lungs, Heart
Rate):
a. Connect Stethoscope tip to the device.
Follow blue dots for correct positioning.
b. Connect Headphones, either to the
socket on the stethoscope or at the
bottom of the device behind the rubber
band (see gure 8).
c. Select Heart, Lungs or Heart Rate.
d. Sound recording starts automatically,
indicated by the red dot.
e. Every time you position the stethoscope
on an auscultation point, select the
relevant area on the device. The
currently selected area is marked in blue.
Previously marked areas will be in green.
f. In Lungs, use the Switch Side button
to switch between front and back (see
gure 9).
g. You can adjust the Volume and Audio
Filters applied by swiping down the
device’s screen.
h. Heart Rate – Place the stethoscope on
the Heart area for 20 seconds.
i. When nished, press Done.
Performing an Offline Exam and Forward -
For Healthcare Professionals
Figure 8 - Connecting headphones
Figure 9 - Switch side in lungs button
Figure 7 - Exam selection

6
4. Ears Exam:
a. Connect the Otoscope tip to the device. Follow blue dots for correct
positioning.
b. Connect disposable speculum. Two sizes are provided: adults (4mm) and small
children (3mm). Once placed, swivel clockwise to lock.
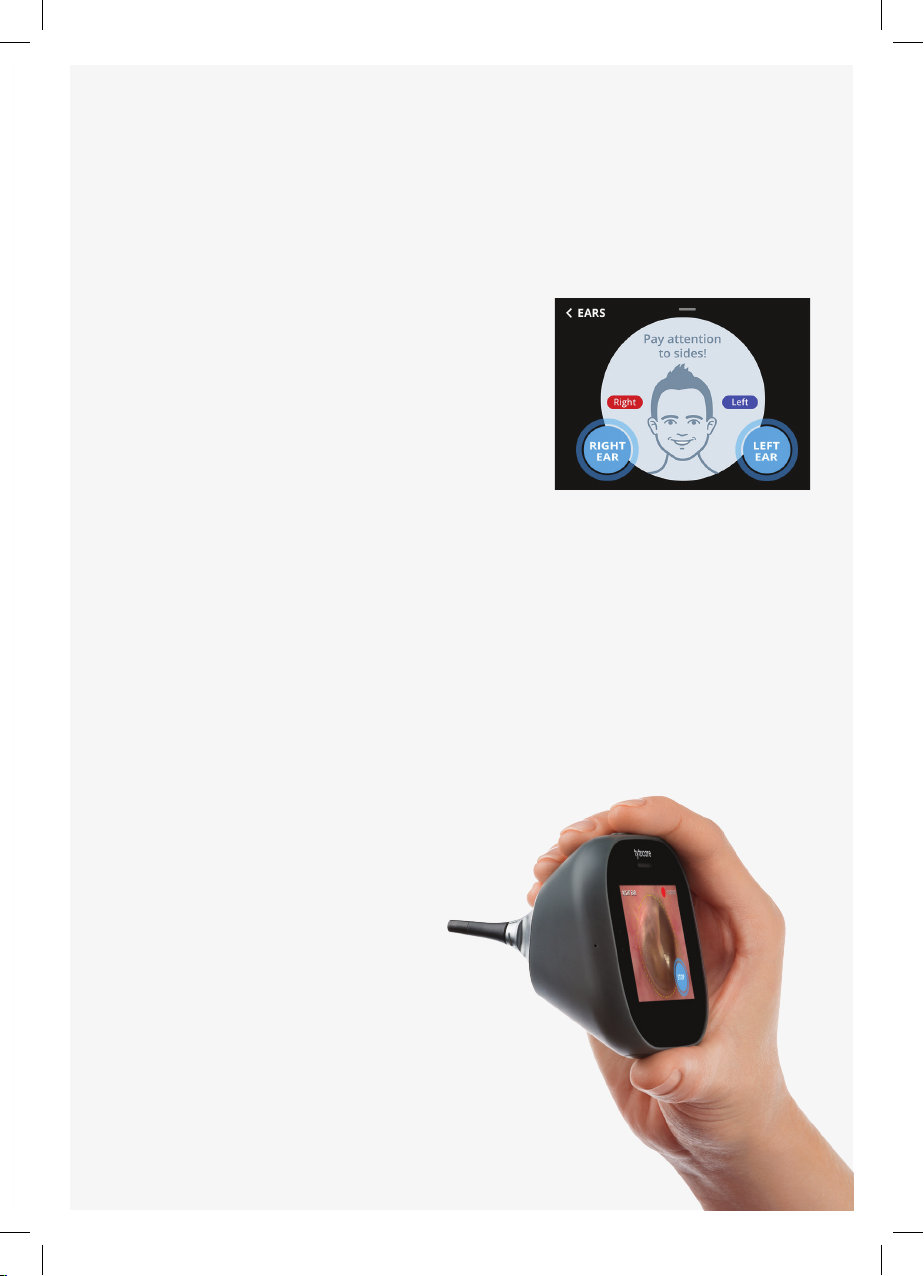
c. Select the Ears exam. Select the rst ear you’re about to examine, left or right.
i. Make sure not to confuse left and right, as patient’s sides are mirrored.
d. Video Recording starts automatically, indicated by the red dot.
e. You can adjust the illumination strength by swiping down the device screen
during the recording.
f. When one eardrum was recorded, end
the exam, either by pressing Left Ear (or
Right Ear) to continue recording the next
ear, or Done to nish the exam.
5. Throat Exam:
a. Make sure device and tongue depressor,
if used, are disinfected using 70%
alcohol wipes.
b. Select Throat exam.
c. Video Recording starts automatically,
indicated by the red dot.
d. You can adjust the illumination strength
by swiping down the device’s screen
during recording.
e. If you cannot get a view of tonsils, use
the Tongue Depressor (TD):
i. Attach the TD holder to the device,
following the blue dots.
ii. Insert the disposable TD blade into
the holder until you hear a locking
click.
iii. To detach the TD blade, press the
locking latch at the bottom of the
TD.
f. Once pharynx and tonsils are captured,
press Done to nish.
6. Temperature Exam:
a. Press Temp exam.
b. Aim Tyto device at the center of the
forehead, just between the eyebrows (see
gure 11).
c. Make sure the device is close to skin, not
exceeding 2 inches (5 cm), without hair or
sweat on forehead.
d. Temperature result will be displayed on the
screen. Press Done to nish.
Figure 10 – Connecting the Tongue
Depressor
1
2
3
Figure 11 – Aim Tyto at the center of
the forehead

7
7. Skin Exam:
a. Swipe left the device screen to access the second exams selection screen.
Then, press Skin exam.
b. Point the camera towards the skin and press to take picture.
c. Leave enough distance (1.5-2 inches (4-5cm)) from skin to allow the camera to
focus.
d. Auto-focus is applied automatically when taking pictures. You can also press the
screen at the point of interest, to activate
local focus.
e. When nished taking the skin images,
press Done.
f. You can then review the skin images
using the App:
i. Press the Skin exam line in the App.
ii. Review images and optionally tag
the body part where the image
was taken, by pressing tag body
part and typing in the name of the
relevant body part.
iii. If an image is unsatisfactory, you can
delete it. Press on the bottom-
right corner to delete the image.
8. Use the Tyto App to review the recorded
exams (gure 12). Press each exam line to
watch or listen to the recording. When all
required exams are recorded, press Save
Visit to send the recordings to the Tyto App.
a. If you wish to delete the recordings, press
Discard Visit.
9. Use the App to decide whether to send the
recordings to a clinician for ofine diagnosis
(Send to Clinician); to initiate an online visit,
where the recordings can be reviewed before
the visit begins (See a Clinician Online); or
to just save the recordings for future use and
end the visit (Save and Exit).
Figure 12 – Exams Summary
Figure 13 – Save or discard visit

8
1. Following login and patient selection (see
instructions above), select Exam and
Forward.
2. Select in the Tyto device the type of exam you
would like to perform:
3. Stethoscope exams (Heart, Lungs and Heart
Rate):
a. Connect Stethoscope to the device.
Follow blue dots for correct positioning.
b. Choose Heart, Lungs or Heart Rate
exams.
c. Note: When placing the stethoscope on
the chest, make sure not to confuse the
left and right sides – the patient’s right
side is on your left.
d. Place the stethoscope on the correct
position on the body, as indicated on the
device and App.
e. Press Start to begin recording each
point of the heart or lungs.
f. Avoid unnecessary noise during
recording, make sure the stethoscope is
in full contact with the patient's skin and
don't move it during recording.
g. Observe the signal strength bar and
keep it in the green zone.
h. If the bar indicates None or Low, it means the sound quality is poor. This could
be due to not having full contact with skin, not pressing the stethoscope rmly
enough, or if the patient doesn’t breathe deeply enough (in Lungs). If the bar
indicates Noisy, it means there is loud external noise or you're moving the
stethoscope on the body.
i. To repeat an already recorded point, press on the body image in the device and
then press at the desired point.
j. Follow the instructions on the App and record all required points as guided by
the system.
k. When nished recording all points successfully, press Done to end the exam.
Performing an Offline Exam and Forward -
For Caregivers or Patients
Figure 14 - Stethoscope exam
Figure 15 - Stethoscope signal
strength

9
4. Other exams:
Please read the instructions described above, under the section for healthcare
professionals. The operation is the same, except the following:
a. After choosing an exam, a short animation will be displayed, reminding you of
the most important instructions for performing a successful and safe exam.
Once you are ready to start the exam, press Start. Video recording will then
start automatically. When nished performing the exam, press Stop.
b. The recorded video will be displayed on
the App, allowing you to review it, and
to decide if it is satisfactory. If OK, press
Done on the device to nish the exam.
Otherwise, press Add to repeat the
exam.
c. On the Ears exam, after recording the
rst ear, press the Right/Left Ear button
on the device to record the next ear.
d. On the Skin exam, after each image
is taken, review it in the App, and
optionally tag the relevant body part, as
described above. Then, either press Add
to take another image, or Done to nish.
5. When all required exams are recorded, press Submit to send the recordings to the
Tyto App.
6. Review the recorded exams on the App by pressing each exam line. Press Continue
when nished.
7. Select Send to Clinician for an ofine review.
a. If you want to start an online visit with a clinician and allow him to review the
recorded exams before
the visit, press See a
Clinician Online.
8. Select the clinician you
would like to review your
recorded exams.
9. Add the patient’s
symptoms and complete
the short questionnaire, to
let the clinician know the
patient’s main complaints.
10. You’ll be notied on the
App once the clinician has
reviewed your exams and
sent you the notes.
Figure 16 - Ears Exam
Figure 17:Preforming
an ears exam

10
General Operation
1. Shutdown the device:
a. Swipe down the device’s screen, and select Shutdown.
b. If the device is unresponsive due to an unexpected error, or you encounter a
blue screen, press the top physical button continuously for 10 seconds to force
shutdown.
2. Charging the device:
a. Remove the rubber band at the bottom
of the device, and connect the charger
cable to the smaller charging outlet
(larger outlet is used for headphones).
b. Charging is indicated by an orange light
on the device. When fully charged, it will
turn green.
c. For safety reasons, examinations are
disabled while the device is charging.
3. Cleaning Instructions:
a. Clean the device before use. Cleaning
should be done using 70% isopropyl alcohol wipes.
b. Use Q-tip swab dipped in 70% alcohol on narrow and less accessible surfaces,
such as the Otoscope lens or the tongue depressor holder.
c. Make sure the lens is clean. It is located on the front of the Otoscope and
Camera.
4. Power Saving:
a. Tyto device features an automatic battery saving mechanism.
b. If the device is not in use for 1 minute when performing an exam, it will exit the
exam.
c. If the device is not in use for 1 minute when not performing an exam, it will
switch to sleep mode, indicated by a blinking green indicator.
d. If the device is in sleep mode for 3 minutes, it will shut down.
e. When turning on the device, it returns automatically to its previous state.
5. Wi-Fi Network:
a. Make sure you have an internet connection before logging in to the Tyto App.
b. For security reasons, a Wi-Fi password is mandatory.
c. If you experience poor video or sound quality, make sure your internet
connection meets the minimum requirements: 5 Mbps download, 2 Mbps
upload. Recommended: 20 Mbps download, 5 Mbps upload.
i. It may be helpful to perform the Tyto Exam closer to the Wi-Fi router.
Figure 18 - Charging
TytoCare
Other manuals for TytoPro
8
Table of contents
Other TytoCare Medical Equipment manuals

TytoCare
TytoCare TytoHome User manual

TytoCare
TytoCare TytoPro Guide

TytoCare
TytoCare TytoHome User manual

TytoCare
TytoCare TytoHome User manual

TytoCare
TytoCare TytoHome User manual

TytoCare
TytoCare TytoPro User manual

TytoCare
TytoCare TytoHome User manual

TytoCare
TytoCare TytoPro User manual

TytoCare
TytoCare TytoHome Otoscope User manual

TytoCare
TytoCare TytoHome User manual