Uniden XTRAK 80 Series User manual

9090
80 Series
REMOTE SPEAKER MIC
UHF CB TRANSCEIVER
For more exciting new products please visit our website:
Australia: uniden.com.au
XTRAK 80 OM_First Lot_print_r5.indd 1XTRAK 80 OM_First Lot_print_r5.indd 1 4/06/2021 1:30:48 PM4/06/2021 1:30:48 PM

Included with your XTRAK 4
Optional Accessories 4
Introduction 5
Features 5
Controls & Connectors 6
Indicators 8
Slide Mount Bracket 9
Connecting the Microphone 10
Mounting the MIC Hanger 11
Operation 12
MENU Order List 12
Turning on the Power 12
Setting the Auto Squelch Level 13
Monitor Mode 13
Selecting a Channel 14
Transmitting & Receiving UHF CB 14
Using UHF CB Repeater Channels 15
Enable / Disable Duplex Mode 15
SMART Key Function 16
Instant Channel 17
Setting the Instant Priority Channel (CH1 or CH2) 17
Recalling the Instant Channel 17
Triple Watch (and Dual Watch) 18
EQL (Equaliser - Voice Enhance Setting) 18
Call Tone 19
CTCSS (Continuous Tone Coded Squelch System) 20
DCS (Digital Coded Squelch) 20
Scanning 21
Open Scan (OS) Mode 21
Group Scan (GS) Mode 22
Priority Watch for Group Scan 23
Add/Remove Channels from SCAN Memory 23
Master Scan (Uninterrupted Transmit & Receive) 24
Setting up Master Scan Mode 25
Using Master Scan 25
Busy Channel Lockout 26
Roger Beep 26
Key Beep On/Off 27
Alpha Tag 27
Speaker Select 28
Key Backlight / Display Dimmer 28
Voice Scramble 29
Microphone Gain 29
Contents
2
UNIDEN XTRAK UHF CB Transceiver
XTRAK 80 OM_First Lot_print_r5.indd 2XTRAK 80 OM_First Lot_print_r5.indd 2 4/06/2021 1:30:49 PM4/06/2021 1:30:49 PM

Operation - Special Features 30
Instant Replay / Receiver Record 30
Turning Instant Replay On/Off 30
100 User Programmable RX Channels 31
Programming a RX Only Channel 31
Selective Calling (SELCALL) 33
Programming the Selcall ID for your Radio 33
Storing Selcall IDs of Other Users to the ID Memory 34
Making a Selcall Call (Tone Calling) 35
TSQ (Tone Squelch) Receiver Quiet Mode 36
Activate/Deactivate TSQ on a Channel 36
Receiving a Selcall 37
Group Calling 38
Selcall ID Format 38
Selcall Settings 39
Tone Period 39
Lead-in Delay 40
Lead-in Delay Programming 40
Lead-in Tone 41
Alarm Mode 42
Call Alarm Auto Mode 42
Call Alarm Continue Mode 42
Group Call Mode 43
SELCALL Tone Frequency List 44
CTCSS Codes Table 44
DCS Codes Table 45
UHF CB Channel Guidelines 47
UHF CB Channels & Frequencies 48
Warranty 50
Contents
3
UNIDEN XTRAK UHF CB Transceiver
XTRAK 80 OM_First Lot_print_r5.indd 3XTRAK 80 OM_First Lot_print_r5.indd 3 4/06/2021 1:30:49 PM4/06/2021 1:30:49 PM

• UHF Antenna • Pass through sockets (for MIC cable)
• External Speaker
Visit the XTRAK page on the website for more information on the availability of optional
accessories: www.uniden.com.au for Australia
Optional Accessories
• Guide rails for the
Quick Release Bracket
maybepre-ttedtothe
base
Owner’s Manual
XTRAK 80
Remote Speaker MIC
UHF CB Transceiver
For more exciting new products please visit our website:
Australia: www.uniden.com.au
2m Extension Cable
(Cable & adaptor)
DC Power Cord
with fuse
Quick Release Bracket,
Guide Rails, Screws
Magnetic Microphone
Hanger
Remote OLED Speaker
Microphone (RM-X80)
Radio Base Unit
Gimbal Mount Bracket,
Washer, Screws
UHF CB Transceiver
4
UNIDEN XTRAK
Included with your XTRAK
XTRAK 80 OM_First Lot_print_r5.indd 4XTRAK 80 OM_First Lot_print_r5.indd 4 4/06/2021 1:30:49 PM4/06/2021 1:30:49 PM

Introduction
5
UNIDEN XTRAK UHF CB Transceiver
The Uniden XTRAK is designed to provide you with years of trouble free service. Its
rugged components and materials are capable of withstanding harsh environments.
Please read this Operating Manual carefully to ensure you gain the optimum
performance of the unit.
NOTE
The citizen band radio service is licenced in Australia by ACMA
Radio-communications (Citizen Band Radio Stations) Class Licence
and in New Zealand by MBIE General User Licence for Citizen Band
Radio and operation is subject to conditions contained in those licenses.
Features
• UHF-CB 80 Channel Narrow Band
Transceiver Radio1
• 5W Transmission Power
• 2W Microphone Speaker
• Duplex Capability1
• Built-in Selective Calling (SelCall)
Feature with Alpha Tag
• Roger Beep Function On/Off
• 10 Different Call Tones
Special Features
• Instant Replay of Recent Received
Signals
• 100 Extra User Programmable
Receive Only Channels with Alpha
Tag2
• 3 One-Touch Smart Keys
• Voice Enhancer (EQL)
• 2 Voice Scramble Settings
Control Features
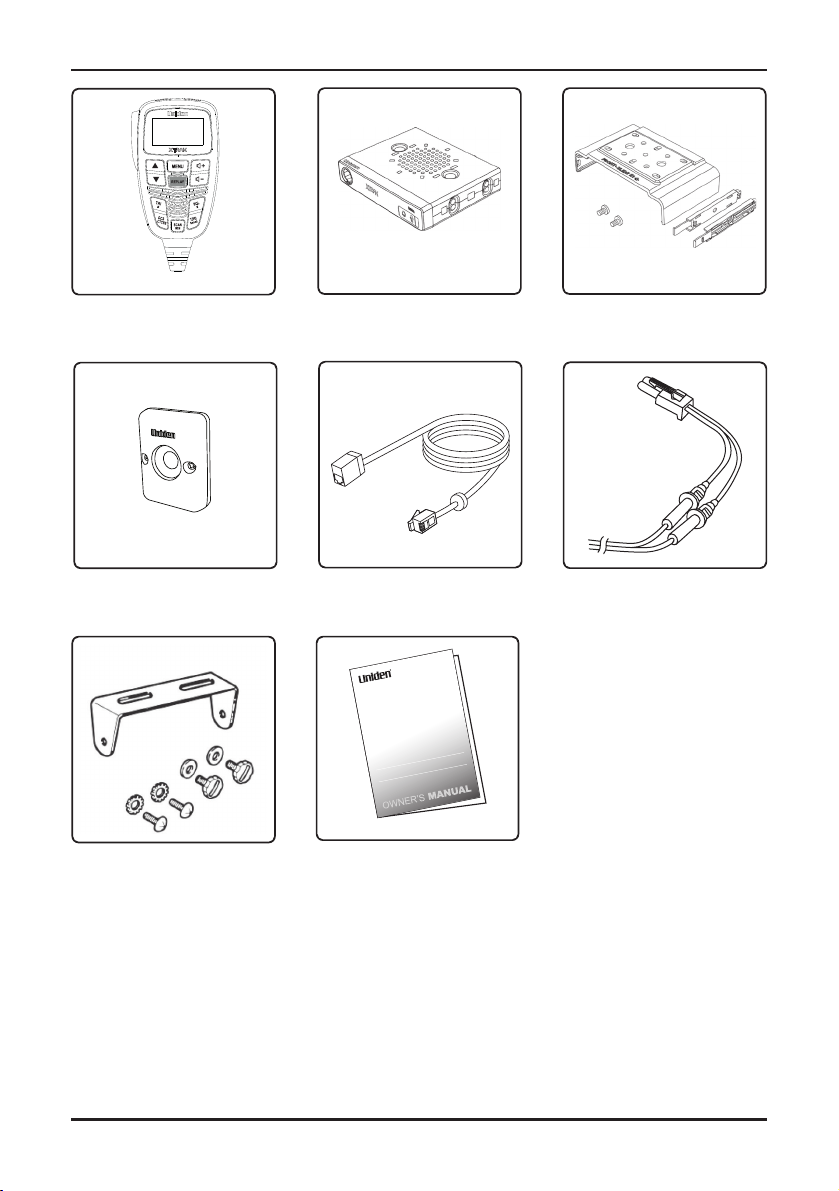
• Remote OLED Speaker Microphone
with 2m Extension Cable
• OLED Display
• Brightness/Dimmer control
• Quick Release Mounting Bracket
• +12V to +24V DC Power Input
• Under and over voltage alert function
• Signal Strength/ Power Meter
• Volume Control
• Base & Remote Mic Speakers
• External Speaker Jack
• Power On/Off Push Switch
• Front MIC Jack
• 10 Level Preset Squelch
Channel Features
• Channel Select
• Instant Channel Programming
• One touch Instant Channel recalling
• Triple/Dual Watch with Instant Channel
• Group Scan with Priority Channel
Watch
• Open Scan
• Master Scan
• Scan Channel Memory for Open Scan
and Group Scan/Master Scan
• Busy Channel Lock-out Function
• 50 Built-in Continuous Tone Coded
Squelch System (CTCSS) codes
• 104 additional Digital Coded Squelch
(DCS) codes that are user selectable
1Refer to p.47 - p.49 for channel information
2Available frequencies & channels are within 400-
520MHz Band only in 12.5kHz steps.
Note:Featuresandspecicationsaresubjectto
continual improvement & change.
XTRAK 80 OM_First Lot_print_r5.indd 5XTRAK 80 OM_First Lot_print_r5.indd 5 4/06/2021 1:30:49 PM4/06/2021 1:30:49 PM

Controls & Connectors
6
UNIDEN XTRAK UHF CB Transceiver
EXT.SP.
DC 13.8V
DC 27.6V
ANT.
22
23
7
9
10
11
12
13
14
15
21
8
1
2
Base (Front & Rear)
Remote OLED Speaker MIC
4
18
19
20
6
5
3
17
16
XTRAK 80 OM_First Lot_print_r5.indd 6XTRAK 80 OM_First Lot_print_r5.indd 6 4/06/2021 1:30:49 PM4/06/2021 1:30:49 PM

7UHF CB TransceiverUNIDEN XTRAK
Controls & Connectors
7POWER
- Power ON/OFF Button
(press & hold)
8[INST /S]*
- Programmable SMART Key
- Default: Instant Channel
9[PTT] - Push To Talk Button
10 [MENU]
- Open/ Select MENU (press)
- Save & Exit MENU (press & hold)
11 [UP / DOWN]
- Channel, Select Up / Down
12 SPEAKER
13 [TRI /S]*
- Programmable SMART Key
- Default: Triple Watch
14 [DCS/CTCSS]
- Open/ Exit Sub-code select
15 [SCAN] - Scan Button (press)
| [MEM] - Memory Button
(press & hold)
1MIC Jack
2Accessory Jack
3Base Speaker
4UHF Antenna Connection
5Power Input Connection
(13.8VDC or 27.6VDC)
6EXT SP - External Speaker Jack
16 MICROPHONE
17 OLED Display
18
Volume Up / Down Buttons
19 [REPLAY]
- Go to/Exit from Replay
20 [SQL /S]*
- Programmable SMART Key
- Default: Squelch Increment
21 [TSQ] - Tone Squelch Channel
(press)
| [Selcall] - Selcall Button
(press & hold)
22 MIC plug (RJ45 type)
23 Front MIC Jack Cover
*See page 16 for how to re-programme a
SMART key.
Base (Front & Rear)
Remote OLED Speaker MIC
XTRAK 80 OM_First Lot_print_r5.indd 7XTRAK 80 OM_First Lot_print_r5.indd 7 4/06/2021 1:30:49 PM4/06/2021 1:30:49 PM

Indicators
8
UNIDEN XTRAK UHF CB Transceiver
11 Alpha Tag or Frequency
EQL# - EQL level
12 UHF CB Channel
13 Replay status
- Replay Rec. is ON
- Replay Rec. is OFF
MIC GAIN level (during PTT only)
14 SCR - Voice Scramble is ON
15 Transceiver status
TX- Transmitting
CALL - Sending Call Tone
RX- Receiving a Signal
MON - Monitor mode
16 INST - CH is an Instant CH
17 Squelch level indication
18 DUP - CH is in Duplex
(Repeater) mode
19 Signal strength meter
1[INST/S] SMART Key status
INST > CAL > EQL > MON >
2[TRI/S] SMART Key status
TRI > CAL > EQL > MON >
3[SQL/S] SMART Key status
SQL > CAL > EQL > MON >
4CB - UHF CB
CB E - Extra RX Only CH Bank1
5MEM - CH is in Scan Memory
6not used
7Watch mode is ON
PRI / TRI (Priority /Triple-Dual)
8Scan mode
O.S / G.S - Open / Group
M.S - Master Scan
SCAN - Flashes during scan
9Sub Code Type
DCS / CTCSS / T.SQ
10 Sub Code No.
Extra RX Channel No.
4
9
10
8
7
1214
19
18
16
5
11
6
1315
17
31 2
XTRAK 80 OM_First Lot_print_r5.indd 8XTRAK 80 OM_First Lot_print_r5.indd 8 4/06/2021 1:30:50 PM4/06/2021 1:30:50 PM

9
UNIDEN XTRAK UHF CB Transceiver
Slide Mount Bracket
How to attach Slide Mount Bracket?
When you unpack the box, ensure that you have the slide mount bracket, guide rails
andthescrews.Theguiderailsmayalreadybepre-ttedtothebaseunit.
Align the guide rails along the side of the base and insert them into the slots provided.
Then use the screws to lock them securely in position.
Slide the bracket along the guide rails to attach the bracket to the unit.
Over the BASE unit Under the BASE unit
XTRAK 80 OM_First Lot_print_r5.indd 9XTRAK 80 OM_First Lot_print_r5.indd 9 4/06/2021 1:30:50 PM4/06/2021 1:30:50 PM

Connecting the Microphone
10
UNIDEN XTRAK UHF CB Transceiver
MIC Jack
Before connecting the Microphone Jack decide if you need to use the 2 metre
Extension Cable - simply connect the MIC plug into the jack end of the Extension
Cable
Push the MIC plug or Extension Cable plug into the MIC jack of the radio until the
connection locks into place. Gently tug the MIC or Extension Cable cord to test that the
connection is locked. Use the rubber cover which is on the cord to seal the MIC jack
entry from dust.
Disconnecting the MIC from the MIC Jack
Pullbacktherubbercoverandmoveitdownalongthecord.Usingtheatbladeofa
screwdriver or similar object carefully push the lock tab of the MIC plug towards the
MIC cord and at the same time tug on the MIC cord to draw back the MIC plug.
Mic Jack for Remote Speaker Mic
XTRAK 80 OM_First Lot_print_r5.indd 10XTRAK 80 OM_First Lot_print_r5.indd 10 4/06/2021 1:30:50 PM4/06/2021 1:30:50 PM

Mounting the MIC Hanger
11
UNIDEN XTRAK UHF CB Transceiver
The Magnetic MIC Hanger comes assembled so the double sided tape can be applied
to the rear side and then applied to a suitable mounting location.
Locate a suitable mounting position.
Remove(peeloff)theplasticcoveringtheadhesivetapeontheatareaoftheMIC
Hangerbackpieceandthenpressrmlytothemountingposition.
XTRAK 80 OM_First Lot_print_r5.indd 11XTRAK 80 OM_First Lot_print_r5.indd 11 4/06/2021 1:30:50 PM4/06/2021 1:30:50 PM

• See the Controls and Indicators on page 6 for dedicated key functions.
• In addition to the dedicated key functions, many features are available in the MENU.
MENU Order List
• Each MENU function is described in their respective operations.
To use the MENU
1. Press [MENU] and then press [UP / DOWN] to highlight a menu option.
2. Press [MENU] to select the option.
3. Press [UP / DOWN] to highlight a setting option.
4. Press and hold [MENU] to store the setting.
Turning on the Power
Press and hold [POWER].
NOTE
Low-Voltage/High-Voltage Alert
Th XTRAK can operate on 12VDC (13.8V) or 24VDC (27.6V) power supply,
with the range between 10.2VDC to 28.8VDC.
If the power supply voltage exceeds 30VDC, an alert tone sounds and
HI DCashesfor5seconds.Thepowersourcemustnotexceed32VDC
otherwise permanent damage may occur to your radio, which may not be
covered by the manufacturer’s warranty.
If the input voltage falls below 10VDC, LO DCashesfor5seconds.The
power turns off automatically if voltage falls below 9.0VDC.
Switch your XTRAK OFF and disconnect it from the power source, before
locating the cause of the power supply problem.
Operation
12
UNIDEN XTRAK UHF CB Transceiver
01 Squelch
02 Duplex
03 Priority Watch
04 Pri/Inst CH1
05 Pri/Inst CH2
06 Scan Mode
07 M.Scan Code
08 Call Tone
09 BCL
10 Roger Beep
11 Key Beep
12 Alpha tag
13 Speaker Select
14 B.light/Dimmer
15 Replay (RX Rec.)
16 Scramble
17 Microphone Gain
XTRAK 80 OM_First Lot_print_r5.indd 12XTRAK 80 OM_First Lot_print_r5.indd 12 4/06/2021 1:30:50 PM4/06/2021 1:30:50 PM

Setting the Auto Squelch Level
TheSquelchfunctionistheradio’ssignallter.Itdetermineswhentheradio’sspeakers
turn on, based on the strength of received signals. This avoids background noise and
undesired signals constantly coming through the speakers.
The Auto Squelch feature has an off (Sq0) setting and 9 preset squelch levels:
It requires no adjustment once set.
Sq0 (off) - squelch is fully open to noise & signals
This is also the Monitor Mode
Sq1 - max sensitivity (min squelch)
Weak (distant) signals can open the squelch.
Sq5 - med sensitivity (med squelch)
Medium and strong signals can open the squelch.
Sq9 - min sensitivity (max/tight squelch)
Only strong/nearby signals can open the squelch.
Setting the Squelch level from the MENU
1. Press [MENU].Squelchistherstoption.Press[MENU] again.
The squelch setting display at the current level.
2. Press [UP / DOWN] to select a squelch level setting.
3. Press and hold [MENU] to store the setting.
Setting the Squelch level by [SQL /S] Smart Key
When the [SQL /S] Smart Key is set to SQL, press [SQL /S] to increment the squelch
one level each press. When the squelch level is maximum the next press cycles back
to Sq0 (Monitor mode). The squelch bar is an indication of the increasing squelch
levels - one bar equates to 2 squelch increments.
NOTE
•IfSq0(opensquelch)isselectedthenMON(monitor)iconashes.
• Setting a tight squelch may prevent the reception of weak signals.
• High noise areas may still break the squelch.
Monitor Mode
The Monitor mode is the squelch function turned off. Use Monitor mode to quickly
check the channel for any weak signals, or if using DCS/CTCSS.
Enable/Disable Monitor Mode by SMART Key
When a SMART key is set to MON, press the assigned SMART key to turn Monitor
mode on or off. MONwillashonthedisplaywhenMonitorison.
Monitor mode is also entered when the SQL level is set to Sq0.
Operation
13
UNIDEN XTRAK UHF CB Transceiver
XTRAK 80 OM_First Lot_print_r5.indd 13XTRAK 80 OM_First Lot_print_r5.indd 13 4/06/2021 1:30:50 PM4/06/2021 1:30:50 PM

Operation
14
UNIDEN XTRAK UHF CB Transceiver
Selecting a Channel
Press [UP / DOWN] to select a desired channel.
When the CB icon is showing the 80 UHF-CB and any user programmed RX channels
will be available for selection or scanning.
The 80 UHF-CB channels are numbered 01-80.
The user programmable RX only channels are numbered 81-180 and only show in the
DCS/CTCSS code area, when programmed¹.
NOTE
¹ Available frequencies & channels are within 400-520MHz Band only
in 12.5kHz steps.
For your reference a list of the available channels, corresponding
frequencies and guidelines for their use is printed on p.47 - p.49. For
Australia, Channels 05 and 35 are reserved for Emergency Calls.
Transmitting & Receiving UHF CB
The XTRAK transmits only on UHF-CB Channels.
NOTE
For your reference a list of the available channels, corresponding
frequencies and guidelines for their use and selection is printed on p.47
- p.49. For Australia, Channels 05 and 35 are reserved for Emergency
Calls.
1. Select a desired channel.
Listen to the channel to make sure there is no activity.
2. Hold the microphone approx. 7cm from your mouth.
3. Press the microphone’s [PTT] button and speak in a normal volume across (not into)
the microphone.
The TX icon and current MIC GAIN level displays while the PTT is pressed.
4. Release the [PTT] button to end the transmission and listen for a reply.
For extended range:
- Transmit in Duplex mode, see Using UHF CB Repeater Channels page 15.
For uninterrupted transmission in busy channel areas:
- Transmit & Receive in Master Scan mode, see Master Scan page 24.
XTRAK 80 OM_First Lot_print_r5.indd 14XTRAK 80 OM_First Lot_print_r5.indd 14 4/06/2021 1:30:50 PM4/06/2021 1:30:50 PM

Operation
15
UNIDEN XTRAK UHF CB Transceiver
Using UHF CB Repeater Channels
Normal Simplex operation transmits on one particular frequency and receives on that
same frequency. If there is a barrier that partially blocks your transmitted signal, the
probability of another radio receiving the signal is very slim. Hills, tall buildings, metallic
structures,...etc tend to act as a screen between radios.
Simplex Operation without
the aid of a Repeater station.
To extend the range of your radio and overcome the shielding effect caused by solid
obstructions the Duplex operation transmits on a UHF CB repeater frequency, where a
Repeater Station re-transmits your signal on the frequency used in Simplex Operation.
The signal coming from your radio is received by the Repeater Station and is re-
transmitted at the same time on another channel. This operation is called “Duplexing”.
For example,
CH01 on Duplex Mode will Receive on CH01 but Transmit on CH31
CH02 on Duplex Mode will Receive on CH02 but Transmit on CH32 etc...
If you transmit on CH01 Duplex mode, you are actually transmitting on CH31 the
repeater station down-converts your signal and retransmits on CH01.
Enable / Disable Duplex Mode
Only channels 01-08 and channels 41-48 are available for Duplex.
1. Press [MENU]. Press [UP / DOWN] until 02 Duplex is highlighted.
2. Press [MENU] to select.
3. Press [UP / DOWN] to change the setting between ON or OFF.
4. Press and hold [MENU] to save & exit from the menu mode.
The DUP icon displays when a selected channel is set to Duplex mode.
NOTE
• Only channels 01-08 and channels 41-48 are available for Duplex.
• Check with your local Retailer for information on available repeaters.
Duplex Operation with the aid
of a Repeater Station.
XTRAK 80 OM_First Lot_print_r5.indd 15XTRAK 80 OM_First Lot_print_r5.indd 15 4/06/2021 1:30:50 PM4/06/2021 1:30:50 PM

SMART Key Function
The XTRAK has 3 SMART keys which can be programmed (set) to operate the
following one-touch functions.
INST - Instant Channel (CH1, CH2) recall
TRI - Triple Watch mode on/off
SQL - Squelch level increment/cycle
CAL - Call Tone transmit
EQL - Equaliser level increment/cycle
MON - Monitor mode on/off
1. Press and hold the SMART key to set the next function. The icon for the function will
display. The table below shows which functions are available for each SMART key.
[INST /S] [TRI /S] [SQL /S]
INST TRI SQL < Default Setting
CALL CALL CALL
EQL EQL EQL
MON MON MON
2. Press the SMART key to use the current function.
Operation
16
UNIDEN XTRAK UHF CB Transceiver
XTRAK 80 OM_First Lot_print_r5.indd 16XTRAK 80 OM_First Lot_print_r5.indd 16 4/06/2021 1:30:50 PM4/06/2021 1:30:50 PM

Operation
17
UNIDEN XTRAK UHF CB Transceiver
Instant Channel
You can set two channels as Instant Priority Channels (CH1 and CH2), which can be
recalled at the press of a button. These two channels are also monitored, along with
the current channel, when Triple Watch mode is enabled.
Setting the Instant Priority Channel (CH1 or CH2)
By default Instant Priority CH1 is preset to the emergency channel, CH05.
By default Instant Priority CH2 is preset to the emergency channel, CH35.
1. Press [MENU].
2. Press [UP / DOWN] key until 04 Pri/Inst CH1 or 05 Pri/Inst CH2 is highlighted.
3. Press [MENU] to select. The current CH1 or CH2 channel setting displays.
4. Press [UP / DOWN] to select a desired channel.
5. Press and hold [MENU] to save and exit.
NOTE
If you only wish to have one Instant Priority Channel, then set Instant
Priority CH2 to Off.
Recalling the Instant Channel
When the [INST/S] SMART key is set to INST;
1. Press [INST/S] to recall the Instant Priority CH1.
2. Press [INST/S] again to recall the Instant Priority CH2 (if CH2 has been set)
3. Press [INST/S] again to return to the previous channel.
The INST icon displays when showing Instant Priority CH1 or CH2.
XTRAK 80 OM_First Lot_print_r5.indd 17XTRAK 80 OM_First Lot_print_r5.indd 17 4/06/2021 1:30:50 PM4/06/2021 1:30:50 PM

Operation
18
UNIDEN XTRAK UHF CB Transceiver
Triple Watch (and Dual Watch)
Triple watch will continuously monitor the two Instant Priority Channels (CH1 and CH2)
and the current channel for activity.
If Instant Priority CH2 is set to Off, then Triple Watch monitors Instant Priority CH1 and
the current channel for activity - this is a Dual Watch. (see Programming the Instant
Priority Channel-1/Channel-2, p.17)
When the [TRI /S] SMART key is set to TRI;
1. Press [TRI /S] to switch Triple Watch On/Off.
The TRI icon displays when Triple Watch mode is on.
NOTE
• Every 1.5 seconds the Instant channel is monitored for 40 msec.
• Triple watch function stops temporarily when receiving a signal.
• Triple watch function is invalid in Scan mode.
EQL (Equaliser - Voice Enhance Setting)
Choose from 4 different receive audio level settings to provide a natural Voice Enhance
for clarity and performance.
When a SMART key is programmed to EQL;
1. Press that SMART key to increment/cycle the setting between the 4 levels;
EQL 0: Normal - Standard or FLAT.
EQL 1: Bass - Enhanced low frequencies, sound quality becomes mild and
easy to listen to, not causing fatigue.
EQL 2: Midrange - Enhanced midrange frequencies, sound quality becomes clear.
EQL 3: High - Enhanced the high frequencied, sound quality becomes sharp.
NOTE
When a signal is received, except for when in Monitor mode, the current
EQL level will display.
XTRAK 80 OM_First Lot_print_r5.indd 18XTRAK 80 OM_First Lot_print_r5.indd 18 4/06/2021 1:30:50 PM4/06/2021 1:30:50 PM

Operation
19
UNIDEN XTRAK UHF CB Transceiver
Call Tone
Use the Call Tone function to transmit a three second ‘wake-up’ ringing tone. The
XTRAK is equipped with 10 selectable call tones that can be set in the MENU (08 Call
Tone).
Setting the Call Tone
1. Press [MENU] and then press [UP / DOWN] key until 08 Call Tone is highlighted.
2. Press [MENU] to select.
3. Press [UP / DOWN] to change the selection. The call tone chime will sound
whenever the selection is changed.
4. Press and hold [MENU] to save & exit from the menu mode.
To use Call Tone
When a SMART key is set to CAL;
1. Press that SMART key to tramnsmit the call tone.
NOTE
• Current regulations require calling tones to be restricted to one
transmission per minute. If a second transmission is attempted within
one minute then an error tone will sound.
XTRAK 80 OM_First Lot_print_r5.indd 19XTRAK 80 OM_First Lot_print_r5.indd 19 4/06/2021 1:30:50 PM4/06/2021 1:30:50 PM

Operation
UHF CB Transceiver
20
UNIDEN XTRAK
CTCSS (Continuous Tone Coded Squelch System)
On congested channels use a CTCSS or DCS code to keep your radio speaker
silent - unless a signal is received from a radio using the same code you have set for
that channel. The code is transmitted when you are pressing PTT on a channel that
you have set a CTCSS code on. Share the code with radio users to hear only their
transmissions.
When a CTCSS or DCS tone is set for a UHF-CB channel, the CTCSS or DCS tone is
displayed in the DCS/CTCSS code area. For channels with the setting of CTCSS OFF,
there will be no display in the DCS/CTCSS code area.
1. Press [UP / DOWN] to select the desired channel to use CTCSS.
2. Press [DCS/CTCSS]. The CTCSS icon and the current code displays.
3. Press [UP / DOWN] to select the desired CTCSS code from 01 - 50.
4. Press [DCS/CTCSS] once to store the new setting.
The CTCSS icon and code will display for the channel.
To turn off CTCSS (or DCS) select oFF during setting.
DCS (Digital Coded Squelch)
DCS is a digital extension of CTCSS. It provides 104 extra, digitally coded, squelch
codes that follow after the 50 CTCSS codes. CTCSS 01-50, followed by DCS 01-104.
1. Follow the steps for setting a CTCSS code.
2. Press [UP / DOWN] until a desired DCS code appears.
3. Press [DCS/CTCSS] to set. The DCS icon and code will display for the channel.
NOTE
CTCSS and DCS is not available on CH 05 and CH 35. For your
reference a list of the available channels, corresponding frequencies
and guidelines for their use and selection is printed on p.47 - p.49 For
Australia, Channels 05 and 35 are reserved for Emergency Calls.
XTRAK 80 OM_First Lot_print_r5.indd 20XTRAK 80 OM_First Lot_print_r5.indd 20 4/06/2021 1:30:51 PM4/06/2021 1:30:51 PM
This manual suits for next models
3
Table of contents
Other Uniden Speakers manuals