Unimax role User manual

???
??????
WARRANTY CARD
Product: EDGE BANDING GUN - 2,000 W HOT AIR GUN
Type: role
Date of manufacture:
Date of sale, stamp, signature:
Serial number (product series):
Repair centre notes:
Without the correctly filled warranty card or without proof of purchase receipt, including
the product type (invoice, purchase receipt) no warranty claim will be processed.
1. KH Trading machines and tools are covered by 6/24 months warranty, starting on the date of
purchase, as described in the Civil Code (proof of purchase or invoice receipt must be
enclosed with the warranty card when making a claim).
2. This warranty does not cover defects caused by unprofessional handling, machine overloads, not
complying with instructions contained in this manual, using accessories that are not approved,
unauthorized repair, regular wear and tear and damages occurred during transport. Further, this
warranty does not cover parts and accessories such as the motor, carbon brushes, seals and
hot-air operated parts and parts that need to be changed regularly.
3. If the repair is to be found as not covered by the warranty policy, all costs including the repair and ship-
ping to and from the repair centre will be paid by the customer, according to valid price list. See www.
4. When making a claim, you must present the warranty card, showing the date of the purchase, the
serial number of the machine, vendor stamp and signature of sales clerk, as well as the proof of
purchase receipt.
5. Warranty claim shall be made at the vendor shop where you bought your machine or you may mail
it to a service centre. The vendor is obligated to fill out the warranty card (date of sale, serial
number, vendor stamp and signature). All these information must be filled in at the time of sale.
6. The warranty period will be extended for the period of time for which the machine has been in the
service centre possession. If the repair or defect is not covered by the warranty policy, all costs including
the repair and shipping will be paid by the owner of the machine / tool. We recommend sending the
machine in its original packaging. Please, also enclose brief description of the defect with the packaging.
7. Before sending the machine for repair, clean it thoroughly. If the received machine is dirty, it may
be rejected by the service shop or you may be charged a cleaning fee.
SERVICE
Logistic centre Klecany
Topolová 483
250 67 Klecany
Czech Republic
Claim department phone number: 266 190 156 T-mobile: 603 414 975
266 190 111 O2: 601 218 255
Fax: 260 190 100 Vodafone: 608 227 255
http://www.KHnet.cz
Email: ser[email protected]
HHOOTTAAIIRRGGUUNN
USER'S MANUAL
role

2
Dear customer. Thank you for purchasing equipment from KH Trading, s.r.o.
Our company is ready to offer you our services - before, during and after you buy our product.
If you have any question, comment or idea, please contact our business centre. We will do our best to address
your comment or question in timely matter.
Before first use, please read this manual carefully. It is your responsibility to study all instructions,
necessary for safe use and operation and to understand all risks that may be involved during the use
of power machines.
WARNING! Do not try to use this machine before reading this entire manual and before you know
how to handle it. Keep this manual for future reference. Pay special attention to safety instructions.
Not complying with safety rules may cause injury to the operating person or to people standing by
or it may cause damage to the machine or to the work piece. Pay special attention to safety notes
and safety labels on the machine. Never remove or damage them.
Please, write information such as the invoice number
and the number of the sale receipt here in this box.
Hot-air gun, model hobby.
Pistol is very light and easy to use. By using the built-in regulator, you may set the temperature to low or high.
Level is indicated by LED diodes. Low temperature may be set from 80 °C - 510 °C and high temperature may
be se from 95 °C - 650 °C.
Use:
Old paint coating removal. Easily remove old paint by using hot air flow and scraper.
Removal of old self-adhesive labels and glue.
Laminate removal.
Linoleum removal.
Old seal removal.
Old vehicle lacquer removal.
Stucco drying.
Concrete drying - before repair.
Wood drying before bond filling or lacquer application.
Base and finishing paint coat drying.
PVC foil shrinkage.
Plastic wire shrinkage.
Rusted nuts or bolts removing.
Bearing heating before installation.
Chassis protective paint removal.
Shortening of dry out or hardening time of various bond filling, glue and paint coatings.
Defrosting of metal piping, door locks and padlocks.
Humidity evaporation from various couplings or joints.
Water pipe soldering.
Plastic material welding.
DESCRIPTION
REPAIR AND MAINTENANCE REPORT
Report and maintenance report:
DATE SERVICE SHOP
REPAIR AND MAINTENANCE REPORT

REVISION REPORT
The user is obligated to perform tests and revisions of electrical equipment of the machine
in accordance with valid rules and regulations. Result report:
DATE REVISION TECHNICIAN
Number / SIGNATURE
REVISION REPORT
3
Plastic parts, PVC pipe or Plexi-glass bending.
Ski wax application and removal.
Refrigerator/freeze defrosting.
NOTE:
Hot air gun may be also used to remove oil and latex paints and lacquers, as well as various other coatings.
You cannot use it for removal of wood stain solutions or base wood paints that impregnate the wood surface.
TECHNICAL SPECIFICATIONS
The accuracy of instructions, graphs and information contained herein, depends on the printing date. Due to
continuous product improvement, the manufacturer reserves the right to change technical parameters of the
product, without prior customer notification.
Voltage . . . . . . . . . . . . . . . . . . . . . . . . . . . . . . . . . . . . . . . . . . . . . . . . . . . . . .~(230 - 240) - 10 % V
Current . . . . . . . . . . . . . . . . . . . . . . . . . . . . . . . . . . . . . . . . . . . . . . . . . . . . . . . . . . . . . . . . . . .9 A
Frequency . . . . . . . . . . . . . . . . . . . . . . . . . . . . . . . . . . . . . . . . . . . . . . . . . . . . . . . . . . . . . . .50 Hz
Max. input . . . . . . . . . . . . . . . . . . . . . . . . . . . . . . . . . . . . . . . . . . . . . . . . . . . . . . . . . . . . .2,000 W
Fastening diameter nozzle fastening diameter... . . . . . . . . . . . . . . . . . . . . . . . . . . . . . . . . . . .∅66 mm
Nozzle outlet diameter . . . . . . . . . . . . . . . . . . . . . . . . . . . . . . . . . . . . . . . . . . . . . . . . . . . .∅36 mm
Regulated input (W) . . . . . . . . . . . . . . . . . . . . . . . . . . . . . . . . . . . . . . . . . . . . . . . . .Temperature (°C)
LO
150 W . . . . . . . . . . . . . . . . . . . . . . . . . . . . . . . . . . . . . . . . . . . . . . . . . . . . . . . . . . . . . . . . . . .80°C
200 W . . . . . . . . . . . . . . . . . . . . . . . . . . . . . . . . . . . . . . . . . . . . . . . . . . . . . . . . . . . . . . . . . .90°C
400 W . . . . . . . . . . . . . . . . . . . . . . . . . . . . . . . . . . . . . . . . . . . . . . . . . . . . . . . . . . . . . . . . . .185°C
650 W . . . . . . . . . . . . . . . . . . . . . . . . . . . . . . . . . . . . . . . . . . . . . . . . . . . . . . . . . . . . . . . . .325°C
800 W . . . . . . . . . . . . . . . . . . . . . . . . . . . . . . . . . . . . . . . . . . . . . . . . . . . . . . . . . . . . . . . . .400°C
1,000 W . . . . . . . . . . . . . . . . . . . . . . . . . . . . . . . . . . . . . . . . . . . . . . . . . . . . . . . . . . . . . . . .510°C
HI
300 W . . . . . . . . . . . . . . . . . . . . . . . . . . . . . . . . . . . . . . . . . . . . . . . . . . . . . . . . . . . . . . . . . .95°C
1,120 W . . . . . . . . . . . . . . . . . . . . . . . . . . . . . . . . . . . . . . . . . . . . . . . . . . . . . . . . . . . . . . . .370°C
1,750 W . . . . . . . . . . . . . . . . . . . . . . . . . . . . . . . . . . . . . . . . . . . . . . . . . . . . . . . . . . . . . . . .550°C
1,850 W . . . . . . . . . . . . . . . . . . . . . . . . . . . . . . . . . . . . . . . . . . . . . . . . . . . . . . . . . . . . . . . .590°C
1,950 W . . . . . . . . . . . . . . . . . . . . . . . . . . . . . . . . . . . . . . . . . . . . . . . . . . . . . . . . . . . . . . . .625°C
2,000 W . . . . . . . . . . . . . . . . . . . . . . . . . . . . . . . . . . . . . . . . . . . . . . . . . . . . . . . . . . . . . . . .650°C
Temperature control
Number of control levels . . . . . . . . . . . . . . . . . . . . . . . . . . . . . . . . . . . . . . . . . . . . . . . . . . . . . . . . .2
Number of degree in one level . . . . . . . . . . . . . . . . . . . . . . . . . . . . . . . . . . . . . . . . . . . . . . .6 degree
Temperature setting ration (degree) . . . . . . . . . . . . . . . . . . . . . . . . . . . . . . . . . . . . . . . .95°C - 650°C
Hot air temperature at the outlet nozzle after the gun has been switched off. . . . . . . . . . . . . . . . . .95°C
Automatic shut of after about: . . . . . . . . . . . . . . . . . . . . . . . . . . . . . . . . . . . . . . . . . . . . . .80 seconds
Setting indication . . . . . . . . . . . . . . . . . . . . . . . . . . . . . . . . . . . . . . . . . . . . . . . . . . . . . . .LED diodes
Weight . . . . . . . . . . . . . . . . . . . . . . . . . . . . . . . . . . . . . . . . . . . . . . . . . . . . . . . . . . . . . . . . . .0.8 kg

4
???
•This device may be used by a qualified person, 18 years or older who has been
trained in work and environmental safety procedures.
•Any person using this equipment must possess a medical certificate
demonstrating his eligibility to operate this equipment.
Symbols used in this manual
Warning!
This symbol informs you about the risk of personal injury or damage to the machine
or materials.
Caution! You are using an electrically powered device!!
Electrical hazard.
Warning!
Danger of damage.
Note:
Additional information.
General instructions
•Plastic bags and packaging materials pose danger to small children or animals.
•Make sure you know your tool or machine and that you are familiar with its operating procedure. Know the
hazards if not used correctly.
•If other person will be using this machine make sure that he knows how to safely operate this equipment
and that he is familiar with hazards and risk that may occur if not used correctly.
•Pay special attention to safety notes and safety labels. Do not remove or damage them. If the warning
label becomes unreadable or damaged please, contact your vendor.
•Maintain your working area clean. Disorganized working area may cause accidents.
•Never work in tight spaces or in purely lit rooms. Make sure the floor is solid and stable and that you can
move around easily. Maintain stable posture during work.
•Stay focused and use all your senses. Pay attention to the working procedure. Do not continue working if
you cannot pay attention and focus.
•Maintain your tools clean.
•Handles must be kept free of grease and dirt.
•Make sure no children, unauthorized persons or animals have access to your workshop.
•Never put your hands or legs inside the working area.
•Never leave your machine unattended during operation.
•Use only for purposes for which it has been designed.
•Use personal protective gear such as safety goggles, ear protection, respirator, safe working shoes etc.
•Do not overreach and use both hands.
•Never work under the influence of alcohol or other drugs.
•Do not use the machine if you feel dizzy or week.
SAFETY PRECAUTIONS

12
According to the warranty policy, the heating unit and fan motor are considered as expendable
materials and are not covered by the warranty.
Detailed description of the use of this device is not included in this manual, because the manufacturer /
distributor assumes that the user is experienced in similar type of work. Also according to the applicable
law, this device is considered as a commonly sold and used tool. If the user is unfamiliar with the use of
this device, we recommend finding out more information about using this device at the Department of
work safety.
When the operational life of your device is over, dispose off it in accordance with valid rules and regulations.
Your product is made of metal and plastic parts that may be recycled when separated.
1. Disassemble all parts.
2. Separate all parts according to the material they are made of (e.g. metals, rubber, plastics, etc.).
Take the separated parts to the recycling facility near you.
3. Electrical waste (used electrical power tools, electric motors, recharging equipment, electronics,
accumulators, batteries etc.).
Dear customer. In accordance with the valid regional rules and regulations describing the management of
electrical waste, electrical waste is considered dangerous.
Disposal of electrical waste must be therefore handled as dangerous waste in accordance with waste
management rules valid in the state you are in.
It is prohibited to mix electrical waste with regular household waste.
You may return your used electrical appliance to a recycling facility near you. More information about
electrical and dangerous waste disposal may be obtained from your local authority or from the Internet.
If the machine breaks down, send it back to the vendor for quick repair. Please, enclose brief description of
the defect. That makes repair easier. If the machine is still covered by warranty, enclose the warranty card
and proof of purchase receipt. After the warranty period expires, we repair your machine for a special price.
To prevent possible damages during shipping, packed the machine carefully or use the original packaging
material. We are not liable for shipping damages due to incorrect packaging of your machine. If making
a claim at the shipping company the level and method of packaging plays a major role during claim evaluation
process.
Note: Pictures and contents in this manual may slightly differ from the actual product or accessories. It is due
to continuous improvement of our products. Such small differences have no effect on the product functionality.
CAUTION
DISPOSAL
5
•Any modifications or improvements to the machine are strictly prohibited. DO NOT USE if you discover
bent part, crack or other damage.
•Never perform any maintenance during operation.
•If you see any unusual sign or hear any strange sound, switch off your machine and stop working immedi-
ately.
•Do not forget to remove all wrenches and screwdrivers from the machine after use.
•Before use, make sure that all screws are tightened securely.
•Perform maintenance regularly. Before use make sure the machine is in good working conditions and
without any damage.
•Use only original spare parts during repairs.
•Using extension pieces or accessories not approved by the manufacturer may cause injuries to the
operating personnel.
•Use suitable tool or machine for particular type of work. Use this machine only for work that is capable of
handling. Do not overload tools, accessories or the machine. For large work volume use more powerful
machine.
•Do not overload your machine. Measure the work load in such way, so it could be done with comfortable
speed. Damages due to machine overload are not covered by waranty.
•Do not expose to extremely high temperature or direct sunlight.
•This machine is not designed for use in humid environments or under water.
•if you are not using your machine, store it in a dry and safe place, out of reach of children.
•Before use make sure that all safety elements work correctly and efficiently. Make sure all moving parts
are in good working conditions.
•Before use make sure that no part is cracked or stuck. Make sure all parts are attached and assembled
as designed. Beware of all other conditions that may have a negative effect on the proper functioning of
your device.
•If not stated otherwise in this manual, all damaged parts and safety elements must be repaired or changed.
Fine mechanics
•Never use vise to hold your tool/machine.
•Protect you device from impact and fall.
Assembly
•Do not use the machine unless completely assembled.
Hot air gun
•Gun produces very high temperatures without using a flame.
•Observe all safety instructions to avoid the risk of fire.
•Always keep appropriate fire extinguisher handy.
•Protect your gun from rain and humidity.
•Your hot air gun is capable of producing very high temperatures, (up to 650 °C). Do not aim the hot air
flow at clothing, hands or other body parts.
•Never use this gun as a hairdryer.
•Do not touch the outlet nozzle. Wait until it cools down completely. Nozzle is very hot. Always hold the gun
by its handle.

6
•Never touch the surface of the work piece with the nozzle. Keep the nozzle at a distance at least 25 mm
above the work piece surface.
•Keep your workplace clean. Disorganized workplace with lot of items scattered around may be the cause
of injuries or fire.
•Remove all flammable materials or waste from your workplace.
•Use your gun only in well ventilated environment. Do not use you gun close to flammables or explosives
(explosive vapours, gases, dust etc.).
•Also it is prohibited to use your gun close to other flammables such as dry leafs, hay, dry grass and other
materials that catch on fire easily.
•Always use protective goggles.
•If you are not using your gun, store it in vertical position. Place it on a even flat surface. Main supply cable
place in such a way so it will not flip the gun over.
•NEVER leave the gun unattended during operation or during cooling down.
•Observe all rules when storing you gun. Do not place the gun aside if it is still hot. Store your gun in dry
and safe place, preferably high above the ground or keep it locked in dry and safe place. Keep children
away.
•Always disconnect the main supply cable from the wall outlet before performing any maintenance or
cleaning. Have maintenance performed by qualified technician or experienced electrician who has the
appropriate licensing.
•Do not attempt to repair or disassemble your gun by yourself.
•Store the gun indoor.
Electrical equipment
•Observe all basic safety rules when using electrical equipment to prevent risk of fire, injuries by electrical
shock and other hazards. Before using this device, read this manual entirely and follow all safety instructions.
•Make sure the power cable plug is plugged into the correct wall outlet. The voltage in the wall outlet must
be the same as shown on the specification label to prevent damage to the electric motor. Too low voltage
will not provide your machine with enough power.
•Before connecting the power supply cable make sure that the main switch is in the Off position. When
you finished your work, disconnect the power plug from the wall outlet and switch off the main switch.
•Never carry electric power tools and equipment by their cable.
•When disconnecting the plug from the wall outlet, never pull the cable by its cord.
•Protect the power cable from high temperatures, oils, paint thinners and make sure that the cable is not
hanging over sharp edges.
•Inspect the power cable regularly. If damaged have it replaced by qualified technician. Inspect extension
cables regularly. If damaged, have it replaced.
•If you need to use an extension cable, use cable with appropriate power rating. Use only completely
unwound. Inspect extension cables regularly. Damaged cables must be repair immediately.
•Before performing any maintenance, repair or adjustment, switch off the main switch and disconnect the
power cable from the wall outlet.
•Make sure no one may switch you machine incidentally on. Do not keep your fingers close to the starting
mechanism unless absolutely necessary.
•If this device is to be installed on a worktable, release the safety switch after the installation.
•Do not use in environments where explosives are stored or used (paint shops, warehouse with
flammables etc.).
•Do not use in humid environments or if wet.
11
Lacquer and paint removal
•To remove paint or lacquer coats easily and effectively you need to gain a certain level of experience
and to get familiar with the following steps: Always test your procedure on small area and if you feel
comfortable move on to larger area.
•Switch the gun on and wait until it reaches the set temperature. Keep the nozzle 75 - 100 mm above the
paint coat. After a short while the coat gets soft and starts to produce blisters. You cannot burn the paint
coat. In such case the removal may be even more difficult. If you are removing paint above your head,
always use eye protection.
•Scrape the paint from the top to the bottom. Use appropriate scraper. Scrape the paint slowly and use
continuous movement. Heat the surface in front of the scraper by moving the gun from side to side. If the
paint is heated correctly you may remove rather thick layer in one move. The coating must peel off in the
same width as the width of the scraper.
•Clean the tip of the scraper often to prevent paint build ups. Scrape off he paint immediately when it is
hot. Otherwise you may not be able to get the paint off.
•To remove the hot paint coat from difficult to reach areas, use steel brush.
•Protect all areas that you do not wish to heat up with fireproof material. Never aim the gun on glass
surfaces or window glass.
NOTE:
Hot air gun may be used to remove oil and latex paints and lacquers, as well as other various coatings. You
cannot use it for removal of wood stain solutions or base wood paints that impregnate the wood surface.
•Only authorized service may perform repairs on you tool.
•Keep your tools clean. Dirt may enter the inner mechanism of your machine and cause damage.
•Do not use aggressive cleaning solution or paint thinners to clean the machine.
•Clean plastic parts with cloth dipped in soup water.
•Clean and lubricate metal surfaces with a cloth dipped in paraffin oil.
•If you are not using your machine, lubricate it with suitable grease and store it in a dry place to prevent
corrosion.
•Make sure that all air supply inlets and exhaust outlets are free of dirt.
•Clean all air openings regularly with soft and dry brush.
•Clean the body of the gun with wet cloth dipped in mild soap solution.
•Many household detergents contain chemicals that may seriously damage the plastic cover of the gun.
•Do not use for cleaning turpentine, paint thinners,benzene and other aggressive chemicals.
•Never let any liquid enter the inner parts of the gun and never submerge the gun in water.
•Before storing your tool, make sure that the hot air nozzle cooled down.
•The nozzle may turn darker after certain time of use. This phenomenon is normal. Hot temperatures have
such effect on metals.
MAINTENANCE
ELECTRICAL DIAGRAM

10
WARNING: LEAD BASED PAINT VAPOURS ARE HARMFUL TO YOU HEALTH. WHEN WORKING IN AN
ENCLOSED AREA, MAKE SURE TO HAVE SUFFICIENT VENTILATION.
•After use, clean the scraper and the gun nozzle of paint of lacquer residue, as they may caught on fire
easily.
•Only use your gun in well-ventilated rooms or areas. Paint residue is poisonous.
•Before using your device, read this manual entirely and make sure you understand its contents.
CAUTION: Do not use hot air gun on porous materials such as outside stucco, walls, corn ceilings,
dividing partitions, etc. These materials may contain flammables and may easily caught on fire under the
flow of hot air. Flammables contained in these materials may catch on fire unnoticeably and cause serious
injuries of material damages. Do not use your gun on such surfaces. Danger of fire! If you have to work
on such surface move the gun back and forth constantly. If you keep the gun over one spot for prolonged
period of time, you may ignite the surface or the material below the surface. Also do not forget to set the
temperature mode to LOW.
•CAUTION: You will lower the risk of fire of injury by electrical shock if you keep the gun away from rain or
humidity. Store the gun indoor.
•CAUTION: If you use your gun for soldering or similar low temperature welding, the welded materials
release chemicals that has been classified as a carcinogenic substances in the state of California. Such
substances are also harmful to fetus or to human reproductive system.
•Your hot air gun is capable of producing very high temperatures, (up to 650 °C). Do not aim the hot air
flow at clothing, hands or other body parts.
•Never use this gun as a hairdryer.
•Do not touch the outlet nozzle. Wait until it cools down completely. Nozzle is very hot. Always hold the gun
by its handle.
•Never touch the surface of the work piece with the nozzle. Keep the nozzle at a distance at least 25 mm
above the work piece surface.
•Keep your workplace clean. Disorganized workplace with lot of items scattered around may be the cause
of injuries or fire.
•Remove all flammable materials or waste from your workplace.
KEEP CHILDREN IN SAFE DISTANCE Keep all unauthorized persons in safe distance from the working
area. NEVER allow bystanders to touch the gun or the main supply cable.
•Use your gun only in well ventilated environment. Do not use you gun close to flammables or explosives
(explosive vapours, gases, dust etc.).
•Also it is prohibited to use your gun close to other flammables such as dry leafs, hay, dry grass and other
materials that catch on fire easily.
•Always use protective goggles.
•If you are not using your gun, store it in vertical position. Place it on a even flat surface. Main supply cable
place in such a way so it will not flip the gun over.
•NEVER leave the gun unattended during operation or during cooling down.
•Observe all rules when storing you gun. Do not place the gun aside if it is still hot. Store your gun in dry
and safe place, preferably high above the ground or keep it locked in dry and safe place. Keep children
away.
•Do not attempt to repair or disassemble your gun by yourself.
7
???
•Before throwing the packaging material out, make sure no part is left inside. If so, take it out and install it.
Use the part listing for check-up and the installation drawing for guidance.
NOTE:
When you switch the gun on for the first time, you may see smoke coming out of the nozzle. That is
burning of the conservation oil as your gun was treated with oil at the factory.
The smoke shall disappear within less then a minute.
•Place the gun in the edge banding holder. Secure in place with screws and nuts.
•Always wear protective goggles and working gloves.
•Do not place your hands close to the hot air outlet. Severe burns may occur.
CAUTION
•If there is a voltage outage in the wall outlet of more than 10% the gun may shut down. It may also get
damaged due to overheating.
•We recommend to test the hot air gun on a piece of spare material.
•Near the gun nozzle slowly and carefully towards the work piece surface. That way you have control over
the distance above the work piece surface, as well as over the time the heat is being applied.
•Move the gun slowly back and forward to make sure that the heat is evenly distributed or concentrated on
one spot if needed.
•If you use your gun in small area, e.g. shrinkage tunnel or similar small space, make sure that you have
enough supply of air available and at the same time you have sufficient vacuum of the hot air out of the
space. Using your gun in completely closed space may damage it, due to overheating.
Control panel
•POWER - switches the gun on and switches
between the high and low temperature mode.
If switched off, activates automatic cooling
down. Press it repeatedly to activate this
function.
•LO - Low temperature mode -
the LED diode at this button will come on.
•HI - High temperature mode -
the LED diode at this button will come on.
•Cooling down with automatic shut off. Both
diodes (at LO and HI) will come on when
activated.
ASSEMBLY
OPERATION

8
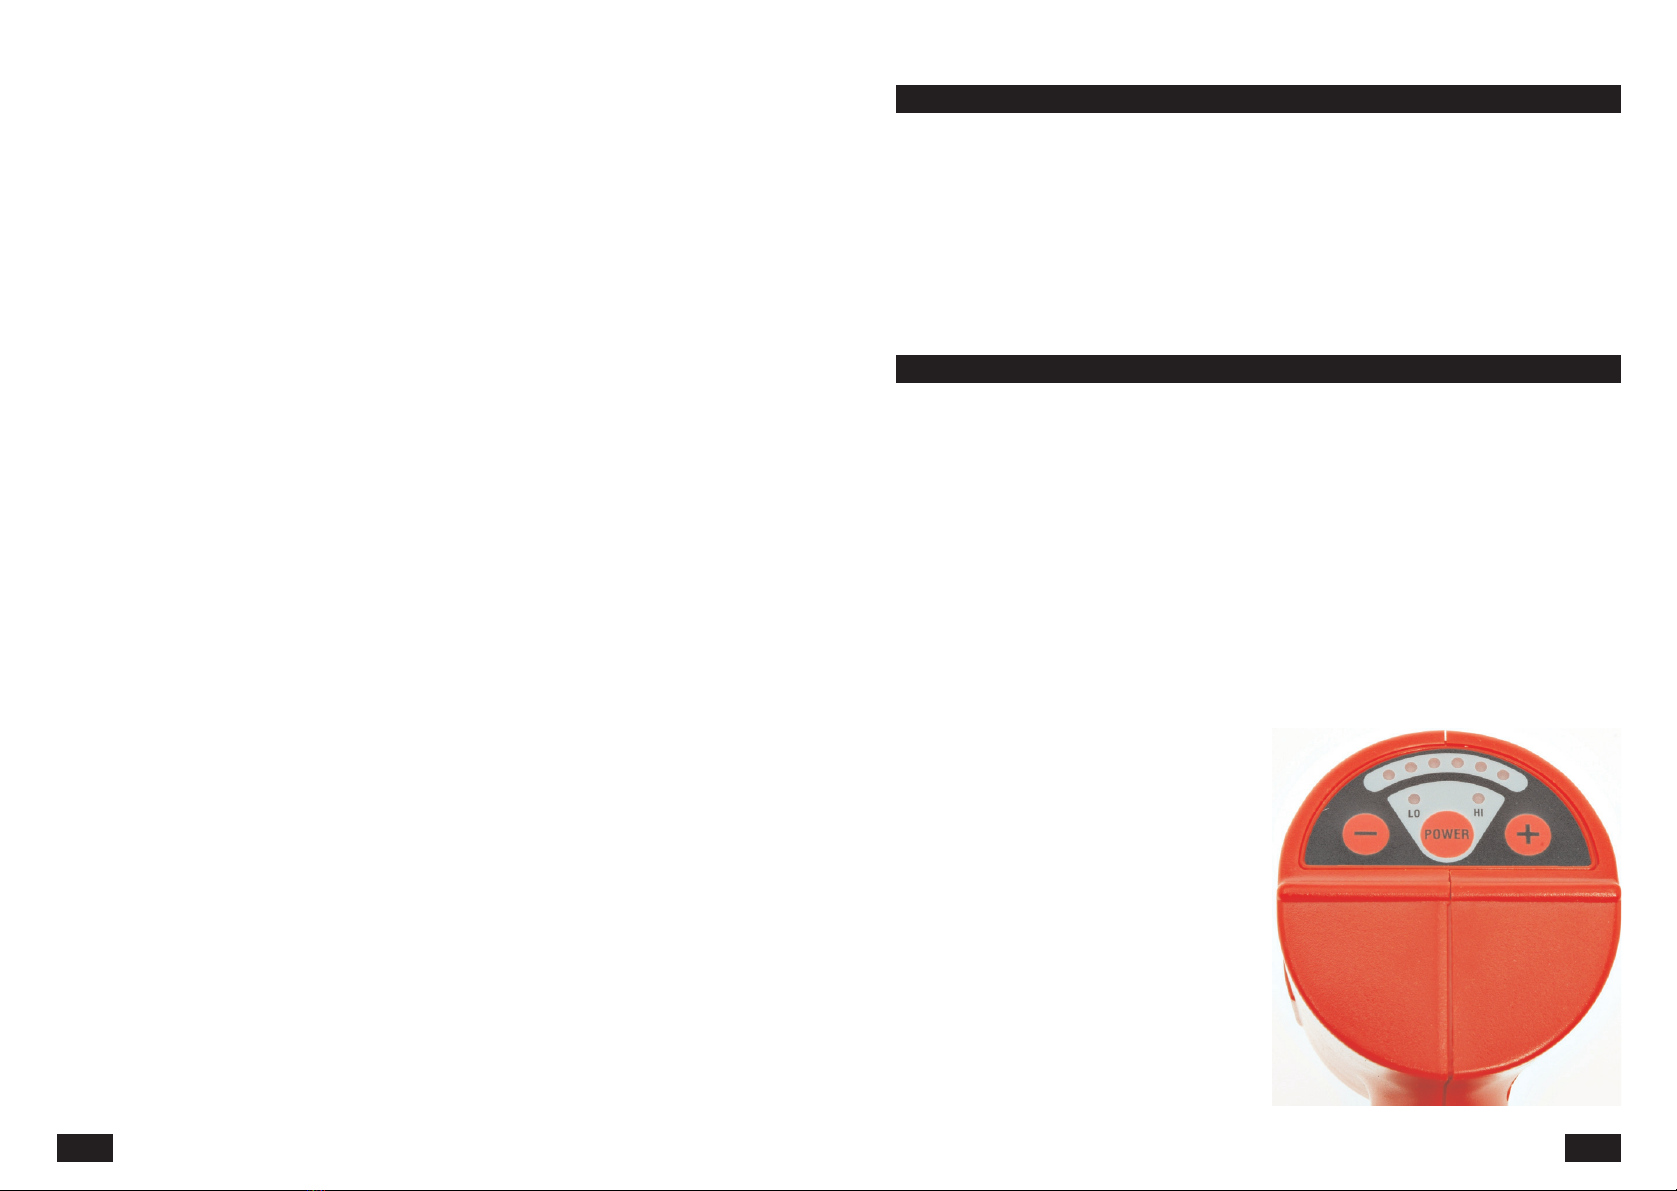
Switching your gun on- the POWER button.
•If you press this button once the gun starts to operate in the low (LO) temperature mode.
The LED diode at this button will come on.
•If you press this button twice the gun starts to operate in the high (HI) temperature mode.
The LED diode at this button will come on.
•If you press this button three times the gun will turn to the cooling down mode with automatic
shut off. (It takes about 80 seconds). Both LED diodes will come on.
Do not shut the gun off by disconnecting the main power supply cable.If you do, the pistol
may get damaged by the accumulated heat.
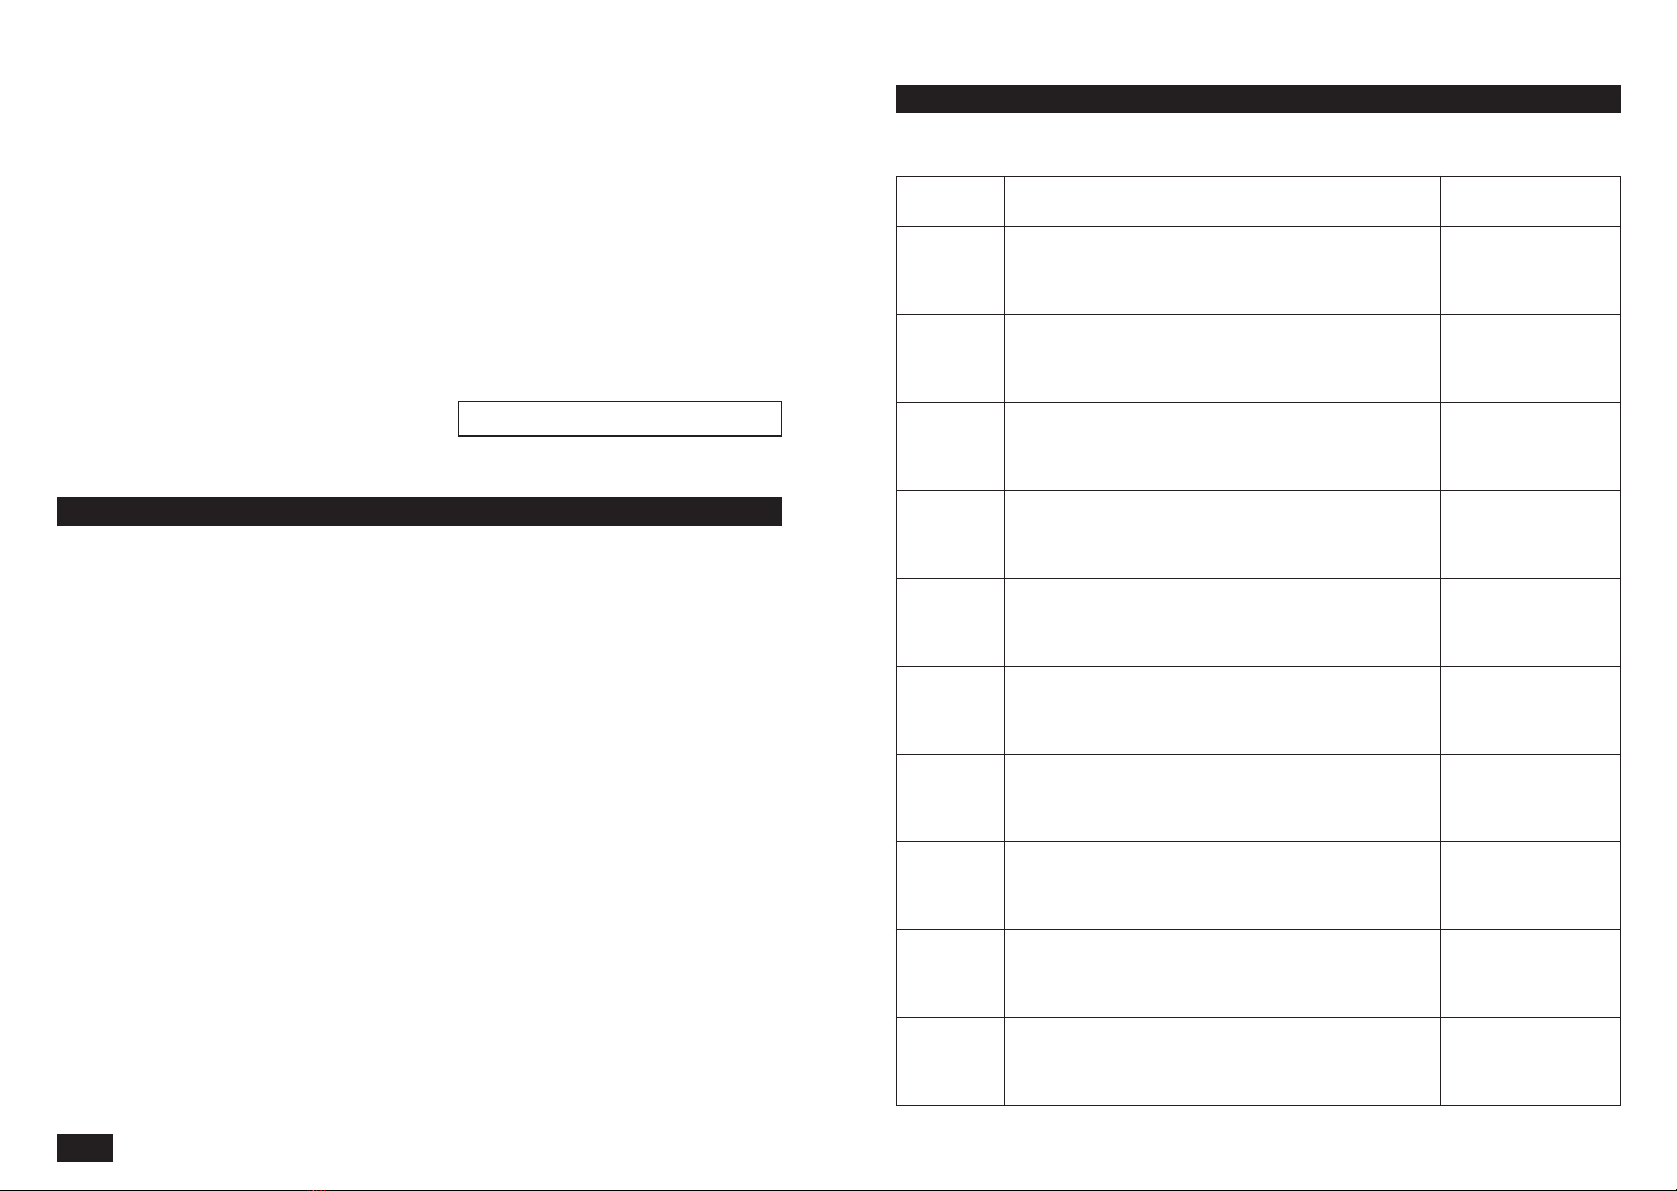
Setting the required air temperature
In both modes (HI and LO) 6 LED diodes indicate the temperature of the outlet air.
The approximate values of the set temperature may be found in the chart.
•By pressing the buttons (+) / (-) and after you have set the LO or HI mode (using the POWER button -
see the steps above) you may decrease or increase the temperature by 6 degrees. The setting is
indicated by the corresponding number of lit LED diodes.
Always wait at least 1 minute before using you gun. It is needed to reach the operating
temperature of the gun.
NOTE:
•If the gun is in the low temperature mode you must press the POWER button twice to activate the
air-cooling function with automatic shut off. After the air stops blowing (after about 80 seconds) the gun
will shuts off completely.
•If the gun is in the high temperature mode you must press the POWER button only once to activate the
air-cooling function with automatic shut off. After the air stops blowing (after about 80 seconds) the gun
will shuts off completely.
Number of lit
LED diodes 1 2 3 4 5 6 80 s
Input (W) 300 1120 1750 1850 1950 2000 265
HI 95 °C 370 °C 550 °C 590 °C 625 °C 650 °C 95 °C
Input (W) 150 200 400 650 800 1000 95 °C
LO 80 °C 90 °C 185 °C 325 °C 400 °C 510 °C 95 °C
Other use for your hot air gun
Removal of old paint coatings
OLD PAINT REMOVAL - SAFETY INSTRUCTIONS
CAUTION: Use extreme caution during paint removal.
•Peeled off coating and its vapour may contain poisonous lead.
•Paints manufactured before 1977 may contain lead and building paints manufactured around 1950 most
certainly contain lead.
9
•If you get lead residue on your fingers, you may easily transfer it to your mouth.
•Even small lead residue may cause irreversible brain and nervous system damage. The most at risk are
young people and unborn children.
•Make sure to find out if the paint that you want to remove contains lead. The lead contents may be
determined by a lead analyser. Contact the local environment protection office for more information.
Paint coating with lead may be only removed by qualified technician without using hot air gun.
•Move the work piece outside. If it is not possible, make sure the area is well ventilated. Open the windows
and place a powerful ventilator in one of them. Make sure that the ventilator is vacuuming the air out of the
room.
•Remove or cover all carpets, clothing, textile covers, furniture, kitchen ware and air pipes from that room.
•Have rugs ready to catch pieces of the removed paint.
•Ware protective clothing and head cover.
•Work in only one room at a time. Remove the equipment from the room or move it to the centre and
cover it.
•The working area must be isolated from the living area. Therefore cover door openings with curtains.
•Make sure that no children, pregnant women or breastfeeding mothers have no access to the working
area. They may only enter after everything has been cleaned thoroughly.
•Exercise extreme caution when using hot air gun. Move the gun constantly. If you heat up one spot too
much, it may produce harmful vapours that may harm the operating person.
•Do not eat or drink during work.
•Wash your hands, arms and face thoroughly before drinking or eating.
•Do not smoke or chew gum or tobacco during work.
•Clean the paint dust or residue colleted on the floor with wet cloth. Clean all walls and other surfaces that
may have gathered the paint dust with wet cloth.
•DO NOT SWEEP THE FLOOR. DRY CLEAN OR VACUUM THE DUST. Use cleaning detergent with high
content of phosphates or trisodium phosphate TSP.
•When you finish your work, collect paint coating peels off in double-wall plastic bag, close it with a rope
and dispose of it according to valid rules and regulations.
•Remove working cloth and shoes while you are still in the working area. That way you will not carry the
paint and dust residue to other rooms.
•Wash the working cloth separately.
•Wipe your working shoes with wet cloth and then wash it together with the working cloth.
•Wash you body and hair with water and soap thoroughly.
•Have rugs ready to catch pieces of the removed paint.
•Ware protective clothing and head cover.
•Work in only one room at a time. Remove the equipment from the room or move it to the centre and cover
it. o The working area must be isolated from the living area. Therefore cover door openings with curtains.
•Make sure that no children, pregnant women or breastfeeding mothers have no access to the working
area. They may only enter after everything has been cleaned thoroughly.
•Exercise extreme caution when using hot air gun. Move the gun constantly. If you heat up one spot too
much, it may produce harmful vapours that may harm the operating person.
•Do not eat or drink during work. o Wash your hands, arms and face thoroughly before drinking or eating.
•Do not smoke or chew gum or tobacco during work.
•Clean the paint dust or residue colleted on the floor with wet cloth.
•Clean all walls and other surfaces that may have gathered the paint dust with wet cloth.
Table of contents
Other Unimax Power Tools manuals
Popular Power Tools manuals by other brands

Makita
Makita BHR241RF technical information

SGS
SGS SAT305 owner's manual

Carrier
Carrier 40VMV0012A Installation and maintenance instructions

STEINEL
STEINEL HG 2620 E manual

Palmgren
Palmgren 80150 Operating manual and parts list

XYZ Machine Tools
XYZ Machine Tools SMX 2500 Safety, installation, maintenance, service & parts list manual