urmet domus 4501/5 User manual

DS 4501-002 LBT 8249
Mod.
4501
“DOMUS VOIPHONE” TELEPHONE
Ref. 4501/5
QUICK INSTALLATION GUIDE
&
USER MANUAL
TRANSFER
HOLD
REDIAL
#
SEND
0
9
WXYZ
8
TUV
6MNO
3
DEF
2
ABC
1
5
JKL
4
GHI
7
PQRS
CONF.
DEL/MUTE
CALL LOG
P.BOOK
DOWN
ENTER
M1
UP
MENU
VMS
VOL-
REG
VOL+
M2
M3
M4
LINE-1
LINE-2
LINE-3
DND
FORWARD
VMS
PICK UP
PSTN

2DS4501-002
INFORMATIVE NOTES
DECLARATION OF CONFORMITY
The manufacturer Urmet Domus S.p.A. whose legal offices are in via Bologna n° 188/C – 10154 Torino (TO) Italy, declares that this device
complies with the requirements of the European Parliament and Council Directive 1999/5/CE dated 9 march 1999 regarding radio apparatures,
telecommunications terminal apparatures and the reciprocal recognition of the conformity thereof, sed by means of
INTENDED USE OF THE DEVICE
This device has been designed and realized for connection to national telephone network (PSTN) or for Urmet Domus switchboard (PABX)
extension using, or for a local network (LAN). Therefore his installation, and his programming –where necessary –must be done by qualified
staff.
PACKAGING
Check that packing and content are not visibly damaged. Contact the retailer immediately if parts are either missing or damaged. Do not
attempt to use the device in this case. Send the product back in its original packing if it is damaged.
RECOMMENDED INSTALLATION LOCATION
It is advisable to use the telephone in sheltered environments with temperature in the range from 5 to 40°and relative humidity in the range
from 20 to 75%.
Keep the telephone away from directly sunlight or sources of heat.
It is advisable not to install the telephone in particularly dusty environments because the accumulation of dust can compromise the correct
operation of moving parts.
TELEPHONE INSTALLATION ADVICE
The VoIPhone telephone was designed to work with power supply.
CLEANING THE TELEPHONE
Use a moist or antistatic cloth for cleaning the telephone only. Do not use volatile liquids, like petrol, alcohol, solvents, etc., or chemically
treated cloths; they could damage the surface finish.
Normally the phone feet do not mark the surface it is rested on but in consideration of the variety of materials available, it is advisable to
clean the resting points regularly.
CONTENTS OF THE BOX
•n.1 telephone
• n.1 telephone table support
• n.1 handset
• n.1 handset spiral cord
• n.1 telephone plug/plug line cord
• n.1 Ethernet cable (RJ45)
• n.1 adapter kit
• n.1 “CONSUMER RIGHTS”list
• n.1 “WEEE DISPOSAL INFORMATION NOTE”sheet
• n.1 instruction manual
• n.1 CD
Urmet Domus reserves the right to change the product specifications and performance without prior notice.
INDEX
QUICK INSTALLATION GUIDE......................................................... 3
USER MANUAL.................................................................................. 7
1. Introduction............................................................................ 7
2. Features................................................................................. 7
3. Standard Compliances .......................................................... 7
4. LED Indicators ....................................................................... 7
5. Installations & SIP Configurations ......................................... 7
6. Default Reset by Using Keypads........................................... 7
7. Configurations by Web Browser............................................ 7
8. LCD Display with Keypads Settings .................................... 34
9. VoIP Application Examples.................................................. 37
10. Trouble Shooting for Web Configurations............................ 39
11. Glossary............................................................................... 40

DS4501-002 3
QUICK INSTALLATION GUIDE
STEP 1: VOIPHONE KEYPAD E REAR PANEL
STEP 2: BROADBAND (ADSL MODEM/CABLE). CONNECTIONS FOR VOIPHONE
1. Connect the VoIPhone RJ45 WAN port to the ADSL Router/Modem using a direct network cable.
2. Connect the VoIPhone RJ45 LAN port to the LAN port of the PC using a straight, direct cable.
3. Connect the VoIPhone RJ11 PSTN port to a PSTN telephone line.
4. If telephone headset with amplifier Ref. 1362/62 is used, connect it to the VoIPhone RJ11 Headset port.
5. Connect the DC adapter. The LCD will light up and the message ‘Loading Program!’will appear.
6. Date, Time and the ‘No service’message will then appear on the LCD if no SIP account has yet been registered. Otherwise, if a SIP account
has been registered, the registered name will appear.
7. Pick up the handset. The message ‘IP Dialing…’will appear on the LCD. 1. Hang up.
8. Press the Menu button, followed by the sequence 4_5 on the keypad to check the IP address used for the VoIPhone LAN (default:
192.168.123.1).
9. Press the Menu button to open and close the menu. Press the Up/Down buttons and the Enter button to confirm selections.
Example of connection of the VoIPhone to an ADSL Router/Modem
STEP 3: CONFIGURATION VIA WEB BROWSER AND PC
1. Connect a PC to the LAN port and start a browser to access web configuration.
2. Press the Menu button followed by the sequence 4_5 on the telephone keypad to display the WAN and IP addresses.
3. Assuming that the LAN port IP address is 192.168.123.1, type http://192.168.123.1:9999 in the web browser address field to connect to the
web configuration page.
4. Login using the default username and password:
Username: root
Password: test
Click on “Login”to access configurations.
Id. DESCRIPTION
MEMORY DIAL
11st SIPACCOUNT2
3rd SIPACCOUNT4 DO NOT DISTURB
5VOICE MESSAGE6 PSTN7
2nd SIPACCOUNT3
SPEAKER PHONE8 MICROPHONE
KEY
9
M1…M3
LINE-1
LINE-3
DND
VMS
PSTN
LINE-2
1
2
4
6
7
8
9
3
5
WAN
DC POWER LAN PSTN HEADSET
M2
M3
M4
LINE-1
LINE-2
LINE-3
DND
FORWARD
VMS
PICK UP
M1M1
PSTN
TRANSFERHOLDREDIAL
PQRS
7
GHI
4
1DEF
3
MNO
6
WXYZ
9
SEND
#
ABC
2
JKL
5
TUV
8
0
REG VMS
MENU ENTER
VOL-VOL+ UP DOWN
CALL LOGP.BOOK DEL/MUTE CONF.
LAN
192.168.123.1
(default)
PSTN
VoIPhone
Telephone
network Router/Modem
ADSL
192.168.123.150
WAN
Audio
Data
Tel n
Splitter
Tel 1
192.168.101.1
2 wires
Ethernet

4DS4501-002
5. The following system information page will appear on the web browser.
6. Program the following network configurations in the left-hand column: Phone, Network WAN/LAN Settings, SIP Settings. Remember to
click on “Save Change”and then save to confirm and activate settings: the telephone will be restarted with the new settings.
7. Three different modes are available for WAN configurations (WAN mode).
DHCP:
This mode is used if the telephone is connected
to an ADSL router with enabled DHCP server,
i.e. which can automatically assign addresses to
the PCs and to the devices connected to it.
This option is used for assigning a dynamic IP
address and is generally chosen as WAN IP
address. When this option is selected, the IP
address, the Subnet mask and the Gateway
IP address will be automatically assigned.
Remember to click on Submit to make the
changes effective.
PPPoE:
This mode is used if the telephone is directly
connected to an ADSL modem, like a PC.
When this option is selected, the PPPoE
username and password must be entered and
the IP address will be automatically assigned to
the WAN port.
Fixed IP:
This option is used to manually program the
IP address, the Subnet mask and the Gateway
IP, if this is necessary due to the presence
of a previously configured network or specific
address allocations (static IP connection) given
by a provider (ITSP).

DS4501-002 5
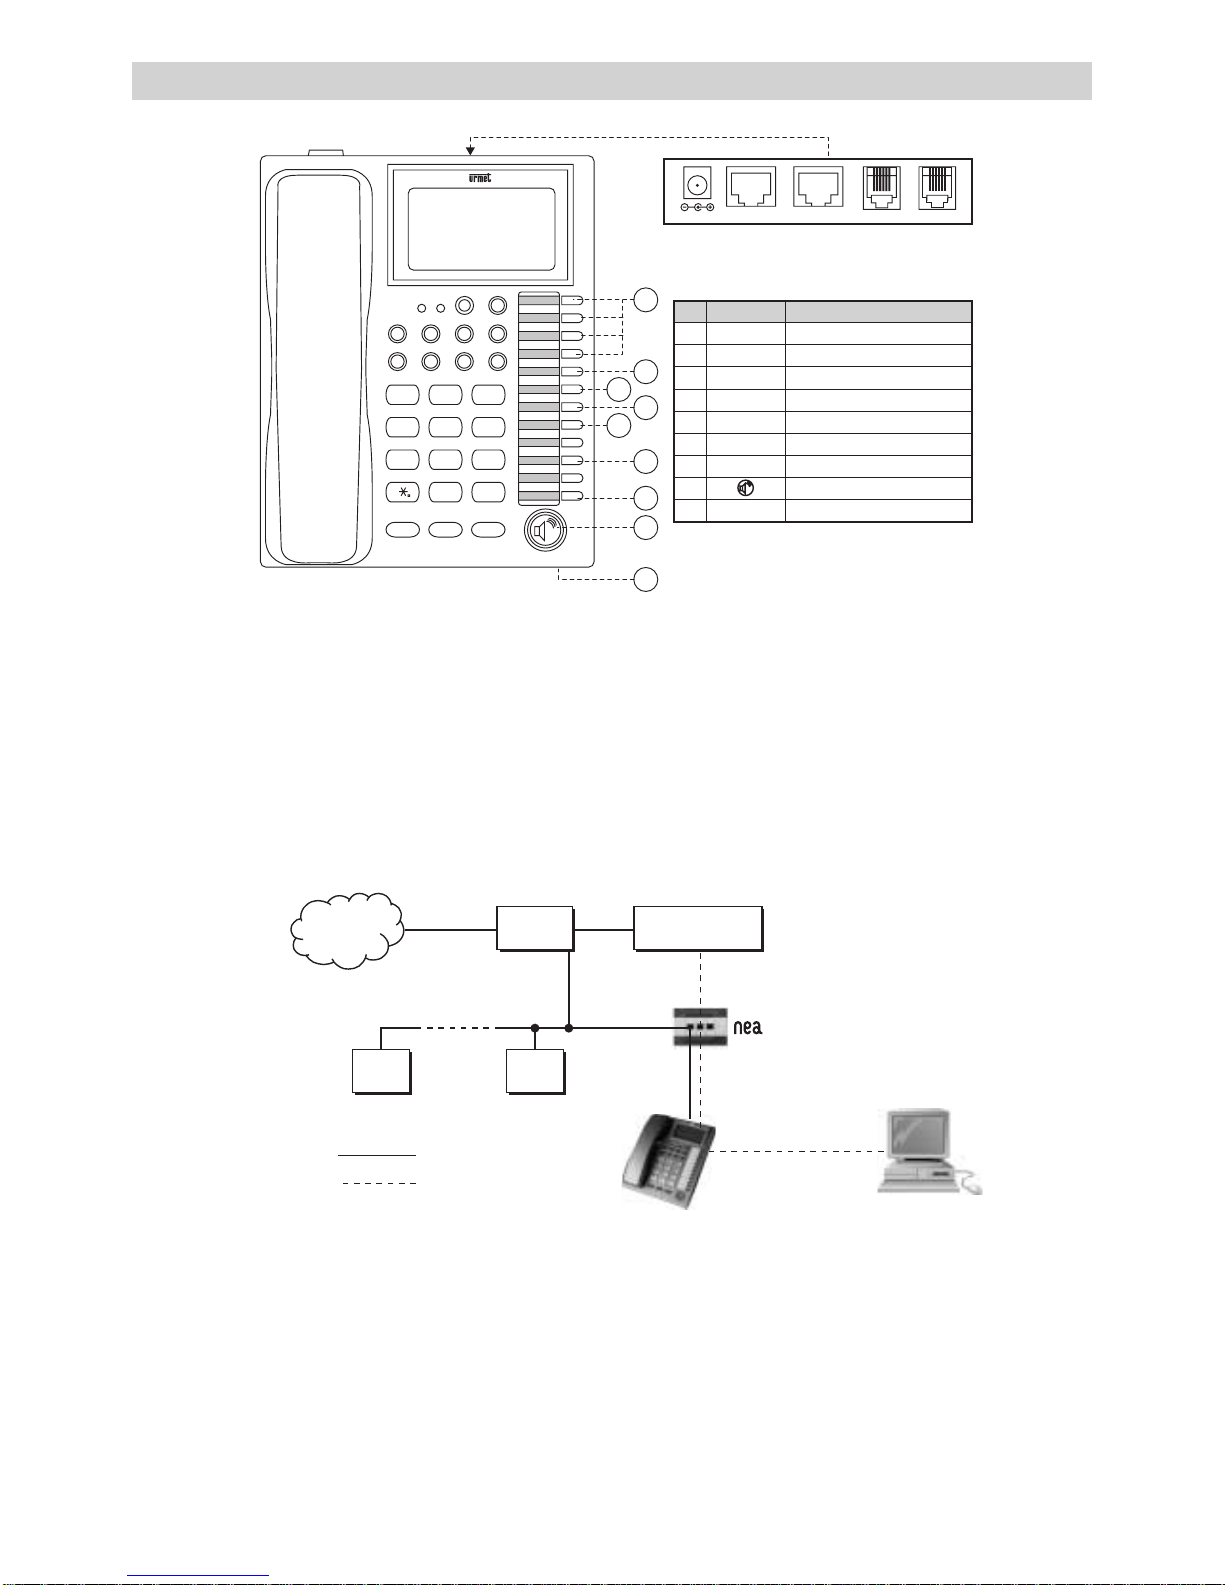
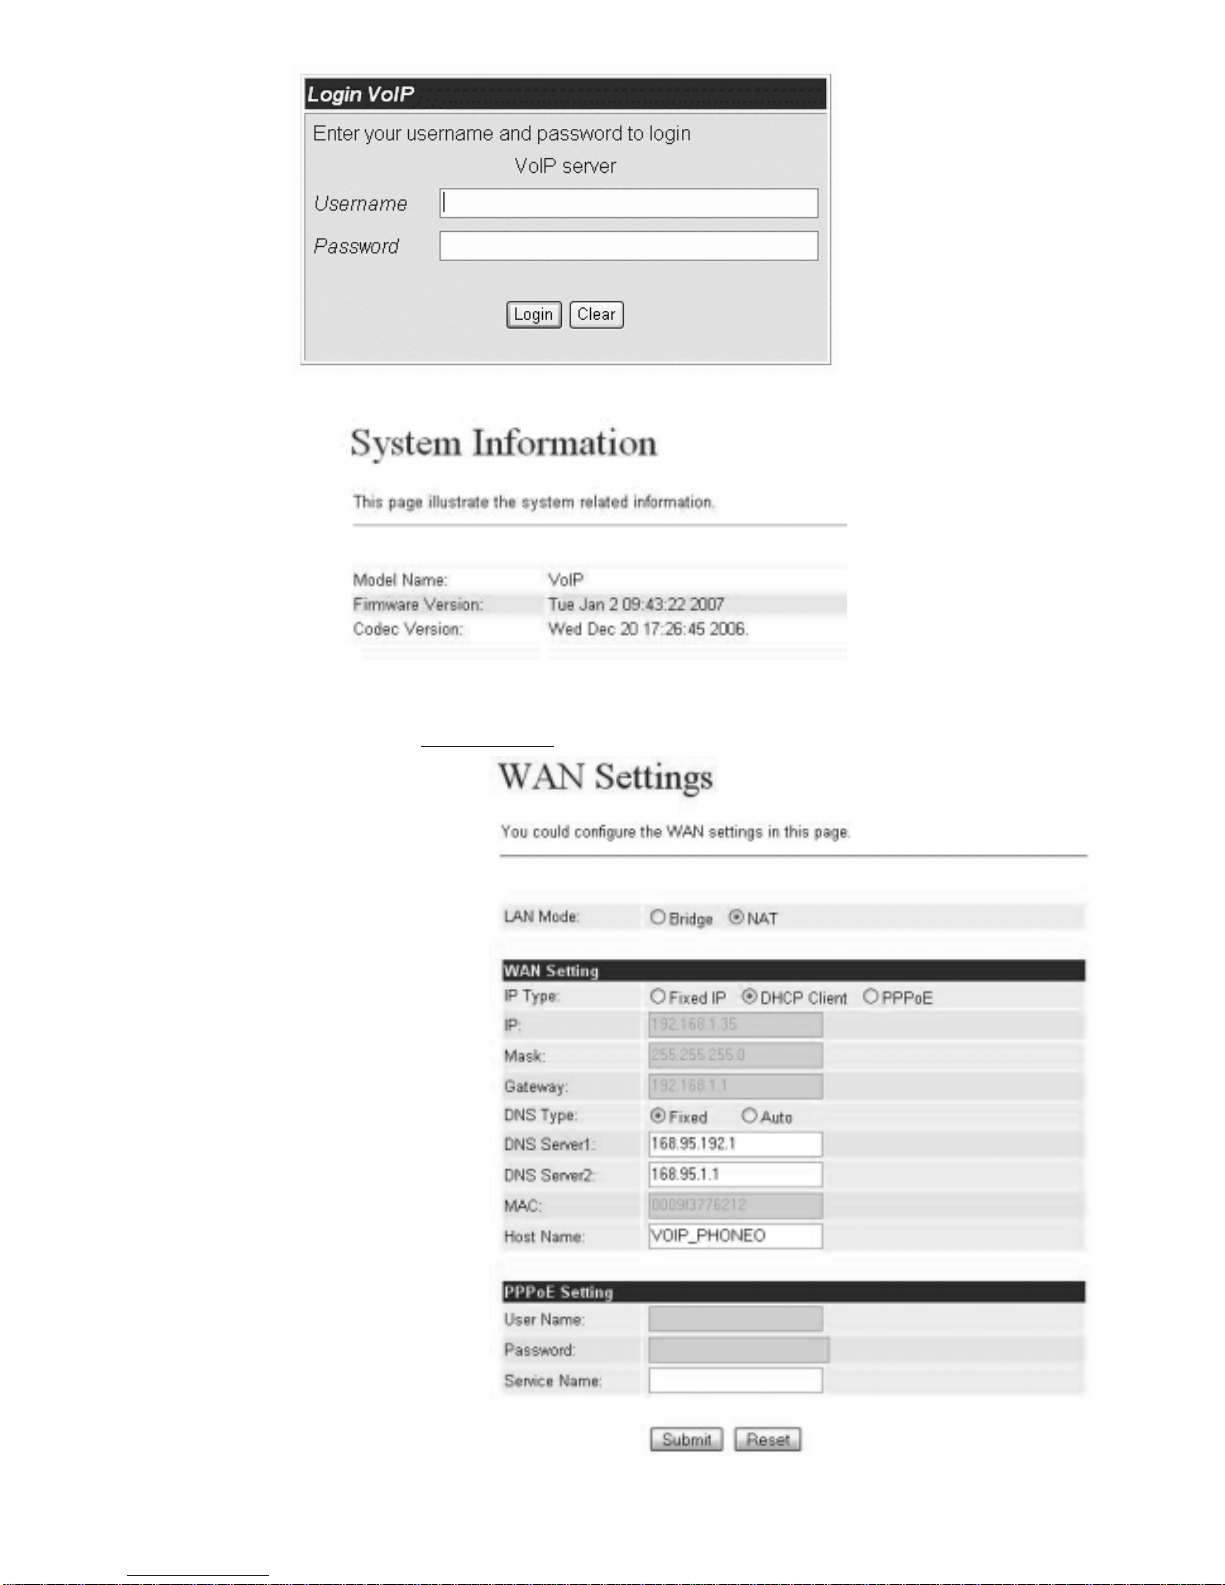
Two configuration modes are possible for the LAN (LAN mode):
NAT (default):
By using this mode, the WAN and LAN ports refer to two separate interfaces; in this case, as shown in the example above, the PC connected
to the LAN port will obtain the address from the telephone (192.168.123.x).
Bridge:
By using this mode, the telephone will behave transparently (as an Ethernet hub/bridge) and in this case, the PC connected to the LAN port
will obtain the address from the ADSL Router/Modem to which the telephone is connected (192.168.101.x in the mentioned example).
This mode cannot work without a router which assigns the addresses and may be useful in presence of a company network in which you want
the PC to take the address from the network.
8. SIP configurations:
In order to use the VoIP service, a SIP account registered at one of the many SIP providers is needed. Register to obtain the account
connection data.
Registration to the Eutelia server is shown by way of example. Connect to the site.
http://www.euteliavoip.com
Follow the instructions for registering and activating the account. You will be asked to choose a telephone number and will receive connection
data like those shown below):
Login 01119838123
(this is the user name of account, which is the same in this case of the telephone number chosen)
Password ********
Domain voip.eutelia.it
Sip Proxy Server voip.eutelia.it
Sip Proxy Socket 5060
Stun Server stun.voip.eutelia.it
Stun Server Socket 3478
These data will then be requested during the SIP account configuration step on the telephone, as we will see below.
The Stun connection data may be needed if the device is connected to a router to which several PC and devices are connected, typically
a large network, where the router works as a NAT, i.e. filters and re-routes packages to the various devices.
Refer to the following paragraph for entering Stun data.
There are many VoIP providers offering this type of services, in addition to Eutelia. Only some are listed here.
Messagenet (http://www.messagenet.it/)
CheapVoIP (http://www.cheapnet.it/supporto/guide/voip/)
Squillo (http://www.ngi.it/squillo/)
The various providers offer different services with different prices and policies. Choose the provider, from the list or others, who offer the
service most in line with your needs.
The user can configure up to 3 SIP registrations (realms) in the Service Domain Settings configurations.
It may be useful to have several configured accounts if several different people use the telephone or if you want to use several SIP providers
at the same time because they are more convenient for certain services.
Account (realm) 1 (default for the first SIP account registration). For example:
Active (state of the telephone): ON
Display Name (shown on the telephone display): Mario
User Name (registered at the SIP provider): 01119838123
Register Name (registered at the SIP provider): 01119838123
Register Password (password registered at the SIP provider): ********
Proxy Server (server +registration port, provided by the SIP provider): voip.eutelia.it:5060
Domain Server (server +registration port, provided by the SIP provider): voip.eutelia.it:5060
Outbound Proxy:
Accounts (realm) 2 &3 (for the second and third SIP account registration, similar to the previous registration)
Active: ON
Display Name: Lucia
User Name: 01119838124
Register Name: 01119838124
Register Password: ********
Proxy Server: voip.eutelia.it:5060
Domain Server: voip.eutelia.it:5060
Outbound Proxy:
Number selection for SIP account
With three registered SIP accounts, the VoIPhone can receive all incoming calls from the three SIP servers. Accounts (Realms) 1, 2, and
3are used to configure the registered numbers for the first, second and third SIP service, respectively. The VoIPhone can register different
telephone numbers on different SIP servers. Press LINE-2 to select the second SIP server. The “Display name”programmed during the
registration step to that SIP server will appear on the display. Press 2_*_Speaker to select the second SIP server. Similarly, press LINE-3
(or 3_*_Speaker) to select the third SIP server. LINE-1 is used by default. Make sure that the Accounts (Realm) 1, 2 and 3 are all registered
and that the REG LED is ON.
Table of contents
Other urmet domus IP Phone manuals