urmet domus LITE 1088/2 User manual

DS1088-003 1
Nota: il ricevitore 1088/12 può gestire un lettore di prossimità aggiuntivo per aprire il varco collegato al relè 1.
I modelli Easy Door Receiver 1088/2 e 1088/12 sono studiati per gestire due varchi i quali, grazie alla ricevente presente
nel dispositivo, possono essere aperti con i radiocomandi 1088/34 e 1088/35.
Easy door Receiver prevede la possibilità di collegare un'antenna esterna che deve essere posta all'interno dell'abita-
zione.
Easy Door Receiver LITE 1088/2
ITALIANO
* Radiocomando 1088/34 consigliato per il ricevitore 1088/2.
* Radiocomando 1088/35 (Mifare) consigliato per il ricevitore 1088/12.
Easy Door Receiver PLUS 1088/12
Chiave Mifare
1088/53
PER 1088/2 E 1088/12
Chiave 4K
1088/40
Tastiera wireless
1087/4
Telecomandi
1088/34-35 *
Antenna
1088/55
Encoder
1088/200
SOLO PER 1088/12
Lettori
1088/41-42
1088/45-47
Easy door receiver può essere programmato in 2 modalità:
LOCALE: non richiede nessuno strumento di programmazione e permette la programmazione fino a 1500 radioco-
mandi/tags.
VIRTUAL NETWORK: che, tramite l'utilizzo di un software Web, può creare virtualmente un complesso edilizio fino a
50 easy door receiver e programmare i radiocomandi/Tag direttamente dal computer utilizzando un encoder 1088/200.
La seconda modalità (virtual network) funziona in base alla tecnologia lettura/scrittura e offre alcune funzioni in più.
Ricevitore con memoria estraibile. La presenza della me-
moria è indispensabile per il funzionamento del dispositivo
ACCESSORI

DS1088-003 2
1088/2 1088/12
Alimentazione Da 12 a 24Vcc o Vac Da 12 a 24Vcc o Vac
Assorbimento Fino a 300mA Fino a 300mA
Temperatura operativa Da -20 a +60°C Da -20 a +60°C
Dimensioni (Lxlxh) 120x100x40 mm 120x100x40 mm
Relè 2 2
Chiave di memoria NO SI
Banda radio frequenza 868.000MHz ÷ 868.600MHz
Massima potenza radio trasmessa 0mW
Protocollo Manchester con rolling code Manchester con rolling code
Trasmissione RF 100m in spazio libero 100m in spazio libero
Proximity
Tecnologia Non disponibile Mifare®
Lettore Non disponibile Lettore a 2 fili (bus100m max)
Modalità locale (radiocomandi master/utente)
N. max. di radiocomandi master 10 10
N. max. di radiocomandi utente 1500 1500
Anti-pass-back NON DISPONIBILE SI
Modalità virtual network tramite Easydoorcontroller.com
N. di radiocomandi 5000 (compresi i radiocomandi an-
nullati)
5000 (compresi i radiocomandi an-
nullati)
Eventi NON DISPONIBILE 20.000
Anti pass-back NON DISPONIBILE Sì
Fasce orarie NON DISPONIBILE Sì
LED VERDE ALIMENTAZIONE. Indica se il ricevitore è alimentato. In tal caso, il led lampeggia ogni 5 secondi.
LED ROSSO PROGRAMMAZIONE. Invia le seguenti segnalazioni:
- Diventa rosso quando il ricevitore è in modalità di programmazione (tramite un commutatore o un radiocomando
master).
- Lampeggia in rosso ogni 3 s quando un lettore a 2 fili è collegato ai morsetti.
- Lampeggia in rosso 3 volte al secondo se il lettore non comunica con il controller.
- È spento in assenza di lettore.
TABELLA DI COMPARAZIONE DEI DUE RICEVITORI
SEGNALAZIONI VISIVE SULLO STATO DEI RICEVITORI
INSTALLAZIONE
Il ricevitore è destinato ad un utilizzo interno. Per essere installato all'esterno, occorre prevedere una scatola aggiuntiva
in plastica resistente alle intemperie.
Il ricevitore è provvisto di 4 fori per poter essere fissato a parete.
MORSETTIERE E COLLEGAMENTO DEI DUE RICEVITORI
Con il codice 1088/12 viene identificato il ricevitore Plus, predisposto per il collegamento di un lettore e dotato di due
ingressi loop e di una memoria esterna. Su questo ricevitore sono presenti inoltre 6 dip switches per la sua program-
mazione.
Il codice 1088/2 si riferisce alla versione Lite. Per confrontare le differenze si vedano i due schemi seguenti.

DS1088-003 3
Dipswitch di programmazione
Ingresso loop porta 2
Relè 2
Ingresso loop porta 1
Relè 1
Pulsante di uscita porta 1
Pulsante di uscita porta 2
RICEVITORE PLUS 1088/12
BC2+
BC2-BP2-
BP2+
NO2
NC2
COM2
BC1+
BC1-
NO1
ON
NC1
COM1
Memoria
LED
Antenna
D+ D-
BP1+
BP1-
Lettore
Massa
Segnale
Buzzer
D+
D-
}
}
ALIMENTAZIONE
+/~
-/~
230V
12V
0V
Dipswitch di programmazione
Relè 2
Relè 1
Pulsante di uscita porta 1
Pulsante di uscita porta 2
RICEVITORE LITE 1088/2
BP2-
BP2+
NO2
NC2
COM2
NO1
ON
NC1
COM1
LED
Antenna
BP1+
BP1-
Massa
Segnale
Buzzer
}
}
ALIMENTAZIONE
+/~
-/~
230V 12V
0V
Pulsante di uscit
a
B
C
2
+
B
C
2-BP2-
BP2
+
NO2
N
C2
COM
2
B
C
1
+
B
C
1-
NO1
ON
N
C1
CO
M
1
Memoria
L
ED
Ant
e
nn
a
D+
D-
BP1+
BP1-
L
e
tt
o
r
e
Ma
ss
a
S
e
g
nal
e
B
uzzer
D+
D-
ALIMENTAZI
O
N
E
+/
~
-/
~
230
V
12V
0V

DS1088-003 4
Attenzione
Nel caso in cui la serratura elettrica (o incontro elettrico) sia alimentata in corrente
continua, si raccomanda di inserire un varistore il più vicino possibile alla serratura,
come indicato a lato:
L'alimentazione in alternata non necessita di questa protezione.
N.B. il componente è a corredo del prodotto.
OFF ON VALORI DI FABBRICA
S1 Modalità operativa Modalità di programmazione
(tutti gli altri dip switches devo-
no essere in OFF)
OFF
S2 * Inutilizzato Inutilizzato OFF
S3 * APB disattiva APB attiva OFF
S4 * APB 24/7 Tempo anti-pass OFF
S5 * APB solo su ingresso APB su ingresso + uscita OFF
S6 PB1 (pulsante 1) - Relè 1
PB2 - Relè 2
PB3 - Relè 1
PB4 - Relè 2
OFF
L'impostazione di fabbrica per il tempo di rilascio porta è di 3 secondi. È tuttavia possibile modificare questo valore per
i due relè 1 e 2 come indicato:
- Spostare il commutatore S1 su ON. Nel caso della versione Plus, S2 e S3 devono essere OFF.
- Premere il pulsante "USCITA PORTA 1" tante volte quanti sono i secondi desiderati per programmare il tempo di rilas-
cio porta. Ripetere la procedura per il relè n. 2, premendo il pulsante USCITA PORTA 2".
È inoltre possibile modificare in qualsiasi momento il tempo di rilascio porta in modalità di gestione remota, creando un
radiocomando di configurazione.
CONFIGURAZIONE DEI RICEVITORI
NOTA: i dipswitch S4 e S5 sono legati all'impostazione di S3. Ad esempio: se S4 è OFF quando S3 è ON, la funzione
anti-pass-back è permanente.
* I dip switches S2-S3-S4-S5 sono disponibili solo sul ricevitore 1088/12
Il ricevitore 1088/12 può attivare la funzione "Car Detective" (vettura rilevata) su ogni
varco. Se il varco è destinato all'ingresso di sole vetture, è infatti possibile collegare un
dispositivo "Loop Car Detector", in questo caso se la macchina entra nell'area "loop"
è consentita l'apertura del varco.
Per collegare il dispositivo loop, occorre rimuovere i ponticelli tra i morsetti BC1-/BC1+ o BC2-/BC2+ e impostare i dip
switch S3, S4, S5.
Questo dispositivo si può integrare con la funzione anti-pass-back (APB), per cui un utente a cui è stato assegnato un
posto auto, non può accedere nella struttura con 2 vetture contemporaneamente.
FUNZIONE CAR DETECTIVE SUL RICEVITORE 1088/12
IMPOSTAZIONE DEI DIP SWITCHES
Le due modalità di configurazione dei ricevitori (locale e virtual network) possono essere usate contemporaneamente.
PROGRAMMAZIONE DEL TEMPO DI RILASCIO PORTA
RESET DELLE IMPOSTAZIONI DI FABBRICA
Portare il commutatore S1 su ON e premere il pulsante "USCITA PORTA 1" fino a udire una sequenza di bip sempre
più rapida, indicante la cancellazione della memoria. Riportare S1 su OFF. Un ultimo bip conferma l'avvenuto reset del
ricevitore. Nota: i radiocomandi master non vengono rimossi.
Con dipswitch S6 OFF: il pulsante in alto a sinistra del radiocomando aziona il relè 1 e il pulsante in alto a destra aziona
il relè 2.
Con dipswitch S6 ON: il pulsante in basso a sinistra aziona il relè 1 e il pulsante in basso a destra aziona il relè 2.
SCELTA DEI TASTI SUL RADIOCOMANDO
MODALITÀ LOCALE
ATTENZIONE. Sui radiocomandi registrati in modalità locale, i due relè porta sono contemporaneamente attivabili dai
tasti scelti tramite il dipswitch S6; la disattivazione di uno dei due relè si può effettuare esclusivamente tramite il sito
www.easydoorcontroller.com.

DS1088-003 5
SUL 1088/2 SUL 1088/12
RADIOCOMANDO Premere il pulsante 1 del radiocomando. Premere il pulsante 1 del radiocomando.
CHIAVE TAG Presentare una chiave di prossimità master
davanti al lettore Mifare
AGGIUNTA DI NUOVI DISPOSITIVI (MAX 10). Sul ricevitore in uso portare il dipswitch n. 1 su ON. Il LED rosso di pro-
grammazione si accende e vengono emessi 3 bip. Eseguire l'azione indicata nella tabella sottostante per il dispositivo
di interesse:
DISPOSITIVI MASTER
Un breve bip conferma l'avvenuta registrazione. Dopo aver programmato l'ultimo dispositivo, riportare il dipswitch su
OFF. Un bip conferma l'uscita dalla modalità di programmazione.
CANCELLAZIONE DI RADIOCOMANDI O TASTIERE 1087/4 (1088/2 o 1088/12). Togliere l'alimentazione. Spostare il
dipswitch n. 1 su ON e ridare alimentazione. Riportare il dipswitch n. 1 su OFF. Un bip conferma l'uscita dalla modalità
di programmazione.
CANCELLAZIONE DI CHIAVI TAG (solo 1088/12). Spostare il dipswitch n.1 su ON. Mantenere premuto il pulsante
di uscita porta 1 per 5 secondi, fino a che il LED non lampeggia rapidamente (3 volte/s). Riportare il dipswitch su OFF.
Tutte le chiavi sono ora cancellate.
AGGIUNTA DI NUOVI RADIOCOMANDI (MAX 1500). Premere il primo pulsante di un radiocomando master per 5
secondi, fino a che il ricevitore non emette 3 bip. Premere il primo pulsante dei radiocomandi da aggiungere. Per ogni
nuovo radiocomando, il buzzer emetterà 1 bip. Dopo avere presentato l'ultimo radiocomando utente, premere breve-
mente quello master per uscire dalla modalità di programmazione. Il LED si spegne e un bip confermerà l'uscita dalla
modalità di programmazione.
DISPOSITIVI UTENTE
CANCELLAZIONE DI RADIOCOMANDI. Premere il primo pulsante di un radiocomando master per 5 secondi, fino a
che il ricevitore non emette 3 bip. Premere per 5 secondi il primo pulsante del radiocomando da cancellare. Per ogni
radiocomando annullato, il buzzer emetterà 1 bip. Dopo aver cancellato l'ultimo radiocomando, premere brevemente
quello master per uscire dalla modalità di programmazione. Il LED si spegne e un bip conferma l'uscita dalla modalità
di programmazione.
ATTENZIONE. Le cancellazioni appena descritte sono operative solo per i dispositivi programmati localmente, non per
quelli che sono stati configurati tramite il sito www.easydoorcontroller.com, di cui si parlerà nel capitolo successivo.
I dispositivi in dotazione agli utenti (radiocomandi, tastiere, chiavi tag) possono avere un profilo UTENTE o un profilo
MASTER. Se un dispositivo viene associato a un profilo UTENTE, esso può agire esclusivamente sulle aperture dei
singoli varchi. Mentre se viene associato a un profilo MASTER, può essere utilizzato sia per le aperture, che per gestire
la programmazione di nuovi dispositivi o di quelli già in uso.
Nei paragrafiseguenti sono illustrate le operazioni che è possibile effettuare sui singoli dispositivi.
PROGRAMMAZIONE DEI DISPOSITIVI
AGGIUNTA DI NUOVE TASTIERE 1087/4. Sul controller spostare il dipswitch 1 su ON. Inserire il codice MASTER della
tastiera (di default 0000). Un bip conferma l'avvenuta registrazione della tastiera nel sistema. Riportare il dipswitch 1
su OFF.
AGGIUNTA DI NUOVE CHIAVI TAG. Presentare una chiave di prossimità MASTER davanti al lettore Mifare per 5
secondi sul frontale del lettore fino a che il LED non diventi rosso. Presentare le chiavi utente al lettore. Per ogni nuova
chiave, il LED diventa verde per breve tempo e poi torna di colore rosso. Dopo avere presentato l'ultima chiave utente,
presentare nuovamente la chiave master per uscire dalla modalità di programmazione. Il LED del lettore si spegne.

DS1088-003 6
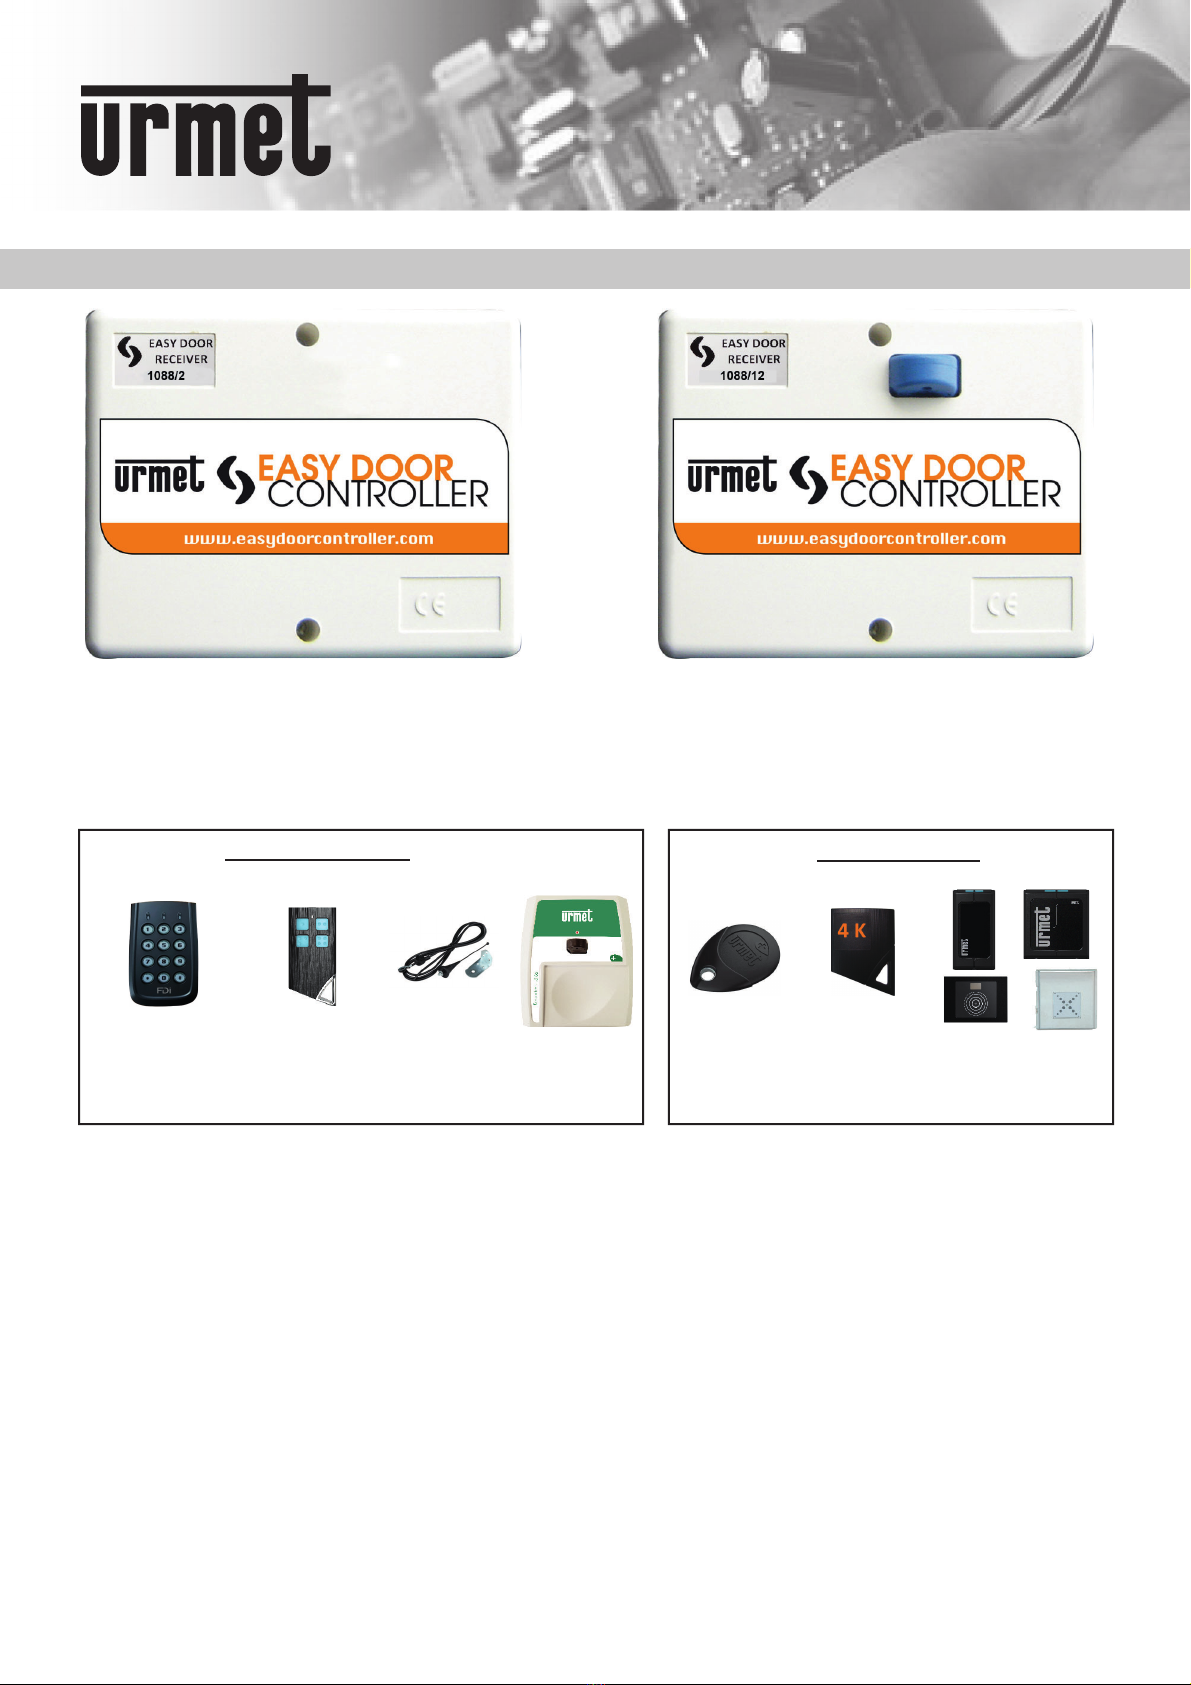
Ogni controller/ricevitore ha un numero di serie univoco (visualizzato sul prodotto con l'indicazione Receiver N°..........).
Quando si crea un nuovo sito di edifici, appartamenti e porte tramite la piattaforma www.easydoorcontroller.com,
inserire il numero di serie visualizzato sul controller, per associarlo alle chiavi/radiocomandi autorizzati a gestire i varchi
da aprire.
Attraverso l'operazione di codifica, i numeri di serie dei controller vengono iscritti nei telecomandi, permettendo la ges-
tione da remoto degli accessi, senza doversi connettere ad essi fisicamente. Successivamente, in caso di smarrimento
di una chiave o di un telecomando, sarà sufficiente ricodificarlo on line. Al primo utilizzo, la nuova chiave o telecomando
annullerà quello smarrito.
ESEMPIO: SMARRIMENTO DI UNA CHIAVE (solo con 1088/12) O DI UN RADIOCOMANDO (sia con 1088/12 che
con 1088/2)
Passo 1: innanzitutto annullare la chiave (o il radiocomando) sul portale.
Passo 2: creare una nuova chiave (o radiocomando), codificarla e farla pervenire all'utente finale.
Passo 3: quando l'utente premerà un qualsiasi pulsante del suo radiocomando, l'ultimo radiocomando verrà annullato e
non sarà più autorizzato all'accesso. Nel contempo, tutte le autorizzazioni del nuovo radiocomando verranno trasferite
al controller. Ogni nuova chiave (o radiocomando) contiene sempre le ultime modifiche del database, i controller sono
automaticamente aggiornati quando queste chiavi (o radiocomandi) vengono presentate al lettore.
Questa modalità avanzata consente, ad esempio, di gestire i siti da un ufficio senza collegamento con i controller.
Una volta ricodificata e utilizzata per la prima volta dall'utente, la nuova chiave sostituirà automaticamente quella vec-
chia. Sul portale www.easydoorcontroller.com sono disponili anche altre funzioni di gestione. Esso è sempre aggior-
nato all'ultima versione e il backup dei dati è integrato.
FUNZIONAMENTO
Quando il ricevitore è nuovo, è in attesa dei radiocomandi di configurazione (uno per porta).
Dalla finestra Door del software Web, è necessario creare un radiocomando di configurazione per canale. Quindi,
presso il sito, premere il primo pulsante dei radiocomandi.
Il ricevitore emette un bip lungo e un bip breve per il canale 1 oppure un bip lungo e due bip brevi per il canale 2.
PRIMO AVVIO
Il ricevitore è in grado di registrare gli ultimi 20.000 eventi degli ultimi 30 giorni.
Dalla finestra Door del software, deve essere codificata una chiave eventi. È possibile selezionare una data di inizio e
una data di fine oppure selezionare solo alcuni tipi di eventi.
Il ricevitore è fornito con l'ora e la data italiane. Se queste impostazioni devono essere modificate (ad esempio, per
gestire eventi), il software Web permette di generare un radiocomando di impostazione del clock.
Questo radiocomando invia al ricevitore l'ora e la data che il software vi ha scritto. In tal modo, se si prevede di impos-
tare il ricevitore alle ore 16.00, occorrerà immettere l'ora nel software quando si codifica questo radiocomando.
ORA E DATA
Ogni volta che un nuovo radiocomando è utilizzato con il ricevitore, la memoria di quest'ultimo viene aggiornata. È tutta-
via possibile creare alcune chiavi di aggiornamento (solo per 1088/12). Da notare che questa funzione è possibile solo
con le chiavi Mifare, non con i radiocomandi. Ciò significa che un lettore di prossimità deve essere collegato al canale
1 del ricevitore almeno per l'aggiornamento.
Non è possibile aggiornare solo una delle due porte. Entrambe le porte dello stesso ricevitore devono essere aggiornate
con la stessa ora e data.
Quando si presenta l'ultima chiave di aggiornamento della prima porta, l'operatore dispone di 1 minuto per presentare
la prima chiave di aggiornamento della seconda porta. Se nessuna chiave viene presentata durante questo lasso di
tempo, il ricevitore emette un bip e l'aggiornamento si conclude.
AGGIORNAMENTO COMPLETO
SCARICARE GLI EVENTI (SOLO PER 1088/12)
N.B.: affinché le chiavi eventi possano essere presentate, occorre collegare un lettore a 2 fili al canale 1 del ricevitore.
Una normale chiave Mifare possiede una memoria sufficiente per 40 eventi. Una chiave 4K Mifare rif. 1088/40 gestisce
200 eventi.
In questa modalità, l'unità di controllo gestisce fino a un massimo di 5.000 radiocomandi. Si tratta della somma dei radio-
comandi autorizzati/non autorizzati. Quando si elimina una porta o un cancello del profilo di accesso della chiave o del
radiocomando, la chiave rimane nella black list del controller.
Fino a 20.000 eventi degli ultimi 30 giorni sono registrati nelle unità di controllo (solo per 1088/12). Questi eventi offline
possono essere trasferiti al computer tramite chiavi speciali.
La gestione chiavi funziona con una tecnologia di lettura/scrittura. Le chiavi sono programmate in remoto tramite un
software Web e un encoder. Successivamente, quando le chiavi sono presentate al lettore, i dati vengono trasferiti
nell'unità di controllo.
Si ricorda che nella modalità remota, tramite il portale www.easydoorcontroller.com, è possibile gestire più funzioni per
ogni sito, impostare i controller e scaricare gli eventi (quest'ultima funzione solo con 1088/12).
MODALITÀ VIRTUAL NETWORK

DS1088-003 7
Sul sito, presentare la chiave eventi al lettore e attendere che il LED di quest'ultimo diventi completamente verde (il LED
lampeggia durante il trasferimento dei dati).
Dopo avere rimosso la chiave, il LED del lettore si spegne se tutti gli eventi sono stati scaricati nella chiave oppure lam-
peggia in rosso/verde se devono essere scaricati altri eventi.
In tal caso, presentare una seconda chiave di trasferimento (chiave neutra) e attendere che il LED del lettore resti
acceso verde. Se necessario, presentare al lettore una terza chiave e così di seguito.
Radiocomando a 4 pulsanti: 1088/34-35
Tastiera wireless: 1087/4
Antenna stilo 868MHz: 1088/55
Encoder: 1088/200
Lettore proximity, 2 fili, anti-vandalo: 1088/41-42-46-47-48*
Chiavi prox 13.56 MHz: 1088/53*
* solo per 1088/12
PRODOTTI COMPATIBILI
Le informazioni contenute in questo manuale possono essere soggette a modifiche
senza preavviso. Per gli eventuali aggiornamenti del manuale e ulteriori approfondimenti
sui prodotti, utilizzare il presente link:
1088/2 1088/12
DICHIARAZIONE DI CONFORMITÀ UE SEMPLIFICATA
Il fabbricante, URMET S.p.A., dichiara che il tipo di apparecchiatura radio: EASY DOOR RECEIVER 1088/2 - 1088/12
sono conformi alla direttiva 2014/53/UE. Il testo completo della dichiarazione di conformità UE è disponibile al seguente
indirizzo Internet: www.urmet.com.
La funzione APB (ANTI PASS BACK) garantisce che una certa zona non sia accessibile per due volte consecutive da
uno stesso utente e che il radiocomando dell'utente non possa essere utilizzato da un'altra persona per accedere con
la stessa chiave. Ciò rende impossibili due ingressi consecutivi senza che una delle due vetture sia uscita. Ad esempio,
un utente che affitti un posto auto non potrà utilizzare il proprio radiocomando per una seconda vettura, fintanto che
la prima sia presente nel parcheggio. Per attivare una zona anti-pass-back, spostare il dip switch S3 su ON. Due dip
switches definiranno la modalità di funzionamento dell'APB:
S4 su OFF, l'APB è permanente. S4 su ON, l'APB viene annullata dopo un lasso di tempo impostabile.
S5 su OFF, solo l'ingresso è controllato, mentre l'uscita è libera. In questo caso, occorre dapprima uscire, ma l'uscita è
abilitata. S5 su ON, solo l'uscita è controllata. In questo caso, occorre entrare per poter uscire e uscire per poter entrare.
GESTIONE APB (FINO A 500 UTENTI). SOLO PER 1088/12
Spento Attivo
S3 senza APB APB attiva
S4 APB 24/7 Tempo anti-pass
S5 APB solo su ingresso APB su ingresso + uscita
Nota: il ricevitore 1088/12 è in grado di gestire la funzione APB solo per l'ingresso oppure per ingresso + uscita, tra-
mite il dipswitch S3. È inoltre possibile gestire il tempo con il dipswitch S4. Dopo un lasso di tempo definito, è possibile
rientrare nella zona.
La durata della funzione anti-pass-back è regolabile. Spostare il dipswitch S1 su ON, il LED rosso si accende. Spostare
S3 su ON e lasciare S2 OFF. Il ricevitore è ora in attesa della programmazione. Ogni pressione del pulsante di uscita
della porta 1 aggiunge 10 minuti, ogni pressione del pulsante di uscita della porta 2 aggiunge un minuto.
Ad esempio, premendo due volte il pulsante di uscita 1 e 5 volte il pulsante di uscita 2 viene impostato un tempo di 25
minuti. Cinque secondi dopo l'ultimo impulso, il ricevitore emette alcuni bip lunghi e brevi. Ogni bip lungo corrisponde a
10 minuti e ogni bip breve a 1 minuto. Spostare S1 su OFF e riportare i dipswitch S2 + S3 nella loro posizione iniziale.
Il tempo anti-pass massimo è di 255 minuti.
IMPOSTAZIONE DEL TEMPO APB

DS1088-003 8
DIRETTIVA 2012/19/UE DEL PARLAMENTO EUROPEO E DEL CONSIGLIO del 4 luglio 2012 sui rifiuti di apparec-
chiature elettriche ed elettroniche (RAEE).
Il simbolo del cassonetto barrato riportato sull’apparecchiatura o sulla sua confezione indica che il prodotto
alla fine della propria vita utile deve essere raccolto separatamente dagli altri rifiuti. L’utente dovrà, pertanto,
conferire l’apparecchiatura giunta a fine vita agli idonei centri comunali di raccolta differenziata dei rifiuti elet-
trotecnici ed elettronici. In alternativa alla gestione autonoma è possibile consegnare l’apparecchiatura che si
desidera smaltire al rivenditore, al momento dell’acquisto di una nuova apparecchiatura di tipo equivalente.
Presso i rivenditori di prodotti elettronici con superficie di vendita di almeno 400 m2 è inoltre possibile conse-
gnare gratuitamente, senza obbligo di acquisto, i prodotti elettronici da smaltire con dimensione massima infe-
riore a 25 cm. L’adeguata raccolta differenziata per l’avvio successivo dell’apparecchiatura dismessa al riciclaggio, al
trattamento e allo smaltimento ambientalmente compatibile contribuisce ad evitare possibili effetti negativi sull’ambiente
e sulla salute e favorisce il reimpiego e/o riciclo dei materiali di cui è composta l’apparecchiatura.
URMET S.P.A.
VIA BOLOGNA 188/C
10154 TORINO (ITALY)
Tel. +39 011.2400000
Customer Service Tel. 0112339810
http://www.urmet.com
e-mail: [email protected]
Made in France
DS1088-003

DS1088-003 9
Note, the receiver 1088/12 can manage an extra reader to open the gate linked to the relay / door 1.
Easy Door Receiver 1088/2 and 1088/12 are designed to manage two relays. It is an all in one product which includes
the receiver part and the smart part. An extra 1088/55 antenna can be added when the receiver needs to be installed
in a metal box for example.
ENGLISH
* Remote control 1088/34 recommended for 1088/2 receiver
* Remote control 1088/35 (Mifare) recommended for 1088/12 receiver
Mifare key
1088/53
FOR 1088/2 AND 1088/12
4K key
1088/40
Wireless keypad
1087/4
Remote contr.
1088/34-35 *
Antenna
1088/55
Encoder
1088/200
ONLY FOR 1088/12
Readers
1088/41-42
1088/45-47
Easy door receiver can be programmed in 2 ways:
LOCAL: does not require any programming tool and allows programming up to 1500 remote controls/tags.
VIRTUAL NETWORK: which, through the use of a Web software, can virtually create a building complex of up to 50
easy door receivers and program the radio controls/Tags directly from the computer using a 1088/200 encoder.
This second mode works on the read & write technology and offers more features.
Easy Door Receiver LITE 1088/2 Easy Door Receiver PLUS 1088/12
Receiver with removable memory. The presence of
memory is indispensable for the device to function
ACCESSORIES

DS1088-003 10
1088/2 1088/12
Power supply 12 to 24Vdc or Vac 12 to 24Vdc or Vac
Consumption Up to 300mA Up to 300mA
Operating temperature -20 to +60°C -20 to +60°C
Dimension (LxWxH) 120x100x40 mm 120x100x40 mm
Relays 2 2
Memory key NO YES
Radio Frequency range 868.000MHz ÷ 868.600MHz
Max radio power transmitted 0mW
Protocol Manchester with rolling code Manchester with rolling code
RF transmission 100m in open field 100m in open field
Proximity
Technology Not available Mifare®
Reader Not available 2 wire reader (bus100m max)
Stand alone mode (master /user remotes)
Max number of master remotes 10 10
Max number of user remotes 1500 1500
Anti pass back NOT AVAILABLE YES
Virtual network Easydoorcontroller.com
Number of remotes 5000 (deleted remotes included) 5000 (deleted remotes included)
Events NOT AVAILABLE 20000
Anti pass back NOT AVAILABLE Yes
Time slots NOT AVAILABLE Yes
GREEN POWER LED. Indicates if the receiver is powered. In this case, the LED flashes every 5 seconds.
RED PROGRAMMING LED. Send the following reports:
- Turns red when the receiver is in programming mode (via a master switch or remote control).
- Flashes red every 3 s when a 2-wire reader is connected to the terminals.
- Flashes red 3 times per second if the player is not communicating with the controller.
- It is offif there is no reader.
COMPARISON TABLE OF THE TWO RECEIVERS
VISUAL SIGNALS ON THE STATUS OF THE RECEIVERS
INSTALLATION
The receiver is meant for an indoor use. If it needs to be used outdoor, please use an extra plastic weatherproof box.
The receiver has 4 holes in order to be bolted.
TERMINAL BOARDS AND CONNECTION OF THE TWO RECEIVERS
The code 1088/12 identifies the Plus receiver, set up for the connection of a reader and equipped with two loop inputs
and an external memory. On this receiver there are also 6 dip switches for its programming.
Code 1088/2 refers to the Lite version. To compare the differences see the following two diagrams.

DS1088-003 11
Dipswitch setting
Door 2 loop input
Relay 2
Door 1 loop input
Relay 1
Door 1 exit button
Door 2 exit button
1088/12 PLUS RECEIVER
BC2+
BC2-BP2-
BP2+
NO2
NC2
COM2
BC1+
BC1-
NO1
ON
NC1
COM1
Memory
LED
Antenna
D+ D-
BP1+
BP1-
Reader
Ground
Signal
Buzzer
D+
D-
}
}
POWER SUPPLY
+/~
-/~
230V
12V
0V
Dipswitch setting
Relay 2
Relay 1
Door 1 exit button
Door 2 exit button
1088/2 LITE RECEIVER
BP2-
BP2+
NO2
NC2
COM2
NO1
ON
NC1
COM1
LED
Antenna
BP1+
BP1-
Ground
Signal
Buzzer
}
}
POWER SUPPLY
+/~
-/~
230V
12V
0V

DS1088-003 12
OFF ON FACTORY VALUE
S1 Operative mode Programming mode
(all other dip switches must be
in OFF)
OFF
S2 * Not used Not used OFF
S3 * APB deactivated APB activated OFF
S4 * APB 24/7 Anti-pass time OFF
S5 * APB on entry only APB on entry + exit OFF
S6 PB1 (button 1) - Relay 1
PB2 - Relay 2
PB3 - Relay 1
PB4 - Relay 2
OFF
The factory setting for the door release time is 3 seconds. However, it is possible to modify these values as follows:
- Move switch S1 to ON. S2 and S3 must be OFF. In the case of the Plus version, S2 and S3 must be OFF.
- Press the "DOOR EXIT 1" button as many times as the number of seconds required to program the door release time.
Repeat the procedure for relay n. 2, by pressing the "DOOR EXIT 2" button.
It is also possible to change the door release time at any time in remote management mode by creating a configuration
remote control.
RECEIVER SETTING
Note that dipswitches S4 and S5 are linked to the setting of S3. For example:
If S4 is OFF when S3 is ON, the anti-passback function is permanent.
* The dip switches S2-S3-S4-S5 are available only on the 1088/12 receiver.
The 1088/12 receiver can activate the "Car Detective" function (vehicle detected) at
each gate. If the gate is intended for the entry of cars only, it is in fact possible to
connect a "Loop Car Detector" device; in this case, if the car enters the "loop" area, the gate can be opened.
To connect the loop device, remove the jumpers between the BC1-/BC1+ or BC2-/BC2+ terminals and set the dip swit-
ches S3, S4, S5.
This device can be integrated with the anti-pass-back (APB) function, so that a user who has been assigned a parking
space cannot access the structure with 2 cars at the same time.
CAR DETECTIVE FUNCTION ON 1088/12 RECEIVER
DIP SWITCHES CONFIGURATION
The receiver can work both with the standalone mode or the virtual network mode.
BASIC PROGRAMMING
DOOR RELEASE TIME
Push the S1 switch to On and press the DOOR EXIT 1 button until you hear a sequence of increasingly quick beeps
indicating the erasure of the memory. A last beep will confirm the resetting of the receiver. Push S1 back to OFF. A last
beep confirms that the receiver has been reset.
Note : the master remote controls are not removed.
The top left button of the remote control operates relay 1 and the top right relay 2 when the S6 dipswitch is OFF.
When it is ON, the down left button operates relay 1 and down right button relay 2.
ATTENTION.
On remote controls registered in local mode, the two door relays can be activated simultaneously by the keys selected
via dipswitch S6; deactivation of one of the two relays can only be done via the website www.easydoorcontroller.com.
CHOICE OF KEYS ON THE REMOTE CONTROL
FACTORY SETTING RESET
Attention
If the electric lock (or electric strike) is powered by direct current, it is recommended
to insert a varistor as close as possible to the lock, such as indicated on the side:
AC power does not require this protection.
N.B. the component is supplied with the product

DS1088-003 13
ON 1088/2 ON 1088/12
REMOTE CONTROL Press button 1 of the remote control. Press button 1 of the remote control.
TAG KEY Present a master proximity key in front of the
Mifare reader
ADDING NEW DEVICES (MAX 10). On the receiver in use, set the dipswitch n. 1 to ON. The red programming LED
turns on and 3 beeps are emitted. Perform the action indicated in the table below for the device of interest:
MASTER DEVICES
A short beep confirms successful registration. After programming the last device, turn the dipswitch back to OFF. A beep
confirms exit from programming mode.
CANCELLATION OF REMOTE CONTROLS OR KEYPADS 1087/4 (both 1088/2 or 1088/12). Remove power. Move
the dipswitch n. 1 to ON and restore power. Return the dipswitch n. 1 to OFF. A beep confirms exit from programming
mode.
CANCELLATION OF TAG KEYS (only 1088/12). Move dipswitch n.1 to ON. Press and hold the door 1 exit button for 5
seconds, until the LED flashes rapidly (3 times/s). Return the dipswitch to OFF. All keys are now deleted.
ADDING NEW REMOTE CONTROLS (MAX 1500). Press the first button of a master remote control for 5 seconds, until
the receiver emits 3 beeps. Press the first button of the remote controls to be added. For each new remote control, the
buzzer will emit 1 beep. After presenting the last user remote control, briefly press the master one to exit programming
mode. The LED turns offand a beep will confirm exit from programming mode.
USER DEVICES
CANCELLATION OF REMOTE CONTROLS. Press the first button of a master remote control for 5 seconds, until the
receiver emits 3 beeps. Press the first button of the remote control to be deleted for 5 seconds. For each remote control
cancelled, the buzzer will emit 1 beep. After deleting the last remote control, briefly press the master remote control to
exit programming mode. The LED turns offand a beep confirms exit from programming mode.
ATTENTION. The cancellations described above are effective only for the locally programmed devices, not for those
that have been configured via the www.easydoorcontroller.com website, which will be discussed in the next chapter.
The devices supplied to the users (remote controls, keyboards, tag keys) can have a USER profile or a MASTER pro-
file. If a device is associated with a USER profile, it can only act on the openings of the individual gates. While if it is
associated with a MASTER profile, it can be used both for openings and to manage the programming of new devices
or those already in use.
The following paragraphs illustrate the operations that can be performed on the individual devices.
DEVICE PROGRAMMING
ADDING NEW KEYPADS 1087/4. On the controller, move dipswitch 1 to ON. Enter the MASTER code of the keyboard
(by default 0000). A beep confirms that the keyboard has been registered in the system. Return dipswitch 1 to OFF.
ADDING NEW TAG KEYS. Present a MASTER key in front of the Mifare reader for 5 seconds on the front of the reader
until the LED turns red. Present the user keys to the reader. For each new key, the LED turns green for a short time and
then turns red again. After presenting the last user key, present the master key again to exit programming mode. The
reader's LED turns off.

DS1088-003 14
Each controller/receiver has a unique serial number (displayed on the product as Receiver N°..........). When crea-
ting a new building, apartment and door site via the www.easydoorcontroller.com platform, enter the serial number
displayed on the controller to associate it with the keys/remote controls authorized to manage the gates to be opened.
Through the coding operation, the serial numbers of the controllers are registered in the remote controls, allowing
remote management of the accesses without having to physically connect to them. Subsequently, if a key or remote
control is lost, it will be sufficient to recode it online. On first use, the new key or remote control will cancel the lost one.
EXAMPLE: LOSS OF A KEY (only with 1088/12) OR OF A REMOTE CONTROL (both with 1088/12 and with 1088/2)
Step 1: first cancel the key (or remote control) on the portal.
Step 2: create a new key (or remote control), code it and send it to the end user.
Step 3: when the user presses any button on his remote control, the last remote control will be canceled and it will no
longer be authorized to access. At the same time, all authorizations of the new remote control will be transferred to the
controller. Each new key (or remote control) always contains the latest changes in the database, the controllers are
automatically updated when these keys (or remote controls) are presented to the reader.
This advanced mode allows you, for example, to manage sites from an office without connection to controllers.
Once recoded and used for the first time by the user, the new key will automatically replace the old one. Other manage-
ment functions are also available on the www.easydoorcontroller.com portal. It is always updated to the latest version
and data backup is integrated.
OPERATION
When the receiver is new, it is waiting for configuration remote controls (one per door).
From the door window of the web software, one configuration remote control per channel must be created. Then on site,
press the first push button of the remote controls.
The receiver generates one long beep plus a short one for channel 1 or one long plus two short beeps for channel 2.
FIRST START
The receiver can record the last 20000 events for the last 30 days.
From the door window of the software, an event key has to be encoded. It’s possible to select a start date and end date
or to select only some kind of events.
The receiver is supplied with the Italy time and date. If those settings need to be replaced (to manage events for
example), the web software enables to generate a clock setting remote control.
This remote control sends to the receiver the time & date which the software wrote in it. So if you plan to setup the recei-
ver at 4 pm, you must enter 4 pm in the software when you encode this remote control.
TIME AND DATA
Each time a new remote control is used with the receiver, the memory of this receiver is updated. However, it is possible
to create some update keys. Please note that this feature is only possible with Mifare keys, not with remote controls. This
means that a prox reader has to be connected to channel 1 of the receiver at least for the update.
It’s not possible to update only one of the two doors. Both doors of the same receiver need to be updated with the same
date and time.
When you present the last update key of the first door, you have one minute to present the first update key of the second
door. If no key is swiped during this time frame, the receiver generates a beep and the update is finished.
FULL UPDATE
DOWNLOAD EVENTS (ONLY FOR 1088/12)
N.B. A 2 wire reader needs to be connected to channel 1 of the receiver so the event keys can be swiped.
A normal Mifare key has enough memory for 40 events. A 4K Mifare key ref. 1088/40 manages 200 events.
In this mode, the control unit manages up to 5000 remote controls. This is the sum of authorized / unauthorized remotes
controls.
When you remove a door/gate of the key/remote access profile, the key stays in the black list of the controller.
Up to 20000 events over the last 30 days are recorded in the control units (only with 1088/12). Those offline events can
be transferred to the computer via special keys.
The key management works on read/write technology. Keys are programmed remotely at the office through a web
software and an encoder. Later, when keys are presented to the reader, the data is transferred to the control unit.
Remember that in remote mode, through the www.easydoorcontroller.com portal, it is possible to manage several func-
tions for each site, set the controllers and download the events (the latter function only with 1088/12).
VIRTUAL NETWORK MODE
On site, present the event key to the reader and wait for the reader led to become full green (flashing while transferring
the data).
After removing the key, the reader led will turn offif all events have been downloaded to the key or will flash red / green
if others events have to be downloaded.
If so, present a second transfer key (neutral key) and wait for the reader led to stay green.
Present to the reader a third key, fourth, etc. if necessary.

DS1088-003 15
4 buttons remote controls 1088/34-35
Wireless keypad: 1087/4
Stylus antenna 868MHz: 1088/55
Encoder: 1088/200
Proximity reader, 2 wires vandalproof: 1088/41-42-46-47-48*
13.56 MHz proximity keys: 1088/53*
* only with 1088/12
COMPATIBLE PRODUCTS
Link to Urmet website for manuals and updates downloading
Lien vers le site Web d'Urmet pour télécharger les manuels et les mises à jour
Link zur Urmet-Website zum Herunterladen von Handbüchern und Aktualisierungen
Enlace al sitio web de Urmet para descargar manuales y actualizaciones
1088/2 1088/12
SIMPLIFIED EU DECLARATION OF CONFORMITY
Hereby, URMET S.p.A. declares that the radio equipment type: Easy Door Receiver Lite 1088/2 and Easy Door Recei-
ver Plus 1088/12 are in compliance with Directive 2014/53/EU. The full text of the EU declaration of conformity is avai-
lable at the following internet address: www.urmet.com.
Anti-pass back is a feature which prevents a user from entering into a zone for the second time or to loan his remote to
someone else so this second person could enter with the same key. Two consecutive entries w/o exit in between are
therefore not possible. This function is only available in RF.
For example, a person who rents a car space can’t use his remote control to enter a second car as long as the first one
is in the car park.
For an anti-pass back zone to be active, place dipswitch S3 to ON. Then, two dipswitches will define how the apb should
work:
If S4 is OFF, apb is permanent. If S4 is ON, apb is cancelled after a set time which is adjustable.
If S5 is OFF, the entry only is controlled and the exit is free. In this case, you have to first get out but the exit is enabled.
If S5 is ON, then the exit is also under control. In this case, you have to come in to be able to get out and to get out to
be able to come in.
APB MANAGEMENT (UP TO 500 USERS). ONLY FOR 1088/12
OFF ON
S3 W/O APB APB active
S4 APB 24/7 Anti pass time
S5 APB on entry only APB on entry+ exit
Note. The 1088/12 receiver can manage anti-pass back for entry only or for entry + exit. The S3 dipswitch manages this
feature.
It’s also possible to manage anti-pass time (S4). After a defined delay, it’s possible to enter in the zone again.
The duration of the anti-pass time feature is settable.
Move S1 dipswitch to ON then the red led turns on. Then move S3 to ON and leave S2 OFF. The receiver is now waiting
for programming. Press the exit push button of door 1 to add 10 minutes or door 2 exit push button to add some minutes.
For example, press twice the first exit push button and 5 times the door 2 push button to setup 25 minutes.
Five secs after the last pulse, the receiver generates some long and short beeps. Each long beep corresponds to 10
minutes and each short beep to one minute. Switch S1 OFF and S2 + S3 dipswitches back to their initial position.
The max delay for the anti-pass time is 255 minutes.
APB TIME SETTING

DS1088-003 16
DIRECTIVE 2012/19/EU OF THE EUROPEAN PARLIAMENT AND OF THE COUNCIL of 4 July 2012 on waste elec-
trical and electronic equipment (WEEE).
The symbol of the crossed-out wheeled bin on the product or on its packaging indicates that this product must
not be disposed of with your other household waste. Instead, it is your responsibility to dispose of your waste
equipment by handing it over to a designated collection point for the recycling of waste electrical and electro-
nic equipment. The separate collection and recycling of your waste equipment at the time of disposal will help
to conserve natural resources and ensure that it is recycled in a manner that protects human health and the
environment. For more information about where you can drop offyour waste equipment for recycling, please
contact your local city office, your household waste disposal service or the shop where you purchased the product.
URMET S.P.A.
VIA BOLOGNA 188/C
10154 TORINO (ITALY)
Tel. +39 011.2400000
Customer Service Tel. 0112339810
http://www.urmet.com
e-mail: [email protected]
Made in France
DS1088-003
This manual suits for next models
1
Table of contents
Languages:
Other urmet domus Receiver manuals

urmet domus
urmet domus 1093 Series User manual

urmet domus
urmet domus 1094 User manual

urmet domus
urmet domus 1092/303 User manual

urmet domus
urmet domus 1092/301 User manual

urmet domus
urmet domus 1067 Series Manual

urmet domus
urmet domus 1092/316 User manual

urmet domus
urmet domus SCS Sentinel PRO AAM0119 User manual

urmet domus
urmet domus FDI 1104/941 User manual