URSUS TROTTER UT-KLAR20PW User manual

MANUAL DE USUARIO Y LETRA DE GARANTÍA
WASSERKOCHER
Hervidor eléctrico

Manual de Instrucciones
WASSERKOCHER
UT KLARPW
Lea atentamente este manual antes de usar el hervidor y
guárdelo para consultas futuras.
Importantes instrucciones de seguridad
1. Lea todas las instrucciones antes de usar el hervidor.
2. Antes de enchufar el hervidor al tomacorriente,
verique que el voltaje indicado en la base del aparato
(parte inferior del hervidor) corresponda al voltaje de
la red domiciliaria. De lo contrario, contáctese con el
distribuidor y no utilice el hervidor.
3. Evite que el cable eléctrico cuelgue sobre el borde de
mesas o mesones o esté en contacto con supercies
calientes.
4. No coloque el hervidor cerca o sobre un quemador
caliente a gas o eléctrico ni dentro de un horno caliente.
5. No haga funcionar el hervidor sin agua en el interior
para evitar dañar las piezas calefactoras.
6. Use el hervidor sobre una supercie lisa y plana fuera
del alcance de los niños, esto evitará que se pueda dar
vuelta y producir un accidente.
7. Para evitar incendios, descargas eléctricas o
accidentes, no sumerja el cable eléctrico, el enchufe y el
hervidor en agua ni en otros líquidos.
8. Mientras el agua se encuentra hirviendo, o
inmediatamente después de que el agua ha hervido,
evite estar en contacto con el vapor emitido.
9. Siempre vierta el agua hervida lenta y cuidadosamente
evitando inclinar el hervidor muy rápido.
10. Tenga cuidado al abrir la tapa para rellenar con agua
cuando el hervidor está caliente.
11. El hervidor no ha sido diseñado para ser utilizado por
personas (incluyendo niños) con discapacidades físicas,
sensoriales o mentales, o por personas que no cuentan
con la experiencia ni los conocimientos necesarios acerca
de su uso, a menos que se encuentren supervisadas
por una persona responsable de su seguridad o hayan
recibido las instrucciones de seguridad necesarias.
12. Si hay niños cerca cuando el hervidor está en uso, es
necesario supervisarlos para evitar que jueguen con el
aparato.
13. No toque las supercies calientes. Use el mango o
el botón.
14. La base del hervidor sólo se puede usar para los nes
para los cuales fue diseñada.
15. Es necesario tener mucho cuidado al mover un
aparato que contiene agua caliente.
16. El hervidor no es un juguete. Evite que los niños
jueguen con él.
17. El hervidor ha sido diseñado para uso doméstico; no
lo use en exteriores.
18. El uso de accesorios no recomendados por el
fabricante podría resultar en incendio, descarga eléctrica
o accidentes.
19. Desenchufe el hervidor cuando no esté en uso y antes
de limpiarlo; déjelo enfriar antes de instalar o retirar
piezas y antes de limpiarlo.
20. Para desconectar el hervidor, gire los controles a la
posición ‘o’ y luego desenchufe el cable eléctrico.
21. Si el cable eléctrico está dañado, debe ser
reemplazado por el fabricante, por personal de servicio
técnico o por una persona debidamente calicada para
evitar riesgos.
22. Use el hervidor sólo para hervir agua.
23. El hervidor sólo se puede usar sobre la base eléctrica
incluida.
24. Si el hervidor se llena sobre su capacidad máxima,
puede salpicar agua al hervir.
25. Siempre asegúrese de que la tapa del hervidor esté
cerrada cuando el agua está hirviendo. Se pueden
producir quemaduras si se retira la tapa cuando el
hervidor está calentando el agua.
26. El hervidor ha sido diseñado para uso doméstico y en
lugares como los siguientes:
• Espacios de cocina en tiendas, ocinas o en otros
ambientes de trabajo
• Casas
• Por clientes en hoteles, moteles o en otros ambientes
residenciales similares;
27. Guarde estas instrucciones para consultas futuras.
Este aparato puede ser usado por niños a partir de
los 8 años si están debidamente supervisados o han
recibido las instrucciones necesarias acerca de cómo
usarlo en forma segura y comprenden los riesgos
asociados. Los niños mayores de 8 años pueden limpiar
y dar mantenimiento al aparato sólo si se encuentran
debidamente supervisados. Mantenga el aparato y el
cable eléctrico fuera del alcance de niños menores de 8
años.
Piezas del hervidor
Botón para Abrir Tapa
Tapa
Boca
Carcasa
Switch
Encendido/
Apagado
Mango
Medidor
de Agua
Indicador
Carcasa

Antes de usar el hervidor
Se recomienda lavar el hervidor antes de usarlo por
primera vez; llénelo con agua hasta el nivel máximo de
capacidad, hierva el agua y luego elimínela. Limpie la
supercie exterior del hervidor con un paño húmedo.
NOTA: La capacidad máxima del hervidor es de 2 litros
Instrucciones de uso
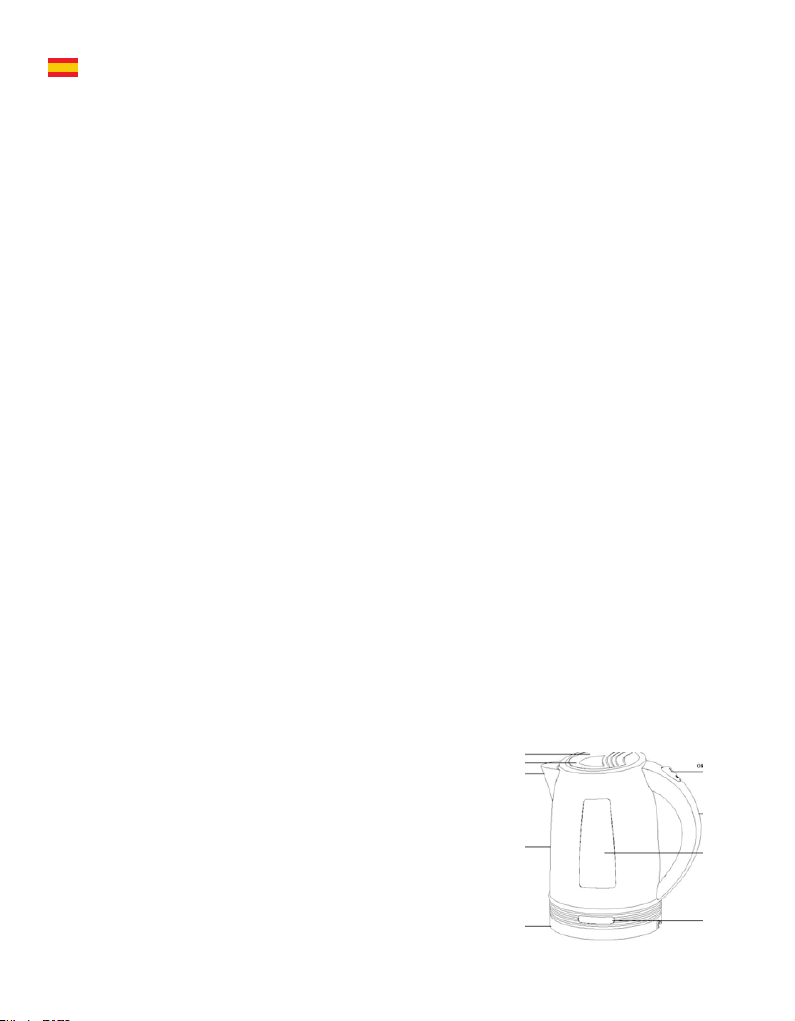
1. Instale el hervidor sobre una supercie nivelada.
2. Para llenar el hervidor con agua, retírelo de la base
eléctrica, abra la tapa presionando el botón y llénelo
con la cantidad de agua deseada. Alternativamente, se
puede llenar el hervidor por la boca.
El nivel de agua debe mantenerse entre el nivel de
capacidad mínima y máxima. Si el hervidor tiene muy
poca agua, se desconectará antes de que el agua
comience a hervir.
NOTA: No exceda la capacidad máxima de llenado ya
que puede salpicar agua al hervir. Verique que la tapa
esté correctamente instalada antes de enchufar el cable
eléctrico al tomacorriente.
3. Coloque el hervidor sobre la base.
4. Enchufe el cable eléctrico a un tomacorriente.
Presione el Switch de Encendido/Apagado; se encenderá
un indicador. El hervidor comenzará a calentar el agua
y una vez que haya hervido, el Switch de Encendido
/ Apagado se desconectará automáticamente. Se
puede desconectar el hervidor en cualquier momento
presionando el Switch de Encendido / Apagado. Si desea
calentar agua nuevamente, sólo presione el Switch de
Encendido / Apagado para reiniciar el hervidor.
NOTA: Asegúrese de que no haya ningún objeto
obstruyendo el Switch de Encendido / Apagado y que la
tapa se encuentre correctamente cerrada. El hervidor
no se desconectará si el switch está forzado o si la tapa
está abierta.
5. Retire el hervidor de la base eléctrica y luego vierta
el agua.
NOTA: Tenga cuidado al verter el agua hirviendo ya
que se pueden producir accidentes por quemaduras.
Adicionalmente, no abra la tapa cuando el agua está
caliente.
6. El hervidor no volverá a calentar el agua hasta presionar
nuevamente el Switch de Encendido / Apagado. Deje el
hervidor sobre la base eléctrica cuando no esté en uso.
NOTA: Siempre desenchufe el hervidor cuando no lo
use.
Sistema de protección
Si accidentalmente el hervidor se hace funcionar sin
agua, el sistema de protección en seco lo desconectará
automáticamente. Si esto ocurre, déjelo enfriar antes de
volver a llenarlo con agua fría y hervir nuevamente.
Instrucciones de limpieza y cuidado
Siempre desenchufe el hervidor y déjelo enfriar
completamente antes de limpiarlo.
1. No sumerja el hervidor, el cable eléctrico o la base
eléctrica en agua y evite que las piezas estén en contacto
con la humedad.
2. Limpie la carcasa del hervidor con un paño húmedo o
limpiador; no use limpiadores abrasivos.
3. Recuerde limpiar el ltro frecuentemente. Para
facilitar las labores de limpieza, retire el ltro, lávelo y
vuelva a instalarlo.
PRECAUCION: No use limpiadores químicos, de acero
o abrasivos para limpiar el exterior para evitar que pierda
el brillo.
4. Cuando el hervidor no esté en uso, puede enrollar y
guardar el cable eléctrico en la parte inferior del aparato.
Eliminación de sarro
Elimine frecuentemente el sarro acumulado en el fondo
del hervidor ya que puede reducir su eciencia de
funcionamiento. Puede utilizar los eliminadores de sarro
disponibles en el mercado y seguir las instrucciones
indicadas en el envase del anti-sarro. Alternativamente,
puede seguir las instrucciones indicadas a continuación
para eliminar el sarro usando vinagre blanco.
1. Llene el hervidor con tres 3 tazas de vinagre blanco y
el resto con agua de manera de cubrir completamente el
fondo y déjelo reposar durante la noche.
2. Al día siguiente, vacíe el agua del hervidor, llénelo
con agua limpia, hiérvala y luego elimínela. Repita
el procedimiento varias veces hasta eliminar
completamente el olor a vinagre. Si observa manchas
dentro del hervidor, elimínelas pasando un paño húmedo.
Disposición ambientalmente segura
¡Puede ayudar a proteger el medio ambiente!
Recuerde respetar las normativas locales: elimine los
electrodomésticos en desuso en los centros de reciclaje
respectivos.

Instruction Manual
WASSERKOCHER
UTKLARPW
Read this manual thoroughly before using and save it for
future reference
Important safeguards
1. Read all instructions before using.
2. Before connecting the kettle to the power supply,
check that the voltage indicated on the appliance
(underside the kettle & base) corresponds with the
voltage in your home. If this is not the case, contact your
dealer and stop using the kettle.
3. Do not let the cord hang over the edge of a table or
counter or touch a hot surface.
4. Do not place on or near a hot gas or electric burner or
in a heated oven.
5. Do not operate the appliance without anything in it to
avoid damaging the heat elements.
6. Ensure that the kettle is used on a rm and at surface
out of reach of children, this will prevent the kettle from
overturning and avoid damage or injury.
7. To protect against a re, electric shock or personal
injury, do not immerse cord, electric plugs or kettle in
water or other liquids.
8. While water is boiling, or just after the water has been
boiled, avoid contacting with steam from the spout.
9. Always take care to pour boiling water slowly and
carefully without tipping the kettle too fast.
10. Be careful of relling when the kettle is hot.
11. This appliance is not intended for use by persons
(including children) with reduced physical, sensory or
mental capabilities, or lack of experience and knowledge,
unless they have been given supervision or instruction
concerning use of the appliances by a person responsible
for their safety.
12. Children should be supervised to ensure that they do
not play with the appliance.
13. Do not touch the hot surface. Use the handle or the
button.
14. The attached base can not be used for other than
intended use
15. Extreme caution must be used when moving an
appliance containing hot water.
16. The appliance is not a toy. Do not let the children play
it.
17. The kettle is for household use only. Do not use
outdoors.
18. The use of accessories, which are not recommended
by the appliance manufacturer, may result in re, electric
shock or personal injury.
19. Unplug the kettle from the outlet when not in use and
before cleaning. Allow the kettle to cool before putting
on or taking o parts, and before cleaning the appliance.
20. To disconnect, turn any control to “o,” then remove
plug from wall outlet.
21. If the supply cord is damaged, it must be replaced
by the manufacturer or its service agent or a similarly
qualied person in order to avoid a hazard.
22. Do not use the appliance for other than intended use.
23. The kettle can only use with the stand provided.
24. If the kettle is overlled, boiling water may spill out.
25. Always ensure the lid is closed and do not lift it
while the water is boiling. Scalding may occur if the lid is
removed during the brewing cycles.
26. This appliance is intended to be used in household
and similar applications such as:
– Sta kitchen areas in shops, oces and other working
environments;
– Farm houses;
– By clients in hotels, motels and other residential type
environments;
– Bed and breakfast type environments.
27. Save these instructions.
This appliance can be used by children aged from 8
years and above if they have been given supervision or
instruction concerning use of the appliance in a safe way
and if they understand the hazards involved. Cleaning
and
user maintenance shall not be made by children unless
they are older than 8 and supervised. Keep the appliance
and its cord out of reach of children aged less than 8
years.
Know your water kettle
Lid Realease button
Lid
Spout
Body
On/o/
Switch
Handle
Water Gague
Indicator
Base

Before using your kettle
If you are using the kettle for the rst time, it is
recommended that you should clean your kettle before
use by boiling the Max capacity of water once and then
discarding the water. Wipe the surface with damp cloth.
NOTE: The max capacity of kettle is 2.0L.
Using your water kettle
1. Place the unit on the level surface.
2. To ll the kettle, remove it from the power base and
open the lid by pressing the lid release button, ll with
the desired amount of water, and then close the lid.
Alternatively, the kettle may be lled through the spout.
The water level should not exceed MAX marks or sit
below MIN level. Too little water will cause the kettle
switching o before the water has boiled.
NOTE: Do not ll the water over the maximum level, as
water may spill out of the spout when boiling. Ensure
that the lid is rmly in place before plugging the power
outlet.
3. Position the kettle on the power base.
4. Connect the plug into a power outlet. Press down
the On/O switch, the indicator will light up. Then the
kettle will start to boil the water, once the water has
being boiled the On/O switch will be o automatically.
You can shut o the power by lifting the On/O switch
at any moment during boiling water. If you want to boil
water again, only press down the On/O switch directly
to restart the kettle.
NOTE: Ensure that the On/O switch is free of
obstructions and the lid is rmly closed, the kettle will
not turn o if the switch is constrained or if the lid is
opening.
5. Lift the kettle from the power base and then pour the
water.
NOTE: Operate carefully when pouring the water from
your kettle as boiling water may result in scald, besides,
don’t open the lid while the water in the kettle is hot.
6. The kettle will not re-boil until the On/O switch is
pressed down again. The kettle may be stored on the
power base when not in use.
NOTE: Always disconnect the power supply when not
use.
Boil-dry protection
Should you accidentally let the kettle operate without
water, the boil-dry protection will automatically switch
o the power. If this occurs, allow the kettle to cool
before lling with cold water to reboil.
Cleaning and maintenance
Always disconnect the appliance from the power outlet
and cool it down completely before cleaning.
1. Never immerse the kettle, power cord or power base
in water, or allow moisture to contact with these parts.
2. Wipe the appearance of body with a damp cloth or
cleaner, never use a poisonous cleaner.
3. Remember to clean the lter at intervals. For easier
cleaning, detach the lter and then replace it after
cleaning.
CAUTION: Do not use chemical, steel, wooden or
abrasive cleaners to clean the outside of the kettle to
prevent the gloss loss.
4. When not in use, the power cord can be stored at the
bottom of the appliance.
5. When not use or storage, the power cord may be
wound under the bottom of kettle.
Removal of mineral deposits
Your kettle should be periodically descaled as the
mineral deposits in tap water may form scale at the
bottom of kettle interior so as to cause the operation
less eciency. You can use the commercially available
descaler and follow the instructions on the package
of descaler. Alternatively, you may follow the below
instructions to use the white vinegar.
1. Fill the kettle with 3 cups of white vinegar, then adding
water to the amount so as to cover the bottom of kettle
completely. Leave the solution in the kettle overnight.
2. Then discard the mixture in the kettle, then lling the
kettle with clean water, boiling and then discard the
water. Repeat several times until the odor of vinegar has
been ushed away. Any stains remaining inside the spout
can be removed by rubbing with a damp cloth.
Environment friendly disposal
You can help protect the environment!
Please remember to respect the local regulations:
hand in the non-working electrical equipments to an
appropriate waste disposal center.

POLIZA GARANTIA 24 MESES 2014 CR.ai 1 07-03-14 14:59
URSUS TROTTER SMALL APPLIANCES S.A.
Una empresa Chilena con precisión Alemana que da conanza
San Pablo - Tel.: - Fax.:
Casilla 3234- Santiago - Chile
ventas@ursustrotter.cl - www.ursustrotter.cl
Sujeto a alteración sin previo aviso.

POLIZA GARANTIA 24 MESES 2014 CR.ai 2 07-03-14 14:59

ursustrotter.cl
Table of contents
Languages:
Other URSUS TROTTER Kettle manuals

URSUS TROTTER
URSUS TROTTER UT-LECKER17R User manual

URSUS TROTTER
URSUS TROTTER UT-DUNKEL17P Installation instructions

URSUS TROTTER
URSUS TROTTER UT-HOCH18R User manual

URSUS TROTTER
URSUS TROTTER UT-REIN17SS User manual

URSUS TROTTER
URSUS TROTTER UT-MILAN18 User manual

URSUS TROTTER
URSUS TROTTER UT-LECKER18 User manual