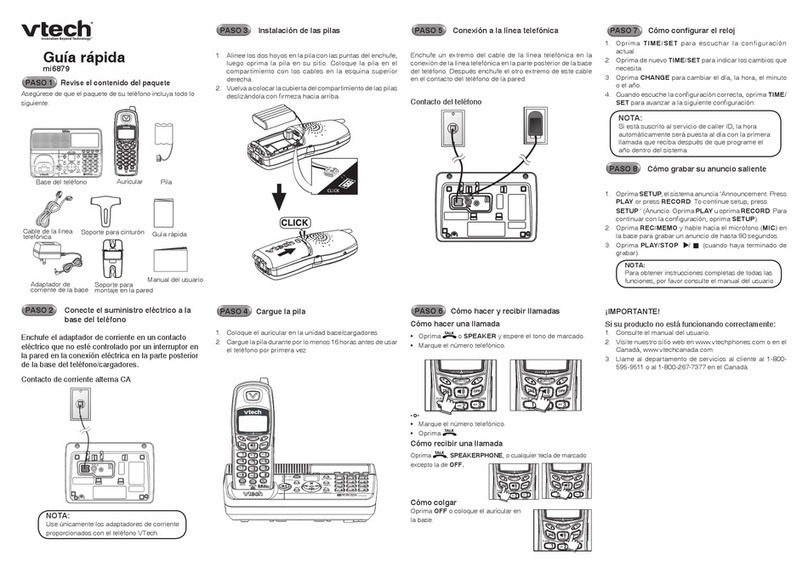
V-tech VT2900 User manual

WEiI
VTECH COMMUNICATIONSLTD.
Distributedinthe USA.by VTECH Communications, 8770 SW Nimbus Avenue
/
Beaverton,Oregon, 97008
DistributedinCanada by VTECH ElectronicsCanada Ltd., Suite 200
-
7671 Alderbridge
Way Richmond, B.C. V6X 1Z9.
Copyright 1996for VTECH COMMUNICATIONSLTD.
ISSUE
0
DlGlTA
L 900MHZ
2
LINE CORDLESS PHONE
MODEL VT2900
VTECH COMMUNICATIONSLTD.

...................................
INTRODUCTION 1
....................
...........
Parts Check List
..
2
...........
REPLACING THE BATTERIES
3
.
Charging the handset batteries
...........
3
.........
Replacing The Handset Batteries 4
IMPORTANTSAFETYINSTRUCTIONS.5
.
GETTING STARTED
.............................
7
.....................
Setting Up Your VT2900
7
...............................
AC Power Adapter 7
................................
Modular Jack Test 8
....................................
Ringer Switches
8
.............
Setting the Tone/Pulse Switch 8
.....................................
Wall Mounting 10
............................
THE LCD DISPLAY 12
..................
THE HANDSET KEYPAD 13
...................
THE BASESET KEYPAD 14
............
QUICK REFERENCE GUIDE 15
SET-UP
...............................................
15
.................................
MAKING CALLS 15
.........................
ANSWERING CALLS 15
HANGING UP
.....................................
15
..........
TO PLACE A CALL ON HOLD 15
TO MUTE A CALLWHILE YOU ARE ON
................................
SPEAKERPHONE 15
......
TO CONFERENCE TWO CALLS 15
...................
USING THE INTERCOM 15
................
I
PROGRAMMING MEMORY 15
.................................
;
NAME DIALING: 16
............................
NUMBER DIALING: 16
...................................
USING REDIAL 16
f
..................................................
HOLD 16
....................
CHANGING CHANNELS
16
.................................................
FLASH 16
.................
CLEARING THE DISPLAY 16
...........................
BASIC OPERATION 17
.......................................
Making Calls 17
.....................................
Disconnecting 17
......................
OFF Mode (STANDBY) 17
..................................
Volume Controls 17
....................
Using the Speakerphone 18
........................
To Put A Call On Hold 18
...............................
The Mute Features 19
..................
Using Both Lines At Once 19
........................
Switchingtothe Handset 20
........
Joining a Handset Conversation 20
....................................................
FLASH 20
..................................................
REDlAL 20
ADVANCED FUNCTIONS
..................
21
.......................................
Conferencing 21
.................................
Temporary Tones 22
....................
Programming The Ringer 23
......................
Changing Ringer Tones 23
.......................
Turning
Off
The Ringer 23
.................
Checking The Ringer Type 23
............
PROG and CLEAR Functions 23
..............................
Advanced Dialing 24
.............................
Changing Channels 24
............................
MEMORY DIALING 25
........................
Dialing using Location 25
...........................
DELETE THIS LINE 25
..................................................
Storing 25
............................
Dialing Using Name 27
.................
Changing Stored Numbers 27
...................
Deleting Stored Numbers 27
........................
Storing Special Codes
27
..................................
MAINTENANCE
28
............
OUT OF RANGE INDICATION 29
....................
INCASEOFDIFFICULTY
30
...................
VTECH LimitedWarranty
32
....................
FCC and IC Regulations
33
.........
TECHNICAL SPECIFICATIONS
36

Congratulations! You havepurchased
one of the mostsophisticatedcordless
telephonesonthe market! The
VT2900
has been designed to offer a new
standard in cordless telephone
technology.
Unlike most other cordless phones,
the
VT2900
digitizes your voice to
give the minimumamountof noise. In
mostconditionsyou will not be ableto
tell you are using a cordless phone.
Gone are the annoyances of static,
interference and having to listen to
other people's conversations on your
cordless phone.
The
VT2900
scrambles your voice
before it transmits it. This allows you
the security
of
knowing that no one
can tune in and eavesdrop on your
conversations. The phone will also
alertyouwhen youare "Out of Range"
evenwhen you're notusingthe phone!
In this way you will not miss an
incoming call just because you were
not close enough to the base unit.
Other special features are:
Two Line Operation
Liquid Crystal Display on Handset
20 Number Speed Dial Memory
"Name" Dialing
10 Channels of operation
Automatic Channel Selection
65,000 security code
combinations
Page/lntercom
HOLD,REDIALandCONFERENCE
features
Programmable Ringer Types
Digital Volume Adjust
Handset Volume Adjust
PHONE
CORD
JACKS
MEMORY
DIALING
CARD
SPEAKER
GRILL
LlNE
2
RINGER
ONIOFF
SWITCH
LlNE
1
RINGER
ONIOFF
SWITCH
TONEIPULSE
SWITCH
ANTENNA
OFF
KEY
LlNE
KEYS
VOLUME
UPIDOWN
KEYS
CONFERENCE
KEY
HOLD
KEY
INTERCOM
KEY
MUTE
KEY
POWER
INDICATOR
CHARGE
INDICATOR
\
\
CHARGE
CONTACTS
MAlNFEATURES
ON
BASE
UNlT
-
-
VOLUME
n
CONTROLKEYS
FLEXIBLE
ANTENNA
LCD SCREEN
LlNE KEYS
OFF KEY
DIGIT KEYS
ZERO
*.TEMPORARY TONE
PROGRAMAND
MEMORYKEY
CLEAR KEY
INTERCOM
8
CHANNEL
CHANGE KEY
CONFERENCEAND
BACKSPACEKEY
REDIALKEY
HOLD KEY
MAlN FEATURES ON HANDSET
This manual is designed to make you
familiar with the
VT2900.
We strongly
recommend you read the manual
before using your phone.
Parts Check List:
1.
Baseunit,HandsetandAC adapter
2.
One-Line Telephone Cord (clear
plugs)
3.
Two-Line Telephone Line Cord
(black plugs)
4. Battery Pack
5. Mountingscrews for wall mounting
6. Wall mount accessory
HANDSET
PARTS
INCLUDED
BASE
UNIT
AC
ADAPTER
WALL
MOUNTING
BRACKET
SCREW
WALL
MOUNTING
EATERY
PACK
CAPS
SCREWS

Charging the handset batteries
The handset of your
VT2900
cordless
telephoneispoweredby rechargeable
batteries. They charge automatically
whenever the handset is in the base.
You shouldchargethe batteriesfor
24
hours when you first receive your
phone. You'll know the batteries need
charging when:
The phone emits a dual-tone
warning when you pressthe LINE
or INTCM keys.
The battery symbol is flashing.
The handset seems completely
dead, the LCD is completely clear
and the handset does not beep
when you press the keys.
To Charge The Batteries
To charge the batteries, place the
handset in the base unit. The
CHARGE indicator will light to show
the handset isseatedproperlyandthe
batteriesarecharging. The CHARGE
indicator will flash if the handset
battery is not charged enough for the
handsetto operate. Once the battery
reaches the minimum level neededto
operate, the CHARGE indicator will Replacing The Handset Batteries
illuminatesteadily and the battery will
continue to charge up to its full Follow the steps below:
potential. It is recommended that the
1.
Remove the battery case by
battery be charged for
24
hours pressing down on the release tab
during the initial charge. After this above the battery and then sliding
initialcharging, an overnight charge of the batten/ downward.
8
to
10
hours should be sufficient to
t
fully charge the battery. You can use
your telephone before that with
diminishedcapacity,but it isbestto let
them charge fully. To maximize the
charge capacity of the NiCad battery
pack, recharge the batteryfor several
cycles. The meximum battery life
between charges is
5.5
hours of
continuous talk time or
6
days of
standby.
I
IT'S IMPOSSIBLE TO OVER-
CHARGE THE BATTERIES
I
If the Batteries Don't RechargeThe
battery pack can be recharged many,
manytimes butif youget alow-battery
signalevenafter
24
hoursof charging,
I
BATTERY CONNECTION
the battery pack should be replaced.
To purchase replacement battery
packs, call VTECH Cornmunicat-
ions at
1-800-624-5688.
2.
Discardthe old battery pack. Don't
put the old battery pack in a trash
compactor or afire
-
it could burst.
InCanada, call VTECH Electronics
3.
Slide the new battery pack on its
at
604-273-51
31.
track up until it is firmly in place.
CAUTION:
To Reducethe Riskof Fireor Injuryto
Persons, Read and Follow the
Instructions
1.
Use only VTECH battery.
2.
Do not dispose of the battery in a
fire. The cell may explode.
IMPORTANT
:
Do not dispose of this
battery into household garbage.
For information on recycling or
proper disposal,~consultyour local
solid waste collection or disposal
organization.
3.
Do not open or mutilatethe battery.
Released electrolyte is corrosive
and may cause damage to the
eyes or skin. It may be toxic if
swallowed.
4.
Exercisecare in handlingbatteries
inorder notto short the batterywith
conductingmaterialssuchas rings,
bracelets,and keys. The batteryor
conductor may overheat and
cause burns.
4.
The new battery pack must be
charged before using your
telephone. Place the handset in
the cradleof the base unitto allow
it to charge for
24
hours.

When usingyourtelephoneequipment,
basicsafetyprecautionsshouldalways
be followed to reduce the risk of fire,
electric shock and injury to persons,
including the following:
1.Read and understand all
instructions.
2.
Followallwarnings andinstructions
marked on the product.
3.
Unplug this product from the wall
outlet beforecleaning. Do not use
liquidcleanersoraerosolcleaners.
Use a damp cloth for cleaning.
4.
Do not use this product near water
(for example, near a bath tub,
kitchen sink, or swimming pool).
5.
Do not place this product on an
unstable cart, stand, or table. The
product may fall, causing serious
damage to the product.
6.
Slots and openings in the cabinet
andthebackorbottomareprovided
for ventilation. To protect it from
overheating, these openings
must not be blockedby placingthe
product on the bed, sofa, rug, or
other similar surface. This product
should never be placed near or
over a radiator or heat register.
This product should not be placed
inabuilt-ininstallationwhereproper
ventilation is not provided.
7.
This product should be operated
only from the type of power source
indicated on the marking label. If
you are not sure of the type of
powersupplytoyour home,consult
your dealeror localpowercompany.
8. Do notallow anythingto restonthe
power cord. Do not locate this
product where the cord will be
abused by persons walking on it.
9.
Neverpushobjectsof any kindinto
this product through cabinet slots
as they may. touch dangerous
voltage points.or short out parts
that could result in a risk of fire or
electricshock. Never spill liquidof
any kind on the product.
10.Toreducethe riskof electricshock,
do not disassemble this product,
buttake itto aqualifiedserviceman
when some service or repair work
is required. Opening or
removing cabirlet parts other than
specifiedaccessdoorsmayexpose
you to dangerousvoltagesor other
risks. Incorrect reassemblingcan
cause electric shock when the
appliance is subsequently used.
11.Do not overload wall outlets and
extension Cords as this can result
in the risk of fire or electric shock.
12.Unplug this product from the wall
outletandreferservicingto qualified
service personnel under the
following conditions:
A.
When the power supply cord or
plug is damaged or frayed.
B.
If liquidhasbeenspilledintothe
product.
C. Ifthe producthasbeenexposed
to rain or water.
D. If the productdoes not operate
normally by following the
operating instructions. Adjust
only those controls that are
covered by the operating
instructions because improper
adjustment of other controls
may result in damage and will
often require extensive work
by a qualified technician to
restore the product to normal
operation.
E. Ifthe producthasbeendropped
and the cabinet has been
damaged.
F. If the productexhibits a distinct
change in performance.
13.Avoid using a telephone (other
than a cordless type) during an
electrical storm. There may be a
remote risk of electric shock from
lighting.
14.Do not usethe telephoneto report
a gas leak inthe vicinityof the leak.
SAVE THESE INSTRUCTIONS

Setting Up Your
VT2900
1. Choose an area near an electrical
outlet and a telephone wall jack.
2.
Connect your telephone Line
Cord(s). If you knowwhat types of
telephonejacks you have,proceed
with the appropriate steps below.
If you are notsure whether you
have two-line jacks or one-line,
perform the Modular Jack Test on
page
8.
If you have two telephone lines
installed on a single jack (type
RJ-14), usethe two linecordsupplied
with your phone (the one with the
black plugs at each end). On the
base, plugone endof the cordintothe
jack marked"L1 OR LllL2. Plug the
other end intothe two-line jack inyour
wall. Now proceedto page
8
Modular
Jack Test.
Note: For two-line operation, you
must have two telephone lines (with
two telephone numbers) installed by
your local telephone company. If you
have only one telephone line, this
phone will still operate, but only as a
single line phone.
You cannot connect this ~h0neto a
two-line jack and a single:line jack at
the same time. You can only connect
it to two single line jacks, or to one
two-line jack.
Ifyou havetwo telephone numbers
installed on two separate jacks,
(type RJ-11) both jacks must be
within reach of your phone. You will
need to use both line cords supplied
(the one with the clear plugs and the
one with the black plugs).
On the base unit, plug one of the line
cords into the jack marked "L1 or L1/
L2". Plug the other end of the cord
into the wall jack that you want
designatedas LlNE 1 on your phone.
Plugthe other line into the jack on the
base unit marked "L2. Plugthe other
end of the cord into your other wall
jack. The line inthis jack will be LINE
2 on your telephone.
AC Power Adapter
Plug the AC power adapter into an
electrical outlet.
AC ELECTRICAL TELEPHONE
OUTLET WALL JACK
Modular Jack Test
Perform this test if you aren't sure
whether you have two-line jacks or
single-linejacks. If you already know
which types of jacks you have, skip
this test and proceed on to the next
section.
To test a jack.
1 Use the telephone line cord with
the black plugs supplied with this
phone. Plug one end in the base
"L1 or LIlL2". Plug the other line
into the wall jack you want to test.
2.
Plugthe AC adapterintoastandard
electrical outlet and connect the
DC plug into the telephone base.
3. Onthe base unit, press LlNE 1and
release it. You should hear a dial
tone over the speaker. Adjust the
volume controlto a suitablesetting
if necessary.
4.
Press OFF, and the dial tone will
stop.
5.
Now press LlNE 2 and release it.
If you hear a dial tone over the
speaker, it means there are two
lines coming from that one jack.
If you don't hear a dial tone, it
means the jack has only one line.
Follow the steps above for each
jack youwant to test. When you've
determined which types of jacks
you have, connect your line cords
as described in the previous
section.
If you don't hear any dial tone on
a jack, there may be a problem
with the jack or the wiring in your
home. (seepage30, 'INCASEOF
DIFFICULTY').
Ringer Switches
If you want both telephone lines to
ring when calls come in, set both
switches on the base to ON.
If you want to turn off the ringfor one
or both lines set the appropriate
switch or switches to OFF. When a
ringer switch is set to OFF, the ringer
tone for that line is turned off at the
base.This does not affectthe handset
ringer (see page 23, Programming
the Ringer).
Setting the Tone/Pulse Switch
Set the TONEIPULSE switch on the
base unit. If you have touch tone
service on both you phone lines, set
the switch to TONE. If you have
rotary (Pulse) service on either of the
phone lines,set the switchto PULSE.
TONEPULSE LINE
1
RINGER LlNE
2
RINGER
SELECTOR ONIOFFSWITCH ONIOFFSWITCH
You cannot select TONE for one line
and PULSEfor the other. Bothwill be
either TONE or PULSE.
CHARGETHE HANDSET BAlTERY
PACK BEFORE USE.
The battery pack recharges
automaticallywheneverthe handsetis
in the base unit. The batteries must
be chargedfor
24
hoursbefore using
your phone for the first time.
Fill in the telephone number card on
the base unit. To removethe window,
insertthetip of a paperclipor peninto
the hole, and gently flex the window.
Check for a dial tone. After the
batteries are charged, pick up the
handset. Now press LlNE
1
on the
handset. The LlNE
1
indicatorshould
light up on the LCD, and you should
heara dialtone. If not, see 'IN CASE
OF DIFFICULTY' on page 30.
CAUTION:
1.
Never install telephone wiring
during a lightning storm.
2. Neverinstalltelephonejacks inwet
locations unless the jack is
specifically designed for wet
locations.
3. Nevertouch uninsulatedtelephone
wires or terminals unless the
telephone line has been
disconnected at the network
interface.
4.
Use caution when installing or
modifying telephone lines.
WALL INSTALLATION USING
MOUNTING SCREWS PROVIDED
Tools You Will Need:
A
hammer, a
nail,a pencilor ballpointpen, a Phillips
head
(+)
screwdriver, and the Wall
Mounting Template included in the
back of this booklet.
1.
Choose a spot near an electrical
outlet and a telephone jack.
Your phone requires a modular
telephone jack and a standard
electrical outlet (120v AC). The
power cord is six feet long; make
sure there is an electrical outlet
within reachof the base.The outlet
should not be controlled by a wall
switch. If the switch is ever turned
off, the phone will not operate.
2.
Choose and mark the mounting
position.
The mountingscrewsshouldscrew
into a wooden stud within the wall-
they will not hold securely in
wallboardalone. Locate awall stud
in the area where you want to
installyour telephone. Use the Wall
MountingTemplate and a pencil to
mark the screw positions on the
wall over the stud (Figure 1). Put
the template aside.
3.
Installthe mounting sleeves and
screws.
Start the screw holes by lightly
tapping a nail into the marks you
made on the wall. Removethe nail
from the wall. Nowslipthe mounting
sleevesonto the screws as shown,
with the smaller end of the sleeve
Figure1
Figure2
toward the screw head. Insert the
screws into the holes you started.
Tighten the screws until the large
end of the mountingsleeve is flat
against the wall
(Figure 2).

4.
Position the wall mount adapter
on the base.
Lineup the tabs on the wall mount
adapter with the holes on the
bottom of the base (Figure
1).
Snapthe wall mount adapterfirmly
in place.
1
5.
Mount the base on the
wall.
I
Positionthe base so the mounting
studs will fit into the holes on the
bottom of the base. Position the
power cordtoextenddownthewall
the phone is to be mounted on.
i
Slide the base down on the
I
mounting studs until it locks into
I
place.
I
6.
Connect the telephone linecord.
The telephone line cord has a
snap-in plug at each end. lnsert
oneof theplugsintothejack on the
bottomof the base. Insertthe other
end of the plug into the wall jack.
7.
Plugtheac adapter onthe power
cord into an electrical outlet
(Figure 2).
8.
Set the Dial Mode switch on the
base unit.
If
you have touch tone service on
your phone line, set the switch to
TONE. If you have rotary service,
set the switch to PULSE (Figure
3).
.
Figure
1
Figure
2
LlNE
2
RINGER
ONlOFFSWITCH
LlNE
1
RINGER
OWOFFSWITCH
TONEPULSE
SELECTOR
Line
2
Indicator
INTERCOM
Indicator
,-
Memory Mode Indicator
Line
1
lndicator7
7
I
/--
Name DialingIndicator
Low Battery
7
\
\
7
EarpieceVolume
Indicator Level Indicator
PROGRAM
lndicator
LOW BATTERY lndicator
4
)
))
VOLUME lndicator shows
Flashes when the unit is in a low- the handset volume setting. This
batterycondition.Thehandset typically indicator is always on provided the
operates for at least
5
minutes after handsetbattery has sufficientcharge.
the low battery indication is given. If If this indicator is not on, the handset
PHONEor INT.COM is pressedduring will not function.
alow batterycondition,awarning tone
is also generated.
nn
AA
LINE1 LINE2
(
PROGRAM Indicator
Indicators illuminate when the line(s) illuminateswhenthe unitisinprogram
is active. If the line(s) is occupied by mode. The name indicator will also
the base, the indicator
(s)
will flash illuminate for name programming.
slowly; if the line(s) is on hold, the
indicator(s) flash quickly.
[m)
INTERCOM lndicator
illuminateswhen an intercom link has
been set-up between base and
handset.
[m)
MEMORY Indicator
illuminateswhen the unitis in memory
dialing mode.
.
(NAME)
NAME ndicator
illuminateswhen the unit is inmemory
name dialing mode.
Figure
3

I
FLEXIBLEANTENNA
LCDSCREEN
LINE KEYS
OFF KEY
DIGITKEYS
ZERO
>f:
,
TEMPORARYTONE
PROGRAMAND MEMORY
CLEAR KEY
INTERCOM
&
CHANNEL
CHANGE KEY
CONFERENCEAND
BACKSPACEKEY
REDIALKEY
HOLD KEY
KEY
MAlN FEATURES ON HANDSET
\.
2 LINE
MHz
CORDLESS
PHONE
bmzl
MEMORY
DIALINGCARD
/
w
SPEAKER GRILL
--
ANTENNA
OFF KEY
LINE KEYS
VOLUME
UPIDOWN
KEYS
CONFERENCE
KEY
INTERCOMKEY
MUTE KEY
HOLD KEY
POWER
INDICATOR
CHARGE
INDICATOR
\
\
CHARGE
CONTACTS
MAlN FEATURES ON BASE UNIT

Here's a brief guide to the features
andfunctionsofyour VT2900cordless
telephone:
SET-UP
Connect telephone line cord(s) to
base unit and telephone jack(s).
(Page
7)
Plug AC adapter into a standard
electrical outlet. (Page
7)
Set DialMode switchto PULSE or
TONE. (Page
8)
Set Base Ringer switches to ON.
(Page
8)
Lethandset batterieschargefor 24
hours
before first use. (Page
3)
MAKING CALLS
Press a LlNE key button on the
handset. When the LlNE indicator
lightsandyou heara dial tone, dial
the number.
ANSWERING CALLS
To answer a call on the handset,
press the LlNE key of the ringing
line. The handset will not auto-
answer when lifted off the base
cradle.
To answeracallonthe base, press
the LlNE key of the ringing line.
HANGING UP
For the handset, press OFF or
place.the handset in the base
cradle.
For the base, press OFF.
TO PLACE A CALL ON HOLD
Press HOLD on the handset or
base. Press the appropriate LlNE
key to return to the call.
TO MUTE A CALLWHILE YOU ARE
ON SPEAKERPHONE
Press MUTE on the base.
The MUTE indicator will light and
the speakerphone microphonewill
be cut off.
Press MUTE again to return to
normal speakerphone operation.
TO CONFERENCETWO CALLS
At leastone of the calls must be on
hold. Press CONF to conference
the calls. This can be done on
base (using speakerphone) or
handset.
USING THE INTERCOM
Fromthe handset, press INTCMto
signal the person at the base unit.
he
base unit will ring once and
then the intercom will be
automaticallyactivate. The person
atthe basethenspeakstowardthe
microphone-just like using the
speakerphone.
To page from the base, press
INTCM.The personat the handset
presses INTCM to activate the
intercom.
To end an intercom conversation,
press OFF.
To useintercomduringatelephone
conversation,putthe active line on
HOLD, then press INTCM (on the
base)or INTCM (on the handset).
PROGRAMMING MEMORY
The phone should be OFF. Enter
the number you wish to store on
the LCD.
Press and hold the MEMIPROG
key until the PROG indicatorturns
on.
Enterthe two digit memorylocation
(00 .. 19), the NAME indicator will
then turn on.
Enter the six character name and
pressMEMtostoreor simply press
MEMto bypassnameprogramming
and store the number.
NAME DIALING:
Press a LlNE key.
Press MEM. Make sure NAME is
displayedon the LCD. If not, press
MEM again.
Begin enteringthe name you wish
to dial. As soon as there is a
match, the number will appear on
the screen and will be dialed out.
NUMBER DIALING:
Press a LlNE key.
Press MEM. Make sure NAME is
NOT displayedon the LCD. If it is,
press MEM again.
Enter the memorv location of the
number you wis(to dial (00..19).
The number will be displayed on
the LCD and will be dialed out.
USING REDIAL
Press a LINE key, then REDIALto
automatically redial out the last
number you dialed on either line.
HOLD
When using the handset or
speakerphone, press HOLD to put
a call on hold.
To returnto the call, pressthe held
LINE key.
CHANGING CHANNELS
Press the CHANIINTCM key to
change the channel. The display
will briefly show the new channel
number.
FLASH
You can use your VT2900cordless
telephone with services such as
Call Waiting and Call Forwarding.
Instead of pressing the switch-
hook, press the LINE key of the
line you are talking on.
After pressing the line key, wait
2
seconds or check that a dial tone
is present before dialing.
CLEARING THE DISPLAY
The display can be cleared by
pressing and holding the CLEAR
key for about a second until the
display clears.

Making Calls
You can make calls directly from the
handset whether you are at the base
or away from it. You cannot make
calls on the speakerphone inthe base
but you can answer calls from the
base.
From the handset
Pick upthe handsetand pressa LlNE
key. When you hear a dial tone, dial
the number. The LlNE indicator for
the line you are using will turn on.
TO
MAKE
A
CALL
PRESS
A
LlNE
KEY,
EITHER LlNE
1
OR
LlNE
2
PRESS
OFF
IF
YOU
MAKE
A
MISTAKE
WHEN
DIALING.
OR
TO
HANG
UP.
NOTE: There are two different
ways to dial out a number:
1.
Pressthe LlNE key and wait for
a dial tone. Then dial out the
number you want.
2.
Enter the number onto the
displayfirst, then pressthe LlNE
key. This will dial out the
number that isdisplayed onthe
LCD after
2
seconds. (See
Advanced Dialing on page
24).
If you make a mistake when dialing,
press OFFto hang up, then pressthe
LlNE key and wait
2
seconds to
get a dial tone again.
Disconnecting
To end acall, either placethe handset
back inthe base, or press OFF on the
handset.
OFF Mode (STANDBY)
When the unit is OFF the display will
be clear except for earpiece volume
indicator.
If the screen is completely blank it
meansthatthe batteryisnotconnected
or has insufficient charge to operate
the handset.Placethe unit inthe base
to recharge the battery. The base
charge indicator will stop flashing
whenthe handsetbatteryhas received
the minimum charge necessary to
operate.
Volume Controls
Both the base unit and the handset
have digital volume controls. The
volume controlsfor the speakerphone
are located on the front face of the
base unit. Press the volume up side
to increase the speaker volume and
the volume down side to decrease the
volume. Holdingeither side down will
continuouslychange thevolume setting
at the rate of
4
steps per second on
the base and
2
steps per second on
the handset.
.
.
VOLUMEUPIDOWNCONTROL
The volume controls for the handset
are located on the side of the unit.
Press the
A
(up) or
V
(down)
keys to increase or decrease the
volume. Holdingeither key down will
continuously change the volume
setting. The ear piece volume level
indicator will change accordingly.
VOLUME
CONTROL
KEYS
Using the Speakerphone
You cannot make calls from the
speakerphone. However, you can
answer calls from the speakerphone
by pressing the LlNE key for the
incoming call.
It does not matter whether or not the
handset is in the base
-
you can use
the speakerphone in either case.
To end a call on the speakerphone,
press OFF.
TO ANSWER A CALL TO ENDA CALL
FROMTHE BASE PRESS FROMTHE BASE
LlNE
1
OR LlNE
2
FOR PRESSOFF
THE INCOMINGCALL
To Put A Call
On
Hold
While using the speakerphone or the
handset, you can put a call on holdby
pressingHOLD. The holdindicatoron
the base unit will flash to show that a
call is on hold.
Onthe handset,the LlNEindicatorwill
flash quickly to show that the line is
on hold.
To return to the call, Dress the LlNE
key on the handset o; the base.

If a call is on HOLD usingthe
VT2900
andyou pickup another phoneonthe
same line, the
VT2900
will take itself
off HOLD and turn OFF. Therefore,
you do not have to go back to turn the
phone OFF if you go to another
extension. It is done automatically.
The Mute Feature
When you press MUTE while using
the speakerphone, you can hear the
caller's voice, but they can't hear you.
Use this feature to speak to someone
inthe roomwithoutyour caller hearing.
While the call is muted, the MUTE
indicatorwill be lit. To go back to the
two-way conversation, press MUTE
again.
Thisfeatureisalso helpfulwhen using
the speakerphone in a noisy room.
(Loud background noise can prevent
your caller's voice from coming over
the speaker). PressMUTEwhile your
caller isspeaking. Press MUTEagain
when you are ready to speak.
Using Both Lines At Once
If your usingyour handsetto carry on
a conversation on one line, it is
possible to use the other line to
answer a call, make a call or use the
intercom
-
all without disconnecting
your first call.
If someone is usingthe speakerphone
or another extension to talk on one
line, you can still use the handset to
makeor answer callson the other line.
You can also link both lines together
to have a three or four-way
conversation. See Conferencing on
page
21.
If you press HOLD to place a call on
hold, you can use the other line as if
it were a second phone.
For example, if the second line rings
when you are on
a
call, press HOLD
to put the first call on hold. Press the
LlNE key of the incoming call. To
switch back to your original call, press
the LlNEkey of the original call which
is on hold.
To hang up the second call but still
keepthe first callon hold,simply press
OFF.
You can also placethe second call on
holdand returnto the first. Just press
the LlNE key of the original call, the
other call will automatically be put on
hold. This issame as pressingHOLD,
then the LlNE key.
NOTE: If youwant to switchto another
linewithout disconnectingyour current
call, you can also simply press the
other line. This will automatically put
your first call on HOLD and connect
you to the second call. The only way
to disconnecta call is to have the call
active and press OFF.
Switching to the Handset
If the handset is in the base, vou can
switchfromthe base by pickingupthe
handset and pressingthe appropriate
LlNEkey. PressOFF on the baseunit
to disconnectit from the conversation.
To switch back to the speakerphone,
you must first press the appropriate
LlNE key on the base, press OFF on
the handset, then place the handset
back in the cradle.
NOTE: You cannotswitch back to the
speakerphone just by returning the
handset to the base
-
that will
disconnect the call.
-
-
-
--
Joining a Handset Conversation
If someone isspeakingon the handset,
you can join the conversation on the
speakerphone. Just press the
appropriate LlNE key on the base
unit. This is just like picking up an
extension.Either party can then leave
the conversation by pressing OFF.
Likewise, if you are using the
speakerphone, someone at the
handset can join the conversation by
pressingthe appropriate LlNE key on
the handset, then leave by pressing
OFF.
The callwill remainconnectedas long
as either the handset or the
speakerphone remains on the line.
(To disconnect the call, both the
handset and the base unit must hang
UP.)
FLASH
You can use your
VT2900
cordless
phone with services such as Call
Waiting and Call Forwarding. Instead
of pressing the switch-hook (as you
would on a regular phone) press the
LlNEkeyof the lineyou aretalkingon.
This feature is not available during
conference calls.
When flashing the line in order to dial
a new number, wait
2
seconds or
check that dial tone is present before
dialing.
REDIAL
To
REDIAL
the last numberyou dialed
out, press a LlNE key then press
REDIAL.The phone willautomatically
dial out the number. The number will
be shown on the display.

Conferencing
This feature allows you to link both
lines together to hold a three-way
conversation between you and the
parties on LINES
1
and
2.
You can
also hold a four-way conversation
between yourself, a person on the
speakerphone, and LINES
1
and
2.
You can hold a conference call at
either the handset or the base.
However, only the handset can dial
out calls
To establishaconference callatthe
handset:
1.
Dialone party on one of your lines.
After you are connected, press
HOLD.
2.
Press the other LlNE button and
dial the second party.
3.
When the second call is
established, press CONF to bring
both parties into the conversation.
Both LINE indicators on the display
will be on while the three parties are
connected.
NOTE: PressCONFto link any two
callsthat are bothonhold, whether
you calledthem or they called you.
CONFERENCE
CALLING
FROM
THE HANDSET
MAKE
OR
RECEIVE
CALL
ON
LlNE
1
OR
LlNE
2
PRESS
HOLD
TO
PLACE
THIS
CALLON
HOLD
MAKE
OR
RECEIVE
ANOTHER
CALL
ON
THE OTHER
LINE.
.
PRESS
CNFIBSP
TO
BRING
BOTH
PARTIES
INTO
THE
CONVERSATION
Conference calls on the
speakerphone:
If you are using the speakerphone
and a second call comes in, put the
first call on hold and press the LlNE
button to answer the second call.
You can now press CONF and have
aconferencecallwithbothlinesif you
wish.
To switch a conference call from the
handset to the base, press LlNE
1
or LlNE
2
onthe speakerphone and
then press OFF on the handset. To
switch a conference call from the
base to the handset, press LlNE
1
or LlNE
2
on the handset and then
pressOFF onthe base. Alternately,
you can also put both the calls on
hold by pressing the HOLD key and
then pressingthe CONF key on the
end where you wish to pick up the
call again.
To join athree-wayconferencealready
in progress, press LlNE
1
or LlNE
2
on the base if the conferenceis at the
handset. If the conference is at the
base, press LlNE
1
or LlNE
2
at the
handset.
CONFERENCE CALLING FROMTHE BASE
If you are using the speakerphone and a second call
comes in, put the first call on HOLD and press either
LlNE 1 or LlNE 2 to answer the second call.
You can now press CONF to bring both parties into
Ihe conversation.
To end a conference call:
If you wish to end a conference call
with one of the parties,pressthe LlNE
keyof the callyou wish to discontinue.
This will put the other line on HOLD.
Press OFF to disconnect the active
line. Press the LlNE key of the line
you wish to continue talking to.
To end the entire conferencecall and
disconnect all parties, press OFF
while both lines are active.
To put a conference call on hold:
Press HOLDto holdbothlines. Press
CONFto releasethe holdandcontinue
your conference call.
To talk privately with one caller:
1.
Press the LINE key of the person
you want to speak with privately.
This will automaticallyputthe other
call on HOLD.
2.
Press CONF to continue your
conference call.
Temporary Tone
If you have a rotary (dial-pulse)
telephone service, (TONEIPULSE
switch is set to PULSE), this feature
allowsyou to enter special codes and
tonesto operateansweringmachines,
useelectronicbankingservices,calling
cards, or other special services.
First, dial the call normally. Then
activate the Temporary Tone feature
by pressing TONE (the
*
key). You
canthen pressthe numbersor symbols
you need, and your phone will send
the proper signals.
To endthecall, pressOFFor placethe
handset back inthe base. The phone
will automatically go back to rotary
(dial-pulse) service.
If you havetouch-toneservice, (TONE/
PULSE switch set to TONE), just
enterthe codes normally. This feature
isonlyfor touchtoneservicetelephone
lines.
11
Ir
PRESS
TONE
(the
'
key)

Programming The Ringer
The handset ringer is capable of four
differenttypes of ringertones for each
line. The following sections detail how
to change the different tones and to
turn off a ringer on the handset.
Changing Ringer Tones
To program, the handset must be
OFF.
To select a different ringer type do the
following:
Press and hold PROG until the
PROG symbol appears on the
display.
Press the # key.
Press:
1
for Handset LlNE
1
2
for Handset LlNE
2
3
for Baseset LlNE
1
4
for Baseset LlNE
2
ringer. The LCD will show what
ringer is being programmed.
I
PROG
I
Press
1,2,3
or
4
to select a ringer
type.
Press MEM or OFF to store.
PROGRAMMING
THE
RINGER
TYPE
HANDSET
MUST
BE
OFF
PRESS
AND
HOLD PROG
UNTILTHE
PROG
SYMBOL
APPEARS
ON
THE
DISPLAY
3
for
Baseset
LlNE
1
4
for
Baseset
LINE
2
PRESS
1
2
3
or
4
TO
SELECT^
~~NGER
TYPE
PRESS
MEM
or
OFF
TO
STORE
THE
RINGER
Turning Off The Ringer
To turn off the ringer for a particular
line do the following:
Press and hold PROG until the
PROG symbol appears on the
display
Press the
#
key
Press
1
for Handset LlNE
1
ringer,
2
for Handset LlNE
2
ringer.
Press
5
to turn off the ringer
Press MEM or OFF to store.The
base ringers are controlled by
ONIOFF switches.
CheckingThe Ringer Type
To test the present ringer type for a
particular line do the following:
Press and hold PROG until the
PROG symbol appears on the
display
Press the
#
key
Press
1
for Handset LlNE
1
ringer,
2
for Handset CINE
2
ringer,
3
for
Base LlNE
1
ringer, or
4
for Base
LlNE
2
ringer
Press
0
to test the ringer
Press MEM or OFF to exit
PROG and CLEAR Functions
The PROGand CLEAR functionscan
be accessedby pressing and holding
the relevant key. For example, to clear
the display, press and holdthe CLEAR
key for
2
seconds until the display is
cleared. To enter program mode
press and hold the MEM key for
2
seconds.
Advanced Dialing
There are two different ways to dial
out a number:
1
Press the LlNE key and wait for a
dial tone.Then dial out the number
you want either manually, using
MEMORY (MEM) dialing or using
REDIAL.
2
Enter the number you wish to dial
onto the display first. Then press
the LlNE key.This will dial out the
number which is displayed on the
LCD.
NOTE: The phone will dial out any
numberwhich isshownonthe display.
If you do not want to dial the number
shown on the LCD, it can bechanged
by:
Use the CNFIBSP key to
backspace one digit for each
keypress. Additional digit$can be
entered. Press a LlNE key to dial
the new number.
Press and hold CLEAR until the
display is cleared, then dial
normally.
Press the OFF key to clear the
display, then dial normally.Wait for
the display to clear, then .press
LlNE and enter the number you
wish to dial.
Changing Channels
In the unlikely event you notice
interferencewhen usingyour handset,
pressthe INTCMICHANkeyto switch
to another channel. The display will
brieflyshow the new channel number.
This has nothing to do with your two
phone lines
-
only the radio link
between the handset and base.
If the noise continues, see 'IN CASE
OF DIFFICULTY' on page
30.
CHANGING
CHANNELS
In
the
unlikely
event
you
notice
interference
when using
your
handset,
press
the
INT.COM/CHAN
key
to
switch
to
a
new
channel

The
VT2900
is capable of two modes
of memory dialing. You can dial out
by pressingthe memory location (e.g.
15) or by entering the person's name
(e.g."BOB). We suggestthatnumbers
be stored with the person's name to
which the number belongs.
When dialing out you can use either
the person's name or the memory
location. Use the
MEM
key to toggle
betweenNAMEdialingandLOCATION
dialing. When youaccessthe memory
dialing option the NAME indicatorwill
be on to indicate the phone is in
NAME
dialing mode. If the symbol is
off, the phone is in LOCATIONdialing
mode. Once you have selected a
mode,the phonewill stay inthat mode
until it is changed by the user.
Dialing using Location
If you wish to dial out the number
stored ina particular memory location
(e.g.
15)
then do the following:
1. Press the
LlNE
key to get a dial
tone.
2.
Press
MEM.
Checkthatthe
NAME
symbol is not on the display. If it
is on, press
MEM
again.
3.
Enter the memory location you
wish to dial out. E.g.
15.
The
number stored at that location will
be shown on the display
and will automatically be dialed
out.
The numberstored inthis locationwill
be dialed out.
You can also review the contents of
the memory locations when you are
not connected to a line. When the
phone is
OFF,
press
MEM
and you
can scroll through the memory
locations by usingthe
*
and
#
key. If you wish to dial out a number
shown press a
LINE
key. The phone
will exit MEMORY,modeand dial the
number displayed. Otherwise, press
OFF
to exit MEMORY mode.
Storing
To program a MEMORY location, do
the following:
Withthephonein
OFF
mode,enter
the telephone number you wish to
store.
(16
Digits Maximum).
Enter program mode by pressing
and holding the
MEMIPROG
key.
The
PROG
and
MEM
indicators
will appear in the display.
Enterthe memory location(00..19)
you wish to storethe number in.As
soon as the second memory
locationdigit is entered, the
NAME
indicatorwill turn on and
6
dashes
will appear. If you do not wish to
store a name with this number,
simply press the MEM key. You
should hear a "HappyTone', if not
the programmingwas in error, and
you willneedto repeatthe process.
Enter a six character name to
store with the number. Use the
letters on the keypad. For a
space, you can use the
1
key.
Example: 'PEGGY
'
would be
entered by pressing
7,3,4,4,9,1
(P-E-G-G-Y-SPACE).
Each dash
will change to an under score as
the letters are entered.
Press
MEM
to store and exit. A
Happy tone will be generated if
programming was successful.
Otherwise,the unit will generate a
sad tone and display:
NOTE:
The name
MUST
have six
characters. If the name you wish to
enter has lessthan six characters,use
the space symbol to fill in the rest or
use part of the person's last name.
If the nameyou wish to enter is longer
than six characters,just put in the first
six characters.
When you dial using NAME, you will
usually not need to enter in all six
characters. You will only needto enter
inas many as neededfor the handset
to get a match.
For example, if you have stored
'GARY R' and 'GARY
J'
in the
memorythen you will needto enter in
all six characters before the phone
can distinguish which you want.
Ifyou get
Duplicate
displayed during
programming when you are entering
thenametheremaybeseveralcauses.
Check:
1. You may be already using the
same name.
2.
There may be a name which is
usingthe same number sequence.
For example, 'JENNY' and
'KENNY'.
Enter another name and press
MEM.

/
If you get Error displayed during
programming when you are entering
I
the name,you may haveentered too
1
few or too manyletters. Enteronlysix
letters.
Enter the six letter name again and
press MEM.
Dialing Using Name
To dial out a number to which you
havestoredthe namedothefollowing:
Press a LINE key to get a line
Press MEM
Make sure NAME appears on the
display. If it does not, press MEM
again.
Begin entering the name you wish
to dial. As soon asthe phonefinds
a match it will dis~lavthe number
.
-
and dial it out.
Changing Stored Numbers
To changeor replaceastorednumber
simply enter the new number on the
display and store it in the memory
location you wish to change.
Deleting Stored Numbers
To delete a stored number from
memory do the following:
Press MEM. Check to make sure
NAMEisnotdisplayedon the LCD.
L
If press MEM again.
Enterthe memory location
(00..19)
or use the arrow keys
*
and
#
to search the memory
to be deleted.
Press and hold CLEAR key until
the word "ERASED"appears.
Press OFF Key to exit.
NOTE:
Stored numbers are retained in
memory even if the base loses it
power or the handset battery is
removed.
Storing Special Codes
To inserta pause ina phone number,
press
HOLD
atthe appropriate point
when entering the number on the
LCD.
This insertsa 2 second pause.
A
'p' appears in the display to show
the pause. For longer pauses, press
HOLD
two or more times. Each
press makes the pause
2
seconds
longerandistreatedas a storeddigit.
If your phone is connected to a
PBX
you can store the
PBX
access
number and a pause before the
phonenumber. Forexample, to store
9-PAUSE-555-1
234
in memory
location
08
(without
NAME
dialing),
do the following:
1.
Press
9
2.
Press HOLD
3.
Dial
5551234
4.
Press and hold PROG
5.
Enter
08
6.
Press MEM
'
TAKING CARE OF YOUR
TELEPHONE
Your
VT2900
cordless telephone
containssophisticatedelectronicparts
so it must be treated with care.
Avoid rough treatment
Placethe handset down gently. Save
the originalpackingmaterialsto protect
your telephone if you ever need to
ship it.
Avoid water
Your telephone can be damaged if it
gets wet. Do not use the handset
outdoors in the rain, or handle it with
wet hands. Do not install your base
unit near a sink, bathtub or shower.
Remember that electrical appliances
can cause serious injury if used when
you are wet or standing in water. If
your base unit should fall into water,
DO NOT RETRIEVE IT UNTIL YOU
UNPLUG THE POWER CORD AND
TELEPHONE LINE CORDS FROM
THE WALL. Then pull the unit out by
the unplugged cords.
Electrical storms
Electricalstormscansometimescause
power surges harmful to electronic
equipment.
For your own safety, use cautionwhen
usingelectricappliancesduringstorms.
Cleaning your telephone
Your telephone has a durable plastic
casing that should retain its luster for
many years. Clean it only with a soft
cloth slightly dampened with water or
a mildsoap. Do not use excess water
or cleaning solvents of any kind.

NOISE OR INTERFERENCE
Your
VT2900
cordless telephone has
auto-channel scan circuitry which will
detect excess noise and change the
channel of the phone to reduce it.
This isdoneautomaticallyor manually
by pressing the INT.COMICHAN key.
Since the
VT2900
is a fully digital
phone it does not suffer from noise
associated with regular cordless
phones. At times you may experience
occasional "drop outs" especially at
the extreme edges of the phone's
range. Simply move closer to the
base unit and this will disappear.
AUTOMATIC SECURITY CODING
Every time you place the handset in
the base, your
VT2900
phone
randomlypicksoneof
65,000
possible
security codes. This allows your
handset and base to recognize each
other, and minimizesthe possibility of
another cordless phone using your
telephone line.
OUT OF RANGE INDICATION
If the handset is moved to a point
where the base and handset can no
longer communicate, the handset will
makea quickseriesof beepsto signal
"Out of Range."
If the handset is active when taken
out-of-range, it will beep twice a
second and enter standby mode after
25
seconds if the link is not
reestablished.Ifthe handset isbrought
backwithin range, itwill automatically
re-linkandthewarningtones will stop.
Forout-of-rangeinstandby mode,the
handset will beep at
15
second
intervals. To disable the warning
tones,simplypressandholdanumber
keyuntilthe phonegivesaconfirmation
beep.
OUT OF RANGE WHEN PHONE IS
ON
If you are presently engaged in a
phone conversation move closer to
the base. If the base unit does not
communicatewith the handset within
25
seconds of losing contact it will
automatically hang up.
OUT OF RANGE WHEN PHONE IS
OFF
If the phone is OFF, the handset and
base still monitor each other to make
sure that they can communicate. If
the handset ismovedout of range,the
handsetwill make a seriesof beeps at
15-20
second intervals. This tells you
that the handset may not ring for
incoming calls.
If you wish to stop the "Out of Range"
tones, simply press the OFF key on
the handset. The handset will not
work until the handset is brought
closer to the base. The base unit will
continue to function during this time.
Whenthe base unitis unpluggedfrom
the power supply, the handset will
begin to give the "Out of Range"
warning beeps. This willcontinueuntil
the base is powered again and the
handset
is
placed into the base
cradle for re-initialization.
If you have difficulty operating your
phone,the suggestions below should
solve the problem. If you still have
difficultyaftertrying these suggestions,
b
call VTECH Communications at
1-800-624-5688.
InCanada, call VTECH Electionics
at
604-273-5131.
THE PHONE DOESN'T WORK AT
ALL.
Make sure the power cord is
plugged in.
Make sure the telephone line cord
is pluggedfirmly into the base unit
and the telephone wall jack.
Makesurethe batteriesareproperly
charged. If the Battery indicatoris
on, the battery needs charging. If
the display is completely blank,
you must charge the batteries.
NO DIAL TONE.
First check all the suggestions
above.
Check the setup of your two line
jacks. See page
9
test Modular
Jack Test.
If you still don't hear a dial tone,
disconnect the base unit from the
telephone jack and connect a
different phone. If there is no dial
tone on that phone either, the
problem is in your wiring or local
service. Call your local telephone
company.
YOU GET NOISE, STATIC, OR A
WEAK SIGNAL EVEN WHEN
YOU'RE NEAR THE BASE UNIT.
Place the handset in the base
momentarilyto re-set the security
code. Then press a LINE key to
get a line.
Household appliances plugged into
the same circuit as the base unit can
sometimes cause interference. Try
movingthe applianceor the base unit
to another outlet.
YOU GET NOISE, STATIC, OR A
WEAK SIGNAL WHEN YOU'RE
AWAY FROM THE BASE UNIT.
You may be out of range. Either
movecloseto the base, or relocate
the base unit.
The layout of your home may be
limitingthe range. Try movingthe
base unit to a new position in your
home or office.
THE HANDSET DOES NOT RING
WHEN YOU RECEIVE A CALL.
Make sure you have the handset
ringer activated. To set the ringer
see page
24,
'Programming The
Ringer'.
Make sure the telephone line cord
is pluggedfirmly into the base unit
and the telephone jack. Make sure
the power cord is plugged in.
You may be too far from the base
unit.
You may have too many extension
phones on your telephone line to
allow all of them to ring. Try
unplugging some of the other
phones.

IF THE HANDSET APPEARS TO
MISS DIGITS IMMEDIATELY
FOLLOWING PRESSING THE LINE
KEY
Pressthe LINEkeyagainandthen
wait
2
seconds before dialing.
THE BASE DOES NOT RING.
Makesurethe BASE RINGER are
set to ON.
There may be too many extension
phonesonyour line.
Try
unplugging
one of the other phones.
YOU HEAR OTHER CALLS WHILE
USING YOUR PHONE.
Disconnectyour base unitfrom the
telephone jack, and plug in a
regulartelephone. If you still hear
other calls,the problemisprobably
inyour wiring or localservice. Call
your local telephone company.
YOU HEAR NOISE IN THE HAND-
SET, AND NONE OFTHE KEYS OR
BUlTONS WORK.
Make sure the power cord is
plugged in.
Your base unit and handset may
not be operating on the same
channelorsecuritycode.Placethe
handset in the cradle for a few
moments to reload the security
code and reset the channel.
WHEN USING THE SPEAKER-
PHONE, YOUR CALLER'S VOICE
GETS CUT OFF AND IS HARD TO
HEAR.
Your VOLUME CONTROL may be
turned down.
If you're in a noisy room, it can
sometimes cut off your caller's
voice. Press MUTE on the
speakerphone to block the noise
while your caller is speaking. Then
press MUTE again when you're
ready to speak.
COMMONCURE FOR ELECTRONIC
EQUIPMENT
Electronics,likepeople,cansometimes
get confused. If the unit does not
seem to be respondingnormally, then
try puttingthe handset inthe cradle to
re-initializethe unit. If it still does not
seemto respondafterdoingthis afew
times, do the following (in the order
listed):
1.
Disconnectthe power to the base.
2.
Disconnect the handset battery.
3.
Wait a few minutes.
4.
Connect power to the base.
5.
Connect the handset battery.
6.
Put the handset in the base to
re-initialize.
VTECH Communications warrants,
to the original purchaser only, the
material and workmanship of this
product for ONEYEAR from the date
of purchase. VTECH will repair or
replace, at our option, this product
without charge should it fail due to a
defect in material or workmanship
within that time period.
This warranty does not apply to loss
or damage which is the result of
accident, misuse or negligence. All
other warranties, expressed, implied,
or statutory, including warranties of
fitness for a particular purpose, are
limitedto the time periodlistedandare
otherwiseexcludedfrom this warranty.
VTECH may, at its option, void the
warranty if unauthorized repairs are
attempted. Additionally, VTECH shall
not be liable for any incidental or
consequentialdamage or commercial
loss,norfor any other lossor damages.
VTECH assumes no responsibility
for products sent without prior
Return Authorization.
To arrange for service, in or out of
warranty, please call our Customer
Service department at
(800) 624-
5688.
In Canada, please call
604-
273-5131.
for Return Authorization.
For warranty service, proof of
,
purchase is required.

This equipmentcomplieswith Parts15
and
68
of the FederalCommunications
Commission(FCC)rulesfor the United
States.
It also complies with
regulations RSS 210 and CS-03 of
lndustry Canada.
A
label is located on the underside of
the base unit containing either the
FCC registration number and Ringer
EquivalenceNumber (REN) or the 1C
registrationnumberand LoadNumber.
You must, upon request, provide this
information to your local telephone
company.
This equipment is compatible with
inductively coupled hearing aids.
Should you experience trouble with
this telephone equipment, please
contact:
VTECH COMMUNICATIONS
SERVICE DEPT. at 1-800-624-5688
IN CANADA, CALL VTECH
ELECTRONICS AT 604-273-5131.
For repairlwarranty information. The
telephone company may ask you to
disconnect this equipment from the
line network until the problem has
been corrected.
FCC Part 15
Warning:
Changes or modifications
to this unit not expressly approved by
the party responsible for compliance
could void the user's authority to
operate the equipment.
The equipment has been tested and
found to comply with part 15 of the
FCC rules.These limits are designed
to provide reasonable protection
against harmful interference in
a
residentialinstal1ation.This equipment
generates, usesand can radiate radio
frequency energy and, if not installed
and used in accordance with the
instructions, may cause harmful
interferenceto radiocommunications.
However, there is no guarantee that
interferencewillnotoccur ina particular
installation. If this equipment does
cause harmfulinterferenceto radio or
television reception, which can be
determined by turning the equipment
off and on, the user is encouragedto
try andcorrectthe interferenceby one
or more of the following measures:
-
Reorient or relocate the receiving
antenna.
-
Increase the separation between
the equipment and receiver.
-
Connect the equipment into an
outlet or on a circuit different from
that to which the receiver is
connected.
-
Consult the dealer or an
experienced radiorrV technician
for help.
FCC Part 68
The FCC requires that you connect
your cordless telephone to the
nationwidetelephonenetworkthrough
a modular telephone jack (USOC
RJ1IC, RJIIW or RJ14).
Your telephone company may
discontinue your service if your
equipment causes harm to the
telephone network. They will notify
you in advance of disconnection, if
possible. During notification, you will
be informed of your right to file a
complaint with the FCC.
Occasionally,yourtelephone company
may make changes in its facilities,
equipment, operation, or procedures
that could affect the operation of your
equipment. If so, you will be given
advance notice of the change to give
you an opportunity to maintain
uninterrupted service.
The base unit contains no user
serviceable parts. The handset
contains a user replaceable battery
pack (see
'REPLACING THE
BATTERIES',
page
3).
If it is determinedthat your telephone
equipment is malfunctioning,the FCC
requires that it not be used and that
it be unpluggedfrom the modularjack
until the problem has been corrected.
Repairs to this telephone equipment
canonly be made bythe manufacturer
or its authorized agents or by others
who may be authorized by the FCC.
For repair procedures, follow the
instructionsoutlinedunderthe VTECH
Limited Warranty.
This equipment may not be used on
coin service provided by the phone
company or Party Lines.
The REN is useful in determiningthe
number of devices you may connect
to your telephone line and still enable
the devices to ring when you receive
a call. The general rule is that the
REN value should not exceed 5.OA
total; however, contact your local
telephone company for the specific
number in your area.
IC (Industry Canada)
This telephoneis registeredfor use in
Canada. This device complies with
RSS-210 of lndustry and Science
Canada. Operation is subject to the
following two conditions:
(1)This device may not cause inter-
ference, and
(2)
This device must accept any
interference,includinginterference
that maycauseundesiredoperation
of the device.
Notice:
The lndustry Canada label
identifies certified equipment. This
certificationmeansthat the equipment
meets certain telecommunications
network, protective, operational and
safety requirements. lndustryCanada
does not guarantee the equipment will
operate to the user's satisfaction.

I
Beforeinstallingthisequipment, users
i
should ensure that it is permissibleto
I
be connected to the facilities of the
1
local telecommunications company.
The equipmentmustalso be installed
I
using an acceptable method of
I
connection. In some cases, the
company's inside wiring associated
with a single line individual service
maybeextendedbymeansof certified
connector assembly (telephone
extensioncord). The customershould
be aware that compliance with the
above conditions may not prevent
degradation of service in some
situations
Repairsto certified equipment should
be made by an authorized Canadian
maintenancefacility designatedbythe
supplier. Any repairs or alterations
made by the user to this equipment,
or equipment malfunctions, may give
the telecommunications company
causeto requesttheusertodisconnect
the equipment.
Users should ensure for their own
protection that the electrical ground
connections of the power utility,
telephone lines and internal metallic
water pipe system, if present, are
connected together. This precaution
may be particularly important in rural
areas.
Caution: User should not attempt to
make such connections them-selves,
but should contact the appropriate
electric inspection authority, or
electrician, as appro-priate.
The Load Number (LN) assigned to
this device denotesthe percentageof
the total load to be connected to a
telephone loop which is used by the
device to prevent overloading. The
termination on a loop may consist of
any combination of devices subject
only to the requirement that the total
of the load numbers of all the devices
does not exceed 100.
The Load Number of the unit is 7.
Your VT2900is designedto operate at
the maximum power allowed by the
FCC and IC. This means your
handset and base unit can
communicate only over a certain
distance
-
which will depend on the
locationof the base unitand handset,
weather, and the construction and
layout of your home or office.
If you move the handset out of range
during a phone conversation,you will
give an 'Out of Range' tone to tell you
that the handset will not be able to
receive or place calls. You may
terminate the 'Out of Range' tone by
pressingthe OFF key on the handset.
FREQUENCY CONTROL
Crystal Controlled Dual
PLL
Synthesizer
TRANSMIT FREQUENCY
Handset: 925.05 MHz to 927.75 MHz
(Allten channelswithinthis
range)
Base: 902.3 MHz to 905.0 MHz
(Allten channelswithinthis
range)
RECEIVE FREQUENCY
Handset: 902.3 MHz to 905.0 MHz
(Allten channelswithin this
range)
Base: 925.05 MHzto 927.75 MHz
(All ten channelswithin this
range)
SIZE
Handset: 20.2cm
x
6.2cm
x
4.5cm
( L x
W
x
T
)
maximum
( anntenna excluded
)
Base: 21.5cm
x
19.6cm x 6.8cm
(
L
x
W
x
T
)
maximum
(
anntenna excluded
)
WEIGHT
Handset: 345 gams
Base: 1050 gams
POWER REQUIREMENTS
Handset: Self-contained nickel-cad-
miumrechargeable battery
supply, 6.OV nominal,
700mAh
capacity.
Base: 12VDC
Q
500mA
MEMORY
Speed Dial: 20locations, 16digits per
location.
I
SPECIFICATIONSARETYPICALAND
MAY CHANGE WITHOUT NOTICE.
I
Table of contents
Other V-tech Telephone manuals

V-tech
V-tech ia5845 User guide

V-tech
V-tech VCS601 User manual

V-tech
V-tech AM18447 User manual

V-tech
V-tech ErisTerminal VSP875G User manual

V-tech
V-tech FS2615A User manual

V-tech
V-tech IS7121A User manual

V-tech
V-tech 15150 User manual

V-tech
V-tech 914-916adl User manual

V-tech
V-tech DS6611 User manual

V-tech
V-tech ErisStation VCS855 User manual

V-tech
V-tech LS6191 User manual

V-tech
V-tech Contemporary Series CTM-A2411-BATT User manual

V-tech
V-tech LS1500-B User manual

V-tech
V-tech gz5838 User manual

V-tech
V-tech i6727 Setup guide

V-tech
V-tech CS6428-32 User manual

V-tech
V-tech i5868 User manual

V-tech
V-tech DS6151 A User manual

V-tech
V-tech SN6127 User manual

V-tech
V-tech HD100 User manual