V-ZUG DWVMR9 User manual

Operating instructions
DWVMR9
Range hood

Thank you for choosing to buy one of our products. Your appliance is made to high
standards and is easy to use. Nevertheless, please take the time to read these operating
instructions in order to familiarize yourself with the appliance and get the best use out of
it.
Please follow the safety precautions.
Modifications
Text, diagrams and data correspond to the technical standard of the appliance at the
time these operating instructions went to press. The right to make technical modifications
for the purpose of the further development of the appliances is reserved.
Validity
The model number corresponds to the first alphanumerics on the identification plate.
These operating instructions apply to:
Type Product family Size system
DWVMR9 62009 90
Variations depending on the model are noted in the text.
© V-ZUG Ltd, CH-6302 Zug, 2018
2

3
Contents
1 Safety precautions 4
1.1 Symbols used......................................................... 4
1.2 General safety precautions.................................. 4
1.3 Appliance-specific safety precautions ............... 4
1.4 Instructions for use................................................ 5
2 Appliance description 7
2.1 Appliance description ........................................... 7
2.2 Extraction model .................................................... 7
2.3 Recirculation model .............................................. 7
2.4 Equipment ............................................................... 7
2.5 Construction ........................................................... 7
2.6 Operating and display elements......................... 8
3 Operating the appliance 8
3.1 Operation ................................................................ 8
3.2 Intensive level ......................................................... 9
3.3 Illumination.............................................................. 9
3.4 Saturation indicators ............................................. 9
3.5 Stand-by................................................................... 9
4 Care and maintenance 10
4.1 Cleaning the housing..........................................10
4.2 Metal grease filter................................................10
4.3 Activated charcoal filter display ........................11
4.4 Standard activated charcoal filter.....................12
4.5 Cleaning the long-life activated charcoal filters ...
13
5 Trouble-shooting 14
5.1 What to do if ….....................................................14
6 Accessories and spare parts 15
7 Technical data 15
8 Disposal 16
9 Index 17
11 Service & Support 19

4
1 Safety precautions
1.1 Symbols used
Denotes important safety precau-
tions.
Failure to observe said precautions
can result in injury or in damage to
the appliance or fittings!
Information and precautions that
should be observed.
Information on disposal
Information about the Operating In-
structions
▸ Indicates step-by-step instructions.
–Describes how the appliance reacts
to the steps taken.
▪Indicates a list.
1.2 General safety precautions
▪Read the operating instruc-
tions before using the appli-
ance for the first time!
▪This appliance can be used
by children aged 8 and above
and by persons with reduced
physical, sensory or mental
capabilities, or lack of experi-
ence and/or knowledge,
provided they are supervised
or have been instructed on
the safe use of the appliance
and have understood the haz-
ards involved. Children shall
not play with the appliance.
Cleaning and user mainten-
ance shall not be undertaken
by children without supervi-
sion.
▪If an appliance is not
equipped with a mains cable
and a plug or other means for
disconnecting from the mains
with a contact opening on
each pole complying with the
conditions of overvoltage cat-
egory III for full isolation, an
isolating device must be in-
corporated into the perman-
ently installed electrical install-
ation in accordance with the
installation regulations.
▪If the mains cable of this ap-
pliance is damaged, it must
be replaced by the manufac-
turer or its Customer Services
or a similarly qualified person
in order to avoid hazard.
1.3 Appliance-specific safety
precautions
▪The room must be adequately
ventilated when operating the
range hood at the same time
as other appliances that burn
gas or other fuels.
▪Observe the official regula-
tions for the exhaust-air lay-
out.

1 Safety precautions
5
▪The extracted air must not be
fed into a chimney which is
used for exhausting fumes
from appliances burning gas
or other fuels.
▪The minimum distance
between the supporting sur-
face for the cooking equip-
ment on the hob and the low-
est part of the range hood
must be observed. If the
range hood is installed above
a gas appliance, this distance
must not be less than 65 cm.
If the installation instructions
for the gas hob stipulate a lar-
ger distance, this must be ob-
served.
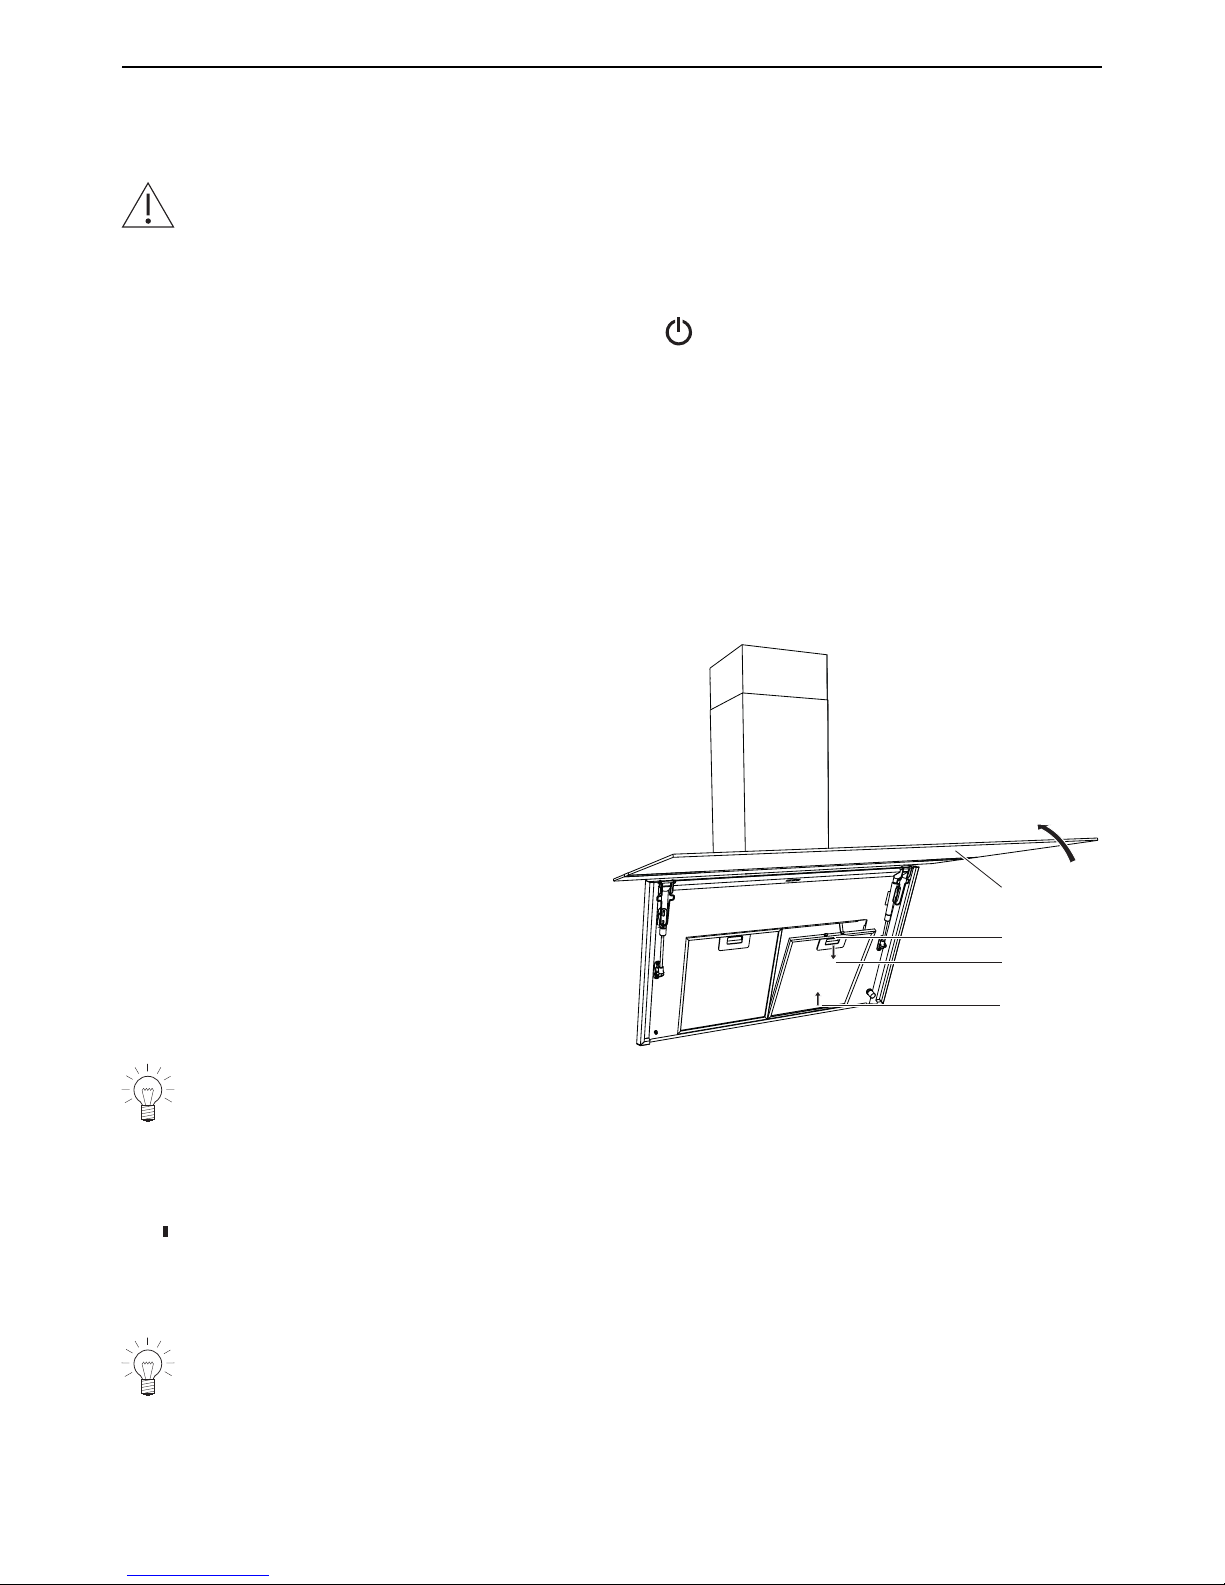
▪WARNING: Before replacing
the light bulb, ensure the ap-
pliance is switched off and
disconnected from the mains
power supply to avoid pos-
sible electric shock.
▪When replacing a light bulb,
the maximum wattage rating
of replaceable light bulbs
must be visible.
▪This appliance is intended for
use in the home and similar
settings such as: in staff kit-
chens in shops, offices and
other commercial establish-
ments; in agricultural estab-
lishments; by guests in hotels,
motels and other accommod-
ation establishments; in bed
and breakfast establishments.
▪Do not operate the appliance
using an external time switch
or a separate remote control
system.
▪Failure to follow the cleaning
instructions may cause a fire
hazard.
▪Do not flambé food under-
neath the range hood.
1.4 Instructions for use
Before using for the first time
▪The appliance must be installed and
connected to the electricity supply in
accordance with the separate installa-
tion instructions. Have a qualified fitter/
electrician carry out the necessary
work.
▪Observe the official regulations for the
exhaust-air layout.
▪Dispose of the packaging material in
accordance with local regulations.
Correct use
▪The appliance is designed for use in
the home for extracting cooking fumes
and smells from above the cooking sur-
face.
▪Any repairs, modifications or manipula-
tions to the appliance, especially any
electrically live parts, may only be car-
ried out by the manufacturer, its cus-
tomer service department or similarly
qualified persons. Repairs if carried out
incorrectly may cause serious injury,
damage to the appliance and fittings,
as well as affect the functioning of the
appliance. If the appliance is not work-
ing properly or in case a repair is
needed, follow the instructions given in
the 'Service & Support' section. Contact
our Customer Services if necessary.

1 Safety precautions
6
▪Use original spare parts only.
▪Retain these operating instructions for
future reference.
Note on use
▪If the appliance is visibly damaged, do
not use it. Contact our Customer Ser-
vices.
▪If the appliance is not functioning prop-
erly, disconnect it from the power sup-
ply immediately.
▪Ensure there is adequate ventilation
when the extractor fan is on so as to
avoid creating underpressure in the kit-
chen and to achieve optimal air extrac-
tion.
▪Avoid a cross-current of air, which
could blow the cooking vapours over
the cooking area.
▪If other appliances – fired by gas or
other fuels – are being used at the
same time, ensure that there is a suffi-
cient supply of fresh air. This does not
apply to air recirculation appliances.
▪If other firing systems are being used at
the same time (e.g. wood, gas, oil or
coal fired heating appliances), safe op-
eration is only possible providing a
room negative pressure of 4Pa
(0.04mbar) is not exceeded at the loc-
ation of the appliance. Risk of toxic
fumes! An adequate flow of fresh air
must be guaranteed e.g. via non-clos-
able openings in doors or windows and
in combination with an air-intake/ex-
haust-air wall box or by other technical
means.
▪When cleaning the appliance make
sure no water gets inside it. Use a mod-
erately damp cloth only. Do not spray
the inside or outside of the appliance
with water. Do not use a steam cleaner.
If water gets inside the appliance, it can
cause damage.
▪Accessible parts may become hot when
used with cooking appliances.
Caution: Burns hazard!
▪Do not leave the appliance unattended
when deep-frying on the cooking sur-
face. The cooking oil in the deep-frying
appliance could overheat and catch
fire. Constantly monitor the temperature
of the cooking oil, keeping it below the
temperature at which it can catch fire.
Change the cooking oil regularly – dirty
oil catches fire more easily than clean
oil.
Caution: Risk to life!
▪Packaging material, e.g. plastic film and
polystyrene, can be dangerous for chil-
dren and animals. Danger of suffoca-
tion! Keep packaging material away
from children and animals.
▪When carrying out maintenance work
on the appliance, including replacing
light bulbs, cut off the electricity supply
to the appliance: remove the screw fuse
from the holder or switch the circuit
breaker off, or disconnect from the
mains supply.
How to avoid damaging the appliance
▪Observe the cleaning intervals. Failure
to do so can increase the fire hazard
due to the build-up of grease in the
metal grease filters.

2 Appliance description
2.1 Appliance description
The appliance is designed for use in the home for extracting cooking fumes and smells
from above the cooking surface.
The model can be used to extract or recirculate air.
2.2 Extraction model
A fan draws cooking fumes and smells from above the cooking area. The metal grease
filters clean the extracted air, which is passed through a connecting pipe fitted with an in-
tegrated non-return valve and through the air duct to the outside.
When in use, ensure there is a sufficient supply of fresh air to replace the air that is
being extracted.
2.3 Recirculation model
After being filtered through the metal grease filters, the cooking fumes and smells above
the cooking area are passed through an activated charcoal filter. The filtered air is then
circulated back into the room through the side openings.
If activated charcoal filters are not supplied with the appliance, these should be
ordered and installed before using the appliance for the first time.
2.4 Equipment
▪1 extractor fan with 4 power levels (1 = low, 2 = medium, 3 = high, and intensive
level). Power levels 1–3 are suitable for continuous operation. The intensive level is
used for short bursts of intensive extraction of cooking fumes and smells, e.g. when
searing meat. The intensive level runs for a maximum of five minutes at a time.
▪Illumination
▪2 metal grease filters
▪2 standard activated charcoal filters (not included in scope of delivery)
2.5 Construction
1 Illumination
7
6
5
43
2
1
2 Metal grease filter
3 Operating elements
4 Glass panel, hinged
5 Lower cover
6 Upper cover
7 Activated charcoal filter
7

3 Operating the appliance
2.6 Operating and display elements
Switching off
Power level 1
Power level 2
Power level 3
Intensive level
Illumination ON/OFF
Flashing: Clean grease filter / saturation indicator for filter
Flashing: Saturation indicator for activated charcoal filters (recirculation model), de-
pending on use:
– Replace standard activated charcoal filters
– Clean and replace long-life activated charcoal filters
Depending on the model and features, the specification of the appliance may differ
from the standard specification described herein.
3 Operating the appliance
3.1 Operation
Switching the appliance on
▸ With the appliance switched off, hold the button depressed for three seconds.
–The stand-by mode is activated.
–The button illuminates.
▸ Pressing the / / or button switches the appliance on at power level 1, 2, 3 or in-
tensive.
–The corresponding button illuminates to indicate which power level is being used.
–If the intensive level is selected, the button also illuminates for the power level that
was running when the intensive level was started.
We recommend switching the appliance on at power level 1 five minutes before
cooking. Use a low power level for normal cooking smells and a higher power
level for very strong cooking fumes and smells.
Switching the appliance off
▸ Depress the button for three seconds.
–The appliance is switched off and no buttons are illuminated.
–Only the illumination can be switched on/off.
After you have finished cooking, allow the appliance to run for another 15 minutes
so that the cooking fumes and smells can be extracted.
8

3 Operating the appliance
3.2 Intensive level
The intensive level can be selected in stand-by mode.
▸ Press the button to switch the intensive level on for five minutes.
–The button and the button for the power level that was running when the intens-
ive level was started illuminate.
▪If another power level had been running beforehand, then the appliance will automat-
ically revert to this power level after the five minutes has elapsed.
▪If the intensive level was selected when in the stand-by mode, the appliance will
switch off after the five minutes.
▸ Press the / / or button to stop the intensive level before the five minutes has
elapsed.
3.3 Illumination
▸ Press the button to switch the illumination on.
▸ Press the button again to switch the illumination off.
3.4 Saturation indicators
Saturation indicator for the metal grease filters
The button flashes after 40 operating hours. The saturation level has been reached and
the grease filters must be cleaned.
Saturation indicator for the activated charcoal filters
The saturation level is reached when the button flashes or within four months at the
latest. Depending on use: Replace the standard activated charcoal filters or clean and re-
place long-life activated charcoal filters.
Resetting the filter saturation indicator
▸ In the stand-by mode, hold the button depressed until an acoustic signal is emitted.
–The flashing LEDs (grease filters) or (activated charcoal filters) no longer flash.
3.5 Stand-by
Deactivating the stand-by mode
▸ Hold the button depressed for three seconds.
–The appliance is switched off and the LED goes out.
This function is useful when cleaning the hood. The illumination can also be used
when the stand-by mode is activated.
Activating the stand-by mode
▸ Hold the button depressed for three seconds.
–The stand-by mode is activated and the LED illuminates.
9

4 Care and maintenance
4.1 Cleaning the housing
Take care that no water gets into the housing of the appliance! If water gets into
the housing, it can cause damage. Do not use abrasive cleaners, scouring pads,
steel wool, etc. for cleaning, as they can damage the surface. Remove the screw
fuse or switch off the circuit breaker. Cleaning the outside/inside
▸ To deactivate the stand-by mode: Depress the button for three seconds.
–The appliance is switched off and the LED goes out.
▸ Clean the outside using a slightly damp cloth – and detergent if necessary – and wipe
dry.
Grease and condensate water can build up on the inside next to the grease filters.
▸ Clean using a slightly damp cloth – and detergent if necessary – and wipe dry.
4.2 Metal grease filter
The filters can be cleaned.
Removing
▸ Swing the glass panel 1 up.
▸ Press down the grip 2, swing the grease
filter 3 forwards and lift it out of the
bracket 4.
1
2
3
4
Take care not to damage the filter.
Cleaning
The grease filters must be cleaned at least once a month with normal use or whenever
the indicator light flashes. If properly cared for, the service life of the grease filters
should be as long as the service life of the hood.
▸ Clean the grease filters (grip facing downwards) in the dishwasher.
▸ Select an «intensive» – or «heavy soiling» – wash programme with a warm pre-wash.
Cleaning may cause the grease filters to become discoloured. This will not affect
the functioning of the filters in any way.
10

4 Care and maintenance
If no dishwasher is available:
▸ Clean the grease filters in hot water and detergent.
▸ Soak the grease filters in hot water and detergent for about two hours, then clean with
a washing-up brush and rinse well with clean water.
Installing
▸ Insert the grease filter 3 into the bracket
4 at the bottom.
▸ Press down the grip 2 and engage the
grease filter 3 in the bracket at the top.
▸ Swing the glass panel 1 down.
▸ In the stand-by mode, hold the button
depressed until an acoustic signal is
emitted.
–The flashing button goes out.
1
2
3
4
4.3 Activated charcoal filter display
Activating the activated charcoal filter display
Only activate this function with the recirculation model.
▸ To deactivate the stand-by mode: Hold the button depressed for three seconds.
▸ Then depress the and buttons at the same time for three seconds.
–First the button flashes, then the / buttons both flash.
–The activated charcoal filter display is activated.
Deactivating the activated charcoal filter display
▸ To deactivate the stand-by mode: Depress the button for three seconds.
–The appliance is switched off and the LED goes out.
▸ Then hold the and buttons depressed at the same time for three seconds.
–The / buttons both flash, then the button flashes.
–The activated charcoal filter display is deactivated when the button stops flashing
and the button keeps on flashing.
11

4 Care and maintenance
4.4 Standard activated charcoal filter
Removing the activated charcoal filters
▸ Swing the glass panel 1 up.
▸ Press down the grip 2, swing the grease
filter 3 forwards and lift it out of the
bracket 4.
1
2
3
4
▸ Remove the activated charcoal filter 7.
7
Replacing
The standard activated filters cannot be washed or regenerated and are replaced.
As soon as the indicator light flashes or, with heavy use, at least every two
months.
Installing the activated charcoal filters
▸ Install the new activated charcoal filters
7.
7
12

4 Care and maintenance
▸ Insert the grease filter 3 into the bracket
4 at the bottom.
▸ Press down the grip 2 and engage the
grease filter 3 in the bracket at the top.
▸ Swing the glass panel 1 down.
▸ In the stand-by mode, hold the button
depressed until an acoustic signal is
emitted.
–The indicator light goes out.
1
2
3
4
4.5 Cleaning the long-life activated charcoal filters
The long-life activated charcoal filters can be cleaned and regenerated. Every two
months with normal use or whenever the saturation indicator flashes. Depending on in-
tensity of use, do not exceed 5–8 regeneration cycles. If properly cared for, the service
life of the long-life activated charcoal filter is up to three years.
Disconnect the power supply and switch off the fuse or circuit breaker.
Cleaning and regenerating
▸ Take the activated charcoal filter mat out of the plastic housing and clean in the dish-
washer.
▸ Select an «intensive» or «heavy» dishwasher programme with a warm prewash. Wash
separately so that no food debris can become stuck to the activated charcoal filter
mat.
If no dishwasher is available:
▸ Clean the activated charcoal filter mat with hot water and detergent and then soak in
hot water in the sink for an hour. Rinse well afterwards.
▸ Subsequently dry the activated charcoal filter mat in an oven at 100 °C using top/bot-
tom heat or hot air.
Dispose of long-life activated charcoal filters that are spent and no longer able to
be recycled at a suitable recycling point.
13

5 Trouble-shooting
5 Trouble-shooting
5.1 What to do if …
… the illumination is not working
Possible cause Solution
▪Fuse or automatic circuit
breaker for electrical installa-
tions in the home is defect-
ive.
▸ Replace the fuse.
▸ Reset the automatic circuit breaker.
▪An interruption in the power
supply.
▸ Check the power supply.
▪LED is defective. ▸ Inform Customer Services.
… the appliance is not extracting enough air
Possible cause Solution
▪The metal grease filters are
dirty.
▸ Clean the metal grease filters.
▪Only for recirculation model:
The activated charcoal filters
are saturated.
▸ Replace the activated charcoal filters.
▪Only for extraction model:
The fresh air intake is insuffi-
cient.
▸ Ensure the fresh air intake is sufficient.
... the range hood or the operating element is not working
Possible cause Solution
▪The range hood or the oper-
ating element is not working.
▸ Disconnect the power supply for at least five
seconds.
▸ Switch the range hood back on again.
The fault cannot be remedied.
▪Contact Customer Services.
14

6 Accessories and spare parts
Please give model number and exact designation when ordering parts.
Metal grease filter for extraction and recir-
culation model
Activated charcoal filter for recirculation
model
Long-life activated charcoal filter set with
plastic receptacle for recirculation model.
Long-life activated charcoal filter for recircu-
lation model
7 Technical data
Electrical connection
▸ See identification plate.
▸ Remove the metal grease filters.
–The identification plate is located on the inside of the appliance.
15

8 Disposal
8 Disposal
8.1 Packaging
Never allow children to play with packaging material due to the danger of injury or
suffocation. Store the packaging material in a safe location or dispose of it in an
environmentally-friendly way.
8.2 Safety
Render the appliance unusable to prevent accidents caused by improper use (e.g.
through children playing):
▸ Disconnect the appliance from the mains. With a fixed appliance, this is to be carried
out by a qualified electrician. Then cut the mains cable off flush with the appliance.
8.3 Disposal
▪ The «crossed‐out wheeled bin» symbol requires the separate collection of waste
electrical and electronic equipment (WEEE). Such equipment can contain hazardous,
environmentally harmful materials.
▪These appliances are to be handed over to a designated collection point for the recyc-
ling of electrical and electronic equipment and must not be disposed of with unsorted
household waste. And in this way, you will be helping to protect resources and the en-
vironment.
▪For more information, please contact the local authorities.
16

9 Index
A
Accessories ...................................................... 15
Activated charcoal filter .................................. 12
Activated charcoal filter display
Activating....................................................... 11
Deactivating .................................................. 11
Appliance description ........................................ 7
Appliance disposal .......................................... 16
C
Cleaning
Long-life activated charcoal filter
........................................................................ 13
Cleaning the housing ...................................... 10
Construction......................................................... 7
D
Display elements................................................. 8
Disposal............................................................. 16
E
Electrical connection ....................................... 15
Equipment ............................................................ 7
Extraction model ................................................. 7
I
Identification plate............................................ 15
Illumination ........................................................... 9
Initial set-up .......................................................... 5
Intensive level ...................................................... 9
M
Malfunction
Illumination not working.............................. 14
Metal grease filter
Cleaning ........................................................ 10
Installing ........................................................ 10
Removing ...................................................... 10
Model designation .............................................. 2
Model number ..................................................... 2
N
Notes.................................................................. 18
O
Operating elements ............................................ 8
Operating the appliance.................................... 8
Operation.............................................................. 8
Q
Queries .............................................................. 19
R
Recirculation model............................................ 7
Resetting the filter saturation indicator
........................................................................ 9
S
Safety precautions
Appliance-specific ..........................................4
Before using for the first time.......................5
Correct use ......................................................5
General .............................................................4
Instructions for use.........................................5
Note on use .....................................................6
Saturation indicator
Activated charcoal filter .................................9
Grease filter .....................................................9
Service & Support............................................ 19
Service agreement........................................... 19
Spare parts ....................................................... 15
Stand-by................................................................ 9
Stand-by mode
Activating..........................................................9
Deactivating .....................................................9
Symbols ................................................................ 4
T
Technical data .................................................. 15
Trouble-shooting .............................................. 14
Type....................................................................... 2
V
Validity................................................................... 2
W
What to do if
Range hood not working............................ 14
The appliance is not extracting enough air
........................................................................ 14
The illumination is not working ................. 14
17

18
10 Notes

11 Service & Support
The «Trouble-shooting» section gives you valuable tips on how to deal with minor
malfunctions yourself, saving you the time and trouble of calling out a service tech-
nician and any cost that goes along with it.
Information on the V-ZUG warranty can be found at www.vzug.com →Service
→Warranty information. Please read this information carefully.
Please register your V-ZUG appliance straightaway:
▪online at www.vzug.com →Service →Online warranty registration or
▪using the enclosed registration card.
This will allow you to take advantage of the best possible support in the event of a fault
in the appliance during the guarantee period. You will require the serial number (SN) and
appliance designation to register your appliance. You will find them on the identification
plate of your appliance.
My appliance information:
SN: __________________________ Appliance: _______________________________
Please have this appliance information to hand when contacting V-ZUG. Thank you.
▸ Remove the metal grease filters.
–The identification plate is located on the inside of the appliance.
–A second identification plate is included in the scope of delivery and should be re-
tained for the purpose of appliance identification.
Your repair order
Call the free service number 0800 850 850 to contact your nearest
V-ZUG service centre. You can arrange an on-site visit by us by phone if you wish.
General queries, accessories and service agreement
V-ZUG will be happy to help you with any general administrative or technical queries, to
accept your orders for accessories and spare parts and to inform you about our pro-
gressive service agreements. You can contact us by calling tel. +41 58 767 67 67 or by
going to our website at www.vzug.com.
19

Quick instructions
Please first read the safety precautions in the operating instructions!
Switching off
Power level 1
Power level 2
Power level 3
Intensive level
Illumination ON/OFF
Flashing: Clean grease filter / saturation indicator for filter
Flashing: Saturation indicator for activated charcoal filters (recirculation model), de-
pending on use:
– Replace standard activated charcoal filters
– Clean and replace long-life activated charcoal filters
V-ZUG Ltd, Industriestrasse 66, CH-6302 Zug
Tel. +41 58 767 67 67, Fax +41 58 767 61 61
[email protected], www.vzug.com
Service Centre: Tel. 0800 850 850
J62009013-R02
Other manuals for DWVMR9
1
Table of contents
Other V-ZUG Ventilation Hood manuals

V-ZUG
V-ZUG DFPQSL Series User manual

V-ZUG
V-ZUG DEHMR 5 User manual

V-ZUG
V-ZUG DFPQS9 User manual

V-ZUG
V-ZUG DFSG 5 User manual

V-ZUG
V-ZUG DWVMR9 User manual

V-ZUG
V-ZUG AiroClearWall V6000 User manual

V-ZUG
V-ZUG DW-SM9 User manual

V-ZUG
V-ZUG LEVANTE User manual

V-ZUG
V-ZUG DSTS9 User manual

V-ZUG
V-ZUG DSMS User manual
Popular Ventilation Hood manuals by other brands

Zanussi
Zanussi CH 93 Instructions for the use and care

Gorenje
Gorenje Simplicity DT6SY2W Instructions for use

FALMEC
FALMEC Lumina 90 Instruction booklet

Dwyer Instruments
Dwyer Instruments AFH2 Installation and operating instructions

Siemens
Siemens LR97CAP21B user manual

Propello
Propello CRUZE user manual