V-ZUG FORANO User manual

FORANO
DE Betriebsanleitung
FR Manuel d’utilisation
IT Manuale d’uso
EN Instruction manual
ES Manual de utilización
PT Manual de utilização
NL Instructiehandleiding
RU Руководство по эксплуатации
S Bruksanvisning
N Veiledning
TR Kullanım kılavuzu


DE
Danke, dass Sie sich für den Kauf eines unserer Produkte entschieden haben. Ihr Gerät genügt hohen Ansprü-
chen und seine Bedienung ist einfach. Nehmen Sie sich trotzdem Zeit, diese Betriebsanleitung zu lesen. So
werden Sie mit Ihrem Gerät vertraut und können es optimal und störungsfrei benutzen.
Beachten Sie bitte die Sicherheitshinweise.
Änderungen
Text, Bild und Daten entsprechen dem technischen Stand des Gerätes zur Zeit der Drucklegung dieser Bedie-
nungsanleitung. Änderungen im Sinne der Weiterentwicklung bleiben vorbehalten.
FR
Merci d’avoir porté votre choix sur l’un de nos produits. Votre nouvel appareil répond aux exigences les plus
élevées et son utilisation est des plus simples. Accordez-vous le temps nécessaire pour lire attentivement ce
mode d’utilisation. Vous vous familiariserez ainsi avec votre appareil, ce qui vous permettra de l’utiliser de
manière optimale et sans dérangement.
Veuillez tenir compte des conseils de sécurité.
Modications
Le texte, les illustrations et les données correspondent au niveau technique de l’appareil au moment de la mise
sous presse de ce mode d’emploi. Sous réserve de modications dans le cadre du progrès technique.
IT
Grazie per aver scelto uno dei nostri prodotti. Il vostro apparecchio soddisfa elevate esigenze, e il suo uso è
molto semplice. E’ tuttavia necessario che vi prendiate il tempo per leggere questo manuale d’uso che vi per-
metterà di comprendere meglio l’apparecchio e di utilizzarlo in modo ottimale e senza problemi.
Vi preghiamo di attenervi alle osservazioni sulla sicurezza.
Modiche
Testo, immagine e dati corrispondono al livello tecnico dell’apparecchio al momento della stampa di queste
istruzioni per l’uso, con riserva di modiche intese come ulteriore sviluppo.
EN
Thank you for choosing to buy one of our products. Your appliance is made to high standards and is easy to
use. Nevertheless, please take the time to read these instruction manual in order to familiarize yourself with the
appliance and get the best use out of it.
Please follow the safety precautions.
Modications
Text, diagrams and data correspond to the technical standard of the appliance at the time these operating in-
structions went to press. The right to make technical modications for the purpose of the further development
of the appliance is reserved.
ES
Le agradecemos que se haya decidido a comprar uno de nuestros productos. Su aparato cumple altos requisi-
tos y su manejo es sencillo. No obstante, debe dedicar el tiempo necesario para leer este manual de utilización.
Así, tendrá conanza en su aparato y podrá utilizarlo de forma óptima y sin fallos.
Por favor, tenga en cuenta las indicaciones de seguridad.
Modicaciones
El texto, la imagen y los datos corresponden al estado técnico del aparato en el momento de la publicación
de este manual de instrucciones. Reservado el derecho arealizar modicaciones para el perfeccionamiento.
PT
Muito obrigado por ter optado pela aquisição de um dos nossos produtos. O aparelho satisfaz elevadas
exigências e o seu manuseamento é simples. Todavia, leia cuidadosamente este manual de utilização. Assim,
familiariza-se com o aparelho e pode utilizar o mesmo de forma optimizada e sem falhas.
Observe as indicações de segurança.

Alterações
Os textos, as imagens e os dados correspondem ao estado técnico do aparelho no momento da impressão
deste manual de instruções. No âmbito do aperfeiçoamento, reservamos o direito de efectuar alterações.
NL
Hartelijk dank dat u heeft gekozen voor een van onze producten. Uw toestel voldoet aan de hoogste eisen en
de bediening is eenvoudig. Neemt u niettemin de tijd deze instructiehand leiding te lezen. Op die manier raakt
u vertrouwd met uw toestel en kunt u het optimaal en zonder storingen gebruiken.
Volg de veiligheidsvoorschriften op.
Wijzigingen
Tekst, afbeeldingen en gegevens komen overeen met de technische conditie van het toestel ten tijde van
het ter perse gaan van deze bedieningshandleiding. Wijzigingen in de zin van verdere ontwikkeling blijven
voorbehouden.
RU
. , -
. . -
-
.
.
,
.
, .
S
Tack för att du valt en av våra produkter. Apparaten uppfyller kundens höga krav och är mycket användarvän-
lig. Vi ber dig att ta dig tid att läsa igenom denna bruksanvisning för att bättre förstå hur apparaten fungerar
och använda den på bästa sätt utan några problem.
Vi ber dig att noga följa alla säkerhetsföreskrifter.
Ändringar
Texten, bilderna och uppgifterna överensstämmer med apparatens tekniska egenskaper i den stund som den-
na bruksanvisning trycks ut. Vi förbehåller oss rätten att utföra förbättrande ändringar på apparaten.
N
Takk for at Dere valgte et av våre produkter. Produktet tilfredsstiller store behov og er svært enkelt å bruke. Li-
kevel er det viktig å ta seg tid til å lese gjennom denne veiledningen, slik det blir lettere å forstå selve apparatet
og dermed ta det i bruk på en optimal måte uten problemer.
Vennligst rette seg etter observasjoner som gjelder sikkerheten.
Endringer
Tekst, bilder og data tilsvarer apparatets tekniske nivå da disse instruksjonene gikk i trykk, med forbehold om
endringer grunnet videre utvikling.
TR
Ürünlerimizden birini satın alma tercihinizden dolayı teşekkür ederiz. Cihazınız yüksek standartlarda üretilmiştir
ve kullanımı kolaydır. Bununla birlikte, lütfen cihaz hakkında bilgi edinmek ve en iyi şekilde faydalanmak için
zaman ayırarak bu kullanım talimatlarını okuyun.
Lütfen emniyet tedbirlerine uyun.
Değişiklikler
Metinler, diyagramlar ve veriler, bu kullanım talimatlarının baskıya verildiği tarihte geçerli olan cihaz teknik
standartlarına uygundur. Cihazı daha da geliştirmek amacıyla teknik değişiklikler yapma hakkımız saklıdır.
© V-ZUG AG, CH-6301 Zug, 2010
- 4 -

- 5 -

- 6 -

- 7 -

- 8 -

ALLGEMEINES
Diese Anleitung bitte aufmerksam durchlesen, da sie wichtige
Sicherheitshinweise zur Installation, zum Gebrauch und zur
Wartung enthält. Die Anleitung für eventuelle zukünftige
Konsultationen aufbewahren. Das Gerät wurde zum Gebrauch
in Abluftsversion (Luftausscheidung nach außen - Abb.1B),
Umluftversion (innerer Luftumlauf - Abb.1A) oder mit äuße-
rem Motor (Abb.1C) entworfen.
SICHERHEITSHINWEISE
1. Vorsicht ist geboten, wenn gleichzeitig eine Abzugshaube
und ein raumluftabhängiger Boiler oder ein oenes Feuer in
Betrieb sind, die von einer anderen Energiequelle als Strom
versorgt werden, da die Küchenhaube die Raumluft absaugt,
die auch der Boiler oder das Feuer zurVerbrennung benötigen.
Der Unterdruck im Raum darf den Wert von 4Pa (4 x 10⁻⁵ bar)
nicht übersteigen. Um einen sicheren Betrieb der Abzugshau-
be zu gewährleisten, ist daher immer auf eine ausreichende
Belüftung des Raumes zu achten. Bei der Ableitung der Luft
nach aussen müssen die nationalenVorschriften eingehalten
werden.
Vor Anschluss des Modells an das Stromnetz:
-Kontrollieren Sie das Typenschild an der Geräteinnenseite
um sich zu vergewissern, ob Spannung und Stromstärke der
des Stromnetzes entsprechen und die Steckdose geeignet ist.
Im Zweifelsfall wenden Sie sich bitte an einen qualizierten
Elektriker.
-Sollte das Speisekabel beschädigt sein, ist es durch ein ande-
res - beim Hersteller oder dessen Kundendienst erhältliches
- Kabel oder mit einem speziellen Bausatz - zu ersetzen.
2. Achtung!
Elektrogeräte können unter gewissen Umständen ge-
fährlich sein!
A)Niemals die Filter kontrollieren, wenn die Dunstabzugs-
haube in Betrieb ist.
B)Die Lampen und die umliegenden Bereiche nicht wäh-
rend oder nach längerer Benutzung des Lichts berühren.
C)Es ist verboten, Speisen unter der Dunstabzugshaube
zu flambieren.
D)Offene Flammen sind unbedingt zu vermeiden, da
diese die Filter beschädigen und einen Brand verursachen
können.
E) Beim Frittieren sind die Speisen ständig zu kontrollie-
ren, um eine Entzündung von überhitztem Öl zu verhin-
dern.
F) Vor jeglichen Wartungsarbeiten unbedingt den Netz-
stecker aus der Steckdose entfernen.
G)Das Gerät sollte nicht von kleinen Kindern oder ge-
brechlichen Personen ohne Beaufsichtigung benutzt
werden.
H) Kleine Kinder sollten beaufsichtigt werden, um sicher-
zugehen, dass sie nicht mit dem Gerät spielen.
I) DerRaummussübereinehinreichendeBelüftungverfü-
gen, wenn die Dunstabzugshaube mit anderen gas- oder
brennstoffbetriebenen Geräten gleichzeitig verwendet
wird.
L)Es besteht Brandgefahr, wenn die Reinigung nicht
entsprechend den Anleitungen durchgeführt wird.
Dieses Gerät ist gemäß der EU-Richtlinie 2002/96/EC, Waste
Electrical Electronic Equipment (WEEE) gekennzeichnet. Sor-
gen Sie bitte dafür, dass das Gerät korrekt entsorgt wird, der
Benutzer trägt dazu bei, den potentiellen negativen Folgen
für Umwelt und Gesundheit vorzubeugen.
Das auf dem Produkt oder auf den Begleitpapieren be
ndliche Symbol sagt aus, dass dieses Produkt nicht wie
normaler Hausmüll behandelt werden darf, sondern
dass es einer geeigneten Sammelstelle für das Recycling
der elektrischen und elektronischen Geräteteile zugeführt
werden muss. Entsorgen Sie bitte das Altgerät gemäß der
lokalen Richtlinien. Für weitere Informationen hinsichtlich der
Behandlung, der Wiederverwertung und des Recycling des
Produkts wenden Sie sich bitte an die zuständige lokale
Stelle, an die Sammelstelle für Hausmüll, oder an den Händler,
bei dem Sie das Gerät erworben haben.
INSTALLATIONSANLEITUNG
Montage und Anschluss müssen von einem Fachmann
durchgeführt werden.
Bei dem Gerät handelt es sich um ein Gerät der Klasse I, und
muss demnach an einen Erdleiter angeschlossen werden.
-Der Elektroanschluss ist wie folgt vorzunehmen:
BRAUN = LLeiter
BLAU = NNulleiter
GELB/GRÜN = Erdungskabel.
Das Nullleiterkabel muss an Klemme Nangeschlossen werden,
das GELB/GRÜNE Kabel dagegen an die neben dem Erdleiter-
Symbol bendliche Klemme .
Stellen Sie beim elektrischen Anschluss bitte sicher, dass die
Steckdose über einen Erdanschluss verfügt. Achten Sie bitte
darauf, dass die Steckdose nach installierter Dunstabzugs-
haube leicht zugänglich ist. Im Falle eines Direktanschlusses
an das Stromnetz muss zwischen Gerät und Netzleitung ein
allpoliger Schalter mit einer Kontaktweite von mindestens
3 mm, der der Belastung und den geltenden Richtlinien
entspricht, installiert werden.
Falls das benutzte Kochfeld ein Elektro-, Gas- oder Indukti-
onsfeld ist, muss der Mindestabstand zwischen diesem und
dem untersten Teil der Dunstabzugshaube mindestens 65
cm betragen.
Falls ein Verbindungsrohr verwendet wird, das aus zwei
oder mehr Teilen zusammengesetzt ist, muss der obere Teil
über den unteren gestülpt werden. Auf keinen Fall darf das
Abluftrohr der Küchenhaube an ein Rohr angeschlossen
werden, in dem Warmluft zirkuliert oder das zur Entlüftung
von Geräten verwendet wird, die an eine andere Energiequelle
als an Strom angeschlossen sind. Vor der Durchführung der
Montagevorgänge, den/die Fettfilter entfernen, damit sich
das Gerät leichter handhaben läßt (Abb.2).
Es empehlt sich der Einsatz eines Luftableitungsrohres,
das denselben Durchmesser aufweist, wie der der Luftab-
zugsönung. Die Verwendung eines Reduzierstücks könnte
die Leistungen des Erzeugnisses beeinträchtigen und das
Betriebsgeräusch erhöhen.
Sollte das Gerät mit Abzugsvorrichtung montiert werden,
DEUTSCH DE
- 9 -

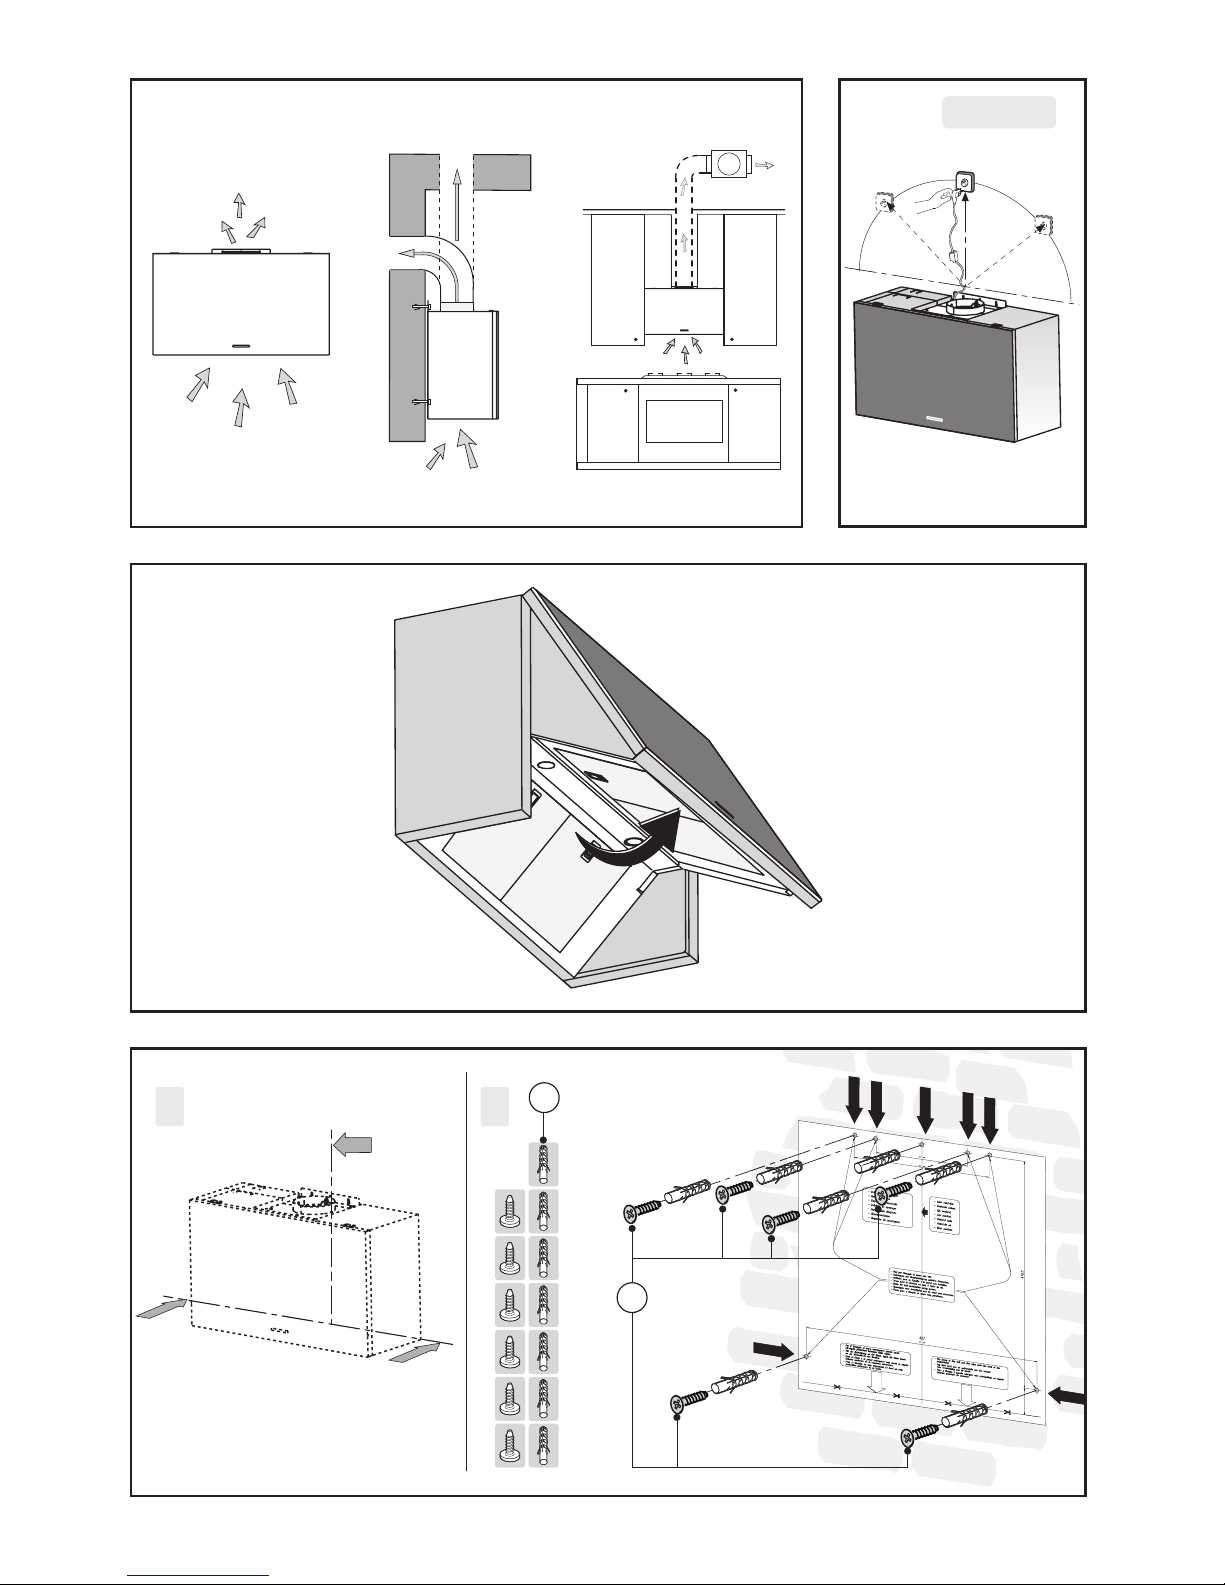
bereiten Sie eine Luftabzugsönung vor.
-Die Unterseite der Dunstabzugshaube an der Wand vor-
zeichnen, Abb.3A (dabei den Mindestabstand zur Kochäche
berücksichtigen).
-Die Bohrschablone an der Wand anbringen; dabei darauf
achten, dass die Linie mit der vorgezeichneten des vorherigen
Absatzes übereinstimmt.
-Die Befestigungsbohrungen markieren und ausführen
(Abb.3B).
-Die 7 Spreizdübel sowie die 6 Schrauben Cbefestigen, ohne
diese vollständig anzuziehen (Abb.3B).
-Das Gerät an der Wand anbringen (Abb.4).
-Darauf achten, dass die 2 Nivellierschrauben Jvollständig
angezogen sind (Abb.5).
-Das Gerät in waagerechter Position durch Betätigung der
beiden Nivellierschrauben Jausrichten (Abb.5).
-Nach erfolgter Einstellung die Dunstabzugshaube mit den
Schrauben Cund Dendgültig befestigen (Abb.4).
-Damit das Motoraggregat bei einemWartungseingri leicht
zu erreichen ist empehlt es sich, nach der endgültigen Nivel-
lierung und Befestigung des Geräts die Bügel abzunehmen
(Abb.5).
-Verwenden Sie zur Geräteinstallation Schrauben und Dübel,
die für die jeweilige Wandart geeignet sind (zum Beispiel:
Betonwände, Wände aus Gipspappe usw.).
-Sollten die Schrauben und Dübel als Geräteausstattung
mitgeliefert werden, stellen Sie bitte sicher, dass diese für die
Art der Wand, an die das Gerät montiert werden soll, geeignet
sind.
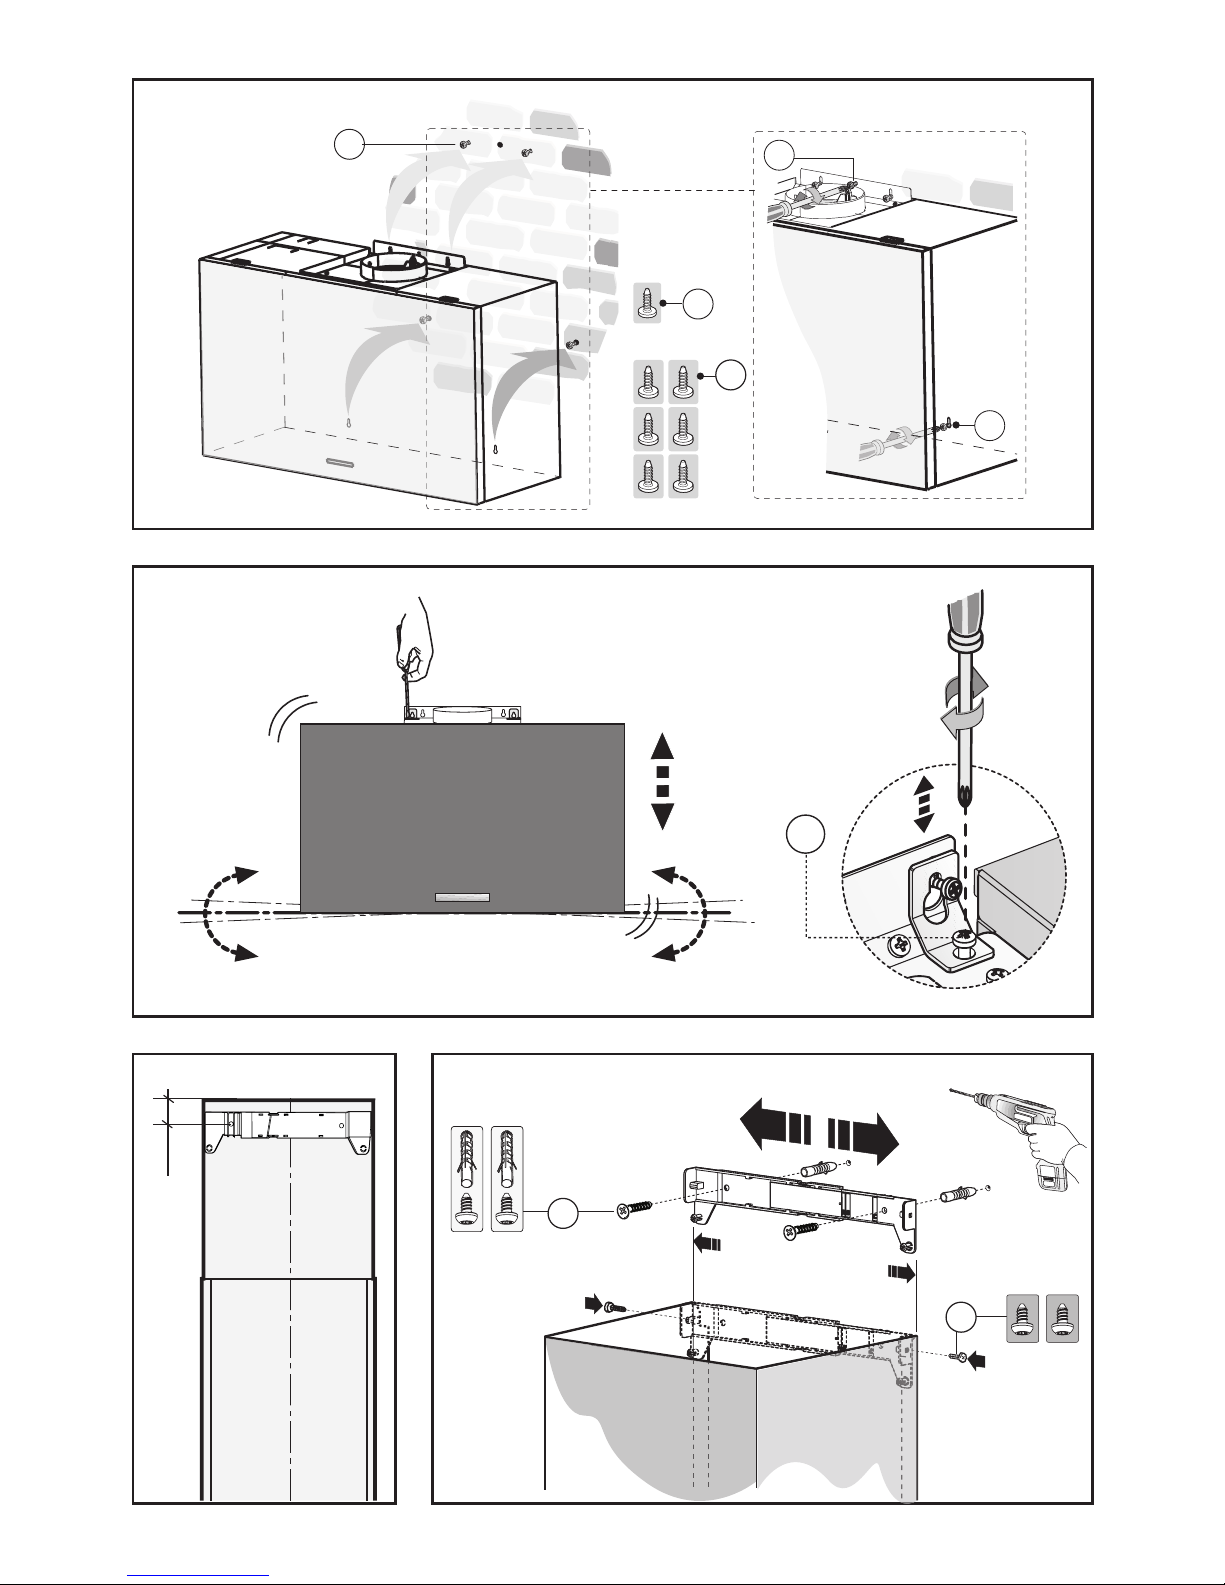
-Die Stromzuleitung innerhalb des Raumbedarfs derTeleskop-
verschalung verlegen. Falls Ihr Gerät in Abluftversion oder
Version mit äußerem Motor zu installieren ist, das Luftaus-
trittsloch vorbereiten.
-Die Breite des Haltebügels anhand der oberen Teleskopver-
schalung einstellen (Abb.7).
-Dann mit den Schrauben A(Abb.7) so an der Decke befesti-
gen, daß er mit der Abzugshaube ausgerichtet ist und die in
Abb.6 angegebene Entfernung von der Decke einhalten.
-Mittels eines Abluftrohrs den Flansch Fmit dem Luftaustritts-
loch verbinden (Abb.8).
-Die obere Teleskopverschalung in die untere Teleskopver-
schalung stecken.
-Die untere Teleskopverschalung auf der Haube in Position
bringen und die obere Teleskopverschalung bis zum Bügel
ausziehen und mit den Schrauben B(Abb.9) befestigen.
-Zur Umrüstung der Abzugshaube von der Abluftversion in
die Umluftversion, beim Händler die Aktivkohlelter besorgen
und die Montageanleitung befolgen.
-Achtung: Die Dunstabzugshaube kann auch mit dem
Luftabzug nach hinten installiert werden. Herzu wird das
Blech X mit dem Motor abgenommen und sie wird wie in
Abb.10 gezeigt gedreht.
Nehmen Sie auch den Wandbefestigungsbügel Y ab und
positionieren Sie ihn unter Verwendung der gleichen
Schrauben wie in Abb.10 gezeigt.
Mittels eines Abluftrohrs den Flansch Fmit dem vorbereiteten
Luftaustrittsloch verbinden. Für einen sauberen Abschluss
kann die Abdeckung Mmontiert werden (Abb.11).
Version:
-Das Gitter Eund den Kabeldurchgang Hvon der Abdeckung
Mlösen (Abb.12A - Abb.12B).
-Das Stromkabel durch den Schlitz in der Abdeckung M wie
in Abb.12B gezeigt führen.
-Nehmen Sie den Kabeldurchgang Hund setzen Sie ihn
zwischen das Versorgungskabel und den Schlitz.
-Setzen Sie die Aktivkohlelter in das Gerät ein (Abb.13).
-Die Abdeckung Mbefestigen und darauf achten, dass sie
richtig in die Befestigungsstifte eingehakt wird (Abb.11).
BENUTZUNG UND WARTUNG
Es wird empfohlen, die Dunstabzugshaube schon vor
Kochbeginn der Speisen einzuschalten. Es wird weiterhin
empfohlen, das Gerät nach Beendigung des Kochvorgangs
noch 15 Minuten weiterlaufen zu lassen, um den vollständigen
Abzug der Kochdünste zu gewährleisten.
Die Leistungsfähigkeit der Dunstabzugshaube hängt
entscheidend von der Sorgfalt und Regelmäßigkeit der
Wartung ab, insbesondere die des Fettlters und die des
Aktivkohlelters.
hat die Aufgabe, die in den Kochdünsten
enthaltenen Fettpartikel zurückzuhalten. Er ist demnach der
Verschmutzung besonders ausgesetzt und sollte, je nach
Gebrauch und Kochgewohnheiten, in mehr oder weniger
langen Zeitabschnitten gereinigt werden.
- Um der Brandgefahr vorzubeugen, müssen maximal alle 2
Monate die Fettlter gewaschen werden. Das geht auch mit
der Spülmaschine.
- Nach einigen Waschgängen können Farbveränderungen
auftreten. Hieraus resultiert jedoch kein Anspruch auf kosten-
losen Ersatz derselben.
Durch Nichteinhaltung der Vorgaben hinsichtlich des
Austauschs und der Reinigung der Fettfilter kann Brand
verursacht werden.
dienen dazu, die Luft, die in den Raum
zurückgeleitet wird zu reinigen; sie haben die Aufgabe, die
unangenehmen Gerüche, die während des Garvorgangs
entstehen, zu beseitigen.
- Die Standard-Aktivkohlelter müssen mindestens alle 4
Monate ausgewechselt werden. Die Sättigung der Aktivkohle
hängt davon ab, wie oft das Gerät benutzt wird, vom Gartyp
und von der Häugkeit, mit der die Reinigung des Fettlters
durchgeführt wird.
- Die Longlife-Aktivkohlelter müssen per Hand mit neutralen,
nicht scheuernden Reinigungsmitteln gewaschen werden
oder man gibt ihn in die Spülmaschine bei einer Temperatur,
die 65°C nicht überschreiten darf (der Waschzyklus muss
ohne Geschirr vollendet werden). Das überschüssige Wasser
entfernen ohne den Filter dabei zu beschädigen, die Bauteile
aus Kunststo entfernen und das Vlies im Ofen 60 Minuten
lang bei einer Temperatur von max. 100°C trocknen. Bei
normaler Nutzung des Gerätes sollte der Longlife-Filter jeden
Monat, oder wenn die Taste A blinkt, gereinigt werden. Nach
etwa 3 Jahren muss der Longlife-Filter ersetzt werden, da die
Geruchsfähigkeit reduziert wird.
Aktivkohlelters ist es unbedingt nötig sicherzustellen,
dass diese gut getrocknet sind.
Reinigen Sie die Haube innen und außen regelmäßig mit
Spiritus oder einem neutralen Flüssigreiniger ohne Scheuer-
mittel.
Die Beleuchtung der Dunstabzugshaube ist dazu geplant,
während des Kochvorgangs eingesetzt zu werden. Durch
einen verlängerten Einsatz der Beleuchtung wird die durch-
schnittliche Lebensdauer der Leuchten erheblich gemindert.
Das Nichteinhalten dieser Hinweise für die Reini-
gung der Haube und deren Auswechseln und die Reinigung
der Filter, führen zu Brandgefahr. Es wird daher empfohlen,
die hier gegebenen Ratschläge zu befolgen.
- 10 -

Zum Önen und Schließen der Tür. Beim
Önen werden gleichzeitig die Lampen und der Motor bei
der 1. Geschwindigkeit eingeschaltet.
Sollte während des Öffnens bzw. Schließens der Tür ein
Widerstand auftreten, so wird diese aus Sicherheitsgründen
blockiert. Um die Blockierung zu beenden, erneut die Taste
“A” drücken. Die Tür önet sich ein oder zwei Mal und kehrt
dann zur anfänglichen Einstellung zurück.
Zum Starten/Abschalten sowie
zur Beschleunigung des Motors.
Bei jedem kurzen Druck auf die Taste beschleunigt der Motor
von der 1. zur 2. zur 3. Geschwindigkeit und schaltet dann
ab. Bei jeder Geschwindigkeit wird ausschließlich die LED
aktiviert, welche die eingestellte Geschwindigkeit anzeigt.
Das Gerät verfügt über die intensive Geschwindigkeit. Für
deren Aktivierung dieTaste“B”für circa 2 Sekunden bei jeder
beliebigen Geschwindigkeitsstufe, in der sich der Motor der
Abzugshaube bendet, drücken. Die aktivierte Funktion wird
durch die blinkende LED der 3. Geschwindigkeit angezeigt.
Die Dauer der intensiven Geschwindigkeit beträgt 15 Minu-
ten; daraufhin kehrt die Abzugshaube zur letzten Einstellung
zurück. Zur Deaktivierung der Funktion vor der festgelegten
Zeit die Taste“B”drücken.
Zum Ein- und Ausschalten der
Lichter.
Die Lichtstärke kann in 3 Stufen reguliert werden: hoch, mittel
und niedrig, indem mehrmals die Taste“C”betätigt wird.
Stellt die Betriebszeit des Geräts auf 15
Minuten ein.
Wenn das Gerät sich in der 1., 2. oder 3. Geschwindigkeit
bendet, wird durch Drücken derTaste“D”dieTimerfunktion
aktiviert. Wenn diese aktiv ist, schaltet sich die LED “E” ein.
Nach Ablauf der 15 Minuten werden der Motor und die Lichter
der Abzugshaube ausgeschaltet. Sollte dieTür geönet sein,
wird sie geschlossen.
DieTimerfunktion kann nicht bei intensiver Geschwindigkeit
aktiviert werden.
Um dieTimerfunktion vor Ablauf der Zeit zu deaktivieren, die
Taste “A”drücken.
Nach 30 Betriebsstunden schaltet
sich die LED-Anzeige der Kontrollleuchte der Filter ohne Blin-
ken ein, und die Fettlter und Longlife-Aktivkohlelter – falls
vorhanden - müssen gereinigt werden. Die Rücksetzung der
Funktion erfolgt (bei ausgeschalteter Abzugshaube), indem
für 5 Sekunden die Taste “B” gedrückt wird. Danach schaltet
sich die LED-Anzeige der Filter aus, und die Einstellung startet
erneut bei Null.
Nach 120 Betriebsstunden blinkt die LED “H” durchgehend.
Dies bedeutet, dass der Standard-Aktivkohlefilter – falls
vorhanden - gewechselt werden muss. Die Rücksetzung der
Funktion erfolgt (bei ausgeschalteter Abzugshaube), indem
für 5 Sekunden die Taste “B” gedrückt wird. Danach schaltet
sich die LED-Anzeige “H” aus, und die Einstellung startet
erneut bei Null.
Die Funktion ermöglicht eine
dauerhafte Luftzirkulation in der Umgebung.
Diese wird bei ausgeschalteter Abzugshaube aktiviert, indem
für 5 Sekunden die Taste Timer“D” gedrückt wird. Der Motor
schaltet sich mit der 1.Geschwindigkeit 10 Minuten pro
Stunde ein. Die Funktion ist aktiv, wenn die Kontrollleuchte
“G” eingeschaltet ist. Während des Motorbetriebs blinkt die
Kontrollleuchte“G”.
Die Funktion wird durch die Betätigung einer beliebigenTaste
(außer der Lichter) deaktiviert.
Während der Glasreinigung,
um ein unbeabsichtigtes Einschalten der Bedienelemente zu
verhindern, können alle Funktionen für 30 Sekunden deakti-
viert werden. Für deren Deaktivierung circa 3 Sekunden die
Taste“A”drücken.Wenn die Funktion aktiviert ist, beginnt die
LED“F”zu blinken. Die Funktion kann nur bei ausgeschalteter
Abzugshaube aktiviert werden.
FÜR SCHÄDEN, DIE AUF DIE NICHTBEACHTUNG DER OBEN
GENANNTEN ANWEISUNGEN ZURÜCKZUFÜHREN SIND,
WIRD KEINERLEI VERANTWORTUNG ÜBERNOMMEN.
- 11 -

GÉNERALITÉS
Lire attentivement le contenu du mode d’emploi puisqu’il
fournit des indications importantes concernant la sécurité
d’installation, d’emploi et d’entretien. Le conserver pour d’
ultérieures consultations. L’appareil a été conçu pour être
utilisé dans le modèle aspirant (évacuation de l’air à l’extérieur
– Fig.1B), ltrant (retour de l’air à l’intérieur – Fig.1A) ou doté
d’un moteur externe (Fig.1C).
CONSEILS POUR LA SÉCURITÉ
1. Attention, lorsque dans la même pièce vous utilisez si-
multanément la hotte à évacuation avec un brûleur ou une
cheminée alimentés par une énergie autre que l’électricité,
vous pouvez créer un problème “d’inversion de ux”. Dans
ce cas la hotte aspire l’air nécessaire à leur combustion. La
dépression dans le local ne doit pas dépasser les 4 Pa (4x10⁻⁵
bar). Pour un fonctionnement en toute sécurité, n’oubliez pas
de prévoir une ventilation susante du local.Pour l’évacua-
tion vers l’extérieur, veuillez vous référer aux dispositions en
vigueur dans votre pays.
Avant de brancher la hotte au réseau de distribution
électrique:
-Lire les données reportées sur la plaquette d’identication
(appliquée à l’intérieur de la hotte) pour vérier si le voltage
et la puissance correspondent à ceux du réseau. Contrôler
aussi si la prise est adaptée. - En cas de doutes, contacter un
électricien qualié.
-Si le câble d’alimentation est abîmé, il faut le remplacer par
un autre câble ou par un ensemble, spécialement prévus, que
vous pouvez commander au fabricant ou à un de ses services
d’assistance technique.
2. Attention!
Dans certaines circonstances lesélectroménagers peuvent
être dangereux.
A)N’essayez pas de contrôler l’état des ltres quand la
hotte est en marche.
B)Ne jamais toucher les lampes et les zones adjacentes,
pendant et tout de suite après l’utilisation prolongée de
l’éclairage.
C)Il est absolument interdit de amber sous la hotte.
D)Évitez de laisser des flammes libres, elles sont
dangereuses pour les filtres et pour les risques
d’incendie.
E) Surveillez constamment les fritures pour éviter que
l’huile surchauée prenne feu.
F) Avant de procéder àtoute opération d’entretien, coupez
l’alimentation électrique de la hotte.
G)Cet appareil ne peut pas être utilisé par des enfants ou
par des personnes nécessitant une surveillance.
H)Veillez à ce que les enfants ne jouent pas avec
l’appareil.
I) Lorsque la hotte est utilisée en présence d’appareils
utilisant du gaz ou d’autres combustibles, la pièce doit
être correctement ventilée.
L) Si le nettoyage n’est pas réalisé conformément aux
instructions, un incendie peut se déclarer.
Cet appareil est marqué conformément à la Directive
européenne 2002/96/CE sur les déchets d’équipements
électriques et électroniques (DEEE). Assurez-vous que
cet appareil soit mis au rebus selon la réglementation en
vigueur, vous éviterez ainsi des conséquences néfastes sur
l’environnement et la santé.
Le symbole appliqué sur le produit ou sur la
documentation jointe rappelle que cet appareil ne doit
pas être traité comme un déchet domestique mais faire
l’objet d’une collecte sélective dans une déchetterie
spécialisée dans le recyclage des appareils électriques et
électroniques. Conformez-vous aux réglementations locales
sur la collecte et l’élimination des déchets. Pour tout autre
renseignement sur le traitement, la récupération et le
recyclage de cet appareil, veuillez contacter le bureau
concerné de votre ville, le service de collecte des déchets
domestiques ou le magasin où vous avez acheté votre
appareil.
INSTRUCTIONS POUR L’INSTALLATION
Le montage et le branchement électrique doivent être
eectués par un personnel spécialisé.
Cet appareil est fabriqué en classe I, il faut par conséquent le
raccorder à une prise de terre.
-Procédez au raccordement électrique comme suit:
MARRON = Lligne
BLEU = Nneutre
JAUNE/VERT =terre.
Le câble neutre doit être raccordé à la borne portant le
symbole Ntandis que le câble JAUNE/VERT, doit être raccordé
à la borne près du symbole de terre .
Lors des opérations de raccordement électrique, assurez-vous
que la prise de courant comporte bien une borne de mise à
la terre. Une fois l’installation terminée, cette prise doit être
facilement accessible.
Un interrupteur omnipolaire ayant une distance d’ouverture
des contacts d’au moins 3 mm, dimensionné à la charge et
conforme aux réglementations applicables en la matière,
doit être intercalé entre le secteur et l’appareil en cas de
raccordement direct au secteur.
La distance minimum entre la surface de support des réci-
pients de cuisson sur le dispositif de cuisson et la partie la plus
basse de la hotte pour cuisine doit être de 65 cm au moins.
S’il doit être utilisé un tuyau de connection composé de deux
ou plusieurs parties, la partie superieure doit être à l’exterieur
de celle inférieure. Ne pas relier le tuyau d’échappement de
la hotte à un conduit dans lequel circule de l’air chaud ou
employé pour évacuer les fumées des appareils alimentés
par une énergie dierente de celle électrique. En vue d’une
manœuvrabilité de l’appareil plus facile, avant d’exécuter les
opérations de montage, déconnecter le ltre/les ltres anti-
graisse (Fig.2).
Nous conseillons d’utiliser un tuyau d’évacuation de l’air de
même diamètre que l’orice de sortie de l’air. L’utilisation d’une
réduction pourrait diminuer les performances du produit et
augmenter le niveau sonore.
S’il s’agit d’une hotte aspirante, il faudra prévoir une ouverture
pour l’évacuation de l’air.
FRANÇAIS FR
- 12 -

-Tracez le côté inférieur de la hotte sur le mur Fig.3A (en
tenant compte de la distance minimum du plan de cuisson).
-Positionnez le gabarit de xation sur le mur en veillant à
ce que la ligne coïncide avec la ligne tracée au paragraphe
précédent.
-Marquez et eectuez les trous de xation (Fig.3B).
-Fixez les 7 chevilles expansibles et les 6 vis Csans les visser
à fond (Fig.3B).
-Placez l’appareil au mur (Fig.4).
-Veillez à ce queles 2 vis de nivellement Jsoient complètement
vissées (Fig.5).
-Alignez l’appareil en position horizontale en intervenant sur
les deux vis de nivellement J(Fig.5).
-Lorsque le réglage est terminé, xer dénitivement la hotte
à l’aide des vis Cet D(Fig.4).
-Pour pouvoir accéder plus facilement au groupe moteur
en cas d’assistance, après avoir nivelé et xé dénitivement
l’appareil, nous conseillons d’enlever les étriers (Fig.5).
-Pour les opérations de montage, utilisez des vis et des
chevilles adaptées à la nature du mur (béton armé par ex. ou
placoplâtre, etc.).
-Si les vis et chevilles sont fournies avec l’appareil, assurez-
vous qu’elles soient bien adaptées à la nature du mur qui
supportera la hotte.
-Prévoir l’alimentation électrique à l’intérieur de l’encombre-
ment du raccord de décoration.
Si votre appareil doit être installé dans le modèle aspirant
ou doté d’un moteur externe, prévoir le trou de l’évacuation
de l’air.
-Régler d’abord la largeur de la bride de support du raccord
supérieur (Fig.7).
-Esuite la xer au plafond, de manière à ce qu’elle soit sur l’axe
de votre hotte au moyen des vis A(Fig.7), tout en respectant
la distance depuis le plafond indiquée à la Fig.6.
-Raccorder la bride Fau trou d’évacuation de l’air au moyen
d’un tube de raccordement (Fig.8).
-Mettre en position sur la cape le raccord télescopique
inférieur, extraire le raccord télescopique supérieur jusqu’à
l’étrier et le xer avec les vis B(Fig.9).
-Si on veut transformer la hotte du modèle aspirant au modèle
ltrant, demander à votre revendeur les ltres au charbon actif
et suivre les instructions de montage.
-Attention: Il est possible d’installer la hotte avec sortie
d’air arrière, il sut de retirer la bride X avec le moteur et
de la tourner, comme illustré Fig.10.
Retirez aussi la bride de xation murale Y et positionnez-
la comme illustré Fig.10 en réutilisant les mêmes vis.
Avec un tuyau d’échappement d’air, connecter la bride
Fau trou d’évacuation d’air déjà prédisposé. Pour une
fermeture plus nette, il est possible de monter la couverture
M(Fig.11).
Version aspirante:
-Enlever la grille Eet le passe câble Hde la couverture M
(Fig.12A – Fig.12B).
-Faites passer le câble d’alimentation par la fente du chapeau
Mvoir Fig.12B.
-Prenez le passe-l Het placez-le entre le câble d’alimentation
et la fente
-Introduisez le ltre à charbon à l’intérieur de la hotte
(Fig.13).
-Fixez le chapeau Men veillant à ce qu’il s’accroche
parfaitement aux goujons de xation (Fig.11).
EMPLOI ET ENTRETIEN
Il est conseillé de mettre en service la hotte quelques minu-
tes avant de commencer à cuisiner. De même il est conseillé
de l’arrêter 15 minutes après avoir terminé la cuisson pour
éliminer au maximum les odeurs et évacuer l’air vicié.
Le bon fonctionnement de la hotte est lié à la fréquence des
opérations d’entretien et, plus particulièrement, à l’entretien
du ltre anti-graisse et du ltre à charbon actif.
à pour rôle de retenir les particules
grasses en suspension dans l’air; par conséquent, il peut se
boucher en un temps qui varie en fonction de l’utilisation de
l’appareil.
- Pour prévenir le danger d’incendie, chaque 2 mois au maxi-
mum, il est nécessaire de laver les ltres anti-graisse à la main
en utilisant des détergents liquides neutres non abrasifs ou
dans le lave-vaisselle à température basse et cycle court.
- Après plusieurs lavages, la couleur peut changer. Cela ne
donne pas le droit à une requête pour leur remplacement.
servent à purier l’air qui sera
rejeté dans la pièce et à atténuer les odeurs générées par la
cuisson.
- Les ltres à carbone actif non régénérables doivent être
remplacés chaque 4 mois au maximum. La saturation du car-
bone actif dépend de l’utilisation plus où moins prolongée de
l’appareil, du type de cuisine et de la régularité avec laquelle
vous eectuez le nettoyage du ltre anti-graisse.
- Les ltres de carbone actif régénérables doivent être lavé
à la main, avec des détergents neutres non abrasifs, ou dans
le lave-vaisselle à température maximale de 65°C (le cycle de
lavage doit être complet et sans plats) Enlever l’eau en excès
sans abîmer le ltre, retirer les parties en plastique, faire sécher
le matelas au four pendant au moins 15 minutes environ et à
la température maximale de 100°C. Cette opération doit être
répétée chaque 2 mois pour maintenir ecace la fonction
du ltre à carbone régénérable. Ces derniers doivent être
remplacés au maximum chaque 3 ans ou lorsque le matelas
est endommagé.
carbone actif régénérables, il est important que ceux-ci
soient bien secs.
Nettoyer fréquemment la hotte, soit à l’intérieur que à
l’extérieur en utilisant un chion humidié avec de l’alcool
dénaturé ou des détergents liquides neutres non abrasifs.
L’installation d’illumination est conçue pour l’utilisation
pendant la cuisson et non pour l’utilisation prolongée pour
illuminer la pièce. L’utilisation prolongée de l’illumination
réduit considérablement la durée moyenne de la lampe.
La non-observation de ces remarques de netto-
yage de la hotte et du remplacement et nettoyage des ltres
comporte des risques d’incendie. Il est donc recommandé de
suivre les instructions suggérées.
Pour remplacer les ampoules dichroïques, débranchez la
lampe en la détachant précautionneusement du support
à l’aide d’un petit tournevis plat ou d’un outil équivalent.
ATTENTION! Pendant cette opération, veiller à ne pas
grier la hotte.
Remplacez-les par des ampoules de même type.
Ouvre et ferme le cache. À l’ouverture
les lampes s’allument et le moteur à la 1ère vitesse se met en
marche.
Si le cache pendant l’ouverture et la fermeture est soumis
à une résistance, pour des raisons de sécurité il se bloque.
- 13 -

Pour le débloquer, appuyez à nouveau sur le bouton “A”. Le
cache eectuera une ou deux ouvertures pour retourner à la
conguration initiale.
Il met en marche/arrête et augmente
la vitesse du moteur.
À chaque fois que l’on appuie brièvement sur le bouton, le
moteur augmente de vitesse de la 1ère à la 2ème à la 3ème puis
il s’arrête. À chaque vitesse s’allume exclusivement la led
indiquant la vitesse programmée.
L’appareil est pourvu de la vitesse intensive. Pour l’activer,
appuyez sur le bouton “B” pendant 2 secondes environ à
n’importe quelle vitesse du moteur la hotte se trouve. La
fonction active est indiquée par la led de la 3ème vitesse qui
clignotera. La durée de la vitesse intensive est de 15 minutes
après lesquelles la hotte retourne à la dernière conguration.
Pour désactiver ka fonction avant le laps de temps déni,
appuyez sur le bouton“B”.
Allume et éteint les lumières.
Il est possible de régler l’intensité des lumières sur 3 niveaux
haut, moyen et faible en appuyant plusieurs fois sur le
bouton“C”.
Il programme le temps de fonctionnement
de l’appareil pendant 15 minutes.
Lorsque l’appareil se trouve à la 1ère, 2ème ou 3ème vitesse, en
appuyant sur le bouton “D”, la fonction Timer s’active et la
led “E” s’allume. Lorsque les 15 minutes se sont écoulées, le
moteur et les lumières de la hotte s’éteignent. Si le cache est
ouvert, il se referme.
La fonction Timer ne peut être activée avec la vitesse
intensive.
Pour désactiver la fonction Timer avant la n, appuyez sur
le bouton“A”.
Après 30 heures de fonctionnement,
l’indicateur à LED du voyant des ltres s’allume sans clignoter,
et dans ce cas il faut nettoyer les ltres anti-gras et les ltres à
charbon actif à longue durée, si présents. La réinitialisation de
la fonction se vérie (avec la hotte à l’arrêt) en appuyant sur
le bouton “B” pendant 5 secondes. Lorsque cette opération
est terminée, la led des ltres s’éteint et la conguration
repart de zéro.
Après 120 heures de fonctionnement, le LED “H” commence
à clignoter en continu. Ceci signie qu’il faut remplacer les
ltres à charbon actif standard, si présents. La réinitialisation
de la fonction se vérie (avec la hotte à l’arrêt) en appuyant
sur le bouton“B”pendant 5 secondes. Lorsque cette opération
est terminée, la led “H” s’éteint et la conguration repart de
zéro.
La fonction permet d’avoir une
recirculation constante de l’air dans la pièce.
Elle s’active, avec la hotte à l’arrêt, en appuyant pendant 5
secondes sur le boutonTimer“D”. Le moteur se met en marche
à la 1ère vitesse pendant 10 minutes toutes les heures. La
fonction est active lorsque le témoin“G”est allumé. Pendant
le fonctionnement du moteur, le témoin “G”clignote.
La fonction se désactive en appuyant sur n’importe quel
bouton à l’exclusion des lumières.
Pendant le nettoyage du verre,
pour éviter d’actionner involontairement les commandes,
il est possible de le désactiver pendant 30 secondes. Pour
les désactiver, appuyez pendant 3 secondes sur le bouton
“A”. Lorsque la fonction est active, la led “F” commencera à
clignoter. Il est uniquement possible d’activer la fonction
avec la hotte à l’arrêt.
NOUS DECLINOS TOUTE RESPONSABILI TE POUR LES
EVENTUELS DÉGATS PROVOQUÉS PAR L’INOBSERVATION
DES SUSDITES INSTRUCTIO.
- 14 -

GENERALITÀ
Leggere attentamente il contenuto del presente libretto in
quanto fornisce importanti indicazioni riguardanti la sicurezza
di installazione, d’uso e di manutenzione. Conservare il
libretto per ogni ulteriore consultazione. L’apparecchio è stato
progettato per uso in versione aspirante (evacuazione aria
all’esterno - Fig.1B) e ltrante (riciclo aria all’interno - Fig.1A)
o con motore esterno (Fig.1C).
AVVERTENZE PER LA SICUREZZA
1. Fare attenzione se funzionano contemporaneamente una
cappa aspirante e un bruciatore o un focolare dipendenti
dall’aria dell’ambiente ed alimentati da un’energia diversa
da quella elettrica, in quanto la cappa aspirando toglie
all’ambiente l’aria di cui il bruciatore o il focolare necessita
per la combustione. La pressione negativa nel locale non deve
superare i 4 Pa (4x10⁻⁵ bar). Per un funzionamento sicuro,
provvedere quindi ad un’opportuna ventilazione del locale.
Per l’evacuazione esterna attenersi alle disposizioni vigenti
nel vostro paese.
Prima di allacciare il modello alla rete elettrica:
-Controllare la targa dati (posta all’interno dell’apparecchio)
per accertassi che la tensione e potenza siano corrispondenti a
quella della rete e la presa di collegamento sia idonea. In caso
di dubbio interpellare un elettricista qualicato.
-Se il cavo di alimentazione è danneggiato, esso deve essere
sostituito da un cavo o un assieme speciali disponibile presso
il costruttore o il suo servizio assistenza tecnica.
2. Attenzione!
In determinate circostanze gli elettrodomestici possono
essere pericolosi.
A) Non cercare di controllare i ltri con la cappa in funzio-
ne.
B) Non toccare le lampade e le zone adiacenti, durante e
subito dopo l’uso prolungato dell’impianto di illumina-
zione.
C) E’ vietato cuocere cibi alla amma sotto la cappa.
D) Evitare la amma libera, perché dannosa per i ltri e
pericolosa per gli incendi.
E) Controllare costantemente i cibi fritti per evitare che
l’olio surriscaldato prenda fuoco.
F) Prima di eettuare qualsiasi manutenzione, disinserire
la cappa dalla rete elettrica.
G) Questo apparecchionon è destinato all’utilizzoda parte
di bambini o persone che necessitano di supervisione.
H) Controllare che i bambini non giochino con l’apparec-
chio.
I) Quando la cappa viene utilizzata contemporaneamente
ad apparecchi che bruciano gas o altri combustibili, il
locale deve essere adeguatamente ventilato.
L) Se le operazioni di pulizia non vengono eseguite nel
rispetto delle istruzioni, esiste il rischio che si sviluppi un
incendio.
Questo apparecchio è contrassegnato in conformità alla
Direttiva Europea 2002/96/EC,Waste Electrical and Electronic
Equipment (WEEE). Assicurandosi che questo prodotto sia
smaltito in modo corretto, l’utente contribuisce a prevenire le
potenziali conseguenze negative per l’ambiente e la salute.
Il simbolo sul prodotto o sulla documentazione di ac-
compagnamento indica che questo prodotto non deve
essere trattato come riuto domestico ma deve essere
consegnato presso l’idoneo punto di raccolta per il ri-
ciclaggio di apparecchiature elettriche ed elettroniche. Disfar-
sene seguendo le normative locali per lo smaltimento dei ri-
uti. Per ulteriori informazioni sul trattamento, recupero e
riciclaggio di questo prodotto, contattare l’idoneo ucio lo-
cale, il servizio di raccolta dei riuti domestici o il negozio
presso il quale il prodotto è stato acquistato.
ISTRUZIONI PER L’INSTALLAZIONE
Le operazioni di montaggio e collegamento elettrico de-
vono essere eettuate da personale specializzato.
Questo apparecchio è costruito in classe I, perciò deve essere
collegato alla presa di terra.
-L’allaccio alla rete elettrica deve essere eseguito come
segue:
MARRONE = Llinea
BLU = Nneutro
GIALLO/VERDE =terra.
Il cavo neutro deve essere collegato al morsetto con il simbolo
N mentre il cavo GIALLO/VERDE, deve essere collegato al
morsetto vicino al simbolo di terra .
Nell’operazione di collegamento elettrico assicurarsi che la
presa di corrente sia munita di collegamento di terra. Dopo
il montaggio della cappa d’aspirazione, fare attenzione
che la posizione della presa di alimentazione elettrica sia
facilmente raggiungibile. Nel caso di collegamento diretto
alla rete elettrica è necessario interporre tra l’apparecchio e
la rete un interruttore onnipolare con apertura minima tra
i contatti 3 mm, dimensionato al carico e rispondente alle
norme vigenti.
La distanza minima fra la supercie di supporto dei recipienti
di cottura sul dispositivo di cottura e la parte più bassa della
cappa da cucina deve essere di almeno 65 cm. Se dovesse
essere usato un tubo di connessione composto di due o
più parti, la parte superiore deve essere all’esterno di quella
inferiore. Non collegare lo scarico della cappa ad un condotto
in cui circoli aria calda o utilizzato per evacuare fumi degli
apparecchi alimentati da un’energia diversa da quella elettri-
ca. Prima di procedere alle operazioni di montaggio, per una
più facile manovrabilità dell’apparecchio disinserire i ltro/i
antigrasso (Fig.2).
Si consiglia l’utilizzo di un tubo evacuazione aria con lo stesso
diametro della angia uscita aria. L’utilizzo di una riduzione
potrebbe diminuire le prestazioni del prodotto ed aumentare
la rumorosità.
Nel caso di montaggio dell’apparecchio in versione aspirante
predisporre il foro di evacuazione aria.
-Tracciare il lato inferiore della cappa sul muro Fig.3A
(tenendo conto della distanza minima dal piano di cottura).
-Posizionare la dima di fissaggio sulla parete, facendo
attenzione che la linea coincida con quella tracciata nel
paragrafo precedente.
ITALIANO IT
- 15 -

-Segnare ed eseguire i fori di ssaggio (Fig.3B).
-Fissare i 7 tasselli ad espansione e le 6 viti Csenza avvitarle
completamente (Fig.3B).
-Posizionare l’apparecchio al muro (Fig.4).
-Fare attenzione che le 2 viti di livellamento Jsiano avvitate
completamente (Fig.5).
-Allineare l’apparecchio in posizione orizzontale agendo sulle
due viti di livellamento J(Fig.5).
-A regolazione avvenuta ssare la cappa denitivamente
tramite le viti C e D(Fig.4).
-Per una più facile accessibilità al gruppo motore in caso
di assistenza, dopo aver livellato e ssato denitivamente
l’apparecchio, consigliamo di rimuovere le stae (Fig.5).
-Per i vari montaggi utilizzare viti e tasselli ad espansione
idonei al tipo di muro (es. cemento armato, cartongesso,
ecc).
-Nel caso in cui le viti e i tasselli siano forniti in dotazione con
il prodotto accertarsi che siano idonei per il tipo di parete in
cui deve essere ssata la cappa.
-Predisporre l’alimentazione elettrica entro l’ingombro del
camino decorativo. Se il vostro apparecchio deve essere
installato in versione aspirante o in versione motore esterno,
predisporre il foro evacuazione aria.
-Regolare la larghezza della staa di supporto del camino
decorativo superiore (Fig.7).
-Successivamente ssarla al muro in modo che sia in asse con
la vostra cappa tramite le viti A(Fig.7) e rispettando la distanza
dal sotto indicata in Fig.6.
-Collegare, mediante un tubo di raccordo la angia Fal foro
evacuazione aria (Fig.8).
-Inlare il camino decorativo superiore all’interno del camino
decorativo inferiore.
-Appoggiare il camino decorativo inferiore sopra la scocca,
slare il camino decorativo superiore no alla staa e ssarlo
tramite le viti B (Fig.9).
-Per trasformare la cappa da versione aspirante a versione
ltrante, richiedere al vostro rivenditore i ltri al carbone attivo
e seguire le istruzioni di montaggio.
-Attenzione: Èpossibile installare la cappa con l’uscita
aria posteriore, rimuovendo la staa X con il motore e
ruotandola, come illustrato in Fig.10.
Rimuovereanche lastaa ssaggioa muroY e posizionarla
come indicato in Fig.10 utilizzando le stesse viti.
Mediante un tubo essibile, connettere la angia Fal foro di
evacuazione aria già predisposto. Per una nitura più pulita,
è possibile montare il cupolino M(Fig.11).
-Rimuovere la griglia Ee il passacavo Hdal cupolino M
(Fig.12A - Fig.12B).
-Far passare il cavo di alimentazione sull’asola del cupolino M
indicata in Fig.12B.
-Prendere il passacavo He posizionarlo trà il cavo di
alimentezione e l’asola.
-Inserire i filtri al carbone attivo all’interno della cappa
(Fig.13).
-Fissare il cupolino Mfacendo attenzione che si agganci
perfettamente ai perni di ssaggio (Fig.11).
USO E MANUTENZIONE
Si raccomanda di mettere in funzione l’apparecchio prima di
procedere alla cottura di un qualsiasi alimento. Si raccomanda
di lasciar funzionare l’apparecchio per 15 minuti dopo aver
terminato la cottura dei cibi, per un’evacuazione completa
dell’aria viziata.
Il buon funzionamento della cappa è condizionato da
una corretta e costante manutenzione; una particolare
attenzione deve essere data al ltro antigrasso e al ltro al
carbone attivo.
ha il compito di trattenere le particelle
grasse in sospensione nell’aria, pertanto è soggetto
ad intasarsi in tempi variabili relativamente all’uso
dell’apparecchio.
- Per prevenire il pericolo di eventuali incendi, al massimo
ogni 2 mesi, è necessario lavare i ltri antigrasso a mano,
utilizzando detersivi liquidi neutri non abrasivi, oppure in
lavastoviglie a basse temperature e con cicli brevi.
- Dopo alcuni lavaggi, si possono vericare delle alterazioni
del colore. Questo fatto non dà diritto a reclamo per
l’eventuale loro sostituzione.
servono per depurare l’aria che
viene rimessa nell’ambiente ed ha la funzione di attenuare
gli odori sgradevoli generati dalla cottura.
- I ltri al carbone attivo non rigenerabili devono essere so-
stituiti ogni 4 mesi al massimo. La saturazione del carbone
attivo dipende dall’uso più o meno prolungato dell’apparec-
chio, dal tipo di cucina e dalla regolarità con cui viene eet-
tuata la pulizia del ltro antigrasso.
- I ltri al carbone attivo rigenerabili devono essere lavati a
mano, con detergenti neutri non abrasivi, o in lavastoviglie
con una temperatura massima di 65°C (il ciclo di lavaggio
deve essere completo senza stoviglie). Togliere l’acqua in
eccesso senza rovinare il ltro, rimuovere le parti in plastica,
e far asciugare il materassino in forno per almeno 15 minuti
circa ad una temperatura di 100°C massimo. Per mantenere
eciente la funzione del ltro al carbone rigenerabile questa
operazione deve essere ripetuta ogni 2 mesi. Questi devono
essere sostituiti al massimo ogni 3 anni oppure quando il
materassino risulta danneggiato.
attivo rigenerabili è importante che questi siano asciu-
gati bene.
Pulire frequentemente la cappa, sia internamente che
esternamente, usando un panno inumidito con alcool dena-
turato o detersivi liquidi neutri non abrasivi.
L’impianto di illuminazione è progettato per l’uso durante la
cottura e non per l’uso prolungato di illuminazione generale
dell’ambiente. L’uso prolungato dell’illuminazione diminuisce
notevolmente la durata media delle lampade.
Attenzione: L’inosservanza delle avvertenze di pulizia della
cappa e della sostituzione e pulizia dei ltri comporta rischi
di incendi. Si raccomanda quindi di attenersi alle istruzioni
suggerite.
Per sostituire le lampade dicroiche, sconnettere la lampada
allentandola con cautela dal portalampade con l’aiuto di
un piccolo cacciavite piatto o uno strumento equivalente.
ATTENZIONE! Nel fare questa operazione, fare attenzione
a non graare la cappa.
Sostituire con lampade dello stesso tipo.
Apre e chiude lo sportello. All’apertura
si accendono contemporaneamente le lampade e il motore
alla 1° velocità.
Se durante l’apertura o chiusura lo sportello incontra una
resistenza questo per motivi di sicurezza si blocca. Per
sbloccarlo premere di nuovo il tasto“A”. Lo sportello eettuerà
una o due aperture per ritornare al settaggio iniziale.
Accende/Spegne e aumenta la velocità
- 16 -

del motore.
Ad ogni pressione breve del tasto il motore aumenta di
velocità dalla 1° alla 2° alla 3° per poi spegnersi. Ad ogni
velocità si accende solo ed esclusivamente il led indicante la
velocità impostata.
L’apparecchio è dotato della velocità intensiva. Per attivarla
premere il tasto “B” per 2 secondi circa in qualsiasi livello di
velocità del motore si trovi la cappa. La funzione attiva viene
indicata dal led della 3° velocità che risulterà lampeggiante.
La durata della velocità intensiva è di 15 minuti dopodiché la
cappa torna all’ultima impostazione settata. Per disattivare la
funzione prima del tempo denito premere il tasto“B”.
Accende/Spegne le luci.
E’possibile regolare l’intensità delle luci su 3 livelli: alto, medio
e basso premendo più volte il tasto“C”.
Imposta il tempo di funzionamento
dell’apparecchio per 15 minuti.
Quando l’apparecchio si trova alla 1°, 2° o 3° velocità,
premendo il tasto “D”, si attiva la funzione Timer. Quando
questa è attiva il led “E” si accende. Al termine dei 15 minuti
il motore e le luci della cappa si spengono. Se lo sportello è
aperto questo si chiude.
La funzione Timer non è attivabile con la velocità intensiva.
Per disattivare la funzione Timer prima del termine premere
il tasto“A”.
= Dopo 30 ore di funzionamento l’indicatore a
LED della spia dei ltri si accende senza lampeggiare, e in tal
caso occorre pulire i ltri antigrasso e i ltri al carbone attivo
a lunga durata, se presenti. Il reset della funzione avviene
(a cappa spenta) premendo il tasto “B” per 5 secondi. Fatta
questa operazione il led della segnalazione ltri si spegne e
l’impostazione riparte da zero.
Dopo 120 ore di funzionamento, il LED“H”inizia a lampeggiare
in modo permanente. Questo signica che occorre sostituire
i ltri a carbone attivo standard, se presenti. Il reset della
funzione avviene (a cappa spenta) premendo per 5 secondi
il tasto “B”. Fatta questa operazione il led “H” si spegne e
l’impostazione riparte da zero.
La funzione permette di avere un ricircolo
costante dell’aria nell’ambiente.
Questa si attiva, a cappa spenta, premendo per 5 secondi
il tasto Timer “D”. Il motore si accende alla 1° velocità per
10 minuti ogni ora. La funzione è attiva quando la spia “G”
è accesa. Durante il funzionamento del motore la spia “G”
lampeggia.
La funzione si disattiva premendo qualsiasi tasto escluso
le luci.
Durante la pulizia del vetro, per evitare di
azionare involontariamente i comandi, è possibile disattivarli
per 30 secondi. Per disattivarle premere per circa 3 secondi
il tasto “A”. Quando la funzione è attiva il led “F” inizierà a
lampeggiare. La funzione è attivabile solo a cappa spenta.
SIDECLINAOGNI RESPONSABILITA’PEREVENTUALIDANNI
PROVOCATI DALLA INOSSERVANZA DELLE SUDDETTE
AVVERTENZE.
- 17 -

GENERAL
Carefully read the following important information regarding
installation safety and maintenance. Keep this information
booklet accessible for further consultations.The appliance has
been designed for use in the ducting version (air exhaust to
the outside – Fig.1B), ltering version (air circulation on the
inside – Fig.1A) or with external motor (Fig.1C).
SAFETY PRECAUTION
1. Take care when the cooker hood is operating simultane-
ously with an open replace or burner that depend on the air
in the environment and are supplied by other than electrical
energy, as the cooker hood removes the air from the environ-
ment which a burner or replace need for combustion. The
negative pressure in the environment must not exceed 4Pa
(4x10⁻⁵ bar). Provide adequate ventilation in the environment
for a safe operation of the cooker hood.
Follow the local laws applicable for external air evacuation.
Before connecting the model to the electricity network:
-Control the data plate (positioned inside the appliance)
to ascertain that the voltage and power correspond to the
network and the socket is suitable. If in doubt ask a qualied
electrician.
-If the power supply cable is damaged, it must be replaced
with another cable or a special assembly, which may be
obtained direct from the manufacturer or from the Technical
Assistance Centre.
2. Warning!
In certain circumstances electrical appliances may be a
danger hazard.
A)Do not check the status of the lters while the cooker
hood is operating.
B)Do not touch bulbs or adjacent areas, during or straight
after prolonged use of the lighting installation.
C)Flambè cooking is prohibited underneath the cooker
hood.
D)Avoid free ame, as it is damaging for the lters and a
re hazard.
E)Constantly check food frying to avoid that the
overheated oil may become a re hazard.
F) Disconnect the electrical plug prior to any maintenance.
G)This appliance is not intended for use by young children
or inrm persons without supervision.
H) Young children should be supervised to ensure they do
not play with the appliance
I) There shall be adequate ventilation of the room when
the rangehood is used at the same time as appliances
burning gas or other fuels.
L) There is a risk of re if cleaning is not carried out in
accordance with the instructions.
This appliance conforms to theEuropeanDirectiveEC/2002/96,
Waste Electrical and Electronic Equipment (WEEE). By making
sure that this appliance is disposed of in a suitable manner,
the user is helping to prevent potential damage to the
environment or to public health.
The symbol on the product or on the accompanying
paperwork indicates that the appliance should not be
treated as domestic waste, but should be delivered to a
suitable electric and electronic appliance recycling collection
point. Follow local guidelines when disposing of waste. For
more information on the treatment, re-use and recycling of
this product, please contact your local authority, domestic
waste collection service or the shop where the appliance was
purchased.
INSTALLATION INSTRUCTIONS
Assembly and electrical connections must be carried out
by specialised personnel.
This is a class I, appliance and must therefore be connected
to an eecient earthing system.
-The appliance must be connected to the electricity supply
as follows:
BROWN = Lline
BLUE = Nneutral
YELLOW/GREEN = earth.
The neutral wire must be connected to the terminal with the
N symbol while the YELLOW/GREEN, wire must be connected
to the terminal by the earth symbol .
When connecting the appliance to the electricity supply,
make sure that the mains socket has an earth connection.
After tting the ducted cooker hood, make sure that the
electrical plug is in a position where it can be accessed easily.
If the appliance is connected directly to the electricity supply,
an omnipolar switch with a minimum contact opening of
3 mm must be placed in between the two; its size must
be suitable for the load required and it must comply with
current legislation.
The minimum distance between the support surfaces of
the cooking pots on the cooker top and the lowest part of
the cooker hood must be at least 65 cm. If a connection
tube composed of two parts is used, the upper part must be
placed outside the lower part. Do not connect the cooker
hood exhaust to the same conductor used to circulate hot air
or for evacuating fumes from other appliances generated by
other than an electrical source. Before proceeding with the
assembly operations, remove the anti-grease lter(s) (Fig.2)
so that the unit is easier to handle.
We recommend the use of an air exhaust tube which has the
same diameter as the air exhaust outlet hole. If a pipe with
a smaller diameter is used, the eciency of the product may
be reduced and its operation may become noisier.
In the case of assembly of the appliance in the suction version
prepare the hole for evacuation of the air.
-Trace the bottom side of the hood on the wall Fig.3A (while
considering minimum distance from the hob).
-Position the fastening template on the wall, paying attention
that the line coincides with that traced in the previous
paragraph.
-Mark and drill fastening holes (Fig.3B).
-Fix the 7 anchors and the 6 screws Cwithout tightening them
completely (Fig.3B).
-Position the appliance at the wall (Fig.4).
ENGLISH EN
- 18 -

-Make sure the 2 Jlevelling screws are tightened completely
(Fig.5).
-Align the appliance horizontally using the two levelling
screws J(Fig.5).
-Once the adjustment has been made, fasten the hood
permanently using the screws Cand D(Fig.4).
-For easy accessibility to the motor unit in the case of
assistance, after having levelled and fixed the appliance
denitively, we recommend that the brackets are removed
(Fig.5).
-When carrying out the xing operations, use only screws
and screw anchors suited to the type of wall (e.g. reinforced
concrete, plasterboard etc.).
-If the screws and screw anchors are supplied with the
appliance, make sure that they are suited to the type of wall
to which the hood must be xed.
-Arrange the electrical power supply within the dimensions
of the decorative ue. If your appliance is to be installed in the
ducting version or in the version with external motor, prepare
the air exhaust opening.
-Adjust the width of the support bracket of the upper ue
(Fig.7).
-Then x it to the ceiling using the screws A(Fig.7) in such a
way that it is in line with your hood and respecting the distance
from the ceiling indicated in Fig.6.
-Connect the ange Fto the air exhaust hole using a connec-
tion pipe (Fig.8).
-Insert the upper ue into the lower ue.
-Put the bottom telescopic ue in place on the hood, extract
the top telescopic ue until the bracket and x it with the
screws B(Fig.9).
-To transform the hood from a ducting version into a ltering
version, ask your dealer for the charcoal lters and follow the
installation instructions.
-Warning: The cooker hood may be installed with the air
exhaust outlet at the rear, by removing bracket X with the
motor and rotating it, as illustrated in Fig.10.
The wall mounting bracketY should also be removed and
xed as illustrated in Fig.10, using the same screws.
By means of an air exhaust pipe, connect the ange Fto the
air exhaust hole already set-up.To close it in a cleaner fashion,
you can mount the cover M(Fig.11).
Ducting version:
-Remove the grid Eand the cable gland Hfrom the cover M
(Fig.12A - Fig.12B).
-Pass the power supply cable through the slot in the canopy
M, as indicated in Fig.12B.
-Taking the grommet H, position it between the power cable
and the slot.
-Fit the carbon lters inside the cooker hood (Fig.13).
-Secure the fairing M, taking care to ensure that it is correctly
hooked on the securing pins (Fig.11).
USE AND MAINTENANCE
We recommend that the cooker hood is switched on before
any food is cooked.We also recommend that the appliance is
left running for 15 minutes after the food is cooked, in order
to thoroughly eliminate all contaminated air.
The eective performance of the cooker hood depends on
constant maintenance; the anti-grease lter and the active
carbon lter both require special attention.
is responsible retaining the grease
particles suspended in the air, therefore it is subject to
clogging with variable frequency according to the use of the
appliance.
- To prevent the danger of possible res, at least every 2
months one must wash the anti-grease lters by hand using
non-abrasive neutral liquid detergents or in the dishwasher
at low temperatures and on short cycles.
- After a few washes, colour alterations may occur. This does
not give the right to claim their replacement.
are used to purify the air that is
sent back into the room and its function s to mitigate the
unpleasant odours produced by cooking.
- The non-regenerable active carbon lters must be replaced
at least every 4 months. The saturation of the active charcoal
depends on the more or less prolonged use of the appliance,
on the type of kitchen and on the frequency with which anti-
grease lter is cleaned.
- Regenerable active charcoal lters must be washed by hand,
with non abrasive neutral detergents, or in the dishwasher at
a maximum temperature of 65°C (the washing cycle must be
complete without dishware). Remove excess water without
damaging the lter, remove the plastic parts, and let the mat
dry in the oven for at least 15 minutes approximately at a
maximum temperature of 100°C. To keep the regenerable
charcoal lter functioning ecient this operation must be
repeated every 2 months. These must be replaced at least
every 3 years or when the mat is damaged.
-
nerable active charcoal lters it is important that they are
completely dry.
Clean the hood frequently, both internally and externally,
using a cloth dampened with denatured alcohol or neutral
liquid detergents that are non abrasive.
The lighting .system is designed for use during cooking
and not for the prolonged general lighting of the room. The
prolonged use of the lighting system signicantly decreases
the average duration of the bulbs.
The non compliance with the hood cleaning
warnings and with the replacement and cleaning of the lters
entails risk of res. One therefore recommends keeping to the
suggested instructions.
In order to replace the dichroic lamps, carefully remove
the lamp from the lamp holder with the help of a small at
screwdriver or a similar tool.
PLEASE NOTE! In doing this operation, please take care
not to scratch the hood.
Replace the bulbs with new ones of the same type.
Opens and closes the door. Upon opening,
both the light and the motor, at speed 1, switch on.
For safety reasons, if while being opened or closed the door
encounters some type of resistance, it locks up. In order to
unlock it, press the“A”key again. The door will complete one
or two openings in order to return to the initial setting.
Switches the motor on/o and increases
its speed.
Each time the key is pressed briey, the motor increases speed
from 1 to 2 to 3 and then shuts o. At each speed only the LED
indicating the speed set turns on.
The appliance is equipped with intense speed. To activate it,
press the “B”key for about 2 seconds, no matter what motor
speed the hood is in. The active function is indicated by the
speed 3 LED that will be ashing. The intense speed lasts 15
minutes and then the hood goes back to the last setting. In
order to deactivate the function before the dened time limit,
- 19 -

press the“B”key.
Turns the lights on/o.
It is possible to adjust light intensity at three levels: high,
medium and low by pressing the“C”multiple times.
Set the appliance operational time for 15
minutes.
When the appliance is on speed 1, 2 or 3, the Timer function
is activated by pressing the“D” key. When active, the“E” LED
turns on. After 25 minutes the hood motor and lights shut o.
If the door is open, it is closed.
The Timer function cannot be activated with intense speed.
To deactivate the Timer function before it ends, press the
“A”key.
After 30 hours of work, the LED indicator
of the lters turns on without ashing. In that event, the
anti-grease and long-lasting active carbon lters, if present,
must be cleaned. The function is reset (with the suction
hood o) by pressing the “B” key for 5 seconds. Afterwards
the LED indicator of the lters will turn o and regulation
restarts from zero.
After 120 hours of work, the“H”LED starts to ash permanently.
This means that the standard active carbon lters must be
replaced, if present. The function is reset (with the suction
hood o) by pressing the “B” key for 5 seconds. Afterwards
the LED indicator of the“H”lters will turn o and regulation
restarts from zero.
The function makes it possible
to have a constant air recirculation in the room.
This is activated, with the hood o, by pressing the Timer key
“D”for 5 seconds.The motor switches on at speed 1 for 10 min.
each hour.The function is active when warning light“G”is on.
During motor operation the warning light“G”ashes.
The function deactivates by pressing any button with the
exception of the ones for the lights.
During cleaning of the glass, to avoid
activating the controls by accident, they can be deactivated
for 30 seconds.To disable them, press the“A”key for about 3
seconds.When the function is active, the“F”LED starts to ash.
The function can only be activated with the hood o.
THE MANUFACTURER DECLINES ALL RESPONSIBILITY
FOR EVENTUAL DAMAGES CAUSED BY BREACHING THE
ABOVE WARNINGS.
- 20 -
Table of contents
Languages:
Other V-ZUG Ventilation Hood manuals

V-ZUG
V-ZUG DFPQ5 User manual

V-ZUG
V-ZUG DEHMR 5 User manual

V-ZUG
V-ZUG AiroClearWall V2000 V90 User manual

V-ZUG
V-ZUG AiroClearCabinet V400 User manual

V-ZUG
V-ZUG DSDSR User manual

V-ZUG
V-ZUG DFPQS9 User manual

V-ZUG
V-ZUG DHL 8 User manual

V-ZUG
V-ZUG DSDSR12 User manual

V-ZUG
V-ZUG DEHMR 5 User manual

V-ZUG
V-ZUG DI-SL10 User manual