VAC Standard LE User manual

ValveAmplification Company
VACStandardPreamplifierLE
Instructions
Manual issued-7April2004
Pleasereadcarefully beforeinstalling
Copyright 2004 by ValveAmplificationCompany. All rightsreserved.

Page2
WELCOME
Congratulations on yourpurchase of the VACStandard Preamplifier,and welcometo the
family of VACowners!
Your VACis designed not to the latest fad but to substance,providingthe highest quality of
sound. Timespent familiarizingyourself with this manual will be well rewarded.
Itis our goalto provide instruments of the highest quality,be informativeto all of our
customers, and to provide responsive, effectivecustomer service.
Please feel free to contact us if we can be of assistance. We can be reached:
Telephone941 952 9695
Fax941 952 9691
E-mail info@vac-amps.com
Website www.vac-amps.com
We lookforward to beingof service,even as you havemany years of enjoyment fromyour
VACStandard Preamplifier.
Kevin M. Hayes
President, VAC
INTRODUCTION
The VACStandard Preamplifier is an all new design, employingthree Class Atriode tube
sections per channel in adirect-coupled two stagecircuit.This simple,elegant design
providesgreat speed,detail,punch,and musicality.Its moderate gain structure and low
output impedance provides an excellent match with awide rangeof popular power
amplifiers.
The robust and massiveexternal power supply makes available an extraordinary degree of
headroom,and keeps all e.m.f.fields and rectifier switchingnoise away fromthe audio
signal, thus preservingboth the power and delicacy of the music.
The chassis is rigid and non-magnetic.
Optional features include triode MM phono stage,triode MC phonostage,and remote
control.

Page3
GENERAL PRECAUTIONS &SAFETY NOTES
1. DANGEROUSVOLTAGESEXISTWITHINTHE MAINCHASSIS.DO NOT
REMOVECHASSIS COVER UNTIL UNITHAS BEEN SWITCHED OFF AND
UNPLUGGEDFROMTHEWALLOUTLET(POWER)ANDALLCOMPONENTS
FOR15 MINUTES.TUBESBECOME HOT INUSE,ANDCANCAUSEINJURY.
DO NOT EXPOSECHASSIS TO MOISTURE.DO NOT PLUG INTO ANAC
SOURCE UNTIL ALL CONNECTIONSARE COMPLETED AND ALL COVERS
ARE INSTALLED.DO NOT DISCONNECT THE POWER SUPPLYFROM THE
MAINCHASSIS UNTIL THE UNITHAS BEEN SWITCHED OFF FOR 15
MINUTES.
2.Complete all signal connections and connection between the power supply and the
main chassis before connectingthe ACcord to the wall outlet and turningthe unit on.
Similarly,always turn the amplifier off and removethe ACpower cord before
detachingcabling.Failure to observethis sequence can result in damageto the
amplifier, speakers or associated components.
3.Atturn on,all volumecontrols should be full counter-clockwise and the mode switch
should be set to “Mute”.Allow one (1) minute for warmup before commencing
playback.Note: Mute is automatically engaged when switchingon units equipped
with the remote control option.
4.For protection of your speakers and power amplifier,always switch amplifier to
“Mute” before switchingthe power off or on.Note: Mute is automatically engaged
when switchingon units equipped with the remote control option.
5. THE POWER SUPPLYCONTAINSNO USER SERVICEABLEPARTS.DO NOT
REMOVE THE BOTTOM COVER.LETHAL VOLTAGESARE PRESENT
WITHINTHE CHASSIS.DO NOT OPERATE THE UNITSIFTHEY ARE WET.
6. THEMAINCHASSISCONTAINSVACUUMTUBES.DANGEROUSVOLTAGES
EXISTWITHINTHIS CHASSIS.NEVER REMOVE THE COVER UNLESS THE
UNITHAS BEEN SWITCHED OFF AND DISCONNECTED FOR ATLEAST15
MINUTES.THE TOP COVER MUSTALWAYSBE LEFT SECURELYIN
PLACE.
7. Takecare to install your preamplifier securely in asturdy,well designed stand so that
it will not fall or tip over (this could cause serious, possibly fatal injury).

Page4
INSTALLINGTHE STANDARD PREAMPLIFIER
Physical requirements:
1)Provide Adequate Ventilation.
2)The chassis cover will becomewarmduringnormal use.
3) This component must be installed in asecure, properly built (and ventilated) stand,
cabinet or enclosure.Itis heavy,and could inflict serious injury or property damage
if it falls,or if the stand upon which it is placed tips over.This concern is particularly
important in households with small children who might try to climbfurniture.
Basic Hookup:
1)Connect line level inputs (CD,Tape,etc.)to the appropriate RCAinput jackson the
rear panel. With the exception of Phono (when fitted), all inputs are “line level”.
2)Connect phono cables to the rear panel RCAinput labeled “Phono.”Connect the
ground wire fromthe turntable or phono cable to the “Ground” terminal provided on
therear panel.(See“Phono Section”for cartridgetypesappropriate foruse.)Connect
output interconnects to your power amplifier.
3)Connect the cable fromthe power supplyto the main chassis.Be sure to insert the
connector properly, and fully tighten the lockingcollar.
4)Connect the ACpower cord to the IEC connector on the power supply.ALWAYS
connectpower cordto component before pluggingit into an ACoutlet,andmakesure
that unit’s power switch is set to “off” before makingthe final connection. For best
performance, try to route the power cord away fromsignal cables.
5)Before turningthe power switch to the “on” position,mute the unit by movingthe
“Mute” switch to its clockwise (i.e.., muted) position,and set output level to zero by
rotatingthe “Volume” control fully counterclockwise.Note: Mute is automatically
engaged when switchingon units equipped with the remote control option.
6)Allow the preamplifier to warmup for aminute before you unmute the unit; failure
to wait can cause atransient to be sent throughyour power amplifier that might cause
damageto your loudspeakers.
Aswith all highperformance audio products,the sonic characteristics of all VACproducts
will continue to improveduringthe first several hundred hours of use.

Page5
OPERATINGTHE STANDARD PREAMPLIFIER
Front Panel Controls:
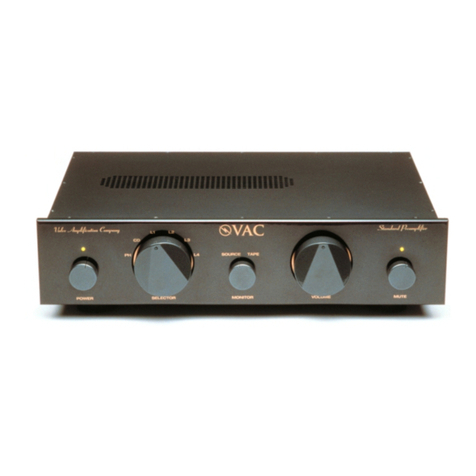
Althoughmostof thefront panel controls (Volume,Power,Mute) areself explanatory,VAC
has outfitted this unit with several advanced features which bear further description:
Phono Section MM (option): When fitted, input “L6" will be connected to adiscrete, pure
tube phono preamplifier,providing37 dB of gain,suitable for use with MM (moving
magnet) and many high-output MC (movingcoil) cartridges.Your VACdealer can
recommend the proper phono cartridge(s).
Phono Section MC (option): Asabove,this will be fitted to “L6",and provides
approximately 60 dB ofgain.Itshould not be used with highoutput pickups,which may
generate excessivedistortion.Your VACdealers can recommend the proper phono
cartridge(s).
Monitor: The small knob found at the lower left-hand corner of the faceplate switches
between“Source”,“Tape”,and“Cinema”(hometheaterpass-throughmode).Inthe“Source”
position,inputselection is determined by theSource SelectorSwitch.Inthe “Tape”position,
the Source Selector is overridden,and the Tape inputsare activated.[Important: The
StandardPreamplifier isoutfitted withafull “tape loop”,includingaline leveltape inputand
afixed level recordingoutput.Inaddition to drivingthe recordinginputs of atape deck,this
output can supply signal to any typical line level input,enablingit to control asecond zone
in multi roominstallations.]
The “Cinema” position provides access to one of the Standard Preamplifier’s most unusual
feature.When set in the “Source” position,input choice is governed by the Input Selector
switch.This is the normal setting,and enables the unit to be used as atypical preamplifier.
Rotatingthe control clockwise to the “Cinema” position bypasses all preamplifier controls
(includingvolume) and passes the output fromyour surround sound processor (i.e., the front
left-and right-channeloutputs ofamultichannel processor)directly to yourpower amplifier.
Inthis case,the users’ analogstereo sources would be connected,as usual,to the line,phono
and tape inputs.A/V inputs (DVD, Laserdisc, DSS, etc.)would be connected to the home
theater processor, and the processor’s main outputs would be connected to the pair of rear
panel RCAjackslabeled “HomeTheater Direct”. When the control is set to the “Cinema”
position,the Standard functions as apass-throughONLY,and is controlled by the external
processor,preamplifier,or othercomponent connectedto the“HomeTheater Direct” inputs.
Mute: On units without remote control,this is atwo position switch.Inthe “Mute” position,
signal is blocked fromleavingthe preamplifier.Note: Mute is automatically engaged when
switchingon units equipped with the remote control option.
On units with remote control,this knob is springloaded; movingthe control clockwise will
Page6
toggle between the “Mute” and “Operate” condition.When muted,ared glow will be
observedin theLED.On occasion the preamplifier may seemnot to haveresponded to aturn
of the “Mute” knob; this is due to “contact bounce” in the switch.Simply turn the knob again
until the desired condition is attained.
STANDARD PREAMPLIFIERS WITH REMOTE CONTROL
The optional remote control allows for wireless adjustment of “Mute” and “Volume”.
The remote wand is powered by two “AAA”batteries.These should be of the alkaline type.
You will need to install themin the wand before usingthe remote.Since batteries can leak,
they should be removed fromthe wand if it is not goingto be used for an extended period
of time.
VolumeUp/Down: These buttons cause amotor to turn the volumecontrol.Motorized
controls offer superior sound,as well as direct visual indication of volumesetting.The front
panel control may also be used directly in the conventional way.
Mute: Pressingeither side of the “Mute” button willtoggle between the “Mute” and
“Operate” condition.When muted,ared glow will be observed in the LED indicator.Mute
is automatically engaged when switchingon units equipped with the remote control option.
OBTAININGTHE BEST PERFORMANCE
Precautions: Before removingcover,mute the preamplifier,turn power switch to “off”
position,disconnect the ACpower cord fromthe wall,removeall interconnects,and wait 15
minutes.FOLLOWINGTHESESTEPSIS IMPORTANT TO PROTECT YOUR SAFETY.
To prevent loss,place cover screws in asmall receptacle.To avoid the riskof shockor other
injury, reinstall cover before reconnectingthe systemor turningthe unit on.

Page7
MAINTENANCE
Chassis Care:
Althoughyour VACchassis and faceplate are extremely durable,their finish can be
scratched,chipped or damaged if improperly treated.Cleaningwith asoft,dampcloth while
the amplifier is switchedoff andunplugged should restore the finish to its original lustre.
Never clean this component with harsh or caustic cleansingagents.
When shippingyour unit,be certain to wrap the amplifier in the cloth,tissue or plastic wrap
in which it was originally packaged.Given the highgloss of the lacquered finish,makesure
there are no ridges or sharp surfaces in those parts of the cloth which contact the faceplate.
Use of acoarser cloth or failure to otherwise protect the faceplate may result in damageto
the finish.VACis not responsible for cosmetic damageresultingfromimproper care or
packing.
InstallingNew Tubes:
Original Equipment Replacement tubes are available fromVAC.These tubes ensure your
Standard Preamplifier will meet or exceed all factory performance specifications.
DANGEROUSVOLTAGESEXISTWITH THIS COMPONENT.YOU MUSTFOLLOW
THESESTEPSTO PROTECT YOUR SAFETY. Before replacingtubes,all power must be
turned off.Unplugthe power cord fromthe wall,and removeall audio interconnect cables.
Wait 15 minutes before removingthe top cover.Install the new tubes fully firmly in their
sockets,takingcare to makesure that pin pattern corresponds to holes in tube socket.
Reinstall the top cover before reconnectingthe unit.
NEVER INSTALL OR OPERATE THIS UNITWITHOUT ALL COVERSINPLACE.
Inthe event that trouble is encountered,checkall signal,speaker and power connections.If
theproblempersists,followallsafetyprecautionsstated earlierin thissection,and checkthat
all tubes are correctly seated in their sockets.Ifpossible,try another tube.Ifthe problem
persists, please consult your VACdealer or contact the factory directly.

Page8
GENERAL INFORMATION ABOUT TUBES
Itis atruth that each brand of tube sounds different in aparticular highresolution circuit.
This is because no two manufacturers makeatube type in quite the sameway,and the
central tendencies of the performance parameters will differ slightly with each maker.This
sonic variability may at first seemaliability,but further thought will reveal that it is an
advantage.The owner of atube amplifier can select those tubes which sound likethe real
thingin his/her specific system. VACcan recommend the best tubes for your amplifier.
The tube types used in this component should last for 8,000 to 15,000 hours of use (two to
ten years for most users).There are always occasional exceptions,longor short.Ifyou have
to replace atube before,say,3,000 hours,just replace the single tube.Ifyou haveto replace
atube at 8,000 hours, replace themall and keep those still functioningwell as spares
VACwill be happy to test tubes for concerned customers.
WARRANTY
Your equipment is warranted for aperiod of thirty (30) days fromthe date of purchase.
Inaddition,if the registration formis received by VACalongwith acopy of your sales
receipt froman authorized VACdealer within this thirty days,aservice contract will be
extended to cover your equipment for three (3) years (tubes excepted).
This warranty applies only to units sold in the United States of America throughauthorized
VACdealers.Itcovers factory service and standard return shipping.For warranty
information outside ofthe U.S.contact the importer of VACequipment for your country.
Units sold outside of the U.S.should still be registered with VAC.Itis the responsibility of
the dealer and/or customer to determine the suitability of this product for any particular
application.
Your questions and comments are always welcome. Contact:
ValveAmplification Company, Inc.
1911 East Avenue North
Sarasota, FL34234
Telephone941 952 9695
Facsimile941 952 9691
E-mail info@vac-amps.com

Page9
VAC STANDARD PREAMPLIFIER SPECIFICATIONS (typical)
Type:Vacuumtube line stagewith external power supply and home
theater (direct power amplifier) mode.
Options:Remote control for volume&mute
Dedicated MM phono input
Dedicated MC phono input
Linestage preamplifier:
Gain:24 dB
Maximuminput signal:Infinite (attenuation precedes line stage)
Main output:Inverting(you may reverse speaker connections if you wish to
compensate, or set you d/a converter to phase reversal)
Tape output:Unity gain fromselector, non-inverting
Phono stage preamplifier:
Gain:37 dB (measured at tape output)
Residual noise:3mVat output (S/N ratio approx. 69 dB)
Overload:117 mV@1kHz =8volts RMSoutput
460 mV@10 kHz
Frequency response:RIAA +/- .25 dB
Notes:Does not invert absolute phase.
Tubecompliment:
2x12AX7 low noise (phono option) (located on circuit board at left side of chassis)
2x12AU7/6189A(line stage)
2x12AX7 (line stage)
Warranty: Three years parts and labor, excludingtubes.

STANDARDLE PREAMPLIFIERREGISTRATION FORM
mailtoVACsoon aspossible.
Name______________________________________________________________
Address______________________________________________________________
______________________________________________________________
Telephone______/______-_____________E-Mail __________________________
Dealername______________________________________________________________
"address______________________________________________________________
Purchasedate______________________SerialNumber__________________________
Salesperson______________________________________________________________
HowdidyoufirstlearnofVACproducts?
__________________________________________________________________________
Whatotherbrandsandmodelsdidyouconsider?
__________________________________________________________________________
__________________________________________________________________________
WhatmadeyoudecideontheVAC?
__________________________________________________________________________
__________________________________________________________________________
PleaseprovideanycommentsonVACproductsoryourdealer
__________________________________________________________________________
__________________________________________________________________________
Whatmagazinesdoyoureadregularly?
________________________________________________________________________
________________________________________________________________________
Whatareyourhobbies?
________________________________________________________________________
Whatareyourfavoritetypesofmusic?
________________________________________________________________________
________________________________________________________________________
Table of contents
Other VAC Amplifier manuals

VAC
VAC Phi 110/110 Setup guide

VAC
VAC ?200 Phi Two Hundred Setup guide

VAC
VAC Sigma User manual

VAC
VAC Phi Beta Triode Setup guide

VAC
VAC PA80/80 User manual

VAC
VAC Standard Preamplifier User manual

VAC
VAC Phi 300 Setup guide

VAC
VAC Renaissance Setup guide

VAC
VAC Musicbloc Master 300 iQ Setup guide

VAC
VAC Sigma 160i Setup guide

VAC
VAC CPA1 Mk III User manual

VAC
VAC Statement 450 Setup guide

VAC
VAC Vintage Line Stage Mk II User manual

VAC
VAC VAC PA100/100 User manual

VAC
VAC Renaissance Mk II Setup guide

VAC
VAC Phi 300.1 Setup guide

VAC
VAC Auricle MusicBloc User manual

VAC
VAC Renaissance Signature Mk II Setup guide

VAC
VAC Vintage Line Stage Mk II User manual

VAC
VAC Renaissance Signature Mk II Setup guide