VacuMaid EB-210 SuperGroom II Model User manual

EB-210EB-210
EB-210EB-210
EB-210
12” Electric Brush12” Electric Brush
12” Electric Brush
FF
FF
Feaea
eaea
eaturtur
turtur
tures inces inc
es inces inc
es include:lude:
lude:lude:
lude:
•3-level height adjustment--adjusts to match
surface being cleaned.
•Soft Bumper--wraps around brush to
protect baseboards and furniture.
•Reset Button--A flat belt drive with a belt
protector reset button means years of
trouble-free service.
Use this powerbrush to
vacuum wall to wall carpeting,
handmade carpets, fine rugs,
and other flooring.
This powerbrush must be used
with the top and lower wands.
REMEMBER:Aswithallelectricappliances,riskofshockispossible.Donot
removebrush,pullwandsout,orattemptmaintenancewhilepowerison.
Pile Height
AdjustmentKnob
OverloadProtector
(resetbutton)
LightCover
EdgeCleaner
(notshown)
LightBulb:
Replacement:EB21016
Belt
Replacement:EB21010
The overload protector pro-
tects the motor from brush
jamming and belt breakage.
If the brush stops or is stalled,
the overload protector will shut the brush off. TT
TT
To ro r
o ro r
o reset the oeset the o
eset the oeset the o
eset the ovv
vv
verer
erer
erloadload
loadload
load
prpr
prpr
protectorotector
otectorotector
otector,,
,,
, turn the vacuum off, press the reset button on the brush.
Now, you may turn your vacuum back on and continue cleaning.
WW
WW
Wandsands
andsands
ands
1. (EB368793) Lo(EB368793) Lo
(EB368793) Lo(EB368793) Lo
(EB368793) Loww
ww
werer
erer
er WW
WW
Wandand
andand
and
• Connects to top wand when operating the floor brush. Curled end
connects to top wand, other end is inserted into electric brush.
2. (W(W
(W(W
(W-540)-540)
-540)-540)
-540) TT
TT
Topop
opop
op WW
WW
Wandand
andand
and
• Connects to lower wand when operating the floor brush
• Cord management--keeps cords out of the way and allows you to
disengage the hose handle from the electric brush
1
2
3
CT-3BLCT-3BL
CT-3BLCT-3BL
CT-3BL
TT
TT
Tool Cadool Cad
ool Cadool Cad
ool Caddd
dd
dyy
yy
y
• Adds portable convenience by allowing
multiple tools to be carried on the wand for
quicker and easier access.
•TT
TT
To ao a
o ao a
o attacttac
ttacttac
ttach:h:
h:h:
h: Snap caddy onto wand at an
angle (beveled side first), then slip attachments
and tools onto caddy pegs. When clipping it
onto wand, attach it so that the two-peg side
faces up, while the single-peg side faces down
the wand. This will keep your tools on better.
CB-180CB-180
CB-180CB-180
CB-180
MeshMesh
MeshMesh
Mesh TT
TT
Tool Cadool Cad
ool Cadool Cad
ool Caddd
dd
dy Bay Ba
y Bay Ba
y Bagg
gg
g
• Holds accessories and tools making them
more manageable.
• For storing and transporting tools & accessories
UT-530BLUT-530BL
UT-530BLUT-530BL
UT-530BL
UpholsterUpholster
UpholsterUpholster
Upholsteryy
yy
y TT
TT
Tool with Slide-On Brool with Slide-On Br
ool with Slide-On Brool with Slide-On Br
ool with Slide-On Brushush
ushush
ush
•Cleans upholstered furniture, drapes,
mattresses,and even works well on
vehicle upholstery and carpets.
• The directional slide brush assures
consistent fit and is detachable for
aggressive cleaning.
12
Accessories shown may not be to scale.
L6178
WPH-219WPH-219
WPH-219WPH-219
WPH-219
2-Blac2-Blac
2-Blac2-Blac
2-Black Strk Str
k Strk Str
k Straightaight
aightaight
aight WW
WW
Wandsands
andsands
ands
• Can use one or both--depending on the
length of wand that you need.
• Attach any of your standard suction tools such
as the upholstery tool or dusting brush for whatever
cleaning needs you may have.
(Not intended for use with EB210 or other electric powerheads)

Electric Brush Assembly & Use
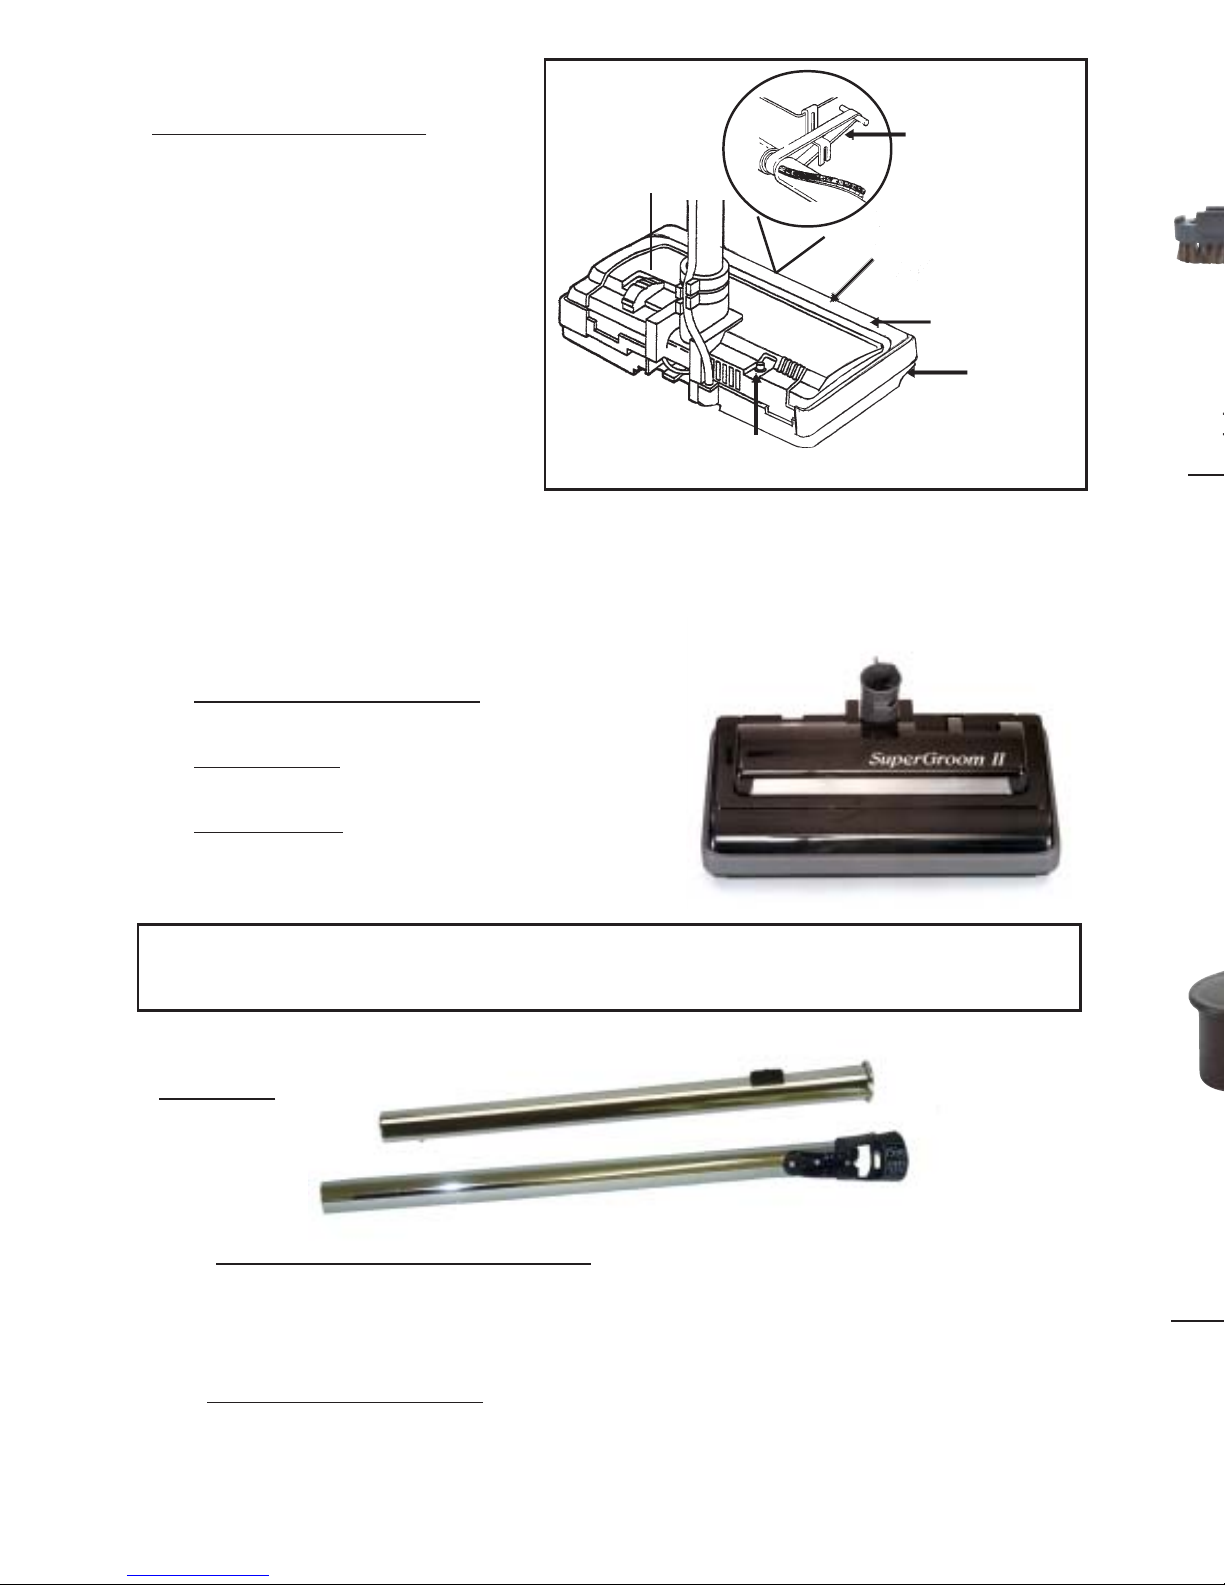
Wand Insertion and Release
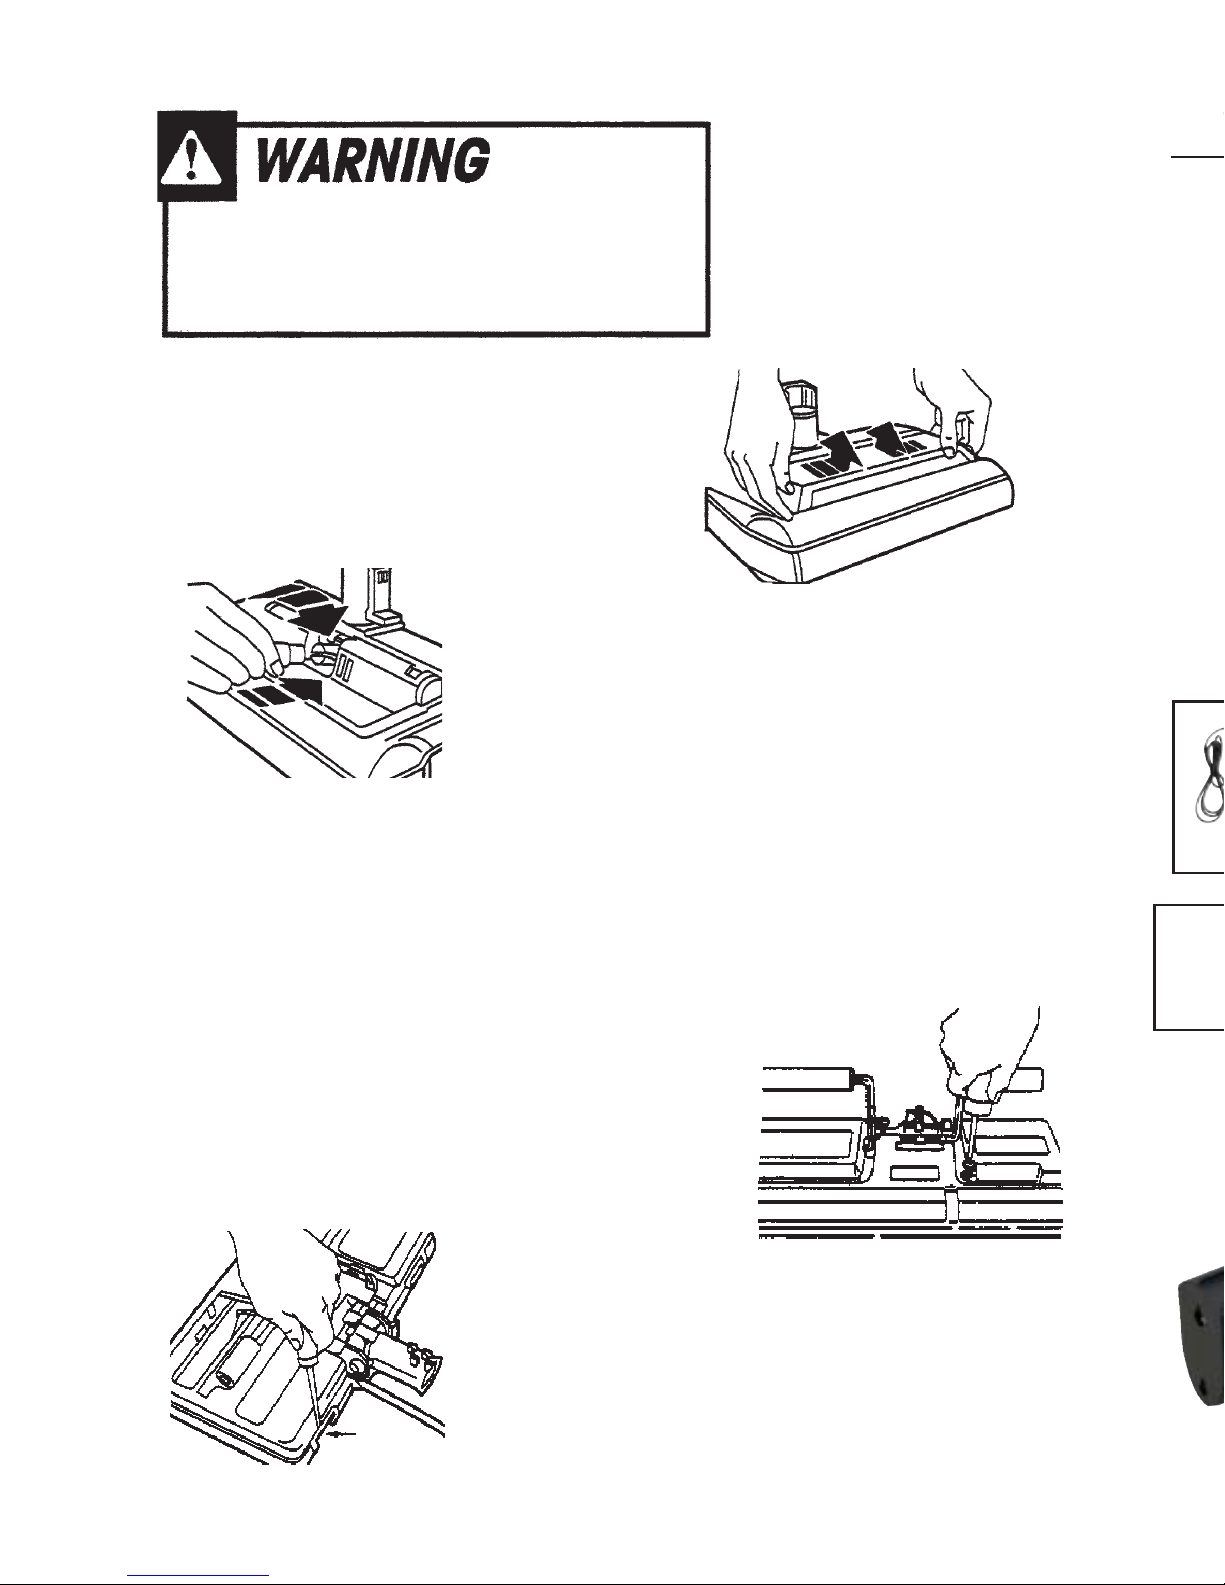
WARNING
!DO NOT attach or remove handle or wands while cleaner is ON. This
could cause sparking and damage the electrical contacts.
For the EB-210--insert wand, snap wand button into
place. Turn wand button past the stop position. This
slotted area allows you to turn the handle to the side to
reachfartherunderfurniture.
Button
StopPosition SlottedArea
HOW TO START
EB-210 SuperGroom II™ Model:
1. To lower wands hold EB-210 SuperGroom II™
down with foot and pull back on wands.
2. Start vacuum and electric brush.
Pileheight adjustment for the EB-210:
Rotate the pile height control. The pile height setting
is shown on the control. The deeper the pile of the
carpet, the higher the setting.
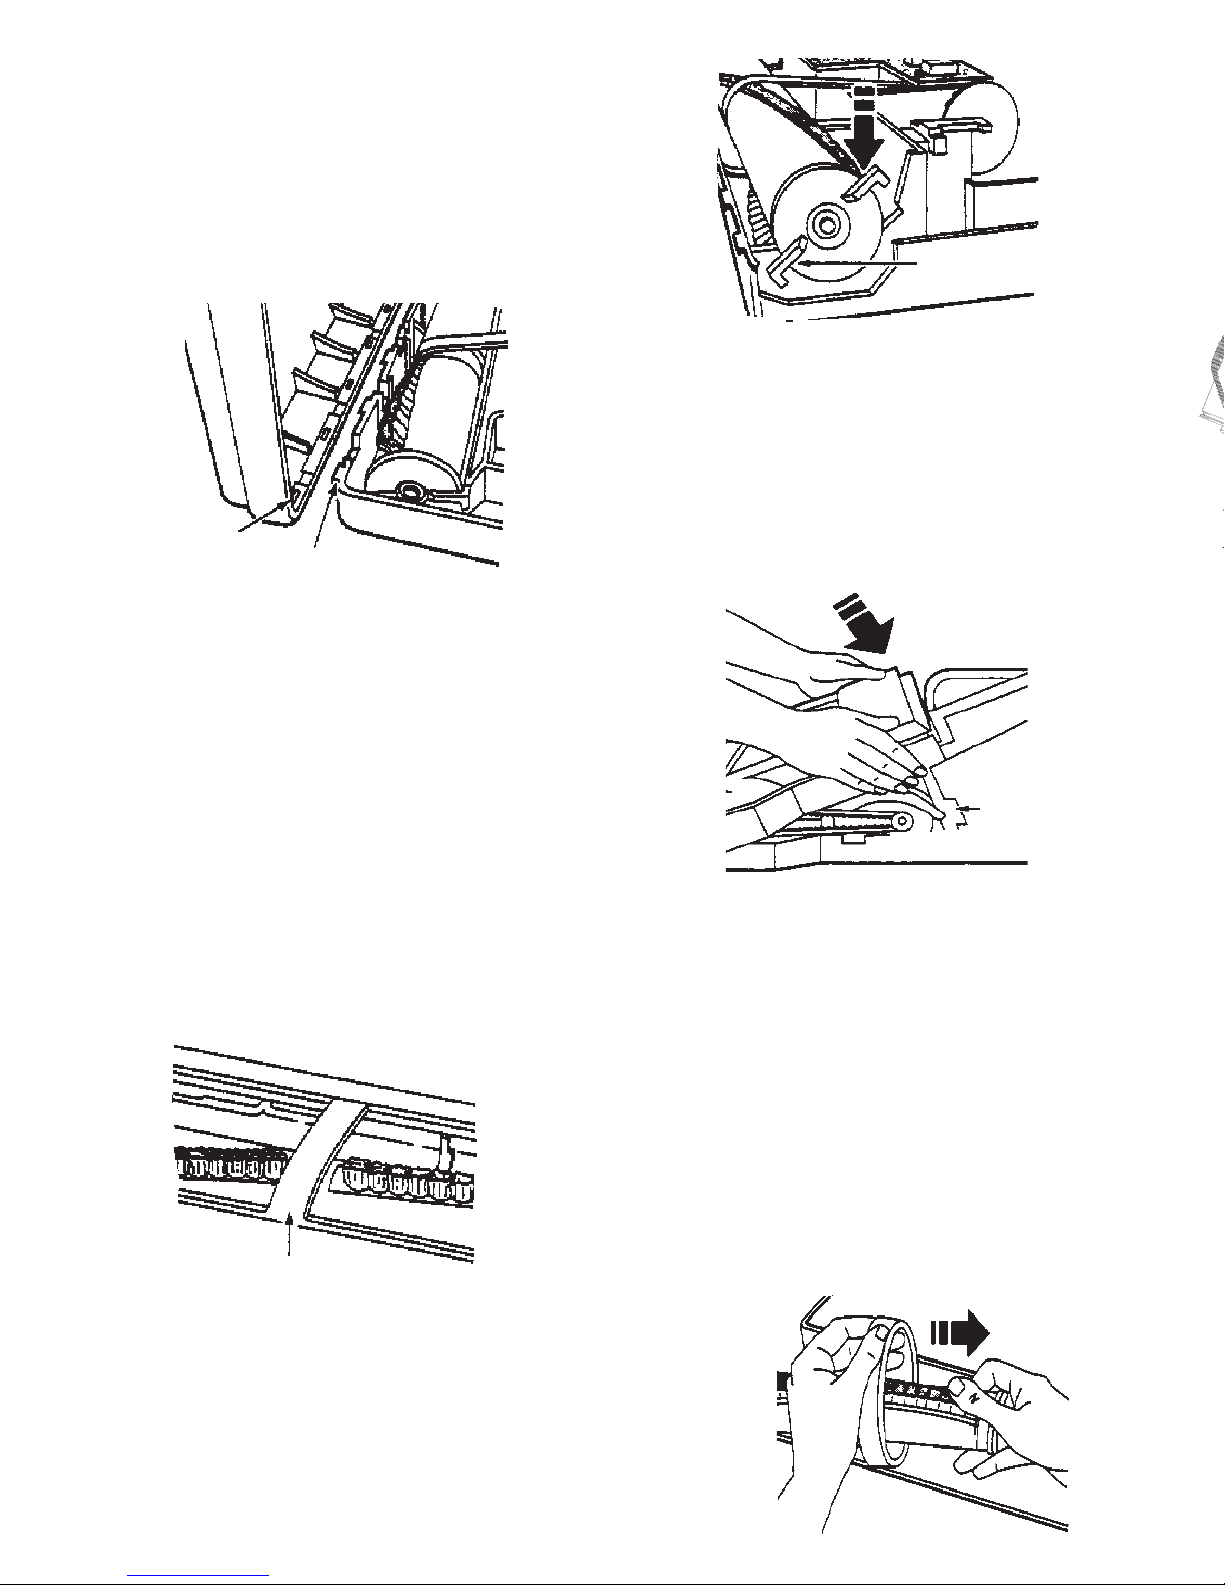
OVERLOADPROTECTOR
The overload protector protects the motor from brush jamming and belt break-
age. If the brush stops, the overload
protector will stop the electric brush.
To correct problem: Unplug the
electrical cord. Check brush area for
excessivelint buildup or jamming.
To reset: Press reset button on topof
thebrush. Pluginandturn on vacuum
andbrush.
OverloadProtector
(resetbutton)
4
CLEANINGCLEANING
CLEANINGCLEANING
CLEANING AA
AA
ATTTT
TTTT
TTAA
AA
ACHMENTS &CHMENTS &
CHMENTS &CHMENTS &
CHMENTS & TT
TT
TOOLS*OOLS*
OOLS*OOLS*
OOLS*
TT
TT
Too
oo
o AttacAttac
AttacAttac
Attachh
hh
h TT
TT
Tools fools f
ools fools f
ools for Use:or Use:
or Use:or Use:
or Use: Simply slide the tool onto end of the
wand or directly onto stub tube of the hose.
•Works well to clean bare floors,
wood flooring, tile, etc.
•Shorter bristles in front, longer
in back--allows larger dirt
particles to be picked up with
forward movement.**
DB-530BLDB-530BL
DB-530BLDB-530BL
DB-530BL
Dusting BrushDusting Brush
Dusting Brush
• Use for dusting furnishings such as bookcases, tables,
desks, and mantles.
• Also great for dusting picture frames,
collectibles, tops of televisions, window sills,
and even the backs of computer monitors.
• Full, natural bristles for gentle cleaning.
FB-215BLKFB-215BLK
FB-215BLKFB-215BLK
FB-215BLK
12” Floor Brush with Wheels12” Floor Brush with Wheels
12” Floor Brush with Wheels
**F**F
**F**F
**For best ror best r
or best ror best r
or best resultsesults
esultsesults
esults,,
,,
, do not force the front of the brush down when moving
forward. Allow the brush to gently glide across the floor. The front of
the brush should allow particles to enter through the raised bristles.
11
CT-530BLCT-530BL
CT-530BLCT-530BL
CT-530BL
CrCr
CrCr
Cree
ee
evicevice
vicevice
vice TT
TT
Toolool
oolool
ool
•13” tool to reach into cracks and crevices such as tracks of
sliding glass doors, corners, along baseboards, and even in the
cracks of couches and other furniture.
•Notched end helps maintain air flow and proper
suction.
•This tool has flat sides which makes it great
for reaching under refrigerators, around air
conditioner coils, and other hard to reach
places that collect a lot of dust and dirt.
*Tools are to be used with plastic straight wands or attach to the stub tube on the
handle of hose. Do NOT use with top or lower electric brush wands.

5
EB-210 SuperGroom II™ Care
Electric Shock Hazard
Disconnect electrical supply before servicing or
cleaning the unit. Failure to do so could result
in electrical shock or personal injury.
LIGHTCHANGING
EB-210 SuperGroom II™:
1.Removelight cover by pressing inand
lifting both sides as shown.
2. Push in and turn bulb to remove.
3. Replace bulb and snap light cover in place.
Note: replacementbulb number is EB21016.
BELTCHANGINGANDBRUSH CLEANING
EB-210 SuperGroom II™:
Disconnect hose and brush from electrical outlet. Frequently check and
removehair, string andlintbuildupintheEB-210SuperGroomII™brush area. If
buildup becomes excessive, disconnect EB-210 SuperGroom II™ from wand
andfollowstepsbelow.
To Remove:
1.Raisethe pile height adjustment rollers. Remove
thetwocoverscrewsfrom the EB-210 SuperGroom
II™base.
2.Insertandtwistflatscrewdriverunderbothback
covertabs.
GSH-430CGSH-430C
GSH-430CGSH-430C
GSH-430C
“T“T
“T“T
“Tearear
earear
ear-Dr-Dr
-Dr-Dr
-Drop”op”
op”op”
op” Style 2-WStyle 2-W
Style 2-WStyle 2-W
Style 2-Wirir
irir
ire Highe High
e Highe High
e High
VV
VV
Voltaolta
oltaolta
oltagg
gg
ge Hose with Pigtail Core Hose with Pigtail Cor
e Hose with Pigtail Core Hose with Pigtail Cor
e Hose with Pigtail Cordd
dd
d
The “tear-drop” style handle has 360° ro-
tation to minimize kinks, effort, and in-
hand weight. Its unique “tear-drop” de-
signed handle allows the hose to drape to
the floor reducing the weight
supported in your hand. For use with the
electric brush.
IMPORIMPOR
IMPORIMPOR
IMPORTT
TT
TANTANT
ANTANT
ANT::
::
: Make sure power is turned off before removing the hose
and handle from the wand. Arcing or damage to the electrical contacts can
occur if the wand is removed while brush power is on.
Hose Handling:Hose Handling:
Hose Handling: Hold the hose and handle in any way you find to be the
most comfortable. With this new style handle, numerous hand positions are
offered and reduce strain and increase ease of use.
Also, for added ease while vacuuming, try keeping the hose behind you rather
than out in front of you. Use one hand to hold the handle and the other hand
to hold and guide the hose. Again, do what feels comfortable to you.
L6178
Pigtail corPigtail cor
Pigtail cord wd w
d wd w
d wall-endall-end
all-endall-end
all-end----
----
--Use with standard pin-jack valve.
TT
TT
To insero inser
o insero inser
o insert hose cuft hose cuf
t hose cuft hose cuf
t hose cufff
ff
finto vinto v
into vinto v
into valvalv
alvalv
alvee
ee
e: Lift valve door, insert
cuff into hole, & plug cord into 110 electrical outlet.
10
H-431H-431
H-431H-431
H-431
Plastic Hose HangerPlastic Hose Hanger
Plastic Hose Hanger
• Use of hanger can increase the life of your hose
and save space while storing.
• Coil your hose around this hanger to store it when
not in use.
• Mount on a wall in a closet, garage, or any other
convenient location for hose storage, and place it
high enough so you can loop your hose only four
times and still clear the floor.
• Mounts using only one stud and two screws.

3. Turn EB-210 SuperGroom II™ right side up.
Tiltcoverforwardfrombackuntilfront snapsfree.
4.Carefullyinsertandlift screwdriver at
each brush support to free brush from
base.
5.Remove belt from motor shaft.
To Replace:
1. Slide on washers and brush supports.
6.Removebroken or worn belt.
7. Slide brush supports off to check and clean
brushsupportareas.SeeBrushAssembly-EB-
210 SuperGroom II™ for picture of complete
brush.
Base
Brush Support
Belt
Belt
2.Install new belt in beltgroove on the brush
assembly, then over motor shaft as show.
Note:Replacement beltnumberisEB21010.
Belt
Motor
Belt
6
Brush
Support
BRUSHASSEMBLY
EB-210 SuperGroom II™:
Brush
Washer
Brush
Support
Belt Groove
Washer
10
13
12
14
15
17
16
18
19
22 20
27
26
21 23
9

3. Insert both front support tabes into base
slots. Thensnap brush supports intoplace.
Front
Support Tab
4. Line up tabs on front of base with slots
insidethecoverfront.
5.Tiltcovertoback.Press cover firmly until rear
tabssnapinto place. Turn EB-210SuperGroom
II™over,replacethecover screwsandlowerthe
pile height adjustment rollers into place.
BRUSHSERVICING
EB-210 SuperGroom II™:
Disconnect hose and brush from electrical outlet and disconnect EB-210
SuperGroomII™ from wand so brushwill not operate whilebeing serviced.
To Check:
When brush is worn to the level of the base
supportbars, replace the brush.
Base Support Bar
Rear
Base
Tabs
Cover
Slots Front
BaseTabs
To Replace:
Remove light cover, EB-210 SuperGroom II™
cover,beltandbrushassembly(followtoremove
sectionin Belt Changing and BrushCleaning”.
7
1. Removebrush support and washers from brush assembly.
2.Remove brush assemblyand replace with new brush.
3. Reassemble brush assembly.
4. Replace belt, brush assembly, EB-210 SuperGroom II™
cover.
Pleasenotewhenorderingthat you must include the identification number for
thebrush. FortheEB-210SuperGroomII™thisisEB210(i.e. to order a light
bulbyouwould order an EB21016).
-10 Belt
-11
-12 Floor nozzle lower unit
-13 Motor assembly
-14 Motor bracket
-15 Overloadprotector
-16 Light bulb
-17 Light bulb socket
-18 Swivel catch
-19 Swivel
-20 Furnitureguard
-21 Roller shaft
-22 Swivelbearing seal
-23 Nozzle roller
-24
-25
-26 Front axle assembly
-27 Brush and bearing assembly
-28
-29 Windowcover (not shown)
-30
-31
-32 Cord and plug assembly (not shown)
-33 Power head cover assembly(notshown)
-34 Floor nozzle upper unit (not shown)
EB-210 SuperGroom II™ Parts List
8L6178

3. Turn EB-210 SuperGroom II™ right side up.
Tiltcoverforwardfrombackuntilfront snapsfree.
4.Carefullyinsertandlift screwdriver at
each brush support to free brush from
base.
5.Remove belt from motor shaft.
To Replace:
1. Slide on washers and brush supports.
6.Removebroken or worn belt.
7. Slide brush supports off to check and clean
brushsupportareas.SeeBrushAssembly-EB-
210 SuperGroom II™ for picture of complete
brush.
Base
Brush Support
Belt
Belt
2.Install new belt in beltgroove on the brush
assembly, then over motor shaft as show.
Note:Replacement beltnumberisEB21010.
Belt
Motor
Belt
6
Brush
Support
BRUSHASSEMBLY
EB-210 SuperGroom II™:
Brush
Washer
Brush
Support
Belt Groove
Washer
10
13
12
14
15
17
16
18
19
22 20
27
26
21 23
9
Table of contents
Other VacuMaid Steam Cleaner manuals