VALBERG 3S58 F WAD929C User manual

974937 - 3S58 F WAD929C
10/2022 - V4
INSTRUCTIONS FOR USE .....................2
CONSIGNES D'UTILISATION ...................36
GEBRUIKSAANWIJZINGEN ...................70
INSTRUCCIONES DE USO ...................104
Dishwasher
Lave-vaisselle
Vaatwasser
Lavavajillas
2/2


1
2
3
4
5
6
7
8
9
10
11
12

2 EN2 EN2 EN
Thanks!
Thank you for choosing this VALBERG product.
Chosen, tested and recommended by ELECTRO DEPOT,
VALBERG branded products are easy to use, reliable,
and of an impeccable standard.
With every use of this appliance, you can be sure of
complete satisfaction.
Welcome to ELECTRO DEPOT.
Visit our website: www.electrodepot.fr

3 EN
3 EN3 EN
Table of contents
AOverview of the
appliance
BUsing the appliance
Getting to know your appliance
Quick user guide
Installation instruction
Control panel
Using your dishwasher
CPractical information Maintenance and cleaning
Troubleshooting tips
Error codes

4EN
Overview of the appliance
A
IMPORTANT
Before using this dishwasher for the first time and to get
the best performance,read these instructions.
Dishwasher features
1Control panel 7Lower spray arm
2Kick board 8Filter
3Cap of water tank 9Tableware basket
4Salt container 10 The place to add detergent
5Basket 11 Water
6Upper spray arm 12 Water bottle
Technical information
420
465
435
780
Height 465 mm
Width 420 mm
Depth 435 mm
Voltage connected Load see rating label
Water pressure 0.04 - 1.0MPa
Power supply see rating label
Capacity 2 place settings(EN-50242)
3 place settings(EN-60436)
Getting to know your appliance

5
EN
Using the appliance
B
Please read the corresponding content on the instruction manual for detailed operating
method.
Connected to power supplies
• The power supply is 220-240V AC 50Hz
• The specification of the socket is 10A 250V AC
• The connection of the drain pipe: Put end of the drain into a sink or bucket.
Fix the drain pipe with the back pipe of the
machine.The interface is fitted with clamps
and tightened with a screwdriver.
or
Fix the drain pipe with suction cups
Add water into the dishwasher’s tank
NOTE
Before adding water , you need to press power button to
turn on the diswasher
There are two ways to add water into the tank:
1Connect inlet hose to the tap;
2Open the cap and add water into the dishwasher’s tank manually
Quick user guide

6
EN
Using the appliance
B
1
2
or
Drain Pipe Power cord
Water Inlet
There are two ways of prompting the tank that full of water
1. Before starting:
When the tank is full of water, the machine will beep fleetly for 3 seconds.
2. After starting:
Water is not enough,
light is on;
Water is enough,
light will be off and the machine will beep fleetly for 3 seconds.
Remove the larger residue
Please remove the large residue before placing.
Open the door, placing the dishes and adding detergent
• Placing order by size and from the two sides to the middle. All cutlery are suggested to
be tilted to improve cleaning performance.
•
The spray arm will be blocked by the improper placement of the cutlery and cleaning
effect may not be ideal.

7
EN
Using the appliance
B
Pull open
Left Right
DO NOT place the dishwares in the upper direction or may affect the cleaning preformance.
Try to leave the dirty face towards the spray arm.
The place is for adding the detergent
Close the door, select the program and start the dishwasher

8
EN
Using the appliance
B
Installation instruction
WARNING
Electrical Shock Hazard
•
Disconnect electrical power before installing dishwasher.
• Failure to do so could result in death or electrical shock.
•
The installation of the pipes and electrical equipments
should be done by professionals.
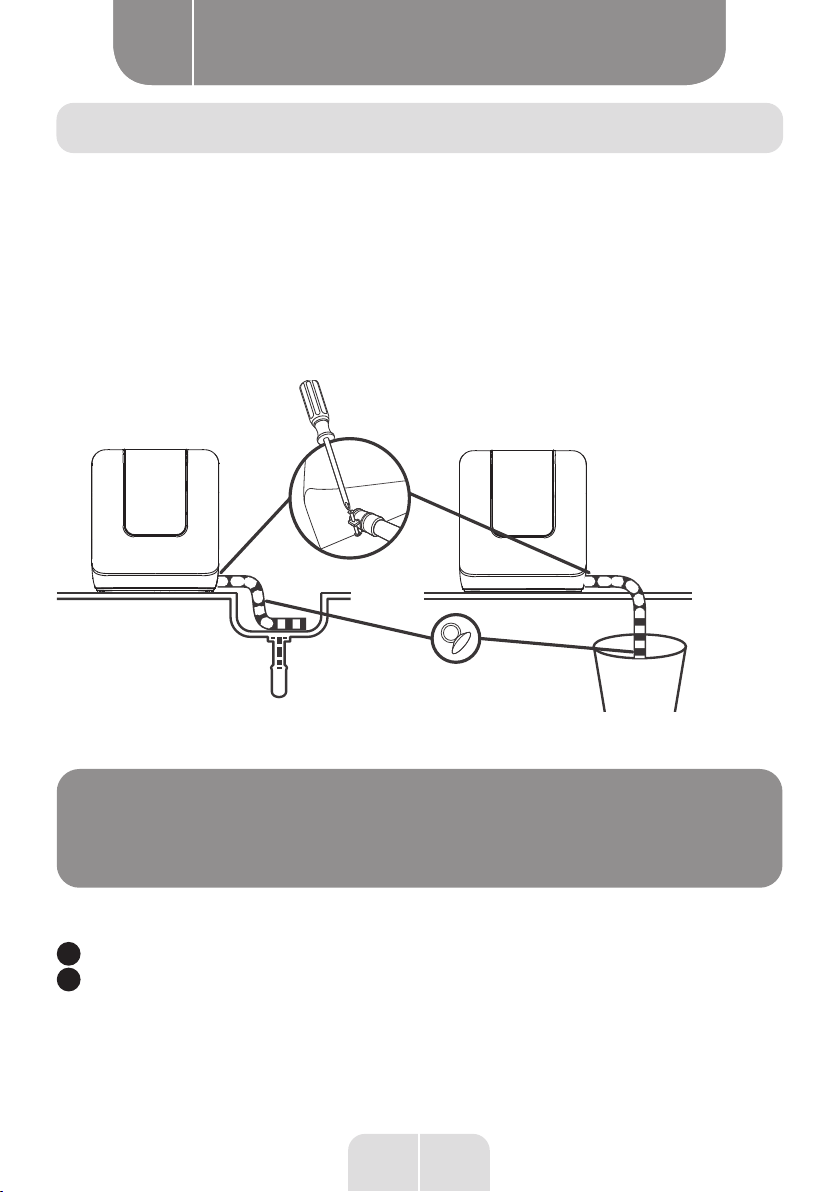
Installation preparation
•
The installation position of dishwasher should be near the existing water inlet tap and
drain outlet and power socket.
• One side of the cabinet sink should be chosen to facilitate the connection of drain hose
of the dishwasher.
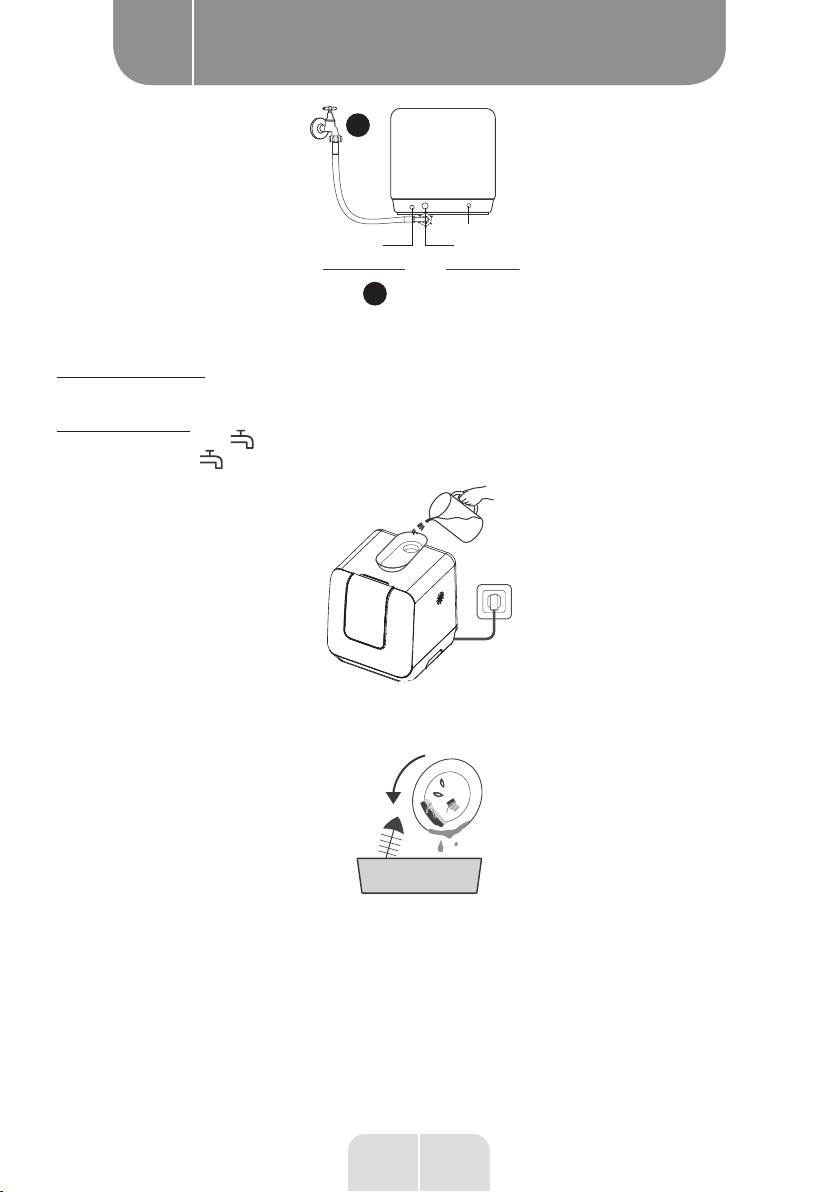
Positioning the Appliance
Position the appliance in the desired location. The back should rest against the wall behind
it, and the sides, along the adjacent cabinets or wall. The dishwasher is equipped with water
supply and drain hoses that can be positioned to the right or the left to facilitate proper
installation.
About Power Connection
WARNING
For personal safety:
• Do not use an extension cord or an adapter plug with this
appliance.
•
Do not, under any circumstances, cut or remove the
earthing connection from the power cord.
Electrical Requirements
Please look at the rating label to know the rating voltage and connect the dishwasher to the
appropriate power supply. Use the required fuse 10 amp, time delay fuse or circuit breaker
recommended and provide separate circuit serving only this appliance.

9
EN
Using the appliance
B
Electrical Connection
Ensure the voltage and frequency of the power being corresponds to those on the rating
plate. Only insert the plug into an electrical socket which is earthed properly. If the electrical
socket to which the appliance must be connected is not appropriate for the plug, replace the
socket, rather than using a adaptors or the like as they could cause overheating and burns.
WARNING
Ensure that proper earthing exists before use
Water Connection
•
Connect the cold water supply hose to a threaded 3/4(inch) connector and make sure
that it is fastened tightly in place.
• If the water pipes are new or have not been used for an extended period of time, let the
water run to make sure that the water is clear and free of impurities. If this precaution is
not taken, there is a risk that the water inlet can get blocked and damage the appliance.
NOTE
If the supplied hose cloes not fit your tap, please contact your
local plumbing supply center where adapters are available
for purchase.

10
EN
Using the appliance
B
Connection of drain hoses
Fix the drain pipe with the back pipe of
the machine.The interfaceis fitted with
clamps and tightened with a screwdriver.
or
Fix the drain pipe with suction cups
The connection of the drain pipe: Put end of the drain into a sink or bucket.
How to Drain Excess Water From Hoses
If the sink is more than1000 mm higher than the floor, the excess water in hoses cannot be
drained directly into the sink. It will be necessary to drain excess water from hoses into a
bowl or suitable container that is held outside and lower than the sink.
Water Outlet
Connect the water drain hose. The drain hose must be correctly fitted to avoid water leaks.
Ensure that the water drain hose is not kinked or squashed.
Extension Hose
If you need a drain hose extension, make sure to use a similar drain hose. It must be no
longer than 4 metres, otherwise the cleaning effect of the dishwasher could be reduced.

11
EN
Using the appliance
B
1 2 3 4 5 6
7
89
Buttons
1Power To turn on and off.
2Program Select the appropriate washing program, the selected program
indicator will be lit.
3Delay Press this button to set the delayed hours for washing. You can
delay the start of washing up to 24 hours. One press on this button
delays the start of washing by one hour.
4Auto open Press this button to activate or deactivate auto open function.
When this function is on, the light will be lit, and the dishwasher
will open the door automatically in the drying phase to help drying.
5Child lock Press this button for 3 seconds to activate or deactivate child lock.
Child lock allows you to lock the buttons except the Power button.
6Start/Pause To start the selected washing program or pause it when the
dishwasher is working.
Control panel

12
EN
Using the appliance
B
7Program
indicator
For heaviest soiled crockery, and normally soiled pots,
pans, dishes etc. with dried-on food.
This is standard program, it is suitable to clean
normally soiled tableware and it is the most efficient
program in terms of its combined energy and water
consumption for that type of tableware.
For lightly soiled crockery and glass.
For normally soiled loads that need quick wash.
A shorter wash for lightly soiled loads that do not need
drying.
This program provides an effective cleaning of the
dishwasher itself.
8Delay
indicator When the delay start function is on, this indicator will
be lit.
9Screen
Digital Display
To show the remaining time and delay time, functions,
error codes etc.
Salt
If the “ ” indicator is lit, it means the dishwasher is low
on dishwasher salt and needs to be refilled.
Water Faucet
If the “ ” indicator is lit, it means the water faucet
closed.
Auto Open
If the “ ” indicator is lit, it means the door will open
automatically for better drying.
Child lock
If the “ ” indicator is lit, it means the child lock is on.

13
EN
Using the appliance
B
NOTE
If your model have no water softener, you may skip this
section.
Loading the salt into the softener
Always use salt intended for use with dishwasher. The salt container is located beneath
the basket and should be filled as follows:
WARNING
•
Only use salt specifically designed for dishwashers use!
Every other type of salt not specifically designed for
dishwasher use, especially table salt, will damage the
water softener. In case of damages caused by the use
of unsuitable salt the manufacturer does not give any
warranty nor is liable for any damages caused.
• Only fill with salt before running a cycle. This will prevent
any grains of salt or salty water, which may have been
spilled, remaining on the bottom of the machine for any
period of time, which may cause corrosion.
SALT
A. Remove the basket and then unscrew and remove the cap from the salt container.
B. Before first wash, add 1lt. of water in the salt container of your machine.
Using your dishwasher

14
EN
Using the appliance
B
C. Place the end of the funnel (if supplied) into the hole and introduce about, 0.13kg of salt.
It is normal for a small amount of water to come out of the salt container.
D. After filling the container, screw the cap tightly back clockwise.
E. Usually, the salt warning light will be cease to be illuminated within 2-6 days after the
salt container has been filled with salt.
F. Immediately after filling the salt into the salt container, a washing programme should be
started (Suggest choose rapid program). Otherwise filter system, pump or other important
parts of the machine may be damaged by salty water. It is out of warranty.
NOTE
•
The salt container must only be refilled when the salt
warning light in the control panel comes on. Depending on
how fully the salt dissolves, the salt warning light may still
be on even though the salt container is filled. If there is no
salt warning light in the control panel (For some Models),
you can judge when to load the salt into the softener by
the cycles that the dishwasher had run.
•
If there are spills of the salt, a soak or a rapid program
should be run to remove the excess salt.
Adjusting Salt Consumption
Please follow the steps below for adjustment in salt consumption.
Step 1: Enter the status of salt adjustment
Close the door, switch on the appliance. Within 60 seconds after the appliance was switched
on, press Program button and hold for 5 seconds, the appliance will enter setting mode.
Step 2: select a certain level of salt consumption
Press the Program button to select the proper set according to your local environment, the
sets will change in the following sequence: H1->H2->H3->H4->H5->H6.
Step 3: Exit the status of salt adjustment
Press the Power button to end the setting mode.
There are 6 levels of salt consumption in all. It is recommended to select the level according
to below table:

15
EN
Using the appliance
B
WATER HARDNESS Setting on
the water
softener
Digital display
stalls
Salt
consumption
(gram/cycle)
Regeneration
occurs every
X program
sequence
°dH 1) Mmol/l 2)
0 - 5 0 - 0.94 1 H1 0 0
6 - 11 1.0 - 2.0 2 H2 4 9
12 - 17 2.1 - 3.0 3 3) H3 8 12
18 - 22 3.1 - 4.0 4 H4 13 20
23 - 34 4.1 - 6.0 5 H5 20 30
35 - 55 6.1 - 9.8 6 H6 40 60
1) German degree of measurement for the water hardness
2) millimol, internationel unit for water hardness
3) factory setting
Contact your local water board for information on the hardness of your water supply.
Every cycle with a regeneration, the program extents by 4 minutes.
Loading the dishwasher baskets
Recommendation
• Consider buying utensils which are identified as dishwasher-proof.
•
Use a mild detergent that is described as 'kind to dishes'. If necessary, seek further
information from detergent manufacturers.
• For particular items, select a program with as low temperature as possible.
•
To prevent damage, do not take glass and cutlery out of the dishwasher immediately
after the program has ended.
Suitability of use in the dishwasher
Not suitable for use:
• Cutlery with wooden, horn, china or mother-of-pearl handles
• Plastic items that are not heat resistant
• Older cutlery with glued parts that are not temperature resistant
• Bonded cutlery items or dishes
• Pewter or copper items
• Crystal glass
• Steel items subject to rusting
• Wooden items
• Items made from synthetic fibres

16
EN
Using the appliance
B
Limited suitability:
• Some glasses can become dull after a large number of washes.
• Silver and aluminium have a tendency to discolour during washing.
• Glazed patterns may fade if washed frequently.
Attention before or after loading the dishwasher baskets
(For the best performance of the dishwasher, follow these loading guidelines. Features
and appearance of baskets and cutlery baskets may vary from your model.) Scrape off any
large food paritcles. Soften remnants of burnt food in pans. It is not necessary to rinse the
dishes under running water. Place objects in the dishwasher in following way:
• Items such as cups, glasses, pots/pans, etc. are face downwards.
•
Curved items, or those with recesses, should be loaded at aslant so that water can run off.
• All utensils are stacked securely and can not tip over.
•
All utensils are placed in the way that the spray arms can rotated freely during washing.
NOTE
Very small items should not be washed in the dishwasher
as they could easily fall out of the basket.
• Load hollow items such as cups, glasses, pans etc. with the opening facing downwards
so that water cannot collect in the container or a deep base.
• Dishes and items of cutlery must not lie inside one another, or cover each other.
• To avoid damage to glasses, they must not be touched.
• Long bladed knives stored in an upright position are a potential hazard!
•
Long and/or sharp items of cutlery such as carving knives must be positioned horizontally
in the basket.
•
Please do not overload your dishwasher. This is important for good results and for
reasonable energy consumption.

17
EN
Using the appliance
B
Use of the dishware support
Small-size dishware will drop through the basket and block the rotation of spray arm.
Flip the dishware support inward to support the small-size dishware.

18
EN
Using the appliance
B
Loading the basket according to EN60436
Loading basket
Position the dishes and cookware so that they will not get moved by the spray of water.
1
2
3
4
56
75
6
7
78
9
Number Item
1Soup plate
2Melamine bowl
3Melamine dessert plate
4Dessert plate
5Dessert bowl
6Mug
7Glass
8Cup
9Saucer
Max plate and glasses size:
Max plate size: Dia 27cm
Max glasses size: 23cm
This manual suits for next models
1
Table of contents
Languages:
Other VALBERG Dishwasher manuals

VALBERG
VALBERG 14S42 D WAD929C User manual

VALBERG
VALBERG 966566 User manual

VALBERG
VALBERG FBI 14S42 C SAD929C User manual

VALBERG
VALBERG 972652 User manual

VALBERG
VALBERG 14S42 C XAD929C User manual

VALBERG
VALBERG FBI 14S40 B KAD929C User manual

VALBERG
VALBERG 12S45 D DXAD701T User manual

VALBERG
VALBERG 972793 User manual

VALBERG
VALBERG FBI 16S43 A XAD929C User manual

VALBERG
VALBERG 14S40 B XAD929C User manual