VALBERG 972652 User manual

EN
WARRANTY CONDITION
This product is guaranteed for a period of 2 years from the date of purchase* against
any failure resulting from a manufacturing or material defect. This warranty does
not cover defects or damage resulting from incorrect installation, improper use or
abnormal wear of the product.
*as shown on the sales receipt.
FR
CONDITION DE GARANTIE
Ce produit est garanti pour une période de 2 ans à partir de la date d’achat*, contre
toute défaillance résultant d’un vice de fabrication ou de matériau. Cette garantie ne
couvre pas les vices ou les dommages résultant d’une mauvaise installation, d’une
utilisation incorrecte ou de l’usure anormale du produit.
*sur présentation du ticket de caisse.
NL
GARANTIEVOORWAARDEN
Dit product wordt gegarandeerd voor een periode van 2 jaar vanaf de
aankoopdatum*, voor elke storing die het gevolg is van een fabricagefout of het
materiaal. Gebreken of schade door slechte installatie, onjuist gebruik of abnormale
slijtage van het product worden niet gedekt door deze garantie.
*op vertoon van kassabon.
ES
CONDICIONES DE GARANTÍA
El certificado de garantía de este producto tiene una duración de 2 años a partir de la
fecha de compra* que se limita a los defectos de fabricación y averías del material.
Se excluyen de la garantía deficiencias o daños originados por una mala instalación,
errores en la manipulación o por un uso inadecuado.
*previa presentación del comprobante de compra.
ELECTRO DEPOT
1 route de Vendeville
59155 FACHES-THUMESNIL - FRANCE

972652 - 15S39 D SAD701T
INSTRUCTIONS FOR USE ....................02
CONSIGNES D'UTILISATION ....................40
GEBRUIKSAANWIJZINGEN ....................80
INSTRUCCIONES DE USO ...................120
2/2 02/2022-V3
Dishwasher
Lave-vaisselle
Vaatwasmachine
Lavavajillas

13
1
2
3
4
5
6
7
8
12
11
10
9


2EN
2EN
2EN
Thanks!
Thank you for choosing this VALBERG product.
Chosen, tested and recommended by ELECTRO
DEPOT,
VALBERG brand products are simple
to use and give reliable performance and quality.
With every use of this appliance, you can be sure
of complete satisfaction.
Welcome to ELECTRO DEPOT.
Visit our website: www.electrodepot.fr

3EN
3EN
3EN
Table of contents
AOverview of the
appliance
CPractical information
BUsing the appliance
Description of the appliance
Installing the dishwasher
Installing the dishwasher under a worktop
Preparing the dishwasher for use
Loading your dishwasher
Advice
Loading the racks
Program table
The control panel
Cleaning and maintenance
Troubleshooting
Automatic failure alert and action

4EN
Overview of the appliance
A
Description of the appliance
1Upper panel (top)
2Upper rack with grids
3Upper spray arm
4Lower rack
5Lower spray arm
6Filters
7Nameplate
8Control panel
9Detergent dispenser and rinse aid
10 Cutlery basket
11 Salt container
12 Locking latches for the top racks
13 Turbo dryer unit: This system improves the drying performance of your dishes.

5EN
Using the appliance
B
Installing the dishwasher
Positioning the dishwasher
When installing your dishwasher, make sure you choose a place where you can easily load
and unload your dishes.
Do not install your dishwasher in a place where the ambient temperature may drop below 5°C.
Sub-zero temperatures may damage the hoses or cause the electronic board to malfunction.
Before positioning the dishwasher, remove it from its packaging, and observe the warnings
on the packaging.
Position the dishwasher close to a water supply and a water drain. You must install your
dishwasher so that the connections are not altered once they have been made.
Do not pull the dishwasher by the door or control panel to move it.
Ensure that you leave space around the dishwasher so that it can be moved easily during
cleaning.
Take care not to jam the water inlet and drain hoses when positioning the dishwasher.
Ensure that you do not trap the electric cable under the dishwasher.
Adjust the legs of the dishwasher so that it is level and stable. It is essential to position the
dishwasher correctly for the door to open and close properly.
If your dishwasher door does not close properly, check that the dishwasher is level and stable
on the floor; if not, position the dishwasher in a stable position using the adjustable legs.
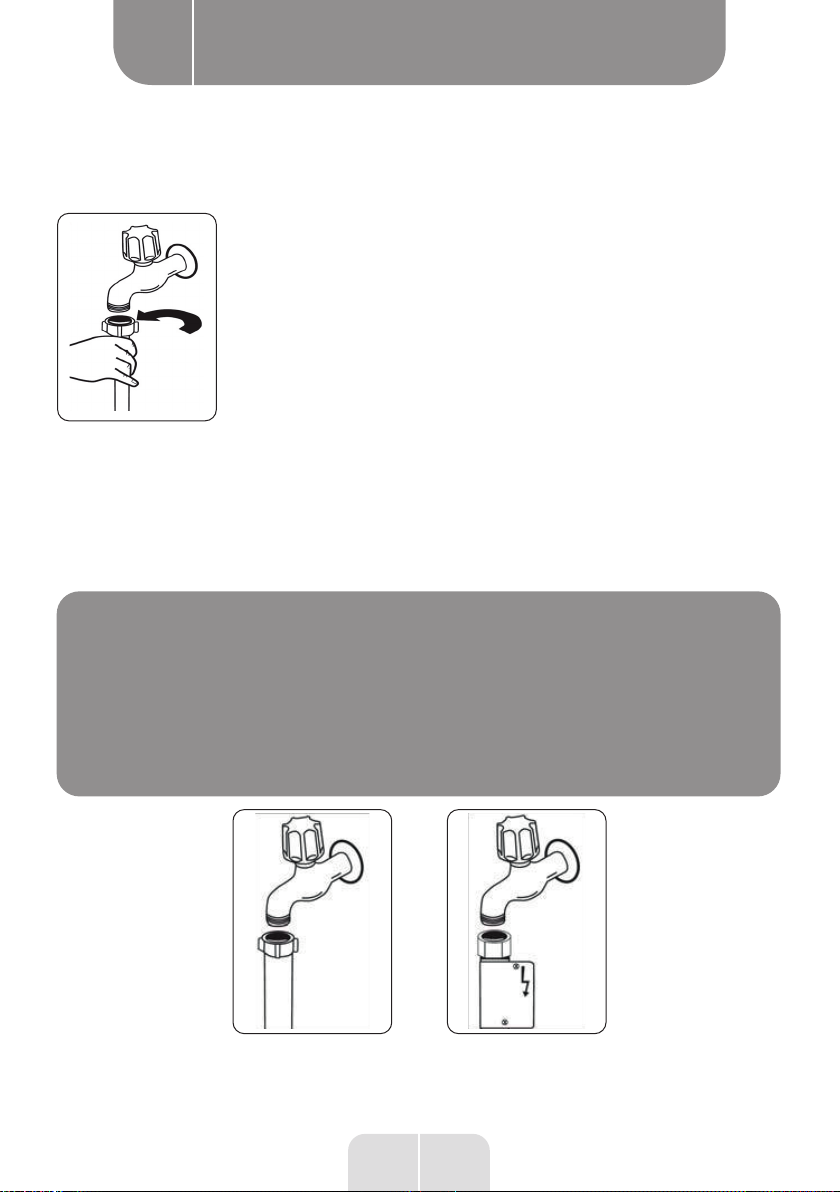
Water connection
Check that the water supply is suitable to install a dishwasher. We recommend that you
install a filter after your water meter to prevent residues (sand, clay, rust, etc.) that may be
brought into the water system or the indoor plumbing installation which could cause damage
to the dishwasher and inconveniences, such as yellowing of the dishes or the formation of
deposits after washing.

6EN
Using the appliance
B
Water inlet hose
The appliance must be connected to the water supply network using
the new connection sets supplied with the appliance; used connection
sets must not be reused.
Before connecting the new or water inlet hose, or one that has not been
used for a long time, to your dishwasher, run water through it for a
while. Manually connect the water inlet hose directly to the inlet tap.
The pressure at the tap must be a minimum of 0.03 Mpa and a maximum
of 1 Mpa. If the water pressure is greater than 1 Mpa, install a pressure
reducing device between the tap and the pipe. Once the connections
are made, open the valve completely and check that there are no leaks.
For your safety, always close the inlet tap after each programme. Check the marking on the
water inlet hose! If the hose is marked 25°C, the water temperature must be a maximum of
25°C (cold water).
For all other models: Preferably cold water; hot water with a maximum temperature of 60°C.
N.B.
Some models use an Aquastop system.
If your dishwasher is equipped with this option, there
is a dangerous voltage. Never cut the Aquastop nozzle
and make sure that it is not bent or twisted.

7EN
Using the appliance
B
Drain hose
The drain hose can be connected either directly to a fixed drain or to the special connection
under the sink. Using a special elbow pipe (if available), the dishwasher can be emptied
directly into the sink by hanging the elbow pipe on the edge of the sink.This connection must
be at least 50 cm and no more than 110 cm above ground level.
max 110 cm
min 4 cm
min 50 cm
WARNING
The length of the drainage hose should not be changed,
as the appliance will not be able to drain properly. In this
case, our company will not accept any responsibility.

8EN
Using the appliance
B
Power supply connection
WARNING
The appliance must be grounded.
Before connecting to the mains, check that the rated voltage of the appliance (marked on the
nameplate of the appliance) corresponds to the voltage of the power supply. The power supply
socket must also be capable of supporting the power rating of the appliance (also stated on
the appliance's rating plate).
In case of doubt, please contact a qualified electrician, the product must be installed according
to the instructions in this manual and in compliance with the standards in force.
In case of non-compliance the manufacturer cannot be held responsible.
This appliance is designed to use a 220-240V power supply. If your power supply is different,
contact a licensed professional or a qualified electrician. Always use the power cord and plug
supplied with the unit.
At low voltage, the efficiency of your dishwasher will be lower. If the power cable is damaged,
it must be replaced by the manufacturer, its after-sales department or a similarly qualified
person in order to avoid any danger. Otherwise, accidents may happen.
For safety reasons, always unplug the machine at the end of the programme.
To avoid an electric shock, do not unplug the appliance when your hands are wet. Always
unplug your dishwasher from the plug. Never pull on the power cable.

9EN
Using the appliance
B
Installing the dishwasher under a worktop
If you wish to place your appliance under a worktop, there must be sufficient space to do so
and the pipework must be suitable for this purpose (1).
If the space under the worktop is suitable for mounting your appliance, remove the dishwasher
top as shown in the illustration (2).
1
2
3
4
Min 570
H
H1: min A
H2: min B1
H3: min B2
598
570
Min 820
Min 600
A B
All
products B1 B2
Height
of the
product
(± 2 mm)
820 mm 830
mm
835
mm
A: If there is no felt on top of the product, you must take into account the height of the product.
B1: If there is felt on top of the product with the 2nd rack, you must take into account the
height of the product.
B2: If there is felt on top of the product with the 3rd rack, you must take into account the
height of the product.
WARNING
The work surface under which the appliance is to be
placed must be stable to avoid loss of balance.

10 EN
Using the appliance
B
The top panel of the dishwasher must be removed to fit the appliance under the worktop.
To remove the top panel, remove the screws that hold it in place at the back of the appliance.
Then push the panel 1 cm towards the back and lift it up.
Adjust the feet of the appliance to the slope of the floor (3).
Install your appliance by pushing it underneath the worktop, ensure that it the pipes are not
bent or crushed (4).
WARNING
After removing the top panel of your dishwasher, the
appliance must be placed in a space with the dimensions
shown in the illustration below.

11 EN
Using the appliance
B
Preparing the dishwasher for use
Getting started
• Make sure that the electrical and water supply specifications correspond to the values
indicated in the installation instructions for the appliance.
• Remove all packing materials from inside the appliance.
• Set the water softener level.
• Fill the container with rinse aid.
Using salt
To work properly, the dishwasher needs soft water, i.e. with less limescale. Otherwise, white
lime residue will remain on dishes and interior equipment.
This will have a negative impact on the washing, drying and shining performance of your
appliance. As the water flows through the softener, the ions that form the hydrometry are
removed from the water; it therefore obtains the softness level required for an optimal washing
result. Depending on the water content of the incoming water, these water-hardening ions
quickly accumulate in the softener. The water softener should be topped up so that it maintains
the same performance during the next wash cycle. Use dishwasher salt for this purpose.
Please use only special dishwasher salt to soften the water in the machine. Do not use table
salt or powdered salt that dissolves easily in water. Using any other type of salt may damage
your machine.
Filling the salt reservoir.
To add softening salt, open the salt compartment cover by turning it clockwise. (1) (2) When
using for the first time, put 1 kg of salt and water (3) into the compartment until it almost
overflows. You can use a funnel (not supplied) (4) for easier filling. Replace the cover and close it.
After every 20 to 30 cycles, add salt to your appliance until it is full (about 1 kg).
1 2 3 4
SALT
Add salt to the salt compartment only when using it for the first time.
Use softening salt specially made for use in dishwashers.
When you start the dishwasher for the first time, the salt compartment fills with water.

12 EN
Using the appliance
B
Therefore, you should put the softening salt into the appliance before starting it.
If you do not start your appliance immediately after the softening salt has overflowed, run a
short washing programme to stop corrosion.
Testing strip
Run water from
the tap (1 min).
Hold the strip
in the water (1
sec)
Shake the strip. Wait
(1 min).
Set the water
hardness of your
appliance.
1
2
3
4
5
6
1
munite
1
second
1
munite
1
minute
1
2
3
4
5
6
1
munite
1
second
1
munite
1
second
1
2
3
4
5
6
1
munite
1
second
1
munite
1
2
3
4
5
6
1
munite
1
second
1
munite
1
minute
1
2
3
4
5
6
1
munite
1
second
1
munite
Strips are not included
NOTE
The level is set to 3 by default. If the water is from a
well or has a hardness level of more than 90 dF, we
recommend using a filter or refining devices.
Water Hardness Table
Level German dH French dF English
British dE Indicator
1 0-5 0-9 0-6 L1 appears on the screen.
2 6-11 10-20 7-14 L2 appears on the screen.
3 12-17 21-30 15-21 L3 appears on the screen.
4 18-22 31-40 22-28 L4 appears on the screen.
5 23-31 41-55 29-39 L5 appears on the screen.
6 32-50 56-90 40-63 L6 appears on the screen.

13 EN
Using the appliance
B
Water softener system
The dishwasher is equipped with a water softener system that reduces the hardness of the
main water supply. To find the level of hardness in your tap water, contact your water company
or use the testing strip (if available).
Settings
• Switch on the dishwasher by pressing the Start/Stop button.
• Press the Programme button for at least 3 seconds immediately after the machine has
been switched on.
• Release the programme selection button when "SL" is displayed on the screen. Then the
last setting level is displayed.
• Press the programmes button to set the desired level. Each time the Programme button is
pressed, this increases the level. Once level 6 is reached, pressing this button again returns
the level to 1.
• To save the last selected water hardness level in the memory, switch off the machine by
pressing the Start/Stop button.
Use of detergent
Use only detergents specifically designed for domestic dishwashers. Keep the detergents in
a cool, dry place, out of reach of children.
Add the suitable detergent for the selected programme to ensure best performance. The
amount of detergent required depends on the wash cycle, load size, and the level of dirtiness
of the dishes.
Do not fill the detergent compartment with more detergent than necessary, otherwise you
may see whitish or bluish streaks on the glass and dishes, or cause the glass to corrode.
Continuous use of too much detergent can damage the machine.
Using too little detergent can lead to poor cleaning, and you may see whitish hard water spots.
Refer to the detergent manufacturer's instructions for more information.

14 EN
Using the appliance
B
Filling with detergent
Press the latch to open the dispenser and pour in the detergent.
Close the cover and press until it locks into place. The dispenser must be refilled just before
the start of each programme. If the dishes are very dirty, put extra detergent in the pre-wash
detergent compartment.
DETERGENT
Using mixed detergents
These products must be used according to the manufacturer's instructions.
Never put mixed detergents in the inner compartment or in the cutlery basket.
Mixed detergents contain not only detergent, but also rinse aid, salt substitutes and additional
components depending on the mixture.
We recommend avoiding mixed detergents for short programmes. Use powdered detergents
instead.
If you encounter a problem when using combination detergent, please contact the detergent
manufacturer.
When you stop using combination detergents, make sure that the water hardness and rinse
aid settings are set to the correct level.
Using rinse aid
The rinse aid helps to dry the dishes without leaving any lines or stains.
The rinse aid is necessary for spotless utensils and clear glasses. The rinse aid is automatically
released during the hot rinsing phase.
If the rinse aid dose is set too low, whitish spots remain on the dishes and the dishes are not
dry and clean.

15 EN
Using the appliance
B
If the dose of rinse liquid is too high, you may see blueish layers on the glass and dishes.
Filling and adjustment with rinse aid
To fill the rinse aid compartment, open the rinse aid compartment cap.
Fill the container with rinse aid to the MAXIMUM level then close the cap. Ensure that you do
not overfill the rinsing compartment and that you wipe up any spills.
To change the rinse aid level, follow the steps below before turning on the dishwasher:
• Switch on the machine by pressing the Start/Stop button.
• Press the Programme button for at least 5 seconds immediately after the machine has
been switched on.
• Release the programme selection button when “rA" is displayed on the screen.
• The setting of the rinse aid level follows that of the water hardness level. Then the last
setting level is displayed.
• Adjust the level by pressing the programme selection button.
• Turn off the machine to save the settings made.
The factory setting is "4”.
If the dishes do not dry properly or are stained, increase the level.
If blue stains form on your dishes, lower the level.
Level Dose of brightener Indicator
1 Rinse aid not released r1 appears on the screen.
2 1 dose is distributed r2 appears on the screen.
3 2 doses have been distributed r3 appears on the screen.
4 3 doses have been distributed r4 appears on the screen.
5 4 doses have been distributed r5 appears on the screen.

16 EN
Using the appliance
B
Loading your dishwasher
For best results, follow these loading guidelines.
Loading the household dishwasher to the capacity specified by the manufacturer will help
save energy and water.
Manually pre-rinsing your dishes uses additional water and energy and is not recommended.
You can place cups, glasses, stemware, small plates, bowls, etc. in the upper rack. Do not lean
long glasses against each other, otherwise they cannot remain stable and may be damaged.
When placing long-stemmed glasses and cups, lean them against the rim of the rack or the
stand and not against other objects.
Place all containers such as cups, glasses and pans in the dishwasher with their openings
facing downwards, otherwise water may collect in them.
If there is a cutlery basket in the machine, it is recommended to use it for best results.
Place all large (pots, pans, lids, plates, bowls, etc.) and very dirty objects in the bottom rack.
Dishes or cutlery should not be placed on top of each other.
WARNING
Make sure that the rotation of the spray arms is not
impeded.
WARNING
Make sure that after loading the dishes this does not
prevent the detergent dispenser from being opened.

17 EN
Using the appliance
B
Remove any heavy residue from the dishes before placing them in the machine.Start the
machine at full load.
CAUTION
Do not overload racks or place dishes in the wrong
racks.
WARNING
To avoid injury, place long-handled, sharp knives
on the baskets with their tips facing down or placed
horizontally.
Adjustable height rack (hook type)
The adjustable height racks allow you to place tall glasses and cups on or under the racks.
The supports can be adjusted to 2 different heights.Long cutlery and utensils can also be
placed on the baskets horizontally.
1
2
Advice
This manual suits for next models
1
Table of contents
Languages:
Other VALBERG Dishwasher manuals

VALBERG
VALBERG 14S42 C XAD929C User manual

VALBERG
VALBERG 972691 User manual

VALBERG
VALBERG 966566 User manual

VALBERG
VALBERG 12S45 D DXAD701T User manual

VALBERG
VALBERG 14S42 D WAD929C User manual

VALBERG
VALBERG 3S58 F WAD929C User manual

VALBERG
VALBERG 972793 User manual

VALBERG
VALBERG FBI 16S43 A XAD929C User manual

VALBERG
VALBERG 14S40 B XAD929C User manual

VALBERG
VALBERG 14S44 D XAD929C User manual