VALBERG 972691 User manual

972691 - 6S49 F W929C
972692 - 6S49 F S929C
ELECTRO DEPOT
1 route de Vendeville
59155 FACHES-THUMESNIL - FRANCE
EN
WARRANTY CONDITION
This product is guaranteed for a period of 2 years from the date of purchase* against
any failure resulting from a manufacturing or material defect. This warranty does not
cover defects or damage resulting from incorrect installation, improper use or abnormal
wear of the product.
*as shown on the sales receipt.
FR
CONDITION DE GARANTIE
Ce produit est garanti pour une période de 2 ans à partir de la date d’achat*, contre
toute défaillance résultant d’un vice de fabrication ou de matériau. Cette garantie ne
couvre pas les vices ou les dommages résultant d’une mauvaise installation, d’une
utilisation incorrecte ou de l’usure anormale du produit.
*sur présentation du ticket de caisse.
NL
GARANTIEVOORWAARDEN
Dit product wordt gegarandeerd voor een periode van 2 jaar vanaf de aankoopdatum*,
voor elke storing die het gevolg is van een fabricagefout of het materiaal. Gebreken of
schade door slechte installatie, onjuist gebruik of abnormale slijtage van het product
worden niet gedekt door deze garantie.
*op vertoon van kassabon.
ES
CONDICIONES DE GARANTÍA
El certificado de garantía de este producto tiene una duración de 2 años a partir de la
fecha de compra* que se limita a los defectos de fabricación y averías del material.
Se excluyen de la garantía deficiencias o daños originados por una mala instalación,
errores en la manipulación o por un uso inadecuado.
*previa presentación del comprobante de compra.
INSTRUCTIONS FOR USE .....................02
CONSIGNES D'UTILISATION .....................42
GEBRUIKSAANWIJZINGEN .....................86
INSTRUCCIONES DE USO ...................126
11/2021-V1
Dishwasher
Lave-vaisselle
Vaatwasser
Lavavajillas

1
2
3
4
5 6
A

2 3
FR FR
Aperçu de l’appareil
A A
3
Table of contents
AOverview of the
appliance
CUseful information
BUsing the appliance Using your dishwasher
Installation instruction
Loading the baskets
Quick user guide
Using your dishwasher
Wash cycle table
Maintenance and cleaning
Troubleshooting tips
Availability of spare parts
Error codes
Product overview
2
Thanks!
Thank you for choosing this VALBERG product.
Chosen, tested and recommended by ELECTRO DEPOT,
VALBERG branded products are easy to use, reliable,
and of an impeccable standard.
With every use of this appliance, you can be sure of
complete satisfaction.
Welcome to ELECTRO DEPOT.
Visit our website: www.electrodepot.fr
EN EN

5EN
Using the appliance
B
4EN
Preview of the appliance
A
Product overview
IMPORTANT
To get the best performance from your dishwasher, read
all operating instructions before using it for the first time.
1Salt container
2Dispenser
3Spray arm
4Filter assembly
5Basket
ACup rack
6Cutlery rack
NOTE
Pictures are only for reference, different models may be
different.
Using your dishwasher
• Before using your dishwasher :
eur
r
Outside
Inside
SALT
1. Set the water softener
2. Loading the salt Into the softener
3. Loading the basket
4. Fill the detergent dispenser
NOTE
Please check the section «Water Softener», if you need to
set the water softener.
Loading the salt into the softener
• If your model does not have any water softener, you may skip this section.
• Always use salt intended for dishwasher use.
• The salt container is located beneath the lower basket and should be filled as explained in
the following:
WARNING
Only use salt specifically designed for dishwashers use!
Every other type of salt not specifically designed for
dishwasher use, especially table salt, will damage the water
softener. In case of damages caused by the use of unsuitable
salt the manufacturer does not give any warranty nor is
liable for any damages caused.

6 7
EN EN
Using the appliance Using the appliance
B B
WARNING
Only fill with salt before running a cycle.
This will prevent any grains of salt or salty water, which may
have been spilled, remaining on the bottom of the machine
for any period of time, which may cause corrosion
• Please follow the steps below for adding dishwasher salt:
SALT
1. Remove the lower basket and unscrew the reservoir cap.
2. Place the end of the funnel (if supplied) into the hole and pour in about 1 kg of dishwasher
salt.
3. Fill the salt container to its maximum limit with water, It is normal for a small amount of
water to come out of the salt container.
4. After filling the container, screw back the cap tightly.
5. The salt warning light will turn off after the salt container has been filled with salt.
6. Immediately after filling the salt into the salt container, a washing program should be
started (We suggest to use a short program). Otherwise the filter system, pump or other
important parts of the machine may be damaged by salty water. This is out of warranty.
NOTE
• The salt container must only be refilled when the salt
warning light in the control panel comes on. Depending
on how well the salt dissolves, the salt warning light may
still be on even though the salt container is filled. If there is
no salt warning light in the control panel (for some models),
you can estimate when to fill the salt into the softener by
the cycles that the dishwasher has run.
• If salt has spilled, run a soak or quick program to remove
it.

8 9
EN EN
Using the appliance Using the appliance
B B
Installation instruction
WARNING
Electrical shock hazard
Disconnect electrical power before installing dishwasher.
Failure to do so could result in death or electrical shock.
WARNING
The installation of the pipes and electrical equipments
should be done by professionals.
About power connection
WARNING
For personal safety:
• Do not use an extension cord or an adapter plug with this
appliance.
• Do not, under any circumstances, cut or remove the
earthing connection from the power cord.
Electrical requirements
Please look at the rating label to know the rating voltage and connect the dishwasher to
the appropriate power supply. Use the required fuse 10A/13A/16A, time delay fuse or circuit
breaker recommended and provide separate circuit serving only this appliance.
Electrical connection
Ensure the voltage and frequency of the power being corresponds to those on the rating
plate. Only insert the plug into an electrical socket which is earthed properly. If the electrical
socket to which the appliance must be connected is not appropriate for the plug, replace the
socket, rather than using a adaptors or the like as they could cause overheating and burns.
WARNING
Ensure that proper earthing exists before use
Water supply and drain
Cold water connection
• Connect the cold water supply hose to a threaded 3/4(inch) connector and make sure that
it is fastened tightly in place.
• If the water pipes are new or have not been used for an extended period of time, let the
water run to make sure that the water is clear.
• This precaution is needed to avoid the risk of the water inlet to be blocked and damage the
appliance.
ordinary supply hose
safety supply hose
About the safety supply hose
• The safety supply hose consists of the double walls. The system guarantees its intervention
by blocking the flow of water in case of the supply hose breaking and when the air space
between the supply hose itself and the outer corrugated hose is full of water.
WARNING
A hose that attaches to tap can burst if it is installed on the
same water line as the dishwasher. If your sink has one,
it is recommended that the hose be disconnected and the
hole plugged.

10 11
EN EN
Using the appliance Using the appliance
B B
How to connect the safety supply hose
1. Pull the safety supply hoses out from storage compartment located at rear of dishwasher.
2. Tighten the screws of the safety supply hose to the faucet with thread 3/4inch.
3. Turn the water fully on before starting the dishwasher.
How to disconnect the safety supply hose
1. Turn off the water.
2. Unscrew the safety supply hose from the faucet.
Connection of drain hoses
Insert the drain hose into a drain pipe with a minimum diameter of 4 cm, or let it run into the
sink, making sure to avoid bending or crimping it. The height of drain pipe must be less than
600 mm. The free end of the hose must not be immersed in water to avoid the back flow of it.
WARNING
Please securely fix the drain hose in either position
A
or
position B
A
B
Back of dishwasher
Inlet pipe connector
Drain pipe
Mains Cable
Drain pipe
Counter
MAX 600 mm
φ 40 mm
Drain Pipe
How to drain excess water from hoses
If the connection to the drain pipe is positioned higher than 1000 mm, excess water may
remain in the drain hose. It will be necessary to drain excess water from the hose into a bowl
or suitable container that is held outside and lower than the sink.
Water outlet
• Connect the water drain hose. The drain hose must be correctly fitted to avoid water leaks.
• Ensure that the water drain hose is not kinked or squashed.
Extension hose
• If you need a drain hose extension, make sure to use a similar drain hose.
• It must be no longer than 4 meters; otherwise the cleaning effect of the dishwasher could
be reduced.
Syphon connection
The waste connection must be at a height less than 1000 mm (maximum) from the bottom
of the dishwasher.
Positioning the appliance
• Position the appliance in the desired location. The back should rest against the wall behind
it, and the sides, along the adjacent cabinets or walls.
• The dishwasher is equipped with water supply and drain hoses that can be positioned
either to the right or the left sides to facilitate proper installation.

12 13
EN EN
Using the appliance Using the appliance
B B
Loading the baskets
According to EN60436:
Loading the dishwasher to its full capacity
will contribute to energy and water savings.
Basket:
with the cup rack
1
2
3
3
7 7 8 9
654
11
12
10
1
23
3
4 5 6
7 7 8 9
11
10
12
without the cup rack
2
3
3
7 7 8 9
654
12
7
13
11
10
14
7
14
23
311
4 5 6
13 7
10
12 7 8 9
Number Item
1Cups
2Mugs
3Glasses
4Melamine bowl
5Soup plates
6Dinner plates
7Saucers
Number Item
8Dessert dishes
9Melamine dessert
plates
10 Oval platter
11 Small pot
12 Cutlery basket
13 Dessert bowls
14 Serving spoon
Cutlery basket:
7
1
8
2
2
5
5
5
3
4
4
3
1
2
4
1
2
3
1
4
3
1
4
4
2
5
3
5
5
3
2
1
6
1 2 3 4 5 6 7 8
Information for comparability tests in accordance
with EN60436
Capacity: 6 place settings
Program: ECO
Rinse aid setting: Max
Softener setting: H4
Number Item
1Forks
2Soup spoons
3Dessert spoons
4Teaspoons
5Knives
6Serving spoons
7Gravy ladles
8Serving forks

14 15
EN EN
Using the appliance Using the appliance
B B
Please read the corresponding content
on the instruction manual for detailed
operating method.
1. Install the dishwasher
(Please check the section “INSTALLATION
INSTRUCTION ”.)
2. Remove larger residue from dishes. Avoid
pre-rinsing.
3. Load the baskets
OutsideInside
4. Fill the dispenser with detergent and rinse
aid.
5. Select a suitable programme and start the
dishwasher.
Quick user guide Using your dishwasher
Control panel
Eco
90’
P
6S49 F W929C
1 2 3 4
5 76
Operation (Button)
1Power Press this button to turn on your dishwasher, the screen lights
up.
2Program Press this button to select the appropriate washing programme,
the programme indicator will be lit.
3Delay
Press this button to set the delayed hours for washing. You can
delay the start of washing up to 24 hours. One press on this
button delays the start of washing by one hour.
4Start/Pause To start the selected washing program or pause it when the
dishwasher is working.

16 17
EN EN
Using the appliance Using the appliance
B B
Display
5Program
indicator
Intensive
For heaviest soiled crockery, and normally soiled pots,
pans, dishes etc. With dried-on food.
Universal
For normally soiled loads, such as pots, plates,
glasses and lightly soiled pans.
ECO
This is standard program, it is suitable to clean
normally soiled tableware and it is the most efficient
program in terms of its combined energy and water
consumption for that type of tableware.
Glass
For lightly soiled crockery and glass.
90 min
For normally soiled loads that need quick wash.
Rapid
A shorter wash for lightly soiled loads that do not
need drying.
6Screen To show the reminding time, delay time, error code etc.
7Warning
indicator
Rinse Aid
If the “ ” indicator is lit, it means the dishwasher is
low on dishwasher rinse aid and requires a refill.
Salt
If the “ ” indicator is lit, it means the dishwasher is
low on dishwasher salt and needs to be refilled.
Water Faucet
If the “ ” indicator is lit, it means the water faucet
closed.
Water softener
• The water softener must be set manually, using the water hardness dial.
• The water softener is designed to remove minerals and salts from the water, which would
have a detrimental or adverse effect on the operation of the appliance.
• The more minerals there are, the harder your water is.
• The softener should be adjusted according to the hardness of the water in your area.
• Your local Water Authority can advise you on the hardness of the water in your area.
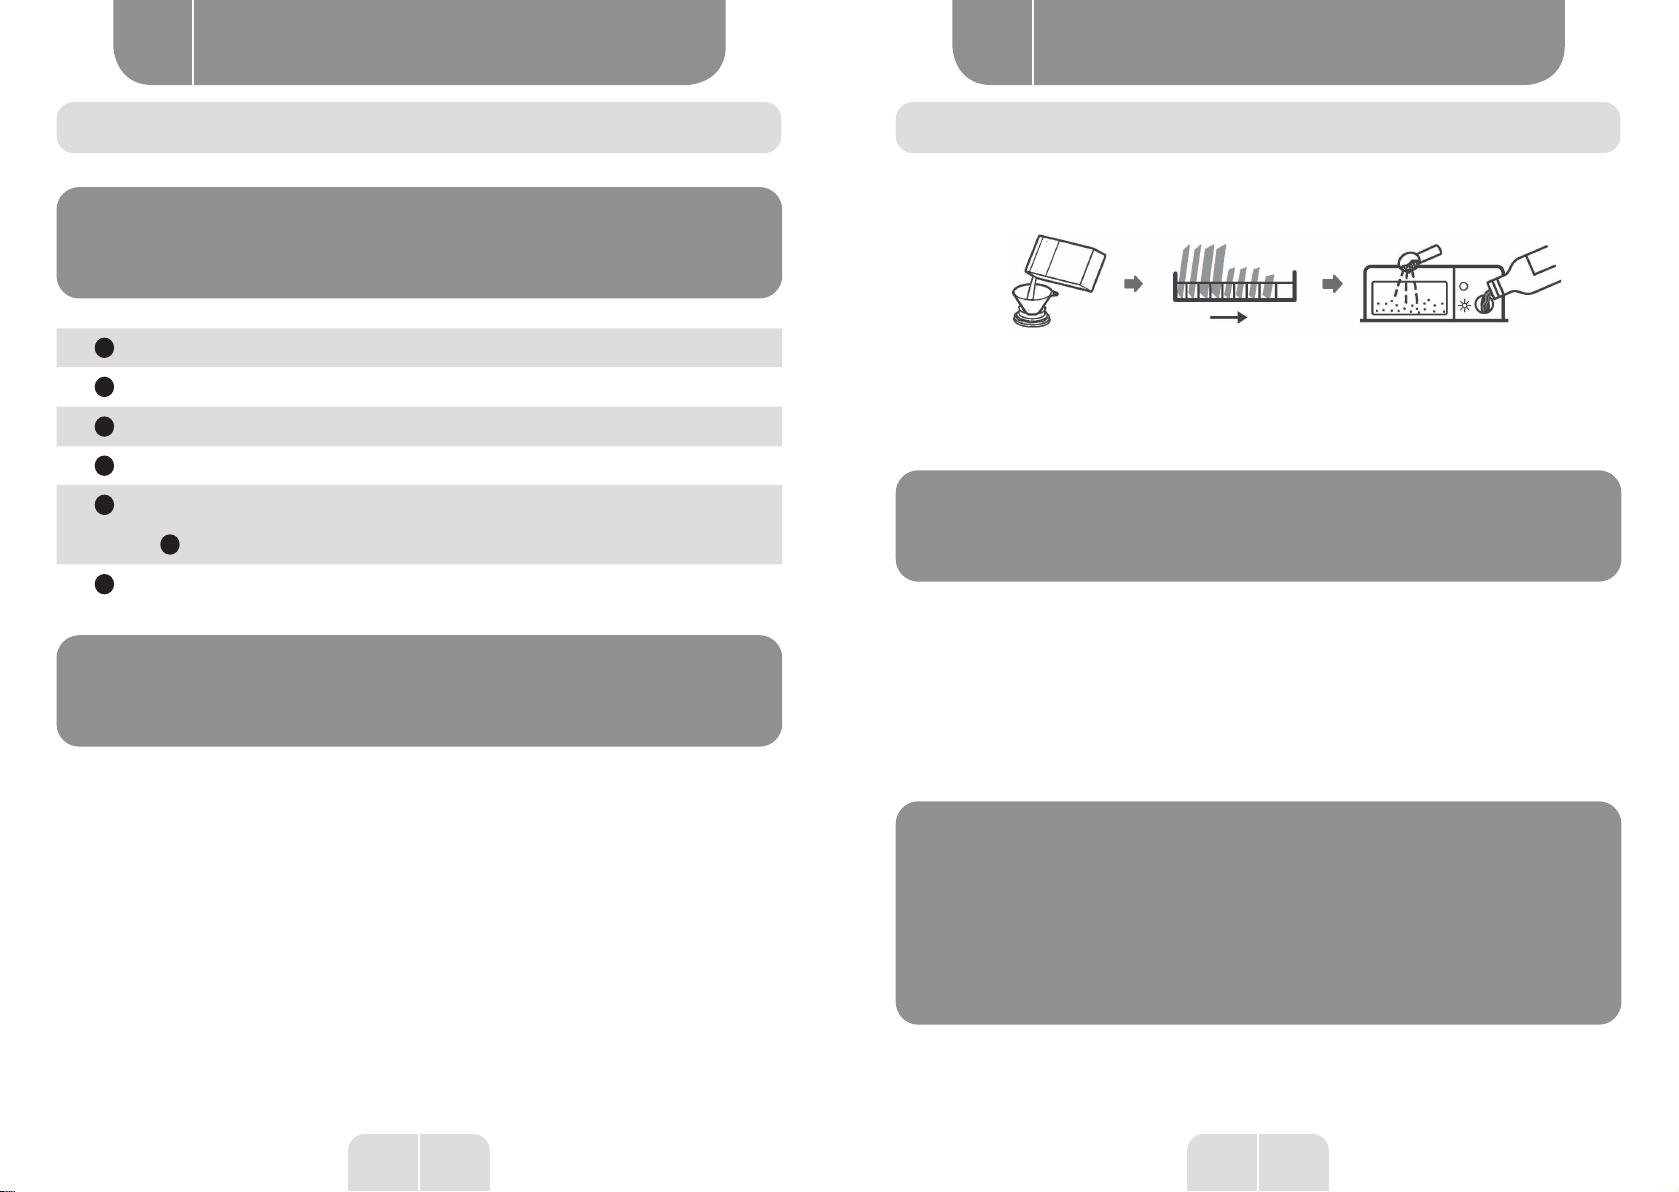
Adjusting salt consumption
• The dishwasher is designed to allow for adjustment in the amount of salt consumed based
on the hardness of the water used. This is intended to optimise and customise the level of
salt consumption.
• Please follow the steps below for adjustment in salt consumption.
1. Close the door, switch on the appliance;
2. Within 60 seconds after the appliance was switched on, press the Programme button for
more than 5 seconds to start the water softener setting mode;
3. Press the Program button again to select the proper setting according to your local
environment, the setting will change in the following sequence:
H1 -> H2 -> H3 -> H4 -> H5 -> H6.
4. Without any operation in five seconds or press the Power button to end the setting mode,
the setting is memorized by the programme.
WATER HARDNESS
Setting on the water
softener
Digital display
stalls
Regeneration
occurs every
X program
sequence 3)
°dH 1) Mmol/l 2)
0 - 5 0 - 0,9 1 H1 No regeneration
6 - 11 1,0 - 2,0 2 H2 10
12 - 17 2,1 - 3,0 3 H3 5
18 - 22 3,1 - 4,0 4 * H4 3
23 - 34 4,1 - 6,1 5 H5 2
35 - 45 6,2 - 8,0 6 H6 1
1) German degree of measurement for the water hardness
2) millimol, internationel unit for water hardness
3) Every cycle with a regeneration operation consumes additional 2.0 litres of water, the
energy consumption increases by 0.02 kWh and the program extents by 4 minutes.
* factory setting
Eco
90’

18 19
EN EN
Using the appliance Using the appliance
B B
NOTE
Please check the “Loading The Salt Into The Softener”, if
your dishwasher lacks salt.
NOTE
If your model does not have any water softener, you may
skip this section.
Water Softener
• The hardness of the water varies from place to place. If
hard water is used in the dishwasher, deposits will form
on the dishes and utensils.
• The appliance is equipped with a special softener that
uses a salt container specifically designed to eliminate
lime and minerals from the water.
Preparing and loading dishes
• Consider buying utensils which are identified as dishwasher-proof.
• For particular items, select a program with the lowest possible temperature.
• To prevent damage, do not take glass and cutlery out of the dishwasher immediately after
the program has ended.
For washing the following cutlery/dishes
Are not suitable:
- Cutlery with wooden, horn china or mother-of-pearl handles
- Plastic items that are not heat resistant
- Older cutlery with glued parts that are not temperature resistant
- Bonded cutlery items or dishes
- Pewter or cooper items
- Crystal glass
- Steel items subject to rusting
- Wooden platters
- Items made from synthetic fibres
Are of limited suitability:
- Some types of glasses can become dull after a large number of washes
- Silver and aluminum parts have a tendency to discolour during washing
- Glazed patterns may fade if machine washed frequently
Recommendations for loading the dishwasher
• Scrape off any large amounts of leftover food. Soften remnants of burnt food in pans.
It is not necessary to rinse the dishes under running water. For best performance of the
dishwasher, follow these loading guidelines.
(Features and appearance of baskets and cutlery baskets may vary from your model.)
Place objects in the dishwasher in the following way:
• Items such as cups, glasses, pots/pans, etc. must face downwards.
• Curved items, or ones with recesses, should be loaded aslant so that water can run off.
• All utensils are stacked securely and can not tip over.
• All utensils are placed in the way that the spray arms can rotate freely during washing.
• Load hollow items such as cups, glasses, pans etc. With the opening facing downwards so
that water cannot collect in the container or a deep base.
• Dishes and items of cutlery must not lie inside one another, or cover each other.
• To avoid damage, glasses should not touch one another.
• The upper basket is designed to hold more delicate and lighter dishware such as glasses,
coffee and tea cups.
• Long bladed knives stored in an upright position are a potential hazard!
• Long and / or sharp items of cutlery such as carving knives must be positioned horizontally
in the upper basket.
• Please do not overload your dishwasher. This is important for good results and for
reasonable consumption of energy.

20 21
EN EN
Using the appliance Using the appliance
B B
NOTE
Very small items should not be washed in the dishwasher
as they could easily fall out of the basket.
WARNING
Items will be hot! To prevent damage, do not take glass
and cutlery out of the dishwasher for around 15 minutes
after the program has ended.
Loading the basket
All tableware can’t be placed face up, in order to improve the cleaning area and washing
performance, it is recommended to place the dirty side towards the spray arm. Please don’t
let tableware out of basket bottom to make sure not block the moving of the spray arm. The
maximum diameter advised for plates in front of the detergent dispenser is of 19 cm, this not
to hamper the opening of it.
Loading the cutlery basket
For personal safety and a top quality cleaning, place the silverware in the basket making
sure that:
• They do not nest together.
• Silverware is placed with the handles-down.
• But place knives and other potentially dangerous utensils are placed handles-up.
WARNING
Do not let any item extend through the bottom.
Always load sharp utensils with the sharp point down!
NOTE
For the best washing effect, please load the baskets refer
to standard loading options.
Function of the rinse aid and detergent
The rinse aid is released during the final rinse to prevent water from forming droplets on
your dishes, which can leave spots and streaks. It also improves drying by allowing water to
run off the dishes. Your dishwasher is designed to use liquid rinse aids.
WARNING
Only use branded rinse aid for dishwasher. Never fill
the rinse aid dispenser with any other substances (e.g.
Dishwasher cleaning agent, liquid detergent). This would
damage the appliance.
When to refill the rinse aid dispenser?
• Unless the rinse-aid warning light ( ) on the control panel is on, you can always estimate
the amount from the color of the optical level indicator located next to the cap. When the
rinse-aid container is full, the indicator will be fully dark. The size of the dark dot decreases
as the rinse-aid diminishes. You should never let the rinse aid level be less than 1/4 full.
• As the rinse aid diminishes, the size of the black dot on the rinse aid level indicator
changes, as illustrated below.
Full 3/4 full 1/2 full 1/4 full Empty

22 23
EN EN
Using the appliance Using the appliance
B B
Function of detergent
• The chemical ingredients that compose the detergent are necessary to remove, crush and
dispense all dirt out of the dishwasher.
• Most of the commercial quality detergents are suitable for this purpose.
WARNING
Proper Use of Detergent
• Use only detergent specifically made for dishwashers
use. Keep your detergent fresh and dry.
• Do not fill detergent into the dispenser until you are ready
to start the dishwasher
Dishwasher detergent is corrosive! Keep dishwasher
detergent out of the reach of children.
Filling the rinse aid reservoir
1. Remove the rinse aid reservoir cap by rotating it counterclockwise.
2. Carefully pour in the raise aid into the dispenser, whilst avoiding it to overflow.
3. Close the rinse aid reservoir cap by rotating it clockwise.
NOTE
Clean up any spilled rinse aid with an absorbent cloth to
avoid excessive foaming during the next wash.
Adjusting the rinse aid reservoir
• Remove the rinse aid reservoir cap.
• Turn the rinse aid indicator dial to a number. The higher the number, the more rinse aid
the dishwasher uses.
• If the dishes are not drying properly or are spotted, adjust the dial to the next higher
number until your dishes are spot-free.
• Reduce it if there are sticky whitish stains on your dishes or a.

24 25
EN EN
Using the appliance Using the appliance
B B
Filling the detergent dispenser
1. Press the release latch on the detergent dispenser to open the cover.
Push latch to open
2. Add detergent into the larger cavity Afor main wash. For more heavily soiled wash loads,
also add some detergent into the smaller cavity Bfor release during pre-wash.
AB
3. Close the cover and press on it until it locks into place.
NOTE
Please observe the manufacturer’s recommendations on
the detergent packaging.
Wash cycle table
• The table below shows which programs are best for the levels of food residue on them and
how much detergent is needed. It also show various information about the programs.
• Consumption values and program duration are only indicative except for ECO program.
( ) indicates that the program uses rinse aid in the last rinse.
Program Description of
cycle
Detergent
pre/main
wash
Running
time(min)
Energy
(kWh)
Water
(L)
Rinse
aid
Intensive
Pre-wash (50 °C)
Wash (70 °C)
Rinse
Rinse
Rinse (70 °C)
Drying
4/10g
1 tab 140 1.200 9.6
Universal
Pre-wash
Wash (60°C)
Rinse
Rinse (70°C)
Drying
4/10g
1 tab 120 1.050 7.7
(*EN60436)
Pre-wash
Wash (45°C)
Rinse (65°C)
Drying
4/10g
1 tab 230 0.613 6.5
Glass
Wash (45°C)
Rinse
Rinse (60°C)
Drying
14g
1 tab 75 0.650 5.8
90 min
Wash (65°C)
Rinse
Rinse
Rinse (70°C)
Drying
14g
1 tab 90 1.100 6.6
Rapid
Wash(40°C)
Rinse
Rinse
12g
1 tab 30 0.500 5.8
Eco
90’

26 27
EN EN
Using the appliance Using the appliance
B B
NOTE
The ECO program is suitable to clean normally soiled
tableware, that for this use, it is the most efficient program
in terms of its combined energy and water consumption,
and it is used to assess compliance with the EU ecodesign
legislation.
Saving energy
1. Pre-rinsing of tableware items leads to increased water and energy consumption and is
not recommended.
2. Washing tableware in a household dishwasher usually consumes less energy and water
in the use phase than hand dishwashing when the household dishwasher is used according
to the instructions.
Starting a programme
1. Draw out the basket, load the dishes and push them back.
2. Pour in the detergent.
3. Insert the plug into the socket. The power supply refer to last page ”Product fiche”. Make
sure that the water supply is turned on to full pressure.
4. Close the door, press the Power button, to switch on the machine.
5. Choose a program, the response light will turn on. Then press the Start/Pause button, the
dishwasher will start its cycle.
Changing the program mid-cycle
• A programme can only be changed if it has been running only for a short period of time,
otherwise the detergent may have already been released or the the wash water with
detergent has already been drained. If this is the case, the dishwasher needs to be reset and
the detergent dispenser must be refilled.
To reset the dishwasher, follow the instructions below:
1. Press the Start/Pause button to pause the washing.
2. Press Program button for more than 3 seconds the machine will be in program selection
mode.
3. Press the Program button to select the desired program.
4. Press the Start/Pause button, after 1 seconds, the dishwasher will start.
3 sec
Forget to add a dish?
A forgotten dish can be added any time before the detergent dispenser opens. If this is the
case, follow the instructions below:
1. Press the Start/Pause button to pause the washing.
2. Wait 5 seconds then open the door.
3. Add the forgotten dishes.
4. Close the door.
5. Press the Start/Pause button after 10 seconds, the dishwasher will start.
After 5 sec
WARNING
It is dangerous to open the door mid-cycle, as hot steam
may scald you.

28 29
EN EN
Useful information Useful information
C C
Maintenance and cleaning
External care
The door and the door seal
• Clean the door seals regularly with a soft damp cloth to
remove food deposits.
• When the dishwasher is being loaded, food and drink
residues may drip onto the sides of the dishwasher door.
•These surfaces are outside the wash cabinet and are not
accessed by water from the spray arms.
•Any deposits should be wiped off before the door is closed.
The control panel
• If cleaning is required, the control panel should be wiped
with a soft damp cloth only.
WARNING
• To avoid penetration of water into the door lock and
electrical components, do not use a spray cleaner of any
kind.
• Never use abrasive cleaners or scouring pads on the outer
surfaces because they may scratch the finish. Some paper
towels may also scratch or leave marks on the surface.
Internal care
Filtering system
• The filtering system in the base of the wash cabinet retains
coarse debris from the washing cycle, including foreign
objects such as tooth picks or shards. The collected coarse
debris may cause the filters to clog. Check the condition of
the filters regularly, carefully remove foreign objects and
clean the parts of the filtering system if necessary with
water.
• Follow the steps below to clean the filter.
NOTE
Pictures are only for reference, different models of the
filtering system and spray arms may be different.
1. Hold the coarse filter and rotate it anticlockwise to unlock
the filter. Lift the filter upwards and out of the dishwasher.
Ouvert

30 31
EN EN
Useful information Useful information
C C
2. Lift fine filter up from main filter.
Fine filter
Main filter
3. Larger food remnants can be cleaned by rinsing the filter
under running water. For a more thorough clean, use a soft
cleaning brush.
4. Reassemble the filters in the reverse order of the
disassembly, replace the filter insert, and rotate clockwise
to the close arrow.
WARNING
• Do not over tighten the filters. Put the filters back in
sequence securely, otherwise coarse debris could get into
the system and cause a blockage.
• NEVER use the dishwasher without filters in place.
Improper replacement of the filter may reduce the
performance level of the appliance and damage dishes
and utensils.

32 33
EN EN
Useful information Useful information
C C
Spray arm
• It is necessary to clean the spray arm regularly for hard
water chemicals will clog the spray arm jets and bearings.
• To clean the spray arm, follow the instructions below:
1. To remove the spray arm, pull out the spray arm upward.
2. Wash the spray arm in soapy and warm water and use a
soft brush to clean the jets. Replace them after rinsing them
thoroughly.
Caring for the dishwasher
Frost precaution
• Please take frost protection measures on the dishwasher
in winter. Every after washing cycles, please operate as
follows:
1. Cut off the electrical power to the dishwasher at the
supply source.
2. Turn off the water supply and disconnect the water inlet
pipe from the water valve.
3. Drain the water from the inlet pipe and water valve. (Use a
pan to gather the water)
4. Reconnect the water inlet pipe to the water valve.
5. Remove the filter at the bottom of the tub and use a sponge
to soak up water in the sump.
After every wash
• After every wash, turn off the water supply to the appliance
and leave the door slightly open for a while so that moisture
and odors are not trapped inside.

34 35
EN EN
Useful information Useful information
C C
Remove the plug
• Before cleaning or performing maintenance, always
remove the plug from the socket.
No solvents or abrasive cleaning
• To clean the exterior and rubber parts of the dishwasher,
do not use solvents or abrasive cleaning products. Only use
a cloth with warm soapy water.
• To remove spots or stains from the surface of the interior,
use a cloth dampened with water an a little vinegar, or a
cleaning product made specifically for dishwashers.
When not in use for a long time
• It is recommend that you run a wash cycle with the
dishwasher empty and then remove the plug from the
socket, turn off the water supply and leave the door of the
appliance slightly open. This will help the door seals to last
longer and prevent odors from forming within the appliance.
Moving the appliance
• If the appliance must be moved, try to keep it in the vertical
position. If absolutely necessary, it can be positioned on its
back.
Seals
• One of the factors that cause odours to form in the
dishwasher is food that remains trapped in the seals. Periodic
cleaning with a damp sponge will prevent this from occurring.
Troubleshooting tips
Before calling for service
Reviewing the charts on the following pages may save you from calling for service
Problem Possible causes Solution
Dishwasher doesn’t start
Fuse blown, or the circuit
breaker tripped.
• Replace fuse or reset
circuit breaker.
• Remove any other
appliances sharing the
same circuit with the
dishwasher.
Power supply is not turned
on.
• Make sure the dishwasher
is turned on and the door is
closed securely.
• Make sure the power cord
is properly plugged into the
wall socket.
Door of dishwasher not
properly closed.
• Make sure to close the
door property and latch it.
Water not pumped from
dishwasher
Kink in drain hose • Check drain hose.
Filter clogged.
• Check the coarse filter.
(see section titled «Internal
Care»)
Kitchen sink clogged.
• Check the kitchen sink
to make sure it is draining
well. If the problem is
the kitchen sink that is
not draining, you may
need a plumber rather
than a serviceman for
dishwashers.

36 37
EN EN
Useful information Useful information
C CCUseful information
Problem Possible causes Solution
Foam in the tub
Improper detergent
• Use only the special
dishwasher detergent to
avoid suds. If this occurred,
open the dishwasher and
let suds evaporate. Add 1
gallon of cold water to the
tub. Close and latch the
dishwasher, then Start any
wash cycle to drain out the
water.
• Repeat if necessary.
Spilled rinse aid. • Always wipe up rinse aid
spills immediately.
Stained tub interior Detergent with colourant
may have been used.
• Make sure that the
detergent has no colourant.
White film on inside surface Hard water minerals.
• To clean the interior, use
the damp soft cloth with
dishwasher detergent and
wear rubber gloves. Never
use any other cleaner than
dishwasher detergent for
the risk of foaming or suds.
There are rust stains on
cutlery
The affected items are not
corrosion resistant.
• Avoid washing items that
are not corrosion resistant
in the dishwasher.
A program was not run after
dishwasher salt was added.
Traces of salt have gotten
into the wash cycle.
• Always run the quick
wash program. without any
crockery in the dishwasher
and without selecting the
Turbo function (if present),
after adding dishwasher
salt.
The lid of the softer is loose. • Check the lip. Ensure the
fix is fine.
Knocking noise in the wash
cabinet
The spray arm is knocking
against an item in a basket.
• Interrupt the program,
and rearrange the items
which are obstructing the
spray arm.
CUseful information
Problem Possible causes Solution
Rattling noise in the wash
cabinet
Item of crockery are loose
in the wash cabinet.
• Interrupt the program,
and rearrange the items of
crockery.
Knocking noise in the water
pipes
This may be caused by
on-site installation or the
cross-section of the piping.
• This has no influence on
the dishwasher function. If
in doubt, contact a qualified
plumber.
The dishes are not clean
The dishes were not loaded
correctly.
• See "Preparing And
Loading Dishes".
The program was not
powerful enough.
• Select a more intensive
program.
Not enough detergent was
dispensed.
• Use more detergent, or
change your detergent.
Item are blocking the path
of spray arms.
• Rearrange the items so
that the spray can rotate
freely.
The filter combination in
the base of wash cabinet is
not clean or is not correctly
fitted. This may cause
the spray arm jets to get
blocked.
• Clean and/or fit the filter
correctly. Clean the spray
arm jets.
Cloudiness on glassware. Combination of soft water
and too much detergent.
• Use less detergent if you
have soft water and select
a shorter cycle to wash the
glassware and to get them
clean.
Black or grey marks on
dishes
Aluminium utensils have
rubbed against dishes
• Use a mild abrasive
cleaner to eliminate those
marks.
Detergent left in dispenser
cups
Dishes block detergent
dispenser cups
• Re-loading the dishes
properly.
This manual suits for next models
3
Table of contents
Languages:
Other VALBERG Dishwasher manuals

VALBERG
VALBERG FBI 16S43 A XAD929C User manual

VALBERG
VALBERG 966566 User manual

VALBERG
VALBERG 14S42 D WAD929C User manual

VALBERG
VALBERG 14S40 B XAD929C User manual

VALBERG
VALBERG 14S42 D WAD929C User manual

VALBERG
VALBERG 972793 User manual

VALBERG
VALBERG 15S39 D S701T User manual

VALBERG
VALBERG 972652 User manual

VALBERG
VALBERG 14S44 D XAD929C User manual

VALBERG
VALBERG 978493 User manual