VALBERG 978493 User manual

978493 & 978494
Dishwasher
Lave-vaisselle
Vaatwasmachine
Lavavajillas
INSTRUCTIONS FOR USE ....................02
CONSIGNES D'UTILISATION ....................44
GEBRUIKSAANWIJZINGEN ....................86
INSTRUCCIONES DE USO ....................128
2/2 04/2023-01


2
EN
Thank you!
Thank you for choosing this VALBERG product.
VALBERG products are chosen, tested, and
recommended by ELECTRO DEPOT, so you can be sure
you are getting a top-quality, easy-to-use product
that won’t let you down.
We’re confident your new device will be a pleasure
to use every day!
Welcome to ELECTRO DEPOT.

3
EN
Table of Contents
AProduct overview
CCleaning and
maintenance
BProduct usage Quick user guide
Installation instruction
Before using your dishwasher
Loading the baskets according to EN60436
Using your dishwasher
Program selection
Usage counter
Maintenance and cleaning
Troubleshooting tips
Error codes
Parts
Technical information

4
EN
Parts
Product overview
A
Dispenser
Salt container
Inner pipe
Top spray arm
Lower spray arm
Filter assembly
Cutlery rack
Upper basket
Upper spray arm
Cup rack
Lower basket
IMPORTANT:
To get the best performance from your dishwasher, read all operating instructions
before using it for the first time.
NOTE:
Pictures are only for reference, different models may be different.

5
EN
Product overview
A
Technical information
Height (H): 845mm
Width (W): 598mm
Depth (D1): 600mm (with the door closed)
Depth (D2): 1175mm (with the door opened 90°)

6
EN
Product usage
B
Quick user guide
Please read the corresponding content in the instruction manual for detailed operating method.
1. Install the dishwasher (Please check the section "Installation instruction".)
2. Remove larger residue from dishes. Avoid pre-rinsing.
3. Load the baskets.
Inside
Outside

7
EN
4. Fill the dispenser with detergent and rinse aid.
5. Select a suitable program and start the dishwasher.
Installation instruction
Electrical Shock Hazard!
• Disconnect electrical power before installing dishwasher.
• Failure to do so could result in death or electrical shock.
Attention!
The installation of the pipes and electrical equipments should be done by
professionals.
About power connection
WARNING!
For personal safety:
• Do not use an extension cord or an adapter plug with this appliance.
•
Do not, under any circumstances, cut or remove the earthing connection from
the power cord.
Product usage
B

8
EN
Electrical requirements
Please look at the rating label to know the rating voltage and connect the dishwasher to
the appropriate power supply. Use the required fuse 10A/13A/16A, time delay fuse or circuit
breaker recommended and provide separate circuit serving only this appliance.
Electrical connection
Ensure the voltage and frequency of the power being corresponds to those on the rating
plate. Only insert the plug into an electrical socket which is earthed properly. If the electrical
socket to which the appliance must be connected is not appropriate for the plug, replace the
socket, rather than using a adaptors or the like as they could cause overheating and burns.
WARNING!
Ensure that proper earthing exists before use.
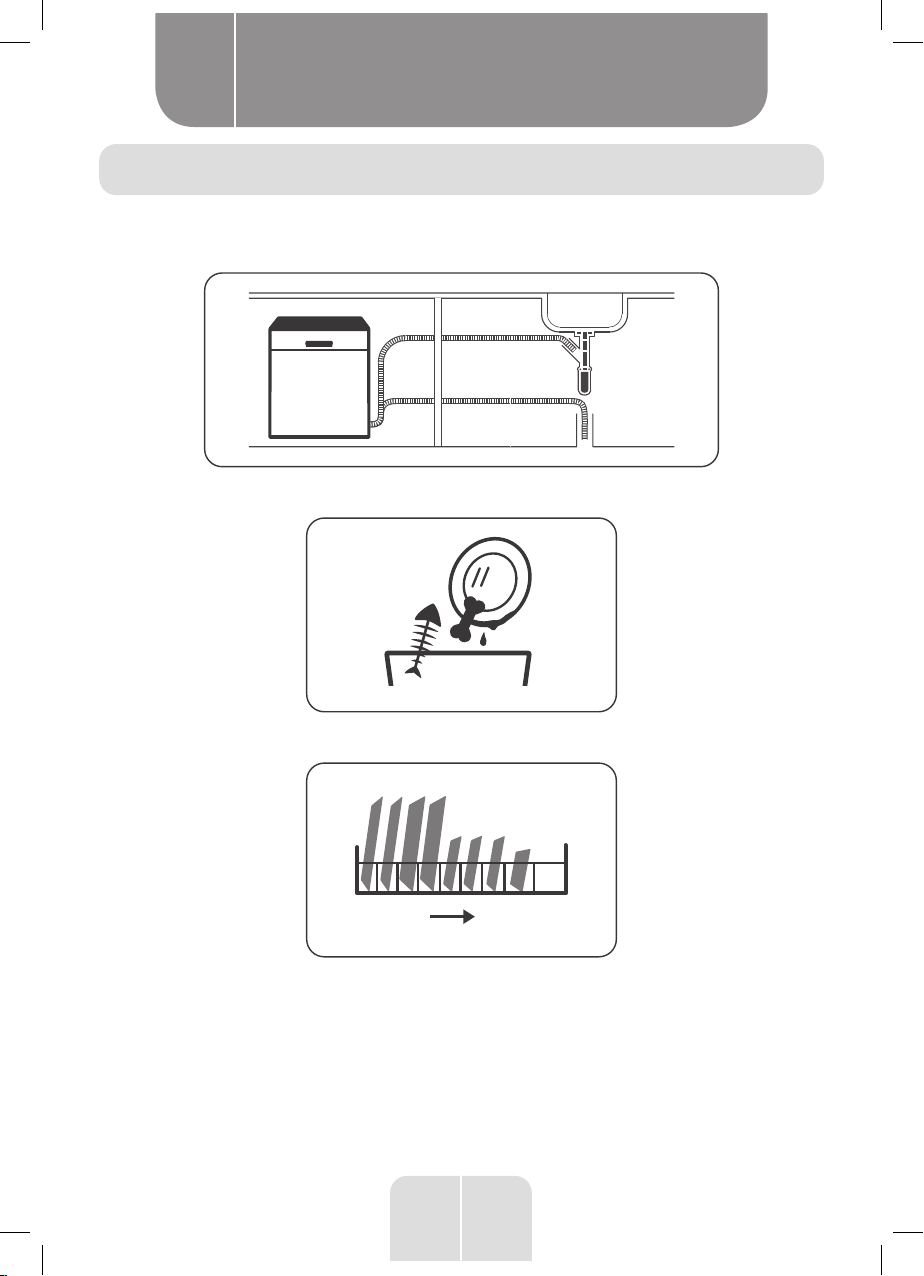
Water supply and drain
Cold water connection
Connect the cold water supply hose to a threaded 3/4(inch) connector and make sure that it
is fastened tightly in place.
If the water pipes are new or have not been used for an extended period of time, let the water
run to make sure that the water is clear. This precaution is needed to avoid the risk of the
water inlet to be blocked and damage the appliance.
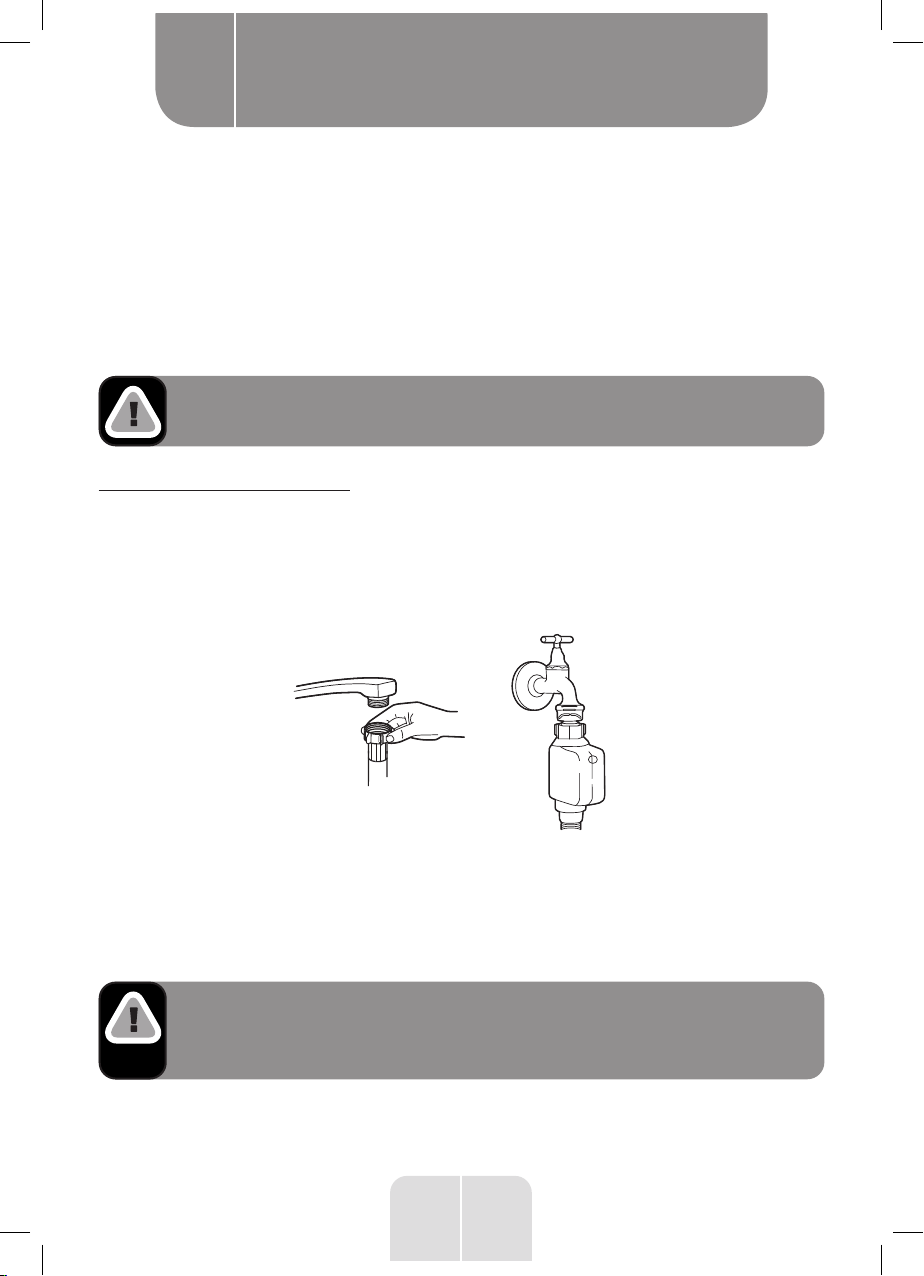
ordinary supply hose
safety supply hose
About the safety supply hose
The safety supply hose consists of the double walls. The system guarantees its intervention by
blocking the flow of water in case of the supply hose breaking and when the air space between
the supply hose itself and the outer corrugated hose is full of water.
WARNING!
A hose that attaches to a tap can burst if it is installed on the same water line as the
dishwasher. If your sink has one, it is recommended that the hose be disconnected
and the hole plugged.
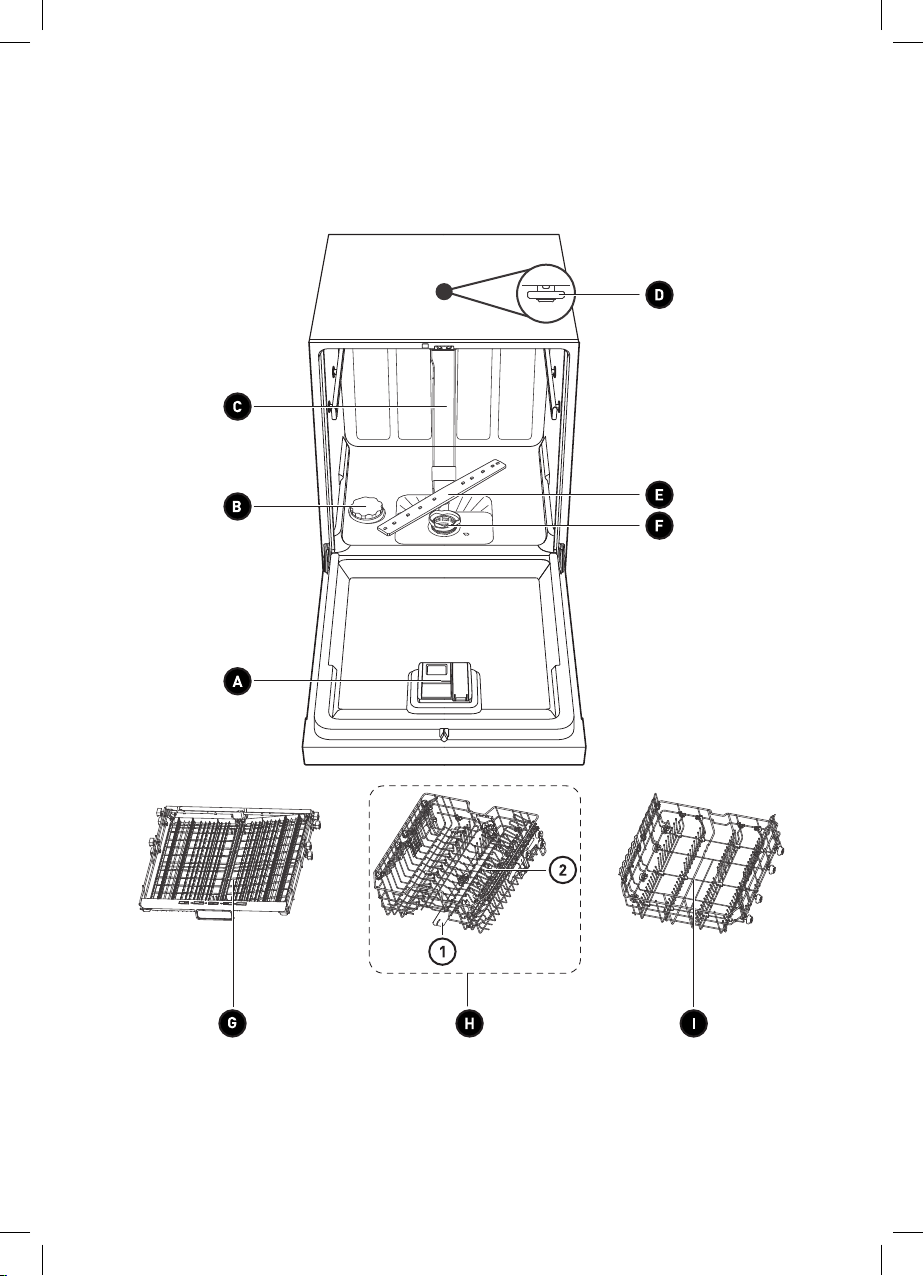
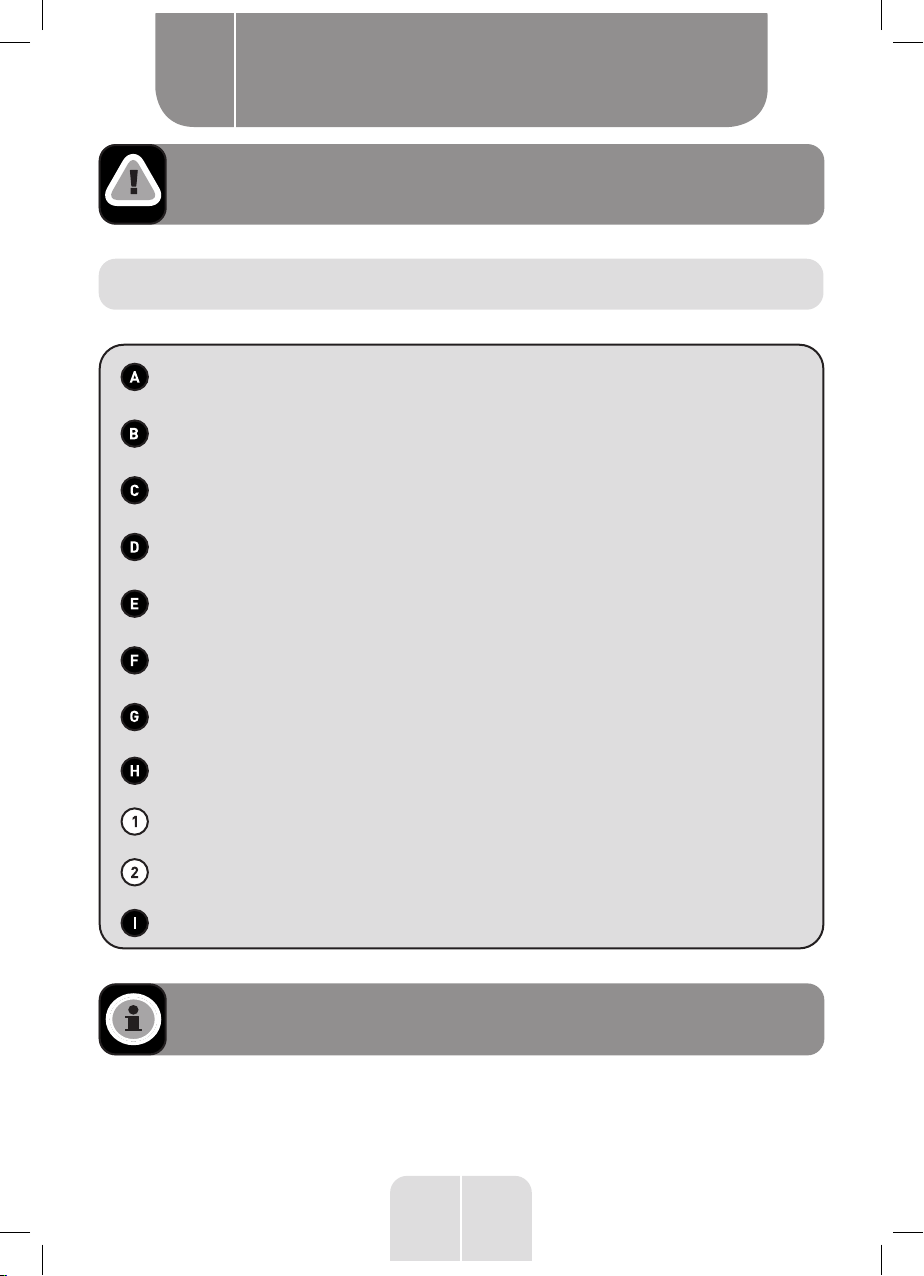
Product usage
B

9
EN
How to connect the safety supply hose
1.
Pull the safety supply hoses out from storage compartment located at rear of dishwasher.
2. Tighten the screws of the safety supply hose to the faucet with thread 3/4 inch.
3. Turn the water fully on before starting the dishwasher.
How to disconnect the safety supply hose
1. Turn off the water.
2. Unscrew the safety supply hose from the faucet.
Connection of drain hoses
Insert the drain hose into a drain pipe with a minimum diameter of 4cm, or let it run into the
sink, making sure to avoid bending or crimping it. The height of drain pipe must be less than
1000mm. The free end of the hose must not be immersed in water to avoid the back flow of it.
WARNING!
Please securely fix the drain hose in either position A or position B.
Back of dishwasher
Mains Cable
Drain Pipe
Water Inlet
Counter
Drain hose
Drain Pipe
How to drain excess water from hoses
If the connection to the drain pipe is positioned higher than 1000mm, excess water may
remain in the drain hose. It will be necessary to drain excess water from the hose into a bowl
or suitable container that is held outside and lower than the sink.
Water outlet
Connect the water drain hose. The drain hose must be correctly fitted to avoid water leaks.
Ensure that the water drain hose is not kinked or squashed.
Extension hose
If you need a drain hose extension, make sure to use a similar drain hose.
It must not be longer than 4 meters, otherwise the cleaning effect of the dishwasher could
be reduced.
Product usage
B

10
EN
Syphon connection
The waste connection must be at a height less than 1000mm (maximum) from the bottom
of the dishwasher.
Positioning the appliance
Position the appliance in the desired location. The back should rest against the wall behind
it, and the sides, along the adjacent cabinets or walls. The dishwasher is equipped with water
supply and drain hoses that can be positioned either to the right or the left sides to facilitate
proper installation.
Levelling the appliance
Once the appliance is positioned for levelling, the height of the dishwasher may be altered
via adjustment of the screwing level of the feet.
In any case, the appliance should not be inclined more than 2°.
Free standing installation
Step 1. Fitting between existing carbinets
The height of the dishwasher, 845mm, has been designed in order to allow the machine to be
fitted between existing cabinets of the same height in modern fitted kitchens.
The laminated top of the machine does not require any particular care since it is heatproof,
scratchproof and stainproof.
Step 2. Underneath existing work top
(When fitting beneath a work top)
In most modern fitted kitchens there is only one single work top under which cabinets
and electrical appliances are fitted. In this case remove the work top of the dishwasher by
unscrewing the screws under the rear edge of the top (a).
Product usage
B

11
EN
Attention!
After removing the work top, the screws must be screwed again under the rear
edge of the top (b).
Selecting the best location for the dishwasher
The installation position of the dishwasher should be near the existing inlet and drain hose
and power socket.
Illustrations of cabinet dimensions and installation position of the dishwasher.
1. Less than 5mm between the top of dishwasher and cabinet and the outer door aligned
to cabinet.
Electrical, drain and
water supply line
connection
Space between cabinet
bottom and floor
600mm (for 60cm model)
450mm (for 45cm model)
Product usage
B

12
EN
2. If dishwasher is installed at the corner of the cabinet, there should be some space when
the door is opened.
Dishwasher
Door of
dishwasher
Minimum space of 50mm
Cabinet
NOTE:
Depending on where your electrical outlet is, you may need to cut a hole in the
opposite cabinet side.
Before using your dishwasher
1. Set the water softener
2. Loading the salt Into the softener
3. Loading the basket
4. Fill the detergent dispenser
NOTE:
Please check the section “Water Softener”, if you need to set the water softener .
Product usage
B

13
EN
Loading the salt into the softener
NOTE:
If your model does not have any water softener, you may skip this section.
It must use salt intended for dishwasher.
The salt container is located beneath the lower basket and should be filled as
explained in the following:
WARNING!
• Only use salt specifically designed for dishwashers use!
Every other type of salt not specifically designed for dishwasher use, especially
table salt, will damage the water softener. In case of damages caused by the
use of unsuitable salt the manufacturer does not give any warranty nor is
liable for any damages caused.
• Only fill with salt before running a cycle.
This will prevent any grains of salt or salty water, which may have been spilled,
remaining on the bottom of the machine for any period of time, which may
cause corrosion.
Please follow the steps below for adding dishwasher salt:
1. Remove the lower basket and unscrew the reservoir cap.
2.
Place the end of the funnel (if supplied) into the hole and pour in about 1.5kg of dishwasher
salt.
3. Fill the salt container to its maximum limit with water, It is normal for a small amount of
water to come out of the salt container.
4. After filling the container, screw back the cap tightly.
5. The salt warning light will turn off after the salt container has been filled with salt.
6.
Immediately after filling the salt into the salt container, a washing program should be
started (We suggest to use a short program). Otherwise the filter system, pump or other
important parts of the machine may be damaged by salty water. This is out of warranty.
Product usage
B

14
EN
NOTE:
• The salt container must only be refilled when the salt warning light ( ) in
the control panel comes on. Depending on how well the salt dissolves, the
salt warning light may still be on even though the salt container is filled.
If there is no salt warning light in the control panel (for some models), you
can estimate when to fill the salt into the softener by the cycles that the
dishwasher has run.
• If salt has spilled, run a soak or quick program to remove it.
Basket loading tips
Adjusting the upper basket
1.
To raise the upper basket, just lift the upper basket at the center of each side until the
basket locks into place in the upper position. It is not necessary to lift the adjuster handle.
2. To lower the upper basket, lift the adjust handles on each side to release the basket and
lower it to the lower position.
Folding back the cup shelves
To make room for taller items in the upper basket, raise the cup rack upwards. You can then
lean the tall glasses against it. You can also remove it when it is not required for use.
Product usage
B

15
EN
NOTE:
When the upper basket locks in the upper position, It can’t fold back the cup shelves.
CRASH
Folding back the rack shelves
The spikes of the lower basket are used for holding plates and a platter. They can be lowered
to make more room for large items.
raise upwards fold backwards
Product usage
B

16
EN
Loading the baskets according to EN60436
Loading the dishwasher to its full capacity will contribute to energy and water savings.
1. Upper basket:
Number Item
Cups
Saucers
Glasses
Mugs
Dessert bowls
Glass bowl
2. Lower basket:
Number Item
Soup plates
Melamine bowls
Dessert plates
Melamine dessert plates
Dinner plates
Small pot
Oven pot
Oval platter
Product usage
B

17
EN
3. Cutlery rack:
Number Item
Soup spoons
Forks
Knives
Tea spoons
Information for comparability tests in
accordance with EN60436
Capacity: 16 place settings
Position of the upper basket: lower position
Program: ECO
Rinse aid setting: Max
Softener setting: H3
Dessert spoons
Serving spoons
Serving fork
Gravy ladle
The number of places specified on the energy label is based on 25cm plates and 12cm high
glasses.
Product usage
B

18
EN
Using the cutlery rack
To create more space for the glass basket, the cutlery rack can be removed. Steps:
•
Lift the right hand side of the rack, while keeping both
parts of the rack flat.
• Slide the right hand side of the rack towards the left.
Both sections overlap.
•
Pull on the right hand side of the rack to remove it
completely.
•
Do this in reverse order to put the right hand rack
back in position.
Product usage
B
This manual suits for next models
1
Table of contents
Languages:
Other VALBERG Dishwasher manuals

VALBERG
VALBERG FBI 14S40 B KAD929C User manual

VALBERG
VALBERG 966566 User manual

VALBERG
VALBERG 14S42 C XAD929C User manual

VALBERG
VALBERG FBI 16S43 A XAD929C User manual

VALBERG
VALBERG 14S44 D XAD929C User manual

VALBERG
VALBERG 972793 User manual

VALBERG
VALBERG 10S44 D SAD929C User manual

VALBERG
VALBERG FBI 14S42 C SAD929C User manual

VALBERG
VALBERG 14S42 D WAD929C User manual

VALBERG
VALBERG 972691 User manual