Valken Code User manual
valken.com
.68 CALIBER ELECTRONIC MARKER
valken.com

valken.com
WARNING
WARNING IMPORTANT SAFETY INSTRUCTIONS
Rules of Safe Marker Handling.
1.Treat every marker as if it were loaded.
2. Never look down the barrel of a paintball marker.
3. Keep your finger off the trigger until ready to shoot.
4. Never point the marker at anything you don’t wish to shoot.
5. Keep the marker on “safe” until ready to shoot.
6. Keep the barrel blocking device in/on the marker’s muzzle when not shooting.
7. Always remove paintballs and propellant source before disassembly.
8. After removing propellant source, point marker in safe direction and discharge until marker is degassed.
9. Store the marker unloaded and degassed in a secure place.
10. Follow warnings listed on propellant source for handling and storage.
11. Do not shoot at fragile objects such as windows.
12. Every person within range must wear eye, face and ear protection designed specifically to stop
paintballs and meeting ASTM standard F1776.
13. Always measure your marker’s velocity before playing paintball and never shoot at velocities in excess
of 300 feet-per-second.
This is not a toy. Misuse may cause serious injury or death. Eye protection designed specifically for paintball
must be worn by the user and persons within range. Recommend 18 years of age or older to purchase.
Persons under 18 years of age must have adult supervision. READ OWNERS MANUAL BEFORE USING.

valken.com
Caliber: 0.68
Barrel: 12” Aluminum ported .689
Battery: 1 - 9V Alkaline
Air: Compressed air or nitrogren
Mode: Unlimited Semi, Adjustable Semi, PSP
Ramping, PSP Burst, NXL Full Auto,
Millennium Ramping, Normal Ramping,
Auto Response, Burst and Full Auto
Material: Aerospace aluminum alloy for body,
frame and other major parts
ROF: Max 30bps
Auto Shut-Off: 30min
CODE SPECIFICATIONS:
SPECIFICATIONS

QUICK SETUP GUIDE
valken.com
The barrel simply threads on. The barrel threads are autococker type.
Open the clamp lever and place the loader into the feedneck. Adjust the tightness of the clamp with a 5/32” hex key. Close the clamp
lever.
Remove grip cover from foregrip. Press the button on the lower front of the foregrip. Pull the 9V battery out and dislodge it from the
battery cap. Replace with a fresh 9V battery. We recommend the use of a high quality alkaline battery.
The CODE has a standard ASA to accept a screw in air tank. First, make sure that the On/OFF is in OFF position (lever pointing to the
front). Carefully screw in the air tank until it stops. Flipping the lever backward will allow air to flow into the marker from the tank.
To remove the tank, flip the lever forward.This will release all the air in ASA and make it easier to remove the tank. We recommend the
use of compressed air or nitrogen air tank with a maximum output pressure of 800 PSI.
Attaching the barrel
Attaching the loader
Battery replacement
Connecting the air source
valken.com
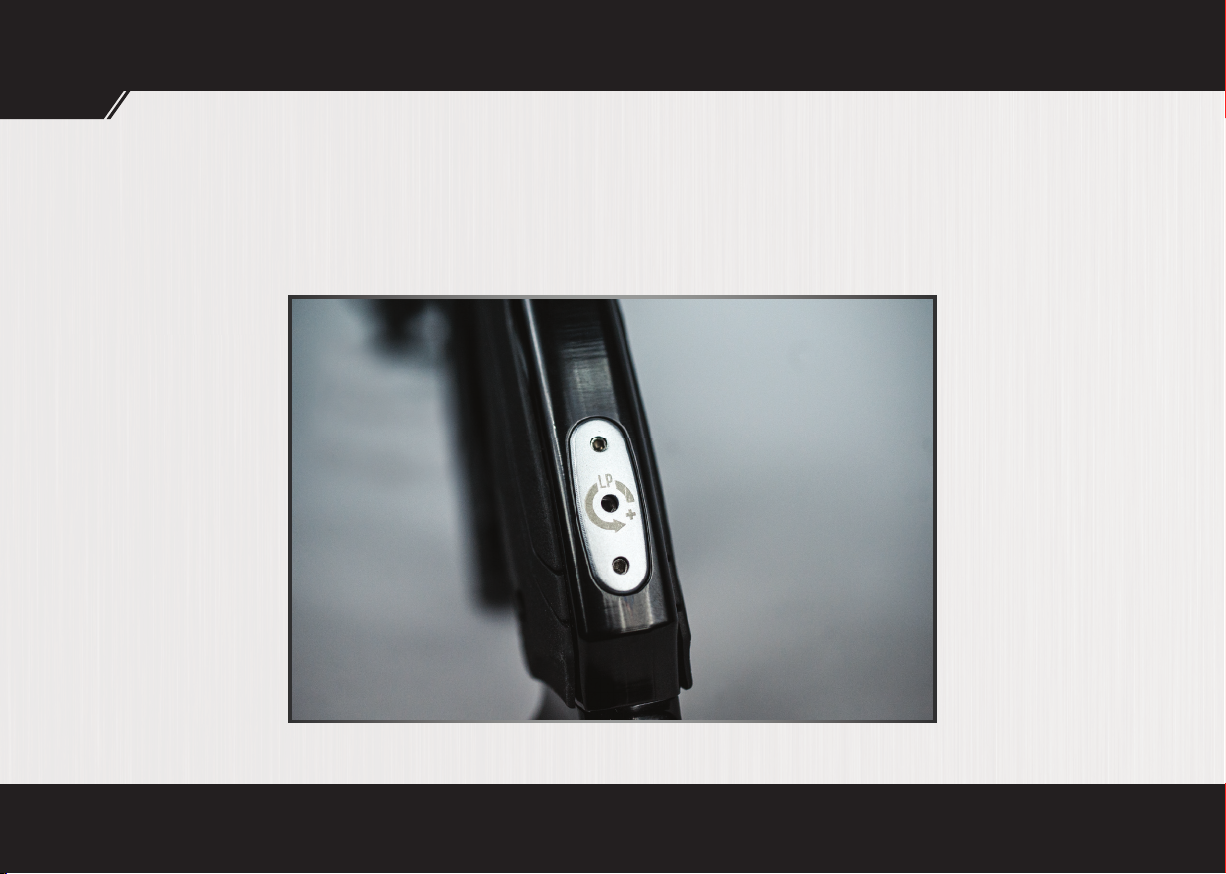
Press power button. Eyes on is blue/blinking blue for blocked/
unblocked eyes. Blinking yellow for eye malfunction (if the eyes
don’t see the bolt return like if you block the eyes continually
with your finger). Eye malfunction reduces rate of fire to prevent
additional chopping.
Hold power button for 2 seconds or until the LED goes off to turn
off the marker.
The CODE has a break beam sensor system. The eyes can be cleaned by simply removing the bolt and using a squeegee, or using
a 1/16” hex key to remove the eye cover. If any malfunction should occur the software automatically overrides the eye function and
reduces the rate of fire. When the marker first powers up, the eyes are on by default. To disable the sensor system, press the on/off
button for 1 sec until the LED is blinking red. To enable the eyes again, simply press the on/off button again for 1sec until the LED is
blinking blue.
Turning the marker ON
Turning the marker OFF
Intelligent break beam ball sensor system
QUICK SETUP GUIDE
valken.com
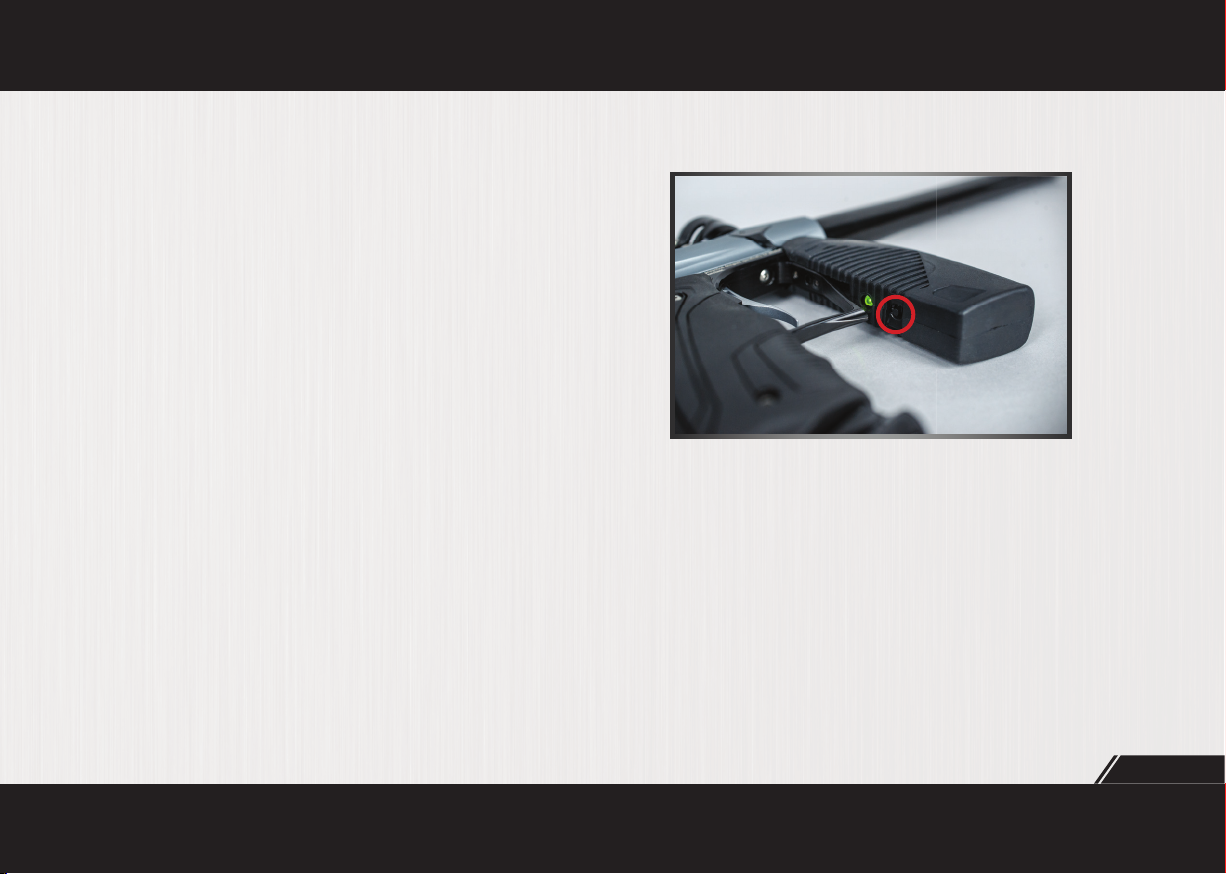
VELOCITY ADJUSTMENT
The CODE has an adjustable regulator in the handle frame that controls the pressure in the marker thereby controlling the velocity.
The best way to adjust the velocity is to turn the adjusting screw clockwise using a 3/32” hex key. This will be the minimum velocity.
Please DO NOT over tighten the screw as it will damage the seal and cause leaking. Check the velocity with a chronograph and
gradually increase the velocity by turning the screw counterclockwise.
Adjusting the velocity

valken.com
TRIGGER ADJUSTMENT
The trigger has adjustments for microswitch activation point and pre travel.
Pre travel adjustment. Use a 3/32” hex key to remove the frame screws. Carefully unplug the solenoid harness. Use a 1/16” hex key
to adjust the set screw on top of the trigger.
Microswitch activation adjustment. using a 3/64” hex key to adjust the set screws in the trigger. Please make sure to leave enough
space for the screw to travel. Setting the screw too deep will damage the microswitch while firing.
Trigger adjustment
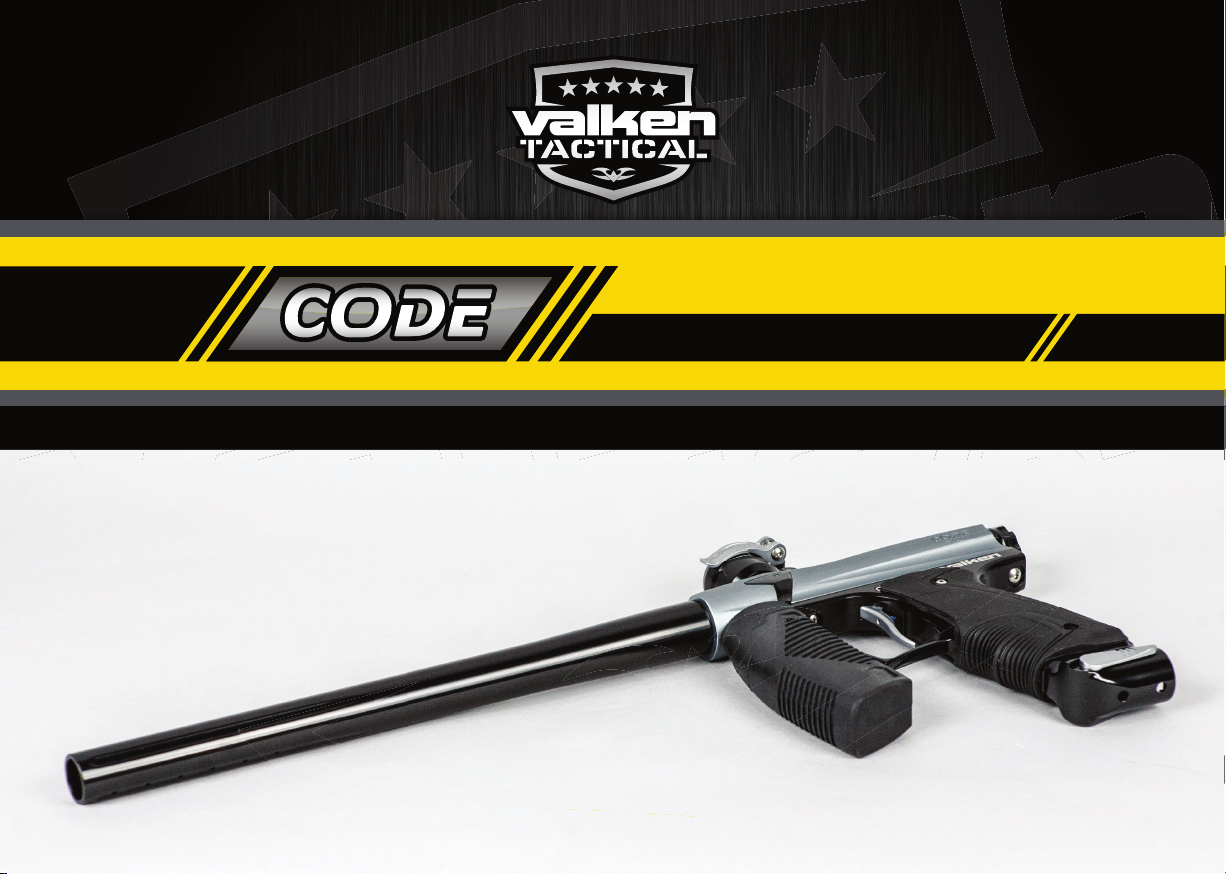
The tournament lock is located inside the upper right of the LED on
the foregrip, after removing the grip cover. This feature prevents
users from entering programming mode while in the field.
While the gun is in the specific firing mode, press and hold the lock
switch for 2 seconds to toggle it on or off. The LED will flash green
to indicate it is locked or red to indicate it is unlocked. When the
lock is off, you can enter programming mode by turning the board
off, then turning it on while the trigger is held.
Tournament Lock

valken.com
PROGRAMMING MODE
valken.com
User can change the setting by entering the programming mode.
Programming Mode
Enter programming mode by holding down trigger and then turning the marker on. Cycle through different setting by pressing the
trigger once. Color Setting:
• Green.................. Firing Modes
• Purple ................ Max Rate of Fire
•Yellow ................. Fine timing for max rate of fire
• Blue .................... Debounce
• Red ..................... Dwell
• White .................. Ramp Start
• Aqua .................. Ramp Percent
Once you are in the desired setting, press and hold the trigger again for 2sec and the LED will start blinking. The last accessed setting
is remembered so you don’t have to keep cycling through settings when you want to test different dwell settings, for instance. When
the blink stopped, you can enter the new numbers by pressing the trigger.
CHANGING THE PARAMETERS

valken.com
valken.com
Firing Modes(Green)
The firing mode can be changed after entering the programming mode.
# Blinks in Fire Mode
1 Unlimited Semi auto
2 Adjustable Semi auto
3 PSP ramping
4 PSP Burst
5 NXL Full Auto
6 Millennium Ramping
7 Normal Ramping
8 Auto Response
9 Burst
10 Full Auto
Max Rate of Fire(Purple)
Blinks BPS Blinks BPS Blinks BPS Blinks BPS Blinks BPS
5 5 11 11 17 17 23 23 29 29
6 6 12 118 18 24 24 30 30
7 7 13 13 19 19 25 25 31 Unlimited
8 8 14 14 20 20 26 26
9 9 15 15 21 21 27 27
10 10 (Default) 16 16 22 22 28 28
PROGRAMMING MODE

valken.com
PROGRAMMING MODE
Fine timing for max rate of fire(Yellow)
Debounce(Blue)
Blinks ms Blinks ms Blinks ms Blinks ms Blinks ms
1111 11 21 21 31 31 41 41
2212 12 22 22 32 32 42 42
3313 13 23 23 33 33 43 43
4414 14 24 24 34 34 44 44
5515 15 25 25 35 35 45 45
6616 16 26 26 36 36 46 46
7717 17 27 27 37 37 47 47
8818 18 28 28 38 38 48 48
9919 19 29 29 39 39 49 49
10 10 (Default) 20 20 30 30 40 40 50 50
Blinks Increments BPS Blinks Increment BPS Blinks Increment BPS
1 0.0 (Default) 5 0.4 9 0.8
2 0.1 6 0.5 10 0.9
3 0.2 7 0.6
4 0.3 8 0.7
Other manuals for Code
1
Table of contents
Other Valken Paintball Equipment manuals


Popular Paintball Equipment manuals by other brands

PLANET ECLIPSE
PLANET ECLIPSE EGO LV1 manual

PLANET ECLIPSE
PLANET ECLIPSE GEO CS1 user manual

First Endeavor Paintball
First Endeavor Paintball The Quest owner's manual

PMI
PMI Piranha VTL owner's manual

Proto
Proto SLG ULTRALITE owner's manual

Bob Long Technologies
Bob Long Technologies Alias Intimidator Operator's manual


