manuals.online logo
Brands
  1. Home
  2. •
  3. Brands
  4. •
  5. Vaxcel
  6. •
  7. Outdoor Light
  8. •
  9. Vaxcel T0238 Instruction manual

Vaxcel T0238 Instruction manual

160303
Lock Nut (E)
WARNING:
TO AVOID RISK OF ELECTRICAL SHOCK, BE SURE TO SHUT OFF
POWER BEFORE INSTALLING OR SERVICING THIS FIXTURE.
NOTES: 1. Before installing, consult local electrical codes for wiring and grounding requirements.
2. Read and save these instructions.
Bulb type B Max. 60W
(not include)
Metal Frame
Fig.1
Glass Panel
Clip
Metal Frame
Fixture
Glass Panel
Set Screw
Set Screw
Slot
Headless Screw(D)
Rubber Pad (H)
Rubber Pad (H)
Wire Nut (F)
Green Grounding Screw (C)
Headless Screw (D)
Mounting Plate (A)
Mounting Screw (B)
Lock Nut
(E)
Fixture Grounding Wire
House Grounding Wire
Fixture Wire
ASSEMBLY AND INSTALLATION
INSTRUCTIONS
T0238
Mounting Screw (B) Wire Nut (F) Ball Nut (G)
Hardware Package (included):
Green Grounding
Screw (C)
Back Plate
Ball Nut(G)
Photocell
Mounting Plate (A)
Fixture
IMPORTANT:
The sensor has an excellent photocell
function to enable the light to turn on
at dusk and off at dawn automatically.
160303
Fig.2 Fig.3
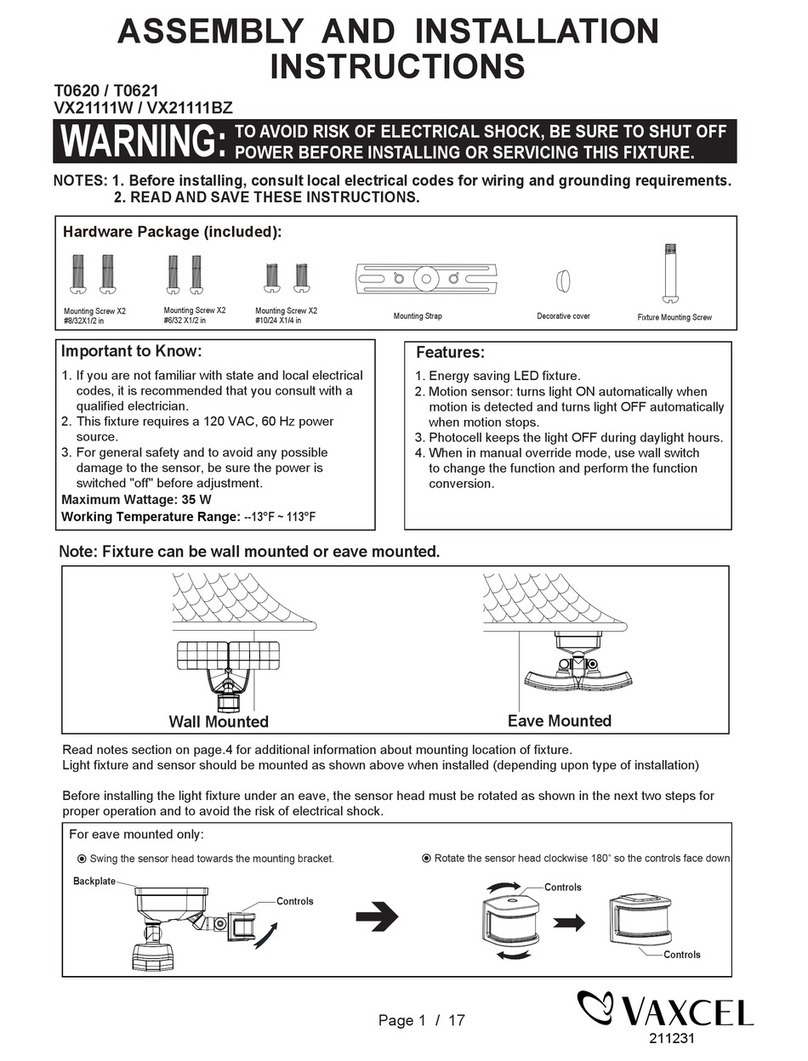
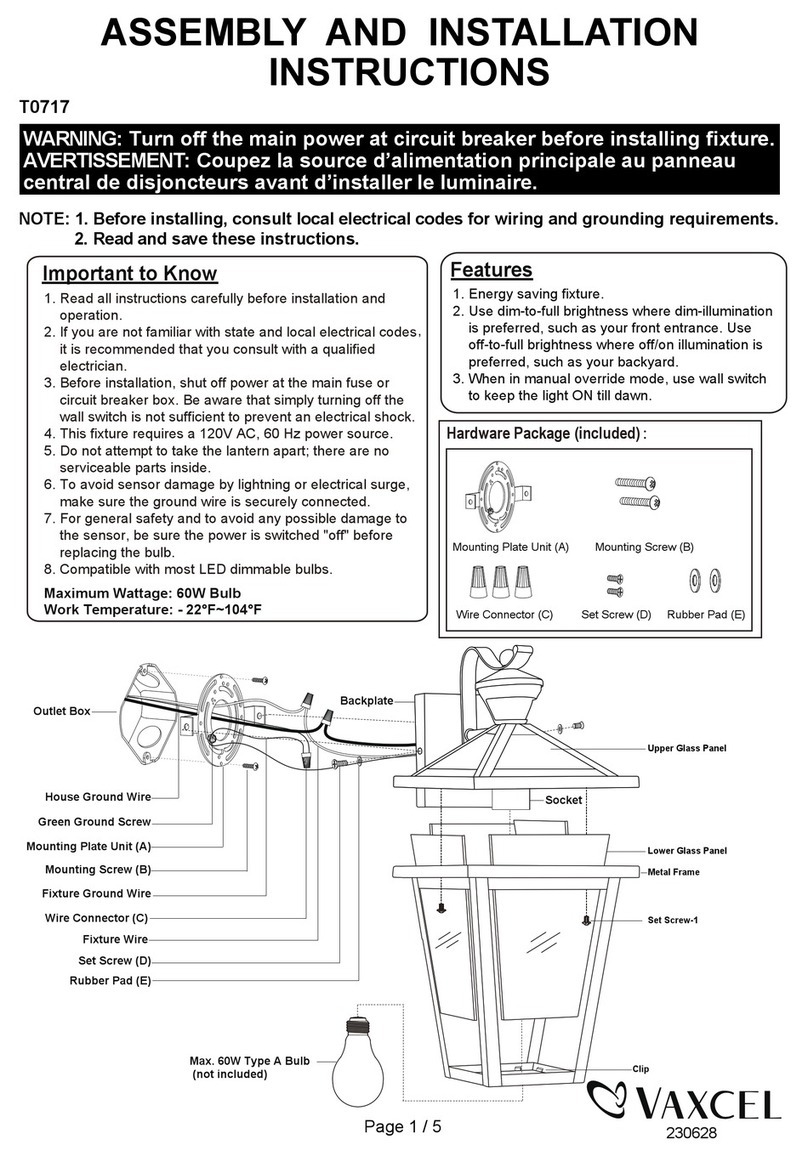
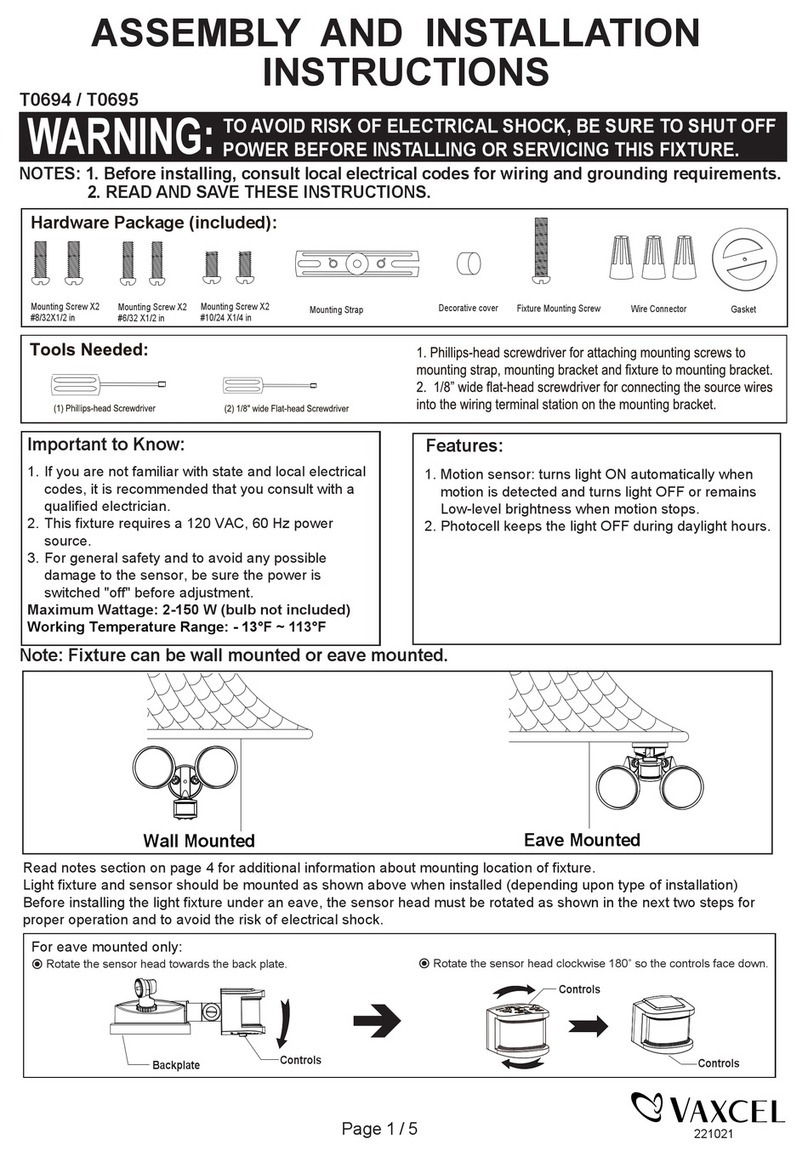
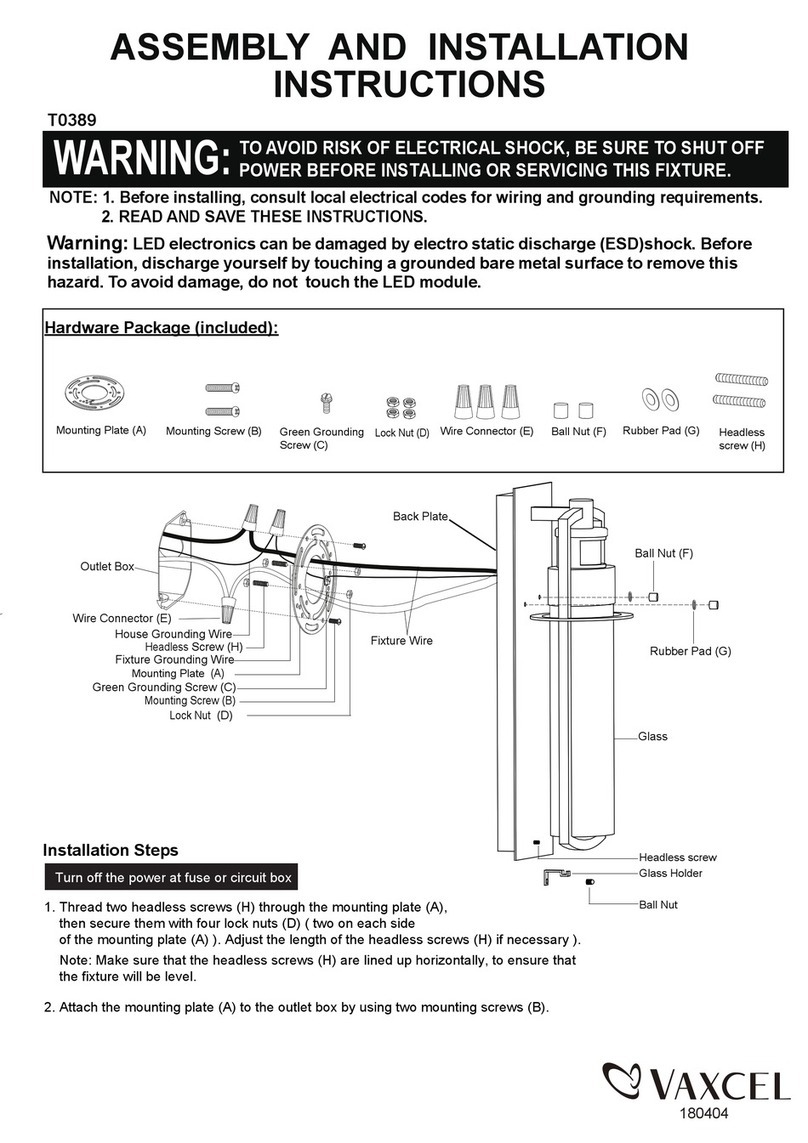
1. Thread two headless screws through the mounting plate, and then secure them with four lock nuts (two on each side
of the mounting plate). Adjust the length of the headless screws if necessary.
Note: Make sure that the headless screws are lined up horizontally to make the fixture level.
2. Attach mounting plate to the outlet box using two mounting screws.
3. Remove two set screws to separate the metal frame from the fixture.
4. Install three bulbs (not included). Check relamping label at socket area or packaging for maximum allowed wattage.
5. Take a glass panel, insert it into the slot at one side of the metal frame carefully, secure it by pressing clips. Repeat
with the other glass panels.(See Fig.1)
6. Attach the metal frame back to fixture, and then secure it with two set screws.(See Fig.1)
7. Pull out the source wires from the outlet box. Make wire connections using wire nuts as follows:
---Connect the hot wire (usually black insulation) from the power source to the black wire from the fixture.
---Connect the neutral wire (usually white insulation) from the power source to the white wire from the fixture.
---Attach the fixture grounding wire (usually green insulation or bare wire) to the mounting plate with the green
grounding screw, or connect to the source grounding wire if available.
Carefully put the wires back into the outlet box.
8. Attach the fixture to the mounting plate by inserting headless screws into holes on back plate, and then secure it
with two rubber pads and two ball nuts.
NOTE: With silicone caulking compound, caulk completely around where the back plate meets with the wall
surface to prevent water from seeping into the outlet box.
Turn off the power at fuse or circuit box.
Turn on the power at fuse or circuit box.
Installation Steps
1. Turn off the power at the fuse or circuit box before starting installation.
2. Loosen the wire nuts connected with the wires from photocell. (See Fig.2)
Note: Do not move the photocell to prevent water from seeping into the outlet box.
3. Take a white pigtail and black pigtail and make wire connections using wire nuts: (See Fig.3)
a. The black wire from the fixture to one end of the black pigtail.
b. The white wire from the fixture to one end of the white pigtail.
c. The other end of the black pigtail to the black wire from the power source.
d. The other end of the white pigtail to the white wire from the power source.
Put all wires back into the back plate of the fixture.
Photocell
White Wires From Photocell
Wire Nuts
Wires From Fixture
Wires From Fixture
Wires From
Main Power
Wire Nut
White Pigtail
Pigtail
Red Wires From Photocell
Black Wires From Photocell
Operation the Unit Without Photocell
160303
Lock Nut (E)
C
A
B
Headless Screw(D)
Rubber Pad (H)
Ball Nut (G)
A: 9"
B: 14-1/4"
C: 10-1/8"
The following parts are available for re-order if damaged or missing.
Spare Parts List:
Assembly Kit
5536MM (1 SET)
Mounting Screw (B)
Wire Nut (F)
Green Grounding
Screw (C)
Mounting Plate (A)
Glass Panel
9806RG (4PCS)

Other Vaxcel Outdoor Light manuals

Vaxcel T0258 Instruction manual

Vaxcel

Vaxcel T0258 Instruction manual

Vaxcel T0142 Instruction manual

Vaxcel

Vaxcel T0142 Instruction manual

Vaxcel T0099 Instruction manual

Vaxcel

Vaxcel T0099 Instruction manual

Vaxcel T0454 Instruction manual

Vaxcel

Vaxcel T0454 Instruction manual

Vaxcel T0496 Instruction manual

Vaxcel

Vaxcel T0496 Instruction manual
Vaxcel T0246 Instruction manual

Vaxcel

Vaxcel T0246 Instruction manual
Vaxcel T0700 Instruction manual

Vaxcel

Vaxcel T0700 Instruction manual

Vaxcel T0503 Instruction manual

Vaxcel

Vaxcel T0503 Instruction manual

Vaxcel T0521 Instruction manual

Vaxcel

Vaxcel T0521 Instruction manual

Vaxcel T0476 Instruction manual

Vaxcel

Vaxcel T0476 Instruction manual

Vaxcel T0694 Instruction manual

Vaxcel

Vaxcel T0694 Instruction manual

Vaxcel T0624 Instruction manual

Vaxcel

Vaxcel T0624 Instruction manual

Vaxcel Proline T0429 Instruction manual

Vaxcel

Vaxcel Proline T0429 Instruction manual

Vaxcel T0076 Instruction manual

Vaxcel

Vaxcel T0076 Instruction manual

Vaxcel T0517 Instruction manual

Vaxcel

Vaxcel T0517 Instruction manual
Vaxcel T0085 Instruction manual

Vaxcel

Vaxcel T0085 Instruction manual

Vaxcel T0620 Instruction manual

Vaxcel

Vaxcel T0620 Instruction manual

Vaxcel T0241 Instruction manual

Vaxcel

Vaxcel T0241 Instruction manual

Vaxcel T0616 Instruction manual

Vaxcel

Vaxcel T0616 Instruction manual

Vaxcel T0551 Instruction manual

Vaxcel

Vaxcel T0551 Instruction manual

Vaxcel T0193 Instruction manual

Vaxcel

Vaxcel T0193 Instruction manual

Vaxcel T0181 Instruction manual

Vaxcel

Vaxcel T0181 Instruction manual

Vaxcel T0199 Instruction manual

Vaxcel

Vaxcel T0199 Instruction manual
Vaxcel T0321 Instruction manual

Vaxcel

Vaxcel T0321 Instruction manual

Popular Outdoor Light manuals by other brands

Philips 168589316 user manual

Philips

Philips 168589316 user manual

Quoizel HVN8410EK installation guide

Quoizel

Quoizel HVN8410EK installation guide

Sparkel Smart Series user manual

Sparkel

Sparkel Smart Series user manual

Pablo CLAMP Assembly/installation instructions

Pablo

Pablo CLAMP Assembly/installation instructions

Challenger SLSW1 Operation instructions

Challenger

Challenger SLSW1 Operation instructions

Saxby Lighting Lille Wall Instruction leaflet

Saxby Lighting

Saxby Lighting Lille Wall Instruction leaflet

Defiant DF-5599-BZ-A Use and care guide

Defiant

Defiant DF-5599-BZ-A Use and care guide

OttLite 25783ABR quick start guide

OttLite

OttLite 25783ABR quick start guide

VELAMP SL532 manual

VELAMP

VELAMP SL532 manual

Steinberg Systems SBS-LA-27 user manual

Steinberg Systems

Steinberg Systems SBS-LA-27 user manual

Polarite Net Light PNL-01-001 operating instructions

Polarite

Polarite Net Light PNL-01-001 operating instructions

screwfix 3345F Instruction leaflet

screwfix

screwfix 3345F Instruction leaflet

Quoizel STG1512BN installation guide

Quoizel

Quoizel STG1512BN installation guide

HERA MPX6 DYNAMIC WHITE SERIES User manual & installation guide

HERA

HERA MPX6 DYNAMIC WHITE SERIES User manual & installation guide

LIGMAN BAMBOO 4 installation manual

LIGMAN

LIGMAN BAMBOO 4 installation manual

MP Lighting L740-L48 installation instructions

MP Lighting

MP Lighting L740-L48 installation instructions

LIGMAN KIOS 4 installation manual

LIGMAN

LIGMAN KIOS 4 installation manual

cocoweb PALMERSTON quick start guide

cocoweb

cocoweb PALMERSTON quick start guide

manuals.online logo
manuals.online logoBrands
  • About & Mission
  • Contact us
  • Privacy Policy
  • Terms and Conditions

Copyright 2025 Manuals.Online. All Rights Reserved.