manuals.online logo
Brands
  1. Home
  2. •
  3. Brands
  4. •
  5. Vaxcel
  6. •
  7. Outdoor Light
  8. •
  9. Vaxcel T0449 Instruction manual

Vaxcel T0449 Instruction manual

ASSEMBLY AND INSTALLATION
INSTRUCTIONS
.stnemeriuqergnidnuorgdnagniriwrofsedoclacirtcelelacoltlusnoc,gnillatsnierofeB.1:SETON
2. READ AND SAVE THESE INSTRUCTIONS.
T0449
WARNING:
TO AVOID RISK OF ELECTRICAL SHOCK, BE SURE TO SHUT OFF
POWER BEFORE INSTALLING OR SERVICING THIS FIXTURE.
181017
Hex Nut (F)
Washer (G) Rubber Pad (H)
End Cap (I)
Fitter Screw (A) Wire Connector (B)
Hardware Package (inculded):
Turn off the power at fuse or circuit box.
Installation Steps
Bulb Type B MAX 60W
(not included)
Handle
Roundhead Screw
Flathead Screw
Fixture body
Socket Tube
Cover Assembly
Fitter Screw (A)
Grounding Wire
Wire Connector (B)
Post
1. Unscrew the roundhead screws and
flathead screws to remove the handle from
the cover assembly and to remove the
cover assembly from the fixture body.
2. Place the socket tubes onto the sockets
to cover the sockets completly.
3. Install bulbs (not included). See relamping
label at socket area or packaging for
maximum allowed wattage.
4. Restore the handle and cover assembly
to the fixture body by the roundhead screws
and flathead screws.
5. Unscrew the fitter screws (A) to remove the
fixture body away from the fitter.
6. Pull out the wires and grounding wire from the post.
Make wire connections using the wire connectors (B):
---The black wire from the fixture to the black
wire from the post.
---The white wire from the fixture to the white wire
from the post.
---The grounding wire from the fixture to the
grounding wire from the post.
Carefully put the wires back into the post.
IMPORTANT:
The sensor has an excellent photocell
function to enable the light to turn on
at dusk and off at dawn automatically.
181017
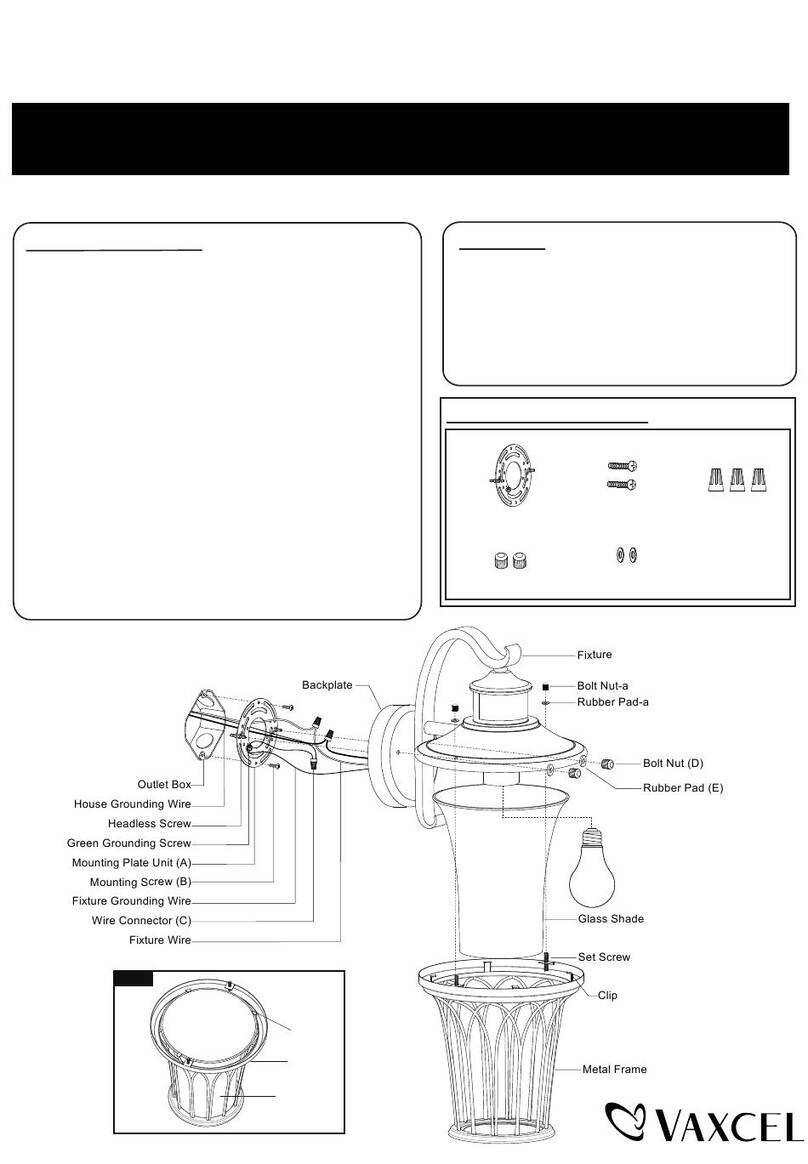
1. Attach the nipple (D) to the mounting strip (A), then secure it with a washer (G) and hex nut (F).
2. Attach the mounting strip (A) to the outlet box by using two mounting screws (B).
3. Pull out the outlet wires and house grounding wire from the outlet box. Make wire connections using the wire
connectors (F):
---The black wire from the fixture to the black wire from the power source.
---The white wire from the fixture to the white wire from the power source.
---Attach the fixture grounding wire to the mounting strip (A) with the green grounding screw (E). Then connect it to
the house grounding wire with a wire connector (F).
Carefully put the wires back into the outlet box.
4. Attach the fixture to the mounting strip (A) by inserting the nipple (D), then secure it with the rubber pad (H) and end
cap (I).
CAUTION: With silicone caulking compound, caulk completely around where the back plate meets
with the wall surface to prevent water from seeping into the outlet box.
5. Install a bulb (not included). See relamping label on socket area or packaging for maximum allowed wattage.
Turn on the power at fuse or circuit box.
1. Turn off the power at fuse or circuit box before starting installation.
2. Unscrew the three set screws to remove the plate from the fitter.
3. Loosen the wire connectors connected with the wires from photocell. (See Fig.1)
Note: Do not move the photocell to prevent water from seeping into the post.
4. Take a white pigtail and black pigtail and make wire connections using wire connectors (B): (See Fig.2)
a. The black wire from the fixture to one end of the black pigtail.
b. The white wire from the fixture to one end of the white pigtail.
c. The other end of the black pigtail to the black wire from the power source.
d. The other end of the white pigtail to the white wire from the power source.
Put all wires back into the post.
5. Restore the plate to the fitter by using three set screws.
Photocell
White Wires From
Photocell
Wire Connector
Black Wire From
Fixture
Wires From Fixture
Wires From
Main Power
Wire Connector (B)
White Pigtail
Pigtail
Red Wires From
Photocell
Black Wires From
Photocell
Operation the Unit Without Photocell
Fig.1 Fig.2
White Wire From
Fixture
Plate
Set Screw
The following parts are available for re-order if damaged or missing.
Fitter Screw (A) Wire Connector (B)
Socket Tube
1089C
Mounting Hardware
6012MM(1 SET)
Spare Parts List:
A: 10"
B: 25"
A
B
7. Place the fitter on the top of the post, and then secure it with fitter screws (A).
CAUTION: With silicone caulking compound, caulk completely around where the fitter meets with the post
surface to prevent water from seeping into the post.

Other Vaxcel Outdoor Light manuals

Vaxcel T0517 Instruction manual

Vaxcel

Vaxcel T0517 Instruction manual

Vaxcel T0238 Instruction manual

Vaxcel

Vaxcel T0238 Instruction manual

Vaxcel T0451 Instruction manual

Vaxcel

Vaxcel T0451 Instruction manual

Vaxcel T0165 Instruction manual

Vaxcel

Vaxcel T0165 Instruction manual

Vaxcel T0363 Instruction manual

Vaxcel

Vaxcel T0363 Instruction manual

Vaxcel T0647 Instruction manual

Vaxcel

Vaxcel T0647 Instruction manual

Vaxcel T0696 Instruction manual

Vaxcel

Vaxcel T0696 Instruction manual

Vaxcel T0178 Instruction manual

Vaxcel

Vaxcel T0178 Instruction manual

Vaxcel T0142 Instruction manual

Vaxcel

Vaxcel T0142 Instruction manual

Vaxcel T0099 Instruction manual

Vaxcel

Vaxcel T0099 Instruction manual

Vaxcel T0698 Instruction manual

Vaxcel

Vaxcel T0698 Instruction manual

Vaxcel T0080 Instruction manual

Vaxcel

Vaxcel T0080 Instruction manual

Vaxcel T0542 Instruction manual

Vaxcel

Vaxcel T0542 Instruction manual

Vaxcel T0199 Instruction manual

Vaxcel

Vaxcel T0199 Instruction manual

Vaxcel T0599 Instruction manual

Vaxcel

Vaxcel T0599 Instruction manual

Vaxcel T0130 Instruction manual

Vaxcel

Vaxcel T0130 Instruction manual

Vaxcel T0700 Instruction manual

Vaxcel

Vaxcel T0700 Instruction manual

Vaxcel T0620 Instruction manual

Vaxcel

Vaxcel T0620 Instruction manual

Vaxcel T0103 Instruction manual

Vaxcel

Vaxcel T0103 Instruction manual
Vaxcel T0575 Instruction manual

Vaxcel

Vaxcel T0575 Instruction manual

Vaxcel T0181 Instruction manual

Vaxcel

Vaxcel T0181 Instruction manual

Vaxcel T0365 Instruction manual

Vaxcel

Vaxcel T0365 Instruction manual

Vaxcel T0362 Instruction manual

Vaxcel

Vaxcel T0362 Instruction manual
Vaxcel T0193 Instruction manual

Vaxcel

Vaxcel T0193 Instruction manual

Popular Outdoor Light manuals by other brands

IKEA BJÖRKSPIREA Assembly instruction

IKEA

IKEA BJÖRKSPIREA Assembly instruction

LIGMAN CO-30196-1-2 instruction manual

LIGMAN

LIGMAN CO-30196-1-2 instruction manual

Festool KAL operating manual

Festool

Festool KAL operating manual

LUDECO PL6011 manual

LUDECO

LUDECO PL6011 manual

John Lewis Stowe Wall light user manual

John Lewis

John Lewis Stowe Wall light user manual

SUNRAY Vittoria 302074 instruction manual

SUNRAY

SUNRAY Vittoria 302074 instruction manual

LIGMAN RA-10772 installation manual

LIGMAN

LIGMAN RA-10772 installation manual

planeo Agate Manual and safety instructions

planeo

planeo Agate Manual and safety instructions

season LIGHTS LIRO 60 Manual and safety instructions

season LIGHTS

season LIGHTS LIRO 60 Manual and safety instructions

SLV CUBIX QPAR51 instruction manual

SLV

SLV CUBIX QPAR51 instruction manual

ASTRO Richmond 285 instructions

ASTRO

ASTRO Richmond 285 instructions

Philips SV16 Series Installation and operating instructions

Philips

Philips SV16 Series Installation and operating instructions

LIGMAN TRIANGLE 5 installation manual

LIGMAN

LIGMAN TRIANGLE 5 installation manual

Nobile 241/G user manual

Nobile

Nobile 241/G user manual

Bounce LED NOVANEON Reflex manual

Bounce LED

Bounce LED NOVANEON Reflex manual

LIGMAN VANCOUVER 67 installation manual

LIGMAN

LIGMAN VANCOUVER 67 installation manual

LIGMAN LBX 4 installation manual

LIGMAN

LIGMAN LBX 4 installation manual

LIGMAN BIU-90006 installation manual

LIGMAN

LIGMAN BIU-90006 installation manual

manuals.online logo
manuals.online logoBrands
  • About & Mission
  • Contact us
  • Privacy Policy
  • Terms and Conditions

Copyright 2025 Manuals.Online. All Rights Reserved.