Veichi AC310 User manual

AC310 Universal AC Drive Service Manual
(Veichi Electric Technical Service Department)
(Note 1: This maintenance manual related circuit diagrams, using the AC310 series
2.2KW machine as a reference, the control board screen printing diagrams and other
power segments of the power board different points, in the appendix will be prompted,
the appendix according to each power segment circuit is divided into 3 power segments,
each power segment select a specific power segment.
There will be tips in the appendix, the appendix according to the different circuits in
each power section, roughly divided into three power sections, each power section to
select a specific power as a practical example to explain the differences and similarities,
details.
(Note 2: AC310 general-purpose AC drive is still in the process of continuous
optimisation of the hardware circuit, so sometimes there may be inconsistencies
between the specifications of the actual components and the specifications on the circuit
diagram.
(Note 3: This service manual involves hardware design circuit diagrams, and should
not be distributed privately.)

AC310 Universal AC Drive Service Manual
I
Catalog
Chapter 1 Summarize ................................................................................................................ 3
1.1 The Working Principle of the AC Drive ......................................................................... 3
1.1.1 Rectifier Bridge ........................................................................................................ 3
1.1.2 Detachable Capacitor................................................................................................ 4
1.1.3 Switching Mode Power Supply ................................................................................ 4
1.1.4 Inverter Module ........................................................................................................ 4
1.2 Common Device Overhaul Method................................................................................. 5
1.2.1 Detect Diode............................................................................................................. 5
1.2.2 Detect Triode............................................................................................................ 5
1.2.3 Optocoupler .............................................................................................................. 6
1.2.4 Static Measurements of Rectifier Bridges ................................................................ 6
1.2.5 Static Measurements of AC Drive Continuity Diodes ............................................. 7
1.2.6 Static Measurement of Brake Units.......................................................................... 7
Chapter 2 Testing and Repairing of Power Supply Boards....................................................... 8
2.1 Driver Circuit .................................................................................................................. 8
2.2 Brake Driver Circuit...................................................................................................... 12
2.3 Current Detection Circuit .............................................................................................. 14
2.4 Busbar Voltage Detection Circuit ................................................................................. 16
2.5 Relay Control Circuit .................................................................................................... 18
2.6 Fan Control Circuit........................................................................................................ 20
2.7 Switching Power Supply ............................................................................................... 22
Chapter 3 AC300CON-A1.0 Control Board Introduction and Brief Detection and
Maintenance ............................................................................................................................ 27
3.1 Summary of IC Related Information............................................................................. 27
3.2 Access to Voltage Points on the Control Board ............................................................ 28
3.3 Detection and Maintenance Optocoupler Unit Circuits ................................................ 32
3.3.1 X Input Circuit Detection and Maintenance........................................................... 33
3.3.2 Y Output Detection and Maintenance .................................................................... 34
3.3.3 Relay Detection and Maintenance.......................................................................... 34
3.4 Analogue Signal Detection and Maintenance ............................................................... 35
3.4.1 Analogue Input Signal Test (AI1, AI2): Voltage 0-10V; Current 0-20mA ........ 35

AC310 Universal AC Drive Service Manual
II
3.4.2 Analogue Output Signal(AO1, AO2):Voltage 0-10V; Current 4-20mA ,0-
20mA;Frequency Signal 0-50KHZ ................................................................................ 38
3.5 RS485 Communication Circuit ..................................................................................... 41
3.6 Drive Signal Processing Circuit .................................................................................... 44
3.7 Keyboard Circuitry........................................................................................................ 46
3.7.1 Keypad Key Circuit:............................................................................................... 47
3.7.2 Keypad Display Circuit .......................................................................................... 48
3.8 VPN Detection and Maintenance .................................................................................. 51
3.9 OH Fault Detection and Maintenance ........................................................................... 52
3.10 Current Acquisition Detection and Maintenance ........................................................ 53
3.11 OC Fault Detection and Maintenance ......................................................................... 54
3.12 Wave-by-Wave Current Limit Comparison Circuit .................................................... 56
Chapter 4. Common Faults Quick Maintenance ..................................................................... 58
4.1 No Display on Power-up ............................................................................................... 58
4.2 Power-up or Operating Undervoltage (L.U.1, E.LU2), Overvoltage (E.OU1/2/3/4) Fault
............................................................................................................................................. 59
4.3 OC Fault (OC1, OC2, OC3, OC4) ................................................................................ 59
4.4 E.SC Fault ..................................................................................................................... 60
4.5 OH Fault........................................................................................................................ 61
4.6 Relay Non-suction Fault................................................................................................ 61
4.7 Inconsistent Voltage Values Generated by the Switching Power Supply ..................... 61
4.8 Output Out of Phase (E.OLF)........................................................................................ 61
4.9 Current Detection Fault (E.HAL).................................................................................. 62

AC310 Universal AC Drive Service Manual
3
Chapter 1 Summarize
1.1 The Working Principle of the AC Drive
The working principle of the AC drive is shown in Fig. 1, the input of the AC drive
is AC, which is rectified by the rectifier bridge composed of six diodes and filtered into
DC by capacitor C. The voltage at the primary side of the switching power supply
transformer is taken from the busbar voltage, and the switching power supply voltage
is obtained through the switching power supply related devices, which provides the
voltage for the drive circuits, fan relays, and control boards, etc.; the DC power is then
inverted into the frequency-variable and voltage-variable alternating current (AC)
through the AC drive module composed of the IGBTs and the renewal diodes, and the
waveforms of the voltages are Pulse-width modulation (PWM) waveforms.
1.1.1 Rectifier Bridge
The rectifier section consists of six rectifier tubes forming a three-phase rectifier
bridge to rectify the three-phase AC full-wave rectification of the power supply into
DC. If the line voltage of the power supply is UL, then the average DC voltage UD
after three-phase full-wave rectification will be: UD=1.35×UL
The line voltage of our three-phase power supply is 380V, so the average voltage
after full-wave rectification: UD = 1.35 × 380V = 513V. This is calculated to be the
average value of the bus voltage, corresponding to there is a maximum value: UDmax

AC310 Universal AC Drive Service Manual
4
= 1.414 × 380 = 538V
1.1.2 Detachable Capacitor
Electrolytic capacitors in the AC drive is the main role of filtering, filtering capacitors
are connected in parallel at the output of the rectifier power supply circuit, to reduce the
AC pulsating ripple coefficient, smooth the DC output of a kind of energy storage device;
filtering capacitors not only make the power supply DC output is stable, reduce the
alternating pulsating ripples on the impact of the electronic circuits, and at the same time
can absorb the current fluctuations generated in the course of the electronic circuits and the
interference through the AC power string into the electronic circuits to make the work of
the electronic circuit more stable performance.
1.1.3 Switching Mode Power Supply
The voltage at the primary side of the switching power supply transformer is
taken from the DC bus voltage, and through the switching power supply circuit, it
gets +24V, ±15V, +5V, 16.5V and other voltages are obtained through the switching
power supply circuit to provide voltages for the drive circuit, current detection, fan
relay circuit, voltage detection and so on, so as to ensure the normal operation of the
frequency converter.
1.1.4 Inverter Module
It consists of IGBT tubes and six diodes. By controlling the switching sequence
and switching time of the IGBT tubes, the AC drive turns the DC power into AC power
with variable frequency and voltage, and the voltage waveform is pulse width
modulated waveform.
(Note: The output voltage waveform of the AC drive is a pulse-width modulated
waveform, but the output current is measured as a sinusoidal waveform in practice,
because the motor is an inductive load, which makes the output sinusoidal waveform)

AC310 Universal AC Drive Service Manual
5
1.2 Common Device Overhaul Method
1.2.1 Detect Diode
Digital multimeter diode file open-circuit voltage of about 2.8V, the red pen is
connected to the positive, the black pen is connected to the negative, the measurement
of the current provided by about 1mA, the display value for the diode forward voltage
drop approximation, the unit is mV or V. Silicon diode forward conduction voltage drop
of about 0.3 ~ 0.8V, reverse bias shows the diode open-circuit voltage. The germanium
diode germanium forward conduction voltage drop is about 0.1~0.3V. And the forward
voltage drop of the more powerful diode is smaller, and the reverse bias shows the open-
circuit voltage of the diode. If the measured value is less than 0.1V, it means that the
diode breaks down, at this time both forward and reverse conduction. If the forward
and reverse are open, it means that the diode is open.
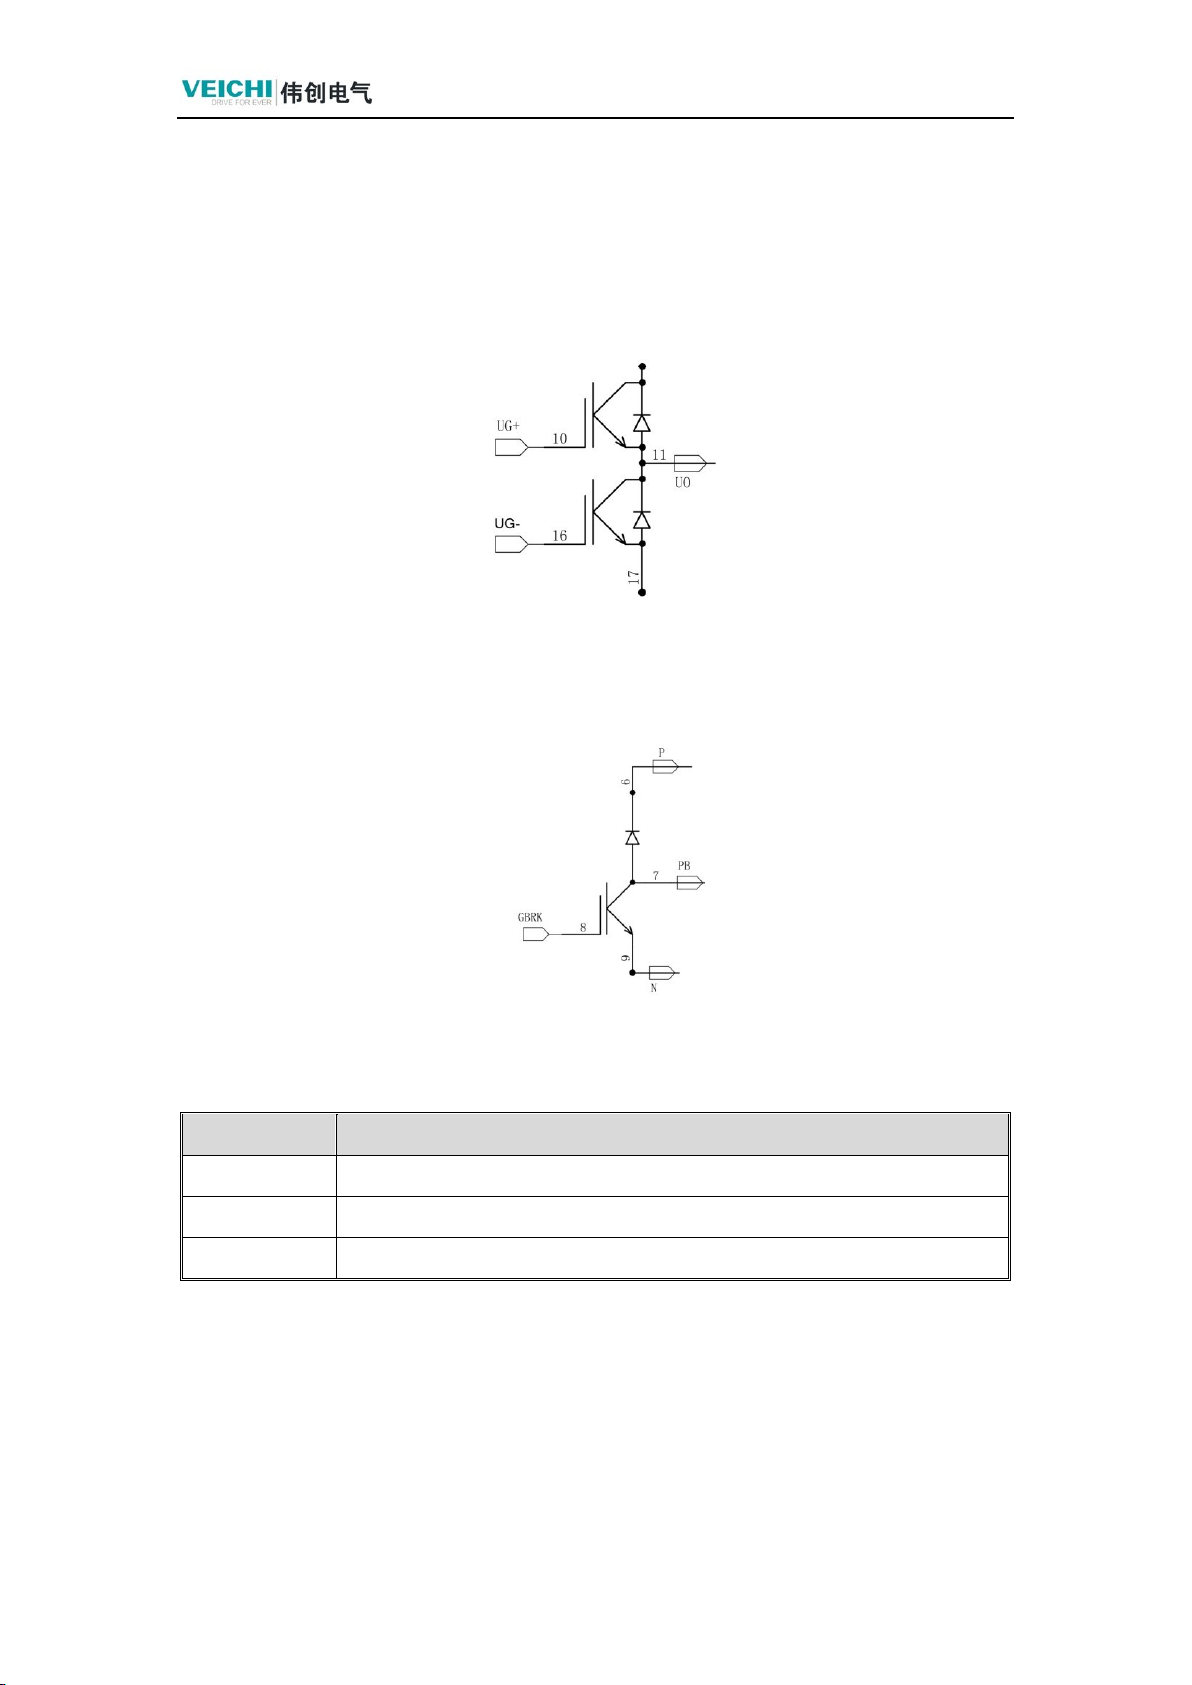
1.2.2 Detect Triode
The triode has two PN junctions, the emitter junction (be) and the collector
junction (bc), which can be measured in the same way as the diode. In the actual
measurement, the forward and reverse voltage drops between each two pins should
be measured, a total of 6 times, of which 4 times show open circuit, only two times
show the voltage drop value (why only 2 times show the data, because the triode is
in the triode, the voltage drop value is not displayed).
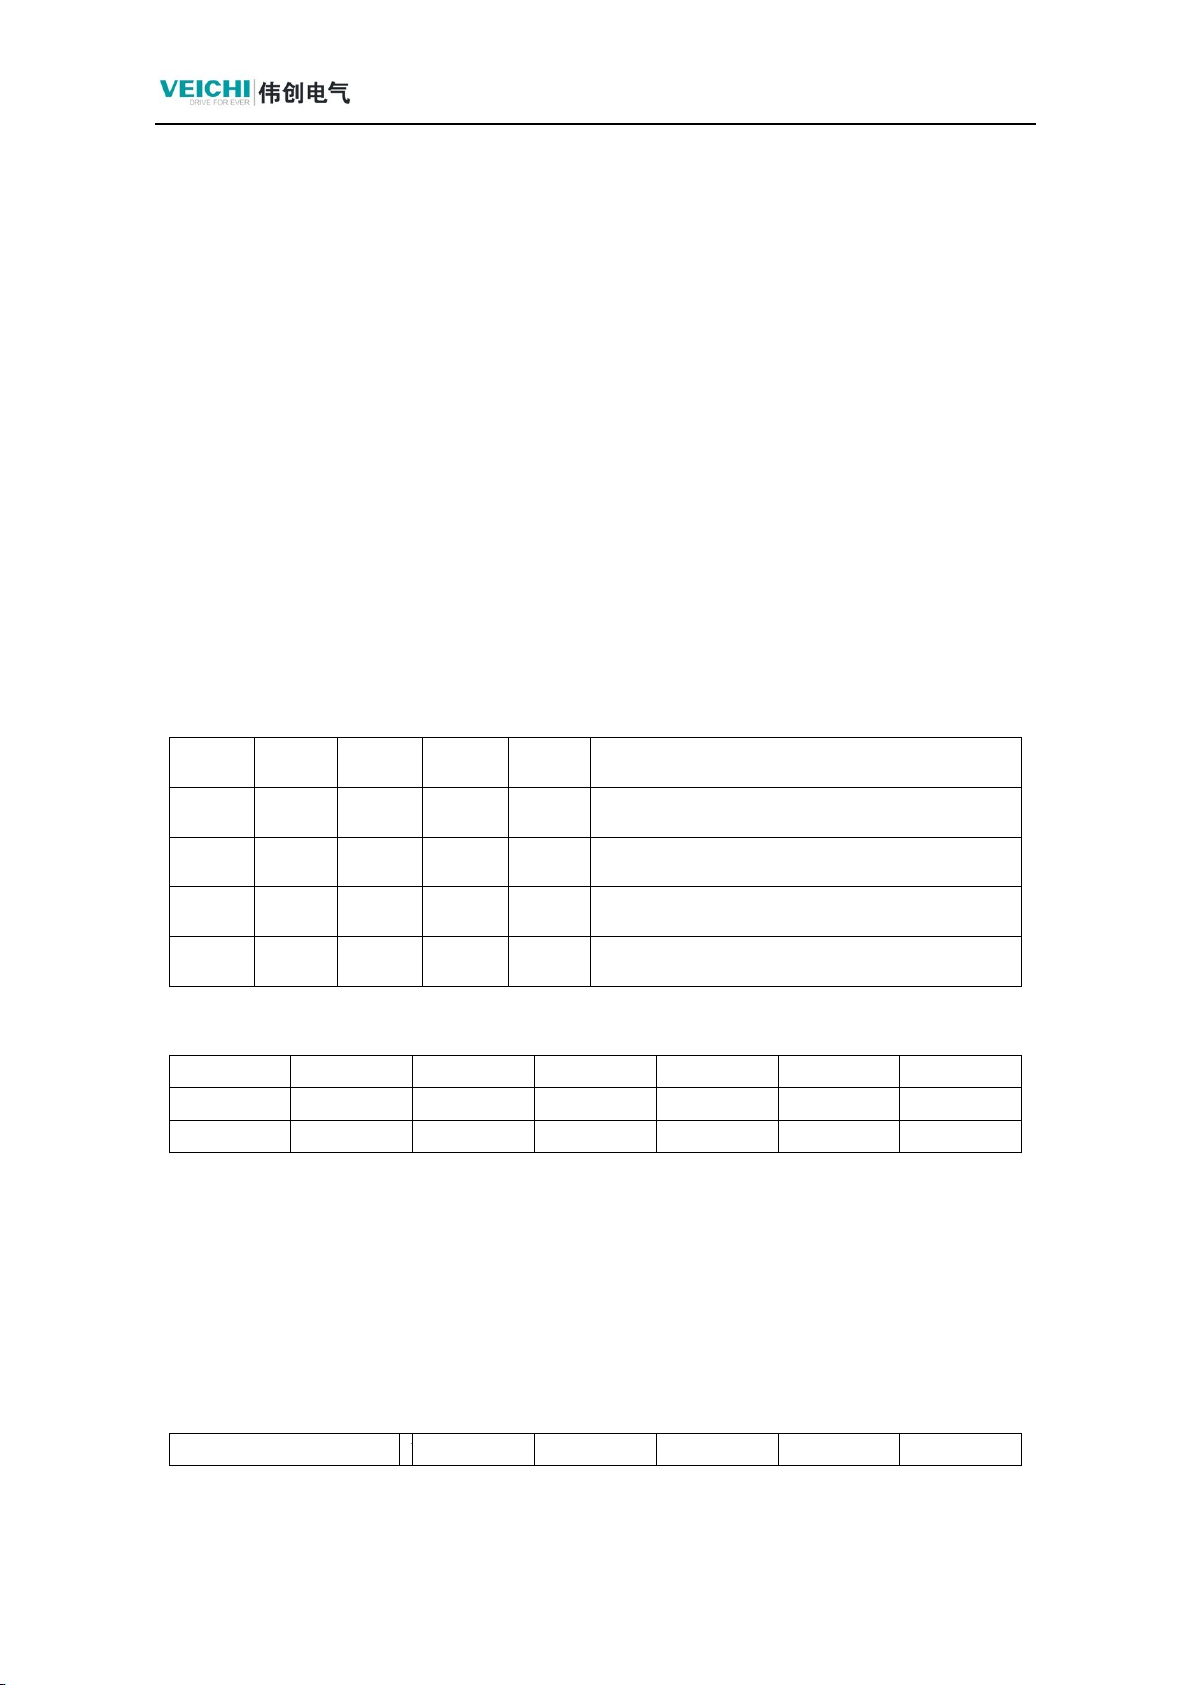
There are two times to show the voltage drop value (why only two times to show
the data, because the transistor in the measurement of the static value of the
equivalent diagram shown in the figure below), otherwise the transistor is bad or
special transistors (such as resistance transistors, Darlington transistors, etc., can be
distinguished by the model number and the ordinary transistors). In two
measurements with values, if the black or red pen is connected to the same pole, the
pole is the base pole, the smaller measurement value is the collector junction, and
the larger one is the emitter junction, because the base pole has been judged, and the
collector and emitter can be judged accordingly. At the same time, it can be judged:
if the black pen is connected to the same pole, the transistor is PNP type; if the red
pen is connected to the same pole, the transistor is NPN type; the one with a voltage

AC310 Universal AC Drive Service Manual
6
drop of about 0.7V is a silicon tube, and the one with a voltage drop of about 0.3V
is a germanium tube.
1.2.3 Optocoupler
The circuit principle and symbols of commonly used optocouplers are shown in
the following figure:
One side is a light-emitting diode, the voltage drop is about 1V, the other side is a
transistor, some only lead out c, e, measurement of forward and reverse are cut off, if
all three legs lead out, the measurement characteristics are the same as the above
transistor (mostly NPN tubes). When using a multimeter to make the diode forward
conduction, at this time with another multimeter to measure the transistor c to e
conduction voltage drop of about 0.15V; disconnect the diode connected to the
multimeter, the transistor c to e cutoff, indicating that the optocoupler is good.
1.2.4 Static Measurements of Rectifier Bridges
Three-phase bridge rectifier electrical schematic diagram, points 1, 2 and 3 are RST
inputs, points 4 and 5 are P and N. Measurement method is the same as that of a normal
diode.

AC310 Universal AC Drive Service Manual
7
1.2.5 Static Measurements of AC Drive Continuity Diodes
Schematic diagram of the AC drive unit, the measurement method is the same as ordinary
diodes. Measurement of the IGBT diode to determine the damage. Just put a meter pen into the
U, V, W output, a meter pen on the P or N, you can measure the good or bad.
1.2.6 Static Measurement of Brake Units
Brake Unit Schematic
GBRK is the braking signal in the diagram. Connect a braking resistor between
terminals P and PB, refer to the instruction manual for specifications.
No.
Description
①
DC-side fuse (optional)
②
Liquid-cooled converter module
③
Motor
Table 2-7 Main circuit description

AC310 Universal AC Drive Service Manual
8
Chapter 2 Testing and Repairing of Power
Supply Boards
2.1 Driver Circuit
1. Circuit components driver circuit
According to the received DSP drive signal to control the switch of IGBT, optocoupler
primary drive signal sampling interlocking form. ACPL-W314 drive optocoupler minimum
output current is 0.4A, the maximum output current is 0.6A, to meet the IGBT drive

AC310 Universal AC Drive Service Manual
9
capability. Due to the bootstrap topology does not have a negative voltage, the need to
shorten the shutdown time to ensure that the dead zone, drive to increase a shutdown loop,
shutdown
After the diode is on, the driver resistor is connected in parallel.
Diodes such as D40 are used to reverse clamp the output of the optocoupler, preventing
the optocoupler pin 5 to pin 4 ground from generating too large a negative voltage when the
IGBT is turned on, resulting in optocoupler output abnormalities.
The value of the gate capacitance is related to the small voltage spike caused by the
continuity of current to the tube after the IGBT is turned off, and a too small value of this
voltage spike may lead to false turn-on.
2. Fault type
No output, output out of phase, module damage, SC
3. Inspection Method:
Static detection:
W314 On-circuit detection
1
3
4
5
6
Multimeter Diode
+
-
1.22
+
-
0.23
+
-
0.64
+
-
0.76
Detection of IGBT gate resistance (2.2kw machine)
UG+
VG+
WG+
UG-
VG-
WG-
GBRK
U0
V0
W0
N
N
N
N
5.2K
5.2K
5.2K
10K
10K
10K
10K
Problems with the drive resistor may be due to a damaged drive resistor, or a damaged
module.
Dynamic detection:
◼Voltage between VDR and N when not running: 16.5±1V (DC)
Note: R151 is a 0Ω resistor on the P-line. Failure of this resistor will result in no power to
the bus voltage disconnect and thus no power to the switching power supply.
◼Measurement of relevant drive voltage points during operation:
Red pen
U
G
+
VG+
WG+
UG-
VG-
WG-

AC310 Universal AC Drive Service Manual
10
Black pen
U
0
V0
W0
N
N
N
AC file
8
-
9
V
8-9V
8-9V
8-9V
8-9V
8-9V
Single measurement
measurement
measurement
measurement
measurement
8
.
0
2
V
8.03V
8.01V
8.20V
8.20V
8.20V
When the drive voltage is at a positive value, the drive is turned on, and at a negative
value, the drive is turned off, so use the AC gear to measure it.
◼Measurement of normal voltage points during operation:
Red pen
UTP
VTP
VTP
Black pen
U0
V0
W0
DC grade
16V
16V
16V
The UTP, VTP, and WTP voltages are generated by the VDR, if there is a problem there,
the drive voltage generated by the switching power supply is faulty Problems.
Measure the voltage of the drive signal on the control board when it is not in operation
(DC phase).
UH
UL
VH
VL
WH
WL
GND
5V
5V
5V
5V
5V
5V
Waveforms of one of the drive signals and GND outputs during operation: as follows
(if the output waveforms are abnormal, the control board is abnormal)
Measure the voltage of each drive signal and GND is about 11.5v when running with
ACgear.
◼Use two ripple probes (pay attention to isolation) to connect to the upper and lower arm
drivers of the same phase (directly soldered to the IGBT pins), power up and run the
whole machine, and test the driving waveforms. (If there is no waveform, the module
may be damaged, or the UH, UL, VH, VL, WH, WL provided on the control board may
be defective.).

AC310 Universal AC Drive Service Manual
11
4. Damage-prone devices
Driver optocoupler, voltage regulator
5. Device bit number and specification
Driver Resistors
R126=R127=R128=R129=R130=R131=68R0
/1206
R42=R50=R60=R67=R46=R53=1000/1206
Gate Resistor/Capacitor
R43/R54/R61/R68/R47/R55=1002/080
5
C41/C45/C49/C52/C43/C47=472/0805
Voltage regulator
BZT52C16
Z2/Z3/Z4/Z5/Z6/Z7/Z8/Z9/Z10/Z11/Z12/Z13
Driver Optocoupler
ACPL-W314-500E
O40/O42/O44/O45/O41/O43
Thyristor
MBR0540T1G D40/D42/D44/D45/D41/D43
1N4148WS D17/D18/D19/D20/D21/D22
Other
R40/R48/R56/R65/R44/R51=3000/080
5
R41/R49/R57/R66/R45/R52=5101/080
5
C40/C44/C48/C51/C42/C46=104/0805

AC310 Universal AC Drive Service Manual
12
2.2 Brake Driver Circuit
1. Circuit composition
Isolation photocoupler, transistor, voltage regulator
2. Fault type:
Overvoltage fault, braking resistor burned out, module damage 3, overhaul mode
Static detection
According to the appendix provides a variety of device detection methods for overhaul,
but also need to test the braking circuit of the brake diode is good or bad.
Dynamic detection
⚫When the brake is not consumed, the control signal BRK voltage is 5V, and when the
brake is turned on, the BRK voltage point is 0.455 (the pulse voltage changes from 5V
to 0.455V).
Before braking, the voltage of GBRK and N point is zero, and when braking is on, the
voltage of GBRK and N point is about 16V. Use the oscilloscope to capture the graph
as follows: (Note: to turn on the energy consumption braking) Use the ripple probe to
connect to the brake tube driver (directly soldered to the IGBT pin), regulate the power
supply to the energy consumption braking point (the default is about 680VDC), and
observe whether the brake tube is turned on or not. CH2: Braking current CH4: Brake

AC310 Universal AC Drive Service Manual
13
tube driver
Brake circuit schematic:
The braking resistor is connected between PB and PJ when the voltage between GBRK
and N is about 16 V. Refer to the selection manual for the braking resistor.
4. Damage-prone devices
Optocouplers, transistors
5. Device bit number and specification
Transistors
Q40=MMBT4401LT1(NPN)
Q41=MMBT4403LT1(PNP)
Gate Resistor/Capacitor
R64=1002/0805 C50=472/0805
Voltage regulator
Z14/Z15= BZT52C16
Driver Optocoupler
U40=EL2501S(K)
R58=3000/0805
R59/R62=5101/0805
R112=1001/0805
R63=1500/1206

AC310 Universal AC Drive Service Manual
14
2.3 Current Detection Circuit
1. Circuit composition
ACS720 current chip is used for sampling, the chip outputs 1.5V bias voltage with zero
current and provides a 1.5V REF. The sampling signal is calculated by the operational
amplifier and sent to the control board.
In addition, the internal circuit of the chip detects a delay of 4us, which is a large delay
for the overcurrent protection function, so the internal overcurrent protection function is
introduced.
The ACS720 has a user-configurable double-fault function, with fast and slow fault
outputs for short-circuit and overcurrent fault detection. Using the fast protection pins
VOC_F and FAULT_F/, the device sends out a low FAULT signal within 1.5us when the

AC310 Universal AC Drive Service Manual
15
current reaches the set overcurrent point, which is connected to the FAU pin to protect the
system from SC; and using the slow protection pins VOC_S and FAULT_S/, the
corresponding OC signal is pulled low, causing the COLSE signal to go high and blocking
the outputs. When the current reaches the set overcurrent point, the chip sends out a low-
level signal of FAULT within 1.5us, and connects this signal to the FAU pin to protect the
system from SC.
2. Fault type
E.HAL, E.OL2, E. OC, E.OLF
3. Detection method
Static detection
(Note that the current detection chip ACS720 is on at pins 1 to 8 during measurement
because the detection chip is differential current detection, which can well suppress external
magnetic field interference). (Note that pins 1 to 8 of the current detection chip ACS720 are
energized during measurement because the detection chip is a differential current detection chip,
which can well suppress the interference of external magnetic field)
Dynamic detection:
When powering up, look at pin 14 of the current detecting chip to see if there is 5V voltage,
pin 12 and REF pin correspond to 1.5V, which corresponds to 5V at pins 13, 15, and 16 when
normal, if the output voltage of pin 12 is abnormal when other voltages are normal, then the
current detecting chip is abnormal.
4. Damage-prone devices ICs, op amps
5. Device bit number and specification
Capacitors
C31/C37=1nf/0805
C14/C62/C33/C34=100nf/
0805 C32/C38=1uf/0805
C35/C36/C55/C54=330pf/
0805
Resistive
R30/R69/R70/R86/R87/R37=5101
/0805
R7/R36/R74/R76/R90/R92=4701/
0805
R78/R81/R38/R39=2000/0805
R75/R77/R91/R94=1002/0805
Sampling chip
U3/U5=ACS720KLATR-65AB-T
Op amp
U4=LF353DRG4

AC310 Universal AC Drive Service Manual
16
2.4 Busbar Voltage Detection Circuit
1. Circuit composition
The bus voltage sampling circuit is a high-resistance isolation circuit that utilizes multiple
resistors in series for isolation and then differential amplification by operational amplifiers.
2. Fault type
Inaccurate bus voltage display, overvoltage, undervoltage
3. Inspection methods
Static detection
If the VPN voltage value is incorrect during the test (dynamic detection has a
measurement method), please test the following parts
(i) Op-amp U75=LF353DRG4; (ii) Test the voltage divider resistor; (iii) Diodes D70 and
D71 to replace the damaged devices, and then test the
VPN voltage point to ensure that the detection value is correct.
Dynamic detection

AC310 Universal AC Drive Service Manual
17
1. Use the DC adjustable voltage regulator to connect to the P-N terminal of the machine
under test, and hang the multimeter pen on the P-N, and set the multimeter to DC voltage
(DC); note that the software voltage correction factor is 100% before testing. Compare the
value displayed by multimeter and keyboard
2. Measure the voltage at this point of the VPN: (get the VPN voltage from the voltage
scaling relationship)
S2 model
T3 model
579V homologous 5V
1000V homologous 5V
4. Vulnerable components op amps
5. Device bit number and specification
Resistive
R82/R83/R84/R85/R2/R3=470K/1206
R4/R5/R95/R96/R97/R98=470K/1206
Double diode
D70/D71=BAV99LT1G
Op amp
U75=LF353DRG4
R79/R99=10K/0805
R80/R100=4.02K/0805
C82/C87=10Nf/0805
C86/C81=100NF/0805

AC310 Universal AC Drive Service Manual
18
2.5 Relay Control Circuit
1. Circuit composition
Controls the 24V power switch according to the received DSP drive signal to control
the relay to close and disconnect
2. Failure type
Operation undervoltage, soft start resistor burned out, no vibration
3. Inspection Methods
Static test Overhaul according to the various device detection methods provided in the
appendix Dynamic test
After static testing, rule out device abnormalities.
When the DC adjustable voltage source is used to energize the bus voltage, the signal
source from the CPU changes from high level (5V) to low level (RCE level changes from
high to low and the main relay opens), and when the voltage is under-voltage, the signal
source from the CPU changes from low to high (5V) (RCE level changes from high to low
and the main relay opens), and the signal source from the CPU changes from low to high
(5V) (RCE level changes from high to low and the main relay opens).

AC310 Universal AC Drive Service Manual
19
(RCE level changes from high to low, the main relay is disconnected), when
undervoltage, the signal source from CPU changes from low level to high level (5V).
After normal power-on, check whether the primary side of the optocoupler is about
0.5V, and whether the secondary side and COM voltage is 24V, if both are normal, then
consider whether the relay is damaged.
Measure the resistance value, if there is resistance value and the same as the silkscreen
value, the resistance is normal, if different and infinity, it means burned out, replace it.
Put the relay into DC24V, when it is good, the coil will absorb, and the multimeter
will measure that the coil is on. Relay is good. Measurement does not conduct, the relay is
damaged
4. Damage-prone devices
Optocouplers, transistors
5. Device bit number and specification
Resistance
R6=300Ω/0805 R141=5.1K/0805
R110/R11=10K/0805
Capacitance
C1/c114=100nf/0805
Triode
Q110=MMBT4401LF1
Optocoupler
O10=EL2501S(K)
Relay
SQM:6W150RJ
Table of contents