manuals.online logo
Brands
  1. Home
  2. •
  3. Brands
  4. •
  5. Velocity
  6. •
  7. Control Unit
  8. •
  9. Velocity VDOT-Mini IP User manual

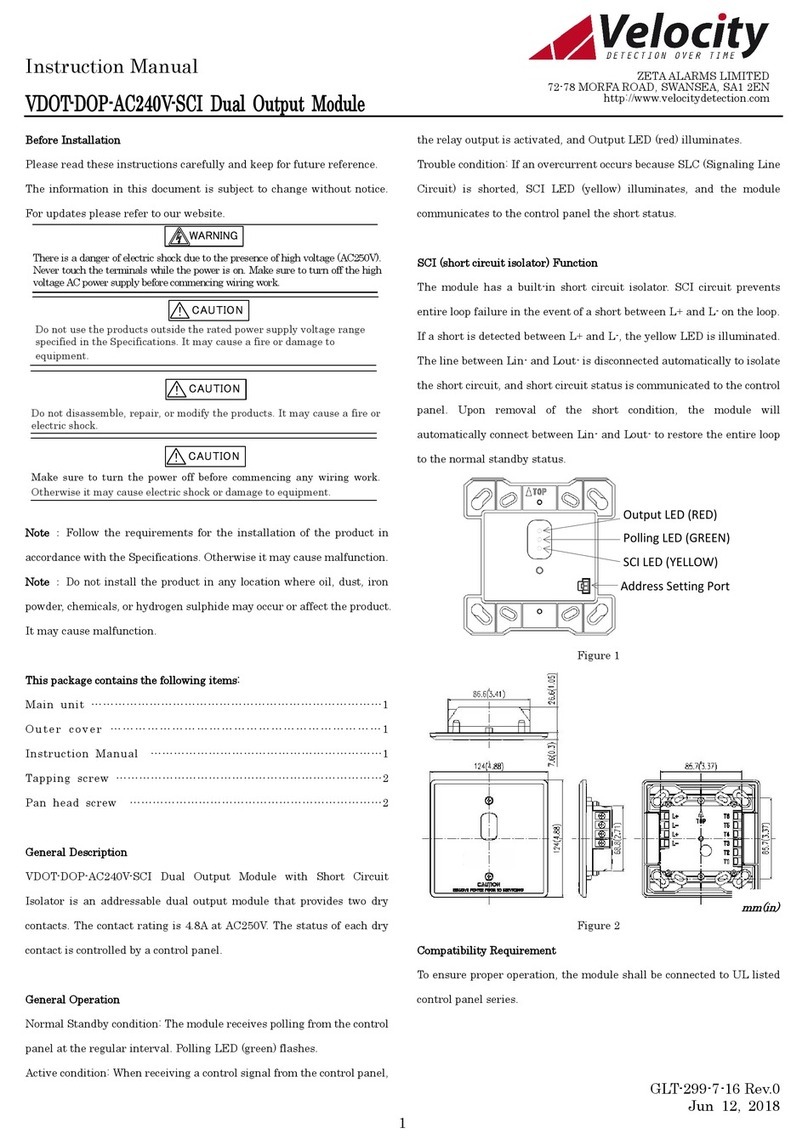
Velocity VDOT-Mini IP User manual

GLT-299-7-17 R ev.1
Jan 24, 2022
1
ADDRESS SETTING PORT
Instruction Manual
VDOT-Mini IP Mini Input Module
Before Installation
Please read these instructions carefully and keep for future reference.
The information in this document is subject to change without notice.
For updates please refer to our website.
Note:Follow the requirements for the installation of the product in
accordance with the Specifications. Otherwise it may cause damage to
equipment.
Note:Do not install the product in any location where oil, dust, iron
powder, chemicals, or hydrogen sulphide may occur or affect the product.
It may cause damage to equipment.
This package contains the following items:
Main unit……………………………………………………………………1
Instruction Manual ………………………………………………………1
EOL Resistor (VDOT-RE-10k)………………………………………………1
Sealing label…………………………………………………………………1
General Description
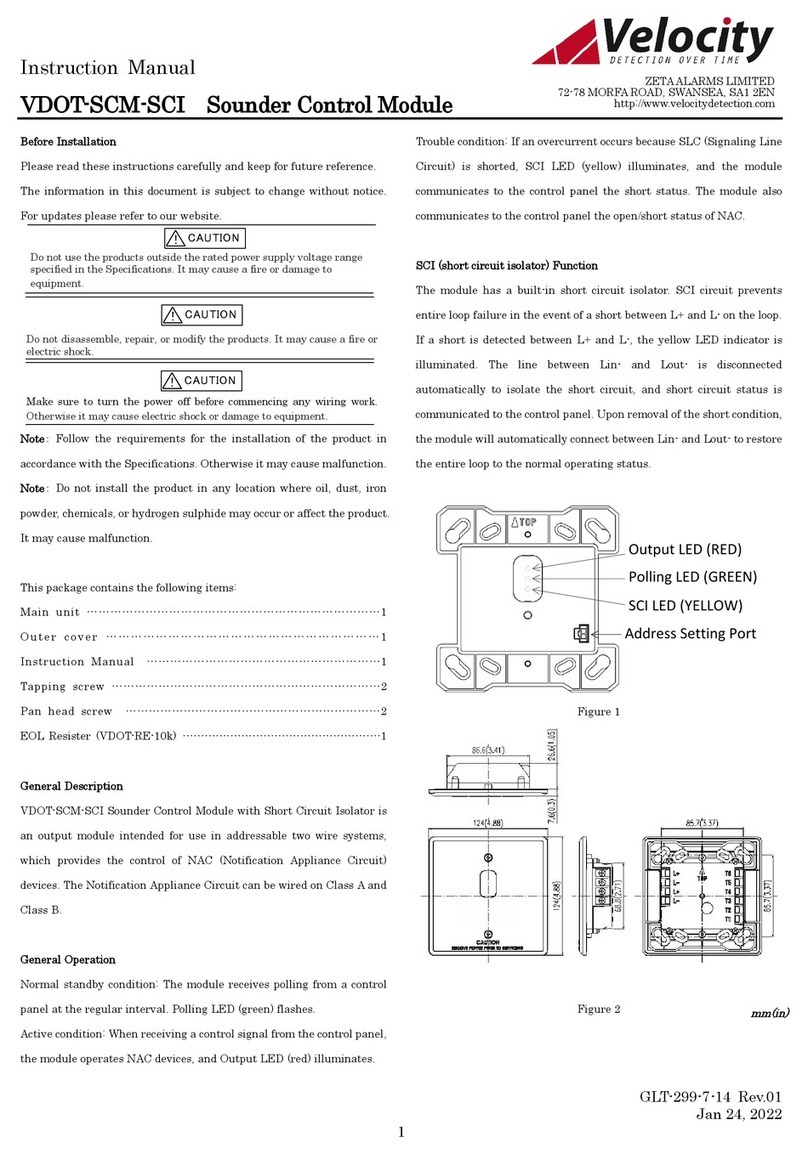
VDOT-MiniIP Mini Input Module is intended for use in addressable two
wire systems. The module monitors and transmits the status (normal,
open, short, or active) of devices equipped with NC/NO dry contacts to a
control panel. The initiating device circuit (IDC) can be wired on
Class B.
General Operation
Normal standby condition: The module receives polling from the control
panel at the regular interval.
Active condition: When the external input is activated, the module
communicates to the control panel the active status.
Trouble condition: The module communicates to the control panel the
open/short status of IDC, depending on the Subtype Setting described
below.
Figure 1
Compatibility Requirement
To ensure proper operation, the module shall be connected to UL listed
control panel series. Any conventional detector cannot be connected
with the module.
Before Installing
Disconnect power to the control panel before installing the module. If
the module is installed in an existing operational system, inform the
operators and local authorities that the system will be temporarily out
of service.
Mounting
Mount or place the module on the back or inside of monitored unit. Its
small size and light weight allow it to be installed without rigid
mounting.
Setting
・Address Setting
Use VDOT-AD2 Programmer for setting the address of the module prior
to installation. VDOT-MiniIP has an address given at random from
factory. Connect the Programmer with the address setting port to
change the address to any of 1-254 (dec), with reference to the
instruction manual of VDOT-AD2 Programmer. The address can be set
regardless of whether power supply from the control panel is turned on
or off. Refer to Figure 1.
ZETA ALARMS LIMITED
72-78 MORFA, ROAD, SWANSEA, SA1 2EN
http://www.velocitydetection.com
Do not use the products outside the rated power supply voltage range
specified in the Specifications. It may cause a fire or damage to
equipment.
CAUTION
!
Do not disassemble, repair, or modify the products. It may cause a fire or
electric shock.
CAUTION
!
Make sure to turn the power off before commencing any wiring work.
Otherwise it may cause electric shock or damage to equipment.
CAUTION
!
mm(in)
GLT-299-7-17 R ev.1
Jan 24, 2022
2
Note: After setting the address, cover the address setting port by using
the sealing label in order to prevent foreign material from entering the
product.
During setting address, the module does not respond to the control
panel.
Set the address of module according to Job data.
・Subtype Setting
Set the subtype depending on the wiring configuration as below. The
subtype is to be set through the Configurator for the control panel.
Sub
type
Input
Method
Open
-circuit
Detection
Short
-circuit
Detection
Class
(Style)
Interrupt
1 Normally
Open
Yes No Class B
Disabled
2 Enabled
3 Normally
Close
No Yes Class B
Disabled
4 Enabled
5 Normally
Open
Yes Yes Class B
Disabled
6 Enabled
When interrupt is enabled, it allows a high priority communication to
the control panel. The consumption current increases with this setting.
Note: Applicable subtype setting differs depending on control panels.
Subtype 1 to 6 can be used with the control panel complying with UL864
9th edition.
Subtype 5 and 6 can be used with the control panel complying with
UL864 10th edition.
Please contact Velocity customer service for any required details.
Wiring
All wiring must conform to applicable local codes, ordinances, and
regulations.
Install module wiring in accordance with the appropriate wiring
diagrams.
Do not connect cables in reverse polarity. Failure to connect the polarity
correctly could result in damage to the module and/or other equipment.
CAUTION
!
Refer to the figures below for wiring styles.
Note : All wiring is power-limited and supervised.
Note: The SLC (signaling line circuit) of VDOT-MiniIP supports Class A
and Class B wiring, and does not support Class X.
Class B (Short circuit detection is available)
EOL (10k ohm) is connected between A+ and A- in VDOT-MiniIP.
Dry contact is OFF.
Typical wiring for N/O contacts only
EOL
10kΩ
RED (L+)
BLACK (L-) ORANGE (A+)
GRAY (A-)
Loop
- +
TO NEXT
DEVICE
- +
Loop
FROM PANEL OR
PREVIOUS DEVICE
Figure 2
Class B (Short circuit detection is available)
EOL (10k ohm) is connected between A+ and A- in VDOT-MiniIP.
Dry contact is OFF.
*Two external inputs can be connected to one input line.
*Resistor of 2.2k ohms(VDOT-RE-2.2k)is an option and not included in
this product.
Figure 3
Normally Close Class B
Dry contact switch and EOL (10k ohm) are connected in series between
A+ and A- in VDOT-MiniIP.
Dry contact is ON.
*Only one external input can be connected to one input line.
Figure 4
Typical wiring for N/C contacts only
RED (L+)
BLACK (L-) ORANGE (A+)
GRAY (A-) EOL
10kΩ
Loop
- +
TO NEXT
DEVICE
- +
Loop
FROM PANEL OR
PREVIOUS DEVICE
Typical wiring for N/O contacts only
RED (L+)
BLACK (L-) ORANGE (A+)
GRAY (A-)
EOL
10kΩ
2.2kΩ2.2kΩ
Loop
- +
TO NEXT
DEVICE
- +
Loop
FROM PANEL OR
PREVIOUS DEVICE
GLT-299-7-17 R ev.1
Jan 24, 2022
3
Maintenance
Routine inspection: Ensure the module is secure and undamaged.
Operation Test
The purpose of the Operational Test is to confirm the product’s correct
operation.
1) When carrying out site testing of the product, the control panel
shall be set to “one-man-walk test mode” prior to the test.
2) Take any necessary precautions to limit the sounding of the alarm
sounders/bells and any fire service summoning device.
3) Turn on the external input connected to the module, and the module
will be in an active condition. Confirm that an active signal is
transmitted to the control panel.
Note: If the test cannot be carried out through the external input,
remove the wire connected to the external input, and test the area
between A+ and A- to check the module. (In accordance with subtype
setting, set the status either 0Ωshort (for subtype 1-2), 2.2kΩshort
(for subtype 5-6), or open (for subtype 3-4).)
4) After the external input has brought the module into the active
condition, reset the external input. Confirm that the module goes
back to the initial status after the external input is reset on the
control panel.
5) If subtype is set as 1 and 2, or 5 and 6, open between terminal A+
and A-, and confirm that the control panel detects the open circuit.
If subtype is set as 3-6, short between terminal A+ and A-, and
confirm that the control panel detects the short circuit.
FOR WARRANTY SERVICE, RETURN TO:
ZETA ALARMS LIMITED
72-78 MORFA ROAD, SWANSEA, SA1 2EN
http://www.zetaalarmsystems.com
Specifications
SLC (Signaling Line Circuit)
Applied Voltage
Rated Range 20 to 38VDC
SLC Current Consumption Standby 1.7mA
Activated 7.2mA (max)
SLC Line Impedance Up to 50 ohms
Number of IDC Circuit 1 x Class B
IDC Circuit Rating 15VDC, 2.2k ohms, 6.8mA(max)
IDC Line Impedance Up to 50 ohms
EOL Device VDOT-RE-10k (10k ohms, 1/4W)
2.2k ohms EOL required for each dry
contact switch in subtype setting 5
and 6
Ambient Installation
Temperature
0℃to 49℃(32°F to 120°F)
Storage Temperature -20℃to 60℃(-4°F to 140°F)
Max Relative Humidity Up to 93%RH,non-condensing
Environment Indoor dry use only
Maximum quantity per loop 127 units
Address Setting VDOT-AD2 Address Programmer
Dimensions 37.6mm H x 69.8mm W x 17.2mm D
(1.480’’ H x 2.748’’ W x 0.677’’ D)
Weight Approximately 34g (1.2oz)
Conformity UL864
GLT-299-7-17 R ev.1
Jan 24, 2022
4
Warranties
1.1 Zeta warrants to the customers that:
(a) all products supplied hereunder will be of merchantable quality
and will comply with any specification agreed between Zeta and
customer.
(b) it is not aware of any rights of any third party in the market which
would or might render the sale of the products, or the use of any of
the trade marks on or in products, or the use of any of the trade
marks on or in relation to the products, unlawful.
1.2 In the event of any breach of the Zeta’s warranty in Clause 1.1(a)
whether by reason of defective materials, production faults or
otherwise, Zeta’s liability shall be limited to:
(a) replacement of the products in question; or
(b) at the Zeta’s option, repayment of the price where this had been paid.
And the warranty period is three (3) years from the shipment from
Zeta’s factory.
1.3 Notwithstanding anything to the contrary in this warranty terms,
Zeta shall not be liable to the customer by reason of any
representation or implied warranty, condition or other term or any
duty at common law, or under the express terms of this warranty
terms, for any consequential loss or damage whether for loss of
profit or otherwise and whether occasioned by the negligence of Zeta
or its employees or agents or otherwise, arising out of or in
connection with any act or omission of Zeta relating to Zeta or
supply of the products, their use by any customer.
1.4 Customer shall indemnify Zeta against all loss, damages, liabilities,
costs and expenses which Zeta may suffer or incur as a result of or
in connection with any breach by customer of this warranties terms
or any laws or regulations of any jurisdiction or any rules of any
governing authorities.

Other Velocity Control Unit manuals

Velocity VDOT-DOP-AC240V-SCI User manual

Velocity

Velocity VDOT-DOP-AC240V-SCI User manual

Velocity VL-SLC User manual

Velocity

Velocity VL-SLC User manual

Velocity VDOT- SCI User manual

Velocity

Velocity VDOT- SCI User manual

Velocity VL-ZMB User manual

Velocity

Velocity VL-ZMB User manual

Velocity VDOT-ZMU-SCI User manual

Velocity

Velocity VDOT-ZMU-SCI User manual

Velocity VDOT-SCM-SCI User manual

Velocity

Velocity VDOT-SCM-SCI User manual

Popular Control Unit manuals by other brands

PANHANS Ultimo-Touch 300 Operation manual

PANHANS

PANHANS Ultimo-Touch 300 Operation manual

horsch AutoForce operating instructions

horsch

horsch AutoForce operating instructions

Baumuller BM4-O-IEI-01 operating instructions

Baumuller

Baumuller BM4-O-IEI-01 operating instructions

Flow-Tek M4 Series Installation & maintenance manual

Flow-Tek

Flow-Tek M4 Series Installation & maintenance manual

SOYO BT24G03 user manual

SOYO

SOYO BT24G03 user manual

StarTech.com BOX4MODULE quick start guide

StarTech.com

StarTech.com BOX4MODULE quick start guide

GEA VARIVENT Vacuum Valve V operating instructions

GEA

GEA VARIVENT Vacuum Valve V operating instructions

Acromag APMC4110 user manual

Acromag

Acromag APMC4110 user manual

ScanMeg SIM-P user manual

ScanMeg

ScanMeg SIM-P user manual

WAGO 750-564 manual

WAGO

WAGO 750-564 manual

Steca PR 2020 IP65 operating instructions

Steca

Steca PR 2020 IP65 operating instructions

Sonosax SX-RC8+ user manual

Sonosax

Sonosax SX-RC8+ user manual

ProSoft Technology inRAx MVI56-S3964R user manual

ProSoft Technology

ProSoft Technology inRAx MVI56-S3964R user manual

Ebyte E19-915M20S user manual

Ebyte

Ebyte E19-915M20S user manual

Zator MZF User and maintenance manual

Zator

Zator MZF User and maintenance manual

Sharp NU-JC415B installation manual

Sharp

Sharp NU-JC415B installation manual

Cleveland P-DR-CC Specifications

Cleveland

Cleveland P-DR-CC Specifications

Siemens OCC-1 installation instructions

Siemens

Siemens OCC-1 installation instructions

manuals.online logo
manuals.online logoBrands
  • About & Mission
  • Contact us
  • Privacy Policy
  • Terms and Conditions

Copyright 2025 Manuals.Online. All Rights Reserved.