Velp Scientifica OV 625 User manual

Instruction Manual
Manuale di istruzioni
Manuel d’instructions
Manual de instrucciones
Bedienungsanleitung
指导手册
OV 625 Digital Disperser
F20900470, F20910470
General Information / Informazioni Generali / Informations Générales / Información General / Allgemeine Hinweise / 一般信息
Before using the unit, please read the following instruction manual carefully.
Prima dell’utilizzo dello strumento, si raccomanda di leggere attentamente il seguente manuale operativo.
Avant d’utiliser l’instrument, il est recommandé de lire attentivement le présent manuel d’instructions.
Antes de utilizar el instrumento, le recomendamos que lea con atención el siguiente manual de funcionamiento.
Bitte lesen Sie vor Inbetriebnahme des Geräts diese Bedienungsanleitung sorgfältig durch
在使用本装置之前,请仔细阅读以下使用说明书。
Do not dispose of this equipment as urban waste, in accordance with EEC directive 2002/96/CE.
Non smaltire l’apparecchiatura come rifiuto urbano, secondo quanto previsto dalla Direttiva 2002/96/CE.
Ne pas recycler l’appareil comme déchet solide urbain, conformément à la Directive 2002/96/CE.
No tirar el aparato en los desechos urbanos, como exige la Directiva 2002/96/CE.
Dieses Gerät unterliegt der Richtlinie 2002/96/EG und darf nicht mit dem normalen Hausmüll entsorgt werden.
根据 EEC指令 2002/96/CE,请不要将本设备作为城市垃圾处理。
This unit must be used for indoor laboratory applications only. The manufacturer declines all responsibility for any use of the unit that
does not comply with these instructions. If the product is used in a way not specified by the manufacturer or with non-specified
accessories, the product's safety may be compromised.
Questo strumento deve essere utilizzato solo per applicazioni di laboratorio per uso interno. La società produttrice declina ogni
responsabilità sull’impiego non conforme alle istruzioni degli strumenti. Se il prodotto viene utilizzato in un modo non specificato o con
accessori non specificati dal costruttore stesso, la sicurezza del prodotto potrebbe essere compromessa.
Cet instrument ne peut être utilisé pour les applications de laboratoire à l'intérieur seulement. Le fabriquant décline toute
responsabilité en cas d’utilisation non conforme aux instructions concernant ces instruments. Si le produit est utilisé d'une manière non
spécifiée par le fabricant ou accessoires non spécifiés, la sécurité du produit peut être compromise.
Este dispositivo sólo debe utilizarse para aplicaciones de laboratorio para uso interno.
El fabricante declina toda responsabilidad por el uso no conforme a las instrucciones de los dispositivos. Si se utiliza el producto de una
manera no especificada o con accesorios no especificados de el fabricante, la seguridad del producto puede estar comprometida.
Dieses Gerät muss nur für Laboranwendungen verwendet werden. Der Hersteller lehnt jede Haftung für unsachgemäße Verwendung
oder Nichtbeachtung dieser Bedienungsanleitung ab. Wenn das Produkt in einer Weise verwendet wird, die nicht vom Hersteller oder mit
unsachgemäßer Zubehör angegeben , kann das Produkt die Sicherheit beeinträchtigt werden.
本装置必须只用于实验室的室内应用。制造商对任何不符合这些说明的使用不承担任何责任。如果该产品以制造商未指定的方式使用或使用
未指定的附件,产品的安全性可能受到影响。

This unit has been designed and manufactured in compliance with the following standards:
Lo strumento è stato progettato e costruito in accordo con le seguenti norme:
L’instrument a été conçu et fabriqué conformément aux normes suivantes:
El dispositivo se ha sido diseñado y fabricado de acuerdo con las siguientes normas:
Das Gerät wurde in Übereinstimmung mit folgenden Normen entwickelt und gebaut:
本装置的设计和制造符合以下标准。
Safety requirements for electrical equipment for measurement, control and for laboratory use
Prescrizioni di sicurezza per apparecchi elettrici di misura, controllo e per l’utilizzo in laboratorio
Règles de sécurité pour appareils électriques de mesurage, de régulation et de laboratoire
Prescripciones de seguridad para equipos eléctricos de medición, control y su uso en laboratorio
Sicherheitsbestimmungen für elektrische Mess-, Steuer-, Regel- und Laborgeräte
测量、控制和实验室用电气设备的安全要求
IEC/EN 61010-1
IEC/EN 61010-2-051
Electrical equipment for laboratory use
UL 61010-1
General requirement - Canadian electrical code
CAN/CSA-C22.2 No.61010-1
VELP reserves the right to modify the characteristics of its products with the aim to constantly improve their quality.
Nell’impegno di migliorare costantemente la qualità dei prodotti, VELP si riserva la facoltà di variarne le caratteristiche.
Dans le but d’améliorer constamment la qualité de ses produits, VELP se réserve le droit d’apporter des modifications aux
caractéristiques de ceux-ci.
VELP se reserva el derecho de modificar las características de sus productos con el objetivo de mejorar constantemente su calidad.
VELP behält sich zum Zwecke der ständigen Verbesserung der Produktqualität das Recht auf Änderung der Geräteeigenschaften vor.
VELP 保留修改其产品特性的权利,目的是不断提高其质量。
Safety Regulations / Norme di Sicurezza / Consignes de Securité / Advertencias de Seguridad / Sicherheitshinweise / 安全条例
The plug disconnects the instrument. Therefore, place the instrument where it can be quickly disconnected.
La spina è il mezzo di disconnessione dell’apparecchio. Pertanto, non posizionare l’apparecchio in modo che sia difficile azionare il mezzo
di disconnessione.
Le bouchon est le moyen de déconnexion de l'appareil. Par conséquent, placer l'appareil où il peut être rapidement débranché.
El tapón es el medio de desconexión del dispositivo. No coloque el dispositivo en una forma que es difícil de desconectar.
Der Stecker trennt das Gerät. Daher Stellen Sie das Instrument, wo es schnell getrennt werden kann.
该插头可以断开仪器的连接。因此,要把仪器放在可以快速断开的地方。
The values indicated on the rating plate of the instrument must correspond to those of the power supply.
I valori di tensione indicati sulla targhetta del modello e quelli della rete devono coincidere.
Les valeurs indiquées sur la plaque signalétique de l'appareil doivent correspondre à ceux de l'alimentation.
Los valores de tensión indicados en la placa y que de la red debe ser los mismos.
Die angegebene Spannung Wert auf dem Typenschild und das Netzwerk muss gleich sein.
仪表的铭牌上标明的数值必须与电源的数值一致。
Position the Double Rod Mini H-Stand Set (A00000383) on a flat, non-slip, dry and non-flammable surface at 30 cm (at least) from the
walls.
Posizionare il Mini H-Stand con doppia asta completo (A00000383) su una superficie piana, antiscivolo, asciutta e non infiammabile ad
una distanza dalle pareti di almeno 30 cm.
Positionner le support mini H (A00000383) sur une surface plat, antidérapant, sec et ininflammable avec une distance de la paroi de 30
cm (au moins).
Coloque el soporte Mini H (A00000383) sobre una superficie plana, antideslizante, seca y no inflamable con una distancia de la pared de
30 cm (por lo menos).
Stellen Sie der H-Stativ (A00000383) auf einer ebenen, rutschfesten, trockenen und nicht brennbaren Oberfläche auf Abstand zur Wand
von 30 cm (mindestens).
将双杆迷你 H 型支架套件 (A00000383) 放置在距离墙壁(至少)30 厘米的平坦、防滑、干燥且不易燃的表面上。
Fasten the unit to the Double Rod Mini H-Stand Set (A00000383). Secure the receptacle using the ribbon clamp.
Fissare saldamente lo strumento al Mini H-Stand con doppia asta completo (A00000383) e il recipiente di agitazione con l’apposita
cinghia.
Fixez l'unité à le statif (A00000383). Fixer le réceptacle à l'attache souple avec ruban.
Asegurar firmemente la herramienta a la barra de soporte (A00000383) y el recipiente con la abrazadera de cinta.
Befestigen Sie das Gerät an der H-Stativ (A00000383). Sichern Sie die Aufnahme mit der Spannhalter.
使用双夹子 将仪器固定在支撑杆(A00000383)上。用带状夹子 固定插座。
Safe working conditions are ensured only when the accessories described in the dedicated chapter are used. Read their instruction
manual carefully.
Il funzionamento sicuro è garantito soltanto con gli accessori descritti nel relativo capitolo. Leggere attentamente il relativo manuale di
istruzioni.
Conditions de travail sûres sont assurées que lorsque les accessoires décrits dans le chapitre dédié sont utilisés. Lisez attentivement
leurs instructions.
El funcionamiento es seguro sólo con los accesorios descritos en el capítulo correspondiente. Lea atentamente sus instrucciones.
Sichere Arbeitsbedingungen sind gewährleistet, wenn das Zubehör in dem Kapitel beschrieben verwendet werden. Lesen Sie ihre
Anweisungen sorgfältig durch.
只有在使用专用章节中描述的附件时,才能确保安全的工作条件。仔細閱讀他們的說明。

Do not use the device without a dispersing tool.
Il funzionamento dell'apparecchio senza utensile di dispersione non è consentito.
L’utilisation du disperseur sans outil dispersant n’est pas autorisée.
El aparato no puede utilizarse sin el útil de dispersión.
Betreiben Sie das Gerät nicht ohne Dispergierwerkzeug.
請勿使用沒有分散元件的設備。
Before installing the dispersing tools, disconnect the plug from the power supply.
Prima di installare gli utensili di dispersione, scollegare la spina della rete di alimentazione.
Avant d'installer les outils de dispersion, débranchez la fiche de l'alimentation électrique.
Antes de instalar las herramientas de dispersión, desconecte el enchufe de la fuente de alimentación.
Bevor Sie die Dispergierwerkzeuge installieren, ziehen Sie den Stecker aus der Steckdose.
安裝分散工具之前,请拔下电源插头。
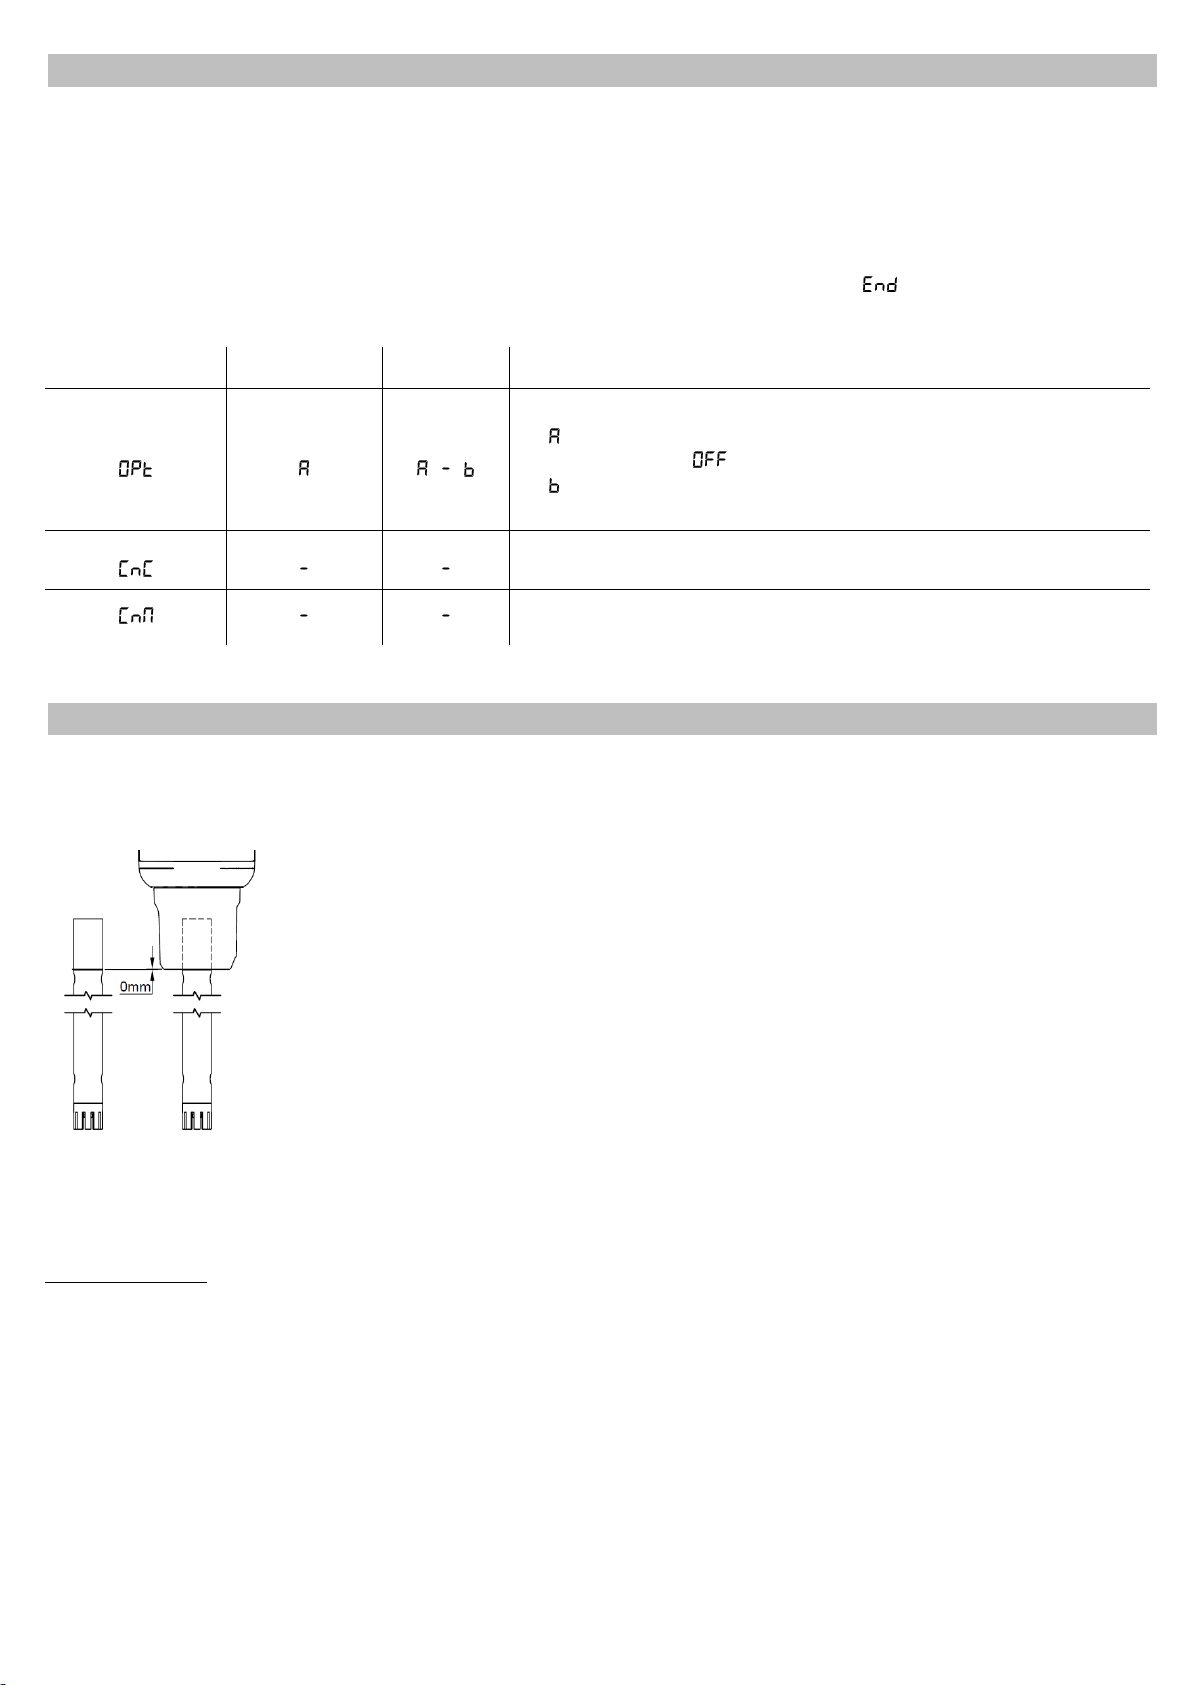
It is dangerous to run the unit with the dispersing blade turning in free air. Always place the dispersing shaft in the receptacle before
turning the unit on.
Il funzionamento dello strumento con estremità dell’utensile in rotazione libera è pericoloso. Per ragioni di sicurezza, quindi, inserire
l’utensile di dispersione nel recipiente di agitazione prima di avviare lo strumento.
Il est dangereux de faire fonctionner l'unité avec la lame d'agitation tournant à l'air libre. Toujours placer la tige d'agitation dans le récipient
avant de mettre l'appareil en marche.
Es peligroso ejecutar la unidad con la paleta de agitación en el aire libre. Coloque siempre la varilla de agitación en el recipiente antes de
encender la unidad.
Es ist gefährlich, das Gerät mit dem Rührklinge Drehen in freier Luft laufen. Legen Sie immer die Rührwelle in der Aufnahme, bevor Sie
das Gerät einschalten.
在自由空气中转动搅拌叶片的情况下运行设备是很危险的。在打开设备之前,一定要把搅拌轴放在容器中。
Never use the dispersing tool dry because tools used without coolant will destroy the gasket.
Non impiegare mai l'utensile di dispersione a secco perché gli utensili impiegati senza liquido di raffreddamento distruggerebbero la
guarnizione.
Ne jamais utiliser l'outil de dispersion à sec car les outils utilisés sans liquide de refroidissement détruiraient le joint.
Nunca use la herramienta de dispersión en seco porque las herramientas usadas sin refrigerante destruirán la junta.
Verwenden Sie das Dispergierwerkzeug niemals trocken, da Werkzeuge ohne Kühlmittel die Dichtung zerstören.
切勿在乾燥狀態下使用分散工具,因為在沒有冷卻劑的情況下使用的工具會損壞墊圈。
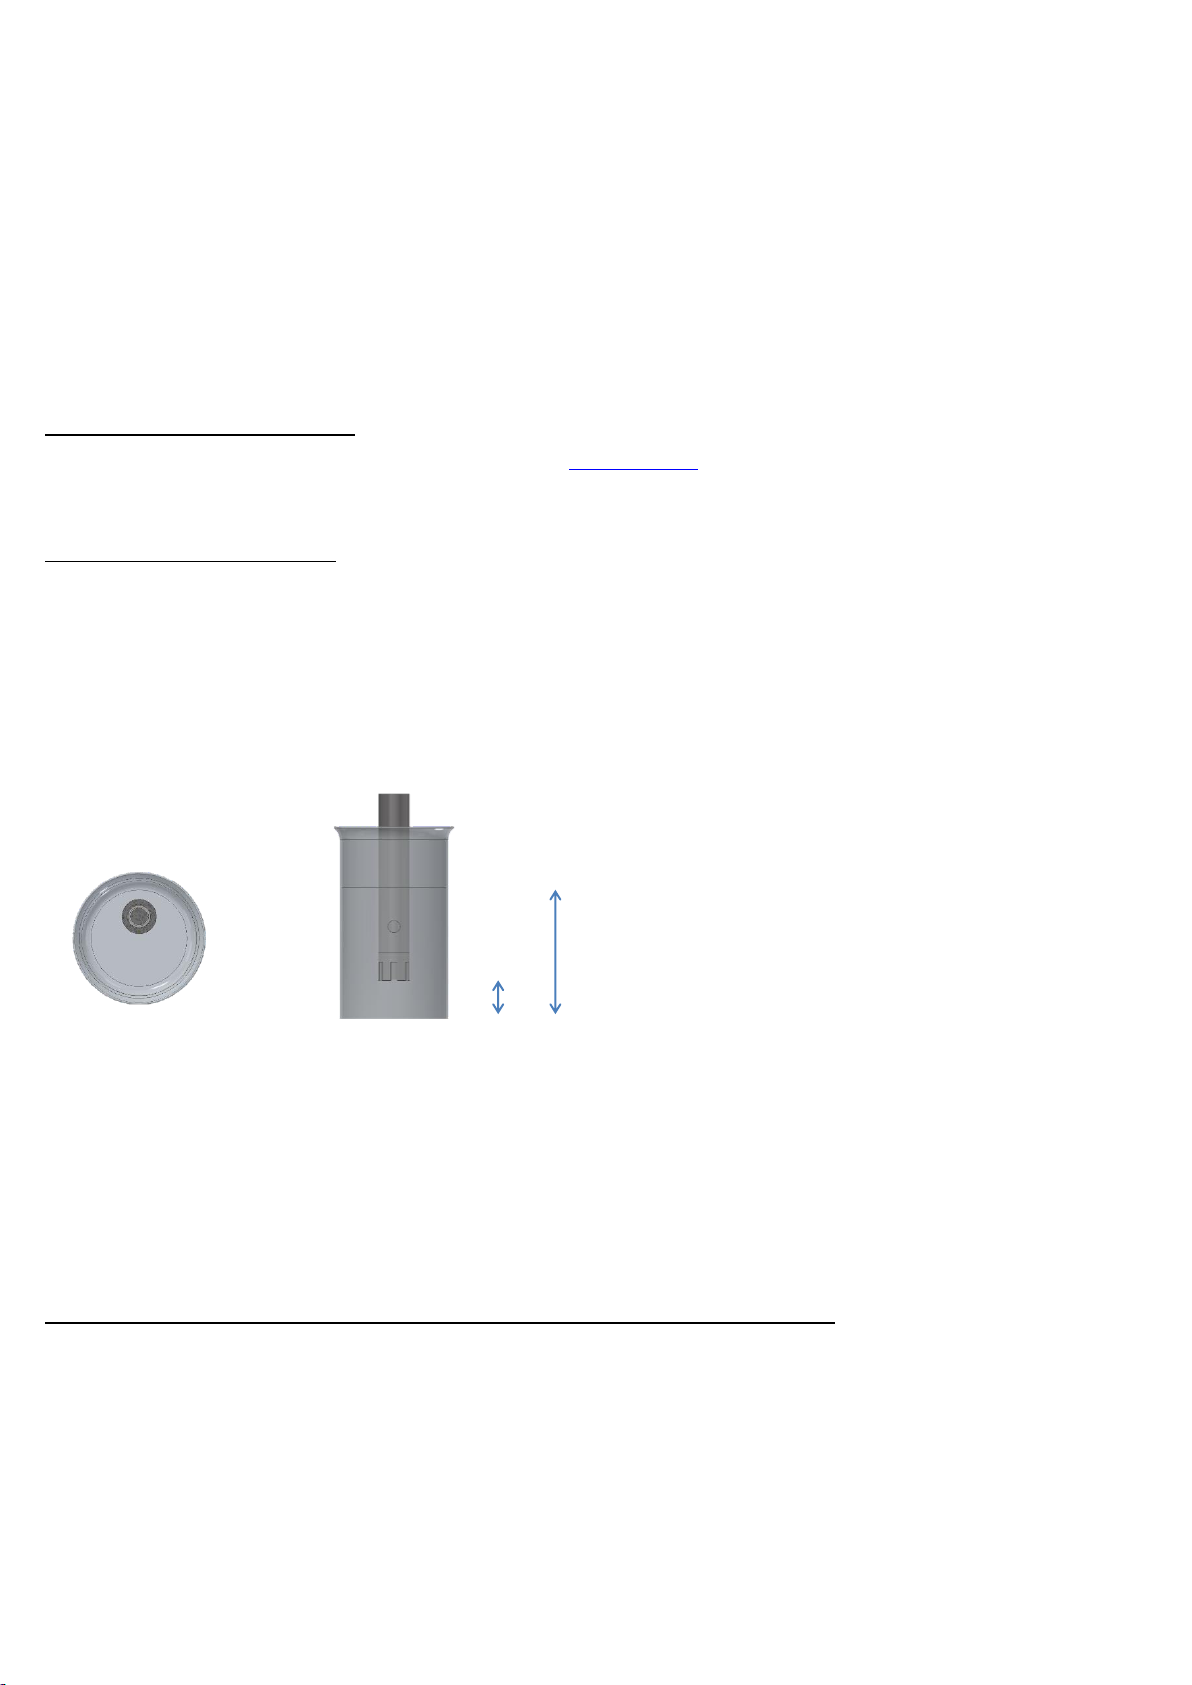
The working speed set on the instrument must be such as to avoid wobbling and/or splashes.
Il numero di giri impostato deve escludere eventuali squilibri del dispersore e possibili spruzzi del prodotto agitato.
Le nombre de tours de l'ensemble agitateur doit exclure les déséquilibres et les éclaboussures du produit agité.
El número de revoluciones del agitador debe excluir cualquier desequilibrio y posible de salpicar de el producto agitado.
Die Arbeitsgeschwindigkeit des Gerätes muss gesetzt sein, wie Wackeln und / oder Spritzer zu vermeiden.
仪器上设定的工作速度必须能够避免摇晃和/或飞溅。
If the noise and vibration of the instrument increase significantly (resonance), change the speed setpoint quickly. This is a physical
phenomenon that depends on the configuration in which the disperser operates (dispersing tool, sample type, volume and speed). If this
condition persists, check the wear of the dispersing tool.
Se il rumore e le vibrazioni dello strumento aumentano significativamente (risonanza), cambiare velocemente la velocità impostata.
Questo è un fenomeno fisico che dipende dalla configurazione in cui opera il dispersore (utensile di dispersione, tipologia di campione,
volume e velocità). Se questa condizione persiste, verificare l’usura dell’utensile di dispersione.
Si le bruit et les vibrations de l'instrument augmentent de manière significative (résonance), modifiez rapidement la vitesse. Il s'agit d'un
phénomène physique qui dépend de la configuration dans laquelle opère le disperseur (outil de dispersion, type d'échantillon, volume et
vitesse). Si cette condition persiste, vérifier l'usure de l'outil de dispersion.
Si el ruido y la vibración del instrumento aumentan significativamente (resonancia), cambie el punto de ajuste de velocidad rápidamente.
Este es un fenómeno físico que depende de la configuración en la que opera el dispersor (herramienta de dispersión, tipo de muestra,
volumen y velocidad). Si esta condición persiste, verifique el desgaste de la herramienta de dispersión.
Wenn die Geräusche und Vibrationen des Instruments stark zunehmen (Resonanz), ändern Sie schnell den Geschwindigkeitssollwert.
Dies ist ein physikalisches Phänomen, das von der Konfiguration abhängt, in der der Dispergierer arbeitet (Dispergierwerkzeug,
Probentyp, Volumen und Geschwindigkeit). Wenn dieser Zustand weiterhin besteht, überprüfen Sie den Verschleiß des
Dispergierwerkzeugs.
如果仪器的噪音和振动显著增加(共振),请立即改变速度设置,这是一种物理现象,取决于分散器运行的配置(分散工具、样品类型、体
积和速度)。 如果这种情况持续存在,请检查分散工具的磨损情况
Do not use with explosive or dangerous materials for which the equipment is not designed. The disperser must not be used in explosive
atmospheres, in bain-marie or to stir harmful liquids prior using protective measures according to the safety standards of the processed
products and/or in force in the laboratories including personal protective equipment and the presence of an extraction hood which ensures
at least 10-fold air change in accordance with the standards EN 14175 and DIN 12924.
Vietato l’uso con materiale esplosivo o pericoloso per cui l’apparecchio non è progettato. Il dispersore non può essere impiegato in
atmosfere esplosive, a bagnomaria o per agitare liquidi pericolosi previo utilizzo di misure di protezione in accordo con le norme di
sicurezza dei prodotti in lavorazione e/o vigenti nei laboratori, compresi dispositivi di protezione individuale e la presenza di una cappa
aspirante che garantisca almeno 10 ricambi di aria in accordo con le norme EN 14175 e DIN 12924.
Ne pas utiliser avec des matières explosives et dangereuses pour lesquelles l'équipement n'est pas conçu. L'agitateur ne doit pas être
utilisé dans des atmosphères explosives, au bain-marie ou pour remuer des liquides nocifs avant l'utilisation de mesures de protection
selon les normes de sécurité des produits transformés et / ou en vigueur dans les laboratoires, y compris les équipements de protection

individuelle et la présence d'une extraction hotte assurant un renouvellement d'air d'au moins 10 fois conformément aux normes EN
14175 et DIN 12924.
No debe utilizarse con materiales explosivos y peligrosos para los que el equipo no está diseñado. El agitador no se debe usar en
atmósferas explosivas, en baño de maría o para agitar líquidos dañinos antes de usar medidas de protección de acuerdo con las normas
de seguridad de los productos procesados y / o vigentes en los laboratorios, incluido el equipo de protección personal y la presencia de
una extracción. Capucha que garantiza un cambio de aire de al menos 10 veces de acuerdo con las normas EN 14175 y DIN 12924.
Nicht mit explosivem Material zu verwenden, für die das Gerät nicht ausgelegt ist. Das Gerät kann nicht in explosionsgefährdeten
Bereichen eingesetzt werden, in einem Wasserbad oder zum Umrühren von schädlichen Flüssigkeiten verwendet werden, bevor
Schutzmaßnahmen gemäß den Sicherheitsnormen der verarbeiteten Produkte durchgeführt werden und / oder in den Laboratorien
einschließlich der persönlichen Schutzausrüstung und dem Vorhandensein einer Extraktion in Kraft sind Haube, die einen mindestens 10-
fachen Luftwechsel gemäß den Normen EN 14175 und DIN 12924 gewährleistet.
请勿将本设备用于非设计的爆炸性或危险材料。搅拌器不得在爆炸性环境中使用,不得在蒸馏器中使用,也不得用于搅拌有害液体,之前应
根据加工产品的安全标准和/或实验室的现行标准采取保护措施,包括个人防护设备和确保至少 10 倍换气量的抽气罩,符合 EN 14175 和
DIN 12924 标准的要求。
It is responsibility of the user appropriately decontaminate the instrument in case of dangerous substances fall on or in it.
It is also responsibility of the user to use safe substances for cleaning or decontaminating, which do not react with internal parts of the
instrument or with the material contained in it. In case of doubts on the compatibility of a cleaning solution, contact the manufacturer or
local distributor.
È responsabilità dell’utilizzatore un’appropriata decontaminazione in caso di versamento di sostanze pericolose sul o dentro
l’apparecchio. È inoltre responsabilità dell’utilizzatore l’uso di sostanze decontaminanti o per la pulizia che non producano pericolo a
causa di reazioni con parti dell’apparecchio o con il materiale in esso contenuto. In caso di dubbio sulla compatibilità di un agente pulente
o decontaminante, contattare il produttore o un distributore locale.
Est responsabilité de l'utilisateur la décontamination en cas de déversement de matières dangereuses sur ou à l'intérieur de l'équipement.
Est responsabilité de l'utilisateur à utiliser des substances qui ne produisent pas de danger pour le nettoyage ou de décontamination, qui
ne réagissent pas avec les parties internes de l'appareil ou avec la matière qu'il contient. En cas de doute sur la compatibilité d'une
solution de nettoyage, contactez le fabricant ou le distributeur local.
Es responsabilidad del usuario una descontaminación adecuada en caso de derrame de sustancias peligrosas en o dentro el equipo. Es
responsabilidad del usuario también utilizar sustancias que no producen peligro para limpiar o descontaminar, que no reaccionan con las
partes internas del instrumento o con el material contenido en él. En caso de duda sobre la compatibilidad de una solución de limpieza,
póngase en contacto con el fabricante o el distribuidor local.
Der Benutzer ist dafür verantwortlich, für die ordnungsgemäße Dekontamination beim Freiwerden gefährlicher Stoffe auf oder im Inneren
des Geräts. Der Benutzer ist dafür verantwortlich, für die Reinigung oder Dekontaminierungsmitteln, die nicht mit internen Teile des
Gerätes oder mit dem Material in ihm enthaltenen reagieren. Im Zweifelsfall über die Vereinbarkeit einer Reinigungslösung den Hersteller,
den Vertreiber oder den Händler.
如果有危险物质落在仪器上或里面,用户有责任对仪器进行适当的净化。
用户也有责任使用安全的物质进行清洁或去污,这些物质不会与仪器的内部零件或其中的材料发生反应。如果对清洁液的兼容性有疑问,请
联系制造商或当地经销商。
The solution may release toxic, dangerous or poisonous gases. Adequate safety measures must be taken, in accordance with the safety
regulations in force, including the presence of hood and personal protective equipment (masks, gloves, goggles, etc.).
Le sostanze potrebbero emanare gas tossici e/o pericolosi e/o velenosi. Adeguate misure di sicurezza devono essere prese, in accordo
con le normative di sicurezza dei prodotti in lavorazione e/o vigenti nei laboratori, compresa la presenza di cappe aspiranti e mezzi di
protezione individuale (maschere, guanti, occhiali, camici, ecc.).
La solution peut libérer gaz toxiques ou dangereux. Des mesures de sécurité adéquates doivent être prises, en conformité avec les
règlements de sécurité en vigueur, compris la présence de la hotte de laboratoire et équipements de protection individuelle (masques,
gants, lunettes, etc.).
Las sustancias pueden emitir tóxicos o peligrosos gas. Medidas de seguridad adecuadas deben ser adoptadas, de acuerdo con las
normas de seguridad vigentes en los laboratorios, incluyendo la presencia de la campana de humos y el equipo de protección personal
(mascarillas, guantes, gafas, etc.)
Die erwärmte Lösung kann giftige oder gefährliche Gase freigeben. Angemessene Sicherheitsmaßnahmen zu treffen, werden in
Übereinstimmung mit den geltenden Sicherheitsvorschriften, einschließlich der Anwesenheit Dunstabzug und persönliche
Schutzausrüstungen (Masken, Handschuhe, Schutzbrille, etc.).
溶液可能会释放出有毒、危险或有毒的气体。必须按照现行的安全规定采取适当的安全措施,包括配备头罩和个人防护设备(口罩、手套、
护目镜等)。

Contents / Indice / Index / Índice / Inhalt / 内容
1. INTRODUCTION.............................................................................................................................................................. 7
2. ASSEMBLY AND INSTALLATION................................................................................................................................... 8
3. OPERATION .................................................................................................................................................................... 8
4. SETTING MODE.............................................................................................................................................................. 9
5. DISPERSING TOOLS...................................................................................................................................................... 9
6. ERROR AND WARNING MESSAGES.......................................................................................................................... 11
7. MAINTENANCE AND CLEANING................................................................................................................................. 11
8. TECHNICAL DATA ........................................................................................................................................................ 12
9. ACCESSORIES / SPARE PARTS................................................................................................................................. 12
1. INTRODUZIONE............................................................................................................................................................ 13
2. MONTAGGIO ED INSTALLAZIONE.............................................................................................................................. 14
3. FUNZIONAMENTO........................................................................................................................................................ 14
4. MODALITÀ IMPOSTAZIONE PARAMETRI................................................................................................................... 14
5. UTENSILI DI DISPERSIONE......................................................................................................................................... 15
6. MESSAGGI DI ERRORE E ATTENZIONE.................................................................................................................... 17
7. MANUTENZIONE E PULIZIA ........................................................................................................................................ 17
8. CARATTERISTICHE TECNICHE .................................................................................................................................. 18
9. ACCESSORI / RICAMBI................................................................................................................................................ 18
1. INTRODUCTION............................................................................................................................................................ 19
2. MONTAGE ET INSTALLATION..................................................................................................................................... 20
3. CONTROLES DU FONCTIONNEMENT........................................................................................................................ 20
4. MODE DE CONFIGURATION DES PARAMÈTRES..................................................................................................... 20
5. OUTILS DE DISPERSION............................................................................................................................................. 21
6. MESSAGES D’ERREUR ET D'AVERTISSEMENT....................................................................................................... 23
7. ENTRETIEN ET NETTOYAGE...................................................................................................................................... 23
8. CARACTERISTIQUES TECHNIQUES.......................................................................................................................... 24
9. ACCESSOIRES / PIÈCES DE RECHANGE.................................................................................................................. 24
1. INTRODUCCIÓN ........................................................................................................................................................... 25
2. MONTAJE E INSTALACIÓN.......................................................................................................................................... 26
3. LABORAL....................................................................................................................................................................... 26
4. MODOS DE AJUSTE..................................................................................................................................................... 26
5. HERRAMIENTAS DE DISPERSIÓN ............................................................................................................................. 27
6. MENSAJES DE ERROR Y ADVERTENCIA.................................................................................................................. 29
7. MANTENIMIENTO Y LIMPIEZA .................................................................................................................................... 29
8. DATOS TÉCNICOS ....................................................................................................................................................... 30
9. ACCESORIOS / REPUESTOS...................................................................................................................................... 30
1. EINLEITUNG.................................................................................................................................................................. 31
2. MONTAGE UND INSTALLATION.................................................................................................................................. 32
3. BEDIENELEMENTE....................................................................................................................................................... 32
4. PARAMETEREINSTELLUNG........................................................................................................................................ 32
5. DISPERGIERWERKZEUGE.......................................................................................................................................... 33
6. FEHLERCODE............................................................................................................................................................... 35
7. WARTUNG UND REINIGUNG ...................................................................................................................................... 35
8. TECHNISCHE MERK..................................................................................................................................................... 36
9. ZUBEHÖR / ERSATZTEILE .......................................................................................................................................... 36

1. 介绍................................................................................................................................................................................ 37
2. 装配和安装 ..................................................................................................................................................................... 38
3. 工作 ................................................................................................................................................................................ 38
4. 设置模式 ......................................................................................................................................................................... 39
5. 分散工具 ......................................................................................................................................................................... 39
6. 错误讯............................................................................................................................................................................. 41
7. 维护和清洁 ..................................................................................................................................................................... 42
8 技术数据 ......................................................................................................................................................................... 42
9 附件 / 备件...................................................................................................................................................................... 43
10. WIRING DIAGRAM / SCHEMA ELETTRICO / SCHEMA ELECTRIQUE / ESQUEMA ELECTRICO / SCHALTPLAN / 接
线图 ................................................................................................................................................................................ 44
11. DECLARATION OF CONFORMITY / DICHIARAZIONE DI CONFORMITA / DECLARATION DE CONFORMITE /
DECLARACIÓN DE CONFORMIDAD / KONFORMITÄTSERKLÄRUNG / 符合性声明 ..................................... 45
12. DECLARATION OF CONFORMITY ........................................................................................................................ 46

7
1. Introduction
The OV 625 Digital Disperser, equipped with electronic speed control system and brushed motor, it is the ideal solution for
dispersing, homogenizing, mixing and crushing samples of biological materials (cells, animal and plant tissues),
pharmaceutical, cosmetic and food products.
The term dispersion means the subdivision and distribution of a solid or fluid in a liquid phase that is not completely miscible
with the other phase.
The dispersing tool is mainly composed of the rotor and the stator. The high number of revolutions of the rotor allow the tool
to axially sucks the sample into the dispersion head and then push it radially through the slots between the rotor and the
stator. Normally, the processing time is a few minutes to obtain the desired fineness, longer processing times only slightly
improve the fineness of the sample but significantly increase its temperature.
Description
Function
A
OV 625 Digital
D20 Drive unit
B
Dispersing tool fixing knob
To fix the dispersing tool into disperser
C
Mini H stand
To fix the disperser
D
Fixing clamp
To fix the receptacle with the sample
E
Main switch
To turn the disperser on
F
Control knob
Rotate to start/stop the dispersing process, adjust the speed
G
3-digit LED display
To show the speed value (÷ 1000 rpm)
EN
G
E
F
B
C
B
D
A

8
2. Assembly and installation
•Unpacking
➢Check the integrity of the unit after unpacking.
•The box includes
➢OV625 Digital disperser (A)
➢Tool disassembly kit
➢Instruction manual
➢Allen key and allen head screw
➢Support shaft
•Installation
➢Place the Mini H stand (C) (accessory) on a surface as described on safety regulations
➢Fix the support shaft to the instrument with the allen head screw
➢Firmly fix the instrument to the Mini H stand (C)
➢Secure the receptacle with the sample using the fixing clamp (D) supplied to the Mini H stand.
➢Slide the dispersing tool (accessory) into the head of the disperser up to the stop and tight it with the knob (B)
➢Place the dispersing tool into the sample as indicated in Chapter 5
➢Make sure that the rating value of the instrument corresponds to the one of the power supply
➢Ensure that the socket provided, with grounding, is compliant with the current safety norms and easy to reach.
IMPORTANT NOTE
➢Check that the support shaft is firmly seated. The vibrations may loosen the allen head screw, for safety reasons, be
sure to tighten it periodically.
➢Check that the disperser is securely mounted in position before use and at regular periods. The position of disperser
can only be changed if the instrument is turned off and disconnected from the power supply
3. Operation
•Power-up
➢Turn the instrument on through the main switch (E)
➢The display (G) shows the software version, the last setpoint value and (if “ ” is set on , see Chapter 0)
•Dispersing
➢Turn the speed control knob (F) to set the speed and start the dispersing process
➢Speed increases until set point achievement
➢A microprocessor ensures constant speed even when the viscosity changes (SpeedServo)
➢Stop the process by turning the control knob to 0 (F)

9
4. Setting mode
Turn on the instrument using the main switch (E); while the software version is displayed, by turning the speed knob (F) from
minimum to maximum at least two times, the hidden parameters are shown.
Rotate the speed knob to scroll through the different menus available.
If the knob is not moved for 2 seconds, the display shows the current value of the selected menu for 5 seconds and then
goes back, showing the name of the menu if the knob is not turned. For parameters with the possibility of modification, if the
knob is turned (the set LED lights up to indicate that the parameter is being modified), the display shows the parameter
values proportionally to the position of the knob.
The new value is saved if you do not turn the speed knob for 4 seconds, the display shows “ ” (lighting off the Set led) for
2 seconds before coming back to show the name of the menu.
5. Dispersing tools
Insertion of the dispersing tool into the disperser
Unscrew the knob (B) until its head is no more visible through the hole. Slide the dispersing tool from the bottom into the
disperser, up to the stop. The dispersing tool enters with an audible click if you insert it with enough force. It’s fitted correctly
when the notch on the dispersing tool is aligned with the bottom of the disperser.
Now fix the dispersing tool by tighten the knob (B).
Note: before turning on the unit, make sure that the dispersing tool is inserted in the liquid and that the receptacle is well
fixed with the clamp (D).
ABBREVIATIONS
All D20 series tools are allowed (it means with a 20mm diameter head disperser as attachment).
Material: stainless steel AISI 316L.
Head of disperser:
D20 For drive unit with a head of 20mm as diameter
Diameter and type of stator:
S20C Coarse stator diam. 20 mm
S20F Fine stator diam. 20 mm
S25C Coarse stator diam. 25 mm
S25F Fine stator diam. 25 mm
S40C Coarse stator diam. 40 mm (only for mixtures up to 20.000 rpm)
Parameter
Default value
Range
Description
Set starting mode:
➢: when the instrument is switched on through the main switch, its
working state is
➢: when the instrument is switched on through the main switch, it
restarts to work with the last speed set.
Operating time of brushes in hours. If “˙” is shown in the number, the
running time is in days.
Operating time of motor in hours. If “˙” is shown in the number, the
running time is in days.

10
Type of gasket:
P PTFE
Diameter and type of rotor:
R20S Standard rotor diam. 20 mm
R20C Caorse rotor diam. 20 mm
R20E Emulsifying rotor diam. 20 mm
R20M Mixing rotor diam. 20 mm
R25C Caorse rotor diam. 25 mm
R25E Emulsifying rotor diam. 25 mm
R25M Mixing rotor diam. 25 mm
Example of dispersing tool configuration
D20-S20C-P-R20S Velp code: A00000478
AVAILABLE DISPERSING TOOLS
See all dispersing tools (accessories) in Chapter 9 or go to www.velp.com.
Use only the original Velp Scientifica dispersing tools after reading their instruction manual with more information about
applications and technical data.
TO OBTAIN BETTER RESULTS
Diameter of the receptacle with the sample
It is better to disperse using a container slightly larger than the dispersing tool in order to obtain a faster and more
homogeneous solution.
This will prevent part of the sample from remaining on the walls of the container and therefore not being homogenized.
Keep in mind that the insertion of the tool into the receptacle causes the liquid level to rise.
Position of the dispersing tool
•Place the dispersing tool not in the middle of the receptacle (Figure 1)
•Place the dispersing tool about 1/3 of the sample height from the bottom of the receptacle (Figure 2).
Figure 1 Figure 2
If you use a dispersing tool that is too large for the sample amount, it could suck air.
Dispersing speed
Always start at a low speed, then gradually increase it. This allows to keep control of the process.
Normally the dispersion occurs in 30 –60 seconds, if this does not happen, check:
•The dispersing tool position in the container
•If the sample is too viscous
•Incorrect dispersing tool for the sample (size, type)
TO NOT REDUCE THE LIFETIME OF THE DISPERSING TOOL AND THE DISPERSER
Never run the dispersing tool without liquid
The dispersing tool requires a liquid sample to lubricate the gasket during machining.
A PTFE gasket is placed between the rotor and stator to prevent the rotor from bending or moving inside the tool. The
gasket must be immersed in the liquid sample, otherwise it will burn causing overheating and subsequent damage to the
sample and the dispersing tool.
Without the liquid, the PTFE gasket can burn causing damage to the tool and the disperser.
Cleaning and maintenance of dispersing tool
It’s necessary to disassemble and wash the dispersing tool after each use, checking the good condition of the gasket and
the metal parts and replacing them if necessary. The PTFE gasket is naturally subjected to wear because of the friction with
the rotating elements of the tool; therefore it’s necessary to periodically replace it in order to guarantee the correct operation
of the tool and the dispersing instrument.
H (Sample)
H/3

11
Replace the PTFE gasket if the following conditions occur:
•Visible wear of the component (e.g. deformations, thinning),
•Unusual noise and vibration during the operation of the dispersing instrument,
•When the space between the gasket and the internal and external metal parts is excessive.
To disassemble the dispersing tool, use the appropriate tool disassembly kit supplied with the drive unit and read the
instruction manual supplied with each tool.
6. Error and warning messages
When the display shows an error message, the motor stops automatically. To restore the functionality of the instrument,
proceed as follows:
•Turn the unit off using the main switch
•Use the suggestions described in the column “Solution”
•Turn the unit on
Code
Cause
Solution
The motor doesn’t start or doesn’t
reach the set speed
•Check that there aren’t locks in the dispersing tool or structure
•Check the operating time of the motor and brushes (chapter 0)
High internal motor temperature
•Check that there aren’t obstructions on the air vents for internal
ventilation
•Check that there aren’t locks in the dispersing tool or structure
•Reduce speed or load
Motor overload
•Check that there aren’t obstructions on the air vents for internal
ventilation.
•Check that there aren’t locks in the dispersing tool or structure
•Reduce speed or load
Problem on the main board
•Contact VELP Scientifica’s technical service department
Speed variation too high
•Check that there are no locks in the dispersing tool or structure
•Check the operating time of the motor and brushes (chapter 0)
Blackout or plug inserted with the
main switch in position I
•Enter the plug when the main switch is in position 0
If an error persists on the display, please contact VELP Scientifica’s technical service department.
7. Maintenance and cleaning
No routine or extraordinary maintenance is necessary for the unit. The maintenance is foreseen only on the dispersing tools
as described in Chapter 5.
Cleaning
Disconnect the unit from the power supply and use a cloth dampened with a non-flammable non-aggressive detergent.
During cleaning operations, prevent water and humidity residues from entering the unit.
Repair
Repairs must be carried out by authorized Velp personnel only.
The transport of the instrument by freight forwarders, couriers or others must be carried out using the original shockproof
packaging. Follow any instructions on the original packaging (e.g., palletizing).
It is the responsibility of the user to properly decontaminate the unit in case of hazardous substances remaining on the
surface or interior of the device. If in doubt about the compatibility of a cleaning or decontamination product, contact the
manufacturer or distributor.

12
8. Technical data
Models
F20900470
F20910470
General
Voltage
230 V / 50-60 Hz (+/- 10%)
115V / 60 Hz (+/- 10%)
Dimensions (WXHXD):
92x280x130 mm (3,6x11x5,1 in)
Weight
2,4 kg (5,3 lb)
Power consumption
800 W
Construction materials
Aluminum - Technopolymer
Noise (without element)
75 dBa
Environmental temperature admitted
+5…+40 °C
Storage temperature admitted
-10…+60 °C
Max humidity
80%
Overvoltage category
II
Pollution degree CEI EN61010-1
2
Max altitude
4000 m
Dispersing
Volume range
0,2 ml –2,5 l H2O
Programmable speed range
3000 –25000 rpm (200 rpm step)
(at nominal voltage 230V / 50Hz and 115V / 60 Hz)
Motor type
BAC
Speed resolution
200 rpm step
Motor rating output
500 W
Maximum viscosity
5000 mPa s
Safety
Alarm if dispersing tool is not present
No
Alarm inside overtemperature
Yes
Alarm if motor can’t start or not reach
the speed set
Yes
Counters
Motor counter
Hours or days of working
Brushes counter
Hours or days of working
9. Accessories / Spare parts
A00000478 D20-S20C-P-R20S Dispersing tool
A00000462 D20-S20F-P-R20C Dispersing tool
A00000463 D20-S20F-P-R20E Dispersing tool
A00000464 D20-S20F-P-R20M Dispersing tool
A00000479 D20-S25C-P-R25C Dispersing tool
A00000480 D20-S25F-P-R25E Dispersing tool
A00000469 D20-S25F-P-R25M Dispersing tool
A00000472 D20-S40C-P-R25C Dispersing tool
A00000473 D20-S5S-P-R5S Dispersing tool
A00000383 Double Rod Mini H-Stand Set
10007258 Knob 35D blue with notch
40003238 Tool disassembly kit D20

13
1. Introduzione
Il Dispersore OV 625 Digital, dotato di controllo elettronico della velocità e motore a spazzole, è la soluzione ideale per
disperdere, omogeneizzare, miscelare e frantumare campioni di materiali biologici (cellule, tessuti animali e vegetali) e di
prodotti farmaceutici, cosmetici ed alimentari.
Il termine dispersione significa suddivisione e distribuzione di una fase solida o fluida in un liquido non completamente
miscibile con questa.
L’utensile di dispersione è formato da rotore e statore. L’elevato numero di giri del rotore permette all’utensile di aspirare
assialmente il campione nella testa di dispersione e spingerlo radialmente attraverso le fessure di rotore e statore.
Normalmente, il tempo di lavorazione è di pochi minuti per ottenere la finezza desiderata. Tempi di lavorazioni più lunghi
migliorano di poco la finezza del campione, ma ne causano un significativo aumento di temperatura.
Descrizione
Funzione
A
OV 625 Digital
Unità motrice D20
B
Manopola di fissaggio utensile
Fissa l’utensile di dispersione al dispersore
C
Mini H stand
Fissa saldamente il dispersore
D
Pinza a nastro con velcro
Fissa il recipiente di agitazione contenete il campione
E
Interruttore generale
Alimenta il dispersore
F
Manopola velocità
Avvia/arresta la funzione di dispersione, regola la velocità
G
Display LED 3 cifre
Visualizza il valore della velocità (÷ 1000 rpm)
IT
B
C
B
D
A
G
E
F

14
2. Montaggio ed installazione
•Rimozione dall’imballo
➢Controllare l’integrità dello strumento dopo aver rimosso l’imballo
•La scatola include
➢Dispersore OV 625 Digital (A)
➢Kit smontaggio utensile
➢Manuale di istruzioni
➢Chiave esagonale e vite testa esagono incassato
➢Asta di sostegno
•Installazione
➢Posizionare il Mini H-stand (C) (accessorio), su una superficie come descritto nelle prescrizioni di sicurezza.
➢Fissare l’asta di sostegno allo strumento mediante l’apposita vite ad esagono incassato.
➢Fissare saldamente lo strumento al Mini H stand (C)
➢Fissare il recipiente di agitazione contenete il campione utilizzando la pinza a nastro con velcro (D) in dotazione al
Mini H stand.
➢Inserire nella testata del dispersore l’utensile di dispersione (non fornito con lo strumento) fino in battuta ed
assicurarlo con l’apposita manopola (B).
➢Inserire l’utensile di dispersione nel campione come indicato nel capitolo 5
➢Assicurarsi che il valore di tensione di alimentazione dello strumento corrisponda al valore di tensione di rete.
➢Assicurarsi che la presa di corrente fornita sia conforme alle norme di sicurezza e facilmente raggiungibile.
NOTA IMPORTANTE
➢Verificare che l’asta di sostegno sia saldamente alloggiata. Le vibrazioni potrebbero causare un allentamento della
vite con esagono incassato, pertanto controllare per sicurezza, di tanto in tanto, il serraggio della stessa in modo da
garantire l'utilizzo sicuro dello strumento.
➢Verificare, prima dell’utilizzo e ad intervalli periodici, che lo strumento sia montato saldamente in posizione. La
posizione del dispersore può essere modificata solo se l’apparecchiatura è ferma e scollegata dall’alimentazione di
corrente.
3. Funzionamento
•Accensione
➢Accendere lo strumento tramite l’interruttore generale (E)
➢Il display (G) mostra la versione software, l’ultimo valore di set point e (se il parametro “ ” è impostato su ,
vedere capitolo 4)
•Dispersione
➢Ruotare la manopola (F) per impostare la velocità ed avviare la dispersione
➢La velocità incrementa fino al raggiungimento del set point
➢Un microprocessore assicura velocità costante anche a seguito di variazioni di viscosità (SpeedServo)
➢Per fermare l’analisi, posizionare a 0 la manopola (F)
4. Modalità impostazione parametri
Accendendo lo strumento tramite l’interruttore generale (E), durante il tempo di visualizzazione della versione software,
ruotando la manopola velocità (F) al minimo e al massimo per almeno due volte, si accede alla programmazione dei
parametri nascosti.
Ruotando il potenziometro si scorre tra i diversi menù disponibili.
Se per 2 secondi non viene mossa la manopola, si entra in visualizzazione/modifica del parametro visualizzato; il display
visualizza per 5 secondi il valore precedentemente salvato o le ore di funzionamento e poi torna a visualizzare il nome del
menù, se non si ruota la manopola. Solo per i parametri con possibilità di modifica, se si ruota la manopola (il led set si
accende a indicare che si è in modifica del parametro), il display visualizza i valori del parametro proporzionali alla posizione
del potenziometro.
Se per 4 secondi non viene mosso il potenziometro, il nuovo valore viene salvato, il display visualizza “ ” (spegnendo il
led Set) per 2 secondi prima di tornare a visualizzare il nome del menù.

15
5. Utensili di dispersione
Inserimento dell’utensile di dispersione nel dispersore
Svitare la manopola (B) in modo che il puntale di pressione non sporga all'interno del foro. Inserire l'utensile di dispersione
nel dispersore dal basso fino alla battuta. L’albero utensile tubolare si innesta con un clic udibile se lo si inserisce con una
certa forza. L'utensile di dispersione è montato correttamente quando la tacca sull’utensile stesso è allineata al bordo
inferiore dell'unità motrice.
Fissare l'utensile di dispersione avvitando a fondo la manopola (B)
Nota: prima di avviare l’unità, assicurarsi che l’utensile di dispersione sia inserito nel liquido in lavorazione e che il
contenitore sia opportunamente fissato con l’apposita pinza a nastro con velcro (D).
DESCRIZIONE DEGLI ACRONIMI
Sono ammessi tutti gli utensili della serie D20 (cioè con attacco all’unità motrice diametro 20mm).
Materiale: Acciaio inossidabile Aisi 316L.
Gruppo unità motrice:
D20 Per dispersore con testata diam. 20mm
Diametro e tipo statore:
S20C Statore diam. 20 mm Grossolano
S20F Statore diam. 20 mm Fine
S25C Statore diam. 25 mm Grossolano
S25F Statore diam. 25 mm Fine
S40C Statore diam. 40 mm Grossolano (Solo per miscelazioni fino a 20.000 rpm)
Tipo di guarnizione:
P PTFE
Diametro e tipo rotore:
R20S Rotore diam. 20 mm Standard
R20C Rotore diam. 20 mm Grossolano
R20E Rotore diam. 20 mm Emulsionante
R20M Rotore diam. 20 mm Miscelante
R25C Rotore diam. 25 mm Grossolano
R25E Rotore diam. 25 mm Emulsionante
R25M Rotore diam. 25 mm Miscelante
Parametro
Valore di
default
Range
Descrizione
Impostazione della modalità di avvio:
➢: quando si accende lo strumento tramite l’interruttore principale, il
suo stato è .
➢: quando si accende lo strumento tramite l’interruttore principale,
ricomincia a lavorare con l’ultima velocità impostata.
Tempo di funzionamento dei carboncini in ore. Se il display mostra “˙”,
il valore è espresso in giorni
Tempo di funzionamento del motore in ore. Se il display mostra “˙”, il
valore è espresso in giorni

16
Esempio di descrizione utensile di dispersione:
D20-S20C-P-R20S Codice Velp Scientifica: A00000478
UTENSILI DI DISPERSIONE DISPONIBILI
Per l’elenco completo degli utensili di dispersione (accessori) vedi capitolo 9 o vai sul sito www.velp.com
Utilizzare solo utensili di dispersione originali Velp Scientifica dopo aver letto le relative istruzioni d’uso in cui sono contenute
ulteriori informazioni relative alle applicazioni e ai dati tecnici.
PER OTTENERE RISULTATI MIGLIORI
Diametro del recipiente di agitazione contenete il campione
È preferibile disperdere utilizzando un contenitore leggermente più grande dell’utensile di dispersione al fine di ottenere una
lavorazione più rapida ed omogenea.
Questo eviterà che parte del campione rimanga sulle pareti del contenitore e non venga disperso.
Tenere conto che l’inserimento e il funzionamento dell’utensile nel contenitore provoca un aumento del livello del campione.
Posizione dell’utensile di dispersione
•Posizionare l’utensile di dispersione fuori centro nel contenitore (Figura 1).
•Posizionare l’utensile di dispersione a circa 1/3 dell’altezza del campione dal fondo del contenitore (Figura 2).
Figura 1 Figura 2
Se si utilizza un utensile di dispersione troppo grande per la quantità campione, è possibile che l’utensile di dispersione
aspiri aria.
Velocità di omogeneizzazione
Iniziare sempre la dispersione a bassa velocità, quindi aumentare gradualmente la velocità. Ciò consente di mantenere il
controllo dell'intero processo.
Normalmente le dispersioni avvengono in 30 –60 secondi, se ciò non avviene verificare quanto di seguito:
•Posizione dell’utensile non corretta nel contenitore
•Campione troppo viscoso
•Utensile di dispersione non idoneo (dimensione, tipologia)
PER NON COMPROMETTERE LA VITA DELL’UTENSILE E DELL’UNITÀ MOTRICE
Non far funzionare mai l’utensile di dispersione a secco
L’utensile di dispersione richiede un campione liquido per lubrificare la guarnizione durante la lavorazione.
Tra rotore e statore è interposta una guarnizione in PTFE che aiuta a prevenire la flessione o il movimento del rotore
all'interno dell’utensile. La guarnizione deve essere immersa nel campione liquido da lavorare, altrimenti brucerà
provocando il surriscaldamento e successivo danneggiamento del campione e dell’utensile di dispersione.
Senza il liquido, la guarnizione in PTFE può bruciarsi e causare danni all’utensile stesso e al dispersore.
Pulizia e manutenzione dell’utensile di dispersione
È necessario smontare e lavare l’utensile di dispersione dopo ogni utilizzo controllando il buono stato della guarnizione,
delle parti metalliche e nel caso sostituirle. La guarnizione PTFE è naturalmente soggetta ad usura per effetto dell’attrito con
l’elemento rotante dell’utensile; pertanto deve essere sostituita periodicamente al fine di garantire il corretto funzionamento
dell’utensile e del dispersore
Sostituire la guarnizione in PTFE nei seguenti casi:
•Evidente usura del componente (es. deformazioni, assottigliamento),
•Rumore e vibrazioni anomali durante il funzionamento del dispersore,
•Quando il gioco tra guarnizione e parti metalliche interne ed esterne ad essa è eccessivo.
Per le operazioni di smontaggio e montaggio dell’utensile di dispersione, utilizzare l’apposito kit smontaggio utensile fornito
con l’unità motrice e fare riferimento al relativo manuale di istruzioni in dotazione a ciascun utensile.
H (Campione)
H/3

17
6. Messaggi di errore e attenzione
Se il display visualizza uno dei seguenti messaggi d’errore, il motore si ferma automaticamente. Per ripristinare la
funzionalità dello strumento, procedere come di seguito:
•Spegnere lo strumento mediante l’apposito interruttore
•Adottare le misure correttive indicate nella colonna “Soluzione” della seguente tabella
•Riavviare lo strumento
Codice
Causa
Soluzione
Il motore non funziona normalmente.
Non parte o non raggiunge la velocità
impostata
•Verificare che non ci siano blocchi nell’utensile di dispersione e
nella struttura
•Controllare le ore di funzionamento del motore e dei carboncini
(vedi capitolo 4)
Temperatura interna del motore
troppo elevata
•Verificare che non ci siano ostruzioni sulle aperture di aspirazione e
mandata dell’aria per la ventilazione interna.
•Verificare che non ci siano blocchi nell’utensile di dispersione e
nella struttura
•Ridurre la velocità o il carico
Sovraccarico motore
•Verificare che non ci siano ostruzioni sulle aperture di aspirazione e
mandata dell’aria per la ventilazione interna.
•Verificare che non ci siano blocchi nell’utensile di dispersione e
nella struttura
•Ridurre la velocità o il carico
Anomalia scheda elettronica
•Contattare l’assistenza tecnica VELP Scientifica
Velocità motore non costante
•Verificare che non ci siano blocchi nell’utensile di dispersione e
nella struttura
•Controllare le ore di funzionamento del motore e dei carboncini
(vedi capitolo 4)
Blackout o spina inserita con
interruttore in posizione ON = I
•Inserire la spina quando l'interruttore è in posizione OFF = 0
Se l’errore persiste sul display, contattare il più vicino centro di assistenza tecnica VELP Scientifica.
7. Manutenzione e pulizia
Non sono previsti interventi di manutenzione ordinaria e straordinaria sullo strumento. La manutenzione è prevista solo sugli
utensili di dispersione come descritto nel capitolo 5.
Pulizia
La pulizia dello strumento deve essere eseguita, dopo aver staccato l’alimentazione, con un panno inumidito con detergenti
non infiammabili e non aggressivi indossando i guanti di protezione.
Durante le operazioni di pulizia, evitare che residui di acqua e umidità penetrino nello strumento.
Riparazioni
Eventuali riparazioni dovranno essere eseguite soltanto da parte di personale autorizzato VELP Scientifica.
Il trasporto dello strumento tramite spedizionieri, corrieri o altro, deve essere effettuato utilizzando l'imballo originale antiurto
di cui lo strumento è dotato quando spedito da nuovo. Seguire le istruzioni eventualmente riportate sullo stesso (es.
pallettizzare).
È responsabilità dell'utente procedere alla decontaminazione dell'unità nel caso in cui sostanze pericolose rimangano sulla
superficie o all'interno del dispositivo. In caso di dubbi sulla compatibilità di un prodotto per la pulizia o la decontaminazione,
contattare il produttore o il distributore.

18
8. Caratteristiche tecniche
Modelli
F20900470
F20910470
Generali
Alimentazione
230 V / 50-60 Hz (+/- 10%)
115V / 60 Hz (+/- 10%)
Dimensioni (LxHxP)
92x280x130 mm (3,6x11x5,1 in)
Peso
2,4 kg (5,3 lb)
Potenza assorbita
800 W
Materiale di costruzione
Alluminio - Tecnopolimeri
Rumorosità (senza utensile di
dispersione)
75 dBa
Temperatura ambiente ammessa
+5…+40 °C
Temperatura di stoccaggio ammessa
-10…+60 °C
Umidità max ammessa
80%
Categoria di sovratensione
II
Grado di inquinamento EN61010-1
2
Altitudine massima ammessa
4000 m
Dispersione
Volume trattabile
0,2 ml - 2,5 l H2O
Range di velocità impostabile
3000 –25000 rpm (step da 200 rpm)
(alla tensione nominale 230V / 50Hz e 115V / 60 Hz)
Tipo di motore
BAC
Risoluzione velocità
Step da 200 rpm
Potenza motore erogata
500 W
Viscosità max
5000 mPa s
Sicurezze
Avviso presenza utensile
No
Avviso temperatura interna elevata
Si
Avviso anomalia funzionamento
motore
Si
Contatore
Contatore motore
Ore o giorni di funzionamento
Contatore spazzole
Ore o giorni di funzionamento
9. Accessori / Ricambi
A00000478 D20-S20C-P-R20S Utensile di dispersione
A00000462 D20-S20F-P-R20C Utensile di dispersione
A00000463 D20-S20F-P-R20E Utensile di dispersione
A00000464 D20-S20F-P-R20M Utensile di dispersione
A00000479 D20-S25C-P-R25C Utensile di dispersione
A00000480 D20-S25F-P-R25E Utensile di dispersione
A00000469 D20-S25F-P-R25M Utensile di dispersione
A00000472 D20-S40C-P-R25C Utensile di dispersione
A00000473 D20-S5S-P-R5S Utensile di dispersione
A00000383 Mini H-Stand con doppia asta completo
10007258 Manopola 35D blu con indice
40003238 Kit smontaggio utensile D20

19
1. Introduction
Le disperseur OV 625 Digital, équipé d’un système de contrôle électronique de la vitesse et d’un moteur à balais. Il est la
solution idéale pour disperser, homogénéiser, mélanger et broyer des échantillons de matière biologique (cellules, tissus
animaux et végétaux) et de produits pharmaceutiques, cosmétiques et alimentaires.
Par dispersion on entend la subdivision et la répartition d’une phase solide, fluide ou gazeuse dans un milieu homogène qui
n’est pas complètement miscible avec celle-ci.
L’outil de dispersion se compose d’un rotor et d’un stator. La vitesse élevée du rotor attire l’échantillon axialement dans la
tête de dispersion et le pousse radialement à travers les espaces entre le rotor et le stator.
Normalement, le temps de traitement est de quelques minutes pour obtenir la finesse souhaitée, des temps de traitement
plus longs n’améliorent que légèrement la finesse du matériau au détriment de la température de l’échantillon, qui aura
tendance à augmenter.
Description
Fonction
A
OV 625 Digital
Unité motrice D20
B
Poignée de fixation de l’outil
Fixation de l’outil de dispersion au disperseur
C
Mini H stand
Fixation stable du disperseur
D
Pince à bande avec velcro
Fixation du bac d’agitation qui contient l’échantillon
E
Interrupteur général
Alimentation électrique du disperseur
F
Poignée de vitesse
Démarrage / Arrêt de la fonction de dispersion, réglage de vitesse
G
Écran LED à 3 chiffres
Affichage de la valeur de vitesse (÷ 1000 rpm)
FR
B
C
B
D
A
G
E
F

20
2. Montage et installation
•Retrait de l’emballage
➢Après avoir retiré l’emballage, il faut contrôler l’intégrité de l’instrument
•Contenu de la boîte
➢Disperseur OV 625 Digital (A)
➢Kit de démontage
➢Notice d’instructions
➢Clé hexagonale et vis à tête hexagonale creuse
➢Tige de support
•Installation
➢Placer le support mini H (C) (accessoire) sur une surface comme décrit dans les consignes de sécurité.
➢Fixer la tige de support à l’instrument à l’aide de la vis à tête hexagonale creuse prévue à cet effet.
➢Fixer solidement l’instrument au support mini H (C)
➢Fixer le bac d’agitation qui contient l’échantillon à l’aide de la pince à bande avec velcro (D) fournie avec le support
mini H.
➢Enfiler l’outil de dispersion (non fourni avec l’appareil) dans la tête du disperseur jusqu’en butée et le fixer avec la
poignée prévue (B).
➢Introduire l’outil de dispersion dans l’échantillon comme indiqué au chapitre 5.
➢S’assurer que la valeur de la tension d’alimentation de l’instrument correspond à la valeur de la tension secteur.
S’assurer que la fiche de courant fournie est conforme aux normes de sécurité et facilement accessible.
➢S’assurer que la fiche de courant fournie est conforme aux normes de sécurité et facilement accessible.
REMARQUE IMPORTANTE
➢Vérifier que la tige de support est bien en place. Les vibrations pourraient desserrer la vis à tête hexagonale creuse,
par conséquent, vérifier de temps en temps la sécurité du serrage de celle-ci afin de garantir une utilisation sûre de
l’appareil.
➢Vérifier avant l’utilisation et à intervalles réguliers que l’appareil est solidement fixé en position. La position du
disperseur ne peut être modifiée que si l’équipement est arrêté et débranché de l’alimentation électrique.
3. Contrôles du fonctionnement
•Mise en marche
➢Allumer l’appareil à l’aide de l’interrupteur principal (E).
➢L’écran (G) affiche la version du logiciel, la dernière valeur de consigne et (si le paramètre « » est configuré
sur , voir chapitre 4).
•Analyse
➢Tourner la poignée de vitesse (F) pour configurer la vitesse et démarrer l’analyse.
➢La vitesse augmente jusqu’à ce que le point de consigne soit atteint.
➢Un microprocesseur assure une vitesse constante même en cas de variations de la viscosité (SpeedServo).
➢Pour arrêter l’analyse, mettre la poignée (F) sur 0.
4. Mode de configuration des paramètres
Après avoir allumé l’appareil par l’interrupteur général (E), pendant l’affichage de la version du logiciel, il suffit de tourner la
poignée de vitesse (F) au minimum et au maximum au moins deux fois pour accéder à la programmation des paramètres
cachés. La rotation du potentiomètre fait défiler les différents menus disponibles. Si la poignée n’est pas touchée pendant 2
secondes, l’on entre en mode de visualisation / modification du paramètre affiché ; l’écran montre la valeur précédemment
enregistrée ou les heures de fonctionnement pendant 5 secondes, puis revient à l’affichage du nom du menu si la poignée
n’est pas tournée. Uniquement pour les paramètres avec possibilité de modification, si la poignée est tournée (la LED Set
s’allume pour indiquer que le paramètre est en cours de modification), l’écran affiche les valeurs du paramètre de manière
proportionnelle à la position du potentiomètre.
Si le potentiomètre n'est pas déplacé pendant 4 secondes, la nouvelle valeur est enregistrée, l'écran affiche “”
(extinction de la LED Set) pendant 2 secondes avant de revenir à l'affichage du nom du menu.
This manual suits for next models
2
Table of contents
Languages: