VERIGA Stop&Go Compact NT User manual

COMPACT NT
STOP&GO
Self Tightening Traction Chain
Samozatezna veriga
VERIGA K.F., d.o.o.
Alpska 43, SI - 4248 Lesce
T: +386 4 537 09 00, F: +386 4 537 09 30,
E: info@veri a-lesce.com
www.veri a-lesce.com
ÖNORM V 5117
-geprüft-
N2006 308
STOP_GO_navodila_book. xd:STOP_GO_navodila_book 11.10.11 11:20 AM Page 1

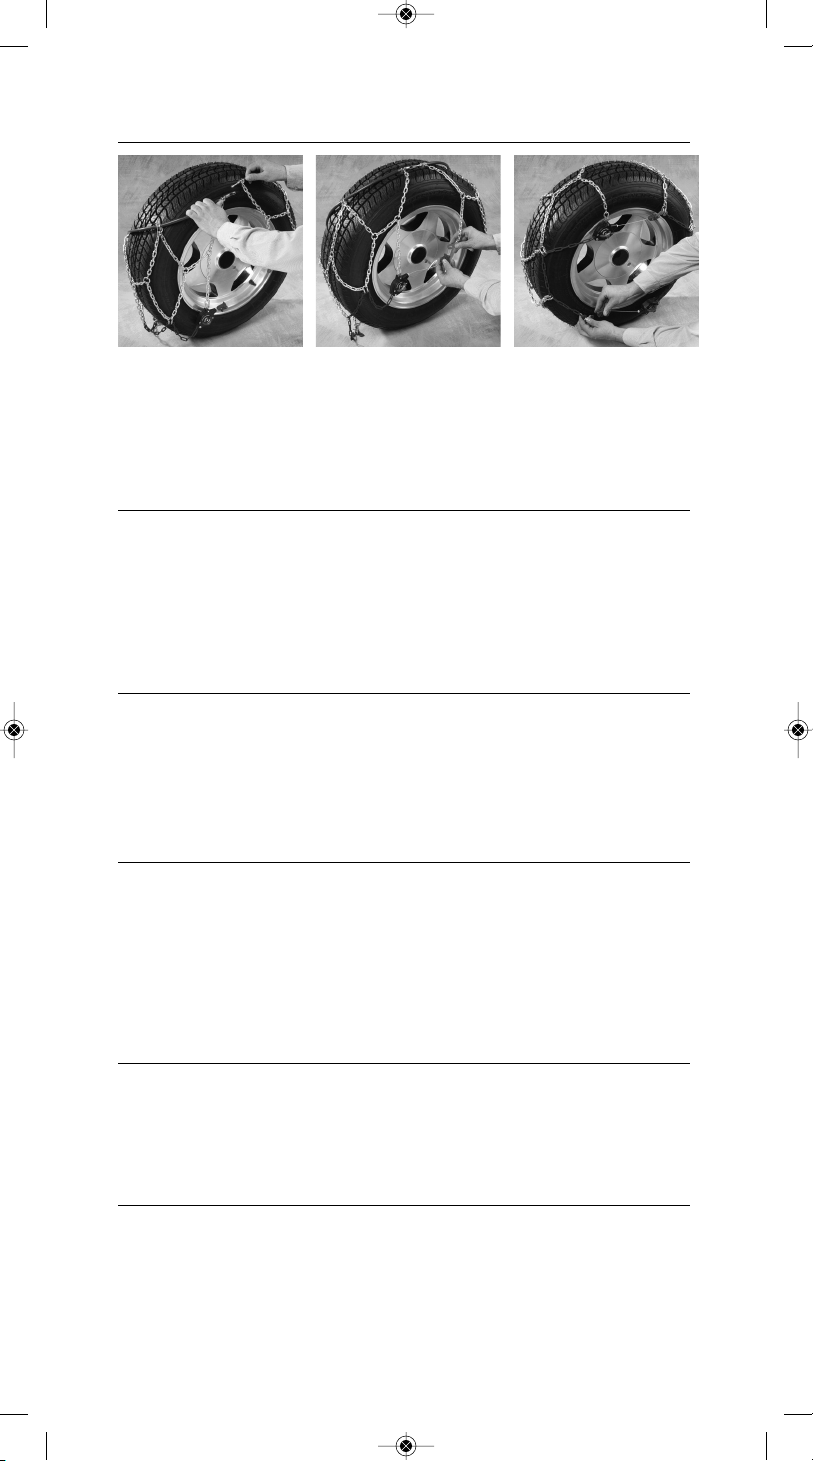
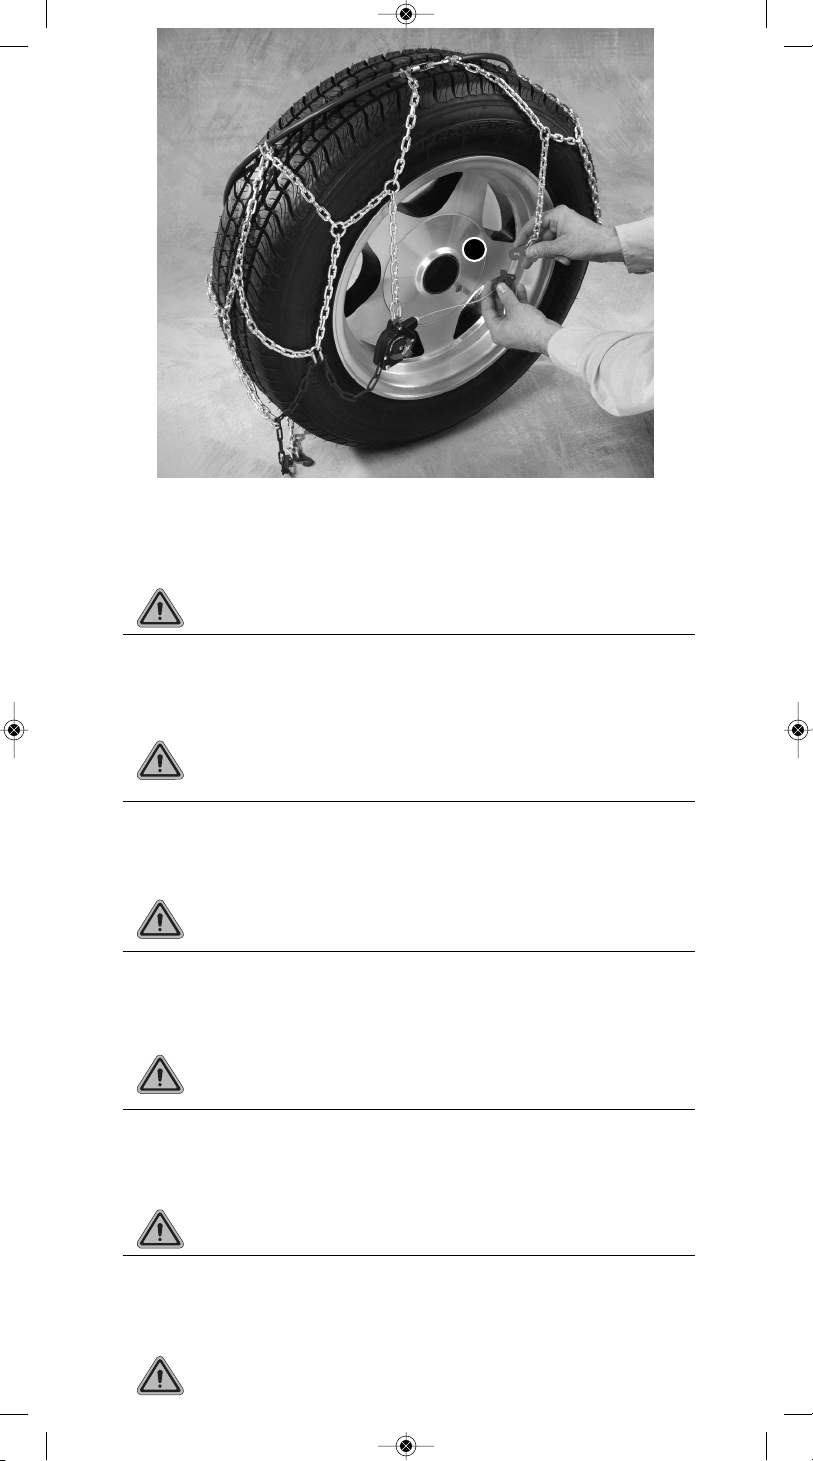
The new “Stop&Go” snow chain is quick and easy to install in just minutes. The
Veriga “Stop&Go” snow chains provide a consistent fit that eliminates loose and
sloppy chains. Just install a pair of “Stop&Go” snow chains and drive away as the
chains tighten and center while you remain in the comfort of your vehicle. Those
annoying re-tightening stops are a thing of the past as are the rubber straps or
extra attachments that other snow chains require.
Englis : Easy Installation in Minutes:
Die neuen „Stop&Go“-Schneeketten sind in wenigen Minuten schnell und einfach
zu montieren. Die „Stop&Go”-Schneeketten von Veriga verfügen über eine
hervorragende Passform, nicht zuletzt durch hren patentierten Selbstspann-
Mechanismus. Nachdem Sie die Ketten auf das Rad aufgezogen haben, zentrieren
sich die „Stop&Go”-Schneeketten und ziehen sich selbstständig fest, während Sie
ganz bequem im Auto sitzen – Sie müssen nur noch losfahren. Außerdem ersparen
Sie sich durch den patentierten Selbstspann-Mechanismus das lästige Nachspannen.
Deutsc : Einfac e Montage in wenigen Minuten:
Nove verige Compact NT Stop&GO so zmontirane hitro in enostavno v nekaj
minutah. Verige Compact NT Stop&GO so posebno zasnovane in vsebujejo
samozatezni mehanizem. Potem ko ste verige namestili na kolesa se lahko
odpeljete naprej, verige pa se samodejno zategnejo in uravnotežijo na kolesu.
To vam omogoata samozatezni kljuavnici, ki prilagodita in uravnotežita verigo na
kolesu, tako da vam ni potrebno ponovno ustavljati vozila in zategovati verige.
Slovensko: Enostavna montaža v nekaj minuta :
La nouvelle chaîne à neige « Stop&Go » est facile et rapide à installer dans
seulement quelques minutes. Les chaînes à neige « Stop&Go » s’adaptent
parfaitement. Finies les chaînes détendues et lâches. l vous suffit d’installer une
paire de chaîne à neige « Stop&Go » et de faire avancer votre véhicule; les chaînes
se resserreront et se centreront alors que vous resterez confortablement dans votre
véhicule. Les arrêts ennuyeux pour resserrer sont du passé, de même que les sangles
en caoutchouc ou les fixations supplémentaires nécessaires pour d’autres chaînes à
neige.
Français: Montage facile en quelques minutes:
È facile installare le nuove catene da neve “Stop&Go”, e bastano pochi minuti. Le
catene da neve Stop&Go Veriga si adattano bene al profilo della ruota. nstalla un
paio di catene “Stop&Go” e parti: le catene si stringono e si centrano mentre rimani
comodo nella tua auto. Quelle soste fastidiose per riallacciare le catene da neve sono
storia passata.
1
Italiano: Installazione facile in poc i minuti:
Łańcuchy Stop&Go montuje się w szybki i prosty sposób w ciągu zaledwie paru minut. Łatwo
dopasowują się do kształtu opony, a dokładność tego dopasowania zwiększają opatentowane
samonapinacze. Po założeniu na koła łańcuchy Stop&Go centrują się i napinają samoczynnie.
Kierowca siedzi wygodnie w samochodzie – wystarczy ruszyć. Samonapinacze pozwalają
uniknąć kłopotliwego korygowania łańcuchów.
Polski: Łatwy montaż w ciągu paru minut
COMPACT NT
STOP&GO
STOP_GO_navodila_book. xd:STOP_GO_navodila_book 11.10.11 11:20 AM Page 2

2
Englis :
Table of Contents
Chain nstallation . . . . . . . . . . . . . . . . . . . . . . . . . . . . . . . . . . . . . . . . . . . 2 - 8
Chain Removal . . . . . . . . . . . . . . . . . . . . . . . . . . . . . . . . . . . . . . . . . . . . . 9 - 12
Warranty . . . . . . . . . . . . . . . . . . . . . . . . . . . . . . . . . . . . . . . . . . . . . . . . 13 - 14
mportant nformation . . . . . . . . . . . . . . . . . . . . . . . . . . . . . . . . . . . . . 15 - 18
Repair . . . . . . . . . . . . . . . . . . . . . . . . . . . . . . . . . . . . . . . . . . . . . . . . . . . . . . 18
Deutsc :
In altsverzeic nis
Montage der Ketten . . . . . . . . . . . . . . . . . . . . . . . . . . . . . . . . . . . . . . . . 2 - 8
Demontage der Ketten . . . . . . . . . . . . . . . . . . . . . . . . . . . . . . . . . . . . . . 9 - 12
Garantie . . . . . . . . . . . . . . . . . . . . . . . . . . . . . . . . . . . . . . . . . . . . . . . . 13 - 14
Wichtige Hinweise . . . . . . . . . . . . . . . . . . . . . . . . . . . . . . . . . . . . . . . . 15 - 18
Reparatur . . . . . . . . . . . . . . . . . . . . . . . . . . . . . . . . . . . . . . . . . . . . . . . . . . . 18
Slovensko:
Vsebina
Montaža verig . . . . . . . . . . . . . . . . . . . . . . . . . . . . . . . . . . . . . . . . . . . . . . . .2-8
Demontaža verig . . . . . . . . . . . . . . . . . . . . . . . . . . . . . . . . . . . . . . . . . . . .9-12
Garancija . . . . . . . . . . . . . . . . . . . . . . . . . . . . . . . . . . . . . . . . . . . . . . . . . .13-14
Pomembne informacije . . . . . . . . . . . . . . . . . . . . . . . . . . . . . . . . . . . . . .15-18
Français:
Table des matières
Montage de la chaîne . . . . . . . . . . . . . . . . . . . . . . . . . . . . . . . . . . . . . . . 2 - 8
Démontage de la chaîne . . . . . . . . . . . . . . . . . . . . . . . . . . . . . . . . . . . . 9 - 12
Garantie . . . . . . . . . . . . . . . . . . . . . . . . . . . . . . . . . . . . . . . . . . . . . . . . 13 - 14
nformations importantes . . . . . . . . . . . . . . . . . . . . . . . . . . . . . . . . . . 15 - 18
Réparation . . . . . . . . . . . . . . . . . . . . . . . . . . . . . . . . . . . . . . . . . . . . . . . . . . . 18
Italiano:
Indice
nstallazione catene . . . . . . . . . . . . . . . . . . . . . . . . . . . . . . . . . . . . . . . . 2 - 8
Smontaggio catene . . . . . . . . . . . . . . . . . . . . . . . . . . . . . . . . . . . . . . . . 9 - 12
Garanzia . . . . . . . . . . . . . . . . . . . . . . . . . . . . . . . . . . . . . . . . . . . . . . . . 13 - 14
nformazioni importanti . . . . . . . . . . . . . . . . . . . . . . . . . . . . . . . . . . . 15 - 18
Riparazione . . . . . . . . . . . . . . . . . . . . . . . . . . . . . . . . . . . . . . . . . . . . . . . . . . 18
Polski: Spis treści
Zakładanie łańcuchów ........................................................................................................................................2 - 8
Zdejmowanie łańcuchów..................................................................................................................................9 12
Warunki gwarancji...........................................................................................................................................13 - 14
Ważne uwagi......................................................................................................................................................15 - 18
Naprawa .......................................................................................................................................................................18
COMPACT NT
STOP&GO
STOP_GO_navodila_book. xd:STOP_GO_navodila_book 11.10.11 11:20 AM Page 3

Slovensko: Verige položite na ravno površino in pazite da mreža ni zavozlana in da
so ključavnice odprte. Prepričajte se da ste verigo namestili na pravilno stran, tako
da je odprta stran verige na tleh pred vami. Nikoli ne uporabljajte poškodovane
verige. (A) Nosilni kabel namestite za kolo tako da je rdeči del v smeri zadnjega
dela vozila. (B) En del verige položite pred kolo drugi del pa za kolo.
Englis : Lay the chains out on a flat surface, remove all tangles and ensure the side wire hooks
are facing down. Do not drive with chains that are damaged. Slide the inside side cable (A) and
chain behind the wheel. Find the split (B) in the front side chain. Lay one half of the chain in
front of the tire and the other behind the tire.
Deutsc : Legen Sie die Schneeketten auf eine glatte Oberfläche und achten Sie darauf,
dass das Laufnetz nicht verdreht ist und alle Verschlüsse geöffnet sind. Stellen Sie sicher,
dass die Kette auf der richtigen Seite liegt, indem Sie darauf achten ob die seitlich
angebrachten Befestigungshaken mit hrer offenen Seite zum Boden hin nach unten
liegen. Benutzen Sie niemals beschädigte Schneeketten! Schieben Sie das Stahlseil (A) mit
dem roten Ende voraus hinter dem Rad hindurch. Die sollte dann zentriert um den Reifen
liegen (B). Legen Sie den einen Teil die Kette vor das Rad und den anderen dahinter.
1
A
B
C ain Installation Instructions
Anleitung zur Montage der Ketten
Montaža verige
Français: Etalez la chaîne sur une surface plane, démêlez-la et assurez-vous que les
crochets métalliques sur le côté sont tournés vers le sol. Ne conduisez pas avec des
chaînes endommagées. Faites glisser le câble du côté intérieur (A) et la chaîne derrière la
roue. Trouvez la fente (B) dans la chaîne latérale avant. Etalez la moitié de la chaîne
devant le pneu et l’autre moitié derrière le pneu.
Instructions de montage de la c aîne
Italiano: Stendere le catene sulla terra, sciogliere i grovigli e assicurarsi che i ganci dei cavi
laterali siano rivolti verso il suolo. Non guidare con catene danneggiate. Far scorrere da
destra a sinistra il cavo laterale interno (A) insieme alla catena dietro la ruota. Trovare la
fessura (B) nella catena della parte anteriore. Stendere metà della catena davanti al
pneumatico e l'altra dietro di esso.
Istruzioni installazione catene
3
Polski: Ułożyć łańcuchy na równej gładkiej powierzchni. Łańcuch nie może być przesunięty ani
przekręcony, a wszystkie zamknięcia muszą być rozpięte. usi też leżeć właściwą stroną do
góry, to znaczy tak, aby boczne haczyki mocujące były odwrócone w dół. Uszkodzonych
łańcuchów nie wolno zakładać na koła. Linkę stalową (A) wraz z łańcuchem przeciągnąć
czerwonym końcem poza kołem. Ułożyć łańcuch tak, aby koło znajdowało się na środku (B).
Jedna połowa łańcucha powinna leżeć przed kołem, a druga za nim.
Zakładanie łańcuchów
STOP_GO_navodila_book. xd:STOP_GO_navodila_book 11.10.11 11:20 AM Page 4

4
Engl sh: Bring the ends of the side cable in front of the outer side wall. Connect the
side cable together by inserting the knob into the key-hole latch (C) • Leave the
connected side cable draped over the outer sidewall (D) while you complete step 3.
Deutsch: Ziehen Sie die Enden des Montagerings vor die äußere, obere Seitenwand
des Reifens. Führen Sie beide Enden zusammen und führen Sie das stabförmige Ende
in die Verschlussvorrichtung ein (C). • Lassen Sie den nun verschlossenen Montagering
über der äußeren Seitenwand des Rads hängen (D), während Sie Schritt 3 ausführen.
Slovensko: Potegnite oba konca nosilnega kabla na gornji sprednji rob pnevmatike.
Spnite skupaj oba konca kabla(C). Pustite speti kabel da prosto leži na zunanji strani
pnevmatike, dokler ne dokončate koraka 3.
França s: Amenez les extrémités du câble latéral à l’avant de la paroi latérale
extérieure. Branchez ensemble les câbles latéraux en insérant le bouton dans la
boutonnière (C) • Pendant que vous réalisez l’étape 3, laissez le câble latéral branché
recouvrir la paroi latérale extérieure (D).
Ital ano: Portare le estremità del cavo laterale sul fianco esterno del pneumatico.
Collegare il cavo esterno inserendo il perno nel dispositivo bloccante (C). • Lasciare il
cavo già legato appoggiato sopra il fianco esterno (D) mentre completi la fase 3.
Polski: Końce bocznej linki wyciągnąć na zewnętrzną stronę koła i spiąć je z sobą wprowadzając
przycisk zamka do otworu (C). Spiętą w pierścień linkę pozostawić na zewnętrznej stronie koła (D)
i wykonać trzeci etap zakładania łańcucha.
2
CAUTION: You could damage your side walls if the side
wire hoo s are not facing out, away from the tire.
VORSICHT: Wenn die Seitenha en am Montagering nicht mit der
offenen Seite nach außen, vom Reifen weg, zeigen önnen die
Seitenwände beschädigt werden!
POZOR: Da ne boste poškodovali pnevmatike, pazite , da so spojni
členi kabla obrnjeni z odprto stranjo stran od pnevmatike.
AVERTISSEMENT: Si les crochets utilisés pour brancher les câbles
sont positionnés vers le pneu, vous risquez d’endommager
les parois
ATTENZIONE: I fianchi del pneumatico si possono danneggiare se
i ganci laterali usati per unire i cavi non sono rivolti verso
l'esterno della ruota.
Uwaga: Jeżeli haczyki nie będą odwrócone na zewnątrz, ale w stronę ko a,
może dojść do uszkodzenia boku opony.
C
Note:Face hooks out!
Zu beacten:Haken müssen mit
der offenen Seite nach außen
zeigen!
Payite:Kavlji na verigi morajo
biti z odprto stranjo obrnjeni
navzven.
Nota:Placez les crochets vers
l’extérieur!
Nota:Ganci rivolti all’esterno!
Uwaga:Haczyki muszą być
odwrócone na zewnątrz.
D
STOP_GO_navodila_book. xd:STOP_GO_navodila_book 11.10.11 11:20 AM Page 5

Engl sh: Grasp the top tensioner (E) and flip the red lever up to
install. Pull the red cable end out and attach to the green side
chain connecter (F).
Deutsch: Nehmen Sie den oberen Spanner (E) und legen Sie den
roten Hebel zur Montage nach oben. Ziehen Sie das rote Seilende
heraus und befestigen Sie es am grünen Kettenverbindungsstück (F).
Slovensko: Vzemite vrhnji napenjalec (E) in rdeči zatik odprite
navzgor. zvlecite rdečo spojko na žični vrvi in jo spnite z zelenim
kavljem (F).
França s: Saisissez le tendeur du haut (E) et levez le levier rouge
pour effectuer le montage. Tirez l’extrémité du câble rouge vers
l’extérieur et fixez-le sur l’attache de la chaîne latérale verte (F).
Ital ano: Afferrare il tensore superiore (E) e spostare in su la leva
rossa per installare. Tirare il terminale rosso del cavo e unire al
connettore verde della catena laterale (F).
Polski: Uchwycić napinacz górny (E) i przełożyć czerwoną dźwigienkę do góry.
Pociągnąć za czerwoną końcówkę linki i połączyć ją z łącznikiem zielonego
bocznego odcinka łańcucha (F).
3
PINCH WARNING: Keep your fingers clear of the chain and
tensioner while engaging the tensioners.
VERLETZUNGSGEFAHR: Passen Sie auf, dass Ihre Finger sich
weder auf der Kette noch am Spanner befinden, während dieser
einrastet.
ATTENTION AUX DOIGTS: Quand vous insérez les tendeurs, faites
attention à tenir vos doigts à l’écart de la chaîne et du tendeur.
NEVARNOST
NEVARNOST POŠKODBE: Pazite, da si ne poš odujete prstov pri
tem opravilu.
RISCHIO DI FERITA: Tenere le dita lontane dalla catena e dal
tensore mentre fissi i tensori.
Uwaga na palce: Podczas ączenia napinacza trzymać palce z daleka od ańcucha i od
samego napinacza.
E
F
E
5
STOP_GO_navodila_book. xd:STOP_GO_navodila_book 11.10.11 11:20 AM Page 6

6
Engl sh: Leave the red lever in the up position and slide the side
cable to the back of the tire (G), ensure the chain is centered on
the tire.
Deutsch: Lassen Sie den roten Hebel in der oberen, arretierten
Position und schieben Sie den Montagering auf die Hinterseite
des Reifens (G). Stellen Sie sicher, dass die Kette mittig auf dem
Reifen sitzt.
Slovensko: Pustite rdeči zatik odprt in namestite nosilni kabel na
zadnjo stran pnevmatike (G). Prepričajte se, da veriga leži na
sredini pnevmatike.
França s: Laissez le levier rouge en position vers le haut et faites
glisser le câble latéral vers l’arrière du pneu (G), assurez-vous que la
chaîne se trouve bien au milieu du pneu.
Ital ano: Lasciare la leva rossa in posizione in su e far scivolare il
cavo laterale sul retro del pneumatico (G), assicurandosi che la
catena sia ben centrata.
Polski: Po przełożeniu czerwonej dźwigienki do góry przeciągnąć boczną linkę za
koło (G). Sprawdzić, czy łańcuch jest równo wyśrodkowany na kole.
4G
STOP_GO_navodila_book. xd:STOP_GO_navodila_book 11.10.11 11:21 AM Page 7

Engl sh: Grasp the bottom tensioner (H) and flip the red lever up
to install. Pull the red cable end out and connect to the side chain
connector (I).
Deutsch: Nehmen Sie den unteren Spanner (H) und klappen Sie den
roten Hebel zur Montage nach oben. Ziehen Sie das rote Seilende
heraus und befestigen Sie es am Kettenverbindungsstück (I).
Slovensko: Vzemite spodnji napenjalec (H) in rdeči zatik odprite
navzgor. zvlecite rdečo spojko na žični vrvi in jo spnite z rdečim
kavljem (I).
França s: Saisissez le tendeur du bas (H) et levez le levier rouge
pour effectuer le montage. Tirez l’extrémité du câble rouge vers
l’extérieur et fixez-le sur l’attache de la chaîne latérale (I).
Ital ano: Afferrare il tensore inferiore (H) e spostare in su la leva
rossa per l’installazione. Tirare il terminale rosso del cavo e unire al
connettore della catena laterale (I).
Polski: Trzymając napinacz dolny (H), przełożyć czerwoną dźwigienkę do góry.
Pociągnąć za czerwoną końcówkę linki i połączyć ją z łącznikiem bocznego łańcucha
(I).
5
PINCH WARNING: Keep your fingers clear of the chain
and tensioner while engaging the tensioners.
VERLETZUNGSGEFAHR: Passen Sie auf, dass Ihre Finger sich
weder auf der Kette noch am Spanner befinden, während dieser
einrastet.
ATTENTION AUX DOIGTS: Quand vous insérez les tendeurs, faites
attention à tenir vos doigts à l’écart de la chaîne et du tendeur.
NEVARNOST POŠKODBE: Pazite, da si ne poš odujete prstov pri
tem opravilu.
RISCHIO DI FERITA: Tenere le dita lontane dalla catena e dal
tensore mentre fissi i tensori.
Uwaga na palce: Podczas ączenia napinacza trzymać palce z daleka od ańcucha i od
samego napinacza.
IH
7
NEVARNOST
STOP_GO_navodila_book. xd:STOP_GO_navodila_book 11.10.11 11:21 AM Page 8

8
Engl sh: Flip the red lever down to tighten both the top and
bottom tensioners. Your chains will begin to self tighten.
Deutsch: Legen Sie den roten Hebel nach unten um, um den
oberen und den unteren Spanner festzuziehen. Die Schneeketten
werden sich nun von selbst zuziehen.
Slovensko: Na obeh napenjalcih zaprite rdeče zatiče. Veriga se bo
začela samodejno zategovati.
França s: Faites basculer le levier rouge vers le bas pour serrer les
deux tendeurs, du haut et du bas. Vos chaînes commenceront à
s’autoserrer
Ital ano: Spostare le leve rosse in giù per stringere i tensori
superiori e inferiori. Le catene inizieranno a stringersi da soli.
Polski: Czerwoną dźwigienkę w obu napinaczach przełożyć w dół, powodując w
ten sposób zaciągnięcie napinacza górnego i dolnego. Łańcuch będzie napinał się
sam.
6
STOP_GO_navodila_book. xd:STOP_GO_navodila_book 11.10.11 11:21 AM Page 9

Engl sh: Park your vehicle with the green side-chain connector (F) at the 1:00
O’clock position. This will ensure easy removal of the tire chains without re-
positioning your vehicle.
C ain Removal Instructions
Anleitung zur Demontage der Ketten
7
F
CAUTION: Par your vehicle off-road with the engine off and the
emergency bra e set before removing your Stop&Go chains.
Deutsch: Stellen Sie hr Fahrzeug so ab, dass das grüne
Kettenverbindungsstück (F) auf 1.00 Uhr steht. So können Sie die Ketten
einfach abnehmen, ohne hr Fahrzeug zwischendurch bewegen zu müssen.
ACHTUNG: Stellen Sie das Fahrzeug nicht auf der Straße ab.
Stellen Sie den Motor ab und ziehen Sie die Handbremse bevor
Sie die Stop&Go-Ketten demontieren.
Navodila za demontažo verig
Slovensko: Ustavite vozilo tako, da je zeleni napenjalni kavelj (F) v položaju, kot da
ura kaže 1h. To vam bo omogočalo lažjo demontažo verig, brez dodatnega
premikanja vozila.
POZOR: Ne par irajte vozila na cestišču. Vozilo ugasnite in potegnite ročno
zavoro.
Instructions de démontage de la c aîne
França s: Garez votre véhicule avec l’attache de la chaîne latérale verte (F) en
position de 01h00. Cela permettra un démontage facile des chaînes du pneu, sans
devoir repositionner votre véhicule.
AVERTISSEMENT: Garez votre véhicule en-dehors de la route, avec le
moteur éteint et le frein à main serré avant d’ôter vos chaînes Stop&Go.
Istruzioni lo smontaggio delle catene
Zdejmowanie łańcuchów
Italiano: Parcheggiare il veicolo con il connettore verde della catena laterale (F)
in posizione ore 1:00. Questo garantirà il facile smontaggio delle catene senza
dover spostare il veicolo.
ATTENZIONE: Parcheggiare il veicolo fuori strada con il motore spento e
il freno di emergenza inserito prima di rimuovere le catene Stop&Go.
Polski: Ustawić samochód w taki sposób, aby zielone zapięcie łańcucha (F) znalazło się
według zegara na godzinie pierwszej. Przy takim ustawieniu łańcuch można łatwo
zdejmować bez potrzeby poruszania samochodem między kolejnymi czynnościami.
Uwaga: Samochód należy zaparkować poza strefą ruchu. Przed przystąpieniem do
zdejmowania ańcuchów Stop&Go wy ączyć silnik i zaciągnąć hamulec ręczny.
9
STOP_GO_navodila_book. xd:STOP_GO_navodila_book 11.10.11 11:21 AM Page 10

10
8
IH
Engl sh: Grasp the bottom tensioner (H) and flip the red lever up to remove. Pull the
red cable out of the side-chain connector (I). Firmly grasp the red cable end and flip
the red lever down to take up the exposed cable.
PINCH WARNING: Keep your fingers clear of the cable while allowing
the cable to re-seat into the tensioner.
Deutsch: Nehmen Sie den unteren Spanner (H) und legen Sie den Hebel nach oben um,
um die Ketten abzunehmen. Ziehen Sie das rote Seilende aus dem
Kettenverbindungsstück (I). Nehmen Sie das rote Seilende fest in die Hand und legen Sie
den roten Hebel nach unten um, um das Drahtseil des Spanners aufzuwickeln. Lassen
Sie das lose Seilende keinesfalls zurückschnappen.
VERLETZUNGSGEFAHR: Passen Sie auf, dass Ihre Finger sich nicht auf dem
Seil befinden, während Sie dieses in den Spanner zurüc ziehen lassen.
Slovensko: Vzemite spodnji napenjalec (H) in rdeči zatik odprite navzgor. Povlecite in
odpnite rdečo spojko na rdečem kavlju (I). Dobro držite rdečo spojko in zaprite
rdečzatik na napenjalcu, žična vrv se bo sama navila v mehanizem.
NEVARNOST POŠKODBE: Pazite, da si ne poš odujete prstov pri tem
opravilu in pravočasno spustite žično vrv.
França s: Pour commencer le démontage, saisissez le tendeur du bas (H) et faites
basculer le levier rouge vers le haut. Tirez le câble rouge vers l’extérieur de l’attache
de la chaîne latérale (I). Saisissez fermement l’extrémité du câble rouge et faites
basculer le levier rouge vers le bas pour enlever le câble à nu.
ATTENTION AUX DOIGTS: Quand vous laissez le câble se repositionner
dans le tendeur, faites attention à tenir vos doigts à l’écart du câble.
Ital ano: Afferrare il tensore inferiore (H) e spostare la leva rossa in su per lo
smontaggio. Estrarre il terminale rosso dal connettore verde della catena laterale (I).
Afferrare il terminale rosso all’ estermita del cavo e tenendo teso il cavo spostare la
leva rossa in basso per far ritirare il cavo.
RISCHIO DI FERITA: Tenere le dita lontane dal cavo mentre questo
viene risistemato nel tensore.
Polski: Trzymając dolny napinacz (H), przełożyć czerwoną dźwigienkę w górę. Wyciągnąć
czerwoną linkę z łącznika (I). ocno uchwycić czerwony koniec linki i, aby ją wyciągnąć
całkowicie, przełożyć czerwoną dźwigienkę w dół.
Uwaga na palce: Zwalniając linkę w napinaczu, trzymać palce z daleka od linki.
NEVARNOST
STOP_GO_navodila_book. xd:STOP_GO_navodila_book 11.10.11 11:21 AM Page 11

Engl sh: Grasp the top tensioner (E) and flip the red lever up to remove. Pull the red
cable end out of the side-chain connector (F). Firmly grasp the red cable end and flip
the red lever down to take up the exposed cable.
9
F
PINCH WARNING: Keep your fingers clear of the cable while allowing
the cable to re-seat into the tensioner.
Deutsch: Nehmen Sie den oberen Spanner (E) und legen Sie den roten Hebel nach
oben um, um die Ketten abzunehmen. Ziehen Sie das rote Seilende aus dem
Kettenverbindungsstück (F). Nehmen Sie das rote Seilende fest in die Hand und legen
Sie den roten Hebel nach unten um, um das Drahtseil des Spanners aufzuwickeln.
Lassen Sie das lose Seilende keinesfalls zurückschnappen.
VERLETZUNGSGEFAHR: Passen Sie auf, dass Ihre Finger sich nicht auf
dem Seil befinden, während Sie dieses in den Spanner zurüc ziehen
lassen.
Slovensko: Vzemite zgornji napenjalec (E) in rdeči zatik odprite navzgor. Povlecite
in odpnite rdečo spojko na zelenem kavlju (F). Dobro držite rdečo spojko in
zaprite rdečzatik na napenjalcu, žična vrv se bo sama navila v mehanizem.
NEVARNOST POŠKODBE: Pazite, da si ne poš odujete prstov pri tem
opravilu in pravočasno spustite žično vrv.
França s: Pour commencer le démontage, saisissez le tendeur du haut (E) et faites basculer
le levier rouge vers le haut. Tirez l’extrémité du câble rouge vers l’extérieur de l’attache de la
chaîne latérale (F). Saisissez fermement l’extrémité du câble rouge et faites basculer le levier
rouge vers le bas pour enlever le câble à nu.
ATTENTION AUX DOIGTS: Quand vous laissez le câble se repositionner
dans le tendeur, faites attention à tenir vos doigts à l’écart du câble.
Ital ano: Afferrare il tensore superiore (E) e spostare la leva rossa in su per lo
smontaggio. Tirare il terminale rosso del cavo dal connettore verde della catena
laterale (F). Afferrare il terminale rosso all’ estermita del cavo e tenendo teso il cavo
spostare la leva rossa in basso per far ritirare il cavo.
RISCHIO DI FERITA: Tenere le dita lontane dal cavo mentre questo viene
risistemato nel tensore.
Polski: Trzymając górny napinacz (E), przełożyć czerwoną dźwigienkę w górę. Wyciągnąć
czerwoną linkę z łącznika (F). ocno uchwycić czerwony koniec linki i, aby ją wyciągnąć
całkowicie, przełożyć czerwoną dźwigienkę w dół.
Uwaga na palce: Zwalniając linkę w napinaczu, trzymać palce z daleka od linki.
E
11
NEVARNOST
STOP_GO_navodila_book. xd:STOP_GO_navodila_book 11.10.11 11:21 AM Page 12

12
10
Engl sh: Bring the back side cable forward and disconnect (Refer to
nstallation instructions, step 2, page 4 ). After use, it is important to wash chains
in hot water in order to eliminate salt deposits and prevent rust. Carefully
inspect for any worn chains or damaged components. Repair, or remove from
service, chains that are worn or chains with damaged components. Dry chains,
lubricate with light oil and store in canvas carrying case.
Deutsch: Ziehen Sie das hintere Stahlseil nach vorne und öffnen Sie
den Verschluss (siehe Montageanleitung, Schritt 2, Seite 4). Nach
Gebrauch ist es wichtig, Ketten in heißem Wasser waschen, um
Salzablagerungen zu beseitigen und verhindern Rost. Sorgfältig auf
etwaige getragen Ketten oder beschädigte Bauteile inspizieren.
Reparatur, oder aus dem Dienst zu entfernen, Ketten, verschlissen
oder Ketten mit beschädigten Teile. Trockene Ketten, mit leichtem Öl
schmieren und speichern in Leinwand Tragetasche.
Slovensko: Potegnite nosilni kabel verige na prednjo stran pnevmatike in
ga odpnite. (Poglejte navodila za montažo, korak 2, stran 4).
França s: Amenez le câble latéral arrière vers l’avant et débranchez.
(Référez-vous aux nstructions de montage, étape 2, page 4). Après
utilisation, il est important de se laver les chaînes dans l'eau chaude afin
d'éliminer les dépôts de sel et de prévenir la rouille. nspecter attentivement
pour tout chaînes de composants usés ou endommagés. Réparation, ou de
retirer du service, les chaînes qui sont usés ou des chaînes avec des
composants endommagés. Chaînes à sec, lubrifier avec une huile légère et
de stocker en toile étui de transport.
Ital ano: Portare avanti il cavo posteriore e staccarlo. (Vedi struzioni di
nstallazione fase 2, pag. 4). Dopo l'uso, è importante lavare le catene in
acqua calda per eliminare depositi di sale e di prevenire la ruggine.
spezionare con cura per eventuali catene usurate o componenti danneggiati.
Ripristinare o rimuovere dal servizio, le catene che sono indossati o le catene
di componenti danneggiati. Catene a secco, lubrificare con un olio leggero e
conservare in tela valigetta.
Polski: Linkę znajdującą się za kołem przełożyć przed koło i rozłączyć (zob. etap 2
zakładania łańcucha). Łańcuchy po użyciu należy umyć w ciepłej wodzie, aby usunąć z
nich sól i nie dopuścić do powstania rdzy. Sprawdzić, czy któryś z elementów łańcucha
nie został uszkodzony. Zużyte lub uszkodzone łańcuchy należy naprawić albo zaprzestać
ich używania. Po wysuszeniu natłuścić lekkim olejem i włożyć do płóciennej walizki.
STOP_GO_navodila_book. xd:STOP_GO_navodila_book 11.10.11 11:21 AM Page 13

(A) DISCLAIMER OF WARRANTIES: Veriga warrants free
from defects in workmanship and materials for 90 days from
purchase date of this product to owner. Warranty does not
include damage due to product failure, misuse, abuse or cost of
inconvenience. No other express warranty is given and no
affirmation, by words or action, shall constitute a warranty.
(B) REMEDIES: The buyer’s sole remedy for breach of any
warranty is limited exclusively to obtaining, at the discretion of
the seller, either credit or repair or replacement of any product
sold hereunder and manufactured by Veriga Chain Company
within 90 days after deliver to the owner. Defective product may
be brought to the place of purchase SPEEDS OVER 50 KM/H,
MPROPER NSTALLAT ON OR MPROPER F T VO DS WARRANTY.
Englis : Limited Warranty
(A) GARANT EAUSSCHLUSS: Veriga übernimmt gegenüber
dem Käufer für Verarbeitungsfehler und Materialschäden eine
Garantie von 90 Tagen ab Kaufdatum. Diese Garantie schließt
Schäden als Folge von Produktversagen, unsachgemäßem
Gebrauch, Missbrauch oder Kosten für entstehende
Unannehmlichkeiten aus. Es wird keine weitere Garantie
gegeben und keine Zusicherung, in Worten oder Taten, stellt
eine solche Garantie dar.
(B) ANSPRÜCHE: m Garantiefall hat der Käufer nach Ermessen
des Verkäufers innerhalb von 90 Tagen nach Erhalt ausschließlich
Anspruch auf eine Gutschrift, Reparatur oder Ersatz des
erworbenen und durch Veriga Chain Company produzierten
Produkts. Das defekte Produkt kann zum Kaufort zurückgebracht
werden BE GESCHW ND GKE TEN ÜBER 50 KM/H,
UNSACHGEMÄßER MONTAGE ODER UNSACHGEMÄßER
ANPASSUNG ENTFÄLLT D E GARANT E.
Deutsc : Garantiebestimmungen
(A) Veriga jamči za eventuelne tovarniške napake v izdelavi
ali materialu v roku 1 leta od dneva nakupa. Garancija ne
vključuje poškodb izdelka zaradi napačne uporabe.
(B) Garancija ne velja v primeru, če je hitrost vožnje z
nameščenimi snežnimi verigami presegala dovoljeno (50 km/h), v
primeru nepravilne montaže, v primeru predolge vožnje po
asfaltu(po kopni cesti). Garancija priznava samo zamenjavo
pokvarjenega (neustreznega) dela ali popravilo, nikakor pa ne
pokriva morebitne škode, ki bi jo predmetom ali osebam
povzročile snežne verige.
Slovensko: Omejena garanc ja
13
www.ver ga-lesce.s
COMPACT NT
STOP&GO
STOP_GO_navodila_book. xd:STOP_GO_navodila_book 11.10.11 11:21 AM Page 14

14
(A) LIMITAZIONE DELLA GARANZIA: Veriga garantisce al
cliente, per 90 giorni dalla data di acquisto del prodotto,
l’assenza di difetti nella manodopera e nei materiali. La garanzia
non comprende danni dovuti alla rottura, uso scorretto, abuso o
problemi del prodotto. Non viene fornita altra garanzia e
nessuna affermazione, tramite parole o azioni, costituirà
garanzia.
(B) RISARCIMENTO: L’unico risarcimento all’acquirente per la
violazione della garanzia è limitato all’ottenimento, a
discrezione del venditore, del costo, riparazione o sostituzione di
qualsiasi articolo venduto e prodotto da Veriga Chain Company
entro 90 giorni dalla consegna al proprietario. Gli articoli
difettosi possono essere riportati nel luogo di acquisto.
VELOC TA’ OLTRE 50 KM/H, NSTALLAZ ONE O ADERENZA
SCORRETT ANNULLANO LA GARANZ A.
(A) LIMITATION DE GARANTIE: Veriga garantit la
fabrication et les matières sans défauts pendant 90 jours à partir
de la date d’achat de ce produit. La garantie ne comprend pas
les dommages dus à une défaillance du produit, une mauvaise
utilisation, un abus ou le coût d’un désagrément. Aucune autre
garantie expresse n’est donnée et aucune affirmation, en mots
ou en action ne constitueront une garantie.
(B) ACTIONS EN JUSTICE: Les seules options pour toute
rupture de la garantie sont, à la discrétion du vendeur, un crédit,
la réparation ou le remplacement de tout produit vendu dans le
cadre de la présente ou fabriqué par Veriga Chain Company,
dans les 90 après livraison au propriétaire. Les produits
défectueux peuvent être rapportés au lieu d’achat. UNE V TESSE
SUPER EURE A 50 KM/H, UN MONTAGE OU UN AJUSTEMENT
NCORRECTS ANNULENT LA GARANT E.
Italiano: Garanzia limitata
(A) Ograniczenie gwarancji: Veriga udziela gwarancji na wykonanie i materiał przez okres
24 miesięcy od daty zakupu. Gwarancja nie obejmuje szkód ani kosztów spowodowanych
wadą lub uszkodzeniem łańcucha, niewłaściwym użytkowaniem lub użytkowaniem
niezgodnym z przez naczeniem. Żadnych innych gwarancji Veriga nie udziela i żadne
potwierdzenie, zarówno wyrażone słownie jak i czynem, nie stanowi gwarancji. Gwarancja
producenta nie wyłącza, nie ogranicza ani nie zawiesza uprawnień kupującego
wynikających z niezgodności towaru z umową.
(B) Reklamacje: Jedynym sposobem załatwienia reklamacji jest naprawa lub wymiana
wadliwego wyrobu, sprzedanego w ramach niniejszej gwarancji i wyprodukowanego przez
firmę Veriga Chain Company, przy czym reklamacja może być załatwiana w ciągu 30 dni od
daty zgłoszenia reklamacji; wybór sposobu załatwienia reklamacji należy wyłącznie do
sprzedającego. Uszkodzony wyrób można dostarczyć do miejsca, w którym został
zakupiony. Gwarancja traci ważność w przypadku jazdy z prędkością powyżej 50 km/h,
jazdą po asfalcie bez śniegu i lodu, nieprawidłowego montażu lub niewłaściwego
dopasowania łańcucha. Nie ponosimy odpowiedzialności w przypadku gdy łańcuchy zostały
użyte we wszelkiego typu samochodach co do których producent pojazdu zaleca
ograniczenie kub wręcz zabrania ich używania
Polski: Warunki gwarancji
Français: Garantie limitée
www.ver ga-lesce.s
COMPACT NT
STOP&GO
STOP_GO_navodila_book. xd:STOP_GO_navodila_book 11.10.11 11:21 AM Page 15

Vehicle wheel clearance for traction devices is the responsibility of the
automobile manufacturer. Please refer to your vehicle owner’s manual for
more information on the use of tire chains. Stop&Go Tire Chains are designed
to meet S.A.E. class “S” clearance requirements. Always practice installing new
chains before you actually need them. Tire sizes can vary by manufacturer,
therefore a proper fit can only be assured with a pre-fit test on the tire. f you
are installing used chains, carefully inspect them for any worn chains and
damaged components. Repair, or remove from service, chains that are worn or
chains with damaged components.
Never exceed 50 Km/h while the Stop&Go Chains are installed. Accelerate
slowly and evenly. Avoid spinning your tires. The life of your chains will vary
according to road conditions, driving speed and individual driving habits.The
following are some activities that can cause unnecessary wear to your tire
chains:
• Locking your wheels when braking
• Driving on bare pavement that is not covered with snow or ice
• Hitting curbs
• nstalling the chains improperly
• Loose or improperly fitted chains
Caut on: Tire chains are designed only to provide extra traction in severe
weather emergencies. Drivers should always exercise caution and observe
driving conditions during hazardous weather. Please use good judgement in
using this product. n the event that a cross chain should break, immediately
pull off the road to a safe place and remove, tie back, or repair the broken
component. Do not continue driving with a loose or broken cross chain.
Use tire chains as a traction device. Do not use them for any other purpose,
including towing or lifting.
Englis : Important Information:
Der Automobilhersteller trägt für die Eignung des Rads für Vorrichtungen
zur verbesserten Bodenhaftung die Verantwortung. Für nähere nformationen
zum Gebrauch von Schneeketten sehen Sie bitte im Handbuch hres Fahrzeugs
nach. Stop&Go-Schneeketten erfüllen die Standards der Klasse “S” des S.A.E.
Verschlissene oder beschädigte Schneeketten dürfen nicht mehr verwendet
werden, außer sie könnendurch fachgerechtete Reparatur in Stand gesetzt
werden.
TIPP: Probieren Sie die Montage von neuen Schneeketten immer zuerst im
Trockenen zuhause aus, bevor Sie sie tatsächlich einsetzen müssen. Achten Sie
bei der Montage gebrauchter Ketten sorgfältig auf abgenutzte oder
beschädigte Teile.
Fahren Sie mit Stop&Go-Schneeketten nie schneller als 50 km/h. Beschleunigen
Sie langsam und gleichmäßig. Vermeiden Sie ein Durchdrehen der Reifen. Die
Lebensdauer hrer Schneeketten ist abhängig von Straßenverhältnissen,
Geschwindigkeit und Fahrstil. m Folgenden sind einige Dinge aufgelistet, die hre
Schneeketten unnötig stark abnutzen:
• Räder blockieren beim Bremsen
• Fahren auf schnee- oder eisfreiem Untergrund
• Bordsteinberührungen
• falsche Montage der Ketten
• lockere oder schlecht angebrachte Ketten
Achtung: Schneeketten dienen nur dazu, bei außergewöhnlichen
Straßenverhältnissen die Bodenhaftung zu verbessern. Bei schlechten
Witterungsverhältnissen sollten Fahrer generell vorsichtig und umsichtig
fahren. Bitte handeln Sie beim Gebrauch dieses Produkts stets
verantwortungsbewusst.
Sollte ein Kettenglied des Laufnetzes bzw. der Seitenkette reißen, bleiben
Sie unverzüglich am Straßenrand stehen. Mit den beiliegenden
Reparaturgliedern kann eine Notreparatur durchgeführt werden.
Kontrollieren Sie öfters den Erhaltungszustand der Kette. Sollten die
Kettenglieder mehr als 50% abgefahren sein, darf die Kette nicht mehr
verwendet werden! Verwenden Sie die Kette niemals zweckentfremdet wie
Deutsc : Wic tige Hinweise:
15
COMPACT NT
STOP&GO
STOP_GO_navodila_book. xd:STOP_GO_navodila_book 11.10.11 11:21 AM Page 16

16
z.B.: zum Abschleppen.Wir empfehlen, die Schneekette nach Gebrauch mit
warmem Wasser zu waschen, anschließend zu trocknen und in der Tragetasche
aufzubewahren.
Spoštovani kupec,
Z nakupom snežnih verig blagovne znamke VER GA, ste kupili kvaliteten proizvod, narejen
na naprednih proizvodnih strojih s konstantnim merjenjem kvalitete. Snežne verige
predstavljajo pomemben pripomoček, ki zagotavlja dodatno varnost na zasneženem cestišču.
Da bodo vaše verige opravljale svojo nalogo večlet in vas pripeljale na končni cilj varno, vas
prosimo, da se držite napotkov, ki so spodaj navedeni. Ne moremo prevzeti nikakršne
odgovornost za škodo ali poškodbo, ki bi nastale zaradi nespoštovanja navodil za uporabo.
1.Pazljivo preberite navodila za uporabo vašega vozila in upoštevajte nasvete proizvajalca
vašega vozila, ki se nanašajo na uporabo snežnih verig.
2.Držite se navodil za montažo. V nasprotnem primeru je možno, da snežna veriga ne bo
opravila svoje naloge, lahko pride celo do škode na vozilu ali cestišču ter eventuelnih poškodb.
3.Snežne verige povečujejo oprijem in izboljšujejo vozne lastnosti pri vožnji in zaviranju na
ledenih in zasneženih cestiščih ali mehkih podlagah.
4.Z nameščenimi verigami vožnja po cesti brez ledu ali snega vpliva na obnašanje vašega
vozila (npr. daljša zavorna pot). Zato je potrebno prilagoditi vožnjo razmeram na cesti in
spremenjenim voznim lastnostim vašega vozila.
5.Svetujemo vam, da poskusno namestite snežne verige v garaži ali doma, preden jih
morate namestiti v nujnih okoliščinah, Preverite, da dimenzija na nalepki ustreza pnevmatiki
nameščeni na vašem vozilu. (Opozorilo: Velikost pnevmatike mora biti popolnoma enaka v
vseh detajlih).
6.Pred vsako namestitvijo verigo obvezno preglejte. Veriga oz. čeni verige so lahko
obrabljeni največ30% na vsaki strani. Če je katerikoli del obrabljen večkot 30% ali je počen
oz kako drugače poškodovan, snežne verige ne smete uporabiti, vendar je vrnite v tovarno na
popravilo. Če je člen počen, verigo takoj demontirajte, da preprečite poškodbe na vozilu.
Snežno verigo lahko popravi samo proizvajalec. V nasprotnem primeru so garancije oz.
jamstva proizvajalca izključena.
7.Vedno namestite verigo na pogonska kolesa. V primeru, da ima vaše vozilo pogon na 4
kolesa, sledite navodilom proizvajalca vozila v zvezi z uporabo snežnih verig.
8.Omejitev hitrosti z nameščenimi snežnimi verigami znaša 50 km/h. V nekaterih državah
je lahko omejitev hitrosti z nameščenimi snežnimi verigami drugačna.
9. zogibajte se vrtenju ali zdrsavanju pogonskih koles v prazno.
10.Ko uporabljate vozilo z nameščenimi snežnimi verigami preverjajte stanje verig pri
vsakem vašem postanku (glej tudi točko 6)
11.Preverjate, da je veriga pravilno napeta. Če je veriga pravilno napeta, jo je možno
oddaljiti od pnevmatike za približno 1-2 cm. Nepravilno nameščena snežna veriga lahko pride
v kontakt z deli vozila. V takem primeru preverite napetost verige in jo po potrebi dodatno
zategnite.
12.Trajnost uporabe snežne verige je odvisna predvsem od vašega načina vožnje. Vozite
previdno in počasi ter previdno, veriga vam bo vrnila s podaljšano življensko dobo.
Vzdrževanje verig:
Kakor hitro je možno je verige po uporabi potrebno oprati v topli sladki vodi in jih nato
posušiti. Šele nato ji lahko zopet shranite v vaše vozilo. Verig ne smete naoljevati.
Priporočamo, da uporabljate sprej s protikorozijsko zaščito. Čeprav so verige narejene iz
visoko legiranega jekla, vendar kljub temu niso korozijsko odporne. Večina rje, ki se naredi na
verigah ne vpliva na kvaliteto verig. Verige so narejene za pnevmatike z letnim in zimskim
profilom, katerih dimenzije ustrezajo standardu D N ali ETRTO.
Slovensko: Pomembne informacije:
COMPACT NT
STOP&GO
Le dégagement de roue du véhicule pour les appareils de traction est de
la responsabilité du fabricant automobile. Veuillez vous référer au manuel
de l’utilisateur du véhicule pour plus d’informations sur l’utilisation des
chaînes antidérapantes. Les Chaînes Antidérapantes Stop&Go sont conçues
pour répondre aux exigences de dégagement S.A.E. classe « S ». Entraînez-
vous toujours à installer les nouvelles chaînes avant d’en avoir vraiment
besoin. La taille des pneus peut varier selon le fabricant, c’est pourquoi un
ajustement correct ne peut être réalisé que lors d’un essai de pré-
ajustement sur le pneu. Si vous installez des chaînes d’occasion, inspectez-
les avec précaution à la recherche de toutes chaînes usées ou de
composants endommagés. Reparer ou remplacer les chaînes qui sont usés
ou les chaînes avec des composants endommagés.
Lorsque des Chaînes Stop&Go sont installées, ne dépassez jamais une
vitesse de 50km/h. Accélérez doucement et de façon régulière. Evitez de
faire tournoyer vos pneus. La vie de vos chaînes variera selon les conditions
Français: Informations importantes:
STOP_GO_navodila_book. xd:STOP_GO_navodila_book 11.10.11 11:21 AM Page 17

Le catene sono montabili su tutte le dimensioni di pneumatici riportate
sul’etichetta presente sulla confezione. E’ obbligatorio consultare il libretto
d’uso del veicolo, rispetttando eventuali restrizioni d’uso. Le catene
Stop&Go sono progettate per rispondere ai requisiti di S.A.E. classe “S”.
Riparare o sostituire catene usurate o catene con pezzi e component
danneggiati.
Esercitarsi ad installare le nuove catene prima di averne bisogno. Le
grandezze dei pneumatici variano in base al produttore; perciò solo un test
pre-installazione può garantire un’aderenza corretta.
Se installi catene usate, controllale attentamente per possibile usura o
componenti danneggiati.
Le catene non devono essere usate su pneumatici da neve.
Non superare mai 50 km/h mentre sono montate le Catene
Stop&Go. Accelera adagio e regolarmente. Evita di far slittare le gomme.
La durata delle catene dipende dalle condizioni della strada, velocità e
abitudini di guida.
Ecco alcune azioni che possono provocare inutile usura alle catene:
• Bloccare le ruote quando freni
• Guidare su asfalto non coperto da neve o ghiaccio
• Urtare i marciapiedi
• nstallare scorrettamente le catene
• Usare catene non ben aderenti
Attenz one: Le catene per pneumatici servono solo a fornire una
maggiore trazione in caso di emergenze dovute a grave maltempo.
conducenti devono fare attenzione e guidare con cautela con il maltempo.
Usare questo prodotto con prudenza. Se una catena si rompe, bisogna
spostarsi subito in un luogo sicuro e rimuovere, riattaccare o riparare il
pezzo rotto. Non continuare a guidare con una catena allentata o rotta.
Usare le catene come dispositivo di trazione. Non usarle per altri scopi,
inclusi traino o sollevamento.
Italiano: Informazioni importanti:
Producent samochodu jest odpowiedzialny za przygotowanie kół do urządzeń i materiałów
zwiększających w czasie jazdy ich przyczepność. Bliższych informacji na temat stosowania
łańcuchów przeciwpoślizgowych należy szukać w instrukcji obsługi samochodu. Łańcuchy
Stop&Go spełniają wymagania klasy „S” według SAE. Zużytych lub uszkodzonych łańcuchów
nie wolno używać, chyba że zostaną naprawione przez fachowy i uprawniony do tego serwis.
Dobre rady: Przed ruszeniem w teren radzimy przeprowadzić próbny montaż nowo
zakupionych łańcuchów. ontując łańcuchy, które były już wcześniej używane, należy
Polski: Ważne uwagi
17
COMPACT NT
STOP&GO
de la route, la vitesse et les habitudes de conduites individuelles.
Veuillez trouver ci-après certaines activités qui peuvent causer une usure
prématurée de vos chaînes antidérapantes:
• Bloquer vos roues lors du freinage
• Rouler sur une route qui n’est pas couverte de neige
ou de glace
• Frapper la bordure d’un trottoir
• Mal installer les chaînes
• Détente des chaînes qui ont été mal ajustées
Prudence: Les chaînes antidérapantes ont été conçues uniquement pour
permettre une meilleure traction en cas de mauvais temps. En cas de
conditions climatiques dangereuses, les conducteurs doivent toujours être
prudents et observer les conditions de route. Veuillez utiliser ce produit avec
discernement. Si une chaîne transversale se casse, sortez immédiatement de la
route, garez-vous dans un endroit en sécurité et ôtez la chaîne. Remettez ou
réparez le composant cassé. Ne continuez pas à conduire avec une chaîne
transversale détendue ou cassée.
Utilisez les chaînes antidérapantes comme appareil de traction. Ne les
utilisez dans aucun autre but, y compris pour remorquer ou soulever.
STOP_GO_navodila_book. xd:STOP_GO_navodila_book 11.10.11 11:21 AM Page 18

18
Repair:
Repair with supplied repair links, if necessary. Use pliers as shown.
Reparatur:
Falls nötig, sollten für die Reparatur ausschließlich die mitgelieferten
Reparaturglieder verwendet werden. Als Hilfsmittel benötigen Sie
lediglich eine Zange – siehe Abbildung.
Popravilo:
Po potrebi popravi z rezervnimi členi.
Réparation:
Réparation avec les maillons fournis, si nécessaire. Utiliser des pinces
comme indiqué.
Riparazione:
Riparazione con collegamenti riparazione fornita, se necessario.
Usare le pinze, come mostrato.
Naprawa
W razie potrzeby łańcuch można naprawić wykorzystując do tego celu zapasowe ogniwa. Przy
naprawie posługiwać się należy kleszczami, jak widać na fotografii.
COMPACT NT
STOP&GO
dokładnie sprawdzić, czy nie zawierają zużytych lub uszkodzonych elementów.
Jadąc na łańcuchach, nie przekraczać nigdy prędkości 50 km/h. Przyspieszać powoli i
równomiernie. Unikać obracania kołami w miejscu. Żywotność łańcuchów zależy od
warunków drogowych, a także od prędkości i stylu jazdy. Poniżej podajemy przykłady
postępowania, które niepotrzebnie skraca żywotność łańcuchów:
• blokowanie kół podczas hamowania,
• jazda po jezdni bez śniegu lub lodu,
• ocieranie się o krawężniki,
• nieprawidłowy montaż,
• luźne lub nieprawidłowe założenie łańcuchów.
Uwaga: Celem stosowania łańcuchów jest tylko polepszenie przyczepności kół w
wyjątkowych warunkach na jezdni. Podczas złych warunków pogodowych kierowca z
reguły powinien jechać ostrożniej i uważniej, dlatego przy korzystaniu z łańcuchów należy
zawsze zachować świadomość odpowiedzialności.
Jeżeli zerwie się któreś z ogniw części bieżnikowej lub bocznej łańcucha, należy
bezzwłocznie zjechać na bok i za pomocą ogniw zapasowych wykonać prowizoryczną
naprawę.
Często sprawdzać stan zużycia łańcuchów. Kiedy wytarcie ogniw przekroczy 50%, łańcuch
nie nadaje się do dalszego użycia! Łańcuchy przeznaczone są do zwiększenia
przyczepności kół i nie należy ich używać do innych celów (np. do ułatwienia holowania).
Po każdym użyciu radzimy łańcuchy wymyć ciepłą wodą i następnie osuszyć, a potem
przechowywać w walizce, w której zostały zakupione.
STOP_GO_navodila_book. xd:STOP_GO_navodila_book 11.10.11 11:21 AM Page 19

COMPACT NT
STOP&GO
Self Tightening Traction Chain
Samozatezna veriga
VERIGA K.F., d.o.o.
Alpska 43, SI - 4248 Lesce
T: +386 4 537 09 00, F: +386 4 537 09 30,
E: info@veri a-lesce.com
www.veri a-lesce.com
STOP_GO_navodila_book. xd:STOP_GO_navodila_book 11.10.11 11:21 AM Page 20
Other VERIGA Automobile Accessories manuals