VERITAS 05J41.01 User manual

1
Mini Tenon Cutters
Safety Rules
As with any power tool accessory, always wear eye protection.
These safety instructions are meant to complement those that came with your power tool. We
suggest that you reread those, in addition to those listed here before you begin to use this
product. To use this product safely, always follow both sets of safety and general instructions.
General Safety Rules
1. Read the manual. Learn the tool’s applications and limitations as well as the specific
hazards related to the tool.
2. Use common sense. If an action appears to be unsafe, it likely is.
3. Wear proper eye/ear protection. Everyday eyeglasses have only impact-resistant lenses;
they are not safety glasses. Also use a face or dust mask if the cutting operation is dusty.
Visitors should wear the same protection.
4. Wear proper apparel. Avoid wearing clothing with loose sleeves. Do not wear gloves, ties,
rings or bracelets as these can get caught in moving machinery.
5. Long hair should be tied back and secured.
6. Do not work under the influence of drugs, alcohol, or medication. Drugs, alcohol,
medication and lack of sleep cause impaired judgment and coordination and should not be
combined with power tool operation.
7. Use in an appropriate environment. Power tools should be used only in dry, clean and well-lit
environments. Exposure to rain or use in the presence of flammable liquids or gases could
result in damage or injury.
8. Do not operate electric tools in gaseous or explosive environments. The spark of the motor
may cause the fumes to ignite.
9. Keep workplace clean. Cluttered areas and benches invite accidents.
10. Use correct power supply. Never use a power source for which this tool was not designed.
It could cause serious injury. If the tool is equipped with a three-prong plug, it should be
plugged into a three-hole electric receptacle. An adapter should be properly grounded.
11. Keep cord away from heat, oil and sharp edges.
12. Do not carry a plugged-in portable tool with finger on the switch.
13. Never carry portable tools by the cord.
14. Use the right tool. Do not force a small tool or attachment to do the job of a
heavy-duty tool.
15. Do not force tool. It will do the job better and safer at the rate for which it was designed.
16. Do not use damaged tools. A damaged tool that does not operate correctly is a safety hazard
and should be fixed before any further use.
17. Repairs and service should be performed by a certified technician. Use only identical
replacement parts.
18. Do not alter or misuse the tool. Stop any operation immediately if you notice
anything abnormal.

2
19. Practice proper maintenance. Keep all tools sharp, clean and well lubricated for the best
and safest results. Sharp blades minimize stalling, kickback, and burning. They perform
faster, better and safer than dull blades.
20. Keep hands away from moving parts until they have come to a complete stop and the
power has been disconnected.
21. Always disconnect the tool from the power source when changing cutters or blades, or
when performing any general maintenance activities (such as adjusting or cleaning).
22. Handle blades with care.
23. Unless otherwise specified, always insert the shank as far as possible into the chuck in order to
provide proper support. Tighten the chuck securely.
24. Remove all nails from a workpiece before performing any operation on it.
25. Hold workpiece firmly in a vise or clamp.
26. Ensure that depth and any other adjustments are tight.
27. Remove adjusting keys and wrenches before use.
28. Maintain good balance.
29. Do not remove workpiece or cut-off pieces from tool during a cut while the cutter
is moving.
30. Do not leave tool until it comes to a complete stop.
31. When not in use, power tools should be stored in a dry area, elevated and locked so that
they are out of the reach of children.

3
TheVeritas®Mini Tenon Cutters cut 60° shouldered tenons on small stock. These small-diameter
tenon cutters are ideal for chair rungs, decorative work on rustic furniture and wherever small
tenons are required, e.g., trellis and lattice work, fan frames, etc. They require little torque
while being driven by an electric drill. The included plug gauge allows the blade to be adjusted
to cut the exact size of tenon required. It is easy to sharpen the blade on a belt sander or
sharpening stone.
These tenon cutters are for use in a hand electric drill. They are not to be used in a drill press
for several reasons.
1. Because the workpiece must be rigidly clamped in line with the equally rigid axis of the
drill-press chuck, any misalignment or movement can create high side loads on the tenon
cutter, leading to the shank failing. Any quill run-out in the drill press contributes further
to the problem.
2. Because there is much less feel as to how the cutter is performing when using a drill press,
it is possible to overload the tenon cutter without realizing it. This too can lead to the
shank failing.
3. Overloading the tenon cutter or operating it at high speeds can also lead to overheating the
high-carbon steel blade, resulting in edge failure, loss of hardness, and a useless blade.
Taking a Test Cut
Firmly tighten the tenon cutter in the chuck of an electric drill.
Clamp a piece of wood horizontally in a vise at about waist height. Ensure the end is cut square.
Maximum diameter of workpiece for each tenon cutter size is shown in Table 1.
Table 1: Maximum Wood Diameter for Tenon Cutter Diameter
Tenon Diameter Max. Stock Diameter
1/4"3/4"
5/16"3/4"
3/8"7/8"
7/16"7/8"
1/2"1"
9/16"1"

4
Tip: If you do not have a vise, you can improvise with a piece of 2×4 with various sizes
of V-shaped notches cut in it and two C-clamps. Place the piece of wood in a notch
slightly smaller than its diameter, and clamp the 2×4 to a bench or a large stable surface.
Place the tenon cutter on the end of the piece of wood and adjust the drill by eye so that it is in
line with the piece of wood. The tenon cutter will cut tenons in line with the axis of the drill. If
you wish to have a tenon come out of the end of the piece of wood at an angle, clamp the piece
in a vise at the desired angle (using an inclinometer if necessary). Cut the tenon while holding
the tenon cutter straight and level.
Note: Whether you are cutting in-line or angled tenons, the secret to cutting a uniform tenon is
to keep the drill very steady while cutting.
While leaning into the wood, switch on the drill at a moderate speed (800 to 1000 rpm). Turning
too fast may cause you to wander from a straight cut. If the blade is properly set, the shaving of
wood will curl out of the tenon cutter as it rotates. If the tenon cutter stops cutting or does not
cut at all, you will need to adjust the blade.
Note: The tenon cutter’s shank has a hole drilled down the center. This is to allow you to insert
a 3/16" dia. pin into the back end to drive out a broken tenon.
Adjusting the Blade
Caution: Be aware that the blade is sharp; careless handling can result in serious injury.
A brass plug gauge has been provided to help you obtain the desired tenon diameter.
Adjusting the Tenon Diameter
Loosen the blade clamping screw slightly to just
allow the blade to slide with minimal vertical
play. Insert the plug gauge into the tenon cutter,
rotating it so that either of the two round surfaces
faces the blade. Lightly push the blade in until
the front corner (the part that determines the final
tenon diameter) touches the plug gauge, while the
right-hand edge remains in contact with the body
shoulder. Firmly tighten the blade clamping screw.
Rotate the plug in either direction until the round
surfaces are no longer touching the blade. While
the flat on the gauge provides clearance under
the blade, withdraw the gauge. Make a test
cut and measure the tenon. If the tenon is not
cutting the desired size, repeat this procedure, or
see Troubleshooting.
...
Body
Shoulder
Blade
Clamping
Screw
Plug Gauge
Front Corner
of Blade
Figure 1: Adjusting the blade.

5
Adjusting the Shaving Thickness
The blade can be adjusted to cut more aggressively
to produce larger shavings. Repeat the above
procedure, but swivel the blade away from the
body shoulder, rotating it about the right-hand
front corner, which is to remain in contact with the
plug gauge.
Note: The plug gauge will develop small scratches
as it is repeatedly rotated against the blade prior
to removal. It has been made of soft brass so that
it does not nick the corner of the blade. It has also
been made long enough so that you may place it
in the tenon cutter at varying depths to find an
unblemished area.
While adjusting the blade, never allow the blade to override the plug. Doing so will cause deep
scratches in the gauge as it is rotated prior to removal, and likely result in undersized tenons.
Tenon Length
A tenon cut to full depth will be 1"long with the 1/4", 5/16"and 3/8"dia. tenon cutters, and 13/8"
long with the 7/16", 1/2"and 9/16"dia. tenon cutters. To cut shorter tenons, just stop cutting
before bottoming out.
Sharpening
You can hold the small blade for sharpening by making a blade holder from 1/2"square stock,
4"to 6"long. Using a bandsaw or other thin blade, cut a center groove at least 3/4"deep in one
end. Drill a 3/16"dia. hole perpendicular to the groove, 3/16"from the end, and just deep enough
to reach the groove. Countersink to accommodate a #10 × 1/2"flat-head wood screw. Chamfer
the front portion of the non-drilled section below the slit at approximately 30°.
Insert the blade in the slot (bevel facing the
chamfered section). Secure it in place with
the #10 × 1/2"flat-head wood screw. Coat the
entire length of the bevel with an indelible
marker. Clamp the blade holder in a honing
guide at a 30° angle, and progressively
hone the blade to 4000x. Observe where
the marker coating has worn off. Continue
sharpening until the full width of the blade
is clear of marker coating (and at least 1/32"
wide). Check to ensure that the bevel remains
square to the side edge of the blade.
Body
Shoulder
Swivel about
front corner
of blade.
Figure 2: Adjusting shaving
thickness.
Figure 3: Shop-made blade holder.
3/4"
3/16"
30°
1
/
2
"×
1
/
2
"stock,
4"to 6"long.

6
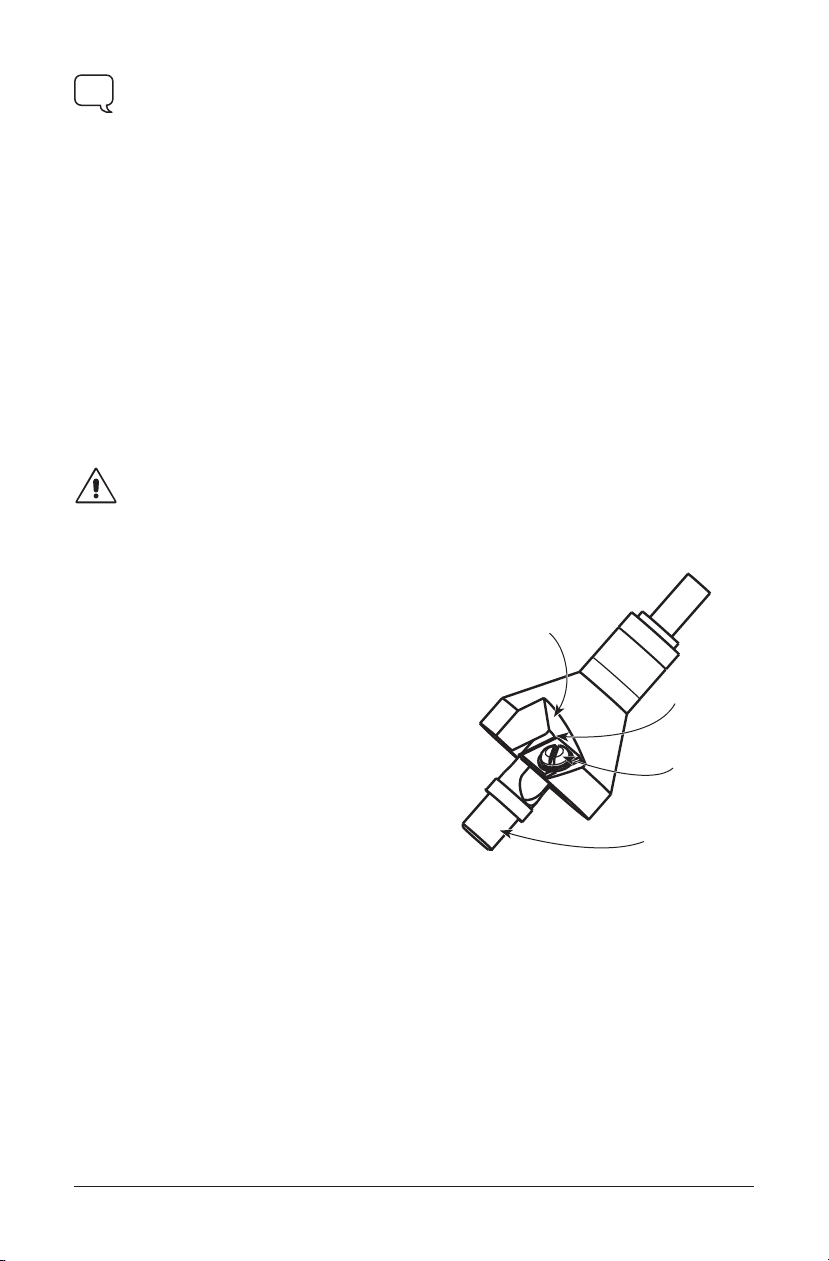
Alternatively, you can sharpen the blade held at a 30° angle against a belt sander (fitted with
a 180x belt for rough sharpening, progressing to 15µ or finer for finishing). Do not hold the
blade in contact with the belt for extended periods of time (more than few seconds) or you may
overheat the blade. Use indelible marker as described above to ensure that the entire bevel has
been sharpened and remains square to the side edge of the blade.
Remove the blade from the holder. To remove the wire burr from the edge of the blade, draw the
face across a fine grit (1000x or higher) sharpening stone or a piece of silicon carbide abrasive
paper on a flat surface.
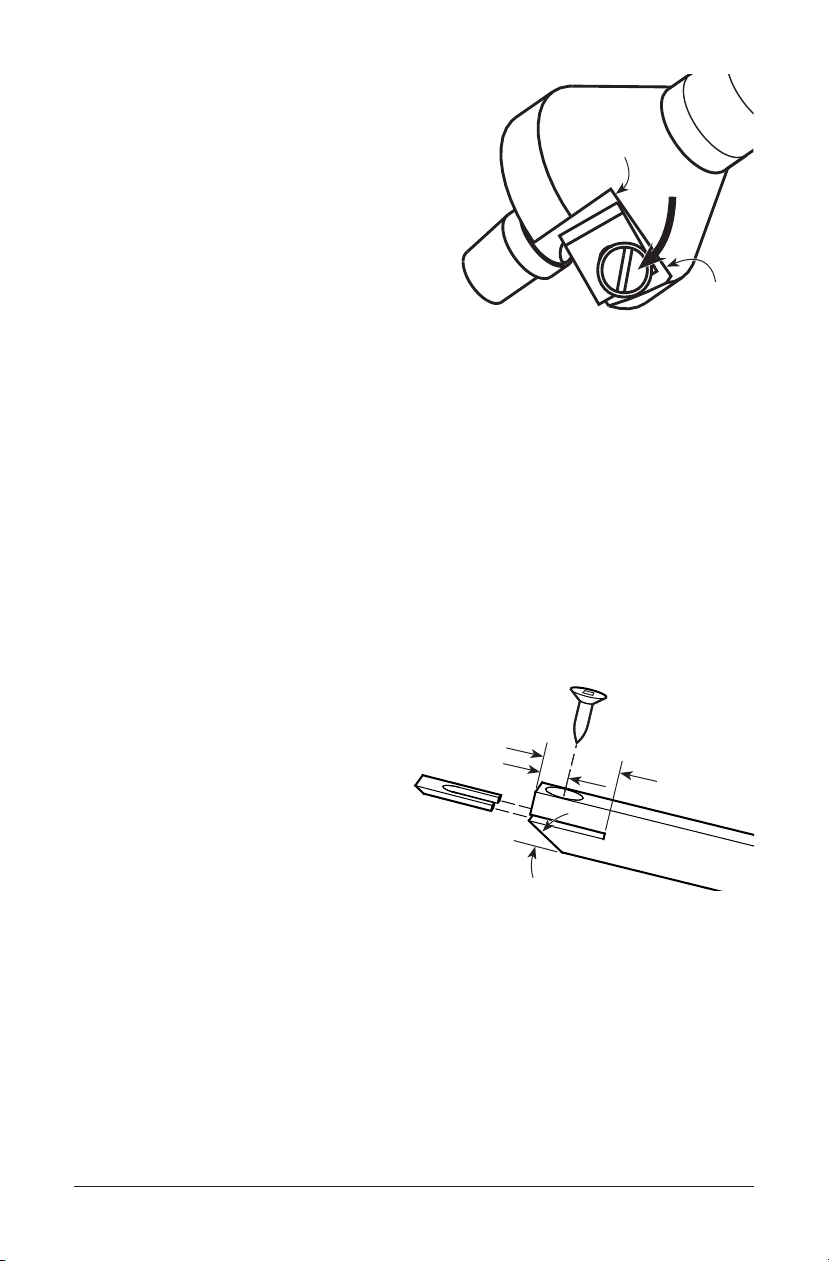
The right-hand corner of the blade determines the final tenon diameter. To increase its longevity
between sharpenings, you may wish to “break” this corner very slightly. Just draw it against a
4000x stone or 5µ abrasive paper with one or two passes.
Troubleshooting
Uneven tenons: This is usually caused by one of two things:
1. An unsteady drill position while cutting. Reduce your drill speed and concentrate on
holding the drill steady while cutting.
2. Growth ring structure. If the corner of the blade is cutting tangential to a very consistent
diameter growth ring, the blade may peel that layer, much the same way veneer is cut from
a log. This will result in uneven or undersized tenons. An extremely sharp blade is just
about the only preventive measure.
Undersized tenons: They usually indicate a blade that has been advanced too far. This is most
often caused by loosening the blade clamping screw too much, which allows the blade to ride
up on the plug gauge and bend slightly once tightened against the gauge. When the gauge is
removed the blade will drop to its unstressed position and produce undersized tenons. Readjust
the blade.
Oversized tenons: These usually arise when cutting green wood, where some compression
takes place. When the tenon cutter is removed, the tenon will spring back to an oversize
condition. Adjust the blade using the gauge as you normally would, but then back off the blade
clamping screw just enough to tap the blade in a bit further, then retighten. Note that you can
use this sprung oversize tenon to your advantage, as it will shrink as it dries.
Scalloped tenons: Applying excessive force while cutting the tenon can result in the cutter
advancing at a rate fast enough to make the tenon look like a coarse thread. Reduce the inward
force applied to the drill.
Continuing to rotate the tenon cutter clockwise while withdrawing it from the tenon can also
cause the blade to cut on its return pass, leaving similar scallops. This is especially so on green
wood, where some compression may have taken place as the tenon was being cut. Instead, pull
the tenon cutter off the tenon with the drill switched off, either without rotating it, or by slowly
rotating it counterclockwise.
Off-center tenons: Nothing can be done about the most common cause of off-center tenons –
natural variations in wood density and growth patterns.
Partial tenons: If the tenon cutter starts cutting, then fades and eventually stops cutting,
this indicates that a minor blade adjustment is required. Swivel the blade to produce a
thicker shaving.
Uneven grind when sharpening: This usually happens when the blade bevel is not held
parallel to the belt or stone. Adjust the jig until the bevel is parallel to the belt or stone.

Veritas Tools Inc. Ottawa ON K2H 1C2 Canada veritastools.com
© Veritas Tools Inc. 2018 341 INS-123_F
Accessories
05J42.10 Replacement Blade, Mini Tenon Cutter
54K93.02 81/2"× 11"Micro-Abrasive, Sheet (15µ SiC, PSA)
54K94.02 81/2"× 11"Micro-Abrasive, Sheet (5µ SiC, PSA)
05J41.01 Power Tenon Cutter,
5/8"
05J41.02 Power Tenon Cutter,
3/4"
05J41.09 Power Tenon Cutter,
7/8"
05J41.03 Power Tenon Cutter, 1"
05J41.07 Power Tenon Cutter, 11/4"
05J41.05 Power Tenon Cutter, 11/2"
05J41.08 Power Tenon Cutter, 13/4"
05J41.06 Power Tenon Cutter, 2"
Other manuals for 05J41.01
1
This manual suits for next models
7
Table of contents
Other VERITAS Cutter manuals
Popular Cutter manuals by other brands

Greenlee
Greenlee ES32FML Operation manual

Gastrodomus
Gastrodomus TA25K Installation, use and maintenance

Techno CNC Systems
Techno CNC Systems Titan NK105G3 manual

EFA
EFA EFA Z27 Operating Instructions, Maintenance instructions, Spare Part List

Logan
Logan PICTURE FRAMING F503 instruction manual

Roller
Roller Disc 100 instruction manual